
Chapter 9. Networking and Web
9.0 Introduction
Connectivity is more important than ever in solutions, and the .NET Framework provides a number of ways to help you support that need. .NET provides many lower-level classes to help make network programming easier than many environments that preceded it. There is a great deal of functionality to assist you with tasks such as:
-
Building network-aware applications
-
Downloading files via FTP
-
Sending and receiving HTTP requests
-
Getting a higher degree of control using TCP/IP and sockets directly
In the areas in which Microsoft has not provided managed classes to access networking functionality (such as some of the methods exposed by the WinInet API for Internet connection settings), there is always P/Invoke, so you can code to the Win32 API, as we’ll explore in this chapter. With all of the functionality at your disposal in the System.Net namespaces, you can also write network utilities very quickly.
In addition to the lower-level networking support, .NET embraces the World Wide Web and has incorporated support for the Web into every nook and cranny of what most .NET developers encounter when building their solutions today. Web services (both REST and SOAP based) are in heavy use, and ASP.NET is one of the main players in the web application space. Given the general need to work with HTML and TCP/IP name resolution, and because uniform resource indicators (URIs) and uniform resource locators (URLs) are being used for more and more purposes, developers need tools to help them concentrate on building the best web interactive applications possible. This chapter is dedicated to taking care of some of the grunge that comes along with programming when the Web is involved. It is not a Web Services or ASP.NET tutorial but rather covers some functionality that developers can use in ASP.NET applications and services and other C#-based applications that interact with networks and the Web.
9.1 Handling Web Server Errors
Problem
You have obtained a response from a web server, and you want to make sure that there were no errors in processing the initial request, such as failing to connect, being redirected, timing out, or failing to validate a certificate. You want to avoid checking for all of the different response codes available.
Solution
Check the StatusCode property of the HttpWebResponse class to determine what category of status this StatusCode falls into and return an enumeration value (ResponseCategories) representing the category. This technique allows you to use a broader approach to dealing with response codes:
public static ResponseCategories CategorizeResponse(HttpWebResponse httpResponse)
{
    // Just in case there are more success codes defined in the future
    // by HttpStatusCode, we will check here for the "success" ranges
    // instead of using the HttpStatusCode enum, as it overloads some
    // values
    int statusCode = (int)httpResponse.StatusCode;
    if ((statusCode >= 100) && (statusCode <= 199))
    {
        return ResponseCategories.Informational;
    }
    else if ((statusCode >= 200) && (statusCode <= 299))
    {
        return ResponseCategories.Success;
    }
    else if ((statusCode >= 300) && (statusCode <= 399))
    {
        return ResponseCategories.Redirected;
    }
    else if ((statusCode >= 400) && (statusCode <= 499))
    {
        return ResponseCategories.ClientError;
    }
    else if ((statusCode >= 500) && (statusCode <= 599))
    {
        return ResponseCategories.ServerError;
    }
    return ResponseCategories.Unknown;
}
The ResponseCategories enumeration is defined like this:
public enum ResponseCategories
{
    Unknown,        // unknown code  ( < 100 or > 599)
    Informational,  // informational codes (100 <= 199)
    Success,        // success codes (200 <= 299)
    Redirected,     // redirection code (300 <= 399)
    ClientError,    // client error code (400 <= 499)
    ServerError     // server error code (500 <= 599)
}
Discussion
There are five different categories of status codes on an HTTP response, as shown in Table 9-1.
| Category | Available range | HttpStatusCode defined range |
|---|---|---|
| Informational | 100–199 | 100–101 |
| Successful | 200–299 | 200–206 |
| Redirection | 300–399 | 300–307 |
| Client Error | 400–499 | 400–426 |
| Server Error | 500–599 | 500–505 |
Each of the status codes defined by Microsoft in the .NET Framework is assigned an enumeration value in the HttpStatusCode enumeration. These status codes reflect what can happen when a request is submitted. The web server is free to return a status code in the available range, even if it is not currently defined for most commercial web servers. The defined status codes are listed in RFC 2616—Section 10 for HTTP/1.1.
You are trying to figure out the broad category of the status of the request. You achieve this by inspecting the HttpResponse.StatusCode property, comparing it to the defined status code ranges for HTTP, and returning the appropriate ResponseCategories value.
When dealing with HttpStatusCode, you will notice that there are certain HttpStatusCode flags that map to the same status code value. An example of this is HttpStatusCode.Ambiguous and HttpStatusCode.MultipleChoices, which both map to HTTP status code 300. If you try to use both of these in a switch statement on the HttpStatusCode, you will get the following error because the C# compiler cannot tell the difference:
error CS0152: The label 'case 300:' already occurs in this switch statement.
See Also
HTTP: The Definitive Guide (O’Reilly); the “HttpStatusCode Enumeration” topic in the MSDN documentation; and HTTP/1.1 RFC 2616—Section 10 Status Codes.
9.2 Communicating with a Web Server
Solution
Use the HttpWebRequest class in conjunction with the WebRequest class to create and send a request to a server.
Take the Uri (universal resource identifier; defined in RFC 3986) of the resource, the method to use in the request (GET or POST), and the data to send (only for POST requests), and use this information to create an HttpWebRequest, as shown in Example 9-1.
Example 9-1. Communicating with a web server
using System.Net;
using System.IO;
using System.Text;

// GET overload
public static HttpWebRequest GenerateHttpWebRequest(Uri uri)
{
    // create the initial request
    HttpWebRequest httpRequest = (HttpWebRequest)WebRequest.Create(uri);
    // return the request
    return httpRequest;
}

// POST overload
public static HttpWebRequest GenerateHttpWebRequest(Uri uri,
    string postData,
    string contentType)
{
    // create the initial request
    HttpWebRequest httpRequest = GenerateHttpWebRequest(uri);

    // Get the bytes for the request, should be pre-escaped
    byte[] bytes = Encoding.UTF8.GetBytes(postData);

    // Set the content type of the data being posted.
    httpRequest.ContentType = contentType;
        //"application/x-www-form-urlencoded"; for forms
         //"application/json" for json data
         //"application/xml" for xml data

    // Set the content length of the string being posted.
    httpRequest.ContentLength = postData.Length;

    // Get the request stream and write the post data in
    using (Stream requestStream = httpRequest.GetRequestStream())
    {
        requestStream.Write(bytes, 0, bytes.Length);
    }
    // return the request
    return httpRequest;
}
Once you have an HttpWebRequest, you send the request and get the response using the GetResponse method. It takes the newly created HttpWebRequest as input and returns an HttpWebResponse. The following example performs a GET for the index.aspx page from the http://localhost/mysite website:
HttpWebRequest request =
    GenerateHttpWebRequest(new Uri("http://localhost/mysite/index.aspx"));

using(HttpWebResponse response = (HttpWebResponse) request.GetResponse())
{
    // This next line uses CategorizeResponse from Recipe 9.1.
    if(CategorizeResponse(response)==ResponseCategories.Success)
    {
        Console.WriteLine("Request succeeded");
    }
}
You generate the HttpWebRequest, send it and get the HttpWebResponse, then check for success using the CategorizeResponse method from Recipe 9.1.
Discussion
The WebRequest and WebResponse classes encapsulate all of the functionality to perform basic web communications. HttpWebRequest and HttpWebResponse are derived from these classes and provide the HTTP-specific support.
At the most fundamental level, to perform an HTTP-based web transaction, you use the Create method on the WebRequest class to get a WebRequest that can be cast to an HttpWebRequest (so long as the scheme is http:// or https://). This HttpWebRequest is then submitted to the web server in question when the GetResponse method is called, and it returns an HttpWebResponse that can then be inspected for the response data.
See Also
The “WebRequest Class,” “WebResponse Class,” “HttpWebRequest Class,” and “HttpWebResponse Class” topics in the MSDN documentation, and the Universal Resource Identifier RFC.
9.3 Going Through a Proxy
Problem
Many companies have a proxy server (sometimes called a web proxy) that allows employees to access the Internet, while preventing outsiders from accessing the company’s internal network. The problem is that to create an application that accesses the Internet from within your company, you must first connect to your proxy and then send information through it, rather than directly out to an Internet web server.
Solution
To get an HttpWebRequest successfully through a specific proxy server, you need to set up a WebProxy object with the settings to validate your specific request to a given proxy. Since this function is generic for any request, you can create the AddProxyInfoToRequest method:
public static HttpWebRequest AddProxyInfoToRequest(HttpWebRequest httpRequest,
    Uri proxyUri,
    string proxyId,
    string proxyPassword,
    string proxyDomain)
{
    if (httpRequest == null)
        throw new ArgumentNullException(nameof(httpRequest));

    // create the proxy object
    WebProxy proxyInfo = new WebProxy();
    // add the address of the proxy server to use
    proxyInfo.Address = proxyUri;
    // tell it to bypass the proxy server for local addresses
    proxyInfo.BypassProxyOnLocal = true;
    // add any credential information to present to the proxy server
    proxyInfo.Credentials = new NetworkCredential(proxyId,
        proxyPassword,
        proxyDomain);
    // assign the proxy information to the request
    httpRequest.Proxy = proxyInfo;

    // return the request
    return httpRequest;
}
If all requests are going to go through the same proxy, in the 1.x versions of the Framework you used the static Select method on the GlobalProxySelection class to set up the proxy settings for all WebRequests. In versions after 1.x, the WebRequest.DefaultWebProxy property should be used:
// Set it up to go through the same proxy for all requests to this Uri
Uri proxyURI = new Uri("http://webproxy:80");

// in 1.1 you used to do this:
//GlobalProxySelection.Select = new WebProxy(proxyURI);

// Now in 2.0 and above you do this:
WebRequest.DefaultWebProxy = new WebProxy(proxyURI);
Discussion
AddProxyInfoToRequest takes the URI of the proxy and creates a Uri object, which is used to construct the WebProxy object. The WebProxy object is set to bypass the proxy for local addresses and then the credential information is used to create a NetworkCredential object. The NetworkCredential object represents the authentication information necessary for the request to succeed at this proxy and is assigned to the WebProxy.Credentials property. Once the WebProxy object is completed, it is assigned to the Proxy property of the HttpWebRequest, and the request is ready to be submitted.
To get the proxy settings for the current user from Internet Explorer, you can use the System.Net.WebRequest.GetSystemWebProxy method and then assign the returned IWebProxy to either the proxy on the HttpWebRequest or the DefaultWebProxy property on the WebRequest:
WebRequest.DefaultWebProxy = WebRequest.GetSystemWebProxy();
See Also
The “WebProxy Class,” “NetworkCredential Class,” and “HttpWebRequest Class” topics in the MSDN documentation.
9.4 Obtaining the HTML from a URL
Solution
You can use the methods for web communication that were set up in Recipes 9.1 and 9.2 to make the HTTP request and verify the response; then, you can get at the HTML via the ResponseStream property of the HttpWebResponse object:
public static async Task<string> GetHtmlFromUrlAsync(Uri url)
{
    string html = string.Empty;
    HttpWebRequest request = GenerateHttpWebRequest(url);
    using(HttpWebResponse response =
        (HttpWebResponse) await request.GetResponseAsync())
    {
        if (CategorizeResponse(response) == ResponseCategories.Success)
        {
            // get the response stream.
            Stream responseStream = response.GetResponseStream();
            // use a stream reader that understands UTF8
            using(StreamReader reader =
                new StreamReader(responseStream, Encoding.UTF8))
            {
                html = reader.ReadToEnd();
            }
        }
    }
    return html;
}
Discussion
The GetHtmlFromUrlAsync method gets a web page using the GenerateHttpWebRequest and GetResponse methods, verifies the response using the CategorizeResponse method, and then, once it has a valid response, starts looking for the HTML that was returned.
The GetResponseStream method on the HttpWebResponse provides access to the body of the message that was returned in a System.IO.Stream object. To read the data, you instantiate a StreamReader with the response stream and the UTF8 property of the Encoding class to allow for the UTF8-encoded text data to be read correctly from the stream. Then call the StreamReader’s ReadToEnd method, which puts all of the content in the string variable called html, and return it.
See Also
The “HttpWebResponse.GetResponseStream Method,” “Stream Class,” and “String-Builder Class” topics in the MSDN documentation.
9.5 Using the Web Browser Control
Solution
Use the System.Windows.Forms.WebBrowser class to embed web browser functionality into your application. The Cheapo-Browser seen in Figure 9-1 shows some of the capabilities of this control.
While this is a not a production quality user interface (it is called Cheapo-Browser for a reason!) it can be used to select a web address, display the content, navigate forward and backward, cancel the request, go to the home page, add HTML directly to the control, print the HTML or save it, and finally, enable or disable the context menu inside of the browser window. The WebBrowser control is capable of much more, but this recipe is meant to give you a taste of what is possible. It would be well worth exploring its capabilities further to see what other needs it might fill.

Figure 9-1. The web browser control
When you add your HTML (<h1>Hey you added some HTML!</h1>), it is displayed as shown in Figure 9-2.
The code to accomplish this is rather simple:
this._webBrowser.Document.Body.InnerHtml = "<h1>Hey you added some HTML!</h1>";
The navigation to a web page is equally trivial:
Uri uri = new Uri(this._txtAddress.Text);
this._webBrowser.Navigate(uri);
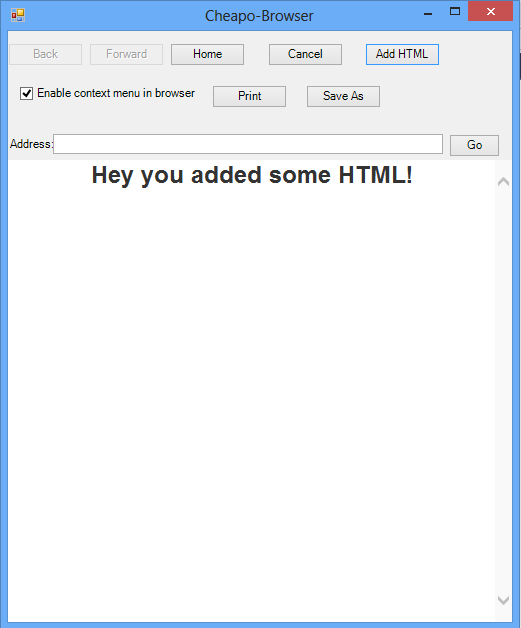
Figure 9-2. Adding HTML to the Cheapo-Browser
The nice thing about the way that navigation is handled is that you can subscribe to the Navigated event so that you are notified when the navigation has completed. This allows code to spin this off in a thread and then come back to it once it is fully loaded. The event provides a WebBrowserNavigatedEventArgs class that has a Url property to tell the URL of the document that has been navigated to:
private void _webBrowser_Navigated(object sender, WebBrowserNavigatedEventArgs e)
{
    // Update with where we ended up in case of redirection
    // from the original Uri.
    this._txtAddress.Text = e.Url.ToString();
    this._btnBack.Enabled = this._webBrowser.CanGoBack;
    this._btnForward.Enabled = this._webBrowser.CanGoForward;
}
Discussion
Way back in the 1.x versions of the .NET Framework, embedding a web browser in your WinForms application was much more difficult and error-prone. Now there is a .NET-based web browser control to handle the hard stuff. You no longer have to struggle with some of the COM interop issues that could arise while you’re trying to hook up to browser events. This is a good opportunity to blur the line between your desktop and web applications even further and use the power of a rich client combined with web flexibility.
See Also
The “WebBrowser Class” topic in the MSDN documentation.
9.6 Prebuilding an ASP.NET Website Programmatically
Solution
Use the ClientBuildManager to prebuild your website into an assembly. To prebuild the website, you must specify:
-
The virtual directory for the web application
-
The physical path to the web application directory
-
The location where you want to build the web application
-
Flags that help control the compilation
To prebuild the web application in the sample code for the book, first retrieve the directory where the web application is located, and then provide a virtual directory name and a location for the web application to build to:
string cscbWebPath = GetWebAppPath();

if(cscbWebPath.Length > 0)
{
    string appVirtualDir = @"CSCBWeb";
    string appPhysicalSourceDir = cscbWebPath;

    // Make the target an adjacent directory as it cannot be in the same tree
    // or the build manager screams...
    string appPhysicalTargetDir =
        Path.GetDirectoryName(cscbWebPath) + @" BuildCSCB";
Next, set up the flags for the compile using the PrecompilationFlags enumeration. The PrecompilationFlags values are listed in Table 9-2.
| Flag value | Purpose |
|---|---|
AllowPartiallyTrustedCallers |
Add the APTC attribute to the built assembly. |
Clean |
Remove any existing compiled image. |
CodeAnalysis |
Build for code analysis. |
Default |
Use the default compile options. |
DelaySign |
DelaySign the assembly. |
FixedNames |
Assembly generated with fixed names for pages. No batch compilation is performed, just individual compilation. |
ForceDebug |
Ensure that the assembly is compiled for debugging. |
OverwriteTarget |
The target assembly should be overwritten if it exists. |
Updateable |
Ensure the assembly is updateable. |
To build a debug image and make sure it is created successfully if the compilation is good, use the ForceDebug and OverwriteTarget flags:
PrecompilationFlags flags = PrecompilationFlags.ForceDebug |
                            PrecompilationFlags.OverwriteTarget;
The PrecompilationFlags are then stored in a new instance of the ClientBuildManagerParameter class, and the ClientBuildManager is created with the parameters that have been set up for it. To accomplish the prebuild, you call the PrecompileApplication method. Notice that there is an instance of a class called MyClientBuildManagerCallback that is passed to the PrecompileApplication method:
    ClientBuildManagerParameter cbmp = new ClientBuildManagerParameter();
    cbmp.PrecompilationFlags = flags;

    ClientBuildManager cbm =
        new ClientBuildManager(appVirtualDir,
                             appPhysicalSourceDir,
                             appPhysicalTargetDir,
                             cbmp);
    MyClientBuildManagerCallback myCallback = new MyClientBuildManagerCallback();
    cbm.PrecompileApplication(myCallback);
}
The MyClientBuildManagerCallback class is derived from the ClientBuildManagerCallback class and allows the code to receive notifications during the compilation of the web application. The ClientBuildManagerCallback methods have LinkDemands on them, which require that the callback methods also have them. Compiler errors, parsing errors, and progress notifications are all available. In the MyClientBuildManagerCallback class, they are all implemented to write to the debug stream and the console:
public class MyClientBuildManagerCallback : ClientBuildManagerCallback
{
    public MyClientBuildManagerCallback()
        : base()
    {
    }

    [PermissionSet(SecurityAction.Demand, Unrestricted = true)]
    public override void ReportCompilerError(CompilerError error)
    {
        string msg = $"Report Compiler Error: {error.ToString()}";
        Debug.WriteLine(msg);
        Console.WriteLine(msg);
    }

    [PermissionSet(SecurityAction.Demand, Unrestricted = true)]
    public override void ReportParseError(ParserError error)
    {
        string msg = $"Report Parse Error: {error.ToString()}";
        Debug.WriteLine(msg);
        Console.WriteLine(msg);
    }

    [PermissionSet(SecurityAction.Demand, Unrestricted = true)]
    public override void ReportProgress(string message)
    {
        string msg = $"Report Progress: {message}";
        Debug.WriteLine(msg);
        Console.WriteLine(msg);
    }
}
The output from a successful compilation of the CSCB website looks like this:
Report Progress: Building directory '/CSCBWeb/Properties'.
Report Progress: Building directory '/CSCBWeb'.
Discussion
ClientBuildManager is actually a thin wrapper around the BuildManager class, BuildManager classwhich does most of the heavy lifting of the compilation. ClientBuildManager makes it more straightforward to ensure that all the important parts of the web application are addressed, while BuildManager gives a bit more fine-grained control. The ClientBuildManager also allows for subscribing to appdomain notification events such as start, shutdown, and unload, allowing for error handling in the event that the appdomain is going away during a prebuild.
To prebuild applications in ASP.NET without resorting to the ClientBuildManager, you can post an HTTP request to the website in the format http://server/webapp/precompile.axd. The precompile.axd “document” triggers an ASP.NET HttpHandler for this that will prebuild the website for you. This is handled by the aspnet_compiler.exe module, which essentially wraps the ClientBuildManager functionality.
See Also
The “ClientBuildManager,” “ClientBuildManagerParameters,” “BuildManager,” and “ASP.NET Web Site Precompilation” topics in the MSDN documentation.
9.7 Escaping and Unescaping Data for the Web
Solution
Use the Uri class static methods for escaping and unescaping data and Uris.
To escape data, use the static Uri.EscapeDataString method, as shown here:
string data = "<H1>My html</H1>";
Console.WriteLine($"Original Data: {data}");
Console.WriteLine();

string escapedData = Uri.EscapeDataString(data);
Console.WriteLine($"Escaped Data: {escapedData}");
Console.WriteLine();

// Output from above code is
// Original Data: <H1>My html</H1>
//
// Escaped Data: %3CH1%3EMy%20html%3C%2FH1%3E
To unescape the data, use the static Uri.UnescapeDataString method:
string unescapedData = Uri.UnescapeDataString(escapedData);
Console.WriteLine($"Unescaped Data: {unescapedData}");
Console.WriteLine();

// Output from above code is
//
// Unescaped Data: <H1>My html</H1>
To escape a Uri, use the static Uri.EscapeUriString method:
string uriString = "http://user:password@localhost:8080/www.abc.com/" +
    "home page.htm?item=1233;html=<h1>Heading</h1>#stuff";
Console.WriteLine($"Original Uri string: {uriString}");
Console.WriteLine();

string escapedUriString = Uri.EscapeUriString(uriString);
Console.WriteLine($"Escaped Uri string: {escapedUriString}");
Console.WriteLine();

// Output from above code is
//
// Original Uri string: http://user:password@localhost:8080/www.abc.com/home
// page.htm?item=1233;html=<h1>Heading</h1>#stuff
//
// Escaped Uri string: http://user:password@localhost:8080/www.abc.com/home
// %20page.htm?item=1233;html=%3Ch1%3EHeading%3C/h1%3E#stuff
In case you are wondering why escaping a Uri has its own method (EscapeUriString), take a look at what the escaped Uri looks like if you use Uri.EscapeDataString and Uri.UnescapeDataString on it:
// Why not just use EscapeDataString to escape a Uri?  It's not picky enough...
string escapedUriData = Uri.EscapeDataString(uriString);
Console.WriteLine($"Escaped Uri data: {escapedUriData}");
Console.WriteLine();

Console.WriteLine(Uri.UnescapeDataString(escapedUriString));

// Output from above code is
//
// Escaped Uri data: http%3A%2F%2Fuser%3Apassword%40localhost%3A8080%2Fwww.abc.
// com%2Fhome%20page.htm%3Fitem%3D1233%3Bhtml%3D%3Ch1%3EHeading%3C%2Fh1%3E%23
// stuff

// http://user:password@localhost:8080/www.abc.com/home page.htm?item=1233;html
// =<h1>Heading</h1>#stuff
Notice that the :, /, :, @, and ? characters get escaped when they shouldn’t, which is why you use the EscapeUriString method for Uris.
Discussion
EscapeUriString assumes that there are no escape sequences already present in the string being escaped. The escaping follows the convention set down in RFC 2396 for converting all reserved characters and characters with a value greater than 128 to their hexadecimal format.
In Section 2.2 of RFC 2396, it states that the reserved characters are:
;|/| ? |:| @ | & | = | + | $ | ,
The EscapeUriString method is useful when you are creating a System.Uri object to ensure that the Uri is escaped correctly.
See Also
The “EscapeUriString Method,” “EscapeUriData Method,” and “Unescape-DataString Method” topics in the MSDN documentation.
9.8 Checking Out a Web Server’s Custom Error Pages
Solution
Use the System.DirectoryServices.DirectoryEntry class to talk to the Internet Information Server (IIS) metabase to find out which custom error pages are set up. The metabase holds the configuration information for the web server. DirectoryEntry uses the Active Directory IIS service provider to communicate with the metabase by specifying the “IIS” scheme in the constructor for the DirectoryEntry:
// This is a case-sensitive entry in the metabase
// You'd think it was misspelled but you would be mistaken...
const string WebServerSchema = "IIsWebServer";

// set up to talk to the local IIS server
string server = "localhost";

// Create a dictionary entry for the IIS server with a fake
// user and password.  Credentials would have to be provided
// if you are running as a regular user
using (DirectoryEntry w3svc =
    new DirectoryEntry($"IIS://{server}/w3svc",
            "Domain/UserCode", "Password"))
{
Once the connection is established, the web server schema entry is specified to show where the IIS settings are kept (IIsWebServer). The DirectoryEntry has a property that allows access to its children (Children), and the SchemaClassName is checked for each entry to see if it is in the web server settings section. Once the web server settings are found, the web root node is located, and from there, the HttpErrors property is retrieved. HttpErrors is a comma-delimited string that indicates the HTTP error code, the HTTP suberror code, the message type, and the path to the HTML file to serve when this error occurs. To accomplish this, just write a LINQ query to get all of the HttpErrors, as shown in Example 9-2. Once the HttpErrors are retrieved, use the Split method to break this into a string array that allows the code to access the individual values and write them out. The code for carrying out these operations is shown in Example 9-2.
Example 9-2. Finding custom error pages
// Use a regular query expression to
// select the http errors for all websites on the machine
var httpErrors = from site in w3svc?.Children.OfType<DirectoryEntry>()
                 where site.SchemaClassName == WebServerSchema
                 from siteDir in site.Children.OfType<DirectoryEntry>()
                 where siteDir.Name == "ROOT"
                 from httpError in siteDir.Properties["HttpErrors"].OfType<string>()
                 select httpError;

// use eager evaluation to convert this to the array
// so that we don't requery on each iteration.  We would miss
// updates to the metabase that occur during execution, but
// that is a small price to pay vs. the requery cost.
// This will force the evaluation of the query now once.
string[] errors = httpErrors.ToArray();
foreach (var httpError in errors)
{
    //400,*,FILE,C:WINDOWShelpiisHelpcommon400.htm
    string[] errorParts = httpError.ToString().Split(','),
    Console.WriteLine("Error Mapping Entry:");
    Console.WriteLine($"	HTTP error code: {errorParts[0]}");
    Console.WriteLine($"	HTTP sub-error code: {errorParts[1]}");
    Console.WriteLine($"	Message Type: {errorParts[2]}");
    Console.WriteLine($"	Path to error HTML file: {errorParts[3]}");
}
We could, of course, have done this without using LINQ to query the metabase, which would have looked like Example 9-3.
Example 9-3. Finding custom error pages without LINQ
foreach (DirectoryEntry site in w3svc?.Children)
{
    if (site != null)
    {
        using (site)
        {
            // check all web servers on this box
            if (site.SchemaClassName == WebServerSchema)
            {
                // get the metabase entry for this server
                string metabaseDir = $"/w3svc/{site.Name}/ROOT";

                if (site.Children != null)
                {
                    // find the ROOT directory for each server
                    foreach (DirectoryEntry root in site.Children)
                    {
                        using (root)
                        {
                            // did we find the root dir for this site?
                            if (root?.Name.Equals("ROOT",
                                    StringComparison.OrdinalIgnoreCase) ?? false)
                            {
                                // get the HttpErrors
                                if (root?.Properties.Contains("HttpErrors") == true)
                                {
                                    // write them out
                                    PropertyValueCollection httpErrors =
                                           root?.Properties["HttpErrors"];
                                    for (int i = 0; i < httpErrors?.Count; i++)
                                    {
                                        //400,*,FILE,
                                        //C:WINDOWShelpiisHelpcommon400.htm
                                        string[] errorParts =
                                            httpErrors?[i].ToString().Split(','),
                                        Console.WriteLine("Error Mapping Entry:");
                                        Console.WriteLine($"	HTTP error code:" +
                                            $"{errorParts[0]}");
                                        Console.WriteLine($"	HTTP sub-error code:" +
                                            $"{errorParts[1]}");
                                        Console.WriteLine($"	Message Type: " +
                                            $"{errorParts[2]}");
                                        Console.WriteLine(
                                            $"	Path to error HTML file:
                                            {errorParts[3]}");
                                    }
                                }
                            }
                        }
                    }
                }
            }
        }
    }
}
At this point, an application could cache these settings for mapping its own error results, or it could dynamically modify the error pages to provide customized content. The takeaway here is that the settings information for the web server is readily available to all applications with a bit of coding.
Discussion
System.DirectoryServices.DirectoryEntry is usually used for Active Directory programming, but it is able to use any of the providers that are available for Active Directory as well. This approach allows code to examine the IIS metabase for both the older-style IIS 5.x metabases as well as the newer IIS metabases that ship with Windows Server.
In Example 9-2, where LINQ was used to query the metabase, a number of interesting things are occurring. The query is walking the metabase hierarchy to retrieve the HttpErrors, but note that the DirectoryEntry.Children property is a DirectoryEntries collection class. DirectoryEntries does support IEnumerable, but it does not support IEnumerable<T>, which LINQ uses to do its work. See Recipe 4.10 for more of an explanation about this. The OfType<DirectoryEntry> extension method returns the strongly typed IEnumerable<DirectoryEntry> from the IEnumerable interface supported by DirectoryEntries. This is done to find the website and the root directory, after which OfType<string> is used to get an enumerable list of strings with the HttpErrors in it:
var httpErrors = from site in w3svc?.Children.OfType<DirectoryEntry>()
                 where site.SchemaClassName == WebServerSchema
                 from siteDir in site.Children.OfType<DirectoryEntry>()
                 where siteDir.Name == "ROOT"
                 from httpError in
                     siteDir.Properties["HttpErrors"].OfType<string>()
                 select httpError;
We’ve written this query using the usual query expression syntax, but we could also have built it using what is known as explicit dot notation syntax, which would look like this:
var httpErrors = w3svc?.Children.OfType<DirectoryEntry>()
                    .Where(site => site.SchemaClassName == WebServerSchema)
                    .SelectMany(siteDir =>
                        siteDir.Children.OfType<DirectoryEntry>())
                    .Where(siteDir => siteDir.Name == "ROOT")
                    .SelectMany<DirectoryEntry, string>(siteDir =>
                    siteDir.Properties["HttpErrors"].OfType<string>());
Explicit dot notation syntax is simply calling the extension methods that LINQ is built upon directly from the collection type or interface that has been extended. These extension methods are defined in the System.Core assembly on the static Enumerable class in the System.Linq namespace and are the foundation upon which the query expression syntax is built. Query expression syntax tells the C# compiler to use these extension methods to perform the query requested.
The use of SelectMany is implied in the normal query syntax through the use of multiple from statements. SelectMany allows the query to collapse the results into a single set so that we have IEnumerable<string> as the httpErrors result; if Select were used, it would be IEnumerable<IEnumerable<string>>, which would be a set of string collections instead of one contiguous collection.
To build the query in the first place, you might find it easier to start out with separate smaller queries and then combine them. When using the explicit dot notation syntax, you can easily recombine the subqueries, as shown here:
// Break up the query using Explicit dot notation into getting the site,
// then the http error property values.

var sites = w3svc?.Children.OfType<DirectoryEntry>()
            .Where(child => child.SchemaClassName == WebServerSchema)
            .SelectMany(child => child.Children.OfType<DirectoryEntry>());

var httpErrors = sites
                 .Where(site => site.Name == "ROOT")
                 .SelectMany<DirectoryEntry,string>(site =>
                     site.Properties["HttpErrors"].OfType<string>());

// Combine the query using Explicit dot notation.
var combinedHttpErrors = w3svc?.Children.OfType<DirectoryEntry>()
                         .Where(site => site.SchemaClassName == WebServerSchema)
                         .SelectMany(siteDir =>
                              siteDir.Children.OfType<DirectoryEntry>())
                         .Where(siteDir => siteDir.Name == "ROOT")
                         .SelectMany<DirectoryEntry, string>(siteDir =>
                            siteDir.Properties["HttpErrors"].OfType<string>());
See Also
The “SelectMany<TSource, TResult> method,” “OfType<TResult> method,” “HttpErrors [IIS],” “IIS Metabase Properties,” and “DirectoryEntry Class” topics in the MSDN documentation.
9.9 Writing a TCP Server
Problem
You need to create a server that listens on a port for incoming requests from a TCP client in either a secured or unsecured fashion. These client requests can then be processed at the server, and any responses can be sent back to the client. Recipe 9.10 shows how to write a TCP client to interact with this server.
Solution
Use the MyTcpServer class created here to listen on a TCP-based endpoint for requests arriving on a given port:
class MyTcpServer
{
    #region Private Members
    private TcpListener _listener;
    private IPAddress _address;
    private int _port;
    private bool _listening;
    private string _sslServerName;
    private object _syncRoot = new object();
    #endregion

    #region CTORs

    public MyTcpServer(IPAddress address, int port, string sslServerName = null)
    {
        _port = port;
        _address = address;
        _sslServerName = sslServerName;
    }
    #endregion // CTORs
The TCPServer class has four properties:
-
Address, anIPAddress -
Port, anint -
Listening, abool -
SSLServerName, astring
These return the current address and port on which the server is listening, the listening state, and the name of the SSL (Secure Sockets Layer) server that the TcpServer is listening as:
#region Properties
public IPAddress Address { get; }

public int Port { get; }

public bool Listening { get; private set; }

public string SSLServerName  { get; }
#endregion
The ListenAsync method tells the MyTcpServer class to start listening on the specified address and port combination. You create and start a TcpListener, and then run a Task to call its AcceptTcpClientAsync method to wait for a client request to arrive. Once the client connects, the ProcessClientAsync method is run to service the client interaction.
The listener shuts down after serving the client:
    #region Public Methods
    public async Task ListenAsync(CancellationToken cancellationToken =
default(CancellationToken))
    {
        cancellationToken.ThrowIfCancellationRequested();
        try
        {
            lock (_syncRoot)
            {
                _listener = new TcpListener(Address, Port);

                // fire up the server
                _listener.Start();

                // set listening bit
                Listening = true;
            }

            // Enter the listening loop.
            do
            {
                Console.Write("Looking for someone to talk to... ");
                // Wait for connection
                try
                {
                    cancellationToken.ThrowIfCancellationRequested();
                    await Task.Run(async () =>
                    {
                        TcpClient newClient =
                            await _listener.AcceptTcpClientAsync();
                        Console.WriteLine("Connected to new client");
                        await ProcessClientAsync(newClient, cancellationToken);
                    },cancellationToken);
                }
                catch (OperationCanceledException)
                {
                    // the user cancelled
                    Listening = false;
                }
            }
            while (Listening);
        }
        catch (SocketException se)
        {
            Console.WriteLine($"SocketException: {se}");
        }
        finally
        {
            // shut it down
            StopListening();
        }
    }
The StopListening method is called to stop the TCPServer from listening for requests:
public void StopListening()
{
    if (Listening)
    {
        lock (_syncRoot)
        {
            // set listening bit
            Listening = false;
            try
            {
                // shut it down if it is listening
                if (_listener.Server.IsBound)
                    _listener.Stop();
            }
            catch (ObjectDisposedException)
            {
                // if we try to stop listening while waiting
                // for a connection in AcceptTcpClientAsync (since it blocks)
                // it will throw an ObjectDisposedException here
                // Since we know in this case we are shutting down anyway
                // just note that we cancelled
                Console.WriteLine("Cancelled the listener");
            }
        }
    }
}
#endregion
The ProcessClientAsync method shown in Example 9-4 executes to serve a connected client. It determines if the server name for an SSL connection has been set and if so, creates an SslStream using TcpClient.GetStream and using the configured server name to get the server certificate. It then authenticates using the AuthenticateAsServer method. If SSL is not being used, ProcessClientAsync gets the NetworkStream from the client using the TcpClient.GetStream method and then reads the whole request. After sending back a response, it shuts down the client connection.
Example 9-4. ProcessClientAsync method
#region Private Methods
private async Task ProcessClientAsync(TcpClient client,
      CancellationToken cancellationToken = default(CancellationToken))
{
    cancellationToken.ThrowIfCancellationRequested();
    try
    {
        // Buffer for reading data
        byte[] bytes = new byte[1024];
        StringBuilder clientData = new StringBuilder();

        Stream stream = null;
        if (!string.IsNullOrWhiteSpace(SSLServerName))
        {
            Console.WriteLine($"Talking to client over SSL using {SSLServerName}");
            SslStream sslStream = new SslStream(client.GetStream());
            sslStream.AuthenticateAsServer(GetServerCert(SSLServerName), false,
                 SslProtocols.Default, true);
            stream = sslStream;
        }
        else
        {
            Console.WriteLine("Talking to client over regular HTTP");
            stream = client.GetStream();
        }
        // get the stream to talk to the client over
        using (stream)
        {
            // set initial read timeout to 1 minute to allow for connection
            stream.ReadTimeout = 60000;
            // Loop to receive all the data sent by the client.
            int bytesRead = 0;
            do
            {
                // THIS SEEMS LIKE A BUG, but it apparently isn't...
                // When we use Read, the first time it works fine, and then on the
                // second read when there is no data the IOException is thrown for
                // the timeout resulting from the 1 second timeout set on the
                // NetworkStream. If we use ReadAsync, it just hangs forever when
                // there is no data on the second read. This is because timeouts
                // are ignored on the Socket class when Async is used.
                try
                {
                    // We use Read here and not ReadAsync as if you call ReadAsync
                    // it will not timeout as you might expect (see note above)
                    bytesRead = stream.Read(bytes, 0, bytes.Length);
                    if (bytesRead > 0)
                    {
                        // Translate data bytes to an ASCII string and append
                        clientData.Append(
                            Encoding.ASCII.GetString(bytes, 0, bytesRead));
                        // decrease read timeout to 1/2 second now that data is
                        // coming in.
                        stream.ReadTimeout = 500;
                    }
                }
                catch (IOException ioe)
                {
                    // read timed out, all data has been retrieved
                    Trace.WriteLine($"Read timed out: {ioe}");
                    bytesRead = 0;
                }
            }
            while (bytesRead > 0);

            Console.WriteLine($"Client says: {clientData}");

            // Thank them for their input
            bytes = Encoding.ASCII.GetBytes("Thanks call again!");

            // Send back a response.
            await stream.WriteAsync(bytes, 0, bytes.Length, cancellationToken);
        }
    }
    finally
    {
        // stop talking to client
        client?.Close();
    }
}
Finally, the GetServerCert method retrieves the X509Certificate when the TcpServer is set up to use SSL. This expects that the certificate is accessible in the Personal certificate store on the local machine. If it is a self-signed certificate, then the certificate will need to be available in the Trusted Root certificate store as well:
    private static X509Certificate GetServerCert(string subjectName)
    {
        using (X509Store store =
           new X509Store(StoreName.My, StoreLocation.LocalMachine))
        {
            store.Open(OpenFlags.ReadOnly);
            X509CertificateCollection certificate =
                store.Certificates.Find(X509FindType.FindBySubjectName,
                   subjectName, true);

            if (certificate.Count > 0)
                return (certificate[0]);
            else
                return (null);
        }
    }
}
Here’s an example of a simple server that listens for clients until the Escape key is pressed:
class Program
{
    private static MyTcpServer _server;
    private static CancellationTokenSource _cts;

    static void Main()
    {
        _cts = new CancellationTokenSource();
        try
        {
            // We don't await this call as we want to continue so
            // that the Console UI can process keystrokes
            RunServer(_cts.Token);
        }
        catch(Exception ex)
        {
            Console.WriteLine(ex.ToString());
        }
        string msg = "Press Esc to stop the server...";
        Console.WriteLine(msg);
        ConsoleKeyInfo cki;
        while (true)
        {
            cki = Console.ReadKey();
            if (cki.Key == ConsoleKey.Escape)
            {
                _cts.Cancel();
                _server.StopListening();
                break; // allow exit
            }
        }
        Console.WriteLine("");
        Console.WriteLine("All done listening");
    }

    private static async Task RunServer(CancellationToken cancellationToken)
    {
        try
        {
            await Task.Run(async() =>
            {
                cancellationToken.ThrowIfCancellationRequested();
                _server = new MyTcpServer(IPAddress.Loopback, 55555);
                await _server.ListenAsync(cancellationToken);
            }, cancellationToken);
        }
        catch (OperationCanceledException)
        {
            Console.WriteLine("Cancelled.");
        }
    }
}
When talking to the MyTcpClient class in Recipe 9.10, the server gives output like this:
Press Esc to stop the server...
Looking for someone to talk to... Connected to new client
Client says: Just wanted to say hi
Looking for someone to talk to... Connected to new client
Client says: Just wanted to say hi again
Looking for someone to talk to... Connected to new client
Client says: Are you ignoring me?
Looking for someone to talk to... Connected to new client
Client says: I'll not be ignored! (round 0)
Looking for someone to talk to... Connected to new client
Client says: I'll not be ignored! (round 1)
Looking for someone to talk to... Connected to new client
Client says: I'll not be ignored! (round 2)
Looking for someone to talk to... Connected to new client
Client says: I'll not be ignored! (round 3)
Looking for someone to talk to... Connected to new client
Client says: I'll not be ignored! (round 4)
Looking for someone to talk to... Connected to new client
Client says: I'll not be ignored! (round 5)
Looking for someone to talk to... Connected to new client
Client says: I'll not be ignored! (round 6)
Looking for someone to talk to... Connected to new client
Client says: I'll not be ignored! (round 7)
Looking for someone to talk to... Connected to new client
Client says: I'll not be ignored! (round 8)
Looking for someone to talk to... Connected to new client
Client says: I'll not be ignored! (round 9)
Looking for someone to talk to... Connected to new client
Client says: I'll not be ignored! (round 10)
    [more output follows...]
Discussion
The Transmission Control Protocol (TCP) is the protocol used by the majority of traffic on the Internet today. TCP is responsible for the correct delivery of data packets from one endpoint to another. It uses the Internet Protocol (IP) to make the delivery. IP handles getting the packets from node to node; TCP detects when packets are not correct, are missing, or are sent out of order, and it arranges for missing or damaged packets to be resent. The TCPServer class is a basic server mechanism for dealing with requests that come from clients over TCP.
MyTcpServer takes the IP address and port passed in the constructor method and creates a TcpListener on that IPAddress and port. Once created, the TcpListener.Start method is called to start up the server. The AcceptTcpClientAsync method is called to listen for requests from TCP-based clients and is awaited for a connection from a client. Once the client connects, the ProcessClientAsync method is executed. In this method, the server reads request data from the client and returns a brief acknowledgment. The server disconnects from the client via TcpClient.Close. The server stops listening when the StopListening method is called, which takes the server offline by calling TcpListener.Stop.
To support secured requests, you can set the SSLServerName in the TcpServer constructor, which identifies the certificate to use for authentication.
The program running the server would then supply this name in the constructor like this:
_server = new MyTcpServer(IPAddress.Loopback, 55555, "CSharpCookBook.net");
In the ListenAsync method, we used the lock statement:
public async Task ListenAsync(CancellationToken cancellationToken =
    default(CancellationToken))
{
    cancellationToken.ThrowIfCancellationRequested();
    try
    {
        lock (_syncRoot)
        {
            _listener = new TcpListener(Address, Port);

            // fire up the server
            _listener.Start();

            // set listening bit
            Listening = true;
        }
Warning
MSDN defines lock as follows: “The lock keyword marks a statement block as a critical section by obtaining the mutual-exclusion lock for a given object, executing a statement, and then releasing the lock.” While this is true, you can more simply think “no other thread will run in the section of code inside the brackets for the lock statement until the first thread is finished.” Those of you who like to push the envelope might think, “Hey, I could use async and await inside the lock statement and then it would yield to the next thread, right?” Yes, technically you could, but you shouldn’t, as that is almost certainly going to cause deadlocks in your application. The code you await could be taking out locks itself and causing the deadlocking. The code inside the lock could also then resume on another thread (since when you await, it doesn’t usually resume on the same thread), so you would be unlocking from a different thread than you established the lock on. This is a “Very Bad Thing,” so please don’t do it.
See Also
The “IPAddress Class,” “TcpListener Class,” “SslStream Class,” “lock statement,” and “TcpClient Class” topics in the MSDN documentation.
9.10 Writing a TCP Client
Solution
Use the MyTcpClient class shown in Example 9-5 to connect to and converse with a TCP-based server by passing the address, port, and SSL server name (if authenticated) of the server to talk to, using the System.Net.TcpClient class. This example will talk to the server from Recipe 9.9.
Example 9-5. MyTcpClient class
class MyTcpClient : IDisposable
{
    private TcpClient _client;
    private IPEndPoint _endPoint;
    private bool _disposed;

    #region Properties
    public IPAddress Address { get; }

    public int Port { get; }

    public string SSLServerName { get; }

    #endregion

    public MyTcpClient(IPAddress address, int port, string sslServerName = null)
    {
        Address = address;
        Port = port;
        _endPoint = new IPEndPoint(Address, Port);
        SSLServerName = sslServerName;
    }

    public async Task ConnectToServerAsync(string msg)
    {
        try
        {
            _client = new TcpClient();
            await _client.ConnectAsync(_endPoint.Address,_endPoint.Port);

            Stream stream = null;
            if (!string.IsNullOrWhiteSpace(SSLServerName))
            {
                SslStream sslStream =
                    new SslStream(_client.GetStream(), false,
                        new RemoteCertificateValidationCallback(
                            CertificateValidationCallback));
                sslStream.AuthenticateAsClient(SSLServerName);
                DisplaySSLInformation(SSLServerName, sslStream, true);
                stream = sslStream;
            }
            else
            {
                stream = _client.GetStream();
            }
            using (stream)
            {
                // Get the bytes to send for the message
                byte[] bytes = Encoding.ASCII.GetBytes(msg);

                // send message
                Console.WriteLine($"Sending message to server: {msg}");
                await stream?.WriteAsync(bytes, 0, bytes.Length);

                // Get the response
                // Buffer to store the response bytes.
                bytes = new byte[1024];

                // Display the response
                int bytesRead = await stream?.ReadAsync(bytes, 0, bytes.Length);
                string serverResponse =
                    Encoding.ASCII.GetString(bytes, 0, bytesRead);
                Console.WriteLine($"Server said: {serverResponse}");
            }
        }
        catch (SocketException se)
        {
            Console.WriteLine($"There was an error talking to the server: {se}");
        }
        finally
        {
            Dispose();
        }
    }

    #region IDisposable Members

    public void Dispose()
    {
        Dispose(true);
        GC.SuppressFinalize(this);
    }

    private void Dispose(bool disposing)
    {
        if (!_disposed)
        {
            if (disposing)
            {
                _client?.Close();
            }
            _disposed = true;
        }
    }

    #endregion

    private bool CertificateValidationCallback(object sender,
            X509Certificate certificate,
            X509Chain chain,
            SslPolicyErrors sslPolicyErrors)
    {
        if (sslPolicyErrors == SslPolicyErrors.None)
        {
            return true;
        }
        else
        {
            if (sslPolicyErrors == SslPolicyErrors.RemoteCertificateChainErrors)
            {
                Console.WriteLine("The X509Chain.ChainStatus returned an array of " +
                    "X509ChainStatus objects containing error information.");
            }
            else if (sslPolicyErrors ==
                SslPolicyErrors.RemoteCertificateNameMismatch)
            {
                Console.WriteLine(
                    "There was a mismatch of the name on a certificate.");
            }
            else if (sslPolicyErrors ==
                SslPolicyErrors.RemoteCertificateNotAvailable)
            {
                Console.WriteLine("No certificate was available.");
            }
            else
            {
                Console.WriteLine("SSL Certificate Validation Error!");
            }

            Console.WriteLine("");
            Console.WriteLine("SSL Certificate Validation Error!");
            Console.WriteLine(sslPolicyErrors.ToString());

            return false;
        }
    }

    private static void DisplaySSLInformation(string serverName,
        SslStream sslStream, bool verbose)
    {
        DisplayCertInformation(sslStream.RemoteCertificate, verbose);

        Console.WriteLine("");
        Console.WriteLine($"SSL Connect Report for : {serverName}");
        Console.WriteLine("");
        Console.WriteLine(
            $"Is Authenticated:            {sslStream.IsAuthenticated}");
        Console.WriteLine($"Is Encrypted:                {sslStream.IsEncrypted}");
        Console.WriteLine($"Is Signed:                   {sslStream.IsSigned}");
        Console.WriteLine($"Is Mutually Authenticated:   " +
            $"{sslStream.IsMutuallyAuthenticated}");
        Console.WriteLine("");
        Console.WriteLine($"Hash Algorithm:              {sslStream.HashAlgorithm}");
        Console.WriteLine($"Hash Strength:               {sslStream.HashStrength}");
        Console.WriteLine(
            $"Cipher Algorithm:            {sslStream.CipherAlgorithm}");
        Console.WriteLine(
            $"Cipher Strength:             {sslStream.CipherStrength}");
        Console.WriteLine("");
        Console.WriteLine($"Key Exchange Algorithm:      " +
            $"{sslStream.KeyExchangeAlgorithm}");
        Console.WriteLine($"Key Exchange Strength:       " +
            $"{sslStream.KeyExchangeStrength}");
        Console.WriteLine("");
        Console.WriteLine(4"SSL Protocol:                {sslStream.SslProtocol}");
    }

    private static void DisplayCertInformation(X509Certificate remoteCertificate,
        bool verbose)
    {
        Console.WriteLine("");
        Console.WriteLine("Certficate Information for:");
        Console.WriteLine($"{remoteCertificate.Subject}");
        Console.WriteLine("");
        Console.WriteLine("Valid From:");
        Console.WriteLine($"{remoteCertificate.GetEffectiveDateString()}");
        Console.WriteLine("Valid To:");
        Console.WriteLine($"{remoteCertificate.GetExpirationDateString()}");
        Console.WriteLine("Certificate Format:");
        Console.WriteLine($"{remoteCertificate.GetFormat()}");
        Console.WriteLine("");
        Console.WriteLine("Issuer Name:");
        Console.WriteLine($"{remoteCertificate.Issuer}");

        if (verbose)
        {
            Console.WriteLine("Serial Number:");
            Console.WriteLine($"{remoteCertificate.GetSerialNumberString()}");
            Console.WriteLine("Hash:");
            Console.WriteLine($"{remoteCertificate.GetCertHashString()}");
            Console.WriteLine("Key Algorithm:");
            Console.WriteLine($"{remoteCertificate.GetKeyAlgorithm()}");
            Console.WriteLine("Key Algorithm Parameters:");
            Console.WriteLine(
                $"{remoteCertificate.GetKeyAlgorithmParametersString()}");
            Console.WriteLine("Public Key:");
            Console.WriteLine($"{remoteCertificate.GetPublicKeyString()}");
        }
    }
}
To use the MyTcpClient in a program, you can simply create an instance of it and call ConnectToServerAsync to send a request. In the TalkToServerAsync method, you first make three calls to the server to test the basic mechanism and await the results from the MakeClientCallToServer method. Next, you enter a loop to really pound on it and spawn a number of Task requests that each await the MakeClientCallToServer method. This verifies that the server’s mechanism for handling multiple requests is sound:
static void Main()
{
    Task serverChat = TalkToServerAsync();
    serverChat.Wait();
    Console.WriteLine(@"Press the ENTER key to continue...");
    Console.Read();
}

private static async Task MakeClientCallToServerAsync(string msg)
{
    MyTcpClient client = new MyTcpClient(IPAddress.Loopback, 55555);
    // Uncomment to use SSL to talk to the server
    //MyTcpClient client = new MyTcpClient(IPAddress.Loopback, 55555,
    //    "CSharpCookBook.net");
    await client.ConnectToServerAsync(msg);
}

private static async Task TalkToServerAsync()
{
    await MakeClientCallToServerAsync("Just wanted to say hi");
    await MakeClientCallToServerAsync("Just wanted to say hi again");
    await MakeClientCallToServerAsync("Are you ignoring me?");

    // now send a bunch of messages...
    string msg;
    for (int i = 0; i < 100; i++)
    {
        msg = $"I'll not be ignored! (round {i})";
        RunClientCallAsTask(msg);
    }
}

private static void RunClientCallAsTask(string msg)
{
    Task work = Task.Run(async () =>
    {
        await MakeClientCallToServerAsync(msg);
    });
}
The output on the client side for this exchange of messages is:
Sending message to server: Just wanted to say hi
Server said: Thanks call again!
Sending message to server: Just wanted to say hi again
Server said: Thanks call again!
Sending message to server: Are you ignoring me?
Server said: Thanks call again!
Press the ENTER key to continue...
Sending message to server: I'll not be ignored! (round 1)
Sending message to server: I'll not be ignored! (round 0)
Sending message to server: I'll not be ignored! (round 2)
Sending message to server: I'll not be ignored! (round 3)
Sending message to server: I'll not be ignored! (round 4)
Sending message to server: I'll not be ignored! (round 6)
Sending message to server: I'll not be ignored! (round 5)
Sending message to server: I'll not be ignored! (round 7)
Sending message to server: I'll not be ignored! (round 9)
Sending message to server: I'll not be ignored! (round 10)

[once all requests are set up as tasks you see the responses...]

Server said: Thanks call again!
Server said: Thanks call again!
Server said: Thanks call again!
Server said: Thanks call again!
Server said: Thanks call again!
Server said: Thanks call again!
Server said: Thanks call again!
Server said: Thanks call again!
Server said: Thanks call again!
Server said: Thanks call again!
Server said: Thanks call again!
Discussion
MyTcpClient.ConnectToServerAsync is designed to send one message, get the response, display it as a string, and then close the connection. To accomplish this, it creates a System.Net.TcpClient and connects to the server by calling the TcpClient.ConnectAsync method. ConnectAsync targets the server using an IPEndPoint built from the address and port that you passed to the MyTcpClient constructor.
MyTcpClient.ConnectToServerAsync then gets the bytes for the string using the Encoding.ASCII.GetBytes method. Once it has the bytes to send, it gets either the NetworkStream or the SslStream from the underlying System.Net.TcpClient by calling its GetStream method and then sends the message using the TcpClient.WriteAsync method.
To receive the response from the server, MyTcpClient.ConnectToServerAsync calls the blocking TcpClient.ReadAsync method. Once ReadAsync is awaited and returns, the bytes are decoded to get the string that contains the response from the server. The connections are then closed and the client ends.
To support secured requests, you can set the SSLServerName in the TcpClient constructor, which identifies the certificate to use for authentication.
The program running the client would then supply this name in the constructor like this:
MyTcpClient client =
    new MyTcpClient(IPAddress.Loopback, 55555, "CSharpCookBook.net");
When using a secured connection, we use the DisplaySSLInformation and DisplayCertInformation methods of MyTcpClient to display all of the details of the connection as they pertain to the certificate and security status:
Certficate Information for:
CN=CSharpCookBook.net

Valid From:
12/27/2014 7:29:31 PM
Valid To:
12/31/2039 6:59:59 PM
Certificate Format:
X509

Issuer Name:
CN=CSharpCookBook.net
Serial Number:
0F0E1C4148C6A09C42EDEDAFCD2E83E2
Hash:
664E30B62C4FB9DBEE0C29F27A15E5EDE2C46187
Key Algorithm:
1.2.840.113549.1.1.1
Key Algorithm Parameters:
0500
Public Key:
3082020A0282020100EAB6004CD3F2F5214773E8FE4FA40FE610F1C27E888276E81EBBB86020B904
3B136CF02197C928ED0BCA8339A31334059C2744A8BB617849BBC98C8B242FC360C88BF62E2C491B
1A6F951DDB65E0036D8839AC6695B26CD3E50DD749A5610C8564CF99EE79FED272D04A3100B51A4A
4BAE076BB8129E39B382ED1FDB8382A2D3C057D7F46072DDDE0654083E1F2CB4E25685B5EE4B4F25
F3D2561B61869D9C39B9FB389E6A06D9DEFA6693D94C6A1F2CA34462B3D9C68CF91A179B0957050E
A9A30D508C067C216CAD59CA9E846B0EBA02472333BBF2462415B13567EBF6930FC1000EECC3EA70
9867B8BD6869BF828B8EBA5BA2E4A7660B46B798A8BB8D046FFE1C767F5A77AF1CD6E83F9E013AB1
748264F89617D9C106813F554B8AF4184AC58B55A1A58ABAA2F171CDBFF6923C27FE801FEE5D3664
87F54FAD184B0FCBB874532EC8E6B3BAA322F05DB6AD99E5982B98AD43C0E9BB2356270DB07BA5E5
AAE2F0B66E630A6A0435FDFC61DB46B0FF348AF5D2285C74A35E8AAFC86F45C0E674C2D9FE98B6C1
17208668CF4B03DD77948AE45AE84D33178C3042B1155E58D3B49492697D5CA4CF4AB24549E4A240
CCEB6CF61CEF6F33F412A91BC32803136A6481B6B246FEA5A3943EEB7FDA5E54CC561DE737BBB380
BC2B467F1A5B8CA1BDFC66B6B4E60DCCC7C3912449D0BF8B9878D22C04A36A09898D2AAED0CE32DB
770203010001

SSL Connect Report for : CSharpCookBook.net

Is Authenticated:            True
Is Encrypted:                True
Is Signed:                   True
Is Mutually Authenticated:   False

Hash Algorithm:              Sha1
Hash Strength:               160
Cipher Algorithm:            Aes256
Cipher Strength:             256

Key Exchange Algorithm:      44550
Key Exchange Strength:       256

SSL Protocol:                Tls
Sending message to server: I'll not be ignored! (round 95)
Server said: Thanks call again!
In the Solution, we added the IDisposable interface implementation to the MyTcpClient class as follows:
#region IDisposable Members

public void Dispose()
{
    Dispose(true);
    GC.SuppressFinalize(this);
}

private void Dispose(bool disposing)
{
    if (!_disposed)
    {
        if (disposing)
        {
            _client?.Close();
        }
        _disposed = true;
    }
}

#endregion
We did this to handle the closing of the private TcpClient instance variable _client correctly, as it provides its own Close method so that it can perform some logging and clean up its resources. SuppressFinalize is called in the Dispose method to inform the garbage collector that the object has already been cleaned up fully.
See Also
The “TcpClient Class,” “SslStream Class,” “NetworkStream Class,” “IDisposable Interface,” and “Encoding.ASCII Property” topics in the MSDN documentation.
9.11 Simulating Form Execution
Solution
Use the System.Net.WebClient class to send a set of name/value pairs to the web server using the UploadValues method. This class enables you to masquerade as the browser executing a form by setting up the name/value pairs with the input data. The input field ID is the name, and the value to use in the field is the value:
// In order to use this, you need to run the CSCBWeb project first.
Uri uri = new Uri("http://localhost:4088/WebForm1.aspx");
WebClient client = new WebClient();

// Create a series of name/value pairs to send
// Add necessary parameter/value pairs to the name/value container.
NameValueCollection collection = new NameValueCollection()
    { {"Item", "WebParts"},
        {"Identity", "[email protected]"},
        {"Quantity", "5"} };

Console.WriteLine(
    $"Uploading name/value pairs to URI {uri.AbsoluteUri} ...");

// Upload the NameValueCollection.
byte[] responseArray =
    await client.UploadValuesTaskAsync(uri, "POST", collection);

// Decode and display the response.
Console.WriteLine(
    $"
Response received was {Encoding.UTF8.GetString(responseArray)}");
The WebForm1.aspx page, which receives and processes this data, looks like this:
<%@ Page Language="C#" AutoEventWireup="true" CodeFile="WebForm1.aspx.cs"
    Inherits="WebForm1" %>

<!DOCTYPE html PUBLIC "-//W3C//DTD XHTML 1.0 Transitional//EN"
"http://www.w3.org/TR/xhtml1/DTD/xhtml1-transitional.dtd">

<html xmlns="http://www.w3.org/1999/xhtml">
<head runat="server">
    <title>Untitled Page</title>
</head>
<body>
    <form id="form1" runat="server">
    <div>


        <asp:Table ID="Table1" runat="server" Height="139px" Width="361px">
            <asp:TableRow runat="server">
                <asp:TableCell runat="server"><asp:Label ID="Label1"
                runat="server"
Text="Identity"></asp:Label></asp:TableCell>
                <asp:TableCell runat="server"><asp:TextBox ID="Identity"
runat="server"/></asp:TableCell>
            </asp:TableRow>
            <asp:TableRow runat="server">
                <asp:TableCell runat="server"><asp:Label ID="Label2"
                runat="server"
Text="Item"></asp:Label></asp:TableCell>
                <asp:TableCell runat="server"><asp:TextBox ID="Item"
runat="server"/></asp:TableCell>
            </asp:TableRow>
            <asp:TableRow runat="server">
                <asp:TableCell runat="server"><asp:Label ID="Label3"
                runat="server"
Text="Quantity"></asp:Label></asp:TableCell>
                <asp:TableCell runat="server"><asp:TextBox ID="Quantity"
runat="server"/></asp:TableCell>
            </asp:TableRow>
            <asp:TableRow runat="server">
                <asp:TableCell runat="server"></asp:TableCell>
                <asp:TableCell runat="server"><asp:Button ID="Button1"
                runat="server"
onclick="Button1_Click" Text="Submit" /></asp:TableCell>
            </asp:TableRow>
        </asp:Table>

    </div>
    </form>
</body>
</html>
The WebForm1.aspx.cs codebehind looks like this:
using System;
using System.Web;

public partial class WebForm1 : System.Web.UI.Page
{
    protected void Page_Load(object sender, EventArgs e)
    {
        if(HttpContext.Current.Request.HttpMethod.ToUpper() == "POST")
            WriteOrderResponse();
    }
    protected void Button1_Click(object sender, EventArgs e)
    {
        WriteOrderResponse();
    }

    private void WriteOrderResponse()
    {
        string response = "Thanks for the order!<br/>";
        response += "Identity: " + Request.Form["Identity"] + "<br/>";
        response += "Item: " + Request.Form["Item"] + "<br/>";
        response += "Quantity: " + Request.Form["Quantity"] + "<br/>";
        Response.Write(response);
    }
}
The output from the form execution looks like this:
Uploading name/value pairs to URI http://localhost:4088/WebForm1.aspx ...

Response received was ?Thanks for the order!<br/>Identity: [email protected]<br/>Item:
 WebParts<br/>Quantity: 5<br/>

<!DOCTYPE html PUBLIC "-//W3C//DTD XHTML 1.0 Transitional//EN" "http://www.w3.or
g/TR/xhtml1/DTD/xhtml1-transitional.dtd">

<html xmlns="http://www.w3.org/1999/xhtml">
<head><title>
        Untitled Page
</title></head>
<body>
    <form name="form1" method="post" action="WebForm1.aspx" id="form1">
<input type="hidden" name="__VIEWSTATE" id="__VIEWSTATE" value="/wEPDwULLTE3NDA4
NzI1OTJkZHS2esbeFu36oKf1n3XvCfLBFbminq7tuASWazSmVzNV" />

    <div>


                <table id="Table1" border="0" height="139" width="361">
        <tr>
                <td><span id="Label1">Identity</span></td><td><input name="Ident
ity" type="text" id="Identity" /></td>
        </tr><tr>
                <td><span id="Label2">Item</span></td><td><input name="Item" typ
e="text" id="Item" /></td>
        </tr><tr>
                <td><span id="Label3">Quantity</span></td><td><input name="Quant
ity" type="text" id="Quantity" /></td>
        </tr><tr>
                <td></td><td><input type="submit" name="Button1" value="Submit"
id="Button1" /></td>
        </tr>
</table>

    </div>

<input type="hidden" name="__VIEWSTATEGENERATOR" id="__VIEWSTATEGENERATOR" value
="B6E7D48B" />
<input type="hidden" name="__EVENTVALIDATION" id="__EVENTVALIDATION" value="/wEd
AAWO/dj0xplxW6YoKRXH5OHbmz/pl7ppA227nN6820C6Sskwyhj63BXMkV5ahbRAQpWWUallXbdbKxLN
IxdB86x+zfg78Z8BXhXifTCAVkevd657ebmKYjtae5uEq9PVWd0RhH/uhX8f6dI/Hiyy1p14" /></fo
rm>

<!-- Visual Studio Browser Link -->
<script type="application/json" id="__browserLink_initializationData">
    {"appName":"Unknown","requestId":"c7ee16b51c9b4bccae0c3c79a9fba779"}
</script>
<script type="text/javascript" src="http://localhost:2976/eef9532a4f984be0b28884
3bb4cee559/browserLink" async="async"></script>
<!-- End Browser Link -->

</body>
</html>
Discussion
The WebClient class makes it easy to upload form data to a web server in the common format of a set of name/value pairs. You can see this technique in the call to UploadValuesTaskAsync that takes a URI (http://localhost:4088/WebForm1.aspx), the HTTP method to use (POST), and the NameValueCollection you created (collection).
Note
Note that the asynchronous version of the UploadValues* methods is called and that the one used (UploadValuesTaskAsync) is the one specific to using with async and await.
You populate the NameValueCollection with the data for each field on the form by calling its Add method, passing the id of the input field as the name and the value to put in the field as the value. In this example, you fill in the Identity field with [email protected], the Item field with WebParts, and the Quantity field with 5. You then print out the resulting response from the POST to the console window.
See Also
The “WebClient Class” topic in the MSDN documentation.
9.12 Transferring Data via HTTP
Solution
Use the WebClient.UploadDataTaskAsync or WebClient.DownloadDataTaskAsync methods to transfer data using a URL.
To download the data for a web page, do the following:
Uri uri = new Uri("http://localhost:4088/DownloadData.aspx");

// make a client
using (WebClient client = new WebClient())
{
    // get the contents of the file
    Console.WriteLine($"Downloading {uri.AbsoluteUri}");
    // download the page and store the bytes
    byte[] bytes;
    try
    {
        // NOTE: There is also a DownloadDataAsync that is used in the older
        // EAP pattern, which we do not use here.
        bytes = await client.DownloadDataTaskAsync(uri);
    }
    catch (WebException we)
    {
        Console.WriteLine(we.ToString());
        return;
    }
    // Write the HTML out
    string page = Encoding.UTF8.GetString(bytes);
    Console.WriteLine(page);

}
This will produce the following output:
Downloading http://localhost:4088/DownloadData.aspx
?

<!DOCTYPE html PUBLIC "-//W3C//DTD XHTML 1.0 Transitional//EN" "http://www.w3.or
g/TR/xhtml1/DTD/xhtml1-transitional.dtd">

<html xmlns="http://www.w3.org/1999/xhtml">
<head><title>
        Download Data
</title></head>
<body>
    <form name="Form1" method="post" action="DownloadData.aspx" id="Form2">
        <input type="hidden" name="__VIEWSTATE"
value="dDwyMDQwNjUzNDY2Ozs+kS9hguYm9369sybDqmIow0AvxBg=" />
    <span id="Label1" style="Z-INDEX: 101; LEFT: 142px; POSITION: absolute;
TOP: 164px">This is downloaded html!</span>
    </form>

<!-- Visual Studio Browser Link -->
<script type="application/json" id="__browserLink_initializationData">
    {"appName":"Unknown","requestId":"b43b962ff6264058b5dbf17aed23a082"}
</script>
<script type="text/javascript" src="http://localhost:3587/db7b63d3424649c7a10386
29bc71b103/browserLink" async="async"></script>
<!-- End Browser Link -->

</body>
</html>
You can also download data to a file using DownloadFileTaskAsync:
Uri uri = new Uri("http://localhost:4088/DownloadData.aspx");

// make a client
using (WebClient client = new WebClient())
{
    // go get the file
    Console.WriteLine($"Retrieving file from {uri}...{Environment.NewLine}");
    // get file and put it in a temp file
    string tempFile = Path.GetTempFileName();
    try
    {
        // NOTE: There is also a DownloadFileAsync that is used in the older
        // EAP pattern, which we do not use here.
        await client.DownloadFileTaskAsync(uri, tempFile);
    }
    catch (WebException we)
    {
        Console.WriteLine(we.ToString());
        return;
    }
    Console.WriteLine($"Downloaded {uri} to {tempFile}");
}
This will produce output similar to the following (temporary file path and name will change):
Retrieving file from http://localhost:4088/DownloadData.aspx...

Downloaded http://localhost:4088/DownloadData.aspx to C:UsersjhilyardAppData
LocalTemp	mpA5D7.tmp
To upload a file to a URL, use UploadFileTaskAsync like so:
Uri uri = new Uri("http://localhost:4088/UploadData.aspx");
// make a client
using (WebClient client = new WebClient())
{
    Console.WriteLine($"Uploading to {uri.AbsoluteUri}");
    try
    {
        // NOTE: There is also a UploadFileAsync that is used in the older
        // EAP pattern, which we do not use here.
        await client.UploadFileTaskAsync(uri, "SampleClassLibrary.dll");
        Console.WriteLine($"Uploaded successfully to {uri.AbsoluteUri}");
    }
    catch (WebException we)
    {
        Console.WriteLine(we.ToString());
    }
}
The code for an ASPX page that could receive this would look as follows:
using System;
using System.Web;

public partial class UploadData : System.Web.UI.Page
{
    protected void Page_Load(object sender, EventArgs e)
    {
        foreach (string f in Request.Files.AllKeys)
        {
            HttpPostedFile file = Request.Files[f];
            // need to have write permissions for the directory to write to
            try
            {
                string path = Server.MapPath(".") + @"" + file.FileName;
                file.SaveAs(path);
                Response.Write("Saved " + path);
            }
            catch (HttpException hex)
            {
                // return error information specific to the save
                Response.Write("Failed to save file with error: " +
                    hex.Message);
            }
        }
    }
}
Note
Note that while the preceding ASPX page will receive and store the file, it is a basic sample meant to illustrate uploading with WebClient. When building a page to receive files, make sure you deal with the security aspects of file uploads as specified in the Unrestricted File Upload vulnerability described by OWASP (Open Web Application Security Project) on its website (https://www.owasp.org/index.php/Unrestricted_File_Upload).
This will produce the following output:
Uploading to http://localhost:4088/UploadData.aspx
Uploaded successfully to http://localhost:4088/UploadData.aspx
See Also
The “WebClient Class” topic in the MSDN documentation and the OWASP website.
9.13 Using Named Pipes to Communicate
Solution
Use the NamedPipeClientStream and NamedPipeServerStream in the System.IO.Pipes namespace. You can then create a client and server to work with named pipes.
To use the NamedPipeClientStream class, you need some code like that shown in Example 9-6.
Example 9-6. Using the NamedPipeClientStream class
using System;
using System.Text;
using System.IO.Pipes;
using System.Threading.Tasks;

namespace NamedPipes
{
    class NamedPipeClientConsole
    {
        static void Main()
        {
            Task client = RunClient();
            client.Wait();

            Console.WriteLine("Press Enter to exit...");
            Console.ReadLine();
        }

        private static async Task RunClient()
        {
            Console.WriteLine("Initiating client, looking for server...");
            // set up a message to send
            string messageText = "Sample text message!";
            int bytesRead;

            // set up the named pipe client and close it when complete
            using (NamedPipeClientStream clientPipe =
                    new NamedPipeClientStream(".", "mypipe", PipeDirection.InOut,
                    PipeOptions.None))
            {
                // connect to the server stream
                await clientPipe.ConnectAsync();
                // set the read mode to message
                clientPipe.ReadMode = PipeTransmissionMode.Message;

                // write the message ten times
                for (int i = 0; i < 10; i++)
                {
                    Console.WriteLine($"Sending message: {messageText}");
                    byte[] messageBytes = Encoding.Unicode.GetBytes(messageText);
                    // check and write the message
                    if (clientPipe.CanWrite)
                    {
                        await clientPipe.WriteAsync(
                            messageBytes, 0, messageBytes.Length);
                        await clientPipe.FlushAsync();
                        // wait till it is read
                        clientPipe.WaitForPipeDrain();
                    }

                    // set up a buffer for the message bytes
                    messageBytes = new byte[256];
                    do
                    {
                        // collect the message bits in the stringbuilder
                        StringBuilder message = new StringBuilder();

                        // read all of the bits until we have the
                        // complete response message
                        do
                        {
                            // read from the pipe
                            bytesRead =
                                await clientPipe.ReadAsync(
                                    messageBytes, 0, messageBytes.Length);
                            // if we got something, add it to the message
                            if (bytesRead > 0)
                            {
                                message.Append(
                                    Encoding.Unicode.GetString(messageBytes, 0,
                                        bytesRead));
                                Array.Clear(messageBytes, 0, messageBytes.Length);
                            }
                        }
                        while (!clientPipe.IsMessageComplete);

                        // set to zero as we have read the whole message
                        bytesRead = 0;
                        Console.WriteLine($"    Received message: " +
                            $"{message.ToString()}");
                    }
                    while (bytesRead != 0);

                }
            }

        }
    }
}
Then, to set up a server for the client to talk to, you use the NamedPipeServerStream class, as shown in Example 9-7.
Example 9-7. Setting up a server for the client
using System;
using System.Text;
using System.IO.Pipes;
using System.Threading.Tasks;

namespace NamedPipes
{
    class NamedPipeServerConsole
    {
        static void Main()
        {
            Task server = RunServer();
            server.Wait();

            // make our server hang around so you can see the messages sent
            Console.WriteLine("Press Enter to exit...");
            Console.ReadLine();
        }

        private static async Task RunServer()
        {
            Console.WriteLine("Initiating server, waiting for client...");
            // Start up our named pipe in message mode and close the pipe
            // when done.
            using (NamedPipeServerStream serverPipe = new
                    NamedPipeServerStream("mypipe", PipeDirection.InOut, 1,
                    PipeTransmissionMode.Message, PipeOptions.None))
            {
                // wait for a client...
                await serverPipe.WaitForConnectionAsync();

                // process messages until the client goes away
                while (serverPipe.IsConnected)
                {
                    int bytesRead = 0;
                    byte[] messageBytes = new byte[256];
                    // read until we have the message then respond
                    do
                    {
                        // build up the client message
                        StringBuilder message = new StringBuilder();

                        // check that we can read the pipe
                        if (serverPipe.CanRead)
                        {
                            // loop until the entire message is read
                            do
                            {
                                bytesRead =
                                    await serverPipe.ReadAsync(messageBytes, 0,
                                                  messageBytes.Length);

                                // got bytes from the stream so add them to the
                                // message
                                if (bytesRead > 0)
                                {
                                    message.Append(
                                        Encoding.Unicode.GetString(messageBytes, 0,
                                            bytesRead));
                                    Array.Clear(messageBytes, 0,
                                        messageBytes.Length);
                                }
                            }
                            while (!serverPipe.IsMessageComplete);
                        }

                        // if we got a message, write it out and respond
                        if (message.Length > 0)
                        {
                            // set to zero as we have read the whole message
                            bytesRead = 0;
                            Console.WriteLine($"Received message: " +
                                $"{message.ToString()}");

                            // return the message text we got from the
                            // client in reverse
                            char[] messageChars =
                                message.ToString().Trim().ToCharArray();
                            Array.Reverse(messageChars);
                            string reversedMessageText = new string(messageChars);

                            // show the return message
                            Console.WriteLine($"    Returning Message: " +
                                $"{{reversedMessageText}");

                            // write the response
                            messageBytes = Encoding.Unicode.GetBytes(messageChars);
                            if (serverPipe.CanWrite)
                            {
                                // write the message
                                await serverPipe.WriteAsync(messageBytes, 0,
                                    messageBytes.Length);
                                // flush the buffer
                                await serverPipe.FlushAsync();
                                // wait till read by client
                                serverPipe.WaitForPipeDrain();
                            }
                        }
                    }
                    while (bytesRead != 0);
                }
            }

        }
    }
}
Discussion
Named pipes are a mechanism to allow interprocess or intermachine communications in Windows. The .NET Framework has provided managed access to named pipes, which makes it much easier to utilize named pipes in managed applications. In many cases, you could use Windows Communication Foundation (WCF) to set up the server and client code and even provide a named pipe binding to accomplish this as well. It depends on what your application requirements call for, as well as at what level of the application stack you want to work. If you have an existing application that sets up a named pipe, why use WCF when you can just connect directly? Using named pipes is like using sockets and keeps your code very close to the pipe. The benefit is that there are fewer code layers to process; the drawback is that you have to do more in terms of message processing.
In the Solution, we created some code to use NamedPipeClientStream and NamedPipeServerStream. The interaction between these two goes like this:
-
The server process is started; it fires up a
NamedPipeServerStreamand then callsWaitForConnectionAsyncto wait for a client to connect:// Start up our named pipe in message mode and close the pipe // when done. using (NamedPipeServerStream serverPipe = new NamedPipeServerStream("mypipe", PipeDirection.InOut, 1, PipeTransmissionMode.Message, PipeOptions.None)) { // wait for a client... await serverPipe.WaitForConnectionAsync(); -
The client process is created; it fires up a
NamedPipeClientStream, callsConnectAsync, and connects to the server process:// set up the named pipe client and close it when complete using (NamedPipeClientStream clientPipe = new NamedPipeClientStream(".","mypipe", PipeDirection.InOut,PipeOptions.None)) { // connect to the server stream await clientPipe.ConnectAsync(); -
The server process sees the connection from the client and then calls
IsConnectedin a loop, looking for messages from the client until the connection is gone:// process messages until the client goes away while (serverPipe.IsConnected) { // More processing code in here... } -
The client process then writes a number of messages to the server process using
WriteAsync,FlushAsync, andWaitForPipeDrain:string messageText = "Sample text message!"; // write the message ten times for (int i = 0; i < 10; i++) { Console.WriteLine($"Sending message: {messageText}"); byte[] messageBytes = Encoding.Unicode.GetBytes(messageText); // check and write the message if (clientPipe.CanWrite) { await clientPipe.WriteAsync( messageBytes, 0, messageBytes.Length); await clientPipe.FlushAsync(); // wait till it is read clientPipe.WaitForPipeDrain(); } // response processing.... } -
When the client process receives the response from the server, it reads the message bytes until complete. If the message sending is complete, the
NamedPipeClientStreamgoes out of the scope of theusingstatement and closes (thereby closing the connection on the client side) and then waits to go away when the user presses Enter:// set up a buffer for the message bytes messageBytes = new byte[256]; do { // collect the message bits in the stringbuilder StringBuilder message = new StringBuilder(); // read all of the bits until we have the // complete response message do { // read from the pipe bytesRead = await clientPipe.ReadAsync( messageBytes, 0, messageBytes.Length); // if we got something, add it to the message if (bytesRead > 0) { message.Append( Encoding.Unicode.GetString(messageBytes, 0, bytesRead)); Array.Clear(messageBytes, 0, messageBytes.Length); } } while (!clientPipe.IsMessageComplete); // set to zero as we have read the whole message bytesRead = 0; Console.WriteLine($" Received message: {message.ToString()}"); } while (bytesRead != 0); -
The server process notes that the client has closed the pipe connection via the failed
IsConnectedcall in thewhileloop. TheNamedPipeServerStreamgoes out of the scope of theusingstatement, which closes the pipe.The client output looks like this:
Initiating client, looking for server...
Sending message: Sample text message!
    Received message: !egassem txet elpmaS
Sending message: Sample text message!
    Received message: !egassem txet elpmaS
Sending message: Sample text message!
    Received message: !egassem txet elpmaS
Sending message: Sample text message!
    Received message: !egassem txet elpmaS
Sending message: Sample text message!
    Received message: !egassem txet elpmaS
Sending message: Sample text message!
    Received message: !egassem txet elpmaS
Sending message: Sample text message!
    Received message: !egassem txet elpmaS
Sending message: Sample text message!
    Received message: !egassem txet elpmaS
Sending message: Sample text message!
    Received message: !egassem txet elpmaS
Sending message: Sample text message!
    Received message: !egassem txet elpmaS
Press Enter to exit...
The server output looks like this:
Initiating server, waiting for client...
Received message: Sample text message!
    Returning Message: !egassem txet elpmaS
Received message: Sample text message!
    Returning Message: !egassem txet elpmaS
Received message: Sample text message!
    Returning Message: !egassem txet elpmaS
Received message: Sample text message!
    Returning Message: !egassem txet elpmaS
Received message: Sample text message!
    Returning Message: !egassem txet elpmaS
Received message: Sample text message!
    Returning Message: !egassem txet elpmaS
Received message: Sample text message!
    Returning Message: !egassem txet elpmaS
Received message: Sample text message!
    Returning Message: !egassem txet elpmaS
Received message: Sample text message!
    Returning Message: !egassem txet elpmaS
Received message: Sample text message!
    Returning Message: !egassem txet elpmaS
Press Enter to exit...
The PipeOptions enumeration controls how the pipe operations function. The enumeration values are described in Table 9-3.
| Member name | Description |
|---|---|
None |
No specific options are specified. |
WriteThrough |
When writing to the pipe, operations will not return control until the write is accomplished at the server. Without this flag, writes are buffered, and the write returns more quickly. |
Asychronous |
Enables asynchronous pipe usage (calls return immediately and process in the background). |
See Also
The “Named Pipes,” “NamedPipeClientStream Class,” “NamedPipeServerStream Class,” and “System.IO.Pipes Namespace” topics in the MSDN documentation.
9.14 Pinging Programmatically
Solution
Use the System.Net.NetworkInformation.Ping class to determine if a machine is available. In the TestPing method, create an instance of the Ping class. Send a ping request using the Send method. The SendPingAsync method is asynchronous and when awaited returns a PingReply that you can examine for the result of the ping. You can also perform the second ping request asynchronously using the older SendAsync method, after hooking up to the Ping class for the PingCompleted event. The second parameter of the SendAsync method holds a user token value that will be returned to the pinger_PingCompleted event handler when the ping is complete. SendPingAsync should be used when async and await are available to you, but if you were doing this on an older framework, SendAsync would be your only async option. The token returned can be used to identify requests between the initiation and completion code:
public static async Task TestPing()
{
    System.Net.NetworkInformation.Ping pinger =
        new System.Net.NetworkInformation.Ping();
    PingReply reply = await pinger.SendPingAsync("www.oreilly.com");
    DisplayPingReplyInfo(reply);

    pinger.PingCompleted += pinger_PingCompleted;
    pinger.SendAsync("www.oreilly.com", "oreilly ping");
}
The DisplayPingReplyInfo method shows some of the more common pieces of data you want to get from a ping, such as the RoundtripTime and the Status of the reply. These can be accessed from those properties on the PingReply:
private static void DisplayPingReplyInfo(PingReply reply)
{
    Console.WriteLine("Results from pinging " + reply.Address);
    Console.WriteLine(
        $"	Fragmentation allowed?: {!reply.Options.DontFragment}");
    Console.WriteLine($"	Time to live: {reply.Options.Ttl}");
    Console.WriteLine($"	Roundtrip took: {reply.RoundtripTime}");
    Console.WriteLine($"	Status: {reply.Status.ToString()}");
}
The event handler for the PingCompleted event is the pinger_PingCompleted method. This event handler follows the usual EventHandler convention of the sender object and event arguments. The argument type for this event is PingCompletedEventArgs. The PingReply can be accessed in the Reply property of the event arguments. If the ping was canceled or an exception was thrown, that information can be accessed via the Cancelled and Error properties. The UserState property on the PingCompletedEventArgs class holds the user token value provided in SendAsync:
private static void pinger_PingCompleted(object sender, PingCompletedEventArgs e)
{
    PingReply reply = e.Reply;
    DisplayPingReplyInfo(reply);

    if (e.Cancelled)
        Console.WriteLine($"Ping for {e.UserState.ToString()} was cancelled");
    else
        Console.WriteLine(
            $"Exception thrown during ping: {e.Error?.ToString()}");
}
The output from DisplayPingReplyInfo looks like this:
Results from pinging 23.3.106.121
        Fragmentation allowed?: True
        Time to live: 60
        Roundtrip took: 13
        Status: Success
Discussion
Ping uses an Internet Control Message Protocol (ICMP) echo request message as defined in RFC 792. If a computer is not reached successfully by the ping request, it does not necessarily mean that the computer is unreachable. Many factors can prevent a ping from succeeding aside from the machine being offline. Network topology, firewalls, packet filters, and proxy servers all can interrupt the normal flow of a ping request. By default, Windows Firewall disables ICMP traffic, so if you are having difficulty pinging a machine, check the firewall settings on that machine.
See Also
The “Ping Class,” “PingReply Class,” and “PingCompleted Event” topics in the MSDN documentation.
9.15 Sending SMTP Mail Using the SMTP Service
Solution
Use the System.Net.Mail namespace, which contains classes to take care of the harder parts of constructing an SMTP-based email message. The System.Net.Mail.MailMessage class encapsulates constructing an SMTP-based message, and the System.Net.Mail.SmtpClient class provides the sending mechanism for sending the message to an SMTP server. SmtpClient does depend on there being an SMTP server set up somewhere for it to relay messages through. You add attachments by creating instances of System.Net.Mail.Attachment and providing the path to the file as well as the media type:
// send a message with attachments string from = "[email protected]"; string to = "[email protected]"; MailMessage attachmentMessage = new MailMessage(from, to); attachmentMessage.Subject = "Hi there!"; attachmentMessage.Body = "Check out this cool code!"; // many systems filter out HTML mail that is relayed attachmentMessage.IsBodyHtml = false; // set up the attachment string pathToCode = @"....�9_NetworkingAndWeb.cs"; Attachment attachment = new Attachment(pathToCode, MediaTypeNames.Application.Octet); attachmentMessage.Attachments.Add(attachment); // or just send text MailMessage textMessage = new MailMessage("[email protected]", "[email protected]", "Me again", "You need therapy, talking to yourself is one thing but writing code to send email is a whole other thing...");
To send a simple email with no attachments, call the System.Net.Mail.MailMessage constructor with just the to address, from address, subject, and body information. This version of the MailMessage constructor simply fills in those items, and then you can pass it to SmtpClient.Send to send it along:
// If you have one, you can bounce this off the local SMTP service.
// The local SMTP service needs to have relaying set up to go through
// a real email server like you used to be able to do in IIS6...
//SmtpClient client = new SmtpClient("localhost");

// Since we live in a more security-conscious time, we would provide the
// correct parameters to connect to the SMTP server with the hostname,
// port, SSL enabled, and your credentials.
// NOTE: If you don't replace the current values you will get a
// XXX exception like this:
// System.Net.Mail.SmtpException: The SMTP host was not found. --->
// System.Net.WebException: The remote name could not be resolved:
// 'YOURSMTPSERVERHERE'
using (SmtpClient client = new SmtpClient("YOURSMTPSERVERHERE", 999))
{
    client.EnableSsl = true;
    client.Credentials = new NetworkCredential("YOURSMTPUSERNAME",
    // "YOURSMTPPASSWORD");
    await client.SendMailAsync(attachmentMessage);
}
Discussion
SMTP stands for Simple Mail Transfer Protocol, as defined in RFC 2821. To take advantage of the support for SMTP mail in the .NET Framework using the System.Net.Mail.SmtpClient class, you must specify an SMTP server to relay the messages through. In older versions of Windows (pre–Windows 8/Windows Server 2012), the operating system came with an SMTP server that could be installed as part of IIS. In the Solution, the code shows how you could use the SmtpClient to take advantage of this feature by specifying "localhost" for the server to connect to, which indicates that the local machine is the SMTP relay server. Setting up the SMTP service may not be possible in your network environment, and you may need to use the SmtpClient class to set up credentials to connect to the SMTP server on the network directly, as shown in the Solution:
using(SmtpClient client = new SmtpClient("YOURSMTPSERVERHERE",999))
{
    client.EnableSsl = true;
    client.Credentials = new NetworkCredential("YOURSMTPUSERNAME",
    // "YOURSMTPPASSWORD");
    await client.SendMailAsync(attachmentMessage);
}
The MediaTypeNames.class used in the Solution identifies the attachment type. The valid attachment types are listed in Table 9-4.
| Name | Description |
|---|---|
Octet |
The data is not interpreted as any specific type. |
Pdf |
The data is in Portable Data Format. |
Rtf |
The data is in Rich Text Format. |
Soap |
The data is a SOAP document. |
Zip |
The data is compressed. |
See Also
The “Using SMTP for Outgoing Messages,” “SmtpMail Class,” “MailMessage Class,” and “MailAttachment Class” topics in the MSDN documentation.
9.16 Using Sockets to Scan the Ports on a Machine
Solution
Use the CheapoPortScanner class constructed for your use; its code is shown in Example 9-8. CheapoPortScanner uses the Socket class to attempt to open a socket and connect to an address on a given port. The ScanAsync method supports reporting progress via IProgress<T> for each port in the range supplied to the CheapoPortScanner constructor or in the default range (1 to 65535). By default, CheapoPortScanner will scan the local machine.
Example 9-8. CheapoPortScanner class
public class CheapoPortScanner
{
    #region Private consts and members
    private const int PORT_MIN_VALUE = 1;
    private const int PORT_MAX_VALUE = 65535;
    private List<int> _openPorts;
    private List<int> _closedPorts;
    #endregion
There are two properties on CheapoPortScanner that bear mentioning. The OpenPorts and ClosedPorts properties return a ReadOnlyCollection of type int that is a list of the port numbers that are open and closed, respectively. Their code is shown in Example 9-9.
Example 9-9. OpenPorts and ClosedPorts properties
#region Properties
public ReadOnlyCollection<int> OpenPorts =>
    new ReadOnlyCollection<int>(_openPorts);
public ReadOnlyCollection<int> ClosedPorts =>
    new ReadOnlyCollection<int>(_closedPorts);

public int MinPort { get; } = PORT_MIN_VALUE;
public int MaxPort { get; } = PORT_MAX_VALUE;
public string Host { get; } = "127.0.0.1"; // localhost

#endregion // Properties
#region CTORs & Init code
public CheapoPortScanner()
{
    // defaults are already set for ports and localhost
    SetupLists();
}

public CheapoPortScanner(string host, int minPort, int maxPort)
{
    if (minPort > maxPort)
        throw new ArgumentException("Min port cannot be greater than max port");
    if (minPort < PORT_MIN_VALUE || minPort > PORT_MAX_VALUE)
        throw new ArgumentOutOfRangeException(
            $"Min port cannot be less than {PORT_MIN_VALUE} " +
            $"or greater than {PORT_MAX_VALUE}");
    if (maxPort < PORT_MIN_VALUE || maxPort > PORT_MAX_VALUE)
        throw new ArgumentOutOfRangeException(
            $"Max port cannot be less than {PORT_MIN_VALUE} " +
            $"or greater than {PORT_MAX_VALUE}");

    this.Host = host;
    this.MinPort = minPort;
    this.MaxPort = maxPort;
    SetupLists();
}

private void SetupLists()
{
    // set up lists with capacity to hold half of range
    // since we can't know how many ports are going to be open
    // so we compromise and allocate enough for half

    // rangeCount is max - min + 1
    int rangeCount = (this.MaxPort - this.MinPort) + 1;
    // if there are an odd number, bump by one to get one extra slot
    if (rangeCount % 2 != 0)
        rangeCount += 1;
    // reserve half the ports in the range for each
    _openPorts = new List<int>(rangeCount / 2);
    _closedPorts = new List<int>(rangeCount / 2);
}
#endregion // CTORs & Init code

#region Progress Result
public class PortScanResult
{
    public int PortNum { get; set; }

    public bool IsPortOpen { get; set; }
}

#endregion // Progress Result

#region Private Methods
private async Task CheckPortAsync(int port, IProgress<PortScanResult> progress)
{
    if (await IsPortOpenAsync(port))
    {
        // if we got here it is open
        _openPorts.Add(port);

        // notify anyone paying attention
        progress?.Report(
            new PortScanResult() { PortNum = port, IsPortOpen = true });
    }
    else
    {
        // server doesn't have that port open
        _closedPorts.Add(port);
        progress?.Report(
            new PortScanResult() { PortNum = port, IsPortOpen = false });
    }
}

private async Task<bool> IsPortOpenAsync(int port)
{
    Socket sock = null;
    try
    {
        // make a TCP based socket
        sock = new Socket(AddressFamily.InterNetwork,
                        SocketType.Stream,
                        ProtocolType.Tcp);
        // connect
        await Task.Run(() => sock.Connect(this.Host, port));
        return true;
    }
    catch (SocketException se)
    {
        if (se.SocketErrorCode == SocketError.ConnectionRefused)
            return false;
        else
        {
            //An error occurred when attempting to access the socket.
            Debug.WriteLine(se.ToString());
            Console.WriteLine(se.ToString());
        }
    }
    finally
    {
        if (sock?.Connected ?? false)
            sock?.Disconnect(false);
        sock?.Close();
    }
    return false;
}
#endregion
The trigger method for the CheapoPortScanner is ScanAsync. ScanAsync will check all of the ports in the range specified in the constructor. The LastPortScanSummary method will dump the pertinent information about the last scan to the console output stream:
    #region Public Methods
    public async Task ScanAsync(IProgress<PortScanResult> progress)
    {
        for (int port = this.MinPort; port <= this.MaxPort; port++)
            await CheckPortAsync(port, progress);
    }

    public void LastPortScanSummary()
    {
        Console.WriteLine($"Port Scan for host at {this.Host}");
        Console.WriteLine($"	Starting Port: {this.MinPort}");
        Console.WriteLine($"	Ending Port: {this.MaxPort}");
        Console.WriteLine($"	Open ports: {string.Join(",", _openPorts)}");
        Console.WriteLine($"	Closed ports: {string.Join(",", _closedPorts)}");
    }

    #endregion // Public Methods
}
The TestPortScanner method demonstrates how to use CheapoPortScanner by scanning ports 75–85 on the local machine. A Progress<CheapoPortScanner.PortScanResult> reporter is created and in the ProgressChanged event is subscribed to with an anonymous method to report the progress for the scan. Next, TestPortScanner calls the ScanAsync method with the Progress<T> we created to get progress reports as the scanner works. Finally, it calls LastPortScanSummary to show the full results of the scan, including the closed ports as well as the open ones:
public static async Task TestPortScanner()
{
    // do a specific range
    Console.WriteLine("Checking ports 75-85 on localhost...");
    CheapoPortScanner cps =
        new CheapoPortScanner("127.0.0.1", 75, 85);
    var progress = new Progress<CheapoPortScanner.PortScanResult>();
    progress.ProgressChanged += (sender, args) =>
    {
        Console.WriteLine(
            $"Port {args.PortNum} is " +
            $"{args.IsPortOpen ? "open" : "closed"}");
    };
    await cps.ScanAsync(progress);
    cps.LastPortScanSummary();

    // do the local machine, whole port range 1-65535
    //cps = new CheapoPortScanner();
    //await cps.Scan(progress);
    //cps.LastPortScanSummary();
}
Here is the output for the port scanner as shown:
Checking ports 75-85 on localhost...
Port 75 is closed
Port 76 is closed
Port 77 is closed
Port 78 is closed
Port 79 is closed
Port 80 is open
Port 81 is closed
Port 82 is closed
Port 83 is closed
Port 84 is closed
Port 85 is closed
Port Scan for host at 127.0.0.1
        Starting Port: 75
        Ending Port: 85
        Open ports: 80
        Closed ports: 75,76,77,78,79,81,82,83,84,85
Discussion
Open ports on a machine are significant because they indicate the presence of a program listening on them. Hackers look for “open” ports as ways to enter your systems without permission. CheapoPortScanner is an admittedly rudimentary mechanism for checking for open ports, but it demonstrates the principle well enough to provide a good starting point.
Warning
If you run this on a corporate network, you may quickly get a visit from your network administrator, as you may set off alarms in some intrusion-detection systems. Be judicious in your use of this code.
See Also
The “Socket Class” and “Sockets” topics in the MSDN documentation.
9.17 Using the Current Internet Connection Settings
Solution
Read the current Internet connectivity settings with the InternetSettingsReader class provided for you in Example 9-10. InternetSettingsReader calls some methods of the WinINet API via P/Invoke to retrieve current Internet connection information.
Note
P/Invoke (Platform Invoke) is the .NET Framework mechanism for performing native calls into unmanaged (not run in the .NET CLR) code. When you are using P/Invoke, the data being passed between managed and unmanaged code needs to be marshaled across that boundary. Marshaling is the process of making the calls between the layers and converting the parameter and return data from managed to unmanaged types and then back again. Typically structures are used to transfer sets of data, as they are value types on the stack and can be used as in/out parameters to transfer the data, whereas classes are reference types that would exist on the heap and typically can only be used as in parameters.
You do the majority of the work in setting up the structures that WinINet uses and then marshaling the structure pointers correctly to retrieve the values.
Example 9-10. InternetSettingsReader class
public class InternetSettingsReader
{
    #region Private Members
    string _proxyAddr;
    int _proxyPort = -1;
    bool _bypassLocal;
    string _autoConfigAddr;
    List<string> _proxyExceptions;
    PerConnFlags _flags;
    #endregion

    #region CTOR
    public InternetSettingsReader()
    {
    }
    #endregion
Each property of InternetSettingsReader shown in Example 9-11 calls into the GetInternetConnectionOption method, which returns an InternetConnectionOption. The InternetConnectionOption structure holds all of the pertinent data for the value being returned, and that value is then retrieved based on what type of value was requested by the specific properties.
Example 9-11. InternetSettingsReader properties
#region Properties
public string ProxyAddress
{
    get
    {
        InternetConnectionOption ico =
            GetInternetConnectionOption(
                PerConnOption.INTERNET_PER_CONN_PROXY_SERVER);
        // parse out the addr and port
        string proxyInfo = Marshal.PtrToStringUni(
                                ico.m_Value.m_StringPtr);
        ParseProxyInfo(proxyInfo);
        return _proxyAddr;
    }
}
public int ProxyPort
{
    get
    {
        InternetConnectionOption ico =
            GetInternetConnectionOption(
                PerConnOption.INTERNET_PER_CONN_PROXY_SERVER);
        // parse out the addr and port
        string proxyInfo = Marshal.PtrToStringUni(
                                ico.m_Value.m_StringPtr);
        ParseProxyInfo(proxyInfo);
        return _proxyPort;
    }
}
public bool BypassLocalAddresses
{
    get
    {
        InternetConnectionOption ico =
            GetInternetConnectionOption(
                PerConnOption.INTERNET_PER_CONN_PROXY_BYPASS);
        // bypass is listed as <local> in the exceptions list
        string exceptions =
            Marshal.PtrToStringUni(ico.m_Value.m_StringPtr);

        if (exceptions.IndexOf("<local>") != -1)
            _bypassLocal = true;
        else
            _bypassLocal = false;
        return _bypassLocal;
    }
}
public string AutoConfigurationAddress
{
    get
    {
        InternetConnectionOption ico =
            GetInternetConnectionOption(
                PerConnOption.INTERNET_PER_CONN_AUTOCONFIG_URL);
        // get these straight
        _autoConfigAddr =
            Marshal.PtrToStringUni(ico.m_Value.m_StringPtr);
        if (_autoConfigAddr == null)
            _autoConfigAddr = "";
        return _autoConfigAddr;
    }
}
public IList<string> ProxyExceptions
{
    get
    {
        InternetConnectionOption ico =
            GetInternetConnectionOption(
                PerConnOption.INTERNET_PER_CONN_PROXY_BYPASS);
        // exceptions are seperated by semi colon
        string exceptions =
            Marshal.PtrToStringUni(ico.m_Value.m_StringPtr);
        if (!string.IsNullOrEmpty(exceptions))
        {
            _proxyExceptions = new List<string>(exceptions.Split(';'));
        }
        return _proxyExceptions;
    }
}
public PerConnFlags ConnectionType
{
    get
    {
        InternetConnectionOption ico =
            GetInternetConnectionOption(
                PerConnOption.INTERNET_PER_CONN_FLAGS);
        _flags = (PerConnFlags)ico.m_Value.m_Int;

        return _flags;
    }
}

#endregion

#region Private Methods
private void ParseProxyInfo(string proxyInfo)
{
    if (!string.IsNullOrEmpty(proxyInfo))
    {
        string[] parts = proxyInfo.Split(':'),
        if (parts.Length == 2)
        {
            _proxyAddr = parts[0];
            try
            {
                _proxyPort = Convert.ToInt32(parts[1]);
            }
            catch (FormatException)
            {
                // no port
                _proxyPort = -1;
            }
        }
        else
        {
            _proxyAddr = parts[0];
            _proxyPort = -1;
        }
    }
}
The GetInternetConnectionOption method shown in Example 9-12 does the heavy lifting as far as communicating with WinINet. First, an InternetPerConnOptionList is created as well as an InternetConnectionOption structure to hold the returned value. The InternetConnectionOption structure is then pinned so that the garbage collector does not move the structure in memory, and the PerConnOption value is assigned to determine what Internet option to retrieve. Marshal.SizeOf is used to determine the size of the two managed structures in unmanaged memory. These values are used to initialize the size values for the structures, which allows the operating system to determine the version of the unmanaged structure it’s dealing with.
The InternetPerConnOptionList is initialized to hold the option values, and then the WinINet function InternetQueryOption is called. You fill the InternetConnectionOption type by using the Marshal.PtrToStructure method, which maps the data from the unmanaged structure containing the InternetConnectionOption data from unmanaged code to the managed object instance, and then the managed version is returned with the value.
Example 9-12. GetInternetConnectionOption method
    private static InternetConnectionOption GetInternetConnectionOption(
        PerConnOption pco)
    {
        //Allocate the list and option.
        InternetPerConnOptionList perConnOptList = new InternetPerConnOptionList();
        InternetConnectionOption ico = new InternetConnectionOption();
        //pin the option structure
        GCHandle gch = GCHandle.Alloc(ico, GCHandleType.Pinned);
        //initialize the option for the data we want
        ico.m_Option = pco;
        //Initialize the option list for the default connection or LAN.
        int listSize = Marshal.SizeOf(perConnOptList);
        perConnOptList.dwSize = listSize;
        perConnOptList.szConnection = IntPtr.Zero;
        perConnOptList.dwOptionCount = 1;
        perConnOptList.dwOptionError = 0;
        // figure out sizes & offsets
        int icoSize = Marshal.SizeOf(ico);
        // alloc enough memory for the option (native memory not .NET heap)
        perConnOptList.options =
            Marshal.AllocCoTaskMem(icoSize);

        // Make pointer from the structure
        IntPtr optionListPtr = perConnOptList.options;
        Marshal.StructureToPtr(ico, optionListPtr, false);

        //Make the query
        if (NativeMethods.InternetQueryOption(
            IntPtr.Zero,
            75, //(int)InternetOption.INTERNET_OPTION_PER_CONNECTION_OPTION,
            ref perConnOptList,
            ref listSize) == true)
        {
            //retrieve the value
            ico =
                (InternetConnectionOption)Marshal.PtrToStructure(
                                        perConnOptList.options,
                                        typeof(InternetConnectionOption));
        }
        // free the COM memory
        Marshal.FreeCoTaskMem(perConnOptList.options);
        //unpin the structs
        gch.Free();

        return ico;
    }
    #endregion
}
The use of InternetSettingsReader is demonstrated in the GetInternetSettings method shown in Example 9-13. The proxy information is retrieved and displayed to the console here, but could easily be stored in another program for use as proxy information when connecting. See Recipe 9.3 for details on setting up the proxy information for a WebRequest.
Example 9-13. Using the InternetSettingsReader
public static void GetInternetSettings()
{
        Console.WriteLine("");
        Console.WriteLine("Reading current internet connection settings");
        InternetSettingsReader isr = new InternetSettingsReader();
        Console.WriteLine($"Current Proxy Address: {isr.ProxyAddress}");
        Console.WriteLine($"Current Proxy Port: {isr.ProxyPort}");
        Console.WriteLine($"Current ByPass Local Address setting: " +
            $"{{isr.BypassLocalAddresses}");
        Console.WriteLine("Exception addresses for proxy (bypass):");
        string exceptions;
        if (isr.ProxyExceptions?.Count > 0)
            exceptions = "	" + (string.Join(",", isr.ProxyExceptions?.ToArray()));
        else
            exceptions = "	None";
        Console.WriteLine($"Proxy connection type: {isr.ConnectionType.ToString()}");
        Console.WriteLine("");
}
Here is the output for the Solution:
Reading current internet connection settings
Current Proxy Address: http=127.0.0.1
Current Proxy Port: -1
Current ByPass Local Address setting: False
Exception addresses for proxy (bypass):
        <-loopback>
Proxy connection type: PROXY_TYPE_DIRECT
Discussion
The WinInet Windows Internet (WinInet) API is the unmanaged API for interacting with the FTP, HTTP, and Gopher protocols. This API can be used to fill in where managed code leaves off, such as with the Internet configuration settings shown in the Solution. It can also be used for downloading files, working with cookies, and participating in Gopher sessions. Keep in mind that WinInet is meant to be a client-side API and is not suited for server-side or service applications; issues could arise in your application from improper usage.
There is a huge amount of information available to the C# programmer directly through the BCL (base class library), but at times you still need to roll up your sleeves and talk to the Win32 API. Even in situations in which restricted privileges are the norm, it is not always out of bounds to create a small assembly that needs enhanced access to do P/Invoke. It can have its access locked down so as not to become a risk to the system. We show how you could restrict an assembly like this in Recipe 11.6, and you would need to assert the SecurityPermission with SecurityPermissionFlag.UnmanagedCode.
See Also
The “InternetQueryOption Function [WinInet],” “Interoperating with Unmanaged Code,” and “Using P/Invoke to Call Unmanaged APIs from Your Managed Classes” topics in the MSDN documentation.
9.18 Transferring Files Using FTP
Solution
Use the System.Net.FtpWebRequest class to perform these operations. You create FtpWebRequests from the WebRequest class’s Create method by specifying the URI for the FTP download. In the example that follows, the source code from the latest edition of the C# Cookbook is the target for the download. A FileStream is opened for the target and then is wrapped by a BinaryWriter. A BinaryReader is created with the response stream from the FtpWebRequest. Then, the stream is read, and the target is written until the entire file has been downloaded. This series of operations is demonstrated in Example 9-14 in the FtpDownloadAsync method.
Example 9-14. Using the System.Net.FtpWebRequest class
public static async Task FtpDownloadAsync(Uri ftpSite, string targetPath)
{
    try
    {
        FtpWebRequest request =
            (FtpWebRequest)WebRequest.Create(
            ftpSite);

        request.Credentials = new NetworkCredential("anonymous",
            "[email protected]");
        using (FtpWebResponse response =
            (FtpWebResponse)await request.GetResponseAsync())
        {
            Stream data = response.GetResponseStream();
            File.Delete(targetPath);
            Console.WriteLine(
                $"Downloading {ftpSite.AbsoluteUri} to {targetPath}...");

            byte[] byteBuffer = new byte[4096];
            using (FileStream output = new FileStream(targetPath, FileMode.CreateNew,
                FileAccess.ReadWrite,FileShare.ReadWrite, 4096, useAsync: true))
            {
                int bytesRead = 0;
                do
                {
                    bytesRead = await data.ReadAsync(byteBuffer, 0,
                        byteBuffer.Length);
                    if (bytesRead > 0)
                        await output.WriteAsync(byteBuffer, 0, bytesRead);
                }
                while (bytesRead > 0);
            }
            Console.WriteLine($"Downloaded {ftpSite.AbsoluteUri} to {targetPath}");
        }
    }
    catch (WebException e)
    {
        Console.WriteLine(
            $"Failed to download {ftpSite.AbsoluteUri} to {targetPath}");
        Console.WriteLine(e);
    }
}
Here is an example of calling the FtpDownloadAsync method:
Uri downloadFtpSite =
   new Uri("ftp://ftp.oreilly.com/pub/examples/csharpckbk/CSharpCookbook.zip");
string targetPath = "CSharpCookbook.zip";
await NetworkingAndWeb.FtpDownloadAsync(downloadFtpSite, targetPath);
To upload a file, use FtpWebRequest to get a stream on the request using GetRequestStream and use it to upload the file. Once the file has been opened and written into the request stream, execute the request by calling GetResponse and check the StatusDescription property for the result of the operation. This is demonstrated here in the FtpUploadAsync method:
public static async Task FtpUploadAsync(Uri ftpSite, string uploadFile)
{
    Console.WriteLine($"Uploading {uploadFile} to {ftpSite.AbsoluteUri}...");
    try
    {
        FileInfo fileInfo = new FileInfo(uploadFile);
        FtpWebRequest request =
            (FtpWebRequest)WebRequest.Create(
            ftpSite);
        request.Method = WebRequestMethods.Ftp.UploadFile;
        //if working with text files and going across operating system platforms,
        //you might want to set this value to false to avoid line ending problems
        request.UseBinary = true;
        request.ContentLength = fileInfo.Length;
        request.Credentials = new NetworkCredential("anonymous",
            "[email protected]");
        byte[] byteBuffer = new byte[4096];
        using (Stream requestStream = await request.GetRequestStreamAsync())
        {
            using (FileStream fileStream =
                new FileStream(uploadFile, FileMode.Open, FileAccess.Read,
                FileShare.Read, 4096, useAsync: true))
            {
                int bytesRead = 0;
                do
                {
                    bytesRead = await fileStream.ReadAsync(byteBuffer, 0,
                                    byteBuffer.Length);
                    if (bytesRead > 0)
                        await requestStream.WriteAsync(byteBuffer, 0, bytesRead);
                }
                while (bytesRead > 0);
            }
        }
        using (FtpWebResponse response =
              (FtpWebResponse) await request.GetResponseAsync())
        {
            Console.WriteLine(response.StatusDescription);
        }
        Console.WriteLine($"Uploaded {uploadFile} to {ftpSite.AbsoluteUri}...");
    }
    catch (WebException e)
    {
        Console.WriteLine(
            $"Failed to upload {uploadFile} to {ftpSite.AbsoluteUri}.");
        Console.WriteLine(((FtpWebResponse)e.Response).StatusDescription);
        Console.WriteLine(e);
    }
}
Here is an example of calling the FtpUploadAsync method:
string uploadFile = "SampleClassLibrary.dll";
Uri uploadFtpSite =
    new Uri($"ftp://localhost/{uploadFile}");
await NetworkingAndWeb.FtpUploadAsync(uploadFtpSite, uploadFile);
Discussion
The File Transfer Protocol is defined in RFC 959 and is one of the main ways files are distributed over the Internet. The port number for FTP is usually 21. Happily, you don’t have to really know much about how FTP works in order to use it. This could be useful to your applications in automatic download of information from a dedicated FTP site or in providing automatic update capabilities.
See Also
The “FtpWebRequest Class,” “FtpWebResponse Class,” “WebRequest Class,” and “WebResponse Class” topics in the MSDN documentation.