
3. CSS Basics
In This Chapter
Inline: Adding Styles to an HTML Tag
Embedded: Adding Styles to a Web Page
External: Adding Styles to a Web Site
Grouping: Defining Elements That Are Using the Same Styles
CSS lets you control all the elements of your document’s appearance—fonts, text, colors, backgrounds, sizes, borders, spacing, positioning, visual effects, tables, and lists. It even allows you to control the spatial and temporal styles of elements using transitions and transformations. However, the real power of using CSS for styles is that you can change the appearance of every page on your Web site by changing only a few lines of CSS code.
With savvy use of CSS, you can start with a plain web page, add visual design and interaction, and turn it into a webbed environment.
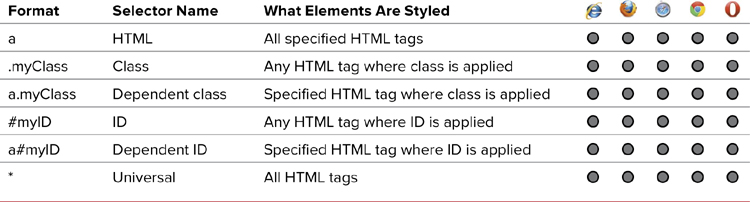
The Basic CSS Selectors
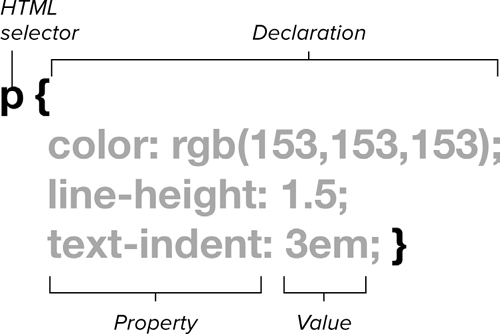
CSS works by defining the styles of the elements on a Web page using CSS rules. Rules are applied using selectors, which come in four basic varieties: HTML selectors are used to reference a specific tag; class selectors are applied individually to elements; ID selectors are applied to a single element on the page; and universal selectors are applied to all elements on the page (Table 3.1). You will use these four basic selectors constantly, and they are the best place to start. In Chapter 4, you will learn about using other selectors for creating more selective styling.
Inline: Adding Styles to an HTML Tag
Although using CSS means you do not have to set the appearance of each tag individually, you still have the freedom to set a style within an individual tag, using an inline style ![]() .
.
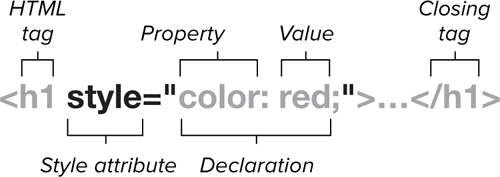
![]() The general syntax for defining styles directly in an HTML tag.
The general syntax for defining styles directly in an HTML tag.
This is useful when you’ve set styles for the page in the head or in an external style sheet, and you need to override those styles on a case-by-case basis. However, you should only do this as a last resort. Because inline styles have the highest priority in the cascade order, they are virtually impossible to override. (See “Why You Should Never, EVER Use Inline Styles in Your Final Web Site...Mostly.”)
To set the style properties of individual HTML tags
1. Add the style property to the HTML tag. Type style= in the HTML tag to which you want to apply styles (Code 3.1)
<h1 style=
2. Add your CSS declarations in a comma-separated list. In quotes, type your style declarations in the format property: value, using a semicolon (;) and separating individual declarations. Be sure to close the declaration list with quotation marks.
"color:red;"
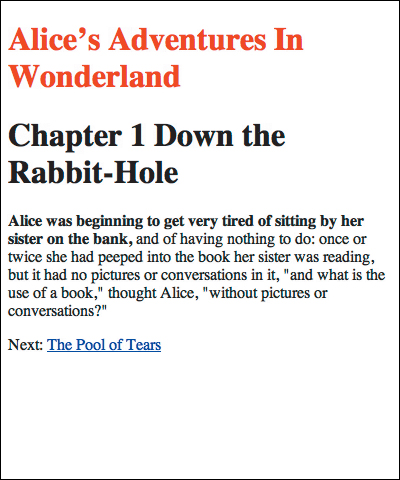
![]() The results of Code 3.1. The header level 1 has been set to red, rather than the default black.
The results of Code 3.1. The header level 1 has been set to red, rather than the default black.
Code 3.1. An inline style is applied to the h1 tag to define the color ![]() .
.
<!-- HTML5 -->
<!DOCTYPE html>
<html lang="en">
<head>
<meta charset=UTF-8">
<title>Alice’s Adventures in Wonderland</title>
</head>
<body>
<h1 style="color:red;">Alice’s Adventures In Wonderland</h1>
<h1 id="ch01">Chapter 1 <span class="chaptertitle">Down the Rabbit-Hole</h1>
<p><strong>Alice was beginning to get very tired of sitting by her sister on the bank,</strong> and of having nothing to do: once or twice she had peeped into the book her sister was reading, but it had no pictures or conversations in it, "and what is the use of a book," thought Alice, "without pictures or conversations?"</p>
</article>
<footer><nav> Next:
<a class="chaptertitle" href="AAIWL-ch02.html">The Pool of Tears</a>
</nav></footer>
</body>
</html>
3. Finish your HTML tag and add content. After closing the tag, add the content to be styled. Then close the tag pair with the corresponding end tag.
>Alice’s Adventures In Wonderland</h1>
If you have conflicting styles applied to the same element, the cascade order determines which is applied, as explained in detail in “Determining the Cascade Order” in Chapter 5.
You should never use inline styles in your final Web site. See the sidebar, “Why You Should Never, EVER Use Inline Styles in Your Final Web Site...Mostly” in this chapter.
So as not to confuse the browser, it is best to use double quotation marks (“...”) around the declaration list and single quotation marks (‘...’) around any values in the declaration list, such as font names with spaces.
Font names made up of more than two words are placed in single quotes (‘Font Name’) when used with a style.
When you are copying and pasting code from an application such as Microsoft Word into a Web-editing application such as Adobe Dreamweaver, make sure that you convert all smart quotes (“...”) to straight quotes (“...”).
A common mistake is to confuse the equals sign (=) with the colon (:). Although the style attribute in the tag uses an equals sign, remember that CSS declarations always use a colon.
Embedded: Adding Styles to a Web Page
To add styles that apply to a single Web page—rather than just a single element (inline) or an entire Web site (external)—you embed the style rules in the Web page using the <style> tag, which in turn will hold all your style rules ![]() .
.
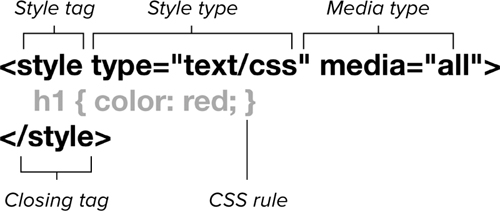
![]() The general syntax of a style tag placed in an HTML document.
The general syntax of a style tag placed in an HTML document.
Adding styles in this manner can look identical to adding styles directly to an HTML tag (as seen in the previous section). However, when you place styles in a common location—preferably in the <head> of the document—you can easily change all the styles in a document. For example, rather than specifying the style of a single <h1 id="ch01"> tag, you can specify the style of all the <h1 id="ch01"> tags on the entire page, and then change the rule in one place to change the appearance of all level 1 headers on that page.
Code 3.2. Style rules are added within the <style> tag. A rule is added for the level 1 header to set its color, but it has no effect ![]() because the inline style overrides it. That’s why you should never use inline styles in your final code.
because the inline style overrides it. That’s why you should never use inline styles in your final code.
<!-- HTML5 -->
<!DOCTYPE html>
<html lang="en">
<head>
<meta charset="UTF-8">
<title>Alice’s Adventures in Wonderland</title>
<style type="text/css" media="all">
h1 {
color: orange;
font-size: 3em;
font-weight: normal; }
h1 .chaptertitle {
color: yellow;
font-size: .5em; }
</style>
</head>
<body>
<h1 style="color:red;">Alice’s Adventures In Wonderland</h1>
<h1 id="ch01">Chapter 1 <span class="chaptertitle">Down the Rabbit-Hole</span></h1>
<p><strong>Alice was beginning to get very tired of sitting by her sister on the bank,</strong> and of having nothing to do: once or twice she had peeped into the book her sister was reading, but it had no pictures or conversations in it, "and what is the use of a book," thought Alice, "without pictures or conversations?"</p>
</article>
<footer><nav> Next:
<a class="chaptertitle" href="AAIWL-ch02.html">The Pool of Tears</a>
</nav></footer>
</body>
</html>
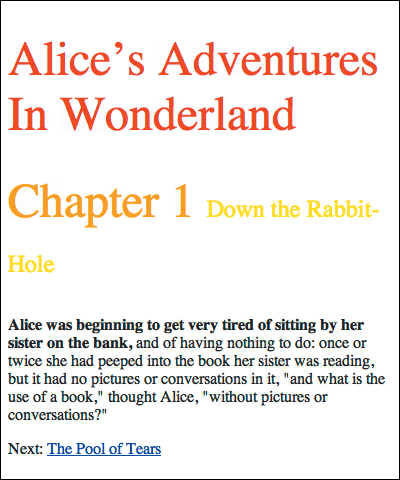
![]() The results of Code 3.2. Notice that although the h1 selector in the <style> tag specifies the color as orange, it does not override the inline style for the first h1 tag, which remains stubbornly red.
The results of Code 3.2. Notice that although the h1 selector in the <style> tag specifies the color as orange, it does not override the inline style for the first h1 tag, which remains stubbornly red.
To set the style for tags in an HTML document
1. Type the opening style tag in the head of your document (Code 3.2). Define the type attribute as "text/css", which defines the styles that follow as CSS, not just any style. Also, define the media type using a value of all, which will apply the style sheet to the page regardless of the type of machine used to output it (see “Querying the Media” in Chapter 4). Then close the style tag.
<style type="text/css" media="all">...</style>
2. Add your CSS rules. Within the style container from Step 1, start a new rule by typing the selector to which you want to add styles, followed by opening and closing curly brackets ({}). (Basic selectors—HTML, class, IDs, and universal—are explained earlier in this chapter, and contextual selectors are explained in Chapter 4.)
h1 {...}
Within the brackets of your rule, type the declarations to be assigned to this rule—formatted as property: value—using a semicolon (;) and separating individual declarations in the list.
3. Add all the CSS rules you want to define. Rules obey the cascade order (explained in detail in “Determining the Cascade Order” in Chapter 5). But generally, you can overrule a style by rewriting it lower in the list.
To make a rule more easily readable, you can also add one or more line breaks, spaces, or tabs after a declaration without interfering with the code.
Although you can place embedded styles anywhere in your HTML document, I highly recommend placing them at the top of your documents in the <head>; otherwise, the page will display without the styles at first and then blink as the page redisplays with the styles.
However, I do not recommend placing embedded styles in your final Web page at all. Although they aren’t as difficult to override as inline styles, embedded styles can confound you later when trying to redesign a page. It’s always best to put all your styles in an external style sheet (explained in the next section) where site-wide changes are easy to make.
External: Adding Styles to a Web Site
A major benefit of CSS is that you can create a style sheet once and use it either in a single Web page or throughout your entire Web site. To do this, you create an external CSS file separate from the HTML document that contains only CSS code—no HTML, JavaScript, or any other code.
Establishing an external CSS file is a two-step process. First, you set up the CSS rules in a text file. Second, you link or import this file into an HTML document using the <link> tag or the @import rule ![]() .
.

![]() External CSS files can be used to style HTML pages directly by linking or importing them.
External CSS files can be used to style HTML pages directly by linking or importing them.
Creating an external style sheet
The first step in using an external style sheet globally on a Web site is to create the external file that contains all the CSS code. However, unlike adding embedded styles, you do not use <style> tags in an external CSS file. In fact, doing so would cause the external style sheet to fail.
In this example, I set up three CSS files: global.css, ch01.css, and ch12.css.
To set up an external CSS file
1. Create a new text file. You can use a text editor or Web-editing software. Save the file using the .css extension. For example, global.css.
Notepad or SimpleText will do, but you may want to use a specialized code editing software program such as Coda or BBEdit.
Do not use Microsoft Word. It adds its own markup code that will interfere with your CSS code.
2. Import CSS files. This is optional, but you can create as many external style sheets as you want and import style sheets into each other to combine their styles (Code 3.4 and Code 3.5). However, if an import rule is included in an external style sheet, it must be placed before all other CSS code. See “Importing a style sheet” in this chapter for more information.
@import{global.css}
Code 3.3. global.css—All the basic styles for the Web site are contained in the default external style sheet.
body {
padding: 220px 0 0 180px; }
h1 {
color: green;
font-size: 3em;
font-weight: bold; }
h1 .chaptertitle {
color: blue;
font-size: .5em;
font-weight: normal; }
p {
color: violet;
font-size: 1.5em;
line-height: 2; }
Code 3.4. ch01.css—Adds a special background image for Chapter 1.
body { background: white url('alice23a.gif') no-repeat 0 0; }
Code 3.5. ch12.css—Adds a specific image for Chapter 12.
body { background: white url('alice40b.gif') no-repeat 0 0; }
3. Add your CSS rules to the text file (Code 3.3). Do not include any other code types—no HTML or JavaScript.
Start a new rule by typing the selector to which you want to add styles, followed by opening and closing curly brackets ({}). (Basic selectors—HTML, class, IDs, and universal—are explained in this chapter, and contextual selectors are explained in Chapter 4.)
h1 { color: green;
font-size: 3em; font-weight: bold; }
In the brackets of your rule, type the declarations to be assigned to this rule—formatted as property: value—using a semicolon (;) and separating individual declarations in the list. (You can also add comments as explained later in this chapter.)
You can now connect this file to your Web pages using one of the following two methods:
• Link. Use the <link> tag to connect external CSS files to an HTML file.
• Import. Use @import to connect external CSS files to an HTML file.
Although the external CSS file can have any name, it’s a good idea to use a name that will remind you of the purpose of these styles. The name “navigation.css,” for example, is probably a more helpful name than “657nm87gp.css.”
A CSS file should not contain any HTML tags (especially not the <style> tag) or other content, with the exception of CSS comments and imported styles.
Linking to a style sheet
External style sheet files can be applied to any HTML file using the <link> tag ![]() . Linking a CSS file affects the document in the same way as if the styles had been embedded directly in the head of the document; but, by placing it in a separate file, the code can be reused across multiple Web pages and changes made in the one central file will affect all of those pages.
. Linking a CSS file affects the document in the same way as if the styles had been embedded directly in the head of the document; but, by placing it in a separate file, the code can be reused across multiple Web pages and changes made in the one central file will affect all of those pages.
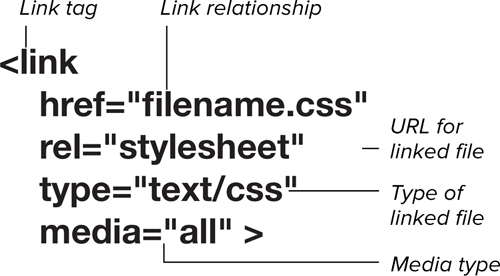
![]() The general syntax for the link tag.
The general syntax for the link tag.
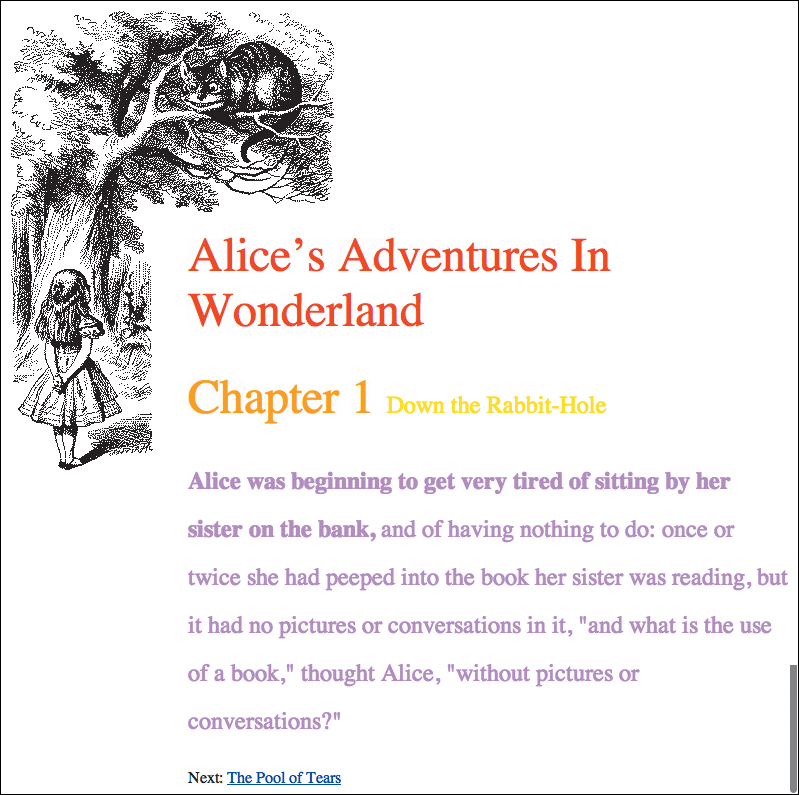
![]() The results of Code 3.6. Our page with all the default and Chapter 1 specific styles applied.
The results of Code 3.6. Our page with all the default and Chapter 1 specific styles applied.
To link to an external CSS file
1. Add a link tag to your HTML document. Within the <head>...</head> of your HTML document (Code 3.6), open your <link> tag and type a space.
<link
2. Specify the link’s relation to the document as a stylesheet. This is important, since the link tag can be used to add other file types. Leaving this out will cause many browsers to not load the code.
rel="stylesheet"
3. Specify the location of the CSS file to be used, either global or local. For example, ch01.css. This is the full path and name (including extension) of the external CSS document. In Chapter 15, you’ll explore style sheet strategies for locating external style sheets in relation to your HTML documents.
href="global.css"
4. Specify the type of information that is being linked. In this example, it’s a text file containing CSS.
type="text/css"
5. Specify the media type to which this style sheet should be applied. For more details, see “Quarrying the Media” in Chapter 4.
media="all">
Keep in mind that the more style sheets you link to, the more server calls your Web page makes, and the slower it loads. Link as needed, but try to minimize links by combining files where possible.
Code 3.6. ch01.html—Imports the external style sheet ch01.css (Code 3.4) and global.css (Code 3.3).
<head>
<!-- HTML5 -->
<!DOCTYPE html>
<html lang="en">
<head>
<meta charset="UTF-8">
<title>Alice’s Adventures in Wonderland</title>
<link href='global.css' rel="stylesheet" type="text/css" media="all">
<link href='ch01.css' rel="stylesheet" type="text/css" media="all">
<style type="text/css" media="all">
h1 {
color: orange;
font-size: 3em;
font-weight: normal; }
h1 .chaptertitle {
color: yellow;
font-size: .5em; }
</style>
</head>
<body>
<h1 style="color:red;">Alice’s Adventures In Wonderland</h1>
<h1 id="ch01">Chapter 1 <span class="chaptertitle">Down the Rabbit-Hole</span></h1>
<p><strong>Alice was beginning to get very tired of sitting by her sister on the bank,</strong> and of having nothing to do: once or twice she had peeped into the book her sister was reading, but it had no pictures or conversations in it, "and what is the use of a book," thought Alice, "without pictures or conversations?"</p>
</article>
<footer><nav> Next:
<a class="chaptertitle" href="AAIWL-ch02.html">The Pool of Tears</a>
</nav></footer>
</body>
</html>
Importing a style sheet
Another way to bring external style sheets into a document is to use the @import rule ![]() . The advantage of importing is that it can be used not only to put an external CSS file in an HTML document file, but also to import one external CSS file into another.
. The advantage of importing is that it can be used not only to put an external CSS file in an HTML document file, but also to import one external CSS file into another.

![]() The general syntax for the @import rule.
The general syntax for the @import rule.
To import an external CSS file
1. Within the head of your HTML document, add a style element (Code 3.7). This is the same as discussed earlier in this chapter.
<style type="text/css" media="all">...</style>
2. Add your @import rule. In the <style> tag, before any other CSS code you want to include, type @import(), and between the parentheses include the URL of the CSS document to be imported. The URL can be global, in which case it would start with http://, or it could be a local path pointing to another file in the same domain.
@import url(global.css);
You can include as many imports as you want, but all of them must be placed before any embedded CSS code in that <style> tag.
You can also place @import directly into another external style sheet. This will import the CSS code from one style sheet to the other so that when the second style sheet is linked or imported into an HTML file, the styles from the first style sheet are also included.
3. Add the rest of your embedded CSS. You can include additional embedded CSS rules here, if necessary. (See “Embedded: Adding Styles to a Web Page” in this chapter.)
Using the @import in external style sheets is now widely discouraged due to the way in which browsers process them. In order to work, the browser has to stop rendering other style sheets until it finishes with a @import style sheets, slowing the site and preventing other important styles from appearing.
Code 3.7. ch12.html—Imports the external style sheet ch12.css (Code 3.5) and global.css (Code 3.3) ![]() .
.
<!-- HTML5 -->
<!DOCTYPE html>
<html lang="en">
<head>
<meta charset="UTF-8">
<title>Alice’s Adventures in Wonderland</title>
<style type="text/css" media="all">
@import url('global.css'),
@import url('ch12.css'),
h1 {
color: orange;
font-size: 3em;
font-weight: normal; }
h1 .chaptertitle {
color: yellow;
font-size: .5em; }
</style>
</head>
<body>
<h1 style="color:red;">Alice’s Adventures In Wonderland</h1>
<h1 id="ch01">Chapter 1 <span class="chaptertitle">Down the Rabbit-Hole</span></h1>
<p><strong>Alice was beginning to get very tired of sitting by her sister on the bank,</strong> and of having nothing to do: once or twice she had peeped into the book her sister was reading, but it had no pictures or conversations in it, "and what is the use of a book," thought Alice, "without pictures or conversations?"</p>
</article>
<footer><nav> Next:
<a class="chaptertitle" href="AAIWL-ch02.html">The Pool of Tears</a>
</nav></footer>
</body>
</html>
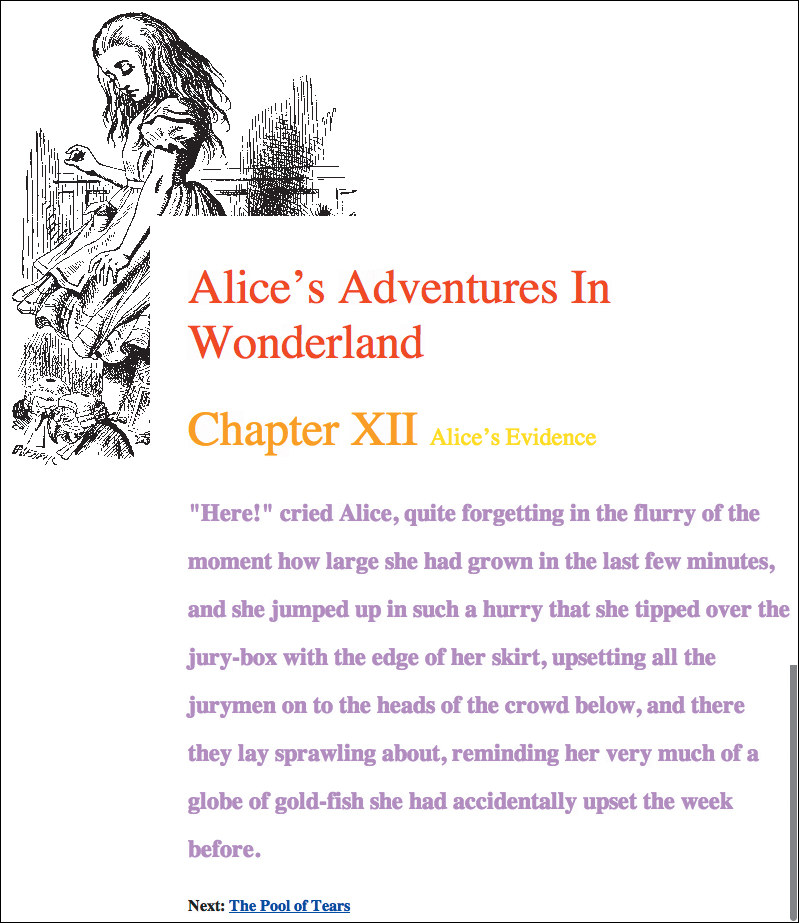
![]() The results of Code 3.7. The page with all of the default and Chapter 12 specific styles applied.
The results of Code 3.7. The page with all of the default and Chapter 12 specific styles applied.
(Re)Defining HTML Tags
Almost all HTML tags have default browser styles associated with them. Take the <strong> tag, for example: Its inherent style declaration is the equivalent of font-weight: bold.
By adding new CSS declarations to the strong HTML selector, you can change any element tagged as strong to look like anything you want ![]() . For example, you could make all italicized text bold or even set font-weight: normal, which would prevent the text from being bold.
. For example, you could make all italicized text bold or even set font-weight: normal, which would prevent the text from being bold.
![]() The general syntax used to define the styles for an HTML tag.
The general syntax used to define the styles for an HTML tag.
To define an HTML selector
1. Start with the HTML selector whose properties you want to define. Add a curly bracket ({) to open your rule (Code 3.8). Make sure you always close your declaration list with a curly bracket (}). If you forget this, it will ruin your day!
h1 {...}
Code 3.8. Ch01.html—Styles the paragraph tag ![]() .
.
<!-- HTML5 -->
<!DOCTYPE html>
<html lang="en">
<head>
<meta charset="UTF-8">
<title>Alice’s Adventures in Wonderland</title>
<link href="global.css" type="text/css" rel="stylesheet" media="all">
<link href="ch01.css" rel="stylesheet" type="text/css" media="all">
<style type="text/css" media="all">
h1 {
color: orange;
font-size: 3em;
font-weight: normal; }
h1 .chaptertitle {
color: yellow;
font-size: .5em; }
p {
color: rgb(153,153,153);
font-family: perpetua, georgia, serif;
line-height: 1.5;
text-indent: 3em; }
</style>
</head>
<body>
<h1 style="color:red;">Alice’s Adventures In Wonderland</h1>
<h1 id="ch01">Chapter 1 <span class="chaptertitle">Down the Rabbit-Hole</span></h1>
<p><strong>Alice was beginning to get very tired of sitting by her sister on the bank,</strong> and of having nothing to do: once or twice she had peeped into the book her sister was reading, but it had no pictures or conversations in it, "and what is the use of a book," thought Alice, "without pictures or conversations?"</p>
</article>
<footer><nav> Next:
<a class="chaptertitle" href="AAIWL-ch02.html">The Pool of Tears</a>
</nav></footer>
</body>
</html>
![]() The results of Code 3.8. Paragraphs are indented and are no longer bright violet.
The results of Code 3.8. Paragraphs are indented and are no longer bright violet.
CSS rules can be defined in the head of your document within the <style> tags or in an external CSS file that is imported or linked to the HTML document. (See “Embedded: Adding Styles to a Web Page” in this chapter.)
2. Add declarations for styles. Within the brackets, type the style declarations to be assigned to this HTML tag—formatted as property: value—using a semicolon (;) and separating individual declarations in the list. You can also add one or more line breaks, spaces, or tabs after a declaration without interfering with the code to make it more readable.
color: red;
Add as many declarations as you want, separated by semicolons:
font-size: 3em; font-weight: normal;
Be sure that the properties will work with the HTML tag in question. For example, you cannot use the text-indent property (which works only on block elements) to define the bold tag (which is an inline element). See Appendix A to verify the properties that can be assigned to specific selectors.
Redefining a tag does not implicitly override that tag’s preexisting properties. Thus, the <strong> tag still makes text bold unless you explicitly tell it not to with font-weight: normal.
Although the body tag can also be redefined, it acts like a block-level tag. (See “Types of HTML Elements” in Chapter 2.) Any inherited properties will affect everything on the page. You can actually use this to your advantage to set default page styles, as explained in Chapter 4, “Inheriting Properties from Parents.”
Defining Reusable Classes
A class selector allows you to set up an independent style that you can apply to any HTML tag ![]() . Unlike an HTML selector, which automatically targets a specific tag, a class selector is given a unique name that is then specified using the style attribute in the HTML tag or in any tags you want to use it. However, you can also specify styles to apply using a class applied to a specific HTML tag, making it a dependent class
. Unlike an HTML selector, which automatically targets a specific tag, a class selector is given a unique name that is then specified using the style attribute in the HTML tag or in any tags you want to use it. However, you can also specify styles to apply using a class applied to a specific HTML tag, making it a dependent class ![]() .
.

![]() The general syntax of a CSS rule using a class selector, which can then be applied to any tag using the class value.
The general syntax of a CSS rule using a class selector, which can then be applied to any tag using the class value.
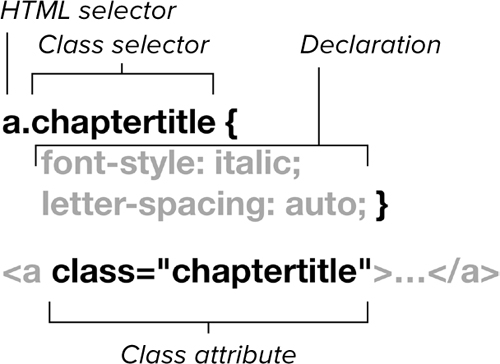
![]() The general syntax of a dependent class selector rule, which can then be applied only to tags using that HTML selector.
The general syntax of a dependent class selector rule, which can then be applied only to tags using that HTML selector.
To define a class selector
1. Give your class a name. Type a period (.) and a class name you give it; then open and close your declaration block with curly brackets ({}) (Code 3.9).
.chaptertitle {...}
CSS classes can be defined in the head of your document within the style tags or in an external CSS file that is imported or linked to the HTML document.
The class name can be anything you choose, with the following caveats:
• Use only letters and numbers. You can use hyphens and underscores, but not at the beginning of the name.
• The first character cannot be a number, underscore, or hyphen.
• Don’t use spaces.
author is an independent class, so you can use it with any HTML tag you want, with one stipulation: The properties set for the class must work with the type of tag you use it on.
2. Add declarations to the rule. Within the brackets, type the declarations to be assigned to this class—formatted as property: value—using a semicolon (;) and separating individual declarations in the list. You can also add one or more line breaks, spaces, or tabs after a declaration without interfering with the code to make it more readable.
font-family: perpetua, georgia, serif;
letter-spacing: .1em;
3. Add dependent classes to your CSS. You create dependent classes, which tie the declarations of the class to a particular HTML tag by placing an HTML selector in front of the class.
a.chaptertitle {...}
In the same document, you can create different versions of the dependent class (using the same name) for different tags and also have an independent class (applied to all tags with the class), as shown in Step 1.
Code 3.9. chapter01.html—The chaptertitle class is used to style chapter titles where they appear ![]() .
.
<!-- HTML5 -->
<!DOCTYPE html>
<html lang="en">
<head>
<meta charset="UTF-8">
<title>Alice’s Adventures in Wonderland</title>
<link href="global.css" type="text/css" rel="stylesheet" media="all">
<link href="ch01.css" rel="stylesheet" type="text/css" media="all">
<style type="text/css" media="all">
h1 {
color: orange;
font-size: 3em;
font-weight: normal; }
h1 .chaptertitle {
color: yellow;
font-size: .5em; }
p {
color: rgb(153,153,153);
font-family: perpetua, georgia, serif;
line-height: 1.5;
text-indent: 3em; }
.chaptertitle {
font-family: perpetua, georgia, serif;
letter-spacing: .1em;
}
a.chaptertitle {
font-size: 2em;
font-style: italic;
letter-spacing: auto;
}
</style>
</head>
<body>
<h1 style="color:red;">Alice’s Adventures In Wonderland</h1>
<h1 id="ch01">Chapter 1 <span class="chaptertitle">Down the Rabbit-Hole</span></h1>
<p><strong>Alice was beginning to get very tired of sitting by her sister on the bank,</strong> and of having nothing to do: once or twice she had peeped into the book her sister was reading, but it had no pictures or conversations in it, "and what is the use of a book," thought Alice, "without pictures or conversations?"</p>
<footer><nav> Next: <a class="chaptertitle" href="AAIWL-ch02.html">The Pool of Tears</a>
</nav></footer>
</article>
</body>
</html>

![]() The results of Code 3.9. The chapter titles are styled differently in a hypertext link.
The results of Code 3.9. The chapter titles are styled differently in a hypertext link.
4. Add the class attribute to the HTML tag to which you want to apply it.
<span class="chaptertitle">Down the Rabbit-Hole<span>
<a class="chaptertitle" href="AAIWL-ch02.html">The Pool of Tears</a>
You can apply multiple classes to a single HTML tag by adding additional class names in a space separated list:
class="name1 name2 name3"
Notice that when you defined the class in the CSS, it began with a period (.). However, you do not use the period when referencing the class name in an HTML tag. Using a period here will cause the class to fail.
You can mix a class with ID and/or inline rules within an HTML tag. (See “Inline: Adding Styles to an HTML Tag” and “Defining Unique IDs” in this chapter.)
Because the <div> and <span> tags have no preexisting properties, you can use them to effectively create your own HTML tags by adding classes. However, use these sparingly because once they are associated, you are locked in to using those specific classes with those specific locations.
Defining Unique IDs
Like the class selector, the ID selector can be used to create unique styles that are independent of any particular HTML tag ![]() . Thus, they can be assigned to any HTML tag. IDs are used in HTML to help establish the structure of your page layout, identifying unique elements in the code, singling them out for special treatment, either for positioning with CSS or JavaScript.
. Thus, they can be assigned to any HTML tag. IDs are used in HTML to help establish the structure of your page layout, identifying unique elements in the code, singling them out for special treatment, either for positioning with CSS or JavaScript.
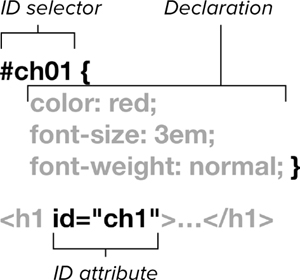
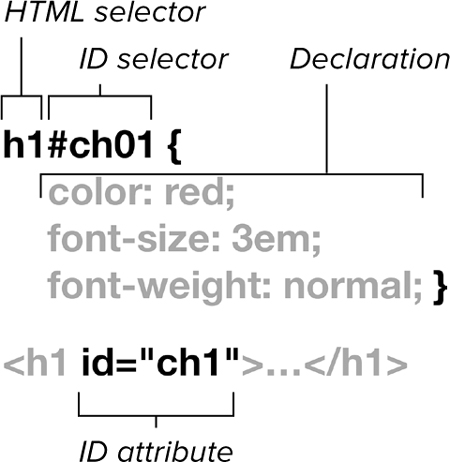
![]() The general syntax for an ID selector rule.
The general syntax for an ID selector rule.
To define an ID selector
1. Add the ID selector to your CSS. ID rules always start with a number sign (#) followed by the name of the ID (Code 3.10).
#ch01 {...}
The name can be a word or any set of letters or numbers you choose, with the following caveats:
• Use only letters and numbers. You can use hyphens and underscores, but do so with caution. Some earlier browsers reject them.
• The first character cannot be a number, hyphen, or underscore.
• Don’t use spaces.
CSS rules can be defined in the head of your document within the <style> tags or in an external CSS file that is imported or linked to the HTML document.
2. Add declarations to your ID. Within the curly brackets, type the style declarations to be assigned to this ID—formatted as property: value—using a semicolon (;) and separating individual declarations in the list. You can also add one or more line breaks, spaces, or tabs after a declaration without interfering with the code to make it more readable.
font-family: perpetua, georgia, serif;
text-shadow: 4px 4px 6px rgba(0,0,0,.5);
3. Add the id attribute to the HTML tag of your choice, with the name of the ID as its value.
<h1 id="ch01">...</h1>
Notice that although the number sign (#) is used to define an ID selector, it is not included for referencing the ID in the HTML tag. If you add it, the rule will fail.
Code 3.10. chapter01.html—The ch01 ID styles the chapter title for chapter 1 ![]() .
.
<!-- HTML5 -->
<!DOCTYPE html>
<html lang="en">
<head>
<meta charset="UTF-8">
<title>Alice’s Adventures in Wonderland</title>
<link href="global.css" type="text/css" rel="stylesheet" media="all">
<link href="ch01.css" rel="stylesheet" type="text/css" media="all">
<style type="text/css" media="all">
h1 {
color: orange;
font-size: 3em;
font-weight: normal; }
h1 .chaptertitle {
color: yellow;
font-size: .5em; }
p {
color: rgb(153,153,153);
font-family: perpetua, georgia, serif;
line-height: 1.5;
text-indent: 3em; }
.chaptertitle {
font-family: perpetua, georgia, serif;
letter-spacing: .1em; }
a.chaptertitle {
font-size: 2em;
font-style: italic;
letter-spacing: auto; }
#ch01 {
font-family: perpetua, georgia, serif;
text-shadow: 0 0 4px rgba(0,0,0,.75); }
</style>
</head>
<body>
<h1 style="color:red;">Alice’s Adventures In Wonderland</h1>
<h1 id="ch01">Chapter 1 <span class="chaptertitle">Down the Rabbit-Hole</span></h1>
<p><strong>Alice was beginning to get very tired of sitting by her sister on the bank,</strong> and of having nothing to do: once or twice she had peeped into the book her sister was reading, but it had no pictures or conversations in it, "and what is the use of a book," thought Alice, "without pictures or conversations?"</p>
<footer><nav> Next: <a class="chaptertitle" href="AAIWL-ch02.html">The Pool of Tears</a>
</nav></footer>
</article>
</body>
</html>
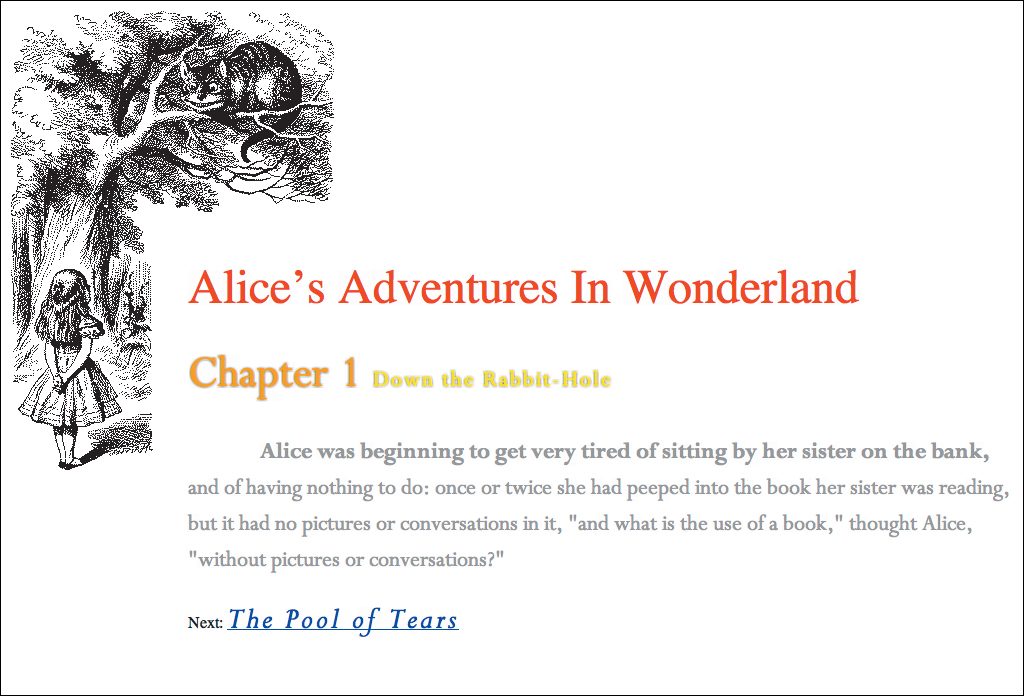
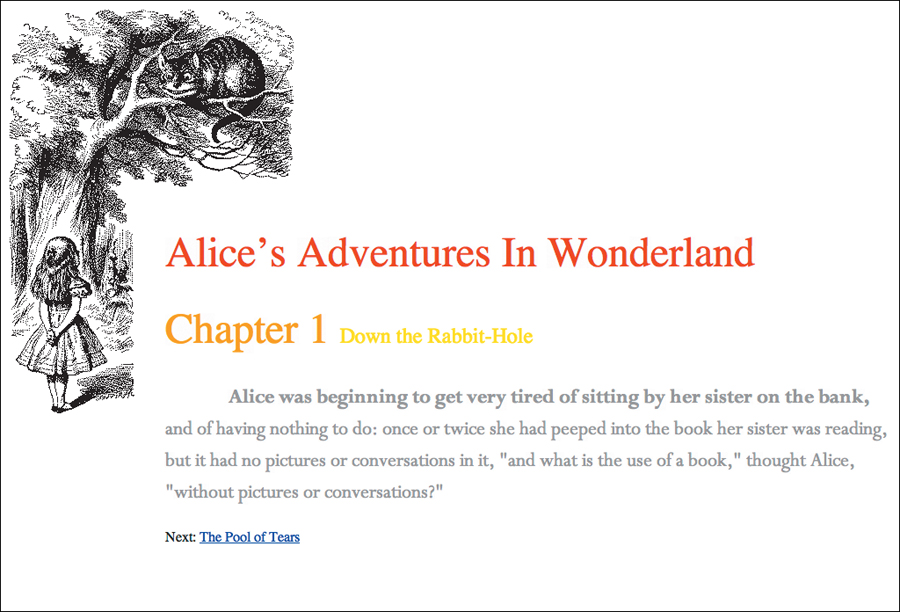
![]() The results of Code 3.10. The chapter title is using perpetua with a drop shadow.
The results of Code 3.10. The chapter title is using perpetua with a drop shadow.
You can also create dependent IDs ![]() , which use the declarations of the ID only when applied to a particular HTML tag. However, I never have a use for these because the point of IDs is that you use them only once per page.
, which use the declarations of the ID only when applied to a particular HTML tag. However, I never have a use for these because the point of IDs is that you use them only once per page.
![]() The general syntax for the dependent ID selector rule.
The general syntax for the dependent ID selector rule.
Although you can use the same name for both a class and ID, you should try to avoid this because it will inevitably lead to confusion.
IDs can give each screen element a unique name and identity. This is why an ID is used only once, for one element in a document, to make it an object that can be manipulated with JavaScript.
Defining Universal Styles
The universal selector is a wildcard character that works as a stand-in to represent any HTML type selector that can appear in that position in a contextual list ![]() .
.
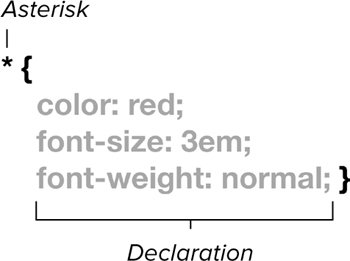
![]() The general syntax for the universal selector rule.
The general syntax for the universal selector rule.
Keep in mind, though, that the universal selector can be used in place of any HTML selector in any configuration, not just as a stand alone selector as shown in this section. The usefulness of this will become apparent in the next chapter when you use contextual styles.
To use the universal selector
1. Add the universal selector. Type an asterisk (*) and then the open curly bracket (Code 3.11). This selector is then a wildcard that can be any HTML tag.
* {...}
2. Add declarations to your universal selector rule. Within the curly brackets, type the style declarations to be assigned to this ID—formatted as property: value—using a semicolon (;) and separating individual declarations in the list. You can also add one or more line breaks, spaces, or tabs after a declaration without interfering with the code to make it more readable.
margin: 0; padding: 0;
In this format, the styles are applied to every element on the page.
Code 3.11. chapter01.html—The universal selector is used to reset the margin and padding of all elements to 0, overriding any browser default styles ![]() .
.
<!-- HTML5 -->
<!DOCTYPE html>
<html lang="en">
<head>
<meta charset="UTF-8">
<link href="global.css" type="text/css" rel="stylesheet" media="all">
<link href="ch01.css" rel="stylesheet" type="text/css" media="all">
<title>Alice’s Adventures in Wonderland</title>
<style type="text/css" media="all">
* {
margin: 0;
padding: 0; }
h1 {
color: orange;
font-size: 3em;
font-weight: normal; }
h1 .chaptertitle {
color: yellow;
font-size: .5em; }
p {
color: rgb(153,153,153);
font-family: perpetua, georgia, serif;
line-height: 1.5;
text-indent: 3em; }
.chaptertitle {
font-family: perpetua, georgia, serif;
letter-spacing: .1em; }
a.chaptertitle {
font-size: 2em;
font-style: italic;
letter-spacing: auto; }
#ch01 {
font-family: perpetua, georgia, serif;
text-shadow: 0 0 4px rgba(0,0,0,.75); }
</style>
</head>
<body>
<h1 style="color:red;">Alice’s Adventures In Wonderland</h1>
<h1 id="ch01">Chapter 1 <span class="chaptertitle">Down the Rabbit-Hole</span></h1>
<p><strong>Alice was beginning to get very tired of sitting by her sister on the bank,</strong> and of having nothing to do: once or twice she had peeped into the book her sister was reading, but it had no pictures or conversations in it, "and what is the use of a book," thought Alice, "without pictures or conversations?"</p>
<footer><nav> Next: <a class="chaptertitle" href="AAIWL-ch02.html">The Pool of Tears</a>
</nav></footer>
</article>
</body>
</html>
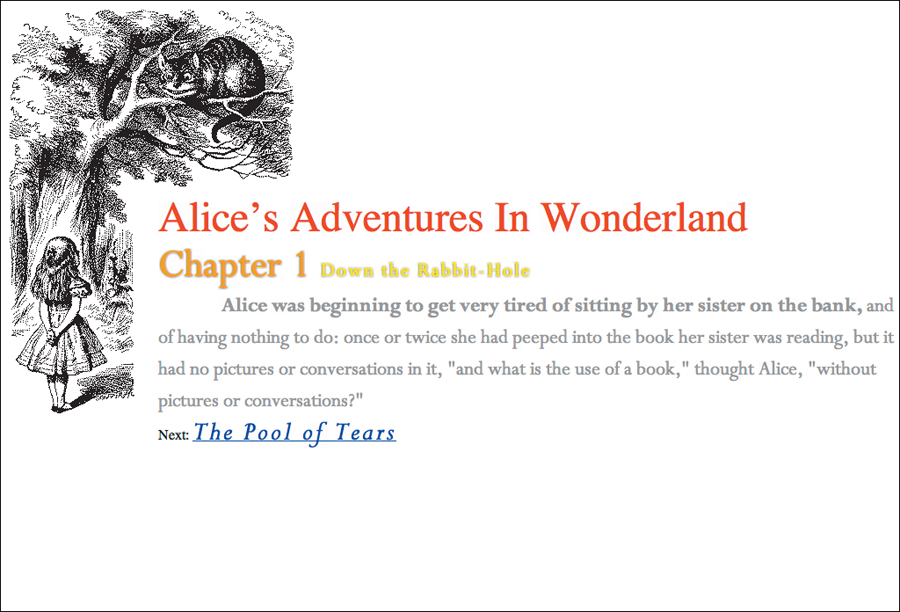
![]() The results of Code 3.11. All the margins and padding are set to 0 on everything, giving you a clean slate for your designs.
The results of Code 3.11. All the margins and padding are set to 0 on everything, giving you a clean slate for your designs.
Although you can also apply styles to the html or body element to have them cascade to their child elements, not all styles will be inherited by their children. Using the universal selector applies the styles directly to every element.
Grouping: Defining Elements That Are Using the Same Styles
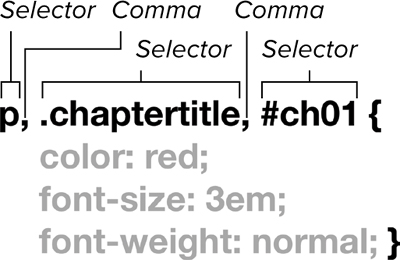
If you want two or more selectors to have the same declarations, group the selectors in a list separated by commas ![]() . You can define common attributes in the declaration block and then add rules for each selector individually to refine them, if you like.
. You can define common attributes in the declaration block and then add rules for each selector individually to refine them, if you like.
![]() The general syntax for a list of selectors, all receiving the same declaration block.
The general syntax for a list of selectors, all receiving the same declaration block.
To group selectors
1. Add a grouping of selectors, separated by commas. Type the list of selectors (HTML, class, or ID) separated by commas (Code 3.12). You can also add one or more line breaks, spaces, or tabs after a comma without interfering with the code to make it more readable.
p, .chaptertitle, #ch01 {
These selectors all receive the same declarations. CSS rules can be defined within the style tags in the head of your document or in an external CSS file that is imported or linked to the HTML document.
2. Add common declarations for the selector grouping. Within the curly brackets, type the style declarations to be assigned to all of the listed selectors—formatted as property: value—using a semicolon (;) and separating individual declarations in the list. You can also add one or more line breaks, spaces, or tabs after a declaration without interfering with the code to make it more readable.
font-family: perpetua, georgia, serif;
Code 3.12. chapter01.html—Common styles for the level 1 headers, chaptertitle class, and ch01 ID are defined ![]() . In reality, though, this code will look no different from code 3.11, since we haven’t added any new styles, just moved a single style to be shared.
. In reality, though, this code will look no different from code 3.11, since we haven’t added any new styles, just moved a single style to be shared.
<!-- HTML5 -->
<!DOCTYPE html>
<html lang="en">
<head>
<meta charset="UTF-8">
<title>Alice’s Adventures in Wonderland</title>
<link href="global.css" type="text/css" rel="stylesheet" media="all">
<link href="ch01.css" rel="stylesheet" type="text/css" media="all">
<style type="text/css" media="all">
* {
margin: 0;
padding: 0; }
p, .chaptertitle, #ch01 {
font-family: perpetua, georgia, serif; }
h1 {
color: orange;
font-size: 3em;
font-weight: normal; }
h1 .chaptertitle {
color: yellow;
font-size: .5em; }
p {
color: rgb(153,153,153);
line-height: 1.5;
text-indent: 3em; }
.chaptertitle {
letter-spacing: .1em; }
a.chaptertitle {
font-size: 2em;
font-style: italic;
letter-spacing: auto; }
#ch01 {
font-family: perpetua, georgia, serif;
text-shadow: 0 0 4px rgba(0,0,0,.75); }
</style>
</head>
<body>
<h1 style="color:red;">Alice’s Adventures In Wonderland</h1>
<h1 id="ch01">Chapter 1 <span class="chaptertitle">Down the Rabbit-Hole</span></h1>
<p><strong>Alice was beginning to get very tired of sitting by her sister on the bank,</strong> and of having nothing to do: once or twice she had peeped into the book her sister was reading, but it had no pictures or conversations in it, "and what is the use of a book," thought Alice, "without pictures or conversations?"</p>
<footer><nav> Next: <a class="chaptertitle" href="AAIWL-ch02.html">The Pool of Tears</a>
</nav></footer>
</article>
</body>
</html>
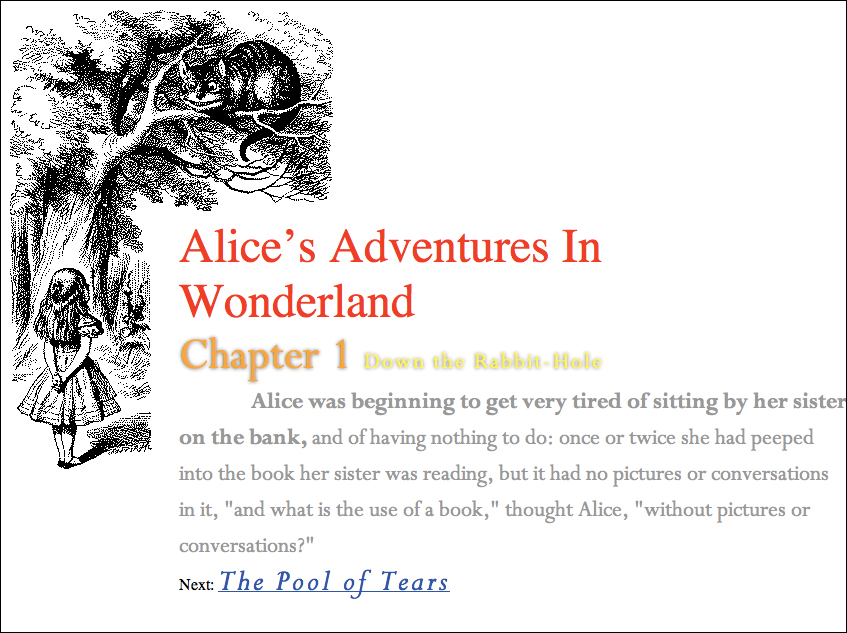
![]() The results of Code 3.12. The font family perpetua is applied to all of the common elements.
The results of Code 3.12. The font family perpetua is applied to all of the common elements.
3. Add refinements as needed. You can then individually add or change declarations for each selector to tailor it to your needs. If you are overriding a declaration set in the group rule, make sure that this rule is placed after the group rule in your CSS. (See “Determining the Cascade Order” in Chapter 4.)
Grouping selectors like this can save a lot of time and repetition. But be careful. By changing the value of any of the properties in the combined declaration, you change that value for every selector in the list.
Grouping selectors does not directly affect their cascade order (explained in Chapter 4); rather, the grouping is treated as if each selector had this rule assigned to it in the order the selectors are listed.
Adding Comments to CSS
Comments allow you to add important notes to your code, as a reminder to yourself or others. A comment does not affect code; comments only add notes or give guidance to those viewing your code. You can include comments in <style> tags or in an external CSS file.
To include comments in a style sheet
1. Add an opening comment mark. To open a comment area in a style sheet (Code 3.13), type a slash (/) and an asterisk (*).
/*
2. Type your comments. You can use any letters, numbers, symbols, or even line breaks by pressing the Return or Enter key.
Styles for Alice's Adventure in Wonderland
3. Add a closing comment mark. Close your comment by typing an asterisk (*) and a slash (/).
*/
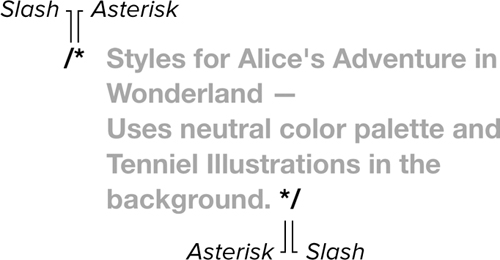
![]() The general syntax for CSS comments.
The general syntax for CSS comments.
Comments are a great way to organize your code, allowing you to add “headers” that separate different parts of the code.
I recommend placing constant values—like color values—at the top of your CSS code in comments for quick reference.
Code 3.13. Comments in the CSS code have no effect on the final product. They are just there to add notes.
<!-- HTML5 -->
<!DOCTYPE html>
<html lang="en">
<head>
<meta charset="UTF-8">
<title>Alice’s Adventures in Wonderland</title>
<link href="global.css" type="text/css" rel="stylesheet" media="all">
<link href="ch01.css" rel="stylesheet" type="text/css" media="all">
<style type="text/css" media="all">
/* Styles for Alice's Adventure in Wonderland — Uses neutral color palette and Tenniel Illustrations in the background. */
* {
margin: 0;
padding: 0; }
p, .chaptertitle, #ch01 {
font-family: perpetua, georgia, serif; }
h1 {
color: orange;
font-size: 3em;
font-weight: normal; }
h1 .chaptertitle {
color: yellow;
font-size: .5em; }
p {
color: rgb(153,153,153);
line-height: 1.5;
text-indent: 3em; }
.chaptertitle {
letter-spacing: .1em; }
a.chaptertitle {
font-style: italic;
letter-spacing: auto; }
#ch01 {
font-family: perpetua, georgia, serif;
text-shadow: 0 0 4px rgba(0,0,0,.75); }
</style>
</head>
<body>
<h1 style="color:red;">Alice’s Adventures In Wonderland</h1>
<h1 id="ch01">Chapter 1 <span class="chaptertitle">Down the Rabbit-Hole</span></h1>
<p><strong>Alice was beginning to get very tired of sitting by her sister on the bank,</strong> and of having nothing to do: once or twice she had peeped into the book her sister was reading, but it had no pictures or conversations in it, "and what is the use of a book," thought Alice, "without pictures or conversations?"</p>
<footer><nav> Next: <a class="chaptertitle" href="AAIWL-ch02.html">The Pool of Tears</a>
</nav></footer>
</article>
</body>
</html>