Chapter 4
Choosing and Setting Up OTA Hardware
IN THIS CHAPTER
![]() Understanding what equipment you need to do the over-the-air thing
Understanding what equipment you need to do the over-the-air thing
![]() Choosing the OTA antenna that's right for you
Choosing the OTA antenna that's right for you
![]() Installing your antenna and hooking it up to your TV
Installing your antenna and hooking it up to your TV
![]() Learning how to get the best antenna reception
Learning how to get the best antenna reception
If you want to watch live local broadcasts, you don't necessarily have to invest in new equipment. As I explain in Chapter 5, streaming services enable you to watch live TV using your existing Internet connection and Wi-Fi network. These services are convenient but not cheap.
What if you want to watch live local broadcasts for free? Then you need to go the over-the-air route, and that route requires some new electronics. Fortunately, you're not looking at a substantial investment here. Sure, you could spend big bucks if you want to, but a modest investment is all that's required for most people. In this chapter, you learn what equipment is required and how to make smart purchases.
What about getting the equipment installed? With some exceptions. The good news is that you don't need to bring in an expert to hook up everything. Most of the connections are straightforward, and I tell you everything you need to know in this chapter.
What Equipment Do You Need?
Before you get started, be sure to check that you can even receive OTA TV signals in your area. This won't be an issue if you live in or near a major urban center, but the farther away from civilization you reside, the fewer over-the-air TV signals you'll receive. There's no point in investigating OTA equipment if no OTA signals are in the air where you live. See Chapter 3 to learn how to check what channels are available in your locale.
That said, let's take a quick look at what's required to receive and watch over-the-air TV broadcasts. I start with the watching part, which you can do using any of the following devices:
TV: Most people watch over-the-air programs on a TV. You don't need anything fancy, just a TV with an F connector (also called an RF port) for the antenna, as shown in Figure 4-1, and a built-in digital tuner. Almost every TV sold since early 2007 has such a tuner. If you have an older TV without a digital tuner, you'll need to spring for an external digital TV tuner or DVR.
 If you're looking to purchase a new TV, be careful. Some manufacturers are selling devices that look a lot like TVs but are marketed as displays. What's the diff? A display has no F connector for your antenna's coaxial cable, nor does it have a tuner! Check the specs before buying to make sure the set has both an F connector and a built-in digital tuner.
- Computer: Computer monitors don't come with digital TV tuners, so you need an external digital TV tuner box that can connect to your computer monitor (say, using an HDMI cable).

FIGURE 4-1: Your HDTV antenna connects to your TV's F connector.
- Mobile device: You need a digital TV tuner. If your mobile device runs Android, you can buy a tuner that connects directly to your device via USB. If you're using an iOS device, look for a digital tuner that can connect to and broadcast over your Wi-Fi network (see, for example, the HDHomeRun family of tuners from SiliconDust).
To receive over-the-air TV signals, you need some or (rarely) all of the following:
- HDTV antenna: Corrals the over-the-air signals whooshing by. An antenna is the only bit of equipment you definitely need. See the next section, “Choosing an OTA Digital Antenna,” to learn some buying tips and suggestions.
Signal amplifier: Boosts the antenna signal. If you live far from an urban center and the resulting over-the-air TV signals are weak, a signal amplifier can help improve the reception into something watchable.
If you live in an area that gets plenty of strong signals, you might be tempted to add a signal amplifier anyway as a way of boosting weaker signals. Paradoxically, adding the amplifier will probably make all your signals worse because your already strong signals will become too strong and the tuner won't be able to handle these overly boosted signals — a phenomenon known as overdriving the tuner.- Signal attenuator: Reduces the antenna signal. Why on Earth would you ever want to do that? If you have a broadcast tower in your neighborhood — within, say, about 5 miles (8 kilometers) — the signal might be so strong that you overdrive your tuner. Connecting an attenuator can fix that problem.
LTE filter: Removes the interference caused by nearby LTE cellular network towers and devices. This doohickey is optional, but if you live in an urban center with all its attendant cellular noise, the $10 or $15 investment is probably worthwhile.
 Some HDTV antennas come with a built-in LTE filter, so you might want to add that feature to your antenna wish list.
- Coaxial cable: Connects the antenna directly to your TV or to an external digital TV tuner (or DVR) if you're using an older TV or a computer or mobile device. (See the section “Connecting Your Antenna” for more on getting everything hooked up.)
Coaxial cable splitter: Splits the signal from your antenna so you can route the signal to multiple devices. Most splitters have two, three, or four outputs. Note that you lose signal strength when you use a splitter. The better splitters sacrifice only 3.5db (decibels) of power (compared to 7db for some splitters), so check the specs.
If you get a splitter and find that you're not using one or more of the outputs, be sure to plug every unused output with a little device called a terminator (insert Arnold Schwarzenegger joke here) to prevent signals from leaking from the open outputs.
Here are a few tips for buying coax cable:
- Don't buy a cable if you don't have to. Many antennas come with their own coaxial cable, so choose your antenna first, and then shop for a coaxial cable if the antenna doesn't provide one. That said, there's a good chance the coaxial cable that comes with the antenna will be either too short or too cheap (see the next item in this list). In that case, make sure the cable is detachable from the antenna, which will enable you to substitute your own (better quality) cable.
- Don't be cheap. Inexpensive cables are tempting, pricewise, but they're usually poorly shielded, which makes them susceptible to signal loss through leakage and to interference from nearby devices. Both signal leakage and external interference can degrade the OTA signals running through the cable. Look for coaxial cables that have three layers of shielding (triple shield) or, even better, four layers of shielding (quad shield). Also, be sure to buy RG-6 (or RG6) coaxial cable, which has less signal loss overall than the older RG-59 (RG59) cables.
- Get enough (but not too much). If you already have at least an idea where you'll install your antenna, take a rough measurement of the distance from that position to your TV. (For accuracy, be sure to measure down the wall and across the floor, not in a straight line from antenna to TV.) Add a few feet for good measure and start shopping. Why not get a super-long cable, just to be safe? Because over-the-air TV signals degrade as they travel along the cable, so the longer the cable, the more degraded the signal when it finally emerges at your TV.
- Get cable that can stand up to the weather. If you're going to install your antenna outdoors, be sure to get coaxial cables designed for outdoor use. Since you'll almost certainly have at least one cable-to-cable connection outside, look for cables with a rubber boot at each end to weatherproof the connection.
Choosing an OTA Digital Antenna
Okay, enough jawing. It's time to get serious about your over-the-air TV future and start shopping for the most important piece of equipment: a cup holder for your reclining chair. Kidding! I speak, of course, of the antenna you need to intercept all those over-the-air TV signals whizzing overhead.
Antenna styles
The first thing you need to know about over-the-air TV antennas is that they come in three main form factors:
Location |
Style |
Description |
|---|---|---|
Indoor |
Flat |
Usually a thin square, rectangle, or circle designed to be mounted in a window or similar glass surface. |
Indoor |
Tabletop |
Usually thin, cylinder-like, and a few inches tall, with a base that enables you to sit the antenna on a table or desk. |
Outdoor |
Various |
Usually fairly large and designed to be mounted on a roof, in an attic, on a pole, or on the side of a building. |
Determine the range
Usually, one of your first antenna decisions is the range you require. Here, range refers to the most distant transmission signal that the antenna can still pick up. For example, if an antenna is marketed as having a 30-mile (50-kilometer) range, it can usually pick up signals from broadcast towers up to 30 miles (50 kilometers) from your location.
 I wrote usually because the advertised range is valid only for ideal conditions. There are lots of factors that influence the strength of a signal. I go through these factors in Chapter 3, so I won't repeat them here. For your antenna shopping purposes, however, note that your real-world range for a particular antenna will almost certainly be less than what the manufacturer claims.
If you've searched for nearby stations using a tool such as TV Fool (see Chapter 3), you already have a good idea of the distance to the farthest station you want to watch. Use that value as your guide when looking for an antenna. For example, if a station you want to watch is 45 miles (72 kilometers) away, you'll want an antenna with a range of at least 50 miles (80 kilometers).
The claimed ranges of many antennas are, to say the least, far-fetched. To learn why, see the section, “Watch out for bogus or exaggerated claims,” later in this chapter.
Indoor or outdoor?
An important antenna buying consideration is the choice between an indoor or an outdoor antenna. How do you make that choice? Here are some factors to bear in mind:
- Range: Generally speaking, indoor antennas can pick up signals from towers up to about 50 miles (80 kilometers) away, and outdoor antennas can pick up signals from up to about 70 miles (112 kilometers) away.
- Cost: Indoor antennas tend to be cheaper than outdoor ones.
- Appearance: Indoor antennas are usually either so small and thin that they're barely visible once installed or have a stylish design that won't hurt your eyes. Outdoor antennas, on the other hand, tend to be quite large and ungainly and so are designed to be installed out of sight.
- Ease of installation: Indoor antennas usually require minimal setup, whereas outdoor antenna installation can be arduous (depending on the existing cable connections in your home).
Some antennas are manufactured to be used indoors or outdoors. That is, the antenna offers a simple mounting system for indoor use, but the antenna is also weatherproof and comes with mounting hardware for a roof, wall, or attic.
Most people who live in an urban locale opt for an indoor antenna because it's cheaper and easier to install than an outdoor antenna, and the range is usually more than enough to pick up quite a few stations. The farther away from an urban center you live, the greater the need for an outdoor antenna.
Amplified or not?
What does an amplifier do? Here's an analogy: First, picture water coming out of a garden hose at a steady rate with the tap turned on full. If you want to increase the water pressure (perhaps to clean a stain on your deck) but the tap is on full, what can you do? That's right: You use your thumb or a finger to partially block the end of the hose, which causes the water to shoot out with greater pressure.
That's essentially what an antenna amplifier does with an incoming over-the-air TV signal: It increases — or amplifies — the power of that signal.
When deciding whether to get an amplified antenna, the most important fact to bear in mind is this: Amplifiers boost power only for signals that you already receive; they don't do anything for signals that are too weak to even reach your antenna. In the garden hose analogy, when you partially block the hose with your thumb, you don't get more water; instead, you boost the power, so to speak, of the existing water stream.
If you live in a rural area and the station you want is 100 miles (160 kilometers) away, an amplifier isn’t going to help you get that station. Instead, you need an amplifier if the stations you do receive are weak and tend to cut out. In that case, you have a few choices:
- Built-in amplifier: The amplifier is part of the antenna itself (this is common with outdoor antennas) or is attached inline with the antenna's coaxial cable.
- External amplifier: The amplifier is a device that you purchase separately and connect to your antenna using coaxial cable.
- Distribution amplifier: The amplifier is a coaxial splitter that also amplifies the signal to make up for the power loss that always occurs whenever you split a signal.
 When you shop for an amplifier, you'll see a lot of talk about the amplifier's gain. Antenna gain, or just gain, refers to the number of decibels (db) of power that the amplifier boosts the signal.
Note, too, that all amplifiers require electrical power, so you'll need to factor the proximity of an electrical outlet into your amplified antenna installation plans.
Remember that an amplifier is almost always a bad idea if the over-the-air TV signals you receive are already strong because boosting strong signals can create a phenomenon called self-oscillation that can overwhelm your TV tuner. However, a variable amplifier enables you to adjust the signal boost higher or lower, so it might be an option for you.
Unidirectional or multidirectional?
I mention in Chapter 3 that the signal analysis results provided by the TV Fool website include a radar chart that shows you the direction of each broadcast tower from your location. The pattern you see in that chart determines another antenna feature:
- Unidirectional: The antenna essentially brings in signals from a single direction, although in practice the towers can be up to 45 or even 90 degrees apart. This antenna is also called a directional antenna. You want a unidirectional antenna if all or most of your available broadcast signals are clustered together, as shown in Figure 4-2.
- Multidirectional: The antenna brings in signals from any direction. This type of antenna is also described as omnidirectional. You want a multidirectional antenna if the broadcast signals in your area are scattered widely, as shown in Figure 4-3.

FIGURE 4-2: Get a unidirectional antenna if your incoming signals come more or less from one direction.
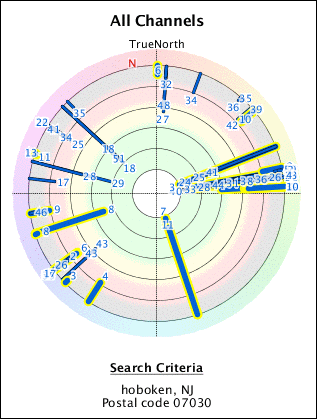
FIGURE 4-3: Get a multidirectional antenna if your incoming signals come from all over the place.
All over-the-air TV transmissions bounce off buildings and any other objects between the tower and your antenna. Some of these bounces are redirected to your antenna. A unidirectional antenna ignores these reflected signals, but a multidirectional antenna picks them up, which can result in a common problem called multipath distortion.
What do you do if you live in an area where you have clusters of OTA signals coming from two different directions, but you have only a unidirectional antenna? One solution is to use an antenna rotator device, which enables you to remotely turn the antenna to face the direction you want, but rotators can play havoc with DVRs. A better solution, if you can afford it, is to buy a second unidirectional antenna, point one antenna to each signal cluster, and then use an antenna coupler (also called an antenna combiner) to join the incoming signals into a single output.
Look for VHF/UHF support
If you run a TV signal analysis report using TV Fool (www.tvfool.com; see Chapter 3), the results include a breakdown of where the available signals appear in the VHF and UHF frequency bands (see the sidebar “UHF versus VHF: Let's Talk Radio,” earlier in this chapter). Figure 4-4 shows an example.

FIGURE 4-4: Available channels appear in the VHF and UHF bands.
Why is this important? Because if you want to watch channels in both the VHF and UHF bands, you need to get an antenna that can pick up both VHF and UHF signals. Many modern antennas are optimized for only the UHF band, so if you're not careful, you might end up with an antenna that can't pick up VHF stations. Here's what to look for:
- The antenna description says that it supports either VHF/UHF or dual band.
- For VHF support, make sure the antenna supports both low VHF (lo V) and high VHF (hi V). Many antennas that have VHF hardware pick up only high-VHF channels. (Note that you need low-VHF support only if the TV Fool report indicates that you have one or more stations still broadcasting in the lower VHF frequencies.)
Watch out for bogus or exaggerated claims
Although the number of people switching to over-the-air TV has slowed in recent years, for a while it seemed like every Tom, Dick, and Harriet was cutting the cord and settling down to watch shows over-the-air. That surging popularity of over-the-air TV meant that lots of people were in the market for an HDTV antenna. And whenever you have a surging marketplace, you inevitably have scammers and unscrupulous marketers looking to take advantage.
So, to help you avoid getting scammed or duped, here are a few things to watch out for when you're researching an HDTV antenna:
- The antenna supports 4K or UHD. This claim refers to the ATSC 3.0 standard that I talk about in Chapter 3, where signals will be broadcast in UHD. However, you do not need a special antenna to capture these signals. Any antenna that can capture run-of-the-mill over-the-air TV transmissions will also be able to pick up ATSC 3.0 transmissions.
- The antenna can pick up CNN, ESPN, or HBO. Nice try, but CNN, ESPN, HBO, and the like are available only via cable or a streaming service, not over-the-air.
- There are no monthly fees or contract. Well, yes, this is technically true, but there are no fees or contracts for any OTA TV antenna, so it's hardly something the manufacturer should be touting as a major feature.
- The antenna has a range of 100 miles (160 kilometers) or more. Nope, sorry, not gonna happen. The Earth, you see, is round. That curvature means that when a broadcast tower gets beyond a certain distance from you, it falls below the horizon. That distance depends on the height of the tower, whether it's located in a high spot, and the height of your antenna. However, the maximum distance in most cases is about 70 to 75 miles (112 to 120 kilometers). Beyond that distance, there's no longer a line-of-sight between the tower and your antenna — and that means no signal. (Signals might still get to you via diffraction or tropospheric scattering, but neither of these is made possible by the antenna.)
To avoid antennas that make these bogus claims, it's generally best to stick with an antenna from a reputable manufacturer, such as AmazonBasics, Antennas Direct, Antop, Channel Master, Mohu, or Winegard.
Installing Your Antenna
After you receive your antenna, you'll no doubt be itching to get it connected to your TV or DVR. Who can blame you? Not I, dear reader, not I. However, you've just spent a bunch of time figuring out the best antenna for your needs (right?), so instead of leaping directly to the connection stage (which I cover later in “Connecting Your Antenna”), it's crucial to take time now to make sure your antenna is installed correctly. A proper installation can often make the difference between picking up just a few stations or a few dozen.
Installing an indoor antenna
The main benefit of going the indoor route for your antenna is that installation is generally a breeze:
Antenna type |
Instructions |
|---|---|
Flat antenna |
Position the antenna in a window or other glass surface (such as a patio door). You can rest the antenna on a sill, or you can use two-sided tape (some antennas include pads with two-sided adhesive) to stick the antenna to the glass surface. |
Tabletop antenna |
Attach the antenna to its stand and then place the antenna and stand on the table or desk you want to use. |
Here are a few tips to bear in mind when positioning your indoor antenna:
- Experiment. You'll need to play around a bit to find the antenna position that brings in the most channels and the strongest signals. Don't be afraid to try lots of different positions to see what works and what doesn't. Remember to rescan your channels each time you change the antenna position. (See “Scanning for OTA channels,” later in the chapter.)
- Make the position temporary, at first. If you're installing a flat antenna, use masking tape or something similar as a temporary way of holding the antenna in place. When you find the ideal spot, then use a two-sided adhesive for a long-term hold.
- Higher is better. Position your antenna at the highest possible point for the best reception.
- Avoid large objects. Try to position the antenna so that it's not pointing directly at a large object, such as a building or tree.
- Avoid metal. If you're installing a flat antenna on glass, keep the antenna away from any metal grates or mesh that are part of the window or door.
- Avoid interference. Don't position your antenna near a source of electromagnetic signals, such as your TV, a computer, an LED light bulb, or just about any electronic device.
Installing an outdoor antenna
Installing an outdoor antenna generally involves the following steps:
- Affix the antenna to its mount.
Attach the mount to a surface.
The surface might be your roof, an exterior wall, a pole, a balcony railing, or an attic wall.
- Drill a hole where you want the connection to enter your house.
- Run some coaxial cable from the antenna to the hole you drilled in Step 3.
- Install a coaxial cable wall plate and connect the coaxial cable to the plate.
Unless you're very handy around the house, I probably lost you at Step 3. If so, not to worry, because it's easy enough to hire someone to perform all of these steps for you.
However, Steps 3 through 5 are necessary only if your home doesn't have an existing TV infrastructure. My assumption in this book, though, is that you've recently (or soon will) cut the cord with your cable company. Since you had (or have) cable TV, coaxial cables, coaxial wall plates, and other TV stuff are already installed.
You can take advantage of that existing infrastructure to make it much easier to install your outdoor antenna. All you need to do is find the main cable that enters your home and connect your antenna to that cable. That task will be either easy or hard:
- Easy (Option A): Look for a coaxial extension adapter that joins two segments of that main cable. Leave the cable segment that enters your home attached to the adapter, disconnect the cable from the other end, and then screw your antenna's coaxial cable into the open end of the adapter.
- Easy (Option B): Look for an endpoint of the main cable, which might be connected to a box attached to your house. Disconnect that endpoint, and then use a coaxial extension adapter to join the main cable and your antenna's coaxial cable.
- Hard: If there's no extension adapter or endpoint, you need to cut the main cable and install an F-type fitting on the cut end. (There's a bit more to it than this, which is why this is the hard method. However, tons of YouTube videos can show you the full procedure.) Then use a coaxial extension adapter to join the main cable and your antenna's coaxial cable.
Here are a few tips to bear in mind when positioning your outdoor antenna:
- Height is your friend. Position your antenna as high as possible to get the strongest signals with the least interference.
- Watch where the antenna points. A unidirectional antenna needs to point where the transmission towers are located. But even if you have a multidirectional antenna, make sure it's not pointing directly at any large objects, such as trees or buildings.
- Take weather into account. Most outdoor installs use at least one coaxial extension adapter, which can be the cause of all kinds of problems if water gets inside the adapter. To prevent that, use a coaxial extension adapter that has rubber boots on each end to protect the connections. Alternatively, you can buy separate rubber boots that you can fit over the connections.
- Terminate unused endpoints. If you're reusing existing TV infrastructure, take a look around to see if any coaxial endpoints are unused. If you find any, be sure to add a terminator device to each endpoint to prevent signal leakage.
Connecting Your Antenna
Assuming you have your OTA antenna installed, your next chore is to connect the antenna to whatever device you want to use to watch over-the-air TV. That device will usually be your TV, but it could also be multiple TVs, a computer, a smartphone or tablet, or a DVR. The next few sections go through the details of each connection type. But first, you need to know how coaxial connections work.
Making coaxial connections
After you have all your equipment gathered around you, combining all those doodads into a working over-the-air TV configuration means connecting them together. Except for power, all the connections you make are coaxial, meaning they involve fastening together one or more coaxial cables as well as coaxial devices such as extension adapters, splitters, amplifiers, filters, and terminators.
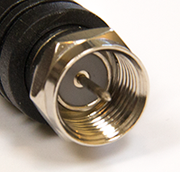
The endpoint of every coaxial cable and device is called an F connector (or sometimes an F-type connector), and there are two types, as shown in the following table:
F connector |
Type |
Description |
|---|---|---|
|
Plug |
A pin in the center, threads on the inside, and a rotatable nut on the outside |
|
Jack |
A socket in the center and threads on the outside |
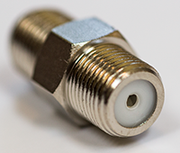
In the table, the photo I use to illustrate an F connector jack is an example of a coaxial extension adapter. This device has jacks on both ends and enables you to connect two coaxial cables by inserting one cable's plug into one of the adapter's jacks, and the other cable's plug into the second of the adapter's jacks.
For historical reasons that are too sexist (and, I suppose, too obvious) to get into here, plug and jack F connectors are referred to distressingly often as male and female F connectors, respectively. Sigh.
Every coaxial connection involves inserting a plug F connector into a jack F connector, as follows:
- Line up the pin of the plug F connector with the socket of the jack F connector.
- Insert the pin into the socket.
Rotate the plug F connector's outside nut (clockwise, if the plug is facing away from you) until you can't turn it any more.
You're connected!
Connecting an antenna to one TV
The simplest connection you can make in your OTA setup is to connect your antenna to a single TV. That connection consists of running the antenna's coaxial cable — either directly from the antenna itself or indirectly from a wall plate connected to an outdoor antenna — to the jack F connector on your TV. The jack F connector usually has one or more of the following labels:
- Ant
- Ant In
- Antenna
- Antenna In
- Cable
- Cable In
Figure 4-5 shows an indoor flat antenna connected to a TV's jack F connector and ready to be installed.

FIGURE 4-5: Connect your antenna’s coaxial cable to your TV’s jack F connector.
Connecting an antenna to multiple TVs
If you want to distribute your OTA signal to two or more TVs (or other devices), you need a coaxial splitter. A splitter is a device that has a single jack F connector input port (usually labeled In) and two or more jack F connector output ports (usually labeled Out). Figure 4-6 shows an example.
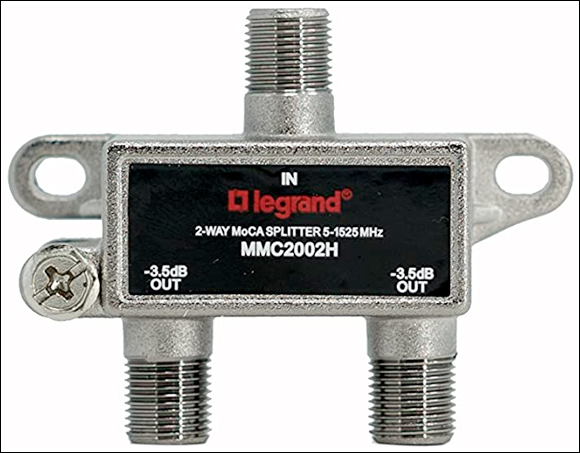
FIGURE 4-6: A garden-variety coaxial splitter.
The idea is that you connect your antenna's coaxial cable to the splitter's input port, and then run coaxial cable from the output ports to each device that you want to receive the antenna's signals.
If you're splitting your signal and one of the output devices is far away (say, more than 50 feet, or 15 meters), the signal might degrade too much for it to be usable on that device. In that case, you might want to invest in a distribution amplifier, which is a splitter that boosts the signal as it goes through each of the amplifier's output ports. Distribution amplifiers are powered devices, so you'll need a nearby power outlet.
What if the perfect place to install your distribution amplifier is a location that has no nearby power outlet? No problem. Just get yourself a power over coax device, which plugs into a power outlet and offers two jack F connectors. Use one connector to run a coaxial cable to your TV. Use the other connector to run some coax to the distribution amplifier. That second coax cable will also power the amplifier.
Connecting an antenna to your computer
Long gone are the days when a TV was the only screen in the house. Nowadays, our faces are aglow with all kinds of screens, including computer monitors. But can you watch over-the-air TV on your computer?
The short answer is, no, you can't, because most computers are missing a crucial bit of tech: an HDTV tuner. Without that tuner, your computer doesn't have the faintest idea what it's supposed to do with an over-the-air TV signal.
Fortunately for you, the long answer is, yes, you can, as long as you augment your computer with an external HDTV tuner, which is a device that has a USB connector on one end and a jack F connector on the other (see Figure 4-7). Plug the device into an available USB port on your PC, run your antenna's coaxial cable to the tuner's jack F connector, and you're good to go.
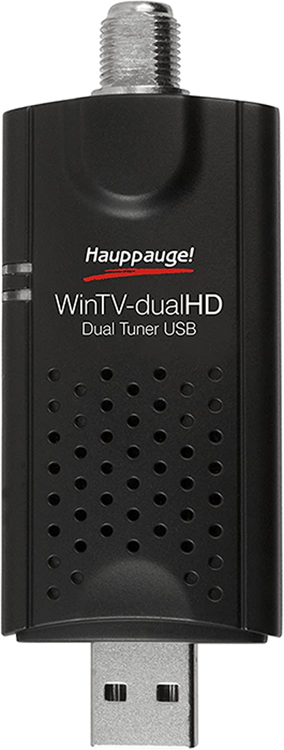
FIGURE 4-7: An HDTV tuner enables you to view over-the-air TV on your PC.
Connecting an antenna to your mobile device
If you want to watch over-the-air TV on your smartphone or tablet, you have a couple of choices:
- If your mobile device has a USB port (as do many Android phones and tablets), look for an HDTV tuner that connects to the USB port and also offers a jack F connector to connect your antenna's coaxial cable.
- For all other mobile devices, it's possible to broadcast your over-the-air TV signals through your Wi-Fi network, and then use an app on your mobile device to tune in to those signals. I talk about this setup in detail in the next section.
Connecting an antenna to your Wi-Fi network
If you want to distribute your over-the-air TV signals to multiple devices scattered throughout your house, what are your options? Two come to mind:
- If your house is already wired with TV infrastructure such as coaxial cables and coaxial wall plates, you can use that setup to distribute your OTA signals. This option doesn't help if you have home areas without TV infrastructure.
- You can run your own coaxial cables throughout the house to each place you need it. Yes, that almost certainly means drilling holes in walls and floors.
These options work in a pinch, but neither is ideal. A much neater, more flexible, and more modern solution is to take advantage of something you probably already have: a Wi-Fi network. This solution requires an HDTV tuner or DVR that can connect to your Wi-Fi network. Setting everything up generally involves these steps:
- Connect the tuner or DVR to your antenna using a coaxial cable.
- Connect the tuner or DVR to your Wi-Fi router (often directly using an Ethernet cable).
Install the device app on any compatible machine.
Compatible machines might be an iOS or Android mobile device or a streaming device such as a Roku player or Amazon Fire TV.
- Use the app to locate the tuner or DVR on your Wi-Fi network.
- Use the app to watch (and possible record) over-the-air TV.
Improving antenna reception
Getting free HD channels just by installing an antenna is one of the best things about cutting the cord. Alas, those free signals lose their luster when the reception cuts in and out or falls off the digital cliff. That's just life in OTA City, right? Well, it might be if you live a really long way from the transmission towers you're trying to access. Otherwise, if your reception is problematic, try the following fixes:
- Look for physical interference. Make sure your antenna's line-of-sight with any transmission tower isn't blocked by a brick wall, a building, a mountain, or tall trees.
- Look for electromagnetic interference. Make sure your antenna isn't close to a TV, computer, Wi-Fi router, or another electronic device that could create interference.
- Add an LTE filter. LTE cellular signals are pretty much everywhere these days, but you can eliminate them as a source of interference by installing an LTE filter. Connect the filter directly to your TV's jack F connector or to the input jack of the amplifier or splitter, if you use one of those devices.
- Shorten the cable. The longer the cable, the more the signal degrades. If you're using, say, a 50-foot coaxial cable to reach a TV that's just 10 feet away, try a shorter cable.
- Lengthen the cable. If you use an extension adapter to combine two shorter lengths of cable, you lose some signal through that adapter. Try a longer cable that doesn't require an extension adapter.
- Replace the cable. If your setup includes an old coaxial cable, the cable might not have enough shielding. If possible, try swapping the old cable for quad shield cable.
- Remove the amplifier. If your antenna includes an amplifier — or if you've added an amplifier to your configuration — try turning off or removing the amplifier.
- Add an amplifier. If you've split the incoming signal, you can make up the signal loss by adding a distribution amplifier.
If you implement any of these fixes, be sure to rescan for OTA channels, as I describe in the next section.
Scanning for OTA Channels
After you have your antenna installed and connected to your TV, your final chore (not including microwaving some popcorn for the upcoming TV binging) is to convince your TV to scan for all the channels that are now available.
You might not have to do any manual scanning because many TVs are set up to automatically scan the connected coaxial cable for signals. If your TV doesn't scan automatically, however, you need to run a scan by following these general steps (the specifics of which vary depending on the make and model of your TV):
On your TV's remote, press the button that takes you to the TV's setup screen.
The button will be labeled Menu, Options, or Setup.
In the setup screen, navigate to and select the item for working with an antenna or over-the-air TV.
The item will be named something like Antenna, Channels, Live TV, or Broadcast.
Select the item for scanning, which will be named something like Channel Scan or Channel Tuning.
If your TV doesn't appear to have a dedicated feature for scanning OTA channels, use the Input button to select the Antenna input, which should start a scan automatically.
Your TV then proceeds to scan the incoming antenna signal for available channels and displays its progress, as shown in Figure 4-8. Note that the scan can take between 5 and 30 minutes, depending on your TV and configuration.
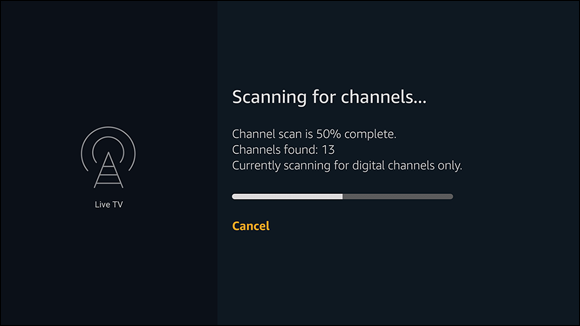
FIGURE 4-8: The screen shows the progress of the channel scan.