
5. Drawing Custom Views
In this chapter, we will build a simple line graph that shows how the user’s weight changes over time. Both the weight axis and the time axis will scale to fill all available space. We will also draw labeled reference lines to help the user interpret the graph.
Most of this chapter focuses on performing custom drawing within our UIViews. We will look both at UIKit’s drawing methods and at the underlying Core Graphics framework. We will also examine how the iOS SDK manages the difference in resolution between regular and Retina displays.
Building GraphStats
Let’s start by creating the GraphStats class. This class will process an array of WeightEntries and calculate some simple statistics about the collection. These include: starting date, ending date, duration, minimum weight, maximum weight, and weight span. GraphStats will also provide a block-based method for iterating over all the WeightEntries in the collection.
Create a new NSObject subclass in the Views group. Name it GraphStats. Then open GraphStats.h and make the following changes:
#import <Foundation/Foundation.h>
@class WeightEntry;
@interface GraphStats : NSObject
@property (strong, nonatomic, readonly) NSDate* startingDate;
@property (strong, nonatomic, readonly) NSDate* endingDate;
@property (assign, nonatomic, readonly) NSTimeInterval duration;
@property (assign, nonatomic, readonly) CGFloat minWeight;
@property (assign, nonatomic, readonly) CGFloat maxWeight;
@property (assign, nonatomic, readonly) CGFloat weightSpan;
- (id)initWithWeightEntryArray:(NSArray*)weightEntries;
- (void)processWeightEntryUsingBlock:(void (^)(WeightEntry*)) block;
@end
The GraphStats class acts as a wrapper around an array of WeightEntry objects. We start by adding a forward declaration for the WeightEntry class. Then we add six readonly properties. These give us access to our calculated values, like the starting date of the array or the maximum weight value. Next, we declare our designated initializer. Not surprisingly, it consumes an array of WeightEntry objects.
We will create GraphStats as a non-mutable class. We pass in our WeightEntry array when we first instantiate the object, and the weights cannot change over the object’s lifetime. If you need to add or remove a weight, you must create an entirely new GraphStats object. This greatly simplifies our code. For example, we can bulk-calculate all the property values during our initialization step, and we never need to change them.
Of course, you never get something for nothing. This approach makes updates more computationally expensive. My recommendation is to go with the simplest approach. Once the application is working, we can perform usability testing and profiling to determine if there’s an actual performance problem.
After our designated initializer, we declare the processWeightEntryUsingBlock: method. This will provide access to the underlying array, allowing us to iterate over all the individual WeightEntry values.
Next, open GraphStats.m. We need to import the WeightEntry header and then add the following extension before the @implementation block:
#import "GraphStats.h"
#import "WeightEntry.h"
@interface GraphStats()
@property (copy, nonatomic) NSArray* entries;
@property (strong, nonatomic, readwrite) NSDate* startingDate;
@property (strong, nonatomic, readwrite) NSDate* endingDate;
@property (assign, nonatomic, readwrite) NSTimeInterval duration;
@property (assign, nonatomic, readwrite) CGFloat minWeight;
@property (assign, nonatomic, readwrite) CGFloat maxWeight;
@property (assign, nonatomic, readwrite) CGFloat weightSpan;
- (void)processArray:(NSArray*)weightEntries;
@end
Here, we add a property to hold our array of WeightEntries. Notice that we copy the array, we do not hold onto the original. This prevents events from accidentally modifying our entries. Adding or removing an entry from the original array has no effect on our copy.
Next, we redeclare our readonly properties, making them readwrite. We also add a private helper method to process our array—this will perform the actual calculations needed to fill our public properties.
With the extension in place, we still have to synthesize our properties:
@synthesize entries = _entries;
@synthesize startingDate = _startingDate;
@synthesize endingDate = _endingDate;
@synthesize duration = _duration;
@synthesize minWeight = _minWeight;
@synthesize maxWeight = _maxWeight;
@synthesize weightSpan = _weightSpan;
Now, let’s implement the designated initializer and override the superclass’s designated initializer, as shown here:
// Designated Initializer.
- (id)initWithWeightEntryArray:(NSArray*)weightEntries {
if ((self = [super init])) {
[self processArray:weightEntries];
}
return self;
}
// Superclass's Designated Initializer.
- (id)init {
// Create with an empy array.
return [self initWithWeightEntryArray:[NSArray array]];
}
We’ve had a lot of practice with designated initializers, so these should seem familiar by now. The initWithWeightEntryArray: method calls the processArray: helper method, while init simply defaults back to the designated initializer and passes in an empty array. That’s it.
Now, let’s implement the processWeightEntryUsingBlock: method.
- (void)processWeightEntryUsingBlock:
(void (^)(WeightEntry*)) block {
for (WeightEntry* entry in self.entries) {
block(entry);
}
}
As you can see, we iterate over the array, passing each WeightEntry object to the provided block. This is a convenient technique for exposing some access to an internal collection. Anyone using our class can iterate over the entire array—but they are never given access to the array itself.
Finally, we need to add our private helper method, processArray:. This gets a bit long, so let’s take it in small steps.
#pragma mark - private methods
- (void)processArray:(NSArray*)weightEntries {
self.entries = weightEntries;
// Handle the edge case where we have no
// dates in our array.
if ([weightEntries count] == 0) {
NSDate* date = [NSDate date];
self.startingDate = date;
self.endingDate = date;
self.duration = 0.0f;
self.minWeight = 0.0f;
self.maxWeight = 0.0f;
self.weightSpan = 0.0f;
return;
}
Here, we assign the weightEntries argument to our entries property. As we discussed earlier, this is a copy property, so it will make a new copy of the entire array. This prevents others from accidentally changing the array out from under us.
Next, we handle the corner case where the weightEntries argument is empty. Here, we create a new NSDate object set to the current date and time. We assign this date object to both the starting date and the ending date (ensuring that these values are the same). Then we set everything else to zero. Finally, we just return without doing any additional calculations.
// The weight entries are in order from newest to oldest.
// Ending date is stored in the first entry.
id myEntry = [weightEntries objectAtIndex:0];
self.endingDate = [myEntry date];
// Starting date is stored in the last entry.
myEntry = [weightEntries lastObject];
self.startingDate = [myEntry date];
self.duration =
[self.endingDate timeIntervalSinceDate:self.startingDate];
From here on, we know that we have at least one WeightEntry in our array, so we start calculating the start and end dates. While we could scan over the entire array looking for the entries with the earliest and latest dates, this is not necessary. If you remember, our code in Chapter 4 kept our weights in strict date order. The newest entry is always at the front of the array, the oldest at the end. Knowing this, we can just grab those values directly.
We calculate the array’s duration by calling timeIntervalSinceDate:. This gives us an NSTimeInterval containing the number of seconds between the two dates. The duration is a positive number if the calling date occurs later than the argument date. If it’s earlier, timeIntervalSinceDate: returns a negative number.
self.minWeight = CGFLOAT_MAX;
self.maxWeight = CGFLOAT_MIN;
for (id currentEntry in weightEntries) {
CGFloat weight = [currentEntry weightInLbs];
if (weight < self.minWeight) self.minWeight = weight;
if (weight > self.maxWeight) self.maxWeight = weight;
}
self.weightSpan = self.maxWeight - self.minWeight;
}
Finally, we iterate over all the WeightEntries and look for the minimum and maximum weights. We then calculate the weight span by subtracting the minimum from the maximum.
Building a Custom View
Next up, we need to create our GraphView. Right-click the Views group and select New File. When the “Choose a template” panel appears, make sure the iOS > Cocoa Touch templates are selected, choose the Objective-C class, and click Next. Name our class GraphView, make it a subclass of UIView, and click Next again. In the final panel, simply accept the defaults and click Create.
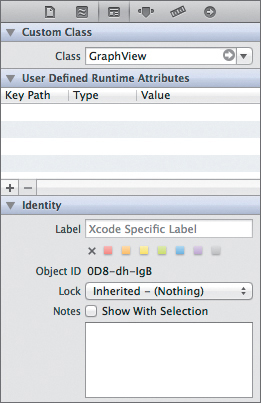
Now open our storyboard and zoom in on the graph view controller scene. Select the view and switch to the Identity inspector. Change the Class setting to GraphView (Figure 5.1). That’s it. We’re now using our very own custom view.
Figure 5.1 Setting the view’s class
Of course, it doesn’t do anything yet. Let’s fix that. Switch to the Attributes tab. Set the Background attribute to Dark Gray Color. Then open GraphView.h and modify it as shown here:
#import <UIKit/UIKit.h>
#import "WeightEntry.h"
@interface GraphView : UIView
@property (nonatomic, assign) CGFloat margin;
@property (nonatomic, assign) CGSize cornerRadius;
@property (nonatomic, strong) UIColor* graphBorderColor;
@property (nonatomic, strong) UIColor* graphFillColor;
@property (nonatomic, assign) CGFloat graphBorderWidth;
@property (nonatomic, strong) UIColor* gridColor;
@property (nonatomic, assign) CGFloat gridSquareSize;
@property (nonatomic, assign) CGFloat gridLineWidth;
@property (nonatomic, strong) UIColor* trendLineColor;
@property (nonatomic, assign) CGFloat trendLineWidth;
@property (nonatomic, strong) UIColor* referenceLineColor;
@property (nonatomic, assign) CGFloat referenceLineWidth;
@property (nonatomic, strong) UIColor* textColor;
@property (nonatomic, assign) CGFloat fontSize;
- (void)setWeightEntries:(NSArray*)weightEntries
andUnits:(WeightUnit)units;
@end
As you can see, we’re declaring a slew of properties that control the graph’s appearance. This has a couple of advantages. First, it makes the code easier to maintain. We can create a single method that defines all the default values. Then, if we want to make a change, we don’t have to chase down every instance where that value is used, we simply modify the default value instead. These properties also let us customize the view’s appearance at runtime. Our GraphViewController just needs to modify these properties before the view appears onscreen.
After the properties, we also declare the setWeightEntries:andUnits: method. The controller will use this to pass in data from our model.
Once the header is finished, switch to the implementation file. Here, we need to import GraphStats.h and then declare a private property to hold our GraphStats object and our units value. We also declare a number of private helper methods. These will draw the different parts of our user interface.
#import "GraphStats.h"
@interface GraphView()
@property (nonatomic, assign) WeightUnit units;
@property (nonatomic, strong) GraphStats* graphStats;
- (void)setDefaults;
- (void)drawSingleEntryTrendLine;
- (void)drawTrendLine;
- (void)drawReferenceLineWithLabel:(NSString*)label
font:(UIFont*)font
atY:(CGFloat)y
withTextWidthOffset:(CGFloat)xOffset;
- (CGPoint) coordinatesForEntry:(WeightEntry*)entry
inBounds:(CGRect)bounds;
@end
Next, we synthesize all the properties:
@synthesize margin = _margin;
@synthesize cornerRadius = _cornerRadius;
@synthesize graphBorderColor = _graphBorderColor;
@synthesize graphFillColor = _graphFillColor;
@synthesize graphBorderWidth = _graphBorderWidth;
@synthesize gridColor = _gridColor;
@synthesize gridSquareSize = _gridSquareSize;
@synthesize gridLineWidth = _gridLineWidth;
@synthesize trendLineColor = _trendLineColor;
@synthesize trendLineWidth = _trendLineWidth;
@synthesize referenceLineColor = _referenceLineColor;
@synthesize referenceLineWidth = _referenceLineWidth;
@synthesize textColor = _textColor;
@synthesize fontSize = _fontSize;
@synthesize units = _units;
@synthesize graphStats = _graphStats;
Now let’s implement our default initializer. Unlike most of the other classes we’ve seen so far, GraphView uses the same designated initializer as its superclass. This means we do not need a separate method just to override the superclass’s initializer.
On the other hand, we will want to override our class’s initWithCoder: method. We will discuss initWithCoder: in more detail in Chapter 6, when we discuss loading and saving files. For now, just understand that loading a view from a nib file (and by extension, loading from a storyboard) does not call the view’s designated initializer, it calls initWithCoder: instead.
- (id)initWithFrame:(CGRect)frame
{
self = [super initWithFrame:frame];
if (self) {
[self setDefaults];
}
return self;
}
- (id)initWithCoder:(NSCoder *)aDecoder {
self = [super initWithCoder:aDecoder];
if (self) {
[self setDefaults];
}
return self;
}
In both cases, we simply call the superclass’s version and then we call the setDefaults method.
Next, let’s set the default values for our drawing:
#pragma mark - Default Values
- (void)setDefaults {
_units = LBS;
_margin = 5.0f;
_cornerRadius = CGSizeMake(20.0f, 20.0f);
_graphBorderColor = [UIColor blackColor];
_graphFillColor = [UIColor lightGrayColor];
_graphBorderWidth = 2.0f;
_gridColor = [UIColor colorWithRed:0.0f
green:1.0f
blue:1.0f
alpha:1.0f];
_gridSquareSize = 20.0f;
_gridLineWidth = 0.25f;
_trendLineColor = [UIColor redColor];
_trendLineWidth = 4.0f;
_referenceLineColor = [UIColor lightTextColor];
_referenceLineWidth = 1.0f;
_textColor = [UIColor lightTextColor];
_fontSize = 10.0f;
}
Here we set a slew of color, line width, and other values for our drawing code. We will look at these in more depth when they are actually used.
Next, implement the setWeightEntries:andUnits: method as shown here:
#pragma mark - Setting the weight data
- (void)setWeightEntries:(NSArray*)weightEntries
andUnits:(WeightUnit)units {
self.graphStats =
[[GraphStats alloc] initWithWeightEntryArray:weightEntries];
self.units = units;
[self setNeedsDisplay];
}
Here, we start by instantiating a new GraphStats object using the weightEntries argument. We then assign that object to our graphStats property. We also set the units property and call setNeedsDisplay.
The setNeedsDisplay method tells the system that the view’s content has changed and needs to be redrawn. Notice that setNeedsDisplay does not trigger an immediate redrawing. Instead, the system just records the request and allows setNeedsDisplay to return. Then, during the next draw cycle, the view redraws itself.
Performing Custom Drawing
Now we get to the heart of this chapter: drawing our user interface.
When UIKit needs to draw a view (either entirely or just in part), it creates a graphics context whose origin matches the view’s bounds (e.g., {0.0, 0.0} is located at the top left corner of the view). It also applies any transforms necessary to make the context match the view (rotation, scaling, etc.). Then, it calls the view’s drawRect: method.
Of course, the default UIView’s drawRect: method doesn’t do anything at all, but we can override it to customize our view’s appearance.
Please note, this is not the only way to draw a view. If you just want to change the background color, you do not need to implement drawRect:. Just change the view’s backgroundColor property. The rest is automatic.
At the other extreme, if you are drawing the content directly in the view’s layer, or if you plan to use OpenGL ES for your drawing, you do not need to override the drawRect: method. These approaches have their own drawing techniques.
Still, if you plan to use the native drawing technologies in Core Graphics and UIKit, drawRect: is your best friend.
In our view, we will draw a simple graph. The y-axis will represent our weights; the x-axis will represent time. We will dynamically scale both axes to cover the full range from our array of WeightEntries. We will also draw a grid in the background, and reference lines to mark the maximum and minimum values. Finally, we will lay the weight’s trend line over this background information.
Obviously, this isn’t the best possible graph. Even small changes in weight can appear huge because of the autoscaling. A better approach would more intelligently select the scale so that it uses the entire space effectively, still shows the entire trend line, and also minimizes the natural daily variances. Additionally, we really should label both axes, not just the weights, and the reference lines should be spaced evenly throughout this range (every 2 pounds, 5 pounds, 10 pounds, whatever). It would also be nice if they aligned with the background grid.
Still, our quick and dirty implementation is relatively straightforward, while letting us explore a number of useful drawing techniques. So go ahead and uncomment the drawRect: method.
In theory, the first time this method is called, the rect argument should be set to the view’s bounds, letting you fill the entire view. Subsequent calls may then only ask to redraw a small portion of that view. In practice, however, unless you are changing your view and explicitly calling setNeedsDisplay or setNeedsDisplayInRect:, you will probably only draw the view once. UIKit caches and reuses this original drawing.
The UIView draws onto its CALayer and then displays the CALayer as needed. As a result, we can resize the view, flip it, fade it in and out, and even cover it up and reveal it again without needing to redraw it.
If you are updating your view, you should try to make the update rectangle as small as possible. The system will automatically set the current context’s clipping path to match the update rectangle. This prevents us from accidentally drawing outside the update rectangle. Still, we should avoid performing any unnecessary drawing, especially when frequently updating our views, since these can create significant performance bottlenecks.
In complex views, you often want to separate the content using multiple views or layers—one contains the static content, the others contain different dynamic elements. This allows us to selectively redraw only those elements that actually change.
In our case, the entire view is static; it should be drawn only once, when the system first displays it. This means we can safely ignore the rect argument and just draw the entire view. If, by some chance, the system happens to update just a portion of our view, everything will still work properly. Yes, we might waste a little computational effort trying to draw outside the clipping path—but those drawing commands are ignored and don’t actually affect the application’s appearance. Remember, there’s no point in optimizing our code for edge cases that never occur in practice.
Also, notice that we don’t ever draw our view’s backgroundColor. The system automatically handles this for us before calling our drawRect: method. However, since our custom drawing code does not fill the entire view, we must either set a non-opaque background color or change our view’s opaque property to NO. Anything else may result in unpredictable drawing errors.
#pragma mark - drawing
- (void)drawRect:(CGRect)rect {
// Calculate bounds with margin.
CGRect innerBounds =
CGRectInset(self.bounds, self.margin, self.margin);
// Fill in the rounded rectangle.
UIBezierPath* graphBorder =
[UIBezierPath bezierPathWithRoundedRect:innerBounds
byRoundingCorners:UIRectCornerAllCorners
cornerRadii:self.cornerRadius];
[self.graphFillColor setFill];
[graphBorder fill];
Here we use the CGRectInset() method to create a smaller rectangle centered in the view’s bounds. We use the margin property to determine the spacing between the inner bounds and the view’s bounds. We set the default margin to 5.0f, so there should be a 5-point gap on all sides (left, right, top, and bottom).
Next, we use the bezierPathWithRoundedRect:byRoundingCorners:cornerRadii: convenience method to create a UIBezierPath. The UIBezierPath class lets us create a series of straight and curved line segments, then draw that path to the current context. Paths can be open or closed. You can build them either one line segment at a time, or you can use one of the convenience methods to create common shapes: rectangle, oval, arc, or in this particular case a rounded rectangle. Once we have our rounded rectangle, we set the current context’s fill color, using the graphFillColor property, and then we fill it in.
Core Graphics and UIKit support two basic drawing operations: fills and strokes. A fill operation paints the inside of a region or shape; a stroke draws the outline. Our context can have separate stroke and fill colors but can have only one fill or stroke color at a time (not including fill patterns and gradients).
// Save the current context.
CGContextRef context = UIGraphicsGetCurrentContext();
CGContextSaveGState(context);
// Limit drawing to inside the rounded rectangle.
[graphBorder addClip];
This step is short, but it’s worth talking about in detail. Each graphics context maintains a stack of states. The states record a number of the graphics context’s parameters. These include the following:
• Current transformation matrix
• Clip region
• Image interpolation quality
• Line width
• Line join
• Miter limit
• Line cap
• Line dash
• Flatness
• Should anti-alias
• Rendering intent
• Fill color space
• Stroke color space
• Fill color
• Stroke color
• Alpha value
• Font
• Font size
• Character spacing
• Text drawing mode
• Shadow parameters
• Pattern phase
• Font smoothing parameter
• Blend mode
Some of these, like the stroke or fill color, are simple enough to set and reset manually. In other cases, it may not be so easy to undo your changes. Look at the clipping path. Both the UIKit methods and the Core Graphics functions offer ways of adding shapes to the current clipping path; however, there’s no way to remove them.
The graphics context’s stack of states gives us an easy way to quickly undo a large number of changes. We can even roll back those hard-to-fix changes. By calling CGContextSaveGState() and CGContextRestoreGState(), we can push and pop the current state onto and off of the state stack.
In this particular case, we want to add the rounded rectangle to the clipping path (thus limiting all drawing to the inside of our rounded rectangle). However, we will still want to draw outside the rectangle later on. Therefore, we must save the state before we alter the clipping path.
Note

You only need to use CGContextSaveGState() and CGContextRestoreGState() if you plan to undo state changes within your own drawing code. The system automatically creates a new graphics context each time a view is drawn. Any changes you make will not persist beyond the current draw cycle and the current view.
// Draw graph paper background.
[self.gridColor setStroke];
CGContextSetLineWidth(context, self.gridLineWidth);
// Draw horizontal.
CGFloat y = innerBounds.origin.y + self.gridSquareSize;
while (y < innerBounds.origin.y + innerBounds.size.height) {
CGPoint segments[] = {CGPointMake(innerBounds.origin.x, y),
CGPointMake(innerBounds.origin.x +
innerBounds.size.width, y)};
CGContextStrokeLineSegments(context, segments, 2);
y += self.gridSquareSize;
}
// Draw vertical.
CGFloat x = innerBounds.origin.x + self.gridSquareSize;
while (x < innerBounds.origin.x + innerBounds.size.width) {
CGPoint segments[] = {CGPointMake(x, innerBounds.origin.y),
CGPointMake(x, innerBounds.origin.y +
innerBounds.size.height)};
CGContextStrokeLineSegments (context, segments, 2);
x += self.gridSquareSize;
}
This snippet draws a grid of horizontal and vertical lines inside our rounded rectangle. We set the stroke color and line width based on our parameters. We then step across the rounded rectangle’s bounds, first drawing vertical lines and then drawing horizontal lines.
The actual drawing is done using the CGContextStrokeLineSegments() function. This takes the context, a C-style array of CGPoints, and a count parameter that indicates the number of points in our array. Here, we just use the line’s two endpoints. The stroke function draws a straight line connecting those points.
// Now draw the trend line.
if (self.graphStats.duration == 0.0) {
[self drawSingleEntryTrendLine];
}
else {
[self drawTrendLine];
}
Next, we check to see if we have an actual trend line (two or more WeightEntries) or just a dot (zero or one WeightEntry). We then call the appropriate helper method.
// Now draw the graph's outline.
CGContextRestoreGState(context);
graphBorder.lineWidth = self.graphBorderWidth;
[self.graphBorderColor setStroke];
[graphBorder stroke];
}
And finally, we restore our graphics state, thus removing the rounded rectangle from the clipping path. Then we set the line width and color, and draw the rounded rectangle’s border. It’s important to draw the border last, placing it over the top of the other drawings. Otherwise, the fill and graph lines would cover its inner edge. Similarly, we have to remove the clipping path, because half the line’s width will be drawn outside the path. If we leave the clipping in place, we’ll only get the inner half of our border.
Now, let’s add stubs for our helper methods. These will let us compile and test our app (Figure 5.2).
- (void)drawSingleEntryTrendLine {
}
- (void)drawTrendLine {
}
- (void)drawReferenceLineWithLabel:(NSString*)label
font:(UIFont*)font
atY:(CGFloat)y
withTextWidthOffset:(CGFloat)xOffset {
}
- (CGPoint) coordinatesForEntry:(WeightEntry*)entry
inBounds:(CGRect)bounds {
return CGPointZero;
}
Figure 5.2 Drawing the rounded rectangle and the grid
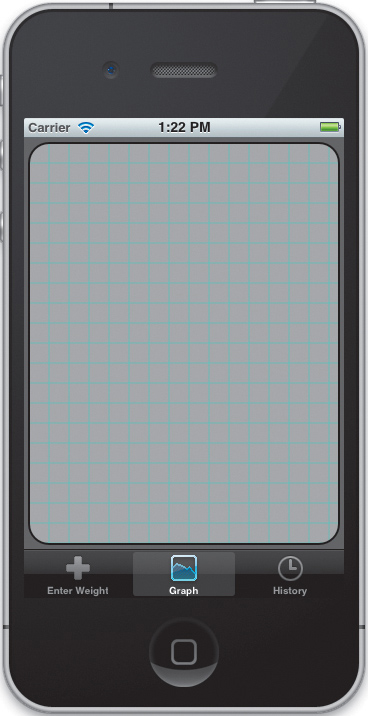
Here we can see the view’s dark background, our rounded rectangle, and our grid lines. We just need to draw our reference lines and the actual trend line.
Drawing a Single-Entry Trend Line
Now we need to implement our helper methods. Let’s start by drawing a dot when we only have a single entry. This also works when we don’t have any entries at all, since the GraphStats will return a duration of 0.0 and a weight of 0.0f.
- (void)drawSingleEntryTrendLine {
NSAssert2(self.graphStats.minWeight ==
self.graphStats.maxWeight,
@"If there's only one entry the minimum weight "
@"(%1.2f) should equal the maximum (%1.2f)",
self.graphStats.minWeight, self.graphStats.maxWeight);
We start with a quick sanity check. We should only call the drawSingleEntryTrendLine method when the GraphStats object has zero or one WeightEntries. In either case, the minimum and maximum weights should have the same value.
We can use NSAssert (and its variants) to verify this assumption. NSAssert takes two arguments: the first is an expression, the second is an NSString. By default, the macro evaluates the expression. If the result is false, NSAssert throws an NSInternalInconsistencyException, using the string in the error message.
NSAsserts can help when debugging, testing, and hardening our code. However, we may not want to include these checks in our final release builds. Fortunately, we can easily disable these checks. Simply define an NS_BLOCK_ASSERTIONS preprocessor macro, and the compiler won’t include the NSAsserts.
By default, Xcode 4.0 automatically disables NSAsserts when you are making release builds. This means we can use as many NSAsserts as we want when developing and testing. We don’t need to worry about them adversely affecting our final product.
Generously sprinkling asserts through your code can greatly help improve your application’s reliability. If a method should take only positive numbers, use an assert to verify that fact. It’s better to crash the application with a reasonable error message than to let it lumber forward in an undefined state.
Of course, there is some debate about whether it’s better to use Cocoa’s NSAssert macro or C’s assert() function. While they largely do the same thing, they have two main differences. The assert() method does not take an error string as an argument. Using NSAssert with well-defined error messages can make it a lot easer to debug your code. On the other hand, assert() is guaranteed to halt your application—NSAssert might not.
NSAssert typically throws an exception, but you can change this behavior by creating a custom NSAssertionHandler subclass. In practice, however, this is almost never done. More commonly, problems might occur when a third-party library accidentally catches and then silently discards your NSInternalInconsistencyException, masking the error from you. This means you might have an assert fail but never actually see it.
Personally, I prefer the richer messages afforded by NSAssert. After all, you can always set a breakpoint to catch exceptions, so they can’t really hide from you—at least, not during development. And, if it becomes a real concern, you can always implement a custom NSAssertionHandler to work around the problem.
Another great source of Internet arguments is the debate over stripping your asserts from your release code. Unless they are actively hurting your performance, there are good arguments both for taking them out and for leaving them in. I must admit, I usually take the path of least resistance. Previous versions of Xcode did not automatically strip the NSAsserts; Xcode 4 does. Most of the time, I’m just not sufficiently motivated to actually go out and modify the behavior either way.
// Find the center of the screen.
CGFloat x = self.bounds.size.width / 2.0f;
CGFloat y = self.bounds.size.height / 2.0f;
CGFloat weight = self.graphStats.minWeight;
After passing the sanity check, we generate some useful values. We calculate the x- and y-coordinates for the center of the graph view. Then we grab the weight value. Since we only have one value, we can just use the GraphStats minimum weight—there’s no need to access the individual WeightEntry objects.
NSString* label =
[WeightEntry stringForWeightInLbs:weight inUnit:self.units];
UIFont* font = [UIFont boldSystemFontOfSize:self.fontSize];
CGSize textSize = [label sizeWithFont:font];
[self drawReferenceLineWithLabel:label
font:font
atY:y
withTextWidthOffset:textSize.width];
Now we’re getting into the nitty-gritty. We start by creating a label string from our weight. As always, this will include the properly formatted number and the unit label. We then request the bold system font based on our current fontSize property. We can use the font to calculate the bounding box needed to draw our string. Simply call the sizeWithFont: method from NSString’s UIStringDrawing extension.
With the string, font, y-coordinate, and text width in hand, we can call the drawReferenceLineWithLabel:font:atY:withTextWidthOffset: helper function. We will look at this function in a bit, but basically it will draw our text label at the specified y-coordinates along the left margin. This is followed by a small space (based on the text width offset and our margin property), and then a thin horizontal line is drawn stretching to the right margin.
UIBezierPath* trendLine = [UIBezierPath bezierPath];
trendLine.lineWidth = self.trendLineWidth;
trendLine.lineCapStyle = kCGLineCapRound;
[trendLine moveToPoint:CGPointMake(x, y)];
[trendLine addLineToPoint:CGPointMake(x + 1, y)];
[self.trendLineColor setStroke];
[trendLine stroke];
}
Finally, we draw our trend line—or actually our trend point. While we could have used the UIBezierPath to create an actual circle, we wanted our trend point to match a multiple-entry trend line as closely as possible. The easiest way to do this is to just draw a very short line.
Here, we create our Bezier path. We set the line width based on our trendLineWidth property. This is 4 points wide by default. We then set the line cap style to round caps. This defines the shape of the line’s endpoints. We then move the cursor to the center of the view and create a 1-point-long line.
Finally, we set the line’s color, based on our trendLineColor property, and draw the line. By drawing a very short, wide line with round end caps, we create a nice little dot that will perfectly match the actual lines we will draw in our next helper method.
Drawing the Full Trend Line
While similar to the previous method in many ways, drawTrendLine adds a few layers of complexity. Here, we’re going to draw two labeled reference lines. One corresponds to the minimum weight, one to the maximum. We will also need to coordinate their appearance, so even though the weight labels may have different widths, the left edge of the reference lines remains properly aligned. Finally, we need to dynamically size our graph so our trend line fills the bulk of the view.
Again, because of the length of this method, we will look at it in smaller chunks.
- (void)drawTrendLine {
// Draw the reference lines.
UIFont* font = [UIFont boldSystemFontOfSize:self.fontSize];
CGFloat textPadding = font.lineHeight / 2.0f;
CGFloat topY = self.margin * 2 + textPadding;
CGFloat bottomY = self.bounds.size.height - topY;
We start by requesting the bold system font again. Then we calculate a textPadding variable based on half the font’s height. We then use this value and our margin property to calculate a safe upper and lower limit for our reference lines. After all, we don’t want to cut off the tops and bottoms of our labels.
NSString* topLabel =
[WeightEntry stringForWeightInLbs:self.graphStats.maxWeight
inUnit:self.units];
NSString* bottomLabel =
[WeightEntry stringForWeightInLbs:self.graphStats.minWeight
inUnit:self.units];
CGSize topTextSize = [topLabel sizeWithFont:font];
CGSize bottomTextSize = [bottomLabel sizeWithFont:font];
// Get the maximum width.
CGFloat textOffset =
topTextSize.width > bottomTextSize.width ?
topTextSize.width: bottomTextSize.width;
[self drawReferenceLineWithLabel:topLabel
font:font
atY:topY
withTextWidthOffset:textOffset];
[self drawReferenceLineWithLabel:bottomLabel
font:font
atY:bottomY
withTextWidthOffset:textOffset];
Next, we create our weight labels for the top and bottom reference lines. As stated earlier, the top line will be our maximum weight, while the bottom will be our minimum weight. We then calculate the size of each of these.
Here we use C’s ternary conditional operator to determine the maximum width (see “Operators” in Chapter 2). This expression says that if the top width is greater than the bottom width, we use the top width. Otherwise we use the bottom.
Finally, we call our helper method to draw the two reference lines. Notice that we use the same textOffset for both of them.
CGFloat startX = self.margin * 4 + textOffset;
CGFloat endX = self.bounds.size.width - (self.margin * 3);
UIBezierPath* trendLine = [UIBezierPath bezierPath];
trendLine.lineWidth = self.trendLineWidth;
trendLine.lineCapStyle = kCGLineCapRound;
trendLine.lineJoinStyle = kCGLineJoinRound;
// Get starting point.
CGRect graphBounds =
CGRectMake(startX, topY, endX - startX, bottomY - topY);
Here, we want to make sure the graph starts well to the right of our labels. So, we utilize our textOffset variable and our margin property to calculate the starting and ending x-coordinates.
Once we have the start and end x-coordinates, we create an empty UIBezierPath. This will hold our trend line. We set the width based on our trendLineWidth property and then give it rounded caps and joins. We discussed the caps earlier. Joins define the shape of the corners where two line segments connect.
As the last step in this snippet, we create a rectangle based on our startX, endX, topY, and bottomY values.
// Process all the entries.
[self.graphStats processWeightEntryUsingBlock:
^(WeightEntry* entry) {
CGPoint point =
[self coordinatesForEntry:entry inBounds:graphBounds];
if (trendLine.empty) {
// If we don't have any points,
// move to the starting point.
[trendLine moveToPoint:point];
}
else {
// Otherwise, draw a line to the next point.
[trendLine addLineToPoint:point];
}
}];
[self.trendLineColor setStroke];
[trendLine stroke];
}
Finally, we use our processWeightEntryUsingBlock: method to process all the WeightEntries in our GraphStats object (see “Building GraphStats” at the beginning of this chapter).
We start by calling the coordinatesForEntry:inBounds: helper method to calculate the entry’s coordinates within our selected bounds. Then, if our Bezier path is empty, we move the cursor to the starting point. Otherwise, we add a new line segment stretching from the current cursor location to the provided point. This also updates the cursor’s location to the new point.
Once the path is complete, we set the stroke color and draw it.
Drawing the Reference Lines and Labels
Now let’s implement the reference line helper method:
- (void)drawReferenceLineWithLabel:(NSString*)label
font:(UIFont*)font
atY:(CGFloat)y
withTextWidthOffset:(CGFloat)xOffset {
// Set x-coordinate.
CGFloat x = self.margin * 2.0f;
[self.textColor setFill];
[label drawAtPoint:CGPointMake(x, y - (font.lineHeight / 2.0f))
withFont:font];
x += self.margin + xOffset;
UIBezierPath* referenceLine = [UIBezierPath bezierPath];
referenceLine.lineWidth = self.referenceLineWidth;
[referenceLine moveToPoint:CGPointMake(x, y)];
[referenceLine addLineToPoint:
CGPointMake(self.bounds.size.width -
(self.margin * 2.0f), y)];
[self.referenceLineColor setStroke];
[referenceLine stroke];
}
We start by creating an x-coordinate that is inset by twice the margin property—once to bring us to the edge of the rounded rectangle, then once more to give us a nice margin inside it. Notice that we are using the same margin value for all the margins: the distance between the view’s bounds and the round rectangle, the distance between the left side of the round rectangle and our reference label, and the distance between the reference label and the reference line. We could have used different margin parameters, but this simplifies the code and provides a clean, uniform appearance.
We then set the fill color to our textColor property, and draw our text using the UIStringDrawing drawAtPoint:withFont: method. This draws a single line of text whose upper-left corner is the given point. Notice that this method uses the text drawing mode and colors from the current context; however, you do not need to set the context’s font. The drawAtPoint:withFont: method manages the font for you automatically.
By default, text is drawn using only the fill color. You can change this if you want by calling the Core Graphics CGContextSetTextDrawingMode() method to add outlines (as well as other drawing effects).
Additionally, we want our text to be vertically centered on the y-coordinate. Notice how we offset the drawing point by subtracting half the font’s line height from our y-coordinate. This moves the label up, centering its bounding box appropriately.
Next, we move the x-coordinate in by using our text width offset and margin. We create our path, a single horizontal line segment that runs from the x- and y-coordinates to the right margin. We set the line width and color, and then we draw the line.
This approach is somewhat different from the one we used to draw the grid lines. Here, we are using UIKit’s UIBezierPath. There, we used Core Graphics’ CGContextStrokeLineSegments() function. As we said earlier, there are a number of duplicate (or near-duplicate) methods between the two frameworks. This often gives us several different ways to accomplish the same basic task. You can pick whichever approach works best in your particular application.
Calculating a Weight Entry’s Coordinates
This method takes a weight entry and the bounds for our trend line. We then calculate the coordinates for that entry within those bounds.
- (CGPoint) coordinatesForEntry:(WeightEntry*)entry
inBounds:(CGRect)bounds {
NSTimeInterval secondsAfterStart =
[entry.date timeIntervalSinceDate:
self.graphStats.startingDate];
CGFloat x = (float)secondsAfterStart /
(float)self.graphStats.duration;
x *= bounds.size.width;
x += bounds.origin.x;
CGFloat y = 1.0f - (entry.weightInLbs -
self.graphStats.minWeight) /
self.graphStats.weightSpan;
y *= bounds.size.height;
y += bounds.origin.y;
return CGPointMake(x, y);
}
We start by calculating our x-coordinates. The x-coordinates should be based on the entry’s date. The starting date should be at the left edge of the bounds; the end date along the right.
We start by using timeIntervalSinceDate: to calculate the number of seconds since our GraphStats starting date. We then divide this by the duration of the GraphStats. This gives us a number from 0.0 to 1.0, where 0.0 is the starting date and 1.0 is the ending date. We convert this to the actual x-coordinate by multiplying it by the bound’s width and then adding the bound’s x-offset.
Next, we do the same thing for the y-coordinates. This time the maximum weight should be at the top of the graph’s bounds, the minimum weight at the bottom. The math is basically the same as above—with one small change. We need to invert the y-coordinates.
The expression, (entry.weightInLbs - self.graphStats.minWeight) / self.graphStats.weightSpan, returns a value from 0.0 to 1.0, with the maximum weight as 1.0. To print at the top, we need the maximum weight to be 0.0 instead. To do that, we simply subtract it from 1.0.
That’s it. Calculate the two coordinates, shove them into a CGPoint, and we’re done.
Run the project and navigate over to the graph view (Figure 5.3). Of course, a graph with no elements isn’t very interesting. Notice how the reference line defaults to 0.0 lbs. We have our red dot in the center of our view. Other than that, there’s not a lot to report here.
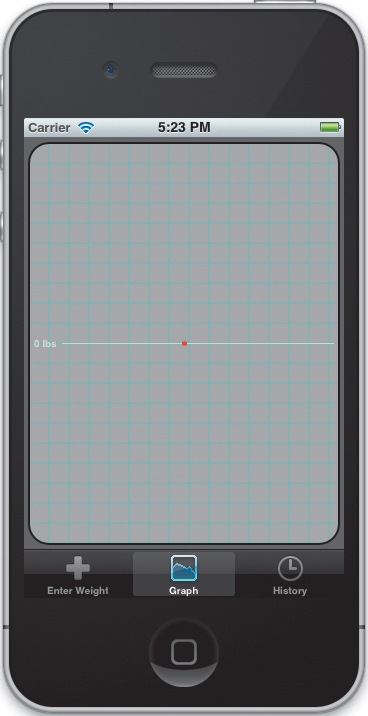
Add another weight and navigate back to the graph. Nothing’s changed. Change the units and navigate back. Still nothing. Clearly the controller isn’t passing along our model information. Let’s fix that.
Finishing the Controller
Open GraphViewController.m. Let’s start by importing our GraphView class. We also need to add string constants for observing our weight list and units.
#import "GraphViewController.h"
#import "GraphView.h"
#import "WeightHistory.h"
static NSString* const WeightKey = @"weights";
static NSString* const UnitsKey = @"defaultUnits";
Next, uncomment the viewDidLoad method and make the following changes:
- (void)viewDidLoad
{
[super viewDidLoad];
id graphView = self.view;
[graphView setWeightEntries:self.weightHistory.weights
andUnits:self.weightHistory.defaultUnits];
// Watch weight history for changes.
[self.weightHistory addObserver:self
forKeyPath:WeightKey
options:NSKeyValueObservingOptionNew
context:nil];
[self. weightHistory addObserver:self
forKeyPath:UnitsKey
options:NSKeyValueObservingOptionNew
context:nil];
}
First, we grab a reference to our custom view and set the view’s weight entries and default units.
There are three common idioms for letting a view controller access a custom view’s properties and instance methods. One is to just cast the view pointer whenever you need it.
[(MyView*) self.view setMyProperty:myValue];
This works, but casting is ugly and I try to avoid it wherever possible.
A second approach involves creating a readonly property to access the custom view, encapsulating the cast in the property’s getter. For example, look at the UITableViewcontroller. This has both a view and a tableView property. The tableView just calls view and casts the result before retuning it. This approach requires a bit more code to set up, but it produces very clean results.
self.myView.myProperty = myValue;
The third option is the one we use here. We leverage Objective-C’s dynamic nature to avoid explicitly casting our results. Instead, we assign the self.view property to an id variable. We can then call any methods we want without getting any compiler warnings. It’s not as nice as the readonly property, but it’s a lot quicker for a one-off solution.
The only downside is that we cannot use the property’s dot notation on ids. We must call the accessor methods instead.
We’ve passed our original data to our view, but we still need to detect updates. To do this, we register our controller for KVO notifications. We’ve seen this before, so there shouldn’t be any big surprises (see “Responding to Changes in the Model” in Chapter 4). There are, however, two small surprises. First, we are observing our model’s weights virtual property—not the weightHistory property. Unlike our history view, we don’t need to know the details of the change. If we see any change at all, we simply redraw the whole view. So, observing the weights property works perfectly well.
Additionally, we are using KVO to observe our defaultUnits property directly, instead of going through the notification center like we did in Chapter 4. We will see why in a second.
As always, anything we set up in viewDidLoad needs to be torn down in viewDidUnload. We added our controller as an observer, so now we must remove it.
- (void)viewDidUnload
{
[super viewDidUnload];
[self.weightHistory removeObserver:self forKeyPath:WeightKey];
[self.weightHistory removeObserver:self forKeyPath:UnitsKey];
}
And we still need to catch these notifications. Remember, all KVO notifications go through the observeValueForKeyPath:ofObject:change:context: method. Let’s implement that now.
- (void)observeValueForKeyPath:(NSString *)keyPath
ofObject:(id)object
change:(NSDictionary *)change
context:(void *)context {
if ([keyPath isEqualToString:WeightKey]||
[keyPath isEqualToString:UnitsKey]) {
id graphView = self.view;
[graphView
setWeightEntries:self.weightHistory.weights
andUnits:self.weightHistory.defaultUnits];
}
}
Having all KVO notifications route through the same method is usually a disadvantage, but this time it actually helps simplify things. If we receive a change notification, we just verify that it matches one of our two keys. If there is a match—we don’t even care which one—we call setWeightEntries:andUnits:, resetting both of them. Also, remember that setWeightEntries:andUnits: automatically calls setNeedsDisplay, causing our view to redraw itself.
Run the application again. Look at the empty graph, and then add a single weight. The graph’s weight label should change when you navigate back to it (Figure 5.4).
Figure 5.4 Single-entry trend line

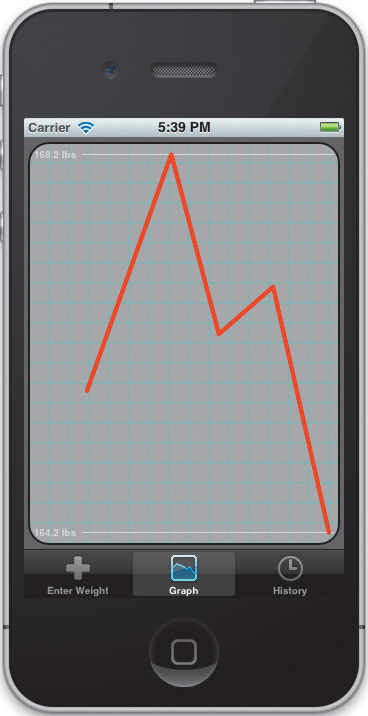
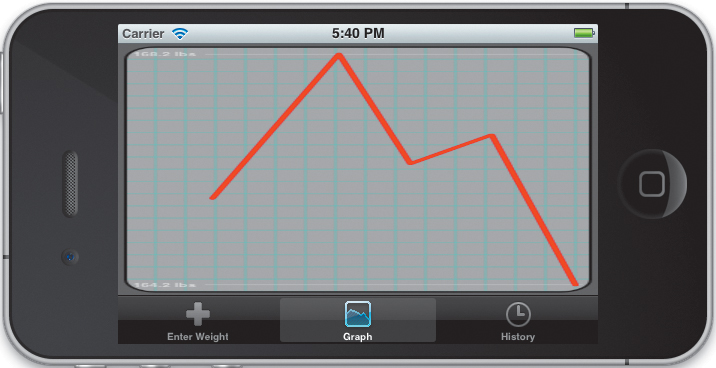
Keep adding weights and see how the graph changes. Try switching between units; the reference line labels should change automatically (Figure 5.5).
Figure 5.5 Displaying a multi-entry graph
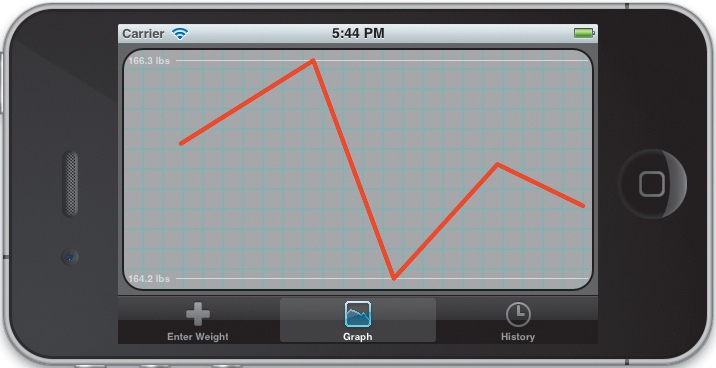
So far, everything looks good, but there’s still one small problem. Try rotating the application. The good news is that our view does not need to be redrawn. The system automatically stretches and squeezes its layer to fit. The bad news—this is obviously not what we want (Figure 5.6).
Figure 5.6 View automatically stretched when rotated
Fortunately, there’s an easy fix. Our view controller already receives a willAnimateRotationToInterfaceOrientation:duration: message when the view rotates. We just need to override this method and ask the view to redraw itself.
- (void) willAnimateRotationToInterfaceOrientation:
(UIInterfaceOrientation) toInterfaceOrientation
duration:(NSTimeInterval)duration {
[self.view setNeedsDisplay];
}
Now run the application again. Add a few weights, and try to rotate it (Figure 5.7). If everything is working properly, commit these changes.
Figure 5.7 Redrawing on rotation
Wrapping Up
In this chapter, we examined different techniques for drawing custom user interface elements. This included a discussion of how UIKit manages the drawing of views, a look at the differences between UIKit and Core Graphics, and some sample code demonstrating drawing techniques from both libraries. However, all the examples in this chapter focused on drawing a static view—a view whose contents rarely changed.
We will take this one step further in Chapter 8, where we will look at custom-drawing a dynamic interface—an interface that is constantly changing. We will also look at incorporating Core Animation to move otherwise static UI elements onto and off of our screen. Finally, we will combine our custom drawing with custom event handling to create our own controls.
In the meantime, Chapters 6 and 7 will focus on saving our user information. Chapter 6 will look at techniques for saving our data model both to disk and to our iCloud storage. Then, in Chapter 7, we will replace our current model with a Core Data-based model.