
Encryption
is the
process
of taking a legible piece of information, such as a text file or Word
document, and converting it into a scrambled, unreadable version. The
process of converting the scrambled version back into a readable
version is referred to as
decryption
.
Encryption is commonly used in sending sensitive information over an
insecure medium. Every communication medium is potentially insecure,
and the Internet’s communication channels are no exception.
Encryption algorithms commonly use a
key
when encrypting the information.
This key helps ensure that only the intended
recipient of the message can decrypt the message. When sending a
sensitive message, the following steps should be taken:
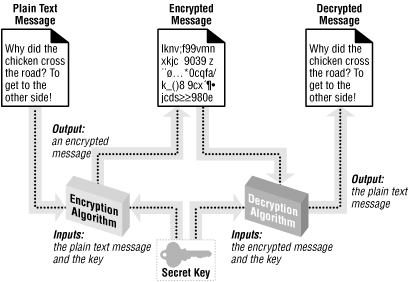
Before sending the sensitive message, encrypt it into an unreadable form using a key.
Send the encrypted message over the insecure communication medium.
The intended recipient of the message has a key that will decrypt the message, converting it from the unreadable, scrambled form back into the readable version that existed prior to Step 1. Once he receives this message, it is decrypted and read.
There are several potential weak points in these three steps. The key
used in Step 1 to encrypt the message is nothing more than a
collection of bits (be it a number, textual password, or some other
key). These keys must be of a finite size; since they are a finite
size, there is obviously a finite number of potential keys. If a
rogue developer intercepts the encrypted message, he can attempt to
decrypt the message through brute force. With
such an approach, the rogue developer would try every possible key in
an attempt to decrypt the data. While there is no way to prevent this
(since there is no way to make a key infinite in size), the best
thing to do is to make the key so long that it would take the rogue
developer too long to decrypt the encrypted message.
Another potential security hole in message encryption involves the storage and exchange of keys. The entire encryption process becomes moot if a rogue developer can discover the intended recipient’s key. This is of special concern in symmetric cryptography, which we’ll discuss in the next section.
For more information on cryptography basics, be sure to check out
ASPEncrypt.com’s “Crypto 101”
section, available at: http://www.aspencrypt.com/crypto101_terminology.html.
In this section, we will be looking at how to perform
security-related tasks using ASPEncrypt, a third-party component from
Persits.com. ASPEncrypt, which includes a free
version of ASPEmail, costs $249.00 for a single server license. A
free 30-day trial can be downloaded at: http://www.aspencrypt.com/download.html.
Tip
For more information on ASPEncrypt and all of Persits’s product line, check out http://www.persits.com.
When encrypting information, a key is used to help ensure that only the intended recipient of the message will be able to decrypt the message. As we discussed in the previous section, the strength of the encryption algorithm is based on the size of the key. There are two types of key-based cryptography schemes that can be employed: symmetric cryptography and asymmetric cryptography. These types of cryptography differ on how they use keys to encrypt and decrypt information.
In symmetric cryptography , a single key is used to both encrypt and decrypt the data. Figure 8.5 graphically illustrates the principles behind symmetric cryptography. Both the sender and receiver of the encrypted message have to agree on the secret key. One glaring weakness of this approach is that, at some point, the sender has to let the receiver know what the secret key is. Since this information can’t be encrypted (since the receiver wouldn’t have a key to decrypt it), a security hole exists if this transfer occurs over an insecure communication medium. The major advantage of this algorithm is it is a fast and efficient one.
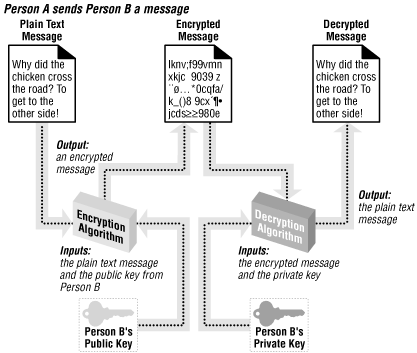
Asymmetric cryptography
uses two mathematically related keys. These two keys include a
private key
, which is never revealed, and a
public key
, which is available to everyone. These two
keys are related mathematically in such a way that a document
encrypted by a public key can only be decrypted by the corresponding
private key. So, as Figure 8.6 illustrates, if
Person A wishes to send Person B an encrypted message, Person A will
encrypt the message with Person B’s public key. Once this is
accomplished, the only key that will decrypt the message is Person
B’s private key, which is known only by
Person B. This has the advantage that anyone can send Person B an
encrypted message that only Person B can decrypt, since everyone
knows Person B’s public key and only Person B knows his private
key.
Encryption can be used to garble the information sent between two computers, but how can a user be sure that when he or she receives a piece of information such as email, it came from whomever claimed to have sent it? While authentication may not seem vitally important, it is essential to protect from the “Man in the Middle” attack.
In the “Man in the Middle” attack, a malicious hacker intercepts communications between a sender and a receiver and masquerades as the sender. For example, say that Person A was interested in obtaining some sensitive information from Person B. In a normal, asymmetric cryptography scheme, the following events would unfold:
Person A sends Person B his public key and asks for a sensitive document.
Person B knows that A has rights to see that sensitive document, so Person B encrypts the sensitive document with Person A’s public key, so that only Person A’s private key can decrypt the information.
Person A receives the encrypted message containing the sensitive document and decrypts it with his private key.
This is how it’s supposed to work, but what if a hacker interjected himself into the middle of this scenario? Imagine that the following sequence of steps occurred:
Person A sends Person B his public key and asks for a sensitive document.
The hacker intercepts this request and alters the request. The hacker replaces Person A’s public key in the request with his own public key.
Person B receives the request. Thinking the request contains Person A’s public key, the information is encrypted with the hacker’s public key. The encrypted message is then sent to Person A.
That hacker again intercepts the message en route to Person A. Since the message was encrypted with the hacker’s public key, the hacker can decrypt the message with his private key and read the sensitive documents!
So as not to alert Person A to a potential security attack, the hacker can encrypt the plain text secure document with Person A’s public key and send it to Person A. At this point, Person A can decrypt the message with his private key. No one except the hacker is aware that any breach in security has occurred!
Figure 8.7 illustrates the “Man in the Middle” attack.
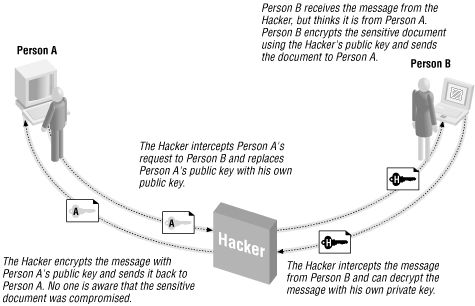
Figure 8-7. Without authentication, asymmetric cryptography is vulnerable to a “Man in the Middle” attack
The reason the “Man in the Middle” attack works is
because Person A and Person B have no means to verify that the
message hasn’t been altered in transit. To account for this,
digital signatures
are used. Digital signatures reverse
the public key/private key roles. If a sender encrypts his message
using his own private key, anyone can decrypt it with the
sender’s public key. Since the sender is the only one who has
access to his private key, a message received that can be
successfully decrypted by the sender’s public key must have
been sent from the sender.
Understand that digital signatures are not used to encrypt data; rather, they are used solely for authentication. Encryption and authentication are two different things; the former garbles the message so it is only readable by the intended recipient(s), while the latter is used to guarantee the message was sent by the person claiming to have sent it. There is no reason why, though, a message can’t be both digitally signed and encrypted.
Asymmetric cryptography, which is widely used, requires a public and private key pair for all parties interested in participating in secure communications. Who is responsible, though, for generating these public and private keys? Obviously, if by chance two people were using the same public or private keys, all the advantages for the public/private key system would go flying out the window.
To overcome these problems, digital
certificates
are used. Digital certificates
bind an individual to a public key. Since asymmetric cryptography
fails if multiple users have identical public or private keys,
trusted third-party companies known as certificate
authorities
have arisen. The job of certificate
authorities is to issue digital certificates, thereby assigning
unique public and private keys. There are many certificate
authorities available that can easily be found by searching the web
for “Certificate Authorities.” A popular certificate
authority is VeriSign (http://www.verisign.com).
Tip
For more information on digital certificates, be sure to check out http://www.aspencrypt.com/crypto101_certs.html.
Digital certificates come for both clients (individual users) and servers (web servers, for example). A web server that wishes to establish the Secure Socket Layer (SSL) needs to use a server certificate. Individuals who wish to receive encrypted documents using an asymmetric cryptography algorithm (such as encrypted email) must have a client digital certificate set up on their computer. In Section 8.4.4, we’ll examine how to set up a client certificate.
There are many potential situations in which it would be nice to be able to send an encrypted email. An online stock-trading web site, for example, might offer its users an option to have their stock portfolio’s current worth emailed to them at the close of the market each day. Sending such information in plain text email poses a potential security threat, since anyone who can intercept the email can easily view its contents. The email could be most likely be intercepted in one of two ways: by some hacker who was eavesdropping on the network communications, or by a nosy technical engineer at the user’s ISP.
To keep the portfolio information secure, one option would be for the online trading company to send encrypted email. When encrypting email, it is important to ensure that the email is encrypted so only the person the email is intended for can decrypt it. Furthermore, it would be nice to encrypt the message using a standard technology so the user receiving the email can decrypt the message without needing to download or use any type of add-on component.
Such a scenario is possible using S/MIME Certificate-based encryption. S/MIME, which stands for Secure/Multipurpose Internet Mail Extensions, aims at adding security measures to email messages using the MIME format. S/MIME provides for secure email by providing two mechanisms that were discussed throughout the past few pages:
Authentication
Encryption
To reiterate, authentication ensures the recipient of an email message that the email was indeed sent by the person who claimed to send it. Encryption is used to secure the email message, ensuring that only the person the email is intended for can read it. To accomplish both of these tasks, S/MIME uses digital certificates.
Tip
S/MIME is currently supported by a number of popular email clients, including Netscape Communicator, Microsoft Outlook, and Microsoft Outlook Express. A full list of S/MIME-enabled email clients can be found at: http://www.rsasecurity.com/standards/smime/products.html. The RSA Security web site also contains a list of S/MIME-compatible third-party encryption components, which can be found at: http://www.rsasecurity.com/standards/smime/interop_center.html.
For a web server to send encrypted email to a visitor, that visitor must have a digital certificate and must present the web server with his public key. For the web server to digitally sign email, thereby proving to the recipient of the email that it truly came from the source it claims to have come from, the web server must have a digital certificate. Therefore, to just encrypt email, only the client is required to have a certificate; to just sign email, only the web server must have a certificate; to both encrypt and sign email, both the web server and client must have a certificate.
In this section, we will look at how to encrypt and digitally sign email using ASPEncrypt. For information on how to perform a number of other security-related tasks with ASPEncrypt, be sure to check out the ASPEncrypt task list at http://www.aspencrypt.com/tasks.html.
Tip
Besides being able to authenticate and encrypt email, ASPEncrypt can also encrypt files on the web server, be used to implement secure uploads and downloads of sensitive information, and encrypt sensitive information like credit-card numbers!
To encrypt email, you need to know the public key of the intended email recipient. To obtain this information, you need to have access to the recipient’s client certificate, which you can obtain in one of two ways:
The first method is a little cumbersome for the end user, requiring
them to export their certificate to a text file and then upload that
text file. The second method, using the ClientCertificate property,
is preferred, but only works over an SSL connection (where the URL
contains https://). I recommend you use the second
method if possible. The first method is error-prone, since the client
has to export his or her certificate. Furthermore, asking the client
to take the time to export their certificate seems unprofessional to
me.
Since the ClientCertificate property requires the web server to use SSL, you must first set up SSL. There are several great online articles that include examples on how to set up SSL on IIS:
“How to Request and Install an SSL Certificate on IIS 4.0,” found at http://www.4guysfromrolla.com/webtech/062299-1.shtml.
“SSL: Both Secure and Friendly: Why and How to use SSL,” found at http://www.asptoday.com/articles/19991206.htm.
“Untangling Web Security: Getting the Most from IIS Security,” found at http://msdn.microsoft.com/workshop/server/iis/Websec.asp.
Tip
When installing SSL on your server, be sure to opt to accept client certificates. The default Client Certificate Authentication option is not to accept client certificates.
When a web visitor visits a SSL-enabled page that requests a client certificate, she will be prompted to select which client certificate she’d like to present to the web server. This certificate contains the piece of information we are after, which is the client’s public key. Figure 8.8 contains a screenshot of the client certificate selection dialog box.
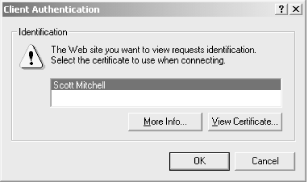
Figure 8-8. When visiting an SSL-enabled web page that accepts client certificates, the visitor must choose what certificate to present to the web site
The Request object’s ClientCertificate property is a collection
containing the client certificate information. Since the property is
a collection, it can be iterated through using a For Each ... Next loop, as Example 8.5 illustrates.
Example 8-5. The Contents of the Client Certificate are Displayed While Iterating Through the ClientCertificate Collection
<% @LANGUAGE="VBSCRIPT" %> <% Option Explicit %> <% Dim strKey 'Loop through each key in the ClientCertificate collection For Each strKey inRequest.ClientCertificateResponse.Write "<B>" & strKey & "</B> - " & _Request.ClientCertificate(strKey)& "<P>" Next %>
The client certificate contains information on the issuer of the
certificate, the email address of the client, the certificate’s
serial number, the date the certificate is valid until, and other
related information. Figure 8.9 contains the output
of the code in Example 8.5 when viewed through a
browser. Note that the URL in the address bar is prefixed by the
SSL-required https:// instead of
the standard http://.

Tip
One bit of information contained in the client certificate, which is
used in Example 8.6 to send encrypted email, is the
Certificate, which is a binary representation of
the entire certificate.
To send encrypted
email using the client’s public
key, the ASPEncrypt component can be used in conjunction with the
ASPEmail
component. Example 8.6 contains an ASP page named
/SendEncMail.asp that sends encrypted email
using the recipient’s public key. This page needs to accomplish
three tasks:
Read in the client certificate.
Create the email message.
Send the encrypted email.
These three steps are outlined with comments in the code in Example 8.6.
Example 8-6. ASPEncrypt and ASPEmail Provide for Encrypted Email Delivery
<% @LANGUAGE="VBSCRIPT" %>
<% Option Explicit %>
<%
  Dim objMail, objCM, objContext, objBlob
  Dim objCert, strMsg, strEmail

  Set objMail = Server.CreateObject("Persits.MailSender")
  Set objCM = Server.CreateObject("Persits.CryptoManager")
  Set objContext = objCM.OpenContext("mycontainer", True)

  ' Retrieve the client certificate from the ClientCertificate property
  Set objBlob = objCM.CreateBlob

  '****** STEP 1: Read in the certificate **********
  objBlob.Binary = Request.ClientCertificate("Certificate")

  'Ensure that the client certificate was correctly received.
  If Len(objBlob.Hex) > 0 Then
    Set objCert = objCM.ImportCertFromBlob(objBlob)

    'See if the certificate contains an email address
    strEmail = objCert.Subject("E")
    If strEmail <> "" Then
      Set strMsg = objContext.CreateMessage
      strMsg.AddRecipientCert objCert

      '******** STEP 2: Create the Email Message **********
      objMail.Host = "mail.yourserver.com"
      objMail.Subject = "This is an Encrypted Message"
      objMail.From = "[email protected]"
      objMail.FromName = "Scott Mitchell"
      objMail.AddAddress strEmail
      objMail.Body = "This message is encrypted!  Only the visitor who supplied " & _
                     "the certificate will be able to view this message."

      '******* STEP 3: Send the encrypted email ***********
      objMail.SendEncrypted strMsg

      Response.Write "Message was successfully sent to " & strEmail
    Else
      'the certificate does not contain an email address; can't send the
      'encrypted email!
      Response.Write "Certificate does not contain an Email address."
    End If
  Else
    'objBlob.Hex = 0, ergo no client certificate was presented
    Response.Write "No certificate received."
  End if
%>
Note that the email is sent using the SendEncrypted method. This method of the ASPEmail component encrypts the email message using the public key provided in the client certificate before sending the email message. This encrypted email message can only be viewed by the client who provided the client certificate and can be displayed only in an S/MIME-compliant email program.
To digitally sign email, the sender of the email must have a certificate. Recall that when a sender wishes to digitally sign email, he will use his private key to encrypt the message. If the receiver of the email message can successfully decrypt the message using the sender’s public key, then the message must have come from the person claiming to have sent the message, since no one else has access to the sender’s private key.
Warning
The purpose of digitally signing an email is not to hide the message of the email from prying eyes, but rather to provide authentication. This will prove the email was really sent from the person who claimed to have sent it, and that it wasn’t tampered with in transit.
Sending digitally signed email requires the message to be encrypted with the server certificate’s private key. This sensitive key is located in the registry, and naturally, should not be able to be read by anyone but the owner of the certificate (the web server). To access this registry information, you must either set the registry permissions to allow the anonymous user to have read access or use the ASPEncrypt object’s LogonUser method to log on as a user who has rights to read the registry.
To send digitally signed email, we must be able to get our hands on
the server certificate, which contains the private key. Unlike
reading the client’s certificate, there is no simple mechanism
to read the server certificate through an ASP page. To get to the
server certificate, we must know the server certificate’s
serial number. The certificate authority assigns
a serial number that uniquely identifies each certificate.
The server certificate’s serial number can be found through the Internet Services Manager. Start by opening the Internet Services Manager (Start → Programs → Administrative Tools → Internet Services Manager). A list of web sites will be brought up; right-click on the web site that will send digitally signed email and click on Properties. Select the Directory Security tab and click on View Certificate. This will bring up a dialog box containing the server certificate’s information. The second tab, Details, contains the properties. Click on the Serial Number property, and the certificate’s serial number is displayed in the text box below. Figure 8.10 shows this dialog box and the server certificate’s numerous properties.
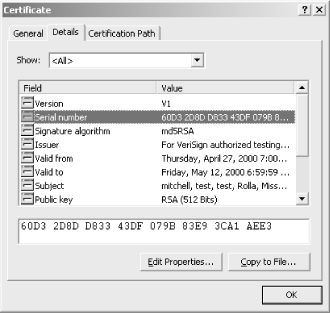
Figure 8-10. The server certificate’s serial number can be found through the Internet Services Manager
Digitally signed email messages are created using the ASPEncrypt and ASPEmail component in tandem. As we saw in Example 8.6, sending encrypted email utilizes both the ASPEncrypt component and a special send method from the ASPEmail component, SendEncrypted. Creating and sending digitally signed email follows a similar pattern: the ASPEncrypt component must be used to read in the server certificate’s private key and encrypt the message, and a special ASPEmail component method (SendSigned) needs to be called to send the signed email. Example 8.7 contains the source code to send digitally signed email using ASPEncrypt and ASPEmail.
Example 8-7. Digitally Signed Email Is Used for Authentication of the Sender
<% @LANGUAGE = "VBSCRIPT" %>
<% Option Explicit %>
<%
  Dim objCM, objMail, objStore, objSignerCert, objContext, objMsg
  Set objCM = Server.CreateObject("Persits.CryptoManager")

  'Log on as a user who has the proper registry permissions
  objCM.LogonUser "domain", "Administrator", "password"

  'Grab the server certificate by serial number
  Set objStore = objCM.OpenStore( "my", True )
  Set objSignerCert = objStore.Certificates("60D3 2D8D D833 43DF 079B 83E9 3CA1 AEE3")

  'Create the digitally signed email
  Set objContext = objCM.OpenContext("my", True )
  Set objMsg = objContext.CreateMessage
  objMsg.SetSignerCert objSignerCert ' Specify signer certificate

  'Send Signed Message
  Set objMail = Server.CreateObject("Persits.MailSender")
  objMail.Host = "mail.yourcompany.com"
  objMail.Subject = "This is a Digitally Signed message"
  objMail.From = "[email protected]"
  objMail.FromName = "Scott Mitchell"
  objMail.AddAddress "[email protected]"
  objMail.Body = "This message is digitally signed, proving its authenticity!"

  objMail.SendSigned objMsg   'Send the signed message
%>
In Example 8.7, we used the LogonUser method to read the server certificate from the web server’s registry. Also note that we used the SendSigned method of the ASPEmail component to send the digitally signed email. For more information on sending digitally signed email using ASPEncrypt and ASPEmail, check out: http://www.aspencrypt.com/task_mail.html.
If you need to send an email message that contains sensitive material and you wish to provide authentication so the user can be assured that the email came from the person claiming to have sent it, you will need to both digitally sign and encrypt the email message. Recall that digitally signing an email message does not hide the email’s contents from prying eyes—it only serves to authenticate that the email was sent by the person who claimed to have sent it. Furthermore, encryption alone does not provide any sort of authentication of the sender.
ASPEncrypt and ASPEmail can be used together to send digitally signed, encrypted emails. The ASPEmail component has a special method, SendSignedAndEncrypted, that is used for sending email messages that need to be both encrypted and signed. Details on sending signed and encrypted email are available on the ASPEncrypt web site at: http://www.aspencrypt.com/task_mail.html. Not surprisingly, this approach involves the union of the code to encrypt the message (shown in Example 8.6) and the code to digitally sign an email message (shown in Example 8.7).