
When managing a software project, communication is one of the most, if not the most, important aspect of software development. In this chapter you’ll learn the excellent features that Visual Studio Team Services offers you for managing your project. Stimulating communication , keeping track of the work that needs to be done, and making sure that all team members work together are important aspects.
You will learn the project management tooling that VS Team Services offers you directly in the Web Access. You will see how you can use these tools to track work, plan resources, and optimize your team. You will also look into team rooms, which is a chat environment that you can use to stimulate discussions and keep track of all the work that’s being done. Finally, you’ll take a first step in Visual Studio by seeing how developers integrate into these processes.
Agile Project Management
When building software there are a lot of parties involved. First, you have the customer with all their different stakeholders. In a typical project you also have business analysts, user experience designers, architects, developers, testers, operations, managers, and maybe you can come up with some more roles for your project.
In what’s now called a waterfall project , the project is divided into distinct phases (see Figure 3-1). First, the analyst works with the customer in creating a detailed specification of what the customer actually wants. This is often called a functional design. Sometimes user stories or other types of documentation are created. This document is discussed with the customer and worked on until the customer agrees that this is what he wants.

Figure 3-1. Stages in awaterfall project
The next phase is coding. The functional specification is then translated into a technical specification. The architect is involved in creating the architecture diagrams and doing all kinds of planning for topics like security, scalability, and modularity. These plans are then passed on to the developers. They try to actually code all the features while interpreting the functional and technical specifications.
Hopefully this is also when the testers get involved. Although in some scenarios, you see that the testers are only involved after the developers are finished. The testers try to map the specifications to the actual implementation and find any bugs and incorrect implementations. After this phase, you should have a correct working application that needs to be deployed to a production environment. The operation team is called in to configure the correct servers, deploy the application, and make sure that everything works.
Waterfall has the big disadvantage that feedback comes really late in the cycle. What if the developers came up with something that is insecure when deployed in production? What if the business analyst interpreted a customer request incorrectly and the customer sees the mistake months later? What if the testers find a bug in a part of the code and in the meantime the developers have moved to a totally different part of the code base?
Shortening the feedback loop is key to improving communication. This is where both processes and tooling can help. Agile is all about shortening cycles, improving communication, and thereby improving value for the customers. VS Team Services has built-in support for running general Agile projects or a project based on the Scrum methodology.
If you look at Scrum as one of the popular methodologies (if you’re unfamiliar with the Scrum terminology, read the official Scrum guide at http://www.scrumguides.org and see Figure 3-2 for the most important terms), you often see teams start without any tooling support. Teams use a whiteboard with post-its or some other physical medium to run their projects. Daily Scrums are done with all team members gathered at a single location and other metrics like the burn down are calculated by hand.
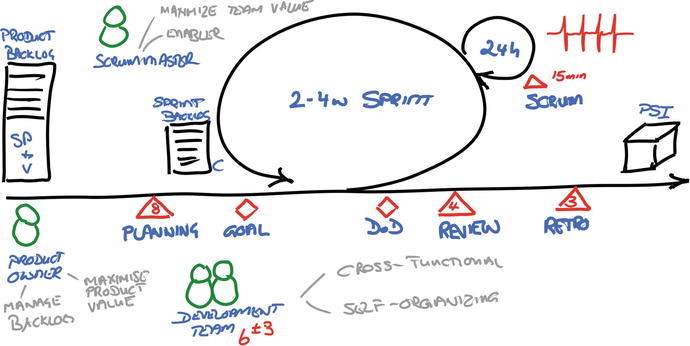
Figure 3-2. Scrum is a popular Agile methodology that uses a couple of key principles
This works. For small, starting teams this can even be a good thing because it allows them to focus on the process and collaboration instead of getting lost in tooling and all the possibilities they discover. I would even encourage you, if you’re just getting started with Scrum, to run a couple of sprints manually just to make sure you focus on the process. After this, you will understand the areas where tooling can help you. Using VS Team Services for the planning phase will make even more sense.
Implementing Scrum does not only affect the team. It should affect the whole organization and be something that’s supported all the way to the top. However, that’s easier said than done. Management commitment is the area where Scrum implementations often fail. Especially when nearing deadlines, the pressure from above can become so intense that teams lose the idea behind Scrum and end up in a mix between Scrum and waterfall: Scrummerfal. This is essentially running a waterfall project with a notion of short iterations.
You need to be aware that in no project, especially a Scrum project, can you have fixed time, features, and resources. But all too often this is what organizations want. The biggest problem with Scrum adoptions is that organizations adopt Scrum and take all their old baggage with them. Organizations are sometimes afraid of change. But for Scrum, and in the same line DevOps, management needs to give teams freedom. The freedom to experiment, try new processes, and iterate on their own process to become better and better. Try to avoid the ScrumBut: we do Scrum but we’re not doing all of it because <substitute your particular reason>. Of course Scrum is not the Holy Grail and you shouldn’t adopt it without thinking things through. Scrum is, however, a complete framework with parts that complement each other.
Note
Willy-Peter Schaub, one of the technical reviewers and the Program Manager for the Microsoft ALM Rangers, pointed out that he doesn’t like the term ScrumBut. “Scrum is a framework, ‘but’ nowhere does it state that a user has to implement every aspect of the framework as outlined. As long as we have the key artifacts as in the previous image; for example, backlog, sprint, events, and a potentially shippable increment, we are practicing Scrum. Using ScrumBut always gives me the impression that unless I implement everything as outlined, I am one of the BUT users.” I understand what Willy is saying. The reason I don’t agree is that I’ve often seen teams before they even tried one sprint already declare that some part of Scrum is not going to work for them because they are different. And then after a couple of sprints, they abandon Scrum because it doesn’t work.
Using tooling becomes especially important when a team starts to grow. Having a distributed team with physical whiteboards with post-its is complex to keep synchronized. Having a digital equivalent of the whiteboards that can be accessed by all team members all over the world is much easier. And of course a whiteboard doesn’t track changes. If the post-its fall from the wall (or are nicely stacked by a helpful cleaner!), you have to recover everything from memory. If you are in a business with auditing requirements, you probably need a more sophisticated solution than a plain whiteboard.
These and other reasons are a sign that tooling can be helpful for you. Of course, VS Team Services won’t make you a perfect Scrum team. But using the tooling the way that it’s meant to be used definitely helps you in improving your process. VS Team Services and Visual Studio have some great tooling support when it comes to Agile and Scrum. The whole idea behind VS Team Services as a solution for your application lifecycle management implementation is that you can achieve full traceability and visibility throughout your process.
This is done by storing all your work items in a central location. Everyone can see them; everyone can work with them (with the necessary permissions, if you require that). All members of your team can use their favorite tools. Product owners and other stakeholders have easy access through a web interface. Developers directly manage their tasks from within Visual Studio. Testers have their own tools (see Chapter 11 on testing for more information). All their work integrates in the backend, thus allowing for a full overview of the process.
Let’s first have a look at the Agile Tooling Web Access interface.
Agile Tooling
When creating a new project, you select a process to base your project on. By default, this can be Scrum, CMMI, and Agile. The differences in these processes come down to different types of work items you can create, out of the box queries and reports, and the states that your work goes through. In essence, all processes are just templates that are built on a shared foundation.
When running an Agile project, it’s often easiest to start with the Scrum template. The Scrum template is the most lightweight template and has some small differences from the Agile template. For example, the Agile template uses terminology like User Story where Scrum uses the more generic Product Backlog Item. The Agile template has states like Resolved (Code Complete and Unit Tests passes) that encourage the separation between developers and testers, while the Scrum template just has an In Progress state. I encourage teams to start with the Scrum template to avoid a team adapting its terminology and process to the Agile template.
The Scrum templates gives you the following important items:
Sprints
Product backlog items
Tasks
Impediments
Bugs
Capacity planning (you can use this regardless of the template you use)
Team Web Access is the portal that you can use to access all those items on VS Team Services. This is the Work tab in your menu (see Figure 3-3).

Figure 3-3. Team Web Access showing the Work page
Sprints
Sprints are the foundation of your Scrum project. You need to decide on the length of your sprint and the day you start a new sprint. A sprint is nothing more than a start and end day. Within this period, you schedule work, track progress, and manage the capacity of your team.
The Scrum guide states that a Sprint should be no longer than four weeks. Typical teams that I encounter run sprints of two or three weeks. This is something that you should decide on as a team and as an organization. Having one sprint schedule across the entire organization improves communication and makes it easier to schedule releases across multiple teams. When configuring your sprints in VS Team Services, you can group them in releases if you want. You can also assign start and end dates to each sprint. This will be used to automatically create the burn down and do capacity planning (see the “Capacity” section later in this chapter).
When you open your Team Project, you start at the Overview page. In the Other Links section, you see a link titled Configure schedules and iterations (Figure 3-4). If you don’t see the Other Links section, add it to your dashboard as a widget.

Figure 3-4. The Configure schedules and iterations link in the Other Links section
By default, there are six sprints visible. By using the New and New Child buttons, you can create a hierarchy of releases and sprints. By default, the iterations are named sprints. This is because you’re using the Scrum template. If you are using the Agile template, they’re named iterations. For each sprint, you can set the start and end date. After setting the first sprint, VS Team Services helps you by suggesting equal sprint lengths for the other sprints. Figure 3-5 shows a configured iteration schedule with two releases and nine sprints. The selected sprints are the ones that are visible for the team. When time passes, you probably want to select new sprints and hide older sprints to maintain a clear overview .

Figure 3-5. A configured sprint schedule
Product Backlog Items
A Scrum team works off a backlog, which is a prioritized list of work that needs to be done. VS Team Services helps you to track your product backlog by letting you create product backlog items (PBIs ) . As you can see in Figure 3-6, a product backlog is a nicely formatted list of items. (In Chapter 5 on Advanced Agile Tooling you’ll look at the Kanban board) You can configure the columns you want to see, such as title, effort, business value, and other fields.

Figure 3-6. An overview of the product backlog
Product backlog items can contain a lot of details. Figure 3-7 shows the detail view for a PBI.

Figure 3-7. Details for a product backlog item
You have standard fields like Title and Description. Other important fields are Assigned To, Acceptance Criteria, Business Value, and Effort. By linking the PBIs to other items, like tasks or storyboards (see Chapter 4 on managing user feedback for more info on storyboarding), you get traceability through all steps in your process.
VS Team Services does not force any strict rules in how to use PBIs. You are free to choose how you name them, which fields you use, and what meaning you assign to them. But there are some best practices that can help you use PBIs in the most optimal way.
A very important field is Title. This field is visible in all the reports and queries and on your backlog. A PBI should be something that an end user can relate to. So having a “Create Shopping Cart” or “Add Error Logging” field is not the best option. But a PBI called “As a customer I want to see an overview of the items in my shopping card so I can decide if I want to place an order” has much more information in it.
The As a <type of user> I <want to> <because> method is one of the ways you can structure your PBIs. Adhering to a standard naming convention will help you and your team make sure that PBIs contain enough information and are easy to understand. The Description field is also one you shouldn’t forget. This is a rich text field that you can use to add information that the team needs to implement the feature.
One field that I often see teams forgetting is the Acceptance Criteria. The information in this field should help a developer know when he’s finished coding the feature. A tester can use this information to test if the feature is actually completed. Acceptance criteria can be a simple bulleted list of items that are important, like:
The user can view a paginated list of 10 items per page in the shopping card
The user can see the price and number of each individual item
The user can see the total costs of the items, including the correct VAT amounts
The user can click on Order when there are items in the shopping cart
This list can be created by both the product owner and the testers since they are usually the most capable in coming up with these requirements. Having acceptance criteria for all your PBIs is a big step in improving your process.
You also shouldn’t forget Effort and Business Value. A product backlog is nothing more than a prioritized list of work that needs to be done. The product owner is responsible for prioritizing the backlog. The order of the backlog items represents the amount of value an item gives to the customer. So a PBI that has a lot of value and is really easy to do should be at the top. Items that don’t offer any value and are hard to accomplish should be at the bottom. And of course you have combinations of those two values. Recording Effort and Business Value with your PBIs is key to ordering your backlog correctly.
Who should determine the Effort field ? Not the product owner. The team is responsible for doing the work, so they should be the ones stating how difficult the item is going to be. It doesn’t make sense to record this in hours since a PBI is not broken down into tasks yet and it’s too soon in the process to make such detailed estimates. Instead, a lot of teams use the Fibonacci sequence: 1, 1, 2, 3, 5, 8, 13, 21, 34, etc. (each number is the sum of the previous two numbers). This sequence quickly rises to very large numbers. A team can pick a PBI, assign it a value, and then use this PBI as a reference to estimate other PBIs. This helps a team not get lost in details (should this be 21 or 22?) and instead focus on the relative size of items. Is this item more difficult or riskier than this item? If so, give it a larger value. Do you first need to do some research? Give it a large number.
Business value is determined by the product owner. He’s the one representing the customer and is responsible for making sure the team delivers the high value items first. Business value could also be a Fibonacci number. I also see teams picking numbers from 1 to a 100. The actual number is not the most important. The relative size of the numbers is.
Two resources I want to point out are the excellent free ebook written by the Microsoft ALM Rangers: Managing Agile Open Source Software Projects with Microsoft Visual Studio Online ( http://blogs.msdn.com/b/microsoft_press/archive/2015/04/09/free-ebook-managing-agile-open-source-software-projects-with-microsoft-visual-studio-online.aspx ) and the Estimate extension available on the VS Team Services Marketplace ( https://marketplace.visualstudio.com/items/ms-devlabs.estimate ). One of the topics the ebook discusses is how the Rangers estimate and how they use normalized estimations. The Estimate extension enables you to play Planning Poker with your team and estimate items this way.
Some other useful features that I often see teams not using are the Discussion field and Tags fields. Team members can use the Discussion field to comment on a PBI and store those comments directly with it. Other team members can view them and respond to them. Tags can be used to add a collection of labels to a PBI. Think of the area a PBI falls in (mobile, frontend, Windows 10, etc.) or some other category that you want to assign. You can add as many tags as you want and you can easily filter PBIs on the tags you assign to them (see Figure 3-8).

Figure 3-8. Product backlog items with tags
While viewing the backlog, you can easily add new PBIs by title. At the top of the backlog, you see the New work item pane. If you change the Type drop-down, you can also create a bug. All you need to do is enter the title and click Add. This adds the PBI to the top of your backlog. You can then double-click on the PBI to open the details view. The order of your backlog is very important. You can easily adjust this by using drag and drop on the PBIs.
Tasks
Product backlog items are features that directly provide value to a customer. To implement a PBI, work needs to be done. This could be things like working out the user experience, writing code, and adding logging and tracing or other work specific to each PBI. These tasks are picked up by your team and executed during the sprint.
The Scrum planning meeting at the beginning of each sprint is used by the product owner to explain the PBI to the team. The team has already taken some time in the previous sprint to check if the PBI is complete or if they need more info. This is the time to discuss this with the product owner. The team breaks up the PBI in tasks and agrees to commit to doing the work. By assigning a PBI to a sprint, the team can manage their tasks in the sprint backlog and on the sprint board. Figure 3-9 shows an example of a sprint backlog. You see the parent PBI (with a blue rectangle) and the tasks (with a yellow rectangle) as children beneath it.

Figure 3-9. A sprint backlog showing a PBI with tasks
During a sprint, the team should record any work they do as tasks. Tasks can be added mid-sprint. For example, if the team discovers they forgot something, they can add a new task for it. PBIs should not be added to an in-progress sprint. The committed PBIs are fixed (except in very special circumstances where it doesn’t make sense to implement a PBI) and the team should not be harassed with all kinds of in-progress changes.
Just as with PBIs, tasks have a set of default fields that can be used. Title, Description, Assigned To, and State are the most important ones. A field that can be used to track progress is Remaining Work. This is a number that the team member who’s working on the tasks updates regularly to show how the task is progressing. When the task is moved to the done state, the remaining work is set to zero.
When the team agrees to schedule a PBI, you set the state of the PBI to Committed. After that, you can use drag and drop or set the iteration field to the sprint you want. By using the green + icon in front of the PBI, you can add tasks that need to be executed.
Impediments
The role of the Scrum Master is to facilitate the team in all the work they need to do. Sometimes a team member runs into issues that he can’t solve himself. The Scrum Master is there to help. These problems are called impediments in Scrum and VS Team Services helps you to track them. Impediments can be all kinds of things, ranging from a broken laptop to not having enough access to the product owner to ask questions.
Impediments have a description and resolution in addition to default fields like the State, Title, and Tags. Figure 3-10 shows the details for a new impediment.

Figure 3-10. Details for a new impediment
An impediment does not show on the product backlog or the task list. This is because impediments are something that need to be worked on by the Scrum Master and shouldn’t take up space or time on the team’s backlog. There are two options to create an impediment. The first one lets you create a new impediment from the Queries tab next to your backlog, as shown in Figure 3-11. The second option is to use the New Work Item widget that you can place on your dashboard.

Figure 3-11. Creating a new impediment
To view your impediments, you select the Open Impediments query in the Shared Queries. Once the impediment is handled, you open the Details view and set the state to Closed. It will then disappear from the Open Impediments query results. Another way to keep track of your open impediments is to use a dashboard tile that shows the number of open impediments (see Chapter 6 for more information).
Bugs
Every project has bugs. Bugs represent work that needs to be tracked. This means that you can choose to show bugs on your backlog and prioritize them just as you do with other work. Some bugs need to be fixed immediately; others are scheduled for a later time. This decision should be made by the product owner.
Bugs can be introduced in various ways. You can add them manually to the backlog through Team Web Access or let testers add them through Microsoft Test Manager. Bugs can also be added automatically for failing automatic builds (see Chapter 9 on builds for more information). When using the Scrum template, bugs show by default on your backlog and your requirements board. If you want, you can easily configure this to not show the bugs or show them on the task board. (Chapter 5 goes into the details of customizing your backlog and Kanban board.)
Note
There is an Open Source extension available at GitHub ( https://github.com/microsoft/mail2bug ) that lets you create bugs from e-mail threads.
Bugs have their own unique fields (see Figure 3-12), such as:
Steps to reproduce
Priority
Severity

Figure 3-12. Detail view of a new bug
If the bug is created through Microsoft Test Manager, additional information about the system where the bug occurred on, IntelliTrace data, or other data sources is added (see Chapter 11 on testing for more information). Traceability is achieved by linking bugs to PBIs. This way, you get data on which PBIs are stable and which have a lot of bugs in them. Bugs go through a workflow where the bug is first approved (meaning that it’s a real bug that needs to be worked on). A team then commits to fixing the bug (just as with other work), and finally the bug is done, meaning it has been fixed and tested .
You can create bugs directly from your backlog by using the New panel and changing the drop-down to Bug. This creates a new bug that’s not linked to a PBI. To link a bug to a PBI, you open the details of the bug, select the Link tab, and create a link to an existing item. You then set the parent relationship and select the PBI as parent (see Figure 3-13).

Figure 3-13. Linking a bug to an existing PBI
Capacity
Now that you have sprints, PBIs, and tasks, you want to get a sense of how much work your team can commit to. In Scrum, velocity is the standard way of tracking the amount of work a team can do during each sprint. The velocity is based on experience of the previous sprints and shows how much PBIs a team typically delivers in a sprint.
As a product owner, you can do a forecast of the time it’s going to take your team to implement features. When you’ve assigned effort values to PBIs, you can then use the Velocity feature to calculate which items can be finished in which sprint. Since velocity is an ever-changing number, it’s wise to do an optimistic and pessimistic forecast so you get a sense of what’s possible. Figure 3-14 shows a forecast for a backlog with four PBIs . The forecasting-based value is a value the product owner can enter. With a velocity of 8, the first item will take a whole sprint. The second and third item will be done in sprint 2 and the last item in sprint 3. For sprint 4, there isn’t any work scheduled at the moment .

Figure 3-14. Forecasting sprints
Velocity is not the only measure to help you plan a sprint. Some team members work part-time, during the year you have holidays, and maybe you need to set aside time for other events. Capacity planning helps you get a quick overview of the hours your team is working and what types of work they can do. For example, if your team has only one Java developer who happens to be on holiday, you shouldn’t try to schedule any Java work for the next sprint, no matter what your velocity was the last couple of sprints. Figure 3-15 shows an example of a capacity planning for a team with two developers and one tester. The development bar is red because there is more development work than there is capacity available.

Figure 3-15. Capacity overview of current sprint
VS Team Services helps you plan your working days (by default, Monday to Friday) and by assigning hours and days off to each team member for each sprint. You can also assign a work category, such as development or testing, to different team members to further help you with planning. This data is then used to show how much work your team can take on and differentiate this from the different types of activities you have in your team. Capacity is something that’s uniquely entered for each sprint.
To see some interesting capacity information, you need multiple team members in your team. If you open a project, click on the Team Members widget to open the Manage Members dialog box. Add a couple of users by e-mail address. In Figure 3-16, you see two fictitious users being added to the team.

Figure 3-16. Managing the members of your team
Now that you have a couple of team members in your team, you can start scheduling their capacity for the coming sprint. Select Work ➤ Backlogs ➤ Sprint 1. You now the see the sprint backlog and the a Capacity option (see Figure 3-17). You can now configure activities for your team members, set their working hours, and schedule days off (see Figure 3-18). As you can see, a team member is not restricted to only one activity. You can add multiple activities per team member and specify the time they have available for each activity. You can also configure days off for individual team members and for the whole team.

Figure 3-17. Capacity planning per sprint

Figure 3-18. A sample capacity plan
Now that you have selected activities for your team members, you also need to configure activities for the tasks you create. This way, VS Team Services can calculate the hours for each activity and display this next to the available team members you have. For a task, select an Activity from the drop-down and set the remaining work to the number of hours required for this task (see Figure 3-19). You can now view the capacity planning at the right side of your sprint backlog. Red bars signal that there is too much work for a certain activity.

Figure 3-19. Assign hours and an activity to a task
Capacity is configured per sprint. When you’re starting a new sprint, you can enter new numbers for your team’s capacity or you can choose to copy the data from the previous sprint and then adapt it.
Team Rooms
Communication is key. To help you with this, VS Team Services offers team rooms, which are online chat rooms where your team members can leave messages. Team rooms are more than simple chat rooms. However, team rooms are definitely not the only solution. Some teams I encounter use Slack, a popular messaging application, or other solutions. Especially when working cross-platform, it’s important to choose an application that’s easy for your team to use.
You can configure team rooms to show messages for different events that happen during your project, such as work item state changes, developers checking in code, testers filing bugs, and other events. This means that a team room gives you a complete transcription of what’s happening in a project. This makes it easy to track what your team members are doing, especially if you missed a couple of days. Some teams even track the notes of their daily standup in a team room. You can create different team rooms with different events they track. You can also configure which team members you want to see the events for.
Note
Team rooms are troublesome if you are working in multiple teams. You can install the following extension to get a summary in one place of all the team rooms you’re part of: https://marketplace.visualstudio.com/items/tfc.TeamRoomSummary .
When you open the Overview page of your project, you can add the Team Room widget to display a list of available team rooms in your project. When you create a new project, a single team room is created for you automatically. You can click on the name of the room to navigate to it (see Figure 3-20).

Figure 3-20. The Team Room widget on the dashboard
Figure 3-21 shows what the team room looks like. The easiest thing to do is send a simple chat message. You can use the textbox at the bottom to enter the message and click Send to share it with your team.

Figure 3-21. A team room in VS Team Services
Besides chat, team rooms can also display events. If you click on Manage Events, you can select event types that you want to be displayed in your team room. You can also add users to the team room so they can view the events. Be aware, however, that this could mean that team members see events of things they normally wouldn’t have access to. Figure 3-22 shows how to configure your team room to display an event for every work item update in the project (both by members of the team room and by other team members).

Figure 3-22. Configuring events for a team room
Now imagine that you change the state of a PBI. This will be picked up by the team room and an automated message is added. Figure 3-23 shows such an event. You can click the PBI to navigate to the details directly.

Figure 3-23. An automated message showing that a PBI has been updated
Achieving Traceability with Developers
One of the best features of VS Team Services is the way it lets all team members interact and use the tooling that’s best for them. This is definitely true for developers. Although a developer should be able to use the Web Access features to participate in team rooms, planning sessions, and other events, Visual Studio is the tool of choice for Microsoft developers. And for not Microsoft developers, VS Team Services offers integration with tools like Eclipse and IntelliJ or cross-platform command-line tools that can be used everywhere.
When a developer works with Visual Studio, she uses the Team Explorer (see Figure 3-24) to connect to VS Team Services. One of the things you can do with the Team Explorer is show work items that are assigned to you and work with them.

Figure 3-24. The Team Explorer in VisualStudio
The best thing about this is that when a developer makes a code change and sends these changes to the server, she can directly correlate her changes with the work item she’s working on. This creates full traceability between code and work done. Later on, the traceability information will be extended to reviews, tests, builds, and releases.
A developer can see which work items are available for her and select a work item to work on. Even better, when a developer gets interrupted, she can save the whole state of her development environment (being code changes, work items, window layout, breakpoints, and other settings), switch to another task, and then return to the saved state to continue working on the task at hand. In the Code part, you will also see how to ask for code reviews directly from Visual Studio. This will create a work item in VS Team Services and track this until the code review is performed.
Opening a project in Visual Studio is easily done from within Web Access. If you check the Overview page of your Team Project, you see the Visual Studio Widget (see Figure 3-25) with an option to directly open the project in Visual Studio.Your browser will show some security questions when you do this. Since you trust both VS Team Services and Visual Studio, you can accept the security warning to launch Visual Studio.

Figure 3-25. The Visual Studio widget on the Overview dashboard
After Visual Studio is launched, you see the Team Explorer panel (if not, go to View ➤ Team Explorer). Select the My Work tile to view any tasks that are assigned to you directly in Visual Studio. If you don’t see anything, this means that no tasks are assigned to you. You can use the Web Access to assign a task to you. If there is a task you want to start working on, you can use drag and drop to move it from Available Work Items to In Progress Work (see Figure 3-26). This updates the work item state and makes the new state immediately visible in Web Access. This way, a developer doesn’t have to leave Visual Studio while still keeping others updated on her work.

Figure 3-26. The My Work panel in Visual Studio
During this book you will learn about other tools, like Microsoft Test Manager, that integrate testers into the traceability chain.
Summary
VS Team Services has a lot to offer when it comes to Agile Tooling. The Web Access interface makes it easy for your whole team to cooperate and work on one single backlog. You can track sprints, product backlog items, tasks, impediments, and bugs. If you want, you can also let VS Team Services help you with capacity planning.
Team rooms are there to facilitate your team in communicating and keeping track of what’s happening in your project. Especially for distributed teams or for members who want a quick update, team rooms are the way to go. You also had a first look at how developers integrate into the Agile process. You worked with the My Work panel in Visual Studio and got a glimpse of how your whole team can cooperate.
But this is only the tip of the iceberg. In the following chapter, you’ll see how you can cooperate with all stakeholders by easily getting their feedback and making sure they can follow along with your process.