
Chapter 2: Installing Kali Linux
Here we are. Join me as we get started by installing Kali Linux. Some of our readers may already be familiar with the installation process, and perhaps even some of the advanced features, such as partitioning and networking. For the beginners and those new to Kali Linux, we encourage you to pay attention to this chapter as we begin from the absolute basics of downloading Kali Linux, working our way up to a successful installation.
The topics that we are going to cover in this chapter are as follows:
- Software version
- Downloading Kali Linux
- Installing Kali Linux
- Installing Kali Linux in VirtualBox
Software version
Kali Linux has been around for quite some time. Known previously as BackTrack, with releases from versions one to five, Kali Linux was first seen in 2015 and released as Kali 1.0. From 2016 onward, Kali Linux was then named according to the year of release. For instance, at the time of writing this book the version used is Kali 2019.4, released in November 2019.
For those running older versions of Kali, or purchasing this book at a later date when new versions of Kali Linux may be available, you can easily update your instance of Kali Linux by using the sudo apt-get update distro command, demonstrated toward the end of this chapter.
Downloading Kali Linux
For safety and security reasons, it is always best to download Kali Linux directly from the website of its creators, Offensive Security. The main reason for this is that the downloads of Kali Linux on other pages could possibly be fake, or worse, infected with malware such as Trojans, rootkits, and even ransomware. Offensive Security has also included hashes of all versions of Kali Linux downloads on their site, allowing users to compare the hash of their downloaded version of Kali Linux with what was generated and posted by Offensive Security on their website (https://www.kali.org). Once there, you can click on the downloads link, or go directly to the Kali Linux downloads page by visiting https://www.kali.org/downloads/.
Once on the downloads page, we can see nine instances of Kali Linux available for download, each with specific category information:
- Image Name: Specifies the name of the download as well as whether the operating system is 32-bit or 64-bit. Clicking on the image name also downloads that version in ISO format via the browser, which can then be saved to a location of your choice.
Tip
32-bit operating systems are limited to utilizing only 4 GB of RAM. Should you have a system with more than 4 GB of RAM, you may wish to download the 64-bit version of Kali Linux.
Important note
ISO files (or ISO images, as they are commonly called) are exact copies of data used specifically when duplicating data.
- Version: Release details of this version of Kali Linux.
- Size: File size in GB.
- SHA256Sum: Command used in Linux to generate a checksum or digital output representing the existing data, which can then be used to compare against the checksum of the downloaded copy to ensure that no data or bits were changed or tampered with:
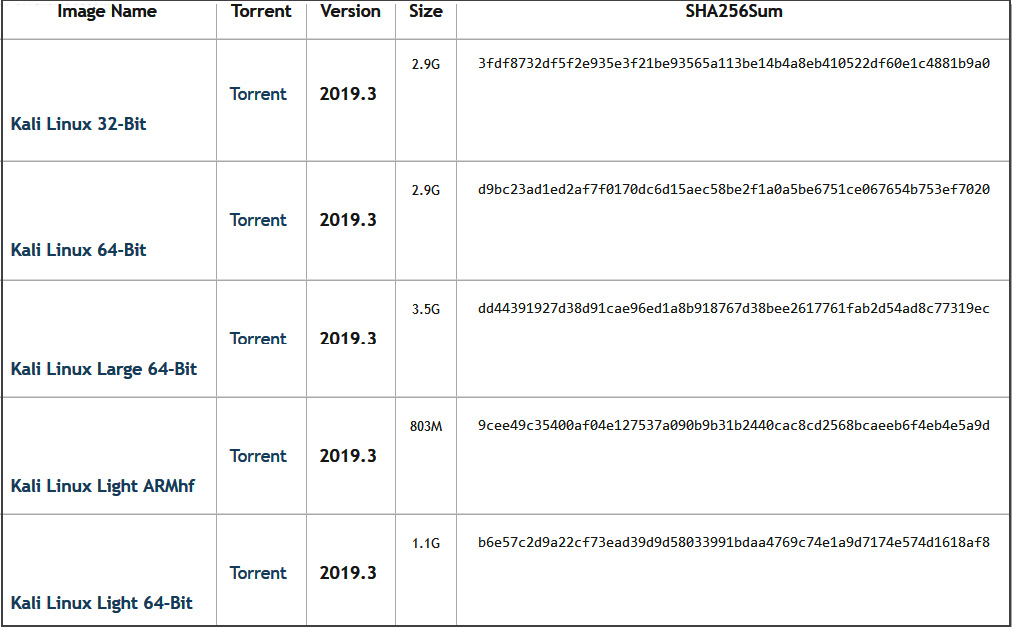
Figure 2.1 – Kali Linux versions available for download
For this book, we'll be using Kali Linux Large 64-Bit, downloaded as an ISO image, as in the following screenshot:
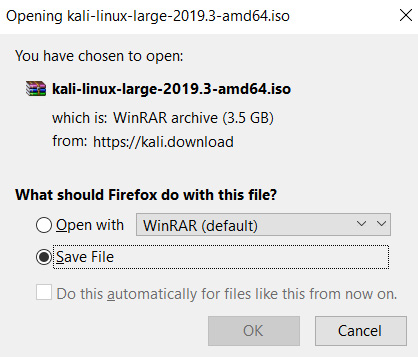
Figure 2.2 – Saving the Kali Linux ISO download file
- If downloading Kali Linux via torrent links, the use of torrent software will be required in order to download the .iso image. Once downloaded, let's begin the installation of Kali Linux.
Installing Kali Linux
As mentioned in Chapter 1, Introduction to Digital Forensics, Kali Linux can be used as a live-response operating system as well as a full operating system, installed and run from a hard disk. Tools such as Rufus and UNetbootin can also be used to install Kali Linux to removable storage media, including a flash drive, SD card, or external hard disk drive, depending on the user's preference.
For those who may not have the available resources to install Kali Linux on a brand new drive, there is also the option of installing Kali Linux within a virtual environment. Users can use virtualization technology, such as VMware and VirtualBox, to be able to run the Kali Linux operating system as a guest machine within their host machine.
Installing Kali Linux in VirtualBox
VirtualBox can run on many platforms, including Windows, macOS, Linux, and Solaris. In this section, we'll install VirtualBox 6.0 on our host machine and take it from there.
VirtualBox can be found at https://www.virtualbox.org/wiki/Downloads:

Figure 2.3 – VirtualBox download page displaying available packages
Depending on the operating system you are working on, download the respective package.
Preparing the Kali Linux virtual machine
Once VirtualBox has been downloaded, it can be installed and then configured to run Kali Linux and many other operating systems, depending on the amount of RAM available.
When setting up a new guest operating system or guest virtual machine, we first click on New and then fill in the following details:
- Name: Kali Large 2019.3 (or a name of your choice)
- Type: Linux
- Version: Debian (64-bit)
You can refer to the following image for the same details:
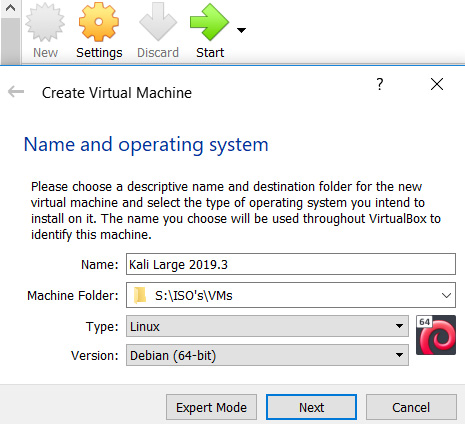
Figure 2.4 – VirtualBox operating system details
We then click Next and proceed to allocate RAM in the Memory size prompt:
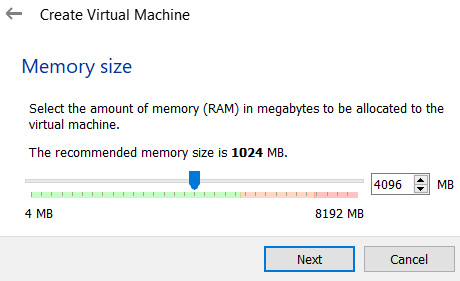
Figure 2.5 – Virtual machine memory allocation
In the preceding screenshot, we can see the maximum RAM capacity to the right of the screen. The machine I used has 8192 MB (rounded off to 8 GB) of RAM. Although the recommended memory size for Kali Linux is a meager 1024 MB (1 GB), I do recommend at least 4 GB of RAM for smooth functionality when using the forensic tools. I have allocated 4096 MB of RAM for use on my virtual machine.
Next, we create a virtual machine by adding a virtual hard disk. I recommend starting with a new virtual hard disk, which is the second option in the selection. Click on Create to proceed, then choose VDI (VirtualBox Disk Image) as the Hard disk file type:
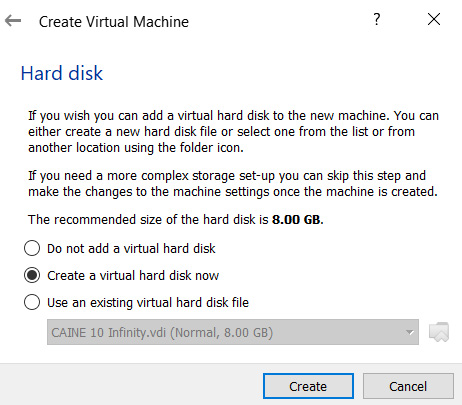
Figure 2.6 – Virtual hard disk creation
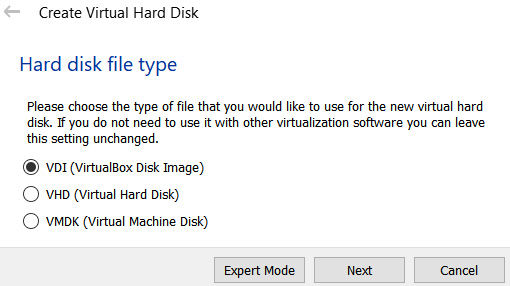
Figure 2.7 – VirtualBox Disk Image (VDI) selection
Once VDI has been selected, choose the Dynamically allocated option to allow the virtual hard disk to be expanded, if the need arises:

Figure 2.8 – Hard drive dynamic allocation
For the next step, we select the file location and the size of the virtual hard disk chosen. The recommended size for the Kali Linux VDI is 8 GB, but I've assigned an ample 32 GB. Once finished, click on Create to complete the creation of the virtual hard disk:
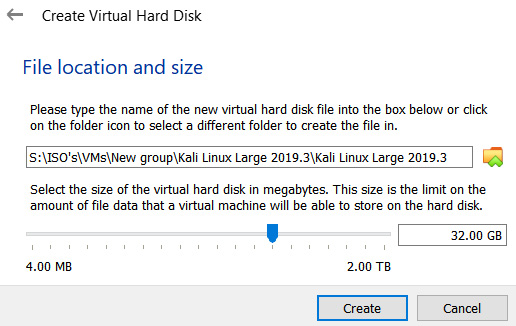
Figure 2.9 – Virtual machine location and size
This concludes the preparation of the virtual disk. Let's now install Kali Linux as a virtual machine.
Installing Kali Linux on the virtual machine
Once the virtual hard disk has been prepared and completed by following the steps from the previous section, we can then begin the actual Kali Linux installation process. In Oracle VM VirtualBox Manager, which is the main operating system management window for VirtualBox, we can see that the virtual machine has been prepared and we can now install Kali Linux.
To the middle of the screen, we can also see the resources assigned, such as the Name and Operating System type in the General section, and the amount of RAM assigned in the System section. Other settings, such as the Video RAM (VRAM) and Display settings can also be accessed within this section:
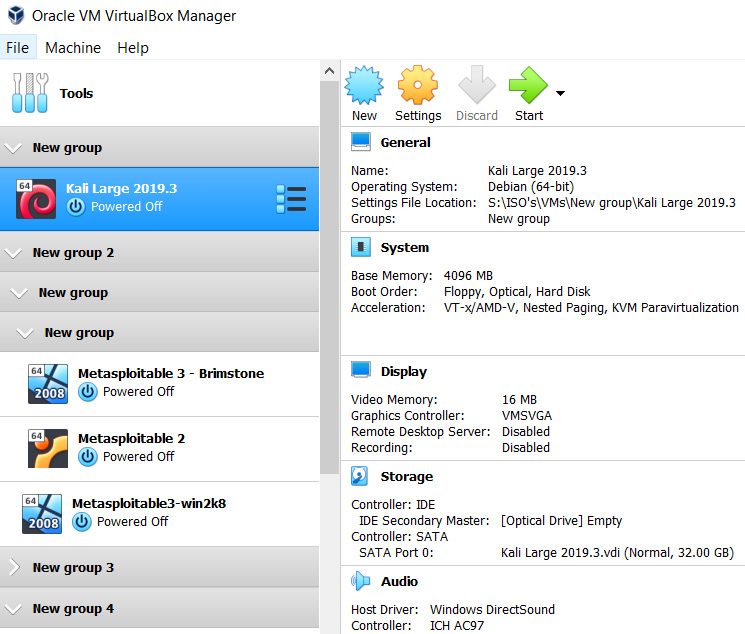
Figure 2.10 – VirtualBox Manager with Kali selected
- To begin our Kali Linux installation, click on the Kali Large 2019.3 entry to the left and then click on the green Start arrow in the top-right corner:
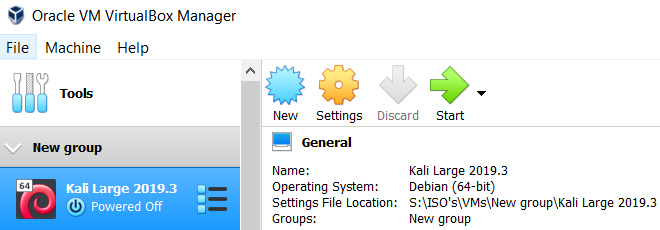
Figure 2.11 – VirtualBox Manager
- In the next step, we must locate the Kali Linux ISO image that we downloaded from the Offensive Security website. Click on the browse folder icon and navigate to the Kali Linux 2019.3 iso file you previously downloaded:

Figure 2.12 – VirtualBox start-up disk selection
- Once you've found the downloaded ISO, click on it, then select Open:
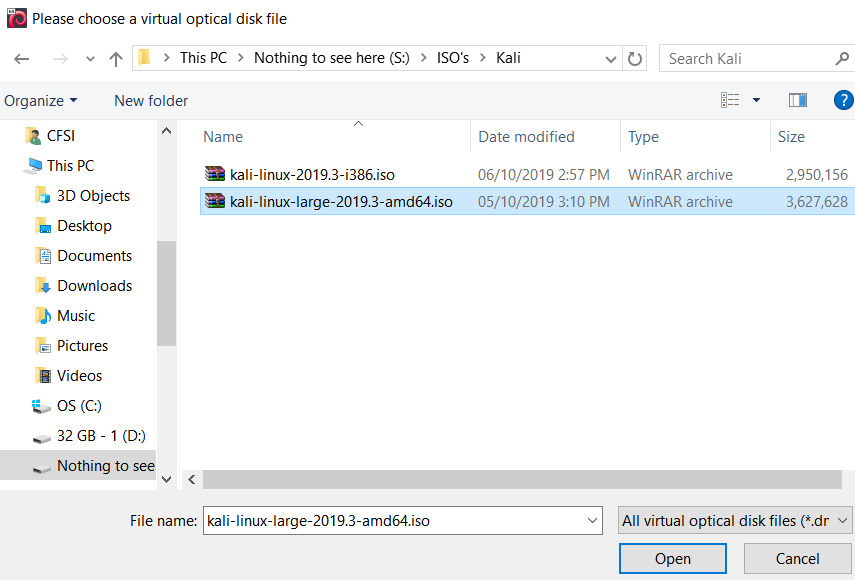
Figure 2.13 – Kali Linux ISO selection
- Once the ISO image is selected, you will notice the selected entry changes to kali- linux-large-2019.3-amd64.iso (3.46 GB). Click on Start to begin the boot process:

- After clicking on Start, the boot menu displays the various options available, including the live versions of Kali. In this lab, we'll be choosing the Graphical install option to install Kali Linux on the virtual hard drive:
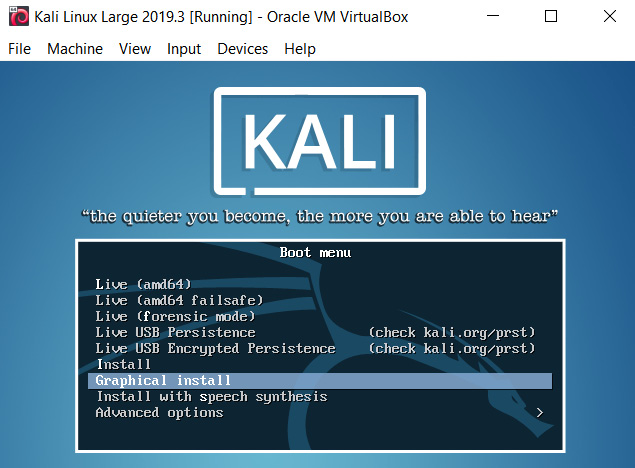
Figure 2.15 – Kali Linux Boot menu
Important note
As a side note, I should also draw your attention to the Live (forensic mode) option, which would be available to us when booting from a DVD, flash drive, or other removable storage media. It's a good idea to always have a copy of Kali Linux for situations where live forensics may be needed.
- Okay, back to our installation. After clicking on the Graphical install option from the boot menu, we're prompted to choose our language and location:

Figure 2.16 – Kali Linux Language selection menu
- In the next step, we'll give our Kali Linux guest a hostname, which is the same as a username in a Windows environment:
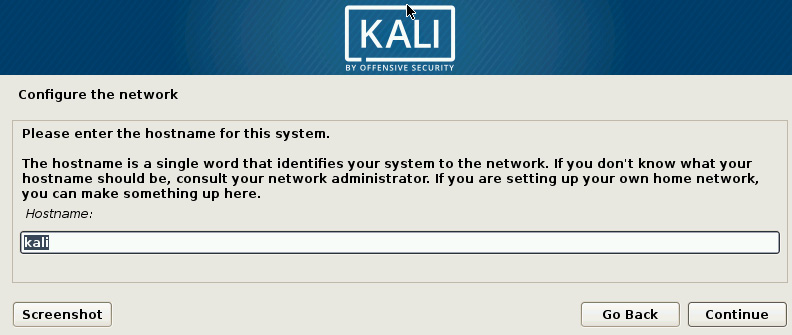
Figure 2.17 – Kali Linux Hostname details
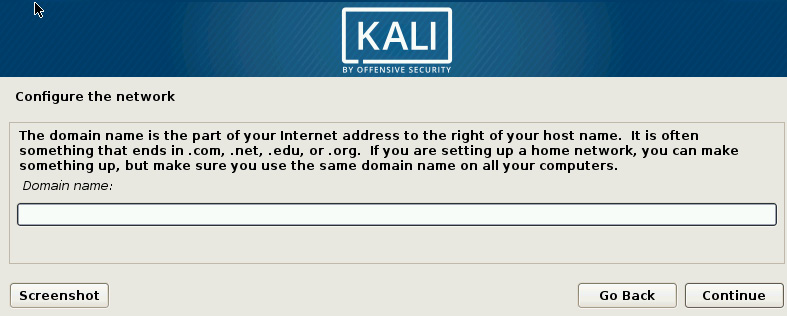
- I've left the Domain name area blank as I won't be joining this host machine to a domain:
- When setting the password, be sure to use a complex string:
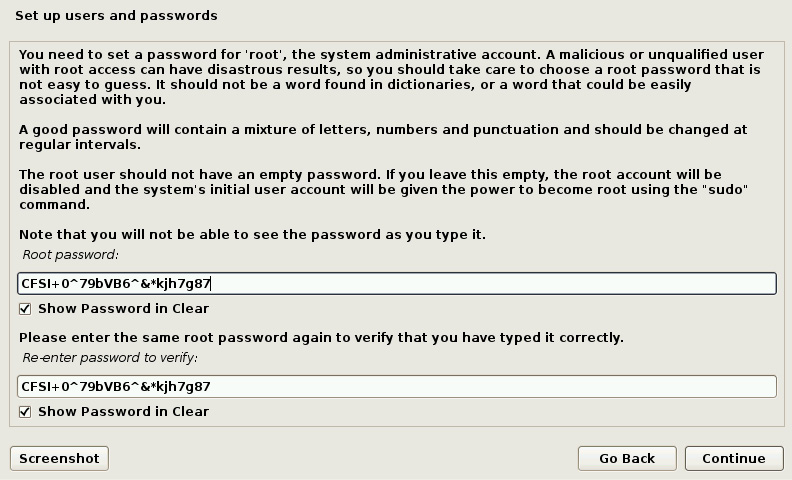
Figure 2.19 – Kali Linux password details
- Configure the clock:
Figure 2.20 – Kali Linux clock configuration
- Choose a time zone:
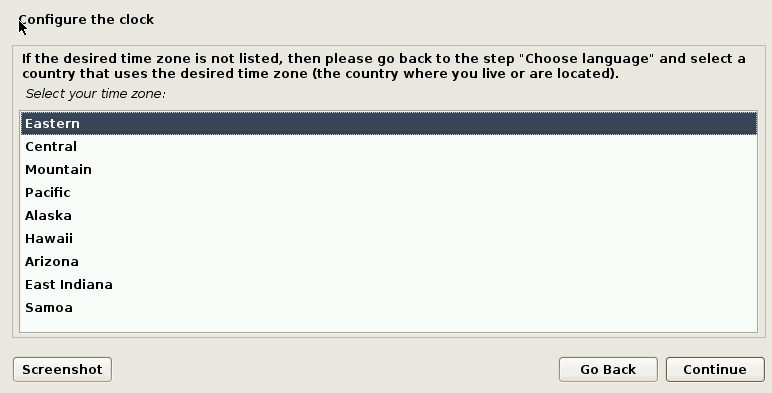
Figure 2.21 – Kali Linux time zone configuration
Partitioning the disk
The partitioning of the hard disk (whether virtual or physical) involves splitting the drive into logical drives. Think of it as having a large apartment studio comprised of one large room. Now imagine that you've put up a wall to separate the apartment in half. It's still physically one apartment but now it's separated into two rooms. One can be used as the main apartment and the other as storage, or you can even have two smaller apartments to share with yourself and a friend. Equally, a partition can allow the installation of multiple operating systems on a hard disk or even the creation of additional volumes to use as storage space:
- Continuing with our Kali Linux installation, the next step provides options for the usage of the virtual disk for partitioning. As this is a virtual disk, I recommend using the Guided - use entire disk partitioning method. This method is very simple and uses all the available allocated space assigned to the virtual disk in the preceding steps. Firstly, let's select the recommended partitioning method:
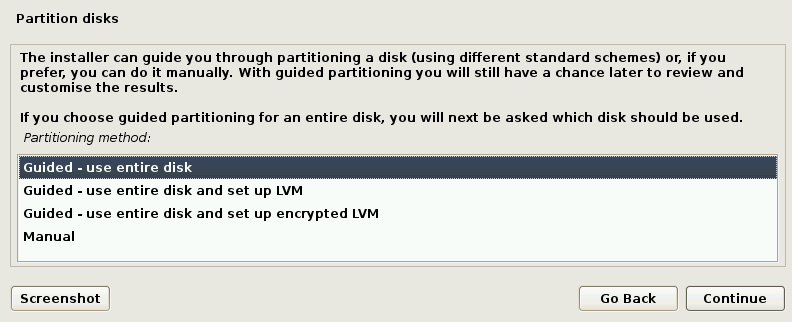
Figure 2.22 – Kali Linux disk partitioning method selection
Important note:
The other options in the preceding screenshot present the user with options for setting up Logical Volume Manager (LVM) and encrypted LVM. LVM manages logical partitions and can create, resize, and delete Linux partitions.
- The prompt may warn you that all data (if any) on the disk will be erased if choosing this option. However, this is a new virtual disk with no existing data on it so we can continue with our installation:
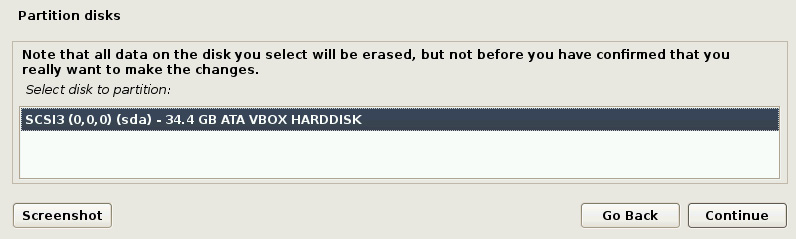
Figure 2.23 – Kali Linux virtual disk selection
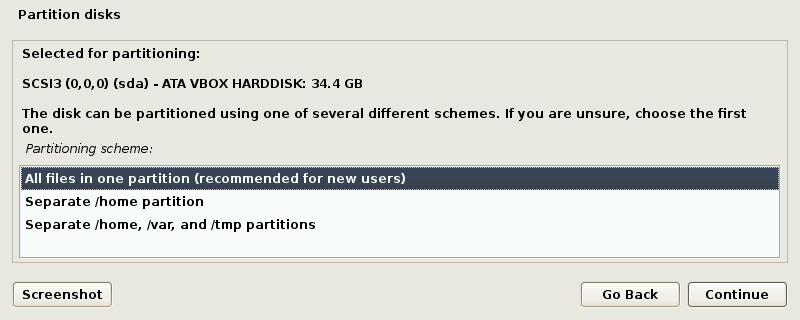
- After selecting the VirtualBox disk, as in in the preceding screenshot, be sure to select All files in one partition (recommended for new users):
- As we continue the partitioning process, I recommend choosing the Guided partitioning option because it does the partitioning automatically. From here, we simply choose the last available option, Finish partitioning and write changes to disk, then click Continue:
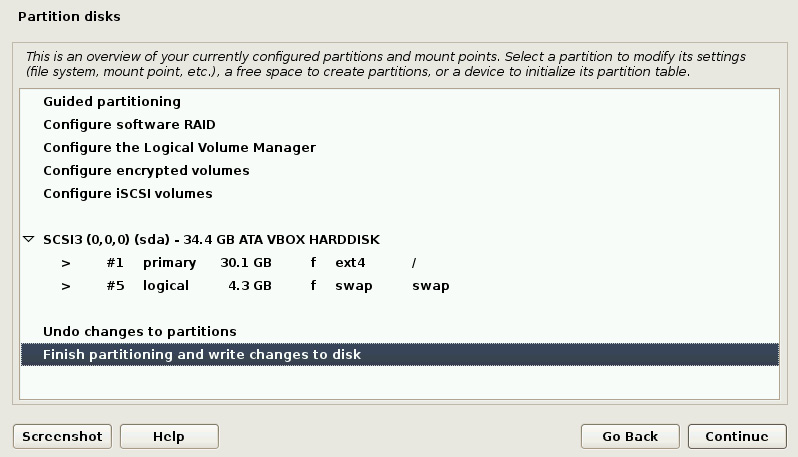
Figure 2.25 – Kali disk partitioning details
- The last step in the partitioning process asks for confirmation to write the specified configurations and changes to the disk. Be sure to choose Yes before clicking on Continue:
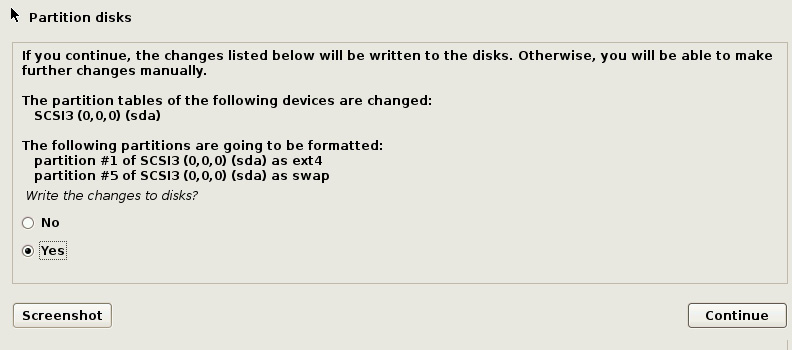
Figure 2.26 – Kali disk partition creation
We're now just a few clicks away from having our Kali Linux virtual machine installed and operational.
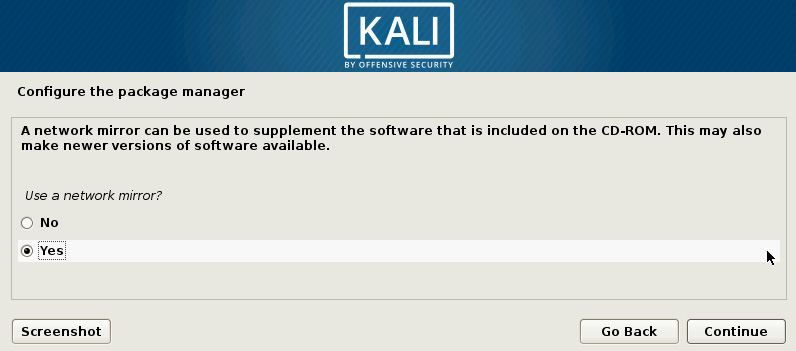
- After the installation is complete, the package manager prompts us to choose a network mirror, which allows us to access newer versions of the software. Although the Yes option is selected by default, as in the following screenshot, I'd advise skipping this step by selecting No as we will soon be installing our updates for Kali Linux manually once we're up and running:
- One of the last steps to take in the installation process is to install the GRUB boot loader on a hard disk. Without going into too much detail, the GRand Unified Bootloader (GRUB) allows for a multi-boot environment by allowing the user to safely have and choose between operating systems on the boot screen, preserving the boot entries for each installed OS.
- Select the /dev/sda option and click on Continue:

Figure 2.28 – Kali Linux GRUB boot loader selection
- A couple more minutes and the installation will be complete. After clicking on Continue, the installation completes and boots into Kali Linux:

Figure 2.29 – Kali Linux installation completion confirmation
- Should you have an error stating that VirtualBox Failed to open a session for the virtual machine upon startup, you may need to change the USB controller setting to USB 1.1 (OHCI) Controller by clicking on Settings and USB:

Figure 2.30 – VirtualBox USB settings
This concludes our Kali Linux installation within a virtual machine. Before we get started using it, however, let's look at another installation method by installing Kali Linux on a portable drive.
Creating a bootable Kali Linux portable drive
As I mentioned earlier in this chapter, it is always a good idea to have an installation of Kali Linux on a forensically sound device, such as a flash drive or SD card, to aid in live incident response.
For best results, I recommend using a USB 3.0 (32 GB) flash drive or thumb drive and, if using an SD card, I recommend using a Class 10 (32 GB) card:
- To create our bootable drive, we'll be using the popular Rufus tool, which can be downloaded free of charge at https://rufus.ie/.
- Once downloaded, run Rufus and select the device to load the Kali Linux operating system onto and select the ISO image of Kali Linux you wish to run via the flash drive or SD card. You can also select a persistent partition size to allow the saving of files and the loading of programs or updates to the Kali Linux OS:
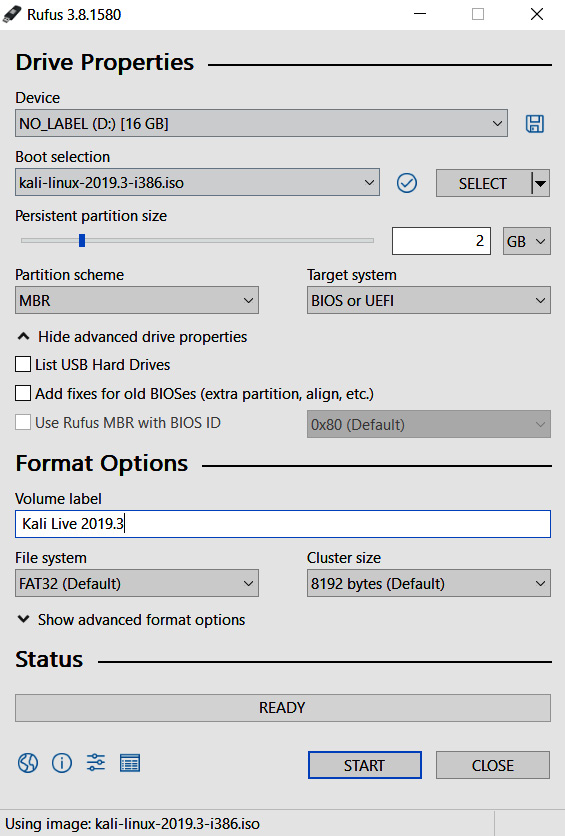
Figure 2.31 – Rufus bootable media creation interface
- Once all of the previous options have been specified, click on START.
- A warning alerts us that all data on the device will be destroyed. Click OK to continue:
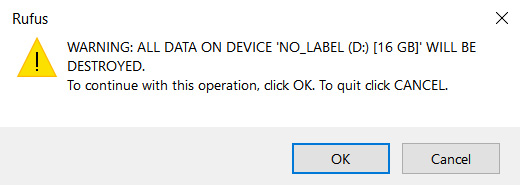
Figure 2.32 – Rufus creation confirmation prompt
Thus begins the formatting process:
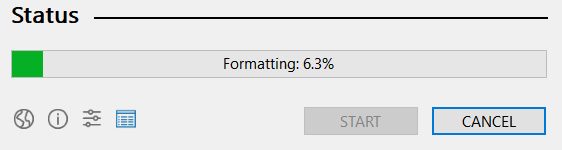
Figure 2.33 - Rufus status bar
Once the process has completed, the green status bar displays READY:

Figure 2.34 – Rufus status bar completion
- When restarting your machine and booting from your bootable drive, you will be presented with the following Boot menu, which consists of various modes, including Live (forensic mode), specifically made for incident response and forensics as it makes very minimal changes to the device during investigations:
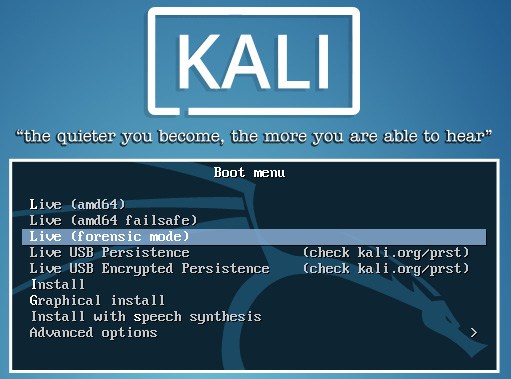
Figure 2.35 – Kali Linux boot menu
Regardless of the method chosen to install Kali Linux, let's now move on to exploring the Kali Linux interface.
Exploring Kali Linux
Once our installation is complete, we can start Kali Linux. If you're using the VirtualBox installation, you will be presented with the usual Kali Linux splash screen. Choose the *Kali GNU/Linux option:

Figure 2.36 – Kali Linux OS selection
To log in, enter root as the username and the password you previously configured:
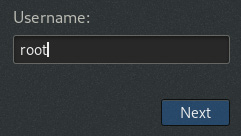
Figure 2.37 – Kali Linux Username field
This brings us to our Kali Linux desktop:
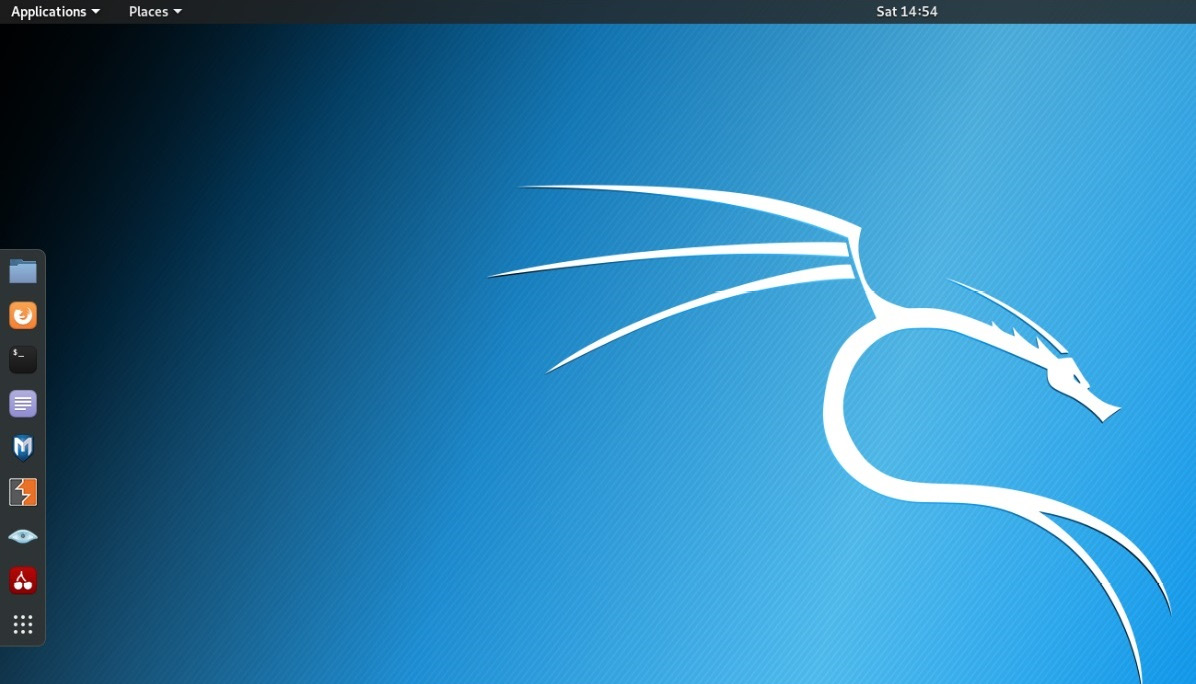
Figure 2.38 – Kali Linux desktop
When logged in, one of the first things we should do is enter three commands in the terminal to update Kali.
To get to the terminal, which is the equivalent of Command Prompt in Windows, click on Applications | Terminal.
With the terminal open, enter the following commands so that Kali Linux can check for package updates, software upgrades, and distribution updates:
- apt-get update
- apt-get upgrade
The apt-get command is used to install software (and can also be used to uninstall software). The apt-get update command checks for new versions of software and packages while the apt-get upgrade command actually upgrades the software and packages to the latest versions:
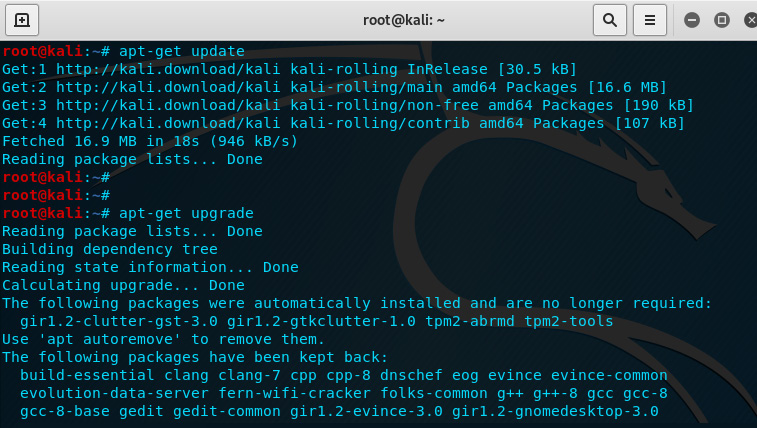
Figure 2.39 – Updating Kali Linux
At this point, we have a successfully updated installation of Kali Linux, which now contains the latest versions of tools as well as specific forensic repositories that contain the tools that we will be using. As this book deals with digital forensics in Kali Linux, we can dive right in by taking a look at some of the tools for forensics available on the Forensics menu in the main application menu.
There are two ways to get to the Forensics menu in Kali Linux:
- The first is to click on Applications, then move down to menu item 11 - Forensics, as in the following screenshot:

Figure 2.40 – Kali Linux main menu
- For the second method, simply click on the Show Applications item (the last icon in the floating side menu) and choose Forensics:
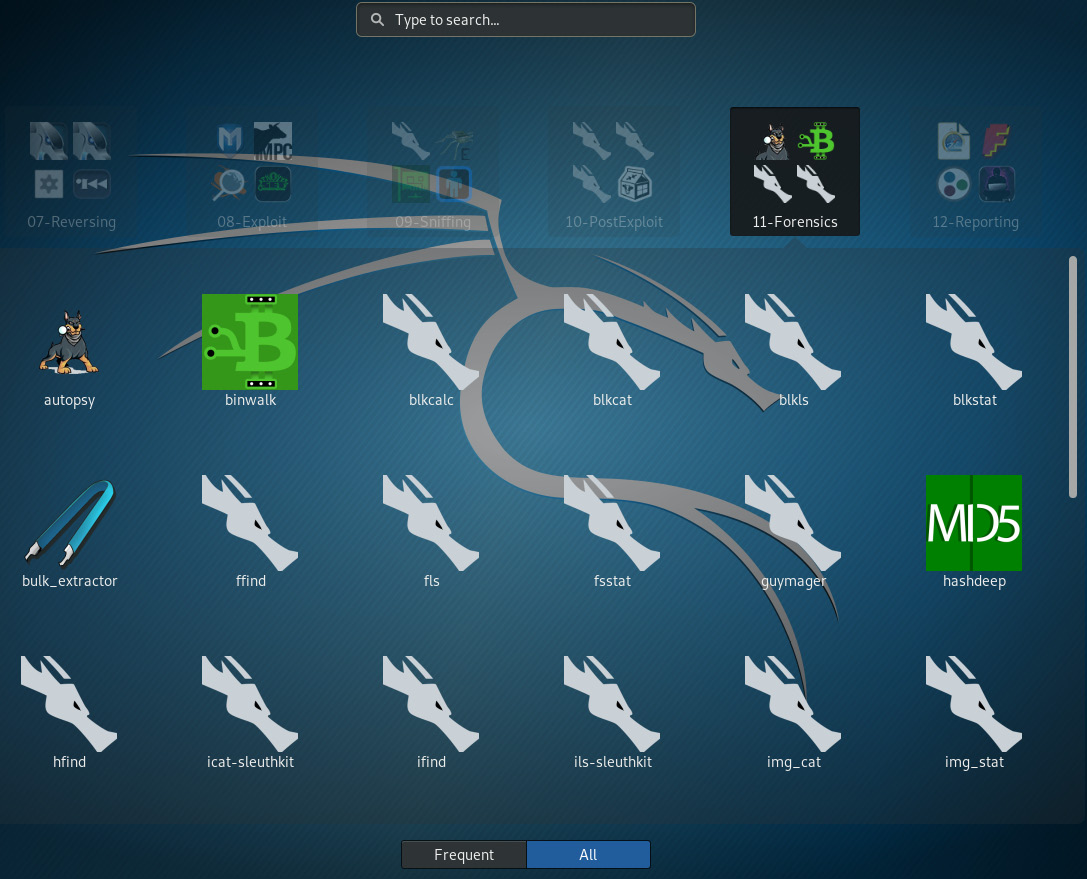
Figure 2.41 – Kali Linux Forensic tools
You'll notice that there are more tools available in this second option. This isn't to say that these are all the forensics tools available to us in Kali Linux. Many are available via the terminal, some of which will be accessed in this manner in later chapters.
I also encourage you to explore Kali Linux and its many wonderful features that also make it a fully functional operating system, not just for use in forensics and penetration testing.
Important note:
Should you be interested in discovering more about Kali Linux as a penetration-testing (pen-testing) distribution, Packt Publishing has many detailed books on Kali Linux, which I wholeheartedly endorse. I own many of them in paperback and use them regularly on the job as well as for preparing my lectures.
Summary
In this chapter, we dived into the technical aspect of Kali Linux and discovered the types of modes available to us via the Kali Linux ISO image, whether running it from a live environment or installing it in a virtual environment. Kali Linux can also be installed on removable storage, such as a flash drive or SD card. Being such a versatile operating system, we can also install Kali Linux as a full-fledged operating system.
We also looked in depth at installing Kali Linux in a virtual environment using VirtualBox. For beginners, I'd recommend this method of installation, as it allows trial and error within an isolated environment. Be sure to allocate enough RAM and remember that the 32-bit version of Kali Linux only allows up to 4 GB of RAM to be recognized and utilized. As a reminder, I once again suggest that you have access to both a Kali Linux live medium (created using Rufus) as well as an installation of the OS, whether physical or virtual, to ensure that all bases are covered.
Understanding the forensics tools used in Kali Linux is an excellent way to go about your investigations but we also need to understand the workings of storage media, filesystems, data types, and locations. Join me in the next chapter, as we continue our journey into digital forensics by first understanding these fundamental concepts.
You may want to consider keeping a log of tests, which ensures that tools were tested prior to investigation in the event that you are called upon to verify or defend your findings.