Chapter 5. Delivering Movies
QuickTime is a very flexible distribution container because it encodes multiple web-friendly formats, including MPEG-4 video, H.264, and AAC. (Chapter 2 provides detailed steps and scenarios for exporting your movies.) QuickTime media can be delivered over the Internet by one of two methods: progressive download or real-time streaming.
This chapter departs partially from the step-by-step methodology of earlier chapters, serving more as a primer for the digital distribution tools contained in QuickTime Pro. Each delivery project is different and presents its own unique challenges, based largely on the nature of the content being broadcast. Therefore, use the sections of this chapter to help you understand how these QuickTime Pro tools work and when to apply them to meet your delivery requirements.
A significant aspect of serving content on the web is just that: serving content. Configuring and administering a QuickTime Streaming Server is outside the scope of this book, but you’ll see how to prepare your content so it can easily reside on QuickTime-based delivery platforms.
Using Progressive Download
Progressive download requires the least amount of server configuration of the Internet distribution methods because the delivery overhead is largely confined to the movie as played by the QuickTime browser plug-in and QuickTime Player. A progressive download begins movie playback as soon as enough data has been delivered to the client to ensure that playback will not be interrupted.
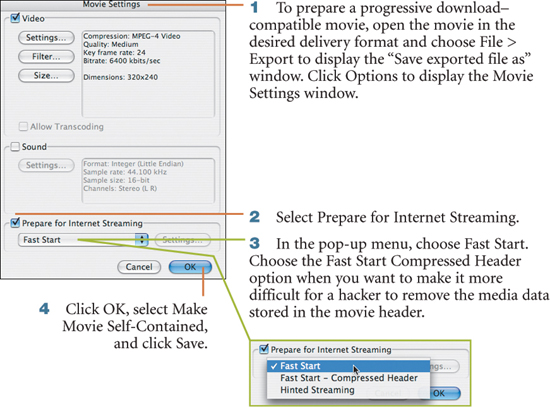
If your movie is already encoded in the delivery format, you can save time by choosing File > Save As and selecting “Save as a self-contained movie” in the Save dialog. This selection automatically prepares the movie for Fast Start Internet streaming.
Using Real-Time Streaming
The QuickTime Streaming Server uses the Real-Time Streaming Protocol (RTSP) to control the broadcast using the client’s standard player controls: play, pause, fast-forward, and reverse. Streaming content is not downloaded to a user’s computer, which makes streaming a good choice when you want to restrict content distribution. Streaming is also ideal for efficiently delivering long-form and live content.
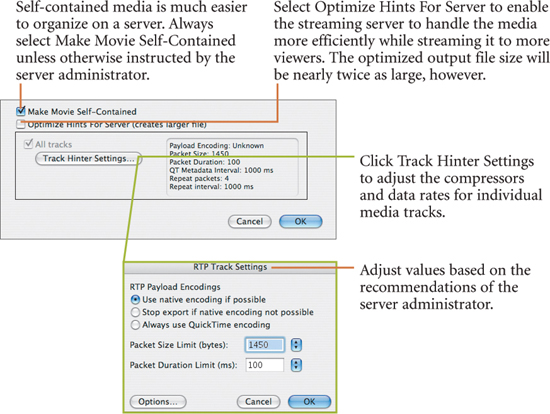
All streaming media on a QuickTime Streaming Server requires a hint track, which tells the server how to package the data in the movie file. The steps for creating hint tracks for streaming movies differ depending on whether the delivery container is MPEG-4 (.mp4) or QuickTime (.mov).
If your movie is already encoded properly and you want to add a hint track, follow these steps:

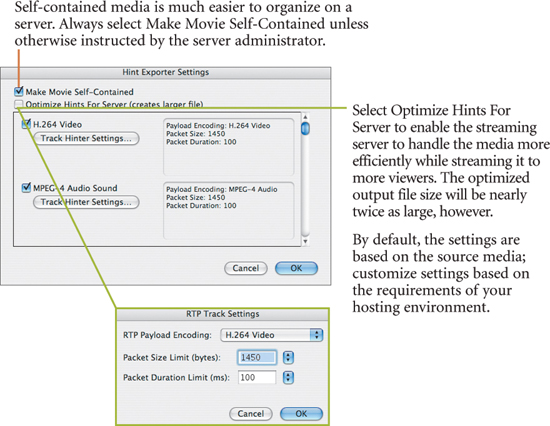
To customize the hint track, click Options to open the Hint Exporter Settings window.
To add a hint track while encoding media within a QuickTime movie container, follow these steps:

You can customize the hint track by clicking the Settings button in the Movie Settings window.
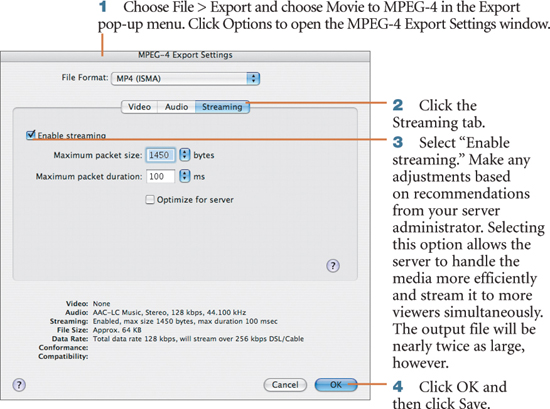
To add a hint track while encoding media within an MPEG-4 container, follow these steps:
Adding a Hint Track Automatically
Apple introduced Automator with Mac OS X version 10.4 (a.k.a. Tiger) as a simple drag-and-drop interface for creating workflows by building them with the several hundred prefabricated actions that come installed in the Automator library.
Automator performs best when charged with performing repetitive tasks, especially those that require a series of manual steps to accomplish such as renaming all the files in a folder. QuickTime is both AppleScriptable and Automator ready, meaning that Automator has actions ready for you to build workflows for QuickTime right out of the box.
QuickTime Pro includes additional Automator actions that support the increased functions of the application. One of these scripts that you can build in Automator creates a hint track within QuickTime movies that are already encoded for the web. Here’s a brief overview of the Automator interface:

Each new workflow opens in a separate Automator window.
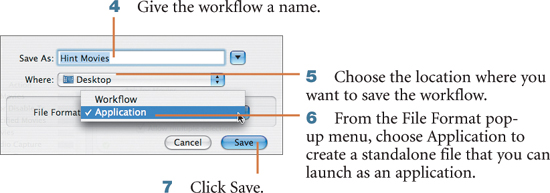
To create a workflow that adds a hint track (for streaming media) to an already encoded QuickTime file, follow these steps:


3. Choose File > Save.

This particular workflow will not create new files; it will save the hint track in the existing file. If you want separate files, apply the hint workflow to a copy of your source media.
Delivering to Cellular Phones
In addition to streaming to computers via the Internet, you can produce and deliver content for cellular phones and mobile devices. The Third Generation Partnership Project (3GPP) protocol allows the creation of uniformly formatted content for multimedia cell phones used over broadband cellular networks. QuickTime Pro can encode audio, video, and text tracks for this protocol that are compatible with multimedia phones.

3. QuickTime Pro exports content in several 3G-compatible file formats. Choose one from the File Format pop-up menu based on your target platform.

Within each 3G file format, QuickTime provides several export settings that can be customized to suit the content and the specific cellular device. Under the File Format pop-up menu is a row of five buttons: Video, Audio, Text, Streaming, and Advanced. Click a button to reveal the settings.
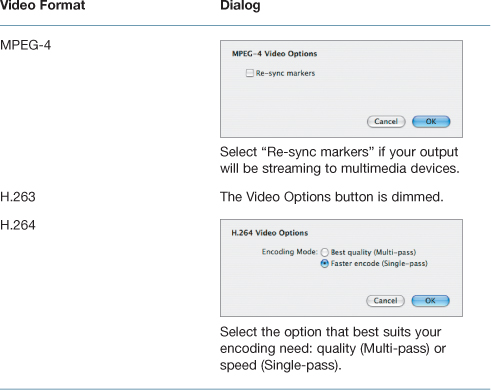
Choosing 3G Video Settings

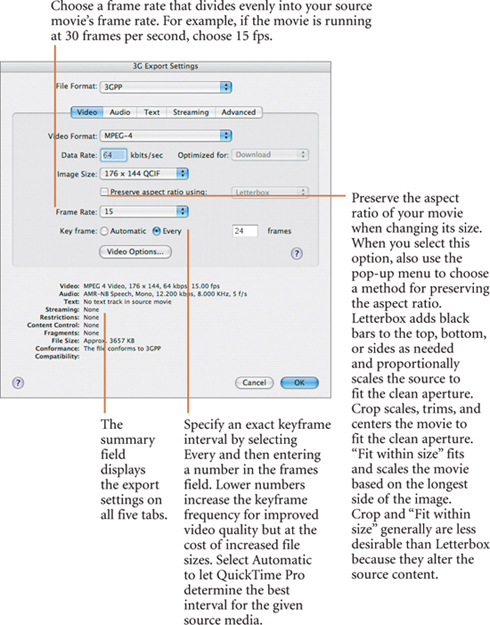
Clicking the Video Options button displays one of two dialogs, depending on the format selected in the Video Format pop-up menu.
Choosing 3G Audio Settings

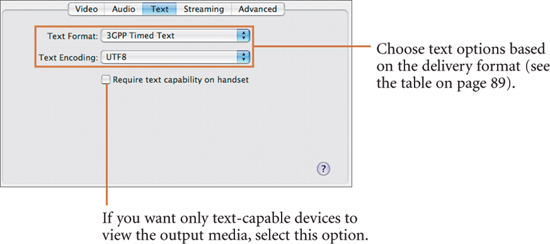
Choosing 3G Text Settings
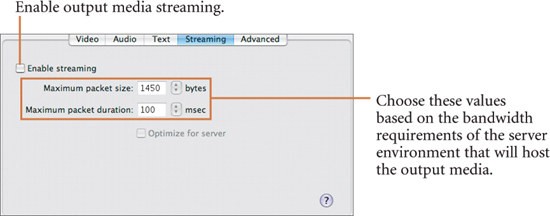
Choosing 3G Streaming Settings
Choosing Advanced 3G Settings

Using QuickTime Broadcaster (Macintosh)
Although the QuickTime Streaming Server (contained in Mac OS X Server version 10.4) is outside the scope of this guide, Apple’s free live-encoding software QuickTime Broadcaster lets you easily stream a live QuickTime feed to a direct one-to-one Internet connection. (You can also broadcast the feed over the Internet by sending it to a QuickTime Streaming Server.) If your system meets the minimum requirements, you can download and install QuickTime Broadcaster from the Apple website at www.apple.com/quicktime/broadcaster.
QuickTime Broadcaster can be useful when you want to stream either live or recorded content from one location to another. For example, if you are holding auditions for a movie and one of the producers cannot attend a session, you can send the live or recorded feed directly to the producer as a direct broadcast.
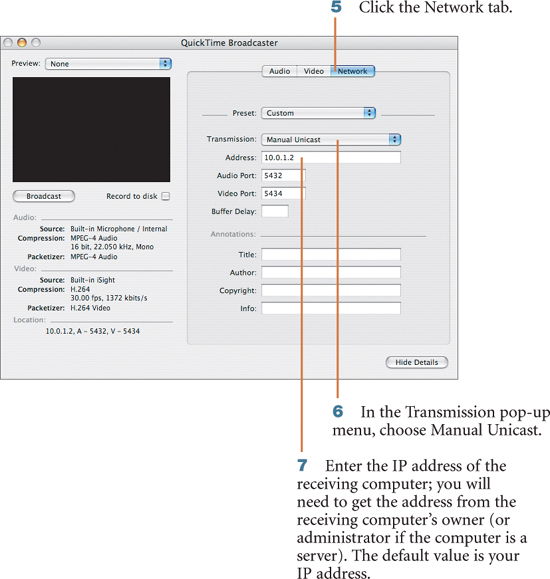
To create a direct one-to-one broadcast, follow these steps:
1. Attach a web camera (iSight, for example) to your Mac and launch QuickTime Broadcaster.

For the Preview display, you can choose None, Source (the raw feed from the camera), or Compressed (the raw source with the applied video preset).
8. Choose File > Export SDP.
9. Email or FTP the SDP file to the person with whom you will have the direct connection. That person will need to launch this file in QuickTime to see the broadcast.
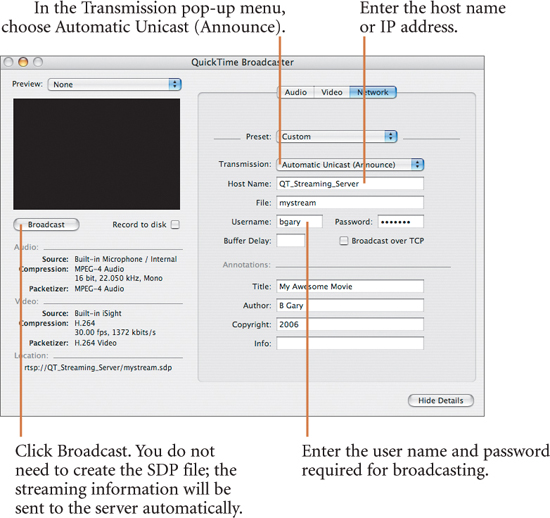
10. Click Broadcast in the QuickTime Broadcaster window.
11. On the receiving computer, double-click the SDP file to view the feed in QuickTime.
To broadcast using a QuickTime Streaming Server, use the preceding steps but with the following variations: