Chapter 1. Getting Started with QuickTime Pro
QuickTime is much more than a digital media player. It’s also a software architecture that other applications, such as Final Cut Pro, can use to drive multimedia functions. As a software architecture QuickTime comes with its own suite of applications, including QuickTime Player (with browser plug-in), QuickTime Pro, QuickTime Broadcaster, QuickTime Streaming Server, MPEG-2 Playback Component, and Darwin Streaming Server. Together they let you create, deliver, and play multimedia content. Additional components from third-party developers extend the capabilities of QuickTime even further.
This book focuses on how to use QuickTime Pro for a broad range of multimedia tasks. Whether you’re an experienced media producer or a QuickTime newcomer, you’ll learn everything from producing content for the web and portable devices (such as iPods, Apple TV, and cell phones), to exporting movies from one format to another (transcoding), to prepping content for live broadcast. (For a primer on using QuickTime Player, the version of the software that’s preinstalled on Macs and available for free download for PCs, see Appendix A.)
The screenshots in this book primarily show the Mac OS X version of QuickTime Pro except where the interface on the PC is different, in which case Windows screenshots augment the presentation.
About QuickTime Pro
This book assumes that you are running QuickTime Pro version 7.1 or higher.
If you have not upgraded to QuickTime Pro, you will see QuickTime Pro’s media-creation and editing features dimmed in the menus.

You can upgrade to QuickTime Pro in either of two ways:
• Purchase a QuickTime Pro license from the Apple Store online.
• Receive the upgrade when you install Final Cut Studio.
QuickTime Pro includes such features as direct recording, editing, and authoring capabilities; full-screen mode with floating playback controls; and the capability to save and export QuickTime content for a large number of codecs and formats.
Playing Movies
QuickTime Pro is installed with a series of codecs (software that allows encoded movies to play back) that determine which movie formats you can play in QuickTime Pro. For example, the MPEG-4 codec allows you to play a movie from the web that was encoded using MPEG-4.
QuickTime files are like containers (or buckets) that hold media. As long as QuickTime Pro has the appropriate codec installed, the media will play.

Content encoded with RealPlayer or Windows Media requires the installation of third-party software to view (or hear) the media in QuickTime Pro. Fortunately, QuickTime has a plug-in architecture that allows you to install compliant software easily, enhancing playback and encoding functionality. (To learn about installing third-party codecs, see Chapter 2.)
Movie Playback Options
You can play movies in standard or full-screen mode, play single or multiple movies simultaneously, and change movie playback size. You can also display additional controls and information when viewing movies.
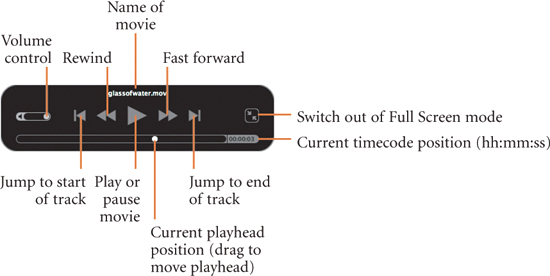
Standard Player Controls

Full Screen Mode
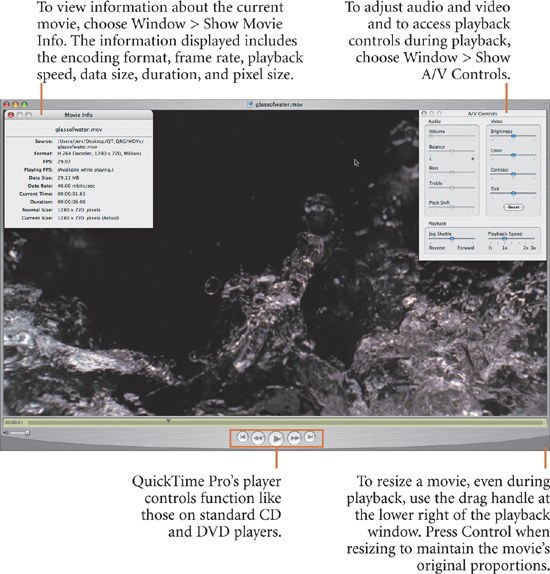
Any single movie can be played in Full Screen mode. This mode hides the menus, the desktop, and the A/V controls and is ideal for presenting movies to clients or for extended playback sessions. Though hidden by default, the A/V controls and the Movie Info window can be displayed in Full Screen mode.

Full Screen Mode Player Controls
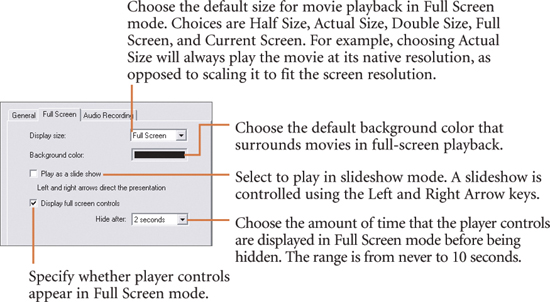
Full Screen Preferences for Windows
Full Screen preferences affect the default settings when you use QuickTime Pro’s functions after choosing View > Full Screen or View > Present Movie. You can also choose when to hide playback controls in Full Screen mode. To open Full Screen preferences, choose Edit > Preferences > Player and click the Full Screen tab.
Multi-Movie Playback
Opening and playing multiple movies at the same time can be useful when, for example, you want to compare two versions of a clip that use different settings. In the following image, the original movie is displayed above a copy that has been modified using QuickTime Pro’s Tint and Color A/V controls. You can make changes in real time while playing a movie.
You can also use this feature to compare identical movies with different codecs applied, and when viewing digital dailies, you can compare multiple takes of a scene.

To view the A/V controls, choose Window > Show A/V Controls.
Recording Movies
You can record simple audio and video in QuickTime Pro and have the content automatically encoded upon output. This is not as robust a feature as you would find in SoundTrack Pro, but it comes in very handy in some situations. For instance, if you’re on the road with a laptop that has a built-in microphone or camera, you could create quick content on the fly with little effort or additional software.
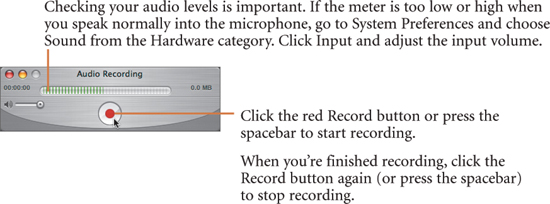
Capturing Audio Only (Mac)
The first step in creating an audio recording in QuickTime Pro is to make sure that your input device is set correctly.

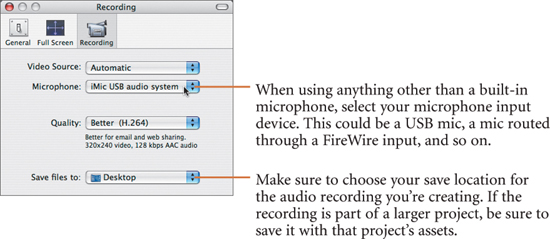
If your microphone does not appear in the Microphone pop-up menu, you may need to configure the device in the Audio pane of System Preferences.

Capturing Video and Audio (Mac)
The first step in recording a movie in QuickTime Pro is to make sure that your video and microphone input devices are set correctly.
Choose QuickTime Player > Preferences; then click the Recording icon.
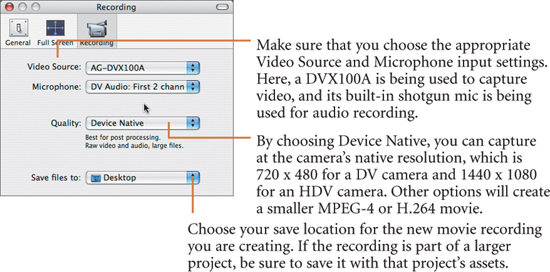
If you have a laptop with a built-in camera (such as a MacBook Pro with a built-in iSight camera), you can capture audio and video without having to connect any external equipment.
You can base your choice in quality on what you need to do with the content. For example, choosing Device Native from the Quality pop-up menu produces the highest-quality media that the device can create, a quality appropriate for ultimate editing on a platform such as Final Cut Pro. If you want to immediately upload or email the content, then one of the compressed formats (MPEG-4 or H.264) would be a better choice.


With a third-party video camera attached to QuickTime Pro, you can capture content that you have previously recorded onto tape, drives, or tapeless media. This means that you can use the New Movie Recording command for more than just live recording. You can grab footage that has already been shot (by switching your camera to its VCR mode and playing back while recording) and then use that footage in your projects. Be sure to choose Device Native in your Recording preferences so that you capture at the camera’s native resolution.
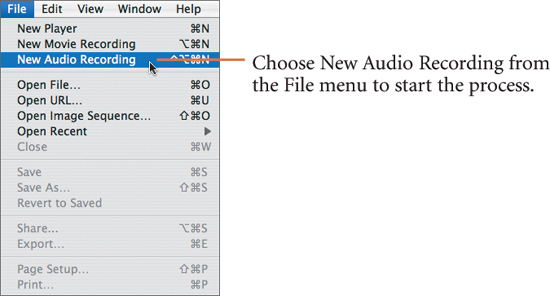
Capturing Audio (Windows)
Before recording, choose Edit > Preferences > Player Preferences to ensure that all the settings are correct for your hardware configuration. Then click the Audio Recording tab.

When the preferences are set correctly, choose File > New Audio Recording.

Saving Movies
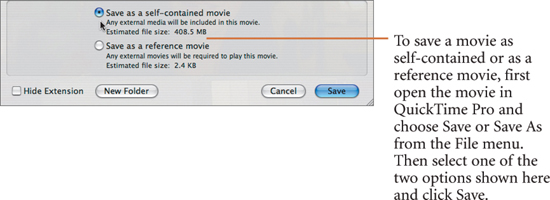
QuickTime Pro adds a few powerful options to the normal Save (or Save As) command that are worth exploring. QuickTime Pro can save two kinds of files: self-contained and reference.
Saving a movie as a self-contained file copies all the content into one file. Therefore, the size of the output file has a direct correspondence to the size of the source media. When you move the movie to another computer (or upload it to the Internet), all the media goes with it.
Reference movies contain only references to the movie’s content (in relation to the content’s current location in the directory path) and any metadata recorded with the movie. You can write reference movies almost instantly to disk because you do not have to copy any data, and you can thereby save considerable disk space. The downside is that if you move or delete any content referenced by the reference movie, you will make the entire movie unplayable. Additionally, if you move the reference movie without also moving all the referenced content (maintaining the exact directory structure), the movie will not play back properly.
Final Cut Studio editors use reference movies often because the Final Cut Studio suite of applications treats reference movies the same as self-contained movies—enabling fast and efficient workflows.
Saving Movies from the Internet
You can download and save QuickTime movies directly from the Internet, provided that the movie’s owner has enabled the movie for saving.
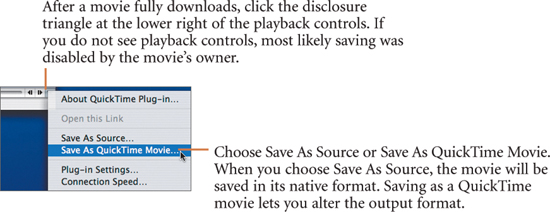
Streaming content is not actually saved to your local computer. Instead, a small reference movie that points to the stream is saved, so you must be connected to the Internet and able to access the clip to play the movie.
Sharing Movies
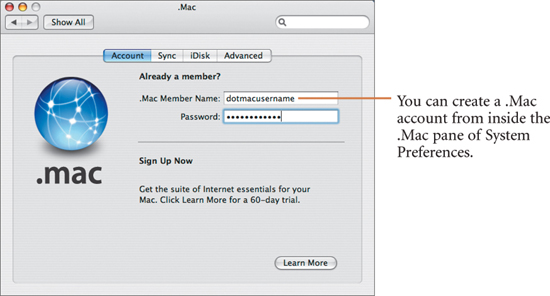
The Share feature in QuickTime Pro lets you quickly email movies or post them to a web page using a .Mac account.
Exporting comprises an entire chapter in this book (Chapter 2), but the Share command offers a much quicker, no-frills approach to exporting—with the trade-off of limited options and delivery choices—and it works only on Macs.
Sharing to Email
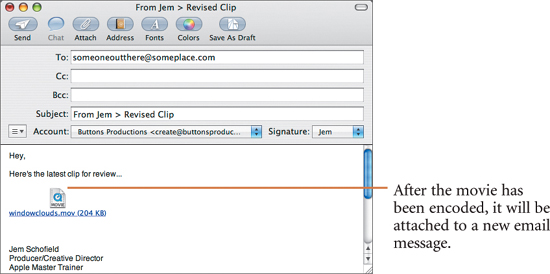
The Email function under Share lets you encode a small-, medium-, or large-size version of a movie using the H.264 codec. You can also export in the native (or original) resolution, but doing so will most likely defeat the purpose of compressing for email delivery. After QuickTime encodes the movie, it will open your default email application and attach the movie to a new message.
Choose File > Share to open the settings window.

Sharing to HomePage
HomePage lets you share a movie directly using a .Mac account. The process is similar to that for the Email function, but you must have a .Mac account to use this feature.
Choose File > Share to open the settings window.
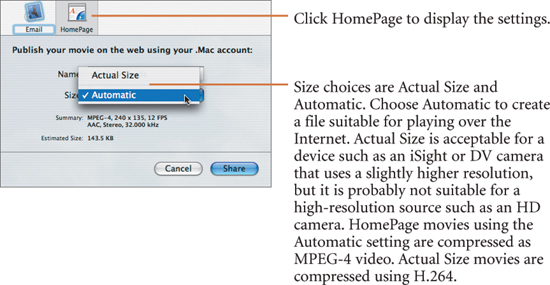
When you click Share, QuickTime encodes the movie. If your Mac is connected to the Internet, it will upload the movie to your .Mac account, create a new page, and launch your default web browser at the site.