
This chapter provides an overview of the BIRT extension framework and shows how to create and deploy a BIRT extension using the Eclipse Plug-in Development Environment (PDE).
The Eclipse platform is an open source, integrated system of application development tools that you implement and extend using a plug-in interface. Eclipse provides a set of core plug-ins that configure the basic services for the platform’s framework. A platform developer can build and integrate new tools in this application development system.
BIRT is a set of plug-in extensions that enable a developer to add reporting functionality to an application. The BIRT APIs define extension points that allow a developer to add custom functionality to the BIRT framework. Eclipse makes BIRT source code available to the developer community in the CVS repository.
In the Eclipse installation, the name of a plug-in directory contains an appended version number. This book omits the version number from the names of the plug-in directories. For example, the book abbreviates the name of the plug-in directory, org.eclipse.birt.report.data.oda.jdbc_2.1.0.N20060628-1351, to org.eclipse.birt.report.data.oda.jdbc.
The following sections provide a general description of how to make an extension to a defined extension point in the BIRT release 2.1 framework using the Eclipse PDE.
An Eclipse plug-in implements the following components:
Extension point schema definition
An XML document that specifies a grammar that you must follow when defining the elements of a plug-in extension in the Eclipse PDE
Plug-in manifest
An XML document that describes the plug-in’s activation framework to the Eclipse run-time environment
Plug-in run-time class
A Java class that defines the methods for starting, managing, and stopping a plug-in instance
The following sections provide detailed descriptions of these Eclipse plug-in components.
A plug-in directory typically contains an XML extension point schema definition (.exsd) file in a schema subdirectory. The XML schema documents the elements, attributes, and types used by the extension point. The Eclipse PDE uses this information to describe the elements and attributes in the property editors and other facilities of the Eclipse platform.
You use the Eclipse PDE to develop the plug-in content, test, and deploy a plug-in. The Eclipse PDE automatically generates the plugin.xml, build.properties, and run-time archive files.
The file, $INSTALL_DIReclipsepluginsorg.eclipse.birt.report.designer.uischema eportitemUI.exsd, documents the settings for a report item extension to the BIRT Report Designer user interface. The XML schema file, reportitemUI.exsd, has the following structure:
<schema> is the root element that sets the target namespace and contains all other elements and their attributes.
<annotation> contains the following attributes:
<appinfo> provides the following items:
Machine-readable metadata that Eclipse uses to identify the plug-in
Text-based information that appears in the PDE Extensions page and HTML extension point description
<documentation> provides user information that appears in the PDE’s HTML extension point description.
<element> declares a reference for the model and optional user interface extensions, such as figure, label, image, builder, property page, palette, editor, outline, and description. Each extension element is a complex type containing attributes and annotations, as described below:
model is an extension element that specifies the Report Object Model (ROM) name for the report item extension.
Each user interface extension element specifies the following items:
Extension element name.
Fully qualified name of the Java class implementing the interface specified for the extension element. For example, builder implements the interface, org.eclipse.birt.report.designer.ui.extensions. IReportItemBuilderUI.
Listing 16-1 is a partial schema example showing reportitemUI.exsd. The ellipses (...) mark the places in the code where lines are omitted.
Example 16-1. Partial example schema for Report Item UI
<?xml version='1.0' encoding='UTF-8'?>
<!-- Schema file written by PDE -->
<schema targetNamespace="org.eclipse.birt.report.designer.ui">
   <annotation>
      <appInfo>
         <meta.schema
           plugin="org.eclipse.birt.report.designer.ui"
           id="reportitemUI"
           name="Report Item UI Extension Point"/>
      </appInfo>
      <documentation>
         This extension point is used in conjunction with the
         Report Item extension point defined in the model. It
         is used to register the GUI to be used for the
         Extended report item.
      </documentation>
   </annotation>
   <element name="extension">
      <complexType>
         <sequence>
            ...
            <element ref="model"/>
            <element ref="builder" minOccurs="0" maxOccurs="1"/>
            <element ref="propertyPage" minOccurs="0"
               maxOccurs="1"/>
            <element ref="palette" minOccurs="0" maxOccurs="1"/>
            <element ref="editor" minOccurs="0" maxOccurs="1"/>
            <element ref="outline" minOccurs="0" maxOccurs="1"/>
            <element ref="description" minOccurs="0"
               maxOccurs="1"/>
         </sequence>
         <attribute name="point" type="string" use="required">
            ...
         </attribute>
      </complexType>
   </element>
   <element name="model">
      <complexType>
         <attribute name="extensionName" type="string"
            use="required">
            <annotation>
               <documentation>
                  The ROM Report Item Extension name that maps
                  to this UI
               </documentation>
            </annotation>
         </attribute>
      </complexType>
   </element>
   ...
   <element name="builder">
      <annotation>
         <documentation>
            Optional Builder for the element inside the Editor.
            Instantiated when a new item is dragged from the
            palette inside the editor.
         </documentation>
      </annotation>
      <complexType>
         <attribute name="class" type="string">
            <annotation>
               <documentation>
                  a fully qualified name of the Java class
                  implementing org.eclipse.birt.report
                  .designer.ui.extensions.IReportItemBuilderUI
               </documentation>
               <appInfo>
                  <meta.attribute kind="java"/>
               </appInfo>
            </annotation>
         </attribute>
      </complexType>
   </element>
   ...
</schema>You install an Eclipse plug-in in a subdirectory of the $INSTALL_DIR/eclipse/ plugins directory. The plug-in manifest file, plugin.xml, describes the plug-in’s activation framework to the Eclipse run-time environment.
At run time, Eclipse scans the subdirectories in $INSTALL_DIR/eclipse/plugins, parses the contents of each plug-in manifest file, and caches the information in the plug-in registry. If the Eclipse run time requires an extension, Eclipse lazily loads the plug-in, using the registry information to instantiate the plug-in’s objects. The run-time environment for the BIRT Report Engine functions in a similar way.
The plug-in manifest file declares the plug-in’s required code and extension points to the plug-in registry. The plug-in run-time class provides the code segment. By lazily loading the plug-in’s code segment, the run-time environment minimizes start-up time and conserves memory resources.
The plug-in manifest file, plugin.xml, has the following structure:
<plugin> is the root element.
<extension> specifies the extension points and the related elements and attributes that define the processing capabilities of the plug-in component.
Listing 16-2 shows the contents of the plug-in manifest file, org.eclipse.birt.sample.reportitem.rotatedlabelplugin.xml. This file describes the required classes and extension points for the BIRT report item extension sample, rotated label.
Example 16-2. Sample plug-in manifest file
   <?xml version="1.0" encoding="UTF-8"?>
   <?eclipse version="3.2"?>
   <plugin>
      <extension
         id="rotatedLabel"
         name="Rotated Label Extension"
         point="org.eclipse.birt.report.designer.ui
            .reportitemUI">
         <reportItemLabelUI
            class="org.eclipse.birt.sample.reportitem
               .rotatedlabel.RotatedLabelUI"/>
         <model extensionName="RotatedLabel"/>
         <palette icon="icons/rotatedlabel.jpg"/>
         <editor
            canResize="true"
            showInDesigner="true"
            showInMasterPage="true"/>
         <outline icon="icons/rotatedlabel.jpg"/>
         <propertyPage
            class="org.eclipse.birt.sample.reportitem
               .rotatedlabel.RotatedLabelPropertyEditUIImpl"/>
   </extension>
   <extension
      id="rotatedLabel"
      name="Rotated Label Extension"
      point="org.eclipse.birt.report.model.reportItemModel">
      <reportItem
         class="org.eclipse.birt.sample.reportitem
            .rotatedlabel.RotatedLabelItemFactoryImpl"
         extensionName="RotatedLabel">
         <property
            defaultDisplayName="Rotation Angle"
            defaultValue="-45"
            name="rotationAngle"
            type="integer"/>
         <property
            defaultDisplayName="Display Text"
            defaultValue="Rotated Label"
            name="displayText"
            type="string"/>
      </reportItem>
   </extension>
   <extension
      id="rotatedLabel"
      name="Rotated Label Extension
      point="org.eclipse.birt.report.engine.reportitem
         Presentation">
      <reportItem
         class="org.eclipse.birt.sample.reportitem.rotated
            label.RotatedLabelPresentationImpl"
         name="RotatedLabel"/>
   </extension>
</plugin>A plug-in runs within an instance of a plug-in run-time class. A plug-in run-time class extends org.eclipse.core.runtime.Plugin, the abstract superclass for all plug-in run-time class implementations. The Plugin run-time class defines the methods for starting, managing, and stopping a plug-in instance.
The Plugin run-time class typically contains a reference to an Open Services Gateway Initiative (OSGi) resource bundle that manages the execution context. Plugin implements the interface, org.osgi.framework.BundleActivator, which installs, starts, stops, and uninstalls the OSGi resource bundle. The OSGi resource bundle implements a service registry to support the following services:
The OSGi platform provides a secure, managed, extensible Java framework for deploying, downloading, and managing service applications. For more information about the OSGi platform, visit the OSGi Alliance web site at http://www.osgi.org/. For more information about the Java run-time and OSGi APIs, see the reference documentation for the Platform Plug-in Developer Guide in Eclipse Help.
Listing 16-3 is a code example showing the life-cycle and resource bundle methods for the report item plug-in, rotated label.
Example 16-3. Sample code for the rotated label report item plug-in
package org.eclipse.birt.sample.reportitem.rotatedlabel;

import org.eclipse.core.runtime.Plugin;
import org.osgi.framework.BundleContext;
import java.util.*;

/**
 * The main plugin class to be used in the desktop.
 */
public class RotatedLabelPlugin extends Plugin {
   // The Plugin ID
   public final static String ID =
      "org.eclipse.birt.sample.reportitem.rotatedlabel";
   //The shared instance.
   private static RotatedLabelPlugin plugin;
   //Resource bundle.
   private ResourceBundle resourceBundle;

   /**
    * The constructor.
    */
   public RotatedLabelPlugin() {
      super();
      plugin = this;
      try {
         resourceBundle = ResourceBundle.getBundle
            ("org.eclipse.birt.sample.reportitem.rotatedlabel
               .RotatedLabelPluginResources" );
      } catch (MissingResourceException x) {
         resourceBundle = null;
      }
   }
   /**
    * This method is called upon plug-in activation
    */
   public void start(BundleContext context) throws Exception {
      super.start(context);
   }

   /**
    * This method is called when the plug-in is stopped
    */
   public void stop(BundleContext context) throws Exception {
      super.stop(context);
   }

   /**
    * Returns the shared instance.
    */
   public static RotatedLabelPlugin getDefault() {
      return plugin;
   }

   /**
    * Returns the string from the plugin's resource bundle,
    * or 'key' if not found.
    */
   public static String getResourceString(String key) {
      ResourceBundle bundle =
         RotatedLabelPlugin.getDefault().getResourceBundle();
      try {
         return (bundle != null) ? bundle.getString(key) : key;
      } catch (MissingResourceException e) {
         return key;
      }
   }

   /**
    * Returns the plugin's resource bundle,
    */
   public ResourceBundle getResourceBundle() {
      return resourceBundle;
   }
}The Eclipse PDE is an integrated design tool that you use to create, develop, test, debug, and deploy a plug-in. The PDE provides wizards, editors, views, and launchers to assist you in developing a plug-in.
The Eclipse PDE provides a wizard to assist you in setting up a plug-in project and creating the framework for a plug-in extension. In the Plug-in Development perspective, you can use the New Plug-in Project wizard to assist you in setting up a plug-in project and creating the framework for a plug-in extension. The PDE wizard automatically generates the plug-in manifest file, plugin.xml, and, optionally, the Java plug-in run-time class.
How to choose the Plug-in Development perspective
To access the PDE, you must choose the Plug-in Development perspective. To open the Plug-in Development perspective, perform the following tasks:
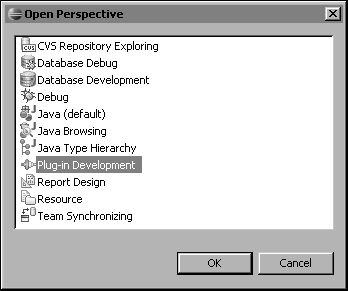
From the Eclipse menu, choose Window →Open Perspective →Other. Open Perspective appears.
Select Plug-in Development, as shown in Figure 16-1.
Choose OK. The Plug-in Development perspective appears.
How to set up a new plug-in project
To access the New Plug-in Project wizard and create a project, perform the following tasks:
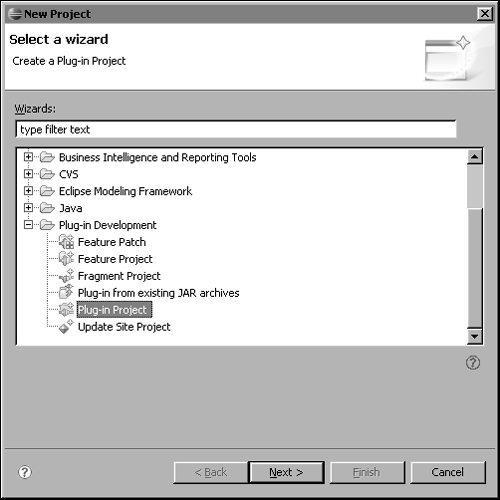
From the PDE menu, choose File →New →Project. New Project appears.
In Wizards, expand Plug-in Development, and select Plug-in Project, as shown in Figure 16-2.
Choose Next. New Plug-in Project appears, as shown in Figure 16-3.
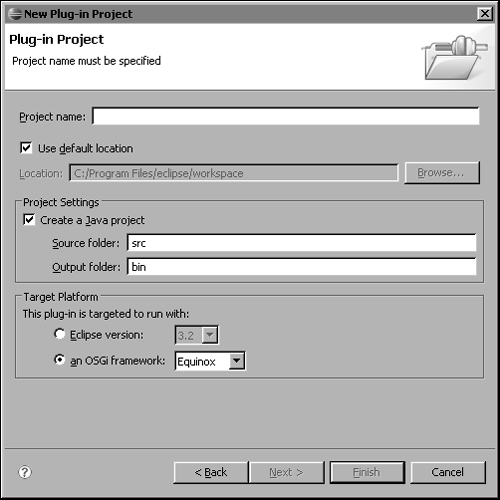
Using the New Plug-in Project wizard, you can define the following properties for the plug-in:
Project settings
Name
Location
Source and output folders
Plug-in format, such as the Eclipse version and whether to create an OSGi bundle manifest
Plug-in content
Properties such as ID, version, name, provider, and the run-time library classpath
Choose to generate an activator, a Java class that controls the plug-in’s life cycle
Create a rich client application
Plug-in components such as an editor, property page, view, menu, or other components from a series of templates
In Eclipse 3.2, opting to create an OSGi bundle manifest, MANIFEST.MF, offers significant advantages. The OSGi bundle manifest, META-INF/MANIFEST.MF, contains a set of manifest headers that provide descriptive information about a bundle.
Eclipse 3.2 uses an implementation of the OSGi R4 framework specification. This framework defines the directives that specify the access rules for an exported package and the headers that facilitate class loading, start-up time, filtering, and other features.
BIRT release 2.1 uses the OSGi framework that comes with the Eclipse 3.2 platform. You must implement any plug-in that extends a BIRT release 2.1 extension point as an OSGi bundle.
Inside the Eclipse environment, you can develop and deploy a plug-in for BIRT Report Designer. Outside of the Eclipse environment, you can develop and deploy a plug-in for BIRT Web Viewer. BIRT Web Viewer is a J2EE web application consisting of servlets and JSPs that encapsulates the BIRT Report Engine API to generate reports.
The Eclipse PDE supports host and run-time instances of the workbench project. The host instance provides the development environment. The run-time instance allows you to launch a plug-in to test it.
Figure 16-4 shows the project for the report item extension sample, rotated label, in the host instance of the PDE Workbench. In the host instance, the PDE Workbench provides the following view and editor components:
Package Explorer provides an expandable view of the plug-in package.
Outline provides an expandable view of the project settings.
PDE Manifest Editor displays a page containing the project settings for the currently selected item in Outline.

In PDE Manifest Editor, you specify project settings and edit related files to create the plug-in framework on the following pages:
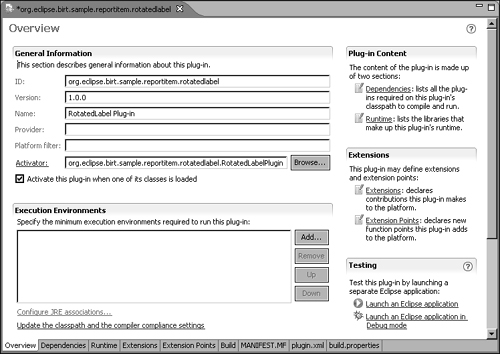
Overview
Lists general information such as the plug-in ID, version, name, provider, platform filter, and activator class. This page also contains sections that link to the plug-in content pages, extensions, launchers for testing and debugging, deployment wizards, and the settings for the execution environment. In Figure 16-4, PDE Manifest Editor displays the Overview page.
Dependencies
Lists the plug-ins that must be on the classpath to compile and run.
Declares the packages that the plug-in exposes to clients, the package visibility to other plug-ins, and the libraries and folders in the plug-in classpath.
Extensions
Declares the extensions that the plug-in makes to the platform.
Extension Points
Declares the new extension points that the plug-in adds to the platform.
Build
Displays the build configuration settings. A change to a setting on this page updates the file, build.properties.
MANIFEST.MF
Displays an editable page containing the header settings for the manifest file, MANIFEST.MF<10032006>><case inconsistent, that provide descriptive information about an OSGi bundle.
Plug-in.xml
Displays an editable page containing the settings for the plug-in manifest file, plugin.xml.
Build.properties
Displays an editable page containing the settings for the file, build.properties.
A modification to a setting in a PDE Manifest Editor page automatically updates the corresponding plug-in manifest or build properties file.
Use the host instance of the PDE Workbench to create the basic structure of a plug-in extension by performing the following tasks:
Specifying the plug-in dependencies
Verifying the plug-in run-time archive
Specifying the plug-in extension
How to specify the plug-in dependencies
On PDE Manifest Editor, choose Overview.
In Plug-in Content, choose Dependencies.
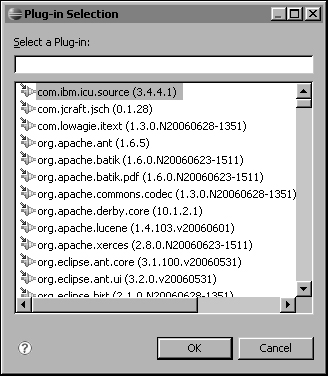
In Required Plug-ins, choose Add. Plug-in Selection appears, as shown in Figure 16-5.
In Plug-in Selection, select a plug-in, such as the following example:
org.eclipse.birt.report.designer.ui
Choose OK.
Repeat steps 2 and 3 to add more plug-ins to the list of required plug-ins in the Dependencies page.
In Required Plug-ins, the order of the list determines the sequence in which a plug-in loads at run time. Use Up and Down to change the loading order as necessary.
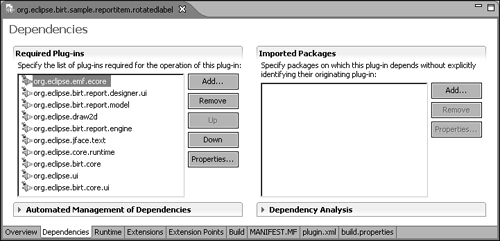
Figure 16-6 shows an example of a list of dependencies for a plug-in extension.
How to verify the plug-in run-time archive
On PDE Manifest Editor, choose Runtime. Runtime appears, as shown in Figure 16-7.
In Runtime, perform the following tasks:
In Exported Packages, list all the packages that the plug-in exposes to clients.
In Package Visibility, when the plug-in is in strict run-time mode, indicate whether a selected package is one of the following options:
Visible to downstream plug-ins
Hidden except for the specified plug-ins
In Classpath, choose Add to add the name of an archive file or folder to the classpath manually.

How to specify the plug-in extension
On PDE Manifest Editor, choose Extensions.
In All Extensions, choose Add. New Extension appears.
On Extension Point Selection, in Extension Points, select a plug-in, such as the following example:
org.eclipse.birt.report.designer.ui.reportitemUI
New Extension appears, as shown in Figure 16-8.
Choose Finish. Extensions appears, as shown in Figure 16-9.
Repeat steps 2 and 3 to add more plug-ins to the list of required extension points in the Extensions page.


The XML schema specifies a grammar that you must follow when creating an extension in the Eclipse PDE. When you select an element of an extension in the Extensions page of the PDE, Eclipse uses the XML schema to populate the Extension Element Details section with the list of valid attributes and values for the element.
On Extensions, if you choose Find declaring extension point, the PDE searches for an extension point that matches the criteria. If you choose Open extension point description, the PDE generates an HTML page containing the information documented in the XML schema and displays the page in a viewer.
This section discusses the following tasks:
Searching for and viewing extension point information
Specifying plug-in extension content
Specifying a build configuration
How to search for and view extension point information
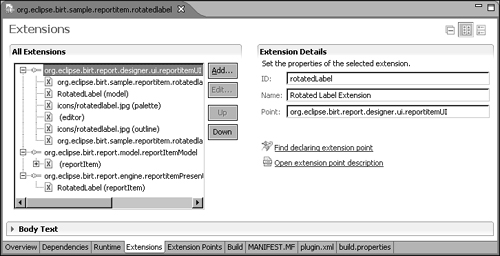
In the Eclipse PDE, select a plug-in extension in All Extensions.
In Extension Details, choose Find declaring extension point.
Search appears. In Figure 16-10, Search lists one match, org.eclipse.birt.report.designer.ui.reportitemUI.
In Search, double-click on the match, such as org.eclipse.birt.report.designer.ui.reportitemUI. In PDE Manifest Editor, a window appears, displaying the contents of the file, org.eclipse.birt.report.designer.ui/ plugin.xml, as shown in Figure 16-11.
Plugin.xml describes the extension points, odadatasource, reportItemUI, and menu Builders.
In PDE Manifest Editor, close the window displaying contents of the plugin.xml file. Choose Extensions.
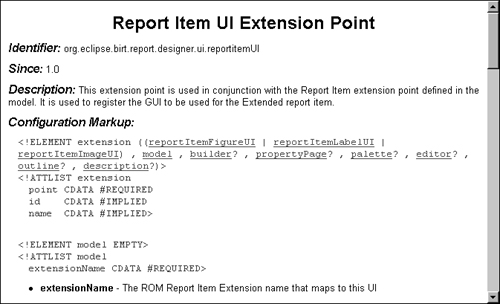
In Extension Details, choose Open extension point description.
A viewer opens, displaying the HTML document for the extension point. In Figure 16-12, the viewer displays Report Item UI Extension Point, containing information extracted from the XML schema, $INSTALL_DIReclipse pluginsorg.eclipse.birt.report.designer.uischema eportitemUI.exsd.
In the HTML document, Configuration Markup displays the attribute list for the extension point. Scroll down to view all the contents of the HTML document, including the optional set of user interface elements for the report item extension, such as builder, property page, palette, editor, outline, and description.


How to specify plug-in extension content
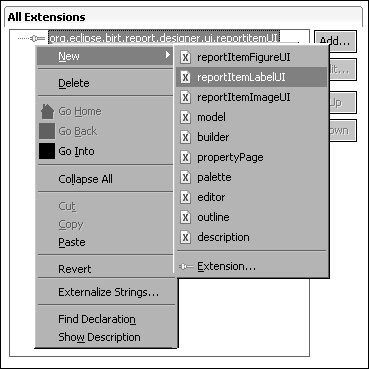
In PDE Manifest Editor, choose Extensions.
In All Extensions, right-click on an extension point such as org.eclipse.birt.report.designer.ui.reportItemLabelUI, and choose New →<extension point element>.
Figure 16-13 shows how to select the extension point element, reportItemLabelUI.
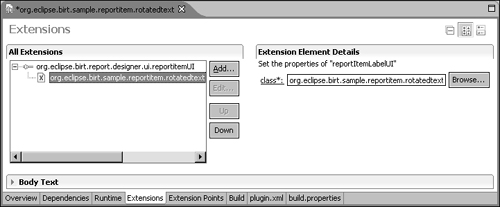
Extensions appears, displaying the extension element and its details, as shown in Figure 16-14.
In this example, All Extensions lists the extension, org.eclipse.birt.sample.reportitem.rotatedlabel.RotatedLabelUI (rotatedItemLabelUI), and Extension Element Details lists rotatedItemLabelUI properties. In Extension Element Details, the label for a required attribute, such as class, contains an asterisk.
To view the annotation for a property listed in Extension Element Details, hover the cursor over the property label.
A ToolTip appears, displaying the annotation for the property from the XML schema. Figure 16-15 shows the annotation for the class property for the example extension element, rotatedItemLabelUI.
To specify the class attributes for an extension element, choose class in Extension Element Details.
If no class file exists, Java Attribute Editor appears, as shown in Figure 16-16. If the class file exists, the class file opens in PDE Manifest Editor.
On Java Attribute Editor, you can modify or add to the settings for the following class properties:
Source folder
Package
Enclosing type
Class name
Modifiers, such as public, default, private, protected, abstract, final, and static
Superclass
Interfaces
Method stubs, such as main, constructors, and inherited abstract methods
Comments
Choose Finish.
To add more elements and attributes to a selected extension point, repeat steps 1 and 2.
Figure 16-17 shows the full list of extension points required for the sample report item extension, org.eclipse.birt.sample.reportitem.rotatedlabel.


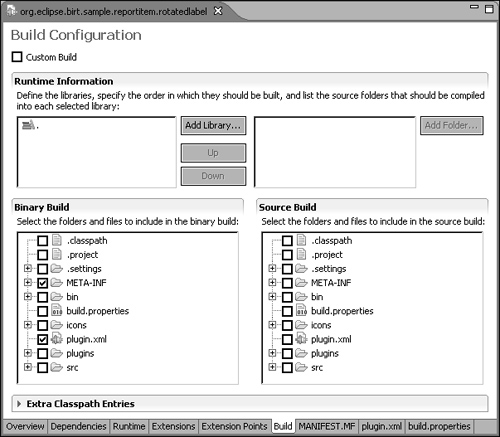
In Eclipse PDE Manifest Editor, Build allows you to specify the build configuration, including the following items:
Defines the libraries, the source folders to compile into each library, and the compilation order.
Binary Build
Selects the files and folders to include in the binary build.
Source Build
Selects the files and folders to include in the source build. Source Build is not typically required. Source Build uses the org.eclipse.pde.core.source extension point that allows the PDE to find source archives for libraries in other Eclipse plug-ins.
How to specify a build configuration
On PDE Manifest Editor, choose Build. Build Configuration appears. Figure 16-18 shows Build Configuration.
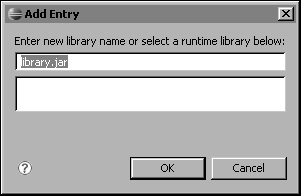
In Runtime Information, add a new library by choosing Add Library.
Add Entry appears.
Enter the new library name or select a run-time library from the list, as shown in Figure 16-19. Choose OK.
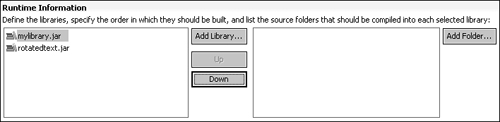
To change the compilation order of a library, change its position in the list. In Runtime Information, select the library and choose Up or Down.
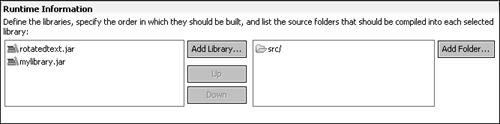
Figure 16-20 shows Runtime Information with mylibrary.jar selected and Down enabled.
To add a folder to a library, choose Add Folder. New Source Folder appears, as shown in Figure 16-21.
Select a folder, such as src, and choose OK. Runtime Information appears, as shown in Figure 16-22.
In Binary Build, include a folder in the binary build by selecting the folder. Figure 16-23 shows the icons folder selected.
From the Eclipse menu, choose Project → Build All, to build a project.
Alternatively, you can choose Project →Build Automatically to continually build the project as you make changes to the code.


The Eclipse PDE can generate an Ant build script for compiling plug-in code, based on the settings in the build.properties file. The generated script is an XML file in which the elements are the required tasks for the build operation. The Ant build tool compiles the project, using the specified Java compiler.
Ant is an open source Java application available from the Apache Software Foundation. For more information on Ant and the Apache Software Foundation, visit the web site at http://ant.apache.org.
How to generate an Ant build script
In Package Explorer, right-click the project’s plugin.xml file and choose PDE Tools →Create Ant Build File. PDE Tools creates an Ant script file, build.xml, in the project folder.
You can launch an instance of the run-time workbench to test and debug the plug-in extension.
How to launch a run-time workbench
On PDE Manifest Editor, choose Overview. Overview appears as shown in Figure 16-24.
In Testing, choose Launch an Eclipse application. Eclipse launches the run-time workbench.
In the report item extension example, Report Design—Eclipse SDK appears. In the run-time workbench, you must create a new report design project to use the report label extension.
You can use the Export Wizard to produce a distributable archive file that contains the plug-in code and other resources. A user can find a software update and extract the contents of the archive file to an Eclipse installation using the Feature Updates and Product Configuration managers. A plug-in developer can create and manage an update site using the Update Site Editor in the Eclipse PDE.
How to deploy a plug-in extension
In the Eclipse PDE Manifest Editor, choose Overview.
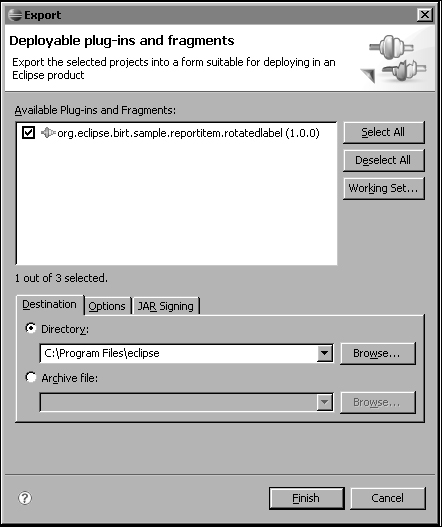
In Exporting, choose Export Wizard. Export appears.
In Available Plug-ins and Fragments, select the plug-in to export. For example, select org.eclipse.birt.sample.reportitem.rotatedlabel.
In Export Destination, specify Archive file or Directory. For example, in Directory, type:
C:Program Fileseclipse
In Export Options, select one of the following options, if necessary:
Include source code
Package plug-ins as individual JAR archives
Save as Ant script
Export appears as shown in Figure 16-25. Choose Finish to export the plug-in to the specified destination.
If all the dependent resources are available in the new environment, Eclipse can discover and activate the plug-in in the run-time environment. In this type of unmanaged distribution and installation, the user must find and install updates to the plug-in if a release occurs in the future.
A plug-in developer can also use a more structured approach and group plug-ins into features. A feature is a set of plug-ins that you install and manage together.
Features contain information that allow the Feature Updates and Product Configuration managers to locate published updates and discover new related features. Updates are typically published in a special internet directory called an update site, created and managed by a plug-in developer using the Update Site Editor.
How to install feature updates and manage the Eclipse configuration
The Eclipse PDE provides wizards and editors that support the use of features and update sites. Choose Help →Software Updates → Find and Install to access Feature Updates. Feature Updates allows you to search for updates and new features, as shown in Figure 16-26.

Choose Help →Software Updates →Manage Configuration to access Product Configuration. Figure 16-27 shows Product Configuration.

Product Configuration allows you to perform the following tasks:
Scan for updates.
View installation history.
Show activities that created the current configuration.
Add an extension location that contains features and plug-ins previously installed.
Revert to a previous configuration.
You create an update site by building an update site project in the Eclipse PDE workspace. The update site project contains a manifest file, site.xml, that lists the features and plug-ins packages.
The build operation for an update site puts the JAR files for features in a features folder and the JAR files for plug-ins in a plug-ins folder. The Eclipse PDE also provides support for uploading an update site to a remote server or local file system for distribution.
How to create an update site project
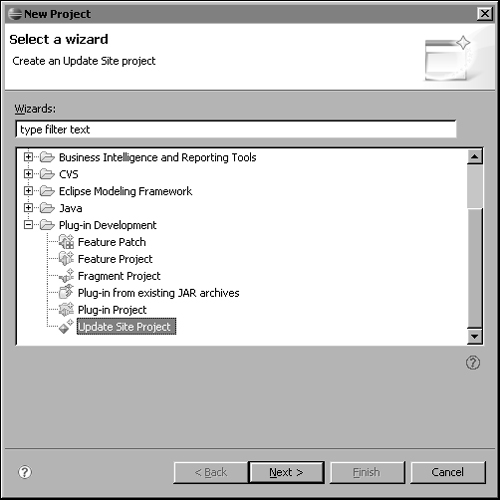
From the Eclipse menu, choose File →New →Project. New Project appears.
In Wizards, open Plug-in Development and select Update Site Project, as shown in Figure 16-28. Choose Next. Update Site Project appears.
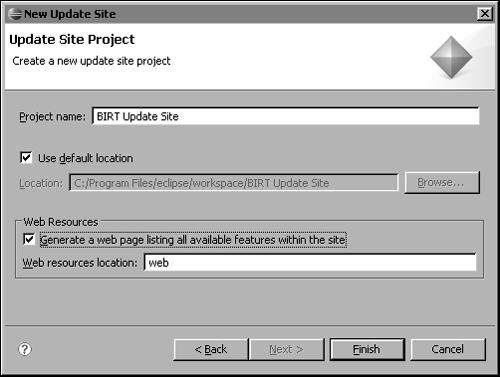
On Update Site Project, specify the following items:
Project name
Project contents directory, such as C:Program Fileseclipseworkspace BIRT Update Site
Web resources
Select Generate web page listing of all available features within the site
Creates index.html, site.css, and site.xls files for displaying the contents of the update site.
Web resources location
Change this setting to the web resources location. The default value is web.
Update Site Project appears as shown in Figure 16-29. Choose Finish. Update Site Map appears as shown in Figure 16-30.
Choose New Category to create a feature category.
Choose Add Feature to add a feature to a selected category.

For more information about deploying a plug-in, installing features, managing a product configuration, and building an update site, see the documentation for the Platform Plug-in Developer Guide in Eclipse Help.
This book provides examples for the following types of BIRT extensions:
Report item
The example shows how to build a rotated label report item plug-in and add the report item to the BIRT Report Designer using the defined extension points. This plug-in renders the label of a report item as an image. The extension rotates the image in a report design to display the label at a specified angle.
Report rendering
The example shows how to extend the emitter interfaces to build and deploy a report rendering plug-in that runs in the BIRT Report Engine environment. The CSV extension example is a plug-in that writes the table data in a report to a file in CSV format.
ODA drivers
The CSV ODA driver example is a plug-in that reads data from a CSV file. The Hibernate ODA driver example uses HQL to provide a SQL-transparent extension that makes the ODA extension portable to all relational databases.
These examples also show how to develop an ODA extension to the BIRT Report Designer 2.1 user interface so that a report developer can select an extended ODA driver.
You can download the source code for these extension examples at http://www.actuate.com/birt/contributions.