
As feature-rich as Expression Web is, there will always be missing features and capabilities that you will find yourself wishing were included. If you have a basic knowledge of Visual Basic for Applications (VBA) and a little initiative, you can easily add functionality and features to Expression Web. Indeed, I consider this feature to be one of the most powerful in Expression Web.
VBA has been a part of Microsoft applications for many years. Many of those applications (such as Microsoft Word and Microsoft Excel) include a macro recorder that allows you to record a series of operations as a macro that you can then reuse as you see fit. Unfortunately, Expression Web does not provide a macro recorder, so if you want to use a macro in Expression Web, you must write it yourself. It makes many users uncomfortable to delve into this area, but writing macros is much easier than most people think. Once you start writing code, you’ll find that there’s almost no limit to what you can accomplish.
The purpose of this chapter is not to teach you the syntax of VBA code or to present all the facets of programming macros in Expression Web. Instead, the intent is to give you enough information to get your feet wet. It’s important to realize that the best method for learning how to write any kind of code is to jump right in and start coding. Hopefully, this chapter will provide you with the foundation to do just that.
Macros are developed with the Visual Basic Editor. To start the Visual Basic Editor, select Tools, Macro, Visual Basic Editor, or use the keyboard shortcut Alt+F11.
Note
Even though Microsoft calls the macro editor the Visual Basic Editor, it is not the same as Microsoft Visual Basic. When you are writing macro code in Expression Web, you are writing VBA code.
VBA is a subset of Visual Basic and does not have all the same capabilities. One of the limitations of VBA is that the code must run within a host application. You cannot write a standalone application with VBA as you can with Visual Basic.
When you first launch the Visual Basic Editor, you will see two windows on the left side of the screen, as shown in Figure 26.1—the Project Explorer and the Properties window. The Project Explorer displays a tree view of all files that are part of your macro project. The Properties window provides access to the properties of items within your project. Let’s briefly discuss the files that make up a macro project.

Three types of files comprise a macro project: modules, class modules, and UserForms. Modules and class modules contain only code, whereas UserForms contain both code and user interface elements. A macro project must have at least one module. It can also contain one or more class modules and UserForms, but it is not required to have either.
A module is a file that contains VBA code. It is common practice for VBA programmers to create many modules when programming complex macros. For example, you might have one module that contains code to perform certain editing functions in your Web pages and another module that performs specialized tasks such as sending email if a failure occurs. The choice is yours, but organization is critical to keep track of your code.
When you start the Visual Basic Editor, one module is automatically created for you. To create new modules, right-click inside the Project Explorer and select Insert, Module from the menu.
A class module is a special kind of module that defines a class. A class is an object that has definable characteristics and performs certain tasks. Characteristics of a class are called properties, and the code that enables a class to perform a certain task is called a method. Expression Web has many of its own classes you can use, but you can also create your own classes with their own properties and methods. Any classes you create are defined in class modules.
To insert a new class module into a macro project, right-click in the Project Explorer and select Insert, Class Module. The use of class modules is outside the scope of this book.
A UserForm provides a user interface for your macro. Many macros do not include a UserForm, but if you require more than basic interaction with the users of your macro, a UserForm might be required.
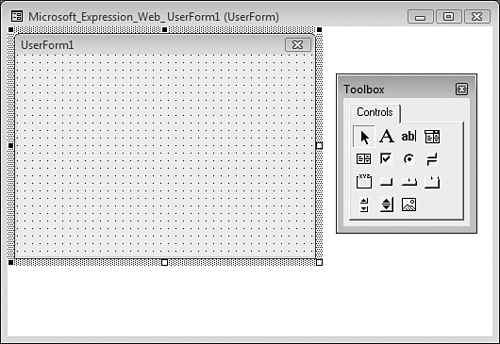
To add a new UserForm (seen in Figure 26.2) to your macro project, right-click in the Project Explorer and select Insert, UserForm. We will be designing a UserForm for the sample macro we’ll write later in this chapter.
Now that you have a general understanding of the pieces that comprise a VBA macro, let’s take a look at how we can use a macro to automate Expression Web.
When you write macros, you access parts of the application you’re developing against using a predefined set of classes, properties, and methods called an object model. Expression Web actually has three different object models you can use: the Application object model, the Web object model, and the Page object model. As you might have guessed, you access the Expression Web application using the Application object model, you access Web sites with the Web object model, and you access Web pages and their content using the Page object model.
The top-level object in the Application object model is the Application object. The Application object represents the current instance of the Expression Web application itself.
Suppose we want to display the version of Expression Web we are running. We can do that using the following code:
MsgBox Application.Version
This code displays the Version property of the Application object in a message box.
At the core of the Web object model is the Web object. A Web object represents an Expression Web Web site. You can get a reference to a Web object as follows:
Dim oWeb As Web
Set oWeb = Webs.Open("c:usersjameschedesktopvba", , , WebOpenInWindow)
In the first line, we declare a variable called oWeb and indicate that it will contain a Web object. We then open the Web site located at c:usersjameschedesktopvba and set the oWeb object equal to that Web site. After this code executes, oWeb will contain a reference to the Web site and we can begin accessing the properties of that site and calling its methods.
For example, suppose we want to publish the Web site to http://www.mysite.com. We can do that using the code in Listing 26.1.
Example 26.1. Publishing to Root Web
1 Dim oWeb As Web
2 Set oWeb = Webs.Open("c:usersjameschedesktopvba", , , WebOpenInWindow)
3 oWeb.Publish "http://www.mysite.com", WebPublishAddToExistingWeb
As you can see, writing code to automate functionality in Expression Web is easy when you get the hang of it.
The Object Browser
The Object Browser is an excellent tool for viewing all the objects, properties, and methods of Expression Web’s object models. You can open the Object Browser by selecting View, Object Browser (or by pressing F2) from the Visual Basic Editor.
As seen in Figure 26.3, the Object Browser provides a comprehensive list of all the objects, properties, and methods in a macro project. When a class is selected in the Classes frame on the left, the Members pane on the right displays all the properties and methods of that class. By right-clicking on any class, property, or method and choosing Help from the menu, you have quick access to the documentation for the object. You can also select the object and press F1 to get help.

The Object Browser is fully searchable. Suppose you want to find documentation on the Open method of an Expression Web Web object. Simply enter “open” in the search box and click the Search button—the button that looks like a pair of binoculars. Using this method, you will often not only find the specific item you need, but you will also likely see other objects of interest that will help to increase your knowledge of Expression Web object models.
Experiment with the Object Browser for a while. Find an interesting object in the Expression Web object model and try to write a macro that uses that object. You’ll find that taking this approach will dramatically increase your knowledge, and you’ll learn skills you can draw on for many years to come.
Now that we’ve got a Web object, we can easily access that Web site’s files by using the WebFile object. If, for example, we wanted to open the page called default.htm in the root folder of the Web site, we would do it by adding the code in Listing 26.2 to the code we entered in Listing 26.1.
Now that you know about the Visual Basic Editor and Expression Web object models, it’s time to put that knowledge to work and write a macro.
Note
The files for the macro you will write are on the CD-ROM in the ExamplesCh26Files folder. Instead of entering the code and creating the UserForm, you can install the files from the CD and then drag and drop the files for the macro to the Project Explorer window.
A useful feature of Expression Web is the ability to specify HTML code optimizations that are applied when you publish an Expression Web Web site. Naturally, the Expression Web object model provides programmatic access to this functionality, so we’ll use that functionality to write a useful macro.
You will want your macro to allow for the entry of a server name. It will then access that Web server and provide a list of all the Expression Web Web sites on that server. When one of those Web sites is selected, it will show the HTML optimizations applied for the site, and it will allow you to easily change those settings with a click of the mouse.
Let’s have a look at the requirements for your macro. You’ll need:
A UserForm to interact with your macro.
A method to retrieve the list of Expression Web Web sites from a given server.
A method to determine the current HTML optimization settings for a given Web site.
A method to set the HTML optimizations for a given Web site as specified by your macro.
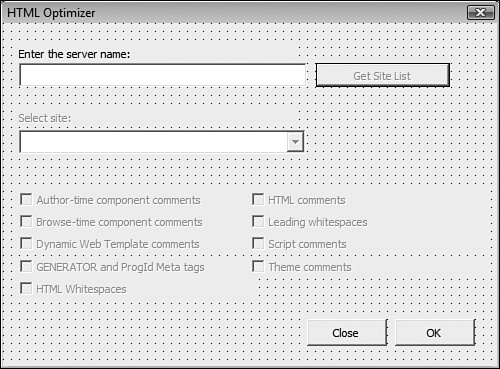
The first thing to do is create a UserForm. You’ll need to provide a way for a user to enter the name of a Web server, a button for the user to click to get a list of Web sites on that server, a method of displaying the list of Web sites to the user, and some checkboxes that will display the current HTML optimization settings. The UserForm will also allow the user of your macro to change the HTML optimization settings and specify new settings. (The completed UserForm is shown in Figure 26.4.)
Note
You can also use this macro on a disk-based Web site by pointing it to the root folder of the site.
Start the Visual Basic Editor if it’s not already running and insert a new UserForm by right-clicking inside the Project Explorer and selecting Insert, UserForm. A new UserForm is inserted into your project and the Toolbox window appears. The Toolbox contains all the tools you will need to create the user interface for your macro.
Note
You’re not limited to the tools that are in the Toolbox by default. By right-clicking on the Toolbox and selecting Additional Controls from the menu, you can add other controls that are installed on your system such as third-party controls you may have purchased or downloaded.
After adding the UserForm, the Properties window will contain a listing of the properties for the UserForm. All objects in a macro have certain properties that control their behavior, and each of these properties has a value associated with it that describes the property. Some properties can be changed, but other properties are read-only.
A discussion of all UserForm properties is outside the scope of this book, but by selecting a property and pressing F1, you can review the context-sensitive help on that property.
At the top of the list of properties is the Name property. This property defines the name used to refer to the selected object in your macro code. Select the Name property and change it from UserForm1 to “frmMain”. After changing the name of the UserForm, change the Caption property to “HTML Optimizer”, the Height property to 277, and the Width property to 375.
Next you’ll need to add some controls to the UserForm. Add a Label control from the Toolbox to the UserForm by clicking the Label control button (the button marked with the letter “A”) and then drawing the label on the UserForm. After drawing the label on the UserForm, change the Left property to 12, the Top property to 18, the Height property to 12, the Width property to 210, and the Caption property to “Enter the server name:”.
Add the controls in Table 26.1 and set their properties as indicated. If you aren’t sure which Toolbox button represents which control, hover over a button with your mouse and the name of the control will display in a tooltip. If you’d prefer, you can install the files from the CD accompanying this book and import the frmMain.frm file from the ExamplesCh26Files folder.
Table 26.1. Controls for the UserForm
Control/Property | Value | |
|---|---|---|
TextBox | TextBox |
|
Name | txtServerName | |
Height | 18 | |
Left | 12 | |
Top | 30 | |
Width | 216 | |
CommandButton | CommandButton | |
Name | cmdGetSites | |
Caption | Get Site List | |
Default | True | |
Enabled | False | |
Height | 18 | |
Left | 235 | |
TakeFocusOnClick | False | |
Top | 30 | |
Width | 100 | |
Label | Label |
|
Name | lblSelectSite | |
Caption | Select site: | |
Enabled | False | |
Height | 12 | |
Left | 12 | |
Top | 66 | |
Width | 210 | |
ComboBox | ComboBox | |
Name | cboSites | |
Enabled | False | |
Height | 18 | |
Left | 12 | |
Style | 2- fmStyleDropDownList | |
Top | 80 | |
Width | 215 | |
CheckBox | CheckBox |
|
Name | chkAuthorComponents | |
Caption | Author-time component comments | |
Enabled | False | |
Height | 15 | |
Left | 12 | |
Top | 125 | |
Width | 180 | |
CheckBox | CheckBox | |
Name | chkBrowseComponents | |
Caption | Browse-time component | |
comments | ||
Enabled | False | |
Height | 15 | |
Left | 12 | |
Top | 141.75 | |
Width | 180 | |
CheckBox | CheckBox | |
Name | chkDynamicTemplates | |
Caption | Dynamic Web Template comments | |
Enabled | False | |
Height | 15 | |
Left | 12 | |
Top | 158.45 | |
Width | 180 | |
CheckBox | CheckBox | |
Name | chkGenerator | |
Caption | GENERATOR and ProgId Meta tags | |
Enabled | False | |
Height | 15 | |
Left | 12 | |
Top | 175.2 | |
Width | 180 | |
CheckBox | CheckBox |
|
Name | chkWhitespace | |
Caption | HTML whitespaces | |
Enabled | False | |
Height | 15 | |
Left | 12 | |
Top | 192 | |
Width | 180 | |
CheckBox | CheckBox | |
Name | chkHTMLComments | |
Caption | HTML comments | |
Enabled | False | |
Height | 15 | |
Left | 186 | |
Top | 125 | |
Width | 180 | |
CheckBox | CheckBox | |
Name | chkLeadingWhitespace | |
Caption | Leading whitespaces | |
Enabled | False | |
Height | 15 | |
Left | 186 | |
Top | 141.75 | |
Width | 180 | |
CheckBox | CheckBox | |
Name | chkScriptComments | |
Caption | Script comments | |
Enabled | False | |
Height | 15 | |
Left | 186 | |
Top | 158.45 | |
Width | 180 | |
CheckBox | CheckBox |
|
Name | chkThemeComments | |
Caption | Theme comments | |
Enabled | False | |
Height | 15 | |
Left | 186 | |
Top | 175.2 | |
Width | 180 | |
CommandButton | CommandButton | |
Name | cmdClose | |
Caption | Close | |
Height | 20 | |
Left | 228 | |
Top | 222 | |
Width | 60 | |
CommandButton | CommandButton |
|
Name | cmdOK | |
Caption | OK | |
Height | 20 | |
Left | 294 | |
Top | 222 | |
Width | 60 |
Figure 26.4 shows the completed version of the UserForm.
Now that the UserForm is complete, it is time to write the main sub-procedure for the macro. This sub-procedure is what you will run to start executing the macro. If Module1 is not visible in the Project Explorer, click the plus sign next to Microsoft_Expression_Web, click the plus sign next to the Modules folder, and then double-click Module1 to open the code window. Enter the main sub-procedure in the Module1 code window.
Code for a macro can be written inside a sub-procedure or function. A sub-procedure and function are defined as follows:
Sub-procedure—. A block of code that performs a certain task but returns no value.
Function—. A block of code that performs a certain task and returns a value.
Click inside the Module1 code window and enter the code seen in Listing 26.3.
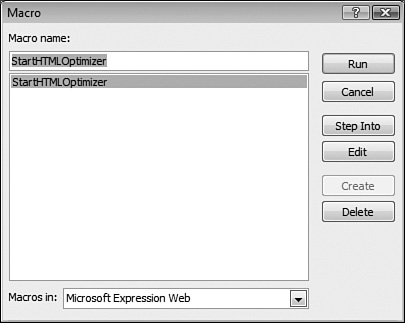
The code in Listing 26.3 declares a public procedure that shows the macro’s UserForm. If you now switch from the Visual Basic Editor to Expression Web and select Tools, Macro, Macros, you will see the StartHTMLOptimizer macro, as seen in Figure 26.5. If you run that macro, it will display the UserForm.
Everything looks great so far, but if you click around on the UserForm, you will find that it doesn’t do much. In fact, it doesn’t do anything at all! You need to write some code to add functionality to the UserForm. The Visual Basic Editor makes this very easy to do.
Note

If you run the UserForm but cannot seem to click anything on it, see “UserForm Seems Hung” in the “Troubleshooting” section at the end of this chapter.
Switch back to the Visual Basic Editor and double-click the Get Site List button. When you do this, the code window for the UserForm opens and the cursor is placed inside the cmdGetSites_Click procedure. When you are running the macro and you click the Get Site List button, a Click event is fired for that button. This event automatically runs the code in the cmdGetSites_Click procedure. Therefore, any code written in this procedure will run whenever the button is clicked.
Place the cursor inside the Click event for cmdGetSites and enter the code in Listing 26.4.
Example 26.4. Code for Click Event
1   ' Variable to hold return value of GetWebSites.
2   Dim bGotWebSites As Boolean
3
4   ' In case we're searching on a new site, reset the form.
5   ResetForm
6
7   ' Call the GetSubwebs procedure and pass the server name to it.
8   bGotWebSites = GetWebSites(txtServerName.Text)
9
10  If bGotWebSites Then
11
12      ' A variable to hold a control
13      Dim c As Control
14
15      ' Iterate through all the controls on the form and enable each one.
16      For Each c In Me.Controls
17          c.Enabled = True
18      Next
19
20      ' Select the first item in cboSites.
21      cboSites.ListIndex = 0
22
23   End If
When the Get Site List button is clicked, Expression Web takes the server name that was entered and gets a list of all Expression Web Web sites on that server. Let’s have a look at the code we just entered to implement this.
Tip
You’ll notice that many of the lines of code in our macro start with a single quote. These lines are comments that serve as inline documentation. They describe what the code is doing. It is good practice to always comment your code, and as you write more complex macros, it becomes a necessity. Without comments, you almost certainly won’t remember what you were thinking when you revisit the code later.
Line 2 in Listing 26.4 declares a Boolean variable that will hold the return value of a call to a function that gets the Expression Web Web sites on the server we enter. A Boolean variable is a variable that has a value of either True or False. Our function will return True if successful and False if something goes wrong. (You will write that function later.)
Line 5 makes a call to a sub-procedure called ResetForm. This sub-procedure (which you will also write later) will be responsible for resetting the UserForm. It will return the UserForm to its initial state and prepare it for displaying information for a new server.
Line 8 sets the Boolean variable to the value returned by the GetSubWebs function. It also passes the text entered into the txtServerName control to that function. When you call a function or sub-procedure, you can pass values to it by appending them to the function’s or sub-procedure’s name. The function or sub-procedure must be written to expect these values to be passed to it, and we’ll have a look at how that’s done in Listing 26.6. In this case, the server name is passed to the GetSubwebs function.
Tip
The code in Listing 26.4 illustrates an important point in programming. By separating the implementation of a button into different sub-procedures and functions, it is very easy to keep track of code and change implementation later. If all the code existed within the Click event itself, the code would quickly become unmanageable, and any change in implementation would increase the risk of introducing bugs.
Line 10 checks the value returned by the call to GetWebSites. If this value is True (meaning that we successfully contacted the Web server and got a list of the Expression Web Web sites on it), the code between the If statement on Line 10 and the End If statement on Line 23 is executed. If the value of bGotWebSites is False (meaning that something prevented you from successfully getting the list of Expression Web Web sites from the Web server), the code between Lines 10 and 23 is not executed.
Line 13 declares a variable of type Control. You will use this variable to cycle through all the controls on your UserForm in Lines 16–18. This is a common technique that will become familiar after working with code for a while. The Controls collection of a UserForm represents all the controls on that UserForm. Any time you want to cycle through all the items in a collection programmatically, declare a variable of the same type as the objects in the collection (a variable of type Control, in this case) and then use a For...Each statement to cycle through the collection. This is referred to as “iterating through a collection.”
Remember when the UserForm was created, the Enabled property of many controls was set to False. We did that because those particular controls are not applicable unless a list of Expression Web Web sites has already been obtained from the server. Since we now have a list of Web sites from the server, we are ready to enable all the controls so the user of the macro can interact with those controls. Lines 16–18 accomplish this by iterating through each control on the UserForm and setting the Enabled property to True.
After the Get Site List button is clicked, we want the combo box to display the settings for the root Web site of the server, which will be the first item in the combo box. To do that, we set the ListIndex to 0 in Line 21.
Now enter the code for the ResetForm procedure. Place the cursor at the end of the code window for frmMain and enter the code in Listing 26.5.
Example 26.5. Code for the ResetForm Procedure
1   Private Sub ResetForm()
2
3       ' Clear entries in cboSites.
4       cboSites.Clear
5
6       ' Variable to hold a reference to a control
7       Dim c As Control
8
9       ' Iterate through all controls and disable all CheckBoxes.
10      For Each c In Me.Controls
11          If TypeName(c) = "CheckBox" Then c.Enabled = False
12      Next
13
14      ' Disable labels and the ComboBox.
15      lblSelectSite.Enabled = False
16      cboSites.Enabled = False
17
18  End Sub
The code in Listing 26.5 resets the UserForm to its original state. Line 4 begins the process by clearing all items in the combo box. After that is done, Lines 7–12 iterate through the controls on the form in the same manner used in Listing 26.4. The difference here is that instead of setting the Enabled property to True, we are setting the Enabled property to False, just as it was when the UserForm was first displayed.
Take a look at Line 11. We’re using the TypeName function and passing the current control to it. The TypeName function returns a string that indicates the type of the control passed to it. In this particular case, we only want to set the Enabled property to False if the control is a CheckBox, so we use the TypeName function to check the control’s type before we set the Enabled property. If the control is a CheckBox, the TypeName function will return “CheckBox” and we’ll disable the control.
After we’ve disabled all the CheckBox controls, the procedure is ended by disabling the two Label controls and the ComboBox control.
To complete the functionality of the Get Site List button, you need to enter the code for the GetWebSites function. Position the cursor at the end of the code window for frmMain again and enter the code in Listing 26.6.
Example 26.6. Code for the GetWebSites Function
1  Private Function GetWebSites(serverName As String) As Boolean
2
3      ' Variables for this sub-procedure
4      Dim oWeb As Web
5      Dim oFolder As WebFolder
6
7      ' Display an hourglass on our UserForm while we work.
8      Me.MousePointer = fmMousePointerHourGlass
9
10     ' Set up error handling so we can inform the user of any problems.
11     On Error GoTo ErrorHandler
12
13     ' Get a reference to the root Web site of the server.
14     Set oWeb = Webs.Open("http://" & serverName, , , WebOpenNoWindow)
15
16     ' Recalculate hyperlinks on the root Web site.
17     oWeb.RecalcHyperlinks
18
19      ' Loop through all folders in oWeb.
20      For Each oFolder In oWeb.AllFolders
21          ' If the current oFolder is a Web, add it to cboSites on our UserForm.
22          If oFolder.IsWeb Then
23              cboSites.AddItem oFolder.URL
24          End If
25      Next
26
27      ' Destroy our Web object.
28      Set oWeb = Nothing
29
30      ' Return the mouse pointer to the default.
31      Me.MousePointer = fmMousePointerDefault
32
33      ' Return True.
34      GetWebSites = True
35
36      ' Exit the sub-procedure to avoid running ErrorHandler code when  no error occurs.
37        Exit Function
38
39  ' Error-handling code
40  ErrorHandler:
41
42      ' If we've reached this point, an error occurred. Display the error to the user.
43      MsgBox Err.Number & ": " & Err.Description, vbExclamation + vbOKOnly, "HTML OPTIMIZER"
44
45      ' Restore the mouse pointer.
46      Me.MousePointer = fmMousePointerDefault
47
48      ' Return False.
49      GetWebSites = False
50
51  End Function
In Line 9 of Listing 26.4, we called the GetWebSites function and passed the server name to it. As I said then, the function must be written to expect this value to be passed to it. By examining what’s inside the parentheses in Line 1 of Listing 26.6, we can see that the GetWebSites function expects a string value (which means a text value) to be passed to it, and it assigns that value to a variable called serverName.
Line 4 declares a variable that will hold a reference to the root Web on the server, and Line 5 introduces a new object in the Expression Web Web object model, the WebFolder object. A WebFolder represents a folder in an Expression Web Web site, and one of its properties is IsWeb, which returns True if the folder is an Expression Web Web site and False if it is not. This property is the perfect way for us to get a list of all the Expression Web Web sites on the Web server.
Line 8 sets the mouse pointer to an hourglass so the user will know we’re processing some information while we parse the Web site. Using the Me keyword here simply refers to the UserForm itself. The Me keyword is not required here, but it makes the code more readable.
Line 11 sets up error handling just in case something goes wrong. When you are accessing an external resource (such as opening a Web site), there’s always a chance that something can go wrong. If you don’t account for that possibility, your macro might crash with an ugly error message. For that reason, it’s always a good idea to implement some error handling if you anticipate that unwanted results are possible.
In VBA, you implement error handling by using the On Error GoTo <line_label> statement, where <line_label> is a label defined inside the same method. The ErrorHandler line label in this case appears on Line 40; Line 11 specifies that if an error occurs, code execution will skip to Line 40 and a message containing the error will be displayed to the user. We will then return a value of False, indicating that something went wrong.
Line 14 sets the oWeb variable to a valid Web object by opening the root Web on the server that was passed to the function. To do that, we call the Open method of the Webs collection.
Line 17 recalculates hyperlinks on the Web site. We do this so that any new Web sites added to the server since the current session of Expression Web was started will be recognized. Without doing this, we cannot guarantee that new Web sites have been added to Expression Web’s configuration files. Recalculating hyperlinks forces Expression Web to update its configuration files for the Web server and guarantees that we will have fresh information to work with.
Beginning at Line 19, we iterate through all the folders in the Web site. If a folder is a Web site (which we determine via the IsWeb property discussed earlier), we add its URL to the cboSites ComboBox on Line 23.
After we’ve run through all the folders, we destroy our Web object on Line 28, reset the mouse pointer to the default pointer, and return a value of True. Finally, on Line 37, we explicitly exit the function so our error-handling code won’t run when no errors are encountered.
Note
Whenever you explicitly create an object (such as the Web object oWeb we created previously), you should destroy that object by setting it equal to Nothing when you finish using it. When you do this, all resources and memory used by that object are freed.
Now that you’ve written code that will get a list of Web sites on the server, you need to write some code to read the current HTML optimization values. You want to do that whenever a new site is chosen from the cboSites ComboBox. Therefore, you’ll write that code in the Change event of the ComboBox control.
Note
You may be the kind of person who dives right in instead of waiting to finish the macro. If you are, you may have noticed that the macro doesn’t work correctly at this point. You’ll need to finish the entire macro before you can test it successfully.
Double-click the cboSites ComboBox and enter the code in Listing 26.7 into the Change event.
Example 26.7. The cboSites_Change Event
1 ' Check to see if there are any entries in the ComboBox. 2 If cboSites.ListCount > 0 Then 3 4 ' A variable to hold a reference to a Web object 5 Dim oWeb As Web 6 7 ' Set up error handling. 8 On Error GoTo ErrorHandler 9 10 ' Open the Web. 11 Set oWeb = Webs.Open(cboSites.SelText, , , WebOpenNoWindow) 12 13 ' Reset error handling. 14 On Error GoTo 0 15 16 ' Run through each CheckBox and check the flag to see if we should check it. 17 With Me 18 .chkAuthorComponents.Value = (oWeb.OptimizeHTMLPublishFlags AndOptimizeHTMLAuthorComponents) 19 .chkBrowseComponents.Value = (oWeb.OptimizeHTMLPublishFlags And
In Line 2, we check to see if there are any items in the ComboBox. This might seem like a strange thing to do because you would think that if the selection in the ComboBox has changed (which is, after all, what causes this code to run because it is in the Change event), there would obviously be an item in the ComboBox. In fact, the Change event does run once when there are no items in the ComboBox. When you run the ResetForm sub-procedure in Listing 26.5, the Change event is fired when the ComboBox is cleared in Line 4. We don’t want the code that opens the Web site and applies optimization settings to run in this case, so we enclose the code within an If...End If block and only run it if the ListCount property is greater than 0.
The code up to Line 14 should be familiar to you by now, but Line 14 probably isn’t. You will notice that Line 8 sets up error handling just as we’ve done in some of our other code. However, in this case, we are resetting that error handling in Line 14. Our error-handling code is designed to handle an error that occurs when we open the Web site in Line 11. After we’ve successfully accomplished that, we reset the error handling in Line 14.
Lines 17–28 also introduce a new concept. In these lines, we are determining the current HTML optimization settings for the Web site by checking the OptimizeHTMLPublishFlags property of the Web site. This property contains a value that is of type OptimizeHTMLFlags, which is a special type of value called a flag. Flags are commonly used when writing programs because they are binary values and the computer can efficiently manipulate them. Fortunately, VBA provides an efficient means of manipulating them as well.
In Lines 18–26, we use the And operator to check the current HTML optimization settings. The return value of OptimizeHTMLPublishFlags And <flag> will return True if the flag denoted by <flag> is set and False if it is not.
The rest of the code in Listing 26.7 uses concepts we have already covered and should already be familiar to you.
The functionality of the macro is almost complete. You’ve written the code necessary to get a list of Expression Web Web sites on the server specified by our user, as well as the code necessary to determine what the current HTML optimizations are for the selected Web site. When the current HTML optimizations are displayed to the user, your macro allows him or her to change those settings and then apply them to the Web site. That’s the code you will write next.
Double-click the OK button on the UserForm and enter the code in Listing 26.8 into the Click event.
Example 26.8. Click Event Code
1 ' Variable to hold return value of OptimizeSite 2 Dim bOptimized As Boolean 3 4 ' Call OptimizeSite and pass the selected URL. 5 bOptimized = OptimizeSite(cboSites.SelText) 6 7 ' If optimization was successful, display appropriate message. 8 If bOptimized Then _ 9 MsgBox "Optimizations applied successfully.", vbInformation + vbOKOnly, "HTML
This code is very similar to the code in Listing 26.4. We are setting the Boolean value bOptimized to the value returned by the OptimizeSite function in Line 5.
Next, place your cursor at the end of the code window for the UserForm and enter the code in Listing 26.9, which is for the OptimizeSite function.
Example 26.9. The OptimizeSite Function
1 Private Function OptimizeSite(sURL As String) As Boolean 2 3 ' Set up error handling. 4 On Error GoTo ErrorHandler 5 6 ' A variable for a Web object 7 Dim oWeb As Web 8 9 ' Get a reference to the Web site URL we passed in. 10 Set oWeb = Webs.Open(sURL, , , WebOpenNoWindow) 11 12 ' Determine the OptimizeHTMLPublishFlags for the site. 13 With oWeb 14 15 ' Reset flags. 16 .OptimizeHTMLPublishFlags = OptimizeHTMLEmpty 17 18 If Me.chkAuthorComponents.Value = True Then _ 19 .OptimizeHTMLPublishFlags = .OptimizeHTMLPublishFlags +
The OptimizeSite function is our longest code listing yet, but there’s not as much here as you might think at first glance. The code up to Line 16 follows the same concepts we covered in Listing 26.7.
Line 16 sets the OptimizeHTMLPublishFlags property of the Web site to OptimizeHTMLEmpty. This clears all the existing HTML optimization settings in preparation for applying the new settings our user has specified. Lines 18–43 check each checkbox’s Value property, and if one is checked, the corresponding OptimizeHTMLPublishFlags bit is set.
Line 45 performs a check to see if the OptimizeHTMLPublishFlags property is still set to fpHtmlOptEmpty. If it is, the user of your macro hasn’t checked any of the checkboxes and we need not apply any HTML optimizations. However, if the user has checked one or more of the checkboxes, we add the fpHtmlOptOn flag to the current OptimizeHTMLPublishFlags. This has the effect of turning on HTML optimization so your user’s settings will be applied the next time the Web site is published.
The rest of Listing 26.9 consists of concepts covered in Listing 26.6.
The main functionality of your macro is now complete. However, there are some finishing touches you need to add.
First, you’ll add the code for the Close button. Double-click the Close button and add the following code to the Click event:
' Unload the form without making any changes...
Unload Me
This is pretty simple code that does exactly what it appears to do. It unloads the UserForm from memory, which causes it to close and our macro to end. That’s all we need for the Close button.
Finally, we don’t want the users of our macro to be able to click the Get Site List button if they haven’t entered a server name. To include that functionality, we’ll add some code to the Change event of the txtServerName TextBox control.
Double-click the txtServerName TextBox control and enter the following code in the Change event:
' If no server name is entered, disable the Get Site List button.
If txtServerName.Text = "" Then
    cmdGetSites.Enabled = False
Else
    cmdGetSites.Enabled = True
End If
The code in the Change event of txtServerName will run whenever the text in the textbox changes. Each time the user of our macro presses a keyboard key while the cursor is in the txtServerName textbox, we will check to see if any text is in it. If there is, we will enable the Get Site List button. If there isn’t text in the textbox, we will disable the Get Site List button.
That’s it! We are now ready to run the macro. Close the Visual Basic Editor (and make sure to save your changes when prompted) and then select Tools, Macro, Macros in Expression Web. Select the StartHTMLOptimizer macro and click Run.
When the UserForm displays, enter the name of a Web server and click the Get Site List button. Your macro gets a list of the Expression Web Web sites on the server and populates the ComboBox with them.
Note
Our macro expects that you will not enter “http://” if you are using it against a server-based Web site. In other words, use the format www.mysite.com when running the macro against a Web server.
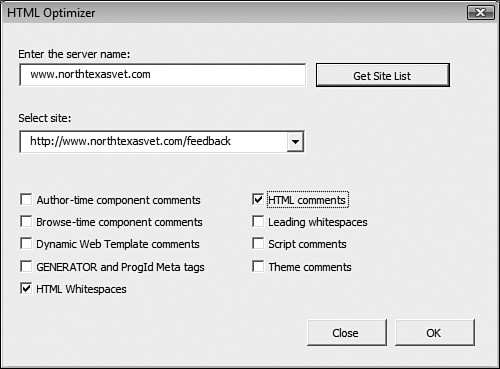
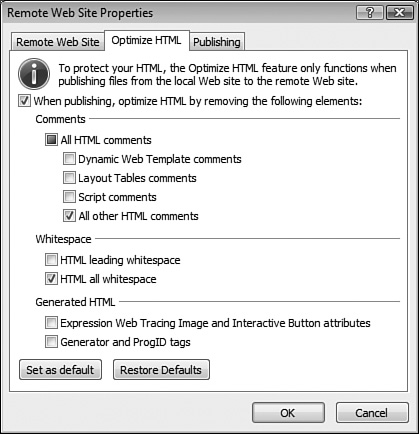
When the site list has populated, select a Web site from the ComboBox and examine the current HTML optimization settings. Change some of the settings and click the OK button to apply them. Figure 26.6 shows the macro with optimization settings applied. Figure 26.7 shows the Remote Web Site Properties dialog in Expression Web. Note that the changes applied with your macro are reflected in the Remote Web Site Properties dialog.
Note
If you’ve specified that browse-time comments be removed, yet they still remain in your pages after publishing, see “Browse-time Comments Still Exist” in the “Troubleshooting” section at the end of this chapter.
The next time this Web site is published, it will be published using the HTML optimizations set with your macro.
Note
If the Remote Web Site Properties dialog does not reflect the settings you specified when you ran your macro, see “New Settings Don’t Take” in the “Troubleshooting” section at the end of this chapter.
One of the tried and true rules of programming is that something will always go wrong. When it does, knowing how to debug a macro is the key to finding any problem and getting it fixed.
Breakpoints are a vital aid in the debugging process. The Visual Basic Editor will automatically stop execution when a breakpoint in code is hit. You can then use the Debug toolbar (accessible from View, Toolbars, Debug) to step through your code. When hovering your mouse pointer over objects and variables in your code, a screen tip will display with the current value of that object or variable.
To set a breakpoint at a line of code, right-click the line of code and select Toggle, Breakpoint from the menu. You can also click in the left border of the code editor at a specific line to set a breakpoint on that line, or click anywhere on the line of code and press F9. You can create as many breakpoints as you like. You can remove all your breakpoints in one step by selecting Debug, Clear All Breakpoints.
Note
It’s not necessary to remove your breakpoints if you don’t want to. They will only affect the macro when you are debugging it in the Visual Basic Editor.
The Locals Window is available by selecting View, Locals Window. It displays all available objects, plus their properties and values in a tree view structure. As you step through your code when debugging, the Locals Window allows you to see what properties of an object are changing and their values. When I am debugging code, I use the Locals Window more than any other debugging tool because it shows everything in one convenient location.
The Immediate Window is available by selecting View, Immediate Window. It allows you to enter commands and view or change the values of variables and properties while your code is paused at a breakpoint.
The Watch Window is available by selecting View, Watch Window. It allows you to watch a particular variable while code executes or to set a conditional breakpoint so the Visual Basic Editor breaks when a particular condition is met or when the value of an expression you specify changes. To add a new watch in the Watch Window, right-click anywhere within the Watch Window and select Add Watch.
For detailed information on debugging and the Locals, Immediate, and Watch Windows, see the Visual Basic Help available by selecting Help, Microsoft Visual Basic Help within the Visual Basic Editor.
When I run the macro, I can see the UserForm, but when I click anywhere on it, nothing happens and my computer just dings at me. What’s wrong?
Make sure that you haven’t disabled the UserForm. When we added controls to the form, we set the Enabled property of many of them to False. If you accidentally set the Enabled property of the UserForm itself to False during that process, you won’t be able to interact with the UserForm at all.
I checked the box so that Expression Web would remove the browse-time Web component comments, but after publishing my Web site, they’re still there! Is the macro broken?
The macro’s not broken. Browse-time Web components rely on the comments to run. Therefore, if you are publishing to a Web site that is running the FrontPage Server Extensions, Expression Web will always leave these comments in. If Expression Web removed them, it would break your Web components!
I selected the optimization options the way I wanted them, but when I checked the Remote Web Site Properties dialog box in Expression Web, the options I selected didn’t seem to take effect.
Make sure the Web site you are configuring is not currently open in Expression Web. Expression Web caches the information for the currently opened Web site, so even though you’ve changed the settings, Expression Web still sees the old settings.
If you really want to see the latest settings, select Tools, Recalculate Hyperlinks in Expression Web and then check the Remote Web Site Properties dialog again. The settings you applied should be visible.
When you start writing and employing macros, you’re going to find many uses for them. You may find that you want to protect the macro code you write from unauthorized modification. In such cases, macro protection is a nice solution.
Macro protection enforces password protection on your macros. When macro protection is enabled, before you can open the macro code in the Visual Basic Editor, you will be required to enter a password.
To set a password for macro protection, select Tools, Microsoft_Expression_Web Properties from the menu in the Visual Basic Editor to display the Project Properties dialog. Click the Protection tab and place a check in the Lock Project for Viewing checkbox, as shown in Figure 26.8. Enter a password of your choice and click OK.

After you enter the password and click OK, the macro will be protected. To test this functionality, close Expression Web and relaunch it. Otherwise, the Visual Basic Editor will still allow you to access the macro code.