
What is the most overlooked aspect of most Web sites? If you said it’s the navigational structure, you’re exactly right. Many Web designers spend a considerable amount of time creating great-looking graphics and carefully choosing just the right colors and then they quickly slap down an inefficient site navigation structure.
A good Web designer will tell you that content is the most important aspect of any Web site. I certainly wouldn’t disagree with that, but I’d give navigational structure the same importance as content. After all, what good is great content if your site’s viewers are unable to locate it?
One of the most popular navigation techniques in use today is the DHTML menu system. You’ve no doubt seen these menus on many Web sites. When you hover over a particular topic, a menu pops up, allowing you to dig deeper into the Web site’s content, as shown in Figure 29.1.

Other navigational systems are more appropriate for more complex structures. For example, Microsoft’s MSDN Web site contains an enormous amount of hierarchical content. The sheer volume of content would quickly overwhelm a menu system such as the one shown in Figure 29.1. In these situations, a tree view is a much better system because it is, by nature, hierarchical. As shown in Figure 29.2, the tree view system works perfectly for a site like MSDN.

Either of these navigation systems is nicely supplemented by a bread crumb system. Remember the story of Hansel and Gretel? Hansel left a trail of bread crumbs along the trail so he and Gretel would be able to find their way back to where they started. The bread crumb navigation system got its name from Hansel’s famous technique, and while it didn’t work out so well for Hansel and Gretel, bread crumbs can make a huge difference for your Web site visitors. Figure 29.3 shows the use of bread crumb navigation on the MSDN Web site.

You might be asking yourself at this point just how difficult it is to build one or more of these cool navigation systems. With ASP.NET and Expression Web, it’s so easy you likely won’t believe it. ASP.NET offers a Menu control for creating DHTML menus, a TreeView control for creating tree view-style navigation systems, and a SiteMapPath control for easily creating bread crumb navigation systems. You can use each of these controls without writing any code at all, but they all expose advanced functionality as well for those Web designers who are more adept at programming.
Chances are that you’re going to want to use a couple of different ASP.NET navigation controls at the same time. For example, you might want to use the Menu control for your navigational menu system and the SiteMapPath control to provide bread crumb navigation links. Imagine the nightmare you’d have to deal with if you had to manage the links in each of those controls manually as your site grows and changes!
Fortunately, ASP.NET allows you to define your site’s navigational structure in one place and then all the navigation controls automatically read that structure to produce your menu, bread crumb links, and tree view nodes. ASP.NET uses a special XML file called a sitemap file for this purpose.
The code in Listing 29.1 shows a typical sitemap file.
Example 29.1. A Sitemap File
<?xml version="1.0" encoding="utf-8" ?>
<siteMap xmlns="http://schemas.microsoft.com/AspNet/SiteMap-File-1.0" ><siteMapNode>
<siteMapNode url="default.aspx" title="Home Page" description="Company Web Site Home" />
   <siteMapNode url="software.aspx" title="Software" description="Our Software">
           <siteMapNode url="apps.aspx" title="Applications" description="Software
 Applications" />
             <siteMapNode url="addins.aspx" title="Add-ins" description="Software Add-ins" />
     </siteMapNode>

     <siteMapNode url="reviews.aspx" title="Reviews" description="Software Reviews"/>
     <siteMapNode url="about.aspx" title="About"   description="About Us"/>
         <siteMapNode url="contact.aspx" title="Contact" description="Contact Us"/>
     </siteMapNode>
</siteMap>
Applications" />
<siteMapNode url="addins.aspx" title="Add-ins" description="Software Add-ins" />
</siteMapNode>
<siteMapNode url="reviews.aspx" title="Reviews" description="Software Reviews"/>
<siteMapNode url="about.aspx" title="About" description="About Us"/>
<siteMapNode url="contact.aspx" title="Contact" description="Contact Us"/>
</siteMapNode>
</siteMap>
Notice that a sitemap file has exactly one root siteMapNode. All other siteMapNodes are nested within the root siteMapNode.
→ | For a general primer on XML, see “Accessing Data with ASP.NET 2.0”, p. 635 (Chapter 35). |
The easiest way to use a sitemap file is to save it as web.sitemap in the root directory of your Web site. As we progress through the rest of this chapter, you’ll get a good idea of how the sitemap file is used to build navigation structure into your Web site.
Tip
Expression Web’s Save dialog doesn’t have a file type specifically for sitemap files. If you select XML as the file type, Expression Web will add an .xml file extension, thus making the file invalid as a sitemap file. Therefore, you should choose All Files in the Save As Type dropdown in the Save dialog when saving your sitemap file.
As I mentioned previously, DHTML menus have become the most common navigational element on the Web these days. Almost every site uses them, and it’s pretty safe to say that all the sites operated by the major players use them. That level of popularity has caused enormous growth in the number of software programs that allow non-programmers to create and manage powerful navigation systems using DHTML menus.
Note
On the CD that accompanies this book, you will find a free full copy of DHTML Menu Builder, an application I have long felt is the best of its kind.
If you decide to use DHTML Menu Builder, you should not use the ASP.NET Menu control. Use one or the other based on your needs.
When it comes to implementing a DHTML menu system in Expression Web, you’ve got three choices: you can write your own code; you can use a third-party application to generate the code for your DHTML menus; or you can use a server-side solution such as the ASP.NET Menu control.
Before we dig deeper into the ASP.NET Menu control, let’s create a Web site that will allow us to experiment with it and other navigation controls in ASP.NET.
Create a new Web site.
Delete the home page.
Create a new ASPX page.
Enter the text “
Home Page” on the page and save it asdefault.aspx.Create a new ASPX page.
Enter the text “
Software Page” on the page and save it assoftware.aspx.Create a new ASPX page.
Enter the text “
Add-ins Page” on the page and save it asaddins.aspx.Create a new ASPX page.
Enter the text “
Applications Page” on the page and save it asapps.aspx.Create a new ASPX page.
Enter the text “
Reviews Page” on the page and save it asreviews.aspx.Create a new ASPX page.
Enter the text “
About Us” on the page and save it asabout.aspx.Create a new ASPX page.
Enter the text “
Contact Us” on the page and save it ascontact.aspx.Create a new XML file.
Add the code from Listing 29.1 to the file.
Choose All Files (*.*) from the Save As Type dropdown.
Save the file as
web.sitemap.
The web.sitemap file is a special file that ASP.NET looks for when using navigation controls. If there is a web.sitemap file in the root of the Web site, ASP.NET will use it automatically to feed the navigation links in the controls you are using. You don’t have to write any code at all. It just happens automatically.
To see what I mean by this:
Open the
default.aspxpage.Make sure you are in Design View.
Place the insertion point below the text you entered on the page.
Insert a
Menucontrol onto the page, as shown in Figure 29.4.Click New Data Source from the Choose Data Source dropdown in the Common Menu Tasks dialog, as shown in Figure 29.5.
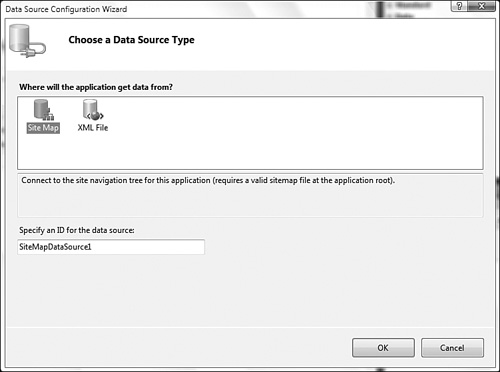
Choose the Sitemap option in the Data Source Configuration Wizard, as shown in Figure 29.6, and click OK.


Save the page and preview it in your browser. Notice that all you can see on the page is a black arrow. If you hover over that arrow, you’ll see the links from the sitemap file you created earlier.
Note

If you see a dialog warning you that the page contains dynamic elements and must be browsed from a Web server, see “Warned to Browse Page from Web Server” in the “Troubleshooting” section of this chapter.
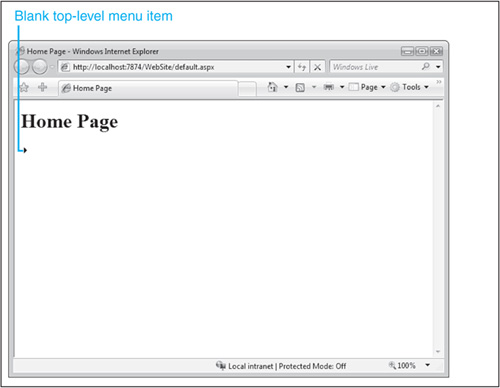
One of the strange things about the ASP.NET sitemap file is that you are required to have exactly one root sitemap node. In the case of Listing 29.1, I created an empty sitemap node to satisfy that requirement. However, that causes the top-level link in the menu to be blank, as shown in Figure 29.7.
The problem of a blank top-level menu item is easily resolved, but it requires you to go into Code View to fix it.
If it’s not already open, open
default.aspx.Switch to Code View.
Locate the code for the
SiteMapDataSource control. It will look like this:<asp:SiteMapDataSource runat="server" ID="SiteMapDataSource1">
Change the code in Step 3 to this:
<asp:SiteMapDataSource runat="server" ID="SiteMapDataSource1"
ShowStartingNode="false">
Save the page.
Tip
Expression Web provides IntelliSense support for editing ASP.NET controls. If you place the insertion point right before the closing bracket on the <asp:SiteMapDataSource> tag and press the spacebar, you will be able to add the ShowStartingNode attribute using IntelliSense.
Now browse the page again and you’ll see a menu system that more closely resembles what you expect. However, it’s not very pretty. Right now it only consists of a few text links. Luckily, there are quite a few options for sprucing up the appearance of a Menu control.
Note
If your Menu control only shows “root” in Design View and is invisible when you preview it in the browser, see “Cannot See Menu Control in Browser” in the “Troubleshooting” section of this chapter.
When it comes to formatting the Menu control, you have several different options. You can use the existing AutoFormat feature if you’d like to format it quickly. You can also use an ASP.NET theme, skin the control using the skinning features of ASP.NET, or use CSS styles.
Note
We’ll cover the AutoFormat features and CSS styles for the Menu control here. ASP.NET themes and skins are outside the scope of this book. If you’d like more information on those topics as well as other ASP.NET 2.0 topics, read Sams Teach Yourself ASP.NET 2.0 in 24 Hours, Complete Starter Kit from Sams Publishing.
The quickest way to format the Menu control for a better appearance is by using the AutoFormat feature available from the Common Menu Tasks dialog, as shown in Figure 29.8.

Click the AutoFormat link and the AutoFormat dialog will appear with four different formats, as shown in Figure 29.9. You can remove any existing formatting by selecting the Remove Formatting option from the list. Choose a format you find attractive and click OK to apply it.

The Menu control exposes many properties that can be used to format the control using CSS. The Menu control uses two different kinds of styles:
Dynamic styles—. Styles that apply to menu items that aren’t visible by default. These menu items appear when another menu item is hovered over.
Static styles—. Styles that apply to menu items that are visible by default.
To format a Menu control using these styles, use the Tag Properties task pane to alter the styles. For example, to change the style of dynamic menu items, change the settings for the DynamicMenuItemStyle, as shown in Figure 29.10.

→ | For more information on the Tag Properties task pane, see “Editing Tag Properties”, p. 215 (Chapter 12). |
→ | For more information on using CSS, see “Creating Style Sheets”, p. 289 (Chapter 17). |
When you choose to automatically format the Menu control using the AutoFormat dialog, you are actually just setting some of the CSS properties of the menu. Open the AutoFormat dialog for the menu and choose the Simple scheme. Now look at the properties that have been set in the Tag Properties task pane. You should see several of the CSS properties set, as shown in Figure 29.11.

You can experiment with the styles available using the Tag Properties task pane. Just keep in mind that changing a style for a dynamic item will only affect those items that are not initially visible and will not affect the appearance of any items that are visible when the Menu control is first loaded.
Now that you’ve dug through some of the features of the Menu control and how to use it on a page, you’ll have no trouble at all using the TreeView control. In fact, it’s quite similar to the Menu control and it can use the same sitemap file you used with the Menu control.
To add a TreeView control to your page:
Open
default.aspx.Place the insertion point where you would like the
TreeViewcontrol to be inserted.Double-click the
TreeViewcontrol in the toolbox to add it to the page.In the Common TreeView Tasks dialog, select
SiteMapDataSource1from the Choose Data Source dropdown, as shown in Figure 29.12.

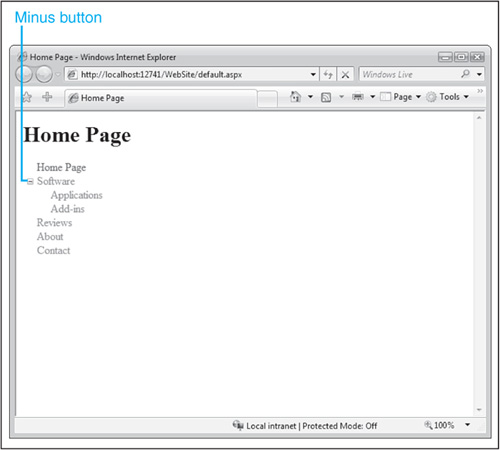
Save the page and preview it in your browser. The TreeView control will display links to pages in your Web site, as shown in Figure 29.13.
Note
If the TreeView control is not visible in the Web browser, see “TreeView Not Visible in Browser” in the “Troubleshooting” section of this chapter.
Each link in a TreeView control is referred to as a node. There can be several different types of nodes in a TreeView control:
Root node—. Each
TreeViewcontains exactly one root node. The root node is the top-level node. There are no nodes above the root node.Parent node—. A parent node is a node that has one or more nodes nested beneath it. In the
TreeViewcontrol in Figure 29.13, the Software node is a parent node.Leaf node—. A leaf node is any node that has no child nodes. The only node in Figure 29.13 that is not a leaf node is the Software node.
Note
You might be wondering what the root node is in Figure 29.13. Remember that we configured SiteMapDataSource1 so the root node is not shown. Therefore, the root node for the TreeView is not shown on the page.
Notice that the Software node has a minus button next to it that can be clicked to collapse the nodes beneath it. You can then click the plus sign to expand the nodes again.
The TreeView control can be easily formatted using the AutoFormat dialog, just as you did with the Menu control. However, as shown in Figure 29.14, there are many more choices in the TreeView control’s AutoFormat dialog.

The TreeView control also has several unique formatting properties you can set in the Tag Properties task pane.
Tip
When you set the properties of any ASP.NET control, Expression Web simply adds the property to the control’s tag in Code View. Therefore, you could set properties in Code View instead of using the Tag Properties task pane. Expression Web will give you IntelliSense for all properties in Code View.
The ExpandDepth property controls the number of levels in the TreeViewstyle menu that are initially visible when your page loads. The default value is FullyExpand, which expands all nodes in the TreeView control. However, you can specify any number of levels to expand by default by specifying a number for the ExpandDepth property.
Notice in Figure 29.13 that the Software node is expanded so you can see the Applications and Add-ins nodes. To configure the TreeView so it is fully collapsed, set the ExpandDepth property to 0.
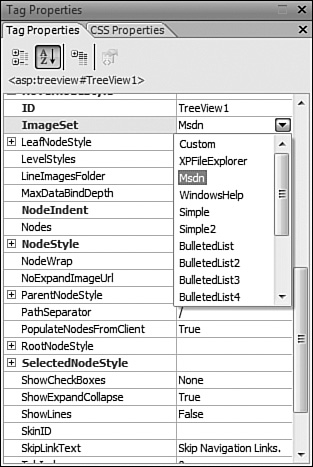
As shown in Figure 29.15, the ImageSet property configures the images used in the TreeView control. Notice that the values available for this property reflect the AutoFormat options available in Figure 29.14.
The NodeIndent property configures the number of pixels that nodes are indented. Note that only nodes that are children of other nodes are affected. In the case of the TreeView control we’re using, only the Applications and Add-ins nodes are affected by the NodeIndent property.
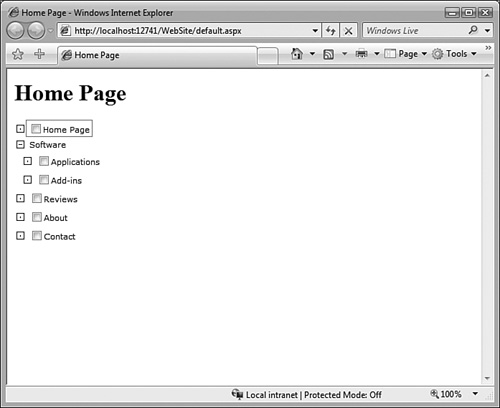
The ShowCheckBoxes property allows you to display checkboxes on specific types of nodes. Valid values are None, Root, Parent, Leaf, or All. By showing checkboxes for nodes, you can allow users to select multiple nodes in a TreeView control.
The TreeView control in Figure 29.16 has a ShowCheckBoxes property set to Leaf.
The ShowExpandCollapse property configures whether the plus and minus buttons are displayed for parent nodes. The TreeView control in Figure 29.13 has the ShowExpandCollapse property set to True.
By default, there are no lines connecting nodes in a TreeView control. If you’d like lines to be drawn connecting the nodes, set the ShowLines property to True (see Figure 29.17).

The TreeView control provides a full range of CSS styles to make formatting with CSS easy. Figure 29.18 shows the different CSS properties available for the TreeView control.

Just as with the Menu control, any AutoFormat options you choose for a TreeView will be applied using the CSS styles for the control. To tweak the configuration of formatting applied using the AutoFormat dialog, use the various style properties for the control.
The SiteMapPath control improves your Web site’s navigation by providing users with a bread crumb-style navigation bar, as shown in Figure 29.19.

Unlike the Menu and TreeView controls, the SiteMapPath control doesn’t require you to configure a data source as long as a web.sitemap file exists in the root of the Web site. Just drop the control on the page and it will automatically use the data in the sitemap file to create links.
To use the SiteMapPath control:
Open the
addins.aspxpage.Place the insertion point on the page underneath the text you entered when the page was created.
Insert a
SiteMapPathcontrol from the toolbox.
That’s all there is to it. After the SiteMapPath control is added to the page, it automatically connects to the sitemap file and displays the appropriate links.
As with the other controls we’ve looked at, the SiteMapPath control can be easily formatted using the AutoFormat dialog available from the Common SiteMapPath Tasks dialog. The AutoFormat schemes available are identical to the ones available for the Menu control.
In addition to the AutoFormat schemes, there are several CSS style properties you can use to affect the appearance of your SiteMapPath control, as shown in Figure 29.20.

There are several properties that affect the behavior and appearance of the SiteMapPath control:
ParentLevelsDisplayedproperty—. Controls the number of parent nodes displayed. If this value is set to the default value of -1, all parent nodes are displayed.PathDirectionproperty—. Controls the direction of theSiteMapPathcontrol. The default value isRootToCurrent, which displays the root node at the left and the current location at the far right. The other valid setting isCurrentToRoot, which reverses the order of the nodes.PathSeparatorproperty—. Configures the character displayed between nodes. The default is the : (colon) character.
The ASP.NET 2.0 navigation controls make building a powerful and dynamic navigation system quite easy, and you can do it without writing a single line of ASP.NET code. You can, of course, significantly add to the functionality of these controls with ASP.NET code, but as you’ve seen in this chapter, it’s not necessary to be a programmer to build perfectly functional site navigation with ASP.NET.
I’m trying to preview an ASP.NET page in my browser, but Expression Web warns me that the page contains dynamic content and must be browsed from a Web server. I thought ASP.NET pages were previewed using the ASP.NET Development Server. What’s wrong?
In my testing, I found that Expression Web would sometimes preview a page from a file location instead of using the ASP.NET Development Server. When this happens, just close your browser and preview the page again. It should preview correctly in the ASP.NET Development Server.
I have added a Menu control to my page, but when I preview the page, the Menu control isn’t there.
The most common cause of this is a missing data source for the Menu control. Make sure to configure a data source using the Choose Data Source dropdown on the Common Menu Tasks dialog. If you’ve already configured a data source, make sure it is selected in the dropdown before you preview the page.
I’ve added a TreeView control to my page, but when I preview the page in my browser, I don’t see the control.
Unlike the SiteMapPath control, both the Menu and TreeView controls require a data source on the page. (The data source is not visible in Design View.)
If you can’t see the TreeView control, make sure a data source has been chosen from the Choose Data Source dropdown on the Common TreeView Tasks dialog. If a data source does not exist in the dropdown, create one as described earlier in this chapter.
You’ve seen some powerful navigation features in this chapter. To make the best use of these navigation controls, however, you should consider using them with ASP.NET Master Pages.
→ | For more information on using ASP.NET Master Pages, see “Using ASP.NET Master Pages and User Controls,” p. 549 (Chapter 30). |
If you use navigation controls in combination with ASP.NET Master Pages, insert the navigation controls on one page only; ASP.NET will automatically add the controls to all your other pages when the pages are browsed. Using this method makes managing your navigation much more efficient because making a change is as easy as changing one page. Without Master Pages, a navigation change would require you to manually update every page that uses the navigation controls.
Note that you can also use Expression Web’s Dynamic Web Templates if you choose. For a comparison of using Master Pages versus Dynamic Web Templates, see the sidebar “Master Pages vs. Dynamic Web Templates”, p. 556 (Chapter 30).
→ | For more information on using Dynamic Web Templates, see “Using Dynamic Web Templates”, p. 363 (Chapter 21). |