Chapter 16. Building the BIRT Project
This chapter explains how to build the BIRT project. The chapter also explains how to build a new web viewer that employs your modifications to BIRT.
This information is primarily for contributors to the BIRT open source project and to those who want to create a custom version of BIRT. The typical user does not need to build BIRT to extend BIRT or to write scripts for BIRT.
After the build process completes, you can explore the BIRT source code and make changes to the code to suit your needs. Any changes made to the BIRT source are immediately implemented in the BIRT Report Designer. To implement your changes in a web application, you must build and export a new web viewer.
About building the BIRT project
Building the BIRT project consists of the following tasks:
• Installing a working version of BIRT Report Designer
By first installing the same version of BIRT Report Designer that you want to build, you ensure that your Eclipse environment is correct and that you have all the necessary components for building BIRT.
• Configuring Eclipse to compile BIRT
You may need to change the compiler settings to match those required to build BIRT. Installing the Eclipse SDK is required to use some extension points.
• Downloading and extracting the correct version of the BIRT source code Download the BIRT source code from the Eclipse web site. Builds move around as new builds are added, so use search to find the appropriate version. The downloaded version and the working version on your system must be identical.
• Importing and building the BIRT projects
The act of importing the BIRT projects initiates the build process. The build process takes a few minutes and should complete with no errors.
Installing a working version of BIRT
To ensure that you have all the components that are necessary for building BIRT, first install a working version of BIRT Report Designer. Ensure that all the plug-ins and auxiliary files BIRT requires are present and that these resources are the versions the source code requires.
The simplest and surest way to know that you have all the necessary components of a working BIRT installation is to choose the Full Eclipse Install option. After installing this package, install the BIRT SDK. Follow the instructions in the installation chapters at the beginning of this book.
After installing BIRT, launch Eclipse and open the Report Design perspective. Verify that you can build a simple report and that you can preview the report in both the BIRT previewer and the web viewer. Typically, this test is sufficient to guarantee that you have a valid working version of BIRT. Of course, you can run more extensive tests to confirm access to any custom items in your environment, for example, custom data sources.
Configuring Eclipse to compile BIRT and build the viewer JAR files
Before importing the BIRT source code into a workspace, check that the Java compiler settings on the workspace are compatible with BIRT. The 2.6 version of the BIRT source code uses some features that are only present in JDK version 1.5 and higher. Some plug-ins depend on other modules that require Java version 1.5 and are not compatible with Java version 1.6. In order for BIRT to build successfully, you need to set the Eclipse compiler compliance to Java 1.5. Set this version for your Eclipse workspace by starting Eclipse and setting Eclipse preferences. Ensure that you apply these settings to any workspace you use to work with BIRT.
To build the viewer Java archive (JAR) files, the JAVA_HOME variable in your system must reference the installed JRE specified in the workspace compiler preferences.
In BIRT 2.6, some extension points refer to files that are not present in the BIRT Full Eclipse Install. For these extension points to locate the required files, install the Helios Eclipse SDK.
How to set Eclipse workspace compiler preferences
1 In BIRT Report Designer, choose Window→Preferences.
2 In Preferences, expand the Java entry in the tree and select Installed JREs. In Installed JREs, select a Java 1.5 JRE, as shown in Figure 16-1.
Figure 16-1 Selecting a Java 1.5 JRE

3 Select Compiler. In Compiler, as shown in Figure 16-2, perform the following steps:
• In JDK Compliance, select 1.5 in Compiler compliance level.
• In Classfile Generation, select all the available options.
Figure 16-2 Compiler preferences

If a message appears asking if you want to do a full rebuild now, choose No. This message appears only if you changed the compiler settings and there are Java projects in the workspace.
How to install the Eclipse SDK
Install the Eclipse SDK to avoid missing file references in some extension points in BIRT 2.6.
1 In BIRT Report Designer, choose Help→Install New Software.
2 In Install, as shown in Figure 16-3, perform the following steps:
• In Work with, select:
The Eclipse Project Updates - http://download.eclipse.org
/eclipse/updates/3.6
• Deselect Show only the latest versions of available software
• In the list of available software, expand Eclipse SDK. Select:
Eclipse SDK 3.6.0.I20100608-0911
Figure 16-3 Selecting the Eclipse SDK

Choose Next.
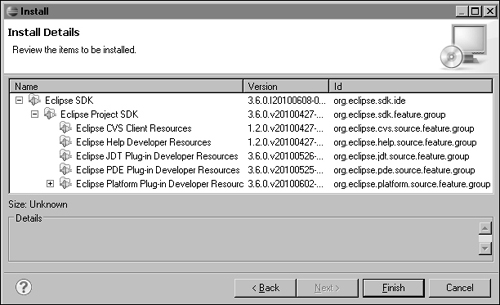
3 Expand the list of software, as shown in Figure 16-4.
Figure 16-4 Reviewing the list of software to install

Choose Finish. Eclipse installs the new software, as shown in Figure 16-5.
Figure 16-5 Installing the Eclipse SDK

4 In the message that appears, as shown in Figure 16-6, choose Restart Now.
Figure 16-6 Preparing to restart Eclipse

Select the workspace for the BIRT source code when Eclipse restarts.
Downloading and extracting the correct version of the BIRT source code
Download the BIRT source code from the same page from which you downloaded the working version of BIRT. The source archive is in the section labeled BIRT Source Code. The archive file has a name similar to birt-source-2_6_0.zip.
Extract the source code archive into a workspace directory. Typically, you use a workspace for BIRT source code that is separate from workspaces used for report development. A separate workspace is not required, but keeps your report workspace less cluttered. If your workspace contains source code from a BIRT build that is not the same as the plug-ins in your Eclipse home directory, Eclipse runs BIRT using the source code in preference to the plug-ins from the Eclipse home directory.
Importing, building, and testing the BIRT project
After downloading the BIRT source, import the feature files, plug-in files, and source files to your workspace. A single Eclipse import operation imports the source files into a workspace and builds the projects.
How to import and build the BIRT project
Use the Java perspective to import and build the BIRT project.
1 Choose Window→Perspective→Other→Plug-in Development. The Plug-in Development perspective opens.
2 To import the BIRT source-code projects, choose File→Import.
3 In Import, expand General. Select Existing Projects into Workspace, as shown in Figure 16-7.
Figure 16-7 Import Project showing expanded General node

Choose Next.
4 In Import Projects, next to Select root directory, choose Browse and navigate to the workspace. A list of all the BIRT source-code projects appears in the Projects pane.
5 Choose Select All, as shown in Figure 16-8. Then, choose Finish.
Figure 16-8 Selecting the BIRT source-codeprojects

Eclipse refreshes the workspace, then builds all the projects in a process that can take several minutes. When the build finishes with no errors, the workspace looks like the one shown in Figure 16-9.
Figure 16-9 Build results showing no errors

If errors appear in the Problems view, use the Eclipse workbench tools to check and correct the project build path.
How to test the BIRT project
To test the BIRT project, run the org.eclipse.birt package as an Eclipse application.
1 In Package Explorer, select the org.eclipse.birt package.
2 Choose Run→Run As→Eclipse Application. Eclipse builds a new default workspace. On a Windows system, the name of the workspace is C: untime-EclipseApplication. Eclipse opens a new instance of the Eclipse workbench that shows the welcome page.
3 Close the welcome page.
4 Open the Report Design perspective. Choose Window→Open Perspective→Report Design. If Report Design is not available, choose Other. On Open Perspective, select Report Design, then choose OK.
To test this perspective that Eclipse built from the BIRT source code, create report projects and report designs.
Building new JAR files to display BIRT output
To make changes to the BIRT source, recreate the files that the web viewer uses to display the BIRT output. For a report, this file is viewservlets.jar. For stand-alone chart viewing, this file is chart-viewer.jar.
Building the viewservlets.jar file
You build viewservlets.jar in the org.eclipse.birt.report.viewer plug-in project. The following procedure shows how to build this file using Eclipse.
How to regenerate the viewservlets.jar file
1 In Package Explorer, expand org.eclipse.birt.report.viewer.
2 In org.eclipse.birt.report.viewer, expand META-INF and right-click MANIFEST.MF.
3 From the context menu, choose PDE Tools→Create Ant Build File, as shown in Figure 16-10.
Figure 16-10 Choosing Create Ant Build File

Eclipse creates build.xml in the org.eclipse.birt.report.viewer root folder.
4 In the org.eclipse.birt.report.viewer folder, right-click build.xml and choose Run As→Ant Build, as shown in Figure 16-11.
Figure 16-11 Setting up the Ant build to create viewservlets.jar

5 In Edit Configuration, in Arguments, select Main. In Arguments, set the value of buildDirectory to the path to your Eclipse home, by typing a line similar using the following syntax, as shown in Figure 16-12:
-DbuildDirectory=<Eclipse home>
Figure 16-12 Setting the value of buildDirectory

If the path to your Eclipse home contains spaces, enclose the path in quotation marks.
Choose Apply. Then, choose Run.
The Ant build process takes several minutes and creates viewservlets.jar in org.eclipse.birt.report.viewer/birt/WEB-INF/lib.
Building the chart-viewer.jar file
If you make changes to the charting source, you typically generate a new chart-viewer.jar file. Use a similar procedure to the one for recreating viewservlets.jar. To build chart-viewer.jar, perform the procedure in org.eclipse.birt.chart.viewer. The build process creates chart-viewer.jar in the org.eclipse.birt.chart.viewer root directory.
