
4. Conditional Statements: If, Else, and Switch
In This Chapter
• Use the popular if/else statement to help make a decision in code
• Learn about switch statements and when to use them
From the moment you wake up, whether you realize it or not, you start making decisions. Turn the alarm off. Turn the lights on. Look outside to see what the weather is like. Brush your teeth. Put on your robe and wizard hat. Basically...you get the point. By the time you step outside your door, you consciously or subconsciously will have made hundreds of decisions with each decision having a certain effect on what you ended up doing.
For example, if the weather looks cold outside, you might decide to wear a hoodie or a jacket. Independent of what you actually do, you can model this decision as shown in Figure 4.1.

If the weather is cold, you do whatever falls into the true bucket. If the weather is not cold, then you do whatever is in the false bucket. Every decision you make can be modeled as a series of true and false statements. This may sound a bit chilly (ha!), but that’s generally how we, others, and pretty much all living things go about making choices.
This generalization especially applies to everything your computer does. This may not be evident from the code we’ve written so far, but we are going to fix that. In this chapter, I will cover what is broadly known as conditional statements. These are the digital equivalents of the decisions we make where your code does something different depending on whether something is true or false.
Onwards!
The If/Else Statement
The most common conditional statement you will use in your code is the if/else statement or just the if statement. The way this statement works is shown in Figure 4.2.
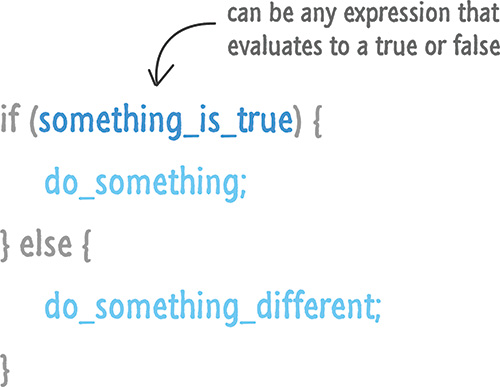
To make sense of this, let’s take a look at a simple example of an if statement in action:
var safeToProceed = true;
if (safeToProceed) {
alert("You shall pass!");
} else {
alert("You shall not pass!");
}
If you put all of this code into an HTML document and run it, you will see an alert with the text You shall pass! This is because your expression (the thing following the word if that ultimately evaluates to true or false) is the variable safeToProceed. This variable is initialized to true, so the “true” part of your if statement kicks in.
Now, go ahead and change the value of the safeToProceed variable from true to false:
if (safeToProceed) {
alert("You shall pass!");
} else {
alert("You shall not pass!");
}
This time when you run this code, you will see an alert with the text “You shall not pass!” This happens because your expression evaluates to false. So far, all of this should seem pretty simple. That’s good. Hopefully you’ll feel the same way in a few more sections!
Meet the Conditional Operators
In most cases, your expression will rarely be a simple variable that is set to true or false like it was in our earlier example. Your expression will involve what are known as conditional operators that help you to compare between two or more things to establish a true or false outcome.
The general format of such expressions is as shown in Figure 4.3.

The conditional operator defines a relationship between the expressions. The end goal is to return a true or a false so that our if statement knows which block of code to execute. This may not make much sense yet, but bear with me. Let’s look at the conditional operators first before diving into more examples where we tie everything together.
The conditional operators are listed in Table 4.1.

Let’s take our fuzzy understanding of conditional operators and make them unfuzzy by looking at an example:
var speedLimit = 55;
function amISpeeding(speed) {
if (speed >= speedLimit) {
alert("Yes. You are speeding.");
} else {
alert("No. You are not speeding. What's wrong with you?");
}
}
amISpeeding(53);
amISpeeding(72);
Take a moment to understand what exactly is going on. We have a variable called speedLimit that is initialized to 55. We then have a function called amISpeeding that takes an argument named speed. Inside this function, you have an if statement whose expression checks whether the passed in speed value is greater than or equal (using >=) to the value stored by the speedLimit variable:
alert("Yes. You are speeding.");
} else {
alert("No. You are not speeding. What's wrong with you?");
}
}
The last thing (well, actually the first thing) our code does is actually call the amISpeedingfunction by passing in a few values for speed:
amISpeeding(53);
amISpeeding(72);
When we call this function with a speed of 53, the speed >= speedLimit expression evaluates to false. The reason is that 53 is not greater than or equal to the stored value of speedLimit, which is 55. This will result in an alert showing the “you are not speeding” message.
The opposite happens when you call amISpeeding with a speed of 72. In this case, you are speeding and the conditional expression evaluates to true. An alert telling you that you are speeding will also appear.
Creating More Complex Expressions
The thing you need to know about these expressions is that they can be as simple or as complex as you can make them. They can be made up of variables, function calls, or raw values. They can even be made up of combinations of variables, function calls, or raw values all separated using any of the operators you saw earlier. The only thing that you need to ensure is that your expression ultimately evaluates to true or false.
Here is a slightly more involved example:
var xPos = 300;
var yPos = 150;
function sendWarning(x, y) {
if ((x < xPos) && (y < yPos)) {
alert("Adjust the position");
} else {
alert("Things are fine!");
}
}
sendWarning(500, 160);
sendWarning(100, 100);
sendWarning(201, 149);
Notice what your condition inside sendWarning’s if statement looks like:
alert("Adjust the position");
} else {
alert("Things are fine!");
}
}
There are three conditions being tested here. The first one is whether x is less than xPos. The second one is whether y is less than yPos. The third is seeing whether the first statement and the second statement both evaluate to true to allow the && operator to return a true as well. You can chain many series of conditional statements together depending on what you are doing. The tricky thing, besides learning what all the operators do, is to ensure that each condition and subcondition is properly insulated using parentheses.
All of what I am describing here and in the previous section falls under the umbrella of Boolean Logic. If you are not familiar with this topic, I recommend that you glance through the excellent quirksmode article on this exact topic: http://www.quirksmode.org/js/boolean.html.
Variations on the If/Else Statement
We are almost done with the if statement. The last thing we are going to is look at some of its relatives.
The if-only Statement
The first one is the solo if statement that doesn’t have an else companion:
if (weight > 5000) {
alert("No free shipping for you!");
}
In this case, if the expression evaluates to true, then great. If the expression evaluates to false, then your code just skips over the alert and moves on to wherever it needs to go next. The else block is completely optional when working with if statements. To contrast the if-only statement, we have our next relative...
The Dreaded If/Else-If/Else Statement
Not everything can be neatly bucketed into a single if or if/else statement. For those kinds of situations, you can chain if statements together by using the else if keyword. Instead of explaining this further, let’s just look at an example:
if (position < 100) {
alert("Do something!");
} else if ((position >= 100) && (position < 300)) {
alert("Do something else!");
} else {
alert("Do something even more different!");
}
If the first if statement evaluates to true, then your code branches into the first alert. If the first if statement is false, then our code evaluates the else if statement to see if the expressions in it evaluate to true or false. This repeats until your code reaches the end. In other words, your code simply navigates down through each if and else if statement until one of the expressions evaluates to true:
if (condition) {
...
} else if (condition) {
...
} else if (condition) {
...
} else if (condition) {
...
} else if (condition) {
...
} else if (condition) {
...
} else {
...
}
If none of the statements have expressions that evaluate to true, the code inside the else block (if it exists) executes. Between the more complex expressions and if/else if statements, you can represent pretty much any decision that your code might need to evaluate.
Phew
And with this, you have learned all there is to know about the if statement. It’s time to move on to a different conditional statement...
Switch Statements
In a world filled with beautiful if, else, and else if statements, the need for yet another way of dealing with conditionals may seem unnecessary. However, people with more battered keyboards than you and me disagreed, so we have what are known as switch statements. In this section, putting my initial snarkastic comments aside, you’ll learn all about them and why they are useful.
Let’s get started!
Using a Switch Statement
The basic structure of a switch statement is as follows:
switch (expression) {
case value1:
statement;
break;
case value2:
statement;
break;
case value3:
statement;
break;
default:
statement;
}
The thing to never forget is that a switch statement is nothing more than a conditional statement that tests whether something is true or false. That “something” is a variation of whether the result of evaluating the expression equals a case value. Now, I do realize that this probably makes no sense if you have never worked with switch statements before. I have worked with switch statements, and what I wrote barely makes sense to me either!
Let’s make this explanation stick by looking at a better example:
var color = "green";
switch (color) {
case "yellow":
alert("yellow color");
break;
case "red":
alert("red color");
break;
case "blue":
alert("blue color");
break;
case "green":
alert("green color");
break;
case "black":
alert("black color");
break;
default:
alert("no known color specified");
}
In this simple example, I have a variable called color whose value is set to green:
var color = "green";
This color variable is what gets passed in to our switch statement, and it is here that things get interesting!
Our switch statement contains a collection of case blocks. Only one of these blocks will get hit with their code getting executed. The way this chosen one gets picked is by matching a block’s case value with the result of evaluating the expression. In our case, because our expression evaluates to a value of green, the code inside the case block whose case value is also green gets executed:
switch (color) {
case "yellow":
alert("yellow color");
break;
case "red":
alert("red color");
break;
case "blue":
alert("blue color");
break;
alert("green color");
break;
case "black":
alert("black color");
break;
default:
alert("no known color specified");
}
Note that only the code inside the green case block gets executed. This is thanks to the break keyword that ends that block. When your code hits the break, it exits the entire switch block and continues executing the code that lies below it. If you did not specify the break keyword, you will still execute the code inside the green case block. The difference is that you will then move to the next case block (the black one in our example) and execute any code that is there. Unless you hit another break keyword, your code will just move through every single case block until it reaches the end. You almost never want that.
With all of this said, if you were to run this code, you will see an alert dialog box that displays the words green color!
You can alter the value for the color variable to other valid values to see the other case blocks execute. Sometimes, no case block’s value will match the result of evaluating an expression. In those cases, your switch statement will just do nothing. If you wish to specify a default behavior, add a default block as highlighted below:
case "yellow":
alert("yellow color");
break;
case "red":
alert("red color");
break;
case "blue":
alert("blue color");
break;
case "green":
alert("green color");
break;
case "black":
alert("black color");
break;
alert("no known color specified");
}
Note that the default block looks a bit different than your other case statements. More specifically, it doesn’t actually contain the word case. You should remember this detail in case it comes up during trivia night. You never know!
Similarity to an If/Else Statement
At the beginning, I mentioned that a switch statement is used for evaluating conditions—just like an if/else statement. Given that this is a major accusation, let’s explore this in further detail by first looking at how an if statement would look if it were to be literally translated into a switch statement.
Let’s say we have an if statement that looks as follows:
var number = 20;
if (number > 10) {
alert("yes");
} else {
alert("nope");
}
Because the value of our number variable is 20, our if statement will evaluate to true. Seems pretty straightforward. Now, let’s turn this into a switch statement:
switch (number > 10) {
case true:
alert("yes");
break;
case false:
alert("nope");
break;
}
Notice that our conditional expression is number > 10. The case value for the case blocks is set to true or false. Because number > 10 evaluates to true, the code inside the true case block gets executed. While your expression in this case wasn’t as simple as reading a color value stored in a variable as in the previous section, our view of how switch statements work still hasn’t changed. Your expressions can be as complex as you would like. If they evaluate to something that can be matched inside a case value, then everything is golden—like a fleece!
Now, let’s look at a slightly more involved example doing the opposite of what we just did. This time, let’s convert our earlier switch statement involving colors into equivalent if/else statements. The switch statement we used earlier looks as follows when converted into a series of if/else statements:
var color = "green";
if (color == "yellow") {
alert("yellow color");
} else if (color == "red") {
alert ("red color");
} else if (color == "blue") {
alert ("blue color");
} else if (color == "green") {
alert ("green color");
} else if (color == "black") {
alert ("black color");
} else {
alert ("no color specified");
}
As you can see, if/else statements are very similar to switch statements and vice versa. The default case block becomes an else block. The relationship between the expression and the case value in a switch statement is combined into if/else conditions in an if/else statement. Everything translates nicely!
Deciding Which to Use
In the previous section, you saw how interchangeable switch statements and if/else statements are. When you have two ways of doing something very similar, it is only natural to want to know when it is appropriate to use one over the other. In a nutshell, and this is totally not helpful, use whichever one you prefer. There are many arguments on the web about when to use switch versus an if/else, and the one thing that is clear is that they are all inconclusive. For once, the Internet has failed to provide a clear answer on a complicated debate.
My personal preference is to go with whatever is more readable. If you look at the comparisons earlier between switch and if/else statements, you’ll notice that if you have a lot of conditions, your switch statement tends to look a bit cleaner. It is certainly less verbose and a bit more readable. What your cut off mark is for deciding when to switch (ha!) between using a switch statement and an if/else statement is entirely up to you. I tend to draw the line at around four or five conditions.
Second, a switch statement works best when you are evaluating an expression and matching the result to a value. If you are doing something more complex involving weird conditions, value checking, and other shenanigans, you probably want to use something different. That “something different” is probably an if statement. You may find other tricks as you progress further through the book that may be more appropriate.
To reiterate, use whatever you like. For every person who agrees with what I’ve written, you’ll find someone who can convincingly provide a counter argument. If you are part of a team with coding guidelines, then follow them. Whatever you do, just be consistent. It makes your life, as well as the life of anybody else who will be working on your code, a little bit easier.
For what it is worth, I’ve personally never been in a situation where I had to use a switch statement, but I’ve been in many situations where I was looking at someone else’s code that used a lot of switch statements. Your mileage may vary.

Just a quick reminder for those of you reading these words in the print or e-book edition of this book: If you go to www.quepublishing.com and register this book, you can receive free access to an online Web Edition that not only contains the complete text of this book but also features a short, fun interactive quiz to test your understanding of the chapter you just read.
If you’re reading these words in the Web Edition already and want to try your hand at the quiz, then you’re in luck – all you need to do is scroll down!