Chapter 4
Manage governance and compliance features in Microsoft 365
The final domain covers governance and compliance within Office 365. While some larger organizations may have dedicated teams responsible for this, many others look to the information security team or the IT admins to address this—usually reactively. This chapter starts with reporting and auditing, which are critical security features that are vital for enforcing governance and ensuring compliance.
Skills in this chapter:
Skill 4.1: Configure and analyze security reporting
This section focuses on the wealth of data that is available to Office 365 customers, including telemetry, reports, and alerts. You should focus on what information is available where, including which portals are used and the options that can be configured with each.
Interpret Windows Analytics
Windows Analytics provides administrators with rich insights into the devices that are in your environment. Originally, this data was intended to help admins plan for upgrades to Windows 10; however, Upgrade Readiness and Device Health solutions were both retired in early 2020. For the exam, you should be familiar with both because it can take time for exams to be updated to reflect the current state.
Device Health can be used to determine the following:
Devices that frequently crash, which might indicate a need to be replaced
Device drivers that cause crashes and might need to be upgraded or replaced
Windows Information Protection misconfigurations that might affect the users’ experience
Upgrade Readiness includes tools that enable admins to plan and execute upgrades from Windows 7 or Windows 8.1 to Windows 10. You can use Upgrade Readiness to get the following:
Visual workflows for the upgrade process
Detailed hardware and software inventory
Search capabilities
Application and driver compatibility information and recommendations
Application usage information
You can export this data to use with System Center Configuration Manager and other software deployment tools.
Configure Windows Telemetry options
By default, Windows 10 shares diagnostic data with Microsoft, but some customers might prefer to restrict what data is shared or to prevent sharing entirely. Administrators can use either Group Policy or Mobile Device Management to centrally configure settings; local administrators can use registry keys on individual machines to do the same. There are four levels of diagnostic data that can be set, as shown in Table 4-1.
Table 4-1 Windows Telemetry options
Level |
Value |
Security |
0 |
Basic |
1 |
Enhanced |
2 |
Full |
3 |
Use the corresponding value in the policy setting to match the level of telemetry you want to permit:
In the Group Policy Management Console, browse to Computer Configuration > Administrative Templates > Windows Components > Data Collection And Preview Builds.
Double-click Allow Telemetry and set it to Enabled. (If you want to disable telemetry completely, you can do that here, too.)
Click Options, and then under Value, choose the desired level, as shown in Table 4-1.
Configure Office Telemetry options
Microsoft Office collects telemetry separately from the operating system and might share data from your documents to enable connected experiences, such as translation, grammar checking, and other functions. You can configure the level of telemetry shared, and you can choose to disable data sharing. Note that disabling connected experiences might limit functionality your users desire.
Administrators can use Group Policy or the Office cloud policy service to manage settings for Office ProPlus or edit the registry directly. Users can access these settings directly by choosing Options > Advanced from within an Office application.
To manage settings for users using Group Policy, download the latest ADMX files from Microsoft and adjust settings by navigating to User Configuration > Policies > Administrative Templates > Microsoft Office 2016 > Privacy >Trust Center. Specifics are documented at https://docs.microsoft.com/en-us/deployoffice/privacy/manage-privacy-controls.
Review and interpret security reports and dashboards
The Security Dashboard in the Office 365 Security & Compliance Center is one of the key places in which security admins will spend time in Office 365. This dashboard, which is the home page of the Office 365 Security & Compliance Center, includes security insights as well as reports about the top information admins need to know. It is also where admins can download reports and manage schedules for reports that need to be run regularly in their environments, and it includes recommendations admins should follow to help secure their environments. To access the Security Dashboard, you need to have one of the following roles: Global Administrator, Security Administrator, or Security Reader.
There are several widgets in the Security Dashboard. You can arrange them to suit your needs and pin those that are more important to you to the home page. Some of the more useful widgets are shown in Table 4-2.
Figure 4-1 shows the Top Insights & Recommendations widget.
Table 4-2 Security Dashboard reports
Widget |
Description |
Top Insights & Recommendations |
This widget highlights things in your environment that can indicate malicious activities so that you are aware and can respond if appropriate. |
Threat Management Summary |
This widget provides an overview of how your organization was protected over the past seven days. It will show a breakdown of malware, phishing, and Office 365 ATP protections based on your licensing. |
Threat Protection Status |
This widget shows trends of phishing and malware. |
Global Weekly Threat Detections |
This widget summarizes scanned messages, the breakdown of the scan (including safe messages), and messages that were blocked. |
Malware |
This widget shows detected malware trends and families. |
Insights |
This widget shows key issues you should review, including top targeted users, as well as recommendations and actions you should take. |
Threat Investigation & Response |
This widget is included with Office 365 ATP Plan 2 and helps to identify emerging campaigns, to investigate threats, and to manage incidents. |
Trends |
This widget shows a detailed breakdown of messaging in your environment. |

Figure 4-1 Top Insights & Recommendation from the Security Dashboard
You can click any report in the dashboard to view more details about the report and to create a schedule to automatically email the report to you on a regular basis (see Figure 4-2). You can also view Related Reports, which appear at the lower-left portion of the screen.

Figure 4-2 Top Senders And Recipients from the Office 365 Security & Compliance Dashboard, with the related Sent And Received Email report below
Plan for custom security reporting with Intelligent Security Graph
You can also create your own custom security reports by directly querying the Intelligent Security Graph, as shown in Figure 4-3. This is useful when an included report does not exist or does not have the level of detail you want for some internal reporting needs. The Security API is a REST API that developers can query to build their own solutions; this can be done either for the developers’ own internal teams or by using third-party products. Existing third-party solutions can query the API, or you can develop your own using Python, ASP.Net, or other languages. If your security team is developing its own tools or looking at third-party security tools, you should consider whether they can integrate with Office 365 to provide more functionality.

Figure 4-3 Architectural overview of the Intelligent Security Graph
Review Office 365 Secure Score actions and recommendations
One of the most important things Microsoft includes with Office 365 is the Microsoft Secure Score. The term “Secure Score” used to be referred to as the “Office 365 Secure Score,” and you might still encounter that name on the exam. No matter what you call it, your Secure Score is a measurement of your security posture, and it evaluates what security options you have based on your licensing and how well or thoroughly you have deployed them. The higher your score, the more fully you have deployed all the available security solutions and the more resistant your organization should be to attempts to compromise it through your Microsoft cloud services. Secure Score helps you to:
Evaluate the current state of your security posture
Identify ways to improve your security posture
Compare your posture with benchmarks and KPIs
The idea is to help you to identify actions you can take and settings you can enable to better secure your environment. Secure Score is regularly updated as new capabilities are released and should be checked by administrators at least monthly. You should aspire to a higher score while balancing security with the business needs of your organization. Figure 4-4 shows an example of a Secure Score.

Figure 4-4 Microsoft Secure Score
Several roles have access to Secure Score. Roles that have read and write access can make changes to Secure Score, acknowledge recommendations, and note recommendations that are handled through third-party solutions or are accepted risks in the environment. Read-only roles can only view the reports. The following read and write roles are available:
Global Administrator
Security Administrator
Exchange Administrator
SharePoint Administrator
The following read-only roles are available:
Helpdesk Admin
User Account Admin
Service Support Admin
Security Reader
Security Operator
Global Reader
Microsoft Secure Score is not limited to only Office 365. It includes information from all the Microsoft cloud services your organization uses and includes what is being evaluated, what the current state is, and the actions you can take to improve the security of the services in question. Items evaluated are broken into four groups:
Identity
Data
Device
Applications
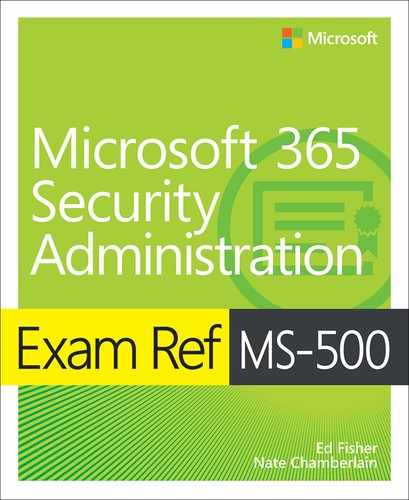
Infrastructure Items are presented in a table with a number of headers and can be sorted based on the significance of the improvement, the relative complexity to implement or deploy, and the potential impact to users. To get some “quick wins,” administrators should look at what can be implemented and focus on things that have a higher effect on the Secure Score and a lower effect on users and then move on to those things that might affect users. One of the most important things you can do to improve your Secure Score is to implement multifactor authentication (MFA) for everyone. This is separated into Require MFA For Azure AD Privileged Roles (see Figure 4-5) and Require MFA For All Users because it’s relatively easy to get admins to use MFA, but it is somewhat more difficult to do so for users.
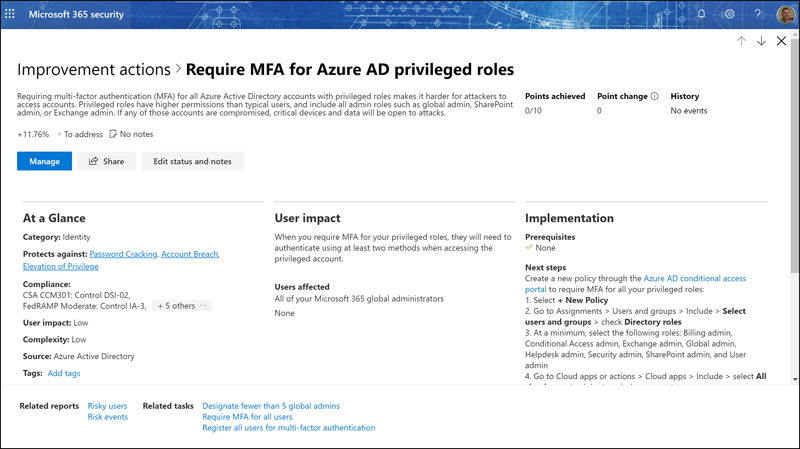
Figure 4-5 The Require MFA For Azure AD Privileged Roles Improvement Action
From the recommendations, you can see steps for implementing the recommended settings, post notes about the topic, and in many cases, link directly to the action you need to take to enable the setting. Click the Edit Status And Notes button to see a Choose Status option from which you can choose one of the following statuses (see Figure 4-6):
To Address
Planned
Risk Accepted
Resolved Through Third Party

Figure 4-6 The Edit Status And Notes page
The Risk Accepted option will remove the recommendation from your list, while the Resolved Through Third Party option will both remove the recommendation and increase your score by the corresponding number of points.
It’s important to note that Secure Score evolves over time and will continue to include more recommendations as new capabilities are added. Administrators should review Secure Score regularly and take actions based on the recommendations to improve their security postures.
Configure alert policies in the Office 365 Security and Compliance Center
Alerts are one of the key components of the Office 365 Security and Compliance Center. Administrators can use alerts to monitor activities within their Office 365 environments and to be notified when events occur or policies are violated so that they can take action or follow-up on actions that were automatically taken, such as when a user attempts to send data in an email and DLP prevents the email from being sent. There are four subsections within Alerts: Dashboard, View Alerts, Alert Policies, and Manage Advanced Alerts.
Dashboard
The dashboard is the top level of Alerts and includes graphical charts of Alert Trends, Active Alerts By Severity, Recent Alerts, Alert Policies, and Other Alerts, as shown in Figure 4-7. Administrators and Security Operators can use this page to get a snapshot of what is happening or has recently happened within the environment.

Figure 4-7 The Alerts Dashboard showing recent activity
View alerts
The View Alerts section shown in Figure 4-8 provides you with a view of all alerts that have triggered in your Office 365 tenant, including both those triggered by default alert policies and those triggered by alert policies you have created yourself.

Figure 4-8 Viewing alerts under the Alerts Dashboard, showing details for all active alerts
You can filter and export the alerts; sort them based on Severity, Status, Last Occurrence, and Activity Count. You can view details and take actions based on internal policies and responses. When you click an alert, you can see more details, update the status, and add comments to the alert; when appropriate, you can resolve the alert. Figure 4-9 shows the expanded view of an alert.

Figure 4-9 Editing an alert to indicate it is resolved and including details about the alert
Once resolved, the alert will not display because the default filter is set to not show resolved alerts. Click the filter and select Resolved to see the details, including who changed the status and when. After setting the filter to Resolved, it will appear as shown in Figure 4-10.

Figure 4-10 A resolved alert
Alert policies
Alert policies include several default alerts, as well as alerts you can create yourself. Default alerts are identified as System Alerts, while alerts you create are identified as Custom Alerts. Alerts include categories for filtering and can include actions beyond just appearing in the Alerts dashboard, such as emailing the alert to users or groups. To create a custom alert, do the following:
Click the +New Alert Policy button.
Type a name for your alert in the Name field. Try to be descriptive but brief.
Use the Description box to add more details.
From the Severity drop-down menu, select Low, Medium, or High. Consider events that can lead to data loss or leakage to be High, while informational events are Low.
In the Category drop-down menu shown in Figure 4-11, choose Data Loss Prevention, Threat Management, Information Governance, Permissions, Mail Flow, or Others.

Figure 4-11 Creating a new alert policy
Click Next.
Under Activity Is, select the type of activity for which you wish to receive an alert, and if necessary, add conditions by clicking the Add A Condition drop-down menu. Conditions are context-aware, and can include things like IP Addresses, File Name, User, and the like. Note that these are optional and intended to help you create more specific alerts where desired.
Under How Do You Want The Alert To Be Triggered?, select the frequency for triggering the alert, as shown in Figure 4-12. Click Next.
Figure 4-12 Choosing the activity
Enter the email recipients who should receive email alerts (if desired) and any daily notification limit. Click Next.
Review your settings, edit any necessary, and then click Finish. By default, the rule will be enabled, but you can also choose to leave it disabled.
Manage advanced alerts
If your tenant has licenses for Microsoft Cloud App Security (MCAS) included in Microsoft 365 E5, you can manage advanced alerts that are triggered by detections in MCAS. This section includes a shortcut to launch the Cloud App Security portal. MCAS is covered in Chapter 3, “Implement and manage information protection.”
Skill 4.2: Manage and analyze audit logs and reports
By default, auditing of administrative actions is enabled in Office 365, but there is much more you should audit, and you should also ensure that the audit logs are reviewed regularly. You can use the Search & Compliance Center or PowerShell to configure and search the unified audit log, which retains data for 90 days. If your organization needs to retain audit data for longer than this, you can download the audit logs or import them into Azure Log Analytics for longer retention.
In this skill, we will review how to manage and analyze audit logs and reports.
Plan for auditing and reporting
Auditing activities by administrators and reviewing those activities regularly is a critical part of ensuring security and compliance. Many organizations audit activities but far fewer actually review those logs, which is why the average time an attacker has access to a network before detection is 90 days or longer. The unified audit log can be used to review or search for both administrator and user activities across your Microsoft Office 365 organization.
Following are the specific categories of action categories that are logged:
Azure Active Directory
Exchange Online
SharePoint Online
OneDrive for Business
Sway
PowerBI
Microsoft Teams
Yammer
The following user activities are logged:
Exchange Online
SharePoint Online
OneDrive for Business
Sway
PowerBI
Microsoft Teams
Yammer
It’s important to note that events are not logged in real-time. For many of the services, there can be up to a 30-minute delay between an event happening and it appearing in the audit log; for Azure Active Directory and other services, the delay can be up to 24 hours. Audit logging is not intended to be used to perform troubleshooting or real-time alerting. It is intended to provide a record of actions that were taken.
By default, Global Administrators and Security Administrators have the permissions necessary to configure auditing and to view audit logs. Also, there are several built-in roles that have the permissions to search the audit logs:
Compliance Administrator
Compliance Data Administrator
Organization Management
Security Operator
There is also a View-Only Audit Logs role that can be used if you need to assign users only the ability to view audit logs through RBAC. For users who are not explicitly added to the Exchange Organization Management role, you need to assign additional permissions in the Exchange Admin Center so that these users can run the Exchange cmdlets needed to search the audit log. To assign a role to a user, open the Security & Compliance Center and choose Permissions. You can select one of the existing roles, or you can create a new one. Browse to Permissions, click the +Create button, and follow the wizard. From the Choose Roles window shown in Figure 4-13, assign them either the View-Only Audit Logs or the Audit Logs roles.

Figure 4-13 Assigning the View-Only Audit Logs role
Configure Office 365 auditing and reporting
By default, both administrator audit logging and mailbox auditing are enabled in Office 365, but if your environment was set up before Microsoft made the decision to do this by default, you might need to enable auditing. To fully enable auditing for your Office 365 environment, you can use the Security & Compliance Center:
Log in to the Security & Compliance Center at https://protection.office.com.
Choose Search & Investigation > Audit Log Search.
Select Start Recording User And Admin Activity. (Note that if auditing has already been enabled, you will not see this link.)
Then for mailbox auditing, which again is now enabled by default, you can check the status of your users’ mailboxes using PowerShell. Connect to Exchange Online using Remote PowerShell and run this command:
Get-OrganizationConfig | fl AuditDisabled
If this command returns False, then mailbox auditing is enabled in your tenant. If this command returns True, you should run the following two commands:
Set-OrganizationConfig -AuditDisabled:$False
Get-Mailbox -ResultSize Unlimited -Filter{RecipientTypeDetails -eq “UserMailbox”} | Set-
    Mailbox -AuditEnabled$true.
The first command enables auditing for all new mailboxes going forward, and the second command enables auditing on all existing user mailboxes.
Once enabled, you use the Security & Compliance Center to search the audit logs.
Perform audit log search
The audit log search tool is located in the Security & Compliance Center and is used to search for and export information from the audit logs. Global Administrators have rights to search audit logs, as do Compliance Management and Organization Management roles. If you are not in one of these roles, you must be granted either the View-Only Audit Logs or the Audit Logs role in Exchange Online, where these permissions are controlled.
To search the audit logs, follow these steps:
Log in to the Security & Compliance Center at https://protection.office.com.
In the left panel, click Search, and then choose Audit Log Search. By default, the search can show results for all activities for the past seven days. You can expand the Activities drop-down menu to see the full list of activities that you can review. (See Figure 4-14.)

Figure 4-14 Selecting activities to show in the audit log
You can also specify date and time ranges, specific users, and key words, such as partial filenames or URLs.
Review and interpret compliance reports and dashboards
The Compliance Manager portal used to be a part of the Security & Compliance Center, but it is now its own portal at https://servicetrust.microsoft.com. This standalone portal provides a simplified experience for managing compliance. You might still see references to the original location in the Security & Compliance Center, but it is no longer accessible. You can read about the new Microsoft Compliance Score (Preview) at https://docs.microsoft.com/en-us/microsoft-365/compliance/compliance-score.
To use the Compliance Manager portal, you must have the appropriate permissions. Built-in roles and their permissions include those shown in Table 4-3.
Table 4-3 Built-in admin roles
|
Compliance Manager Reader |
Compliance Manager Contributor |
Compliance Manager Assessor |
Compliance Manager Administrator |
Portal Admin |
Read Data: Users can read but not edit data. |
X |
X |
X |
X |
X |
Edit Data: Users can edit all fields, except the Test Result and Test Date fields. |
|
X |
X |
X |
X |
Edit Test Results: Users can edit the Test Result and Test Date fields. |
|
|
X |
X |
X |
Manage Assessments: Users can create, archive, and delete Assessments. |
|
|
|
X |
X |
Manage Users: Users can add other users in their organizations to the Reader, Contributor, Assessor, and Administrator roles. Only those users with the Global Administrator role in your organization can add or remove users from the Portal Admin role. |
|
|
|
|
X |
At the time this book was written, the exam focused on the older Compliance Manager. However, the purpose of the old and new compliance tools is the same: to help customers manage their regulatory compliances such that they are responsible for some aspects, while Microsoft is responsible for others. Assessments are the core component and are used to measure the service against a certification standard or regulation. Assessments consist of the following:
In-Scope Services. This lists in-scope service, as well as the services to which they are specific.
Microsoft-Managed Controls. This lists what Microsoft is responsible for as the data custodian/service provider.
Control ID. This is the specific section or article number of the certification or regulation.
Title. This is from the certification or regulation.
Article ID. This is the GDPR article number if the control is related to GDPR.
Description. This is just a text description.
Compliance Score. This is a value from 1 to 10 and indicates the level of risk associated with non-compliance. The higher the value, the greater the risk. This is also color-coded from yellow, orange, and through red.
More. This expands to provide greater detail including audit results.
Figure 4-15 shows the original Compliance Manager dashboard.

Figure 4-15 The original Compliance Manager dashboard
The Compliance Score, as shown in Figure 4-16, provides a visual indicator of how your organization is doing on compliance with relevant standards based on what Microsoft has completed and what your organization has indicated as being complete in the Compliance Manager.

Figure 4-16 Compliance Score in the Compliance Manager
Compliance Manager includes preconfigured templates for the following:
ISO 27001: 2013
ISO 27018: 2014
NIST 800-53 Rev. 4
NIST 800-171
NIST Cybersecurity Framework (CSF)
Cloud Security Alliance (CSA) Cloud Controls Matrix (CCM) 3.0.1
Federal Financial Institutions Examination Council (FFIEC) Information Security Booklet
HIPAA / HITECH
FedRAMP Moderate
European Union GDPR
California Consumer Privacy Act (CCPA) Preview
Microsoft 365 Data Protection Baseline
Configure audit alert policy
Audit alert policies can be configured to generate alerts when certain audit events take place. You can create these alerts so that you are notified, rather than having to review the audit logs. Details are still logged and can be searched after the fact. To configure audit alert policies, do the following:
Log in to the Security & Compliance Center at https://protection.office.com.
Click Search > Audit Log Search.
At the bottom of that page, click the +New Alert Policy button (see Figure 4-17).

Figure 4-17 Creating a new alert policy
Give the alert a name in the Name field and enter something into the Description field to help you understand what it is, why it is there, and who created it.
Set the Alert Type to Custom and select the Activities for which you wish to generate an alert.
The default setting, Show Results For All Users, is usually appropriate. You can set specific users if that is really valid for an audit alert.
In the Recipients field, enter the email address(es) to which to send the alert, as shown in Figure 4-18.
Click Save.

Figure 4-18 Entering details for a new alert policy
Skill 4.3: Configure Office 365 classification and labeling
Classification and labeling are used to classify and protect sensitive content while still supporting your users’ ability to be productive and to collaborate with others. Sensitivity Labels in Office 365 can do the following:
Enforce protection settings, including encryption and watermarks
Protect content in Office applications
Enforce restrictions on data accessed by mobile devices using endpoint protection in Microsoft Intune
Protect content when using third-party services using Cloud App Security
Classify data for usage reporting
Plan for data governance classification and labels
Organizations create, store, manage, and dispose of many different types of data that falls under many different sets of requirements, including business processes, laws and regulations, and compliance standards. Sometimes, the same data might fall under differing requirements. Documents related to employment contracts or to support compliance might need to be maintained as immutable records, while business plans for mergers and acquisitions or patent applications might need to be protected much more strenuously than marketing materials.
Many organizations either struggle with manually dealing with classifications and labels, or they do nothing about it at all, relying upon users to keep the right data in the right place and to exercise caution when storing and sharing the data. The risk there is that a user might make the wrong decision or fail to make any decision at all, jeopardizing the data in question. Data governance uses labels that can be manually or automatically applied to data, so proper permissions, restrictions, and encryption can be handled with a minimum of effort. Manual labeling relies upon users making the determination of what needs to be done with data, while automatic labeling can be applied when data contains certain conditions that can be matched, such as key words or tags in the metadata. Also, organizations might need to identify and classify certain data as records, which indicates the data not only must be retained but that it cannot be modified.
Administrators need to work with various people in their organization to develop the requirements’ classifications based on departmental, regulatory, or legal requirements. Some of the departments that will be involved can include human resources and legal, both of which will likely create large amounts of data that must be classified correctly. Larger organizations might have a data protection officer or department responsible for defining the requirements and ensuring they are met.
Without a good user training program that is regularly reinforced, relying upon users to apply manual labels might not be the best course of action, so it can be well worth the additional licensing costs to use automatic labeling available in Office 365 E5, Microsoft 365 E5, and the Advanced Compliance add-on license.
Search for personal data
“Personal data” does not refer to data such as a user’s personal photos or MP3 collection; instead, it refers to data that falls under the scope of Article 4 of the General Data Privacy Regulation (GDPR) as any data that relates to a resident of the European Union (EU). It can be data that identifies a person or data that can be used to identify a person. Sensitive information types in Office 365 are used to define personal data, including things like national ID numbers and health care numbers.
You can use Content Search to find personal data stored within SharePoint Online and OneDrive for Business, and you can leverage sensitive information types with DLP to find personal data in transit sent through Exchange Online. You can also search on keywords, dates, and other metadata. There are several specific sensitive information types for EU citizen data, including:
Belgium National Number
Credit Card Number
Croatia Identity Card Number
Croatia Personal Identification (OIB) Number
Czech National Identity Card Number
Denmark Personal Identification Number
EU Debit Card Number
Finland National ID
Finland Passport Number
France Driver’s License Number
France National ID Card (CNI)
France Passport Number
France Social Security Number (INSEE)
German Driver’s License Number
Germany Identity Card Number
German Passport Number
Greece National ID Card
International Banking Account Number (IBAN)
IP Address
Ireland Personal Public Service (PPS) Number
Italy’s Driver’s License Number
Netherlands Citizen’s Service (BSN) Number
Norway Identity Number
Poland Identity Card
Poland National ID (PESEL)
Poland Passport
Portugal Citizen Card Number
Spain Social Security Number (SSN)
Sweden National ID
Sweden Passport Number
U.K. Driver’s License Number
U.K. Electoral Roll Number
U.K. National Health Service Number
U.K. National Insurance Number (NINO)
U.S./U.K. Passport Number
More will be added soon. You can enhance the search types using count ranges, and confidence ranges if you need to specify a certain number of results or if you wish to tune your search in the event you get either too few or too many results.
To search for personal data within Office 365, follow these steps:
Log in to the Security & Compliance Center at https://protection.office.com.
Expand Search and then click Content Search.
Click the +New Search button.
In the Search Query dialog box, the default search is for Keywords. In the Keywords section of the dialog box shown in Figure 4-19, enter the content search query for the sensitive information type you wish to find. For example, to find documents that include at least 5 credit card numbers with an 85 percent or better certainty, use this query:
SensitiveType:"Credit Card Number|5|85.."

Figure 4-19 Entering details for a new search query
Make sure the Specific Locations option is selected and click Modify (see Figure 4-20).
Scroll down and enable SharePoint Sites.

Figure 4-20 Modifying the locations for a search
Click Save > Save & Run.
Give your search a Name and a Description and then click Save.
The search will begin immediately and return results once it is complete.
You can view the results or export them if desired.
Apply labels to personal data
Retention labels can be applied to personal data based on sensitive information types or other factors, such as names or locations. You can use labels to perform eDiscovery and Content Searches and apply Data Loss Prevention (DLP) policies to protect sensitive data. Use Sensitivity Labels with data stored on-premises with Exchange Online and with other SaaS apps. You can read more about this at https://docs.microsoft.com/en-us/microsoft-365/compliance/apply-labels-to-personal-data-in-office-365.
Monitor for leaks of personal data
There are three ways you can monitor for leaks of personal data:
Office 365 Data Loss Prevention (DLP)
Office 365 audit log alert policies
Microsoft Cloud App Security
Create and publish Office 365 labels
You can create and publish both Sensitivity and Retention labels in your environment to make them available to users for manual labeling of files. You create labels and define the settings they apply and restrictions they enforce. You then publish the labels in a policy so that they can be manually applied by users or automatically applied.
To create a Sensitivity Label, do the following:
Log in to the Security & Compliance Center at https://protection.office.com.
In the left panel, expand Classification and then click Sensitivity Labels (see Figure 4-21).
Click the +Create A Label button.
Give the label a short, intuitive name, and enter text in the Tooltip box that will help users understand what the label is for. You can also add a Description for admins and then click Next.
If required, enable Encryption. You can choose to assign permissions now or let users assign permissions when they apply the label. If you choose to assign permissions now, you have the option to expire the content and to decide whether to permit offline access. Then you assign permissions as appropriate and click Next.
You can enable Content Marking and add a watermark, header, and/or footer. Customize to meet your needs and then click Next.
Enable Endpoint Data Loss Prevention, if required, and then click Next.
If you wish to auto-label content, enable it here. Note that you must have either Office 365 ProPlus or the Azure Information Protection Unified Labeling content installed. Also, encryption can both incur a performance hit and limit some other functionality, such as searches. If you are going to auto-label, add the Condition, Accuracy, and Instance Counts desired.
Configure whether to auto apply the label or to recommend that users manually apply the label. Enter Policy Tip text that will help the user understand the requirement and then click Next.
If necessary, review the Auto-Labeling For Office Apps setting and click Submit.
Click Done.

Figure 4-21 A Sensitivity Label
You will see the label in the list. To use it, select the label and click Publish Labels; this will launch the wizard to create a label policy, which is covered in the next section.
Configure label policies
Publishing Sensitivity Labels enables them to be used; before publishing, they are not available to users. To publish a label, do the following:
Log in to the Security & Compliance Center at https://protection.office.com.
Browse to Center > Classification > Sensitivity Labels and select the label you want to publish.
Click the Publish Labels button. At this point, you can only publish one label at a time.
On the next screen, you have the option to edit the label if necessary. To publish it, click the Publish Label button.
On the Chooses Labels To Publish screen, you can click Edit to add additional labels to publish if necessary. Click Next.
Choose the users and groups to whom you want to publish the label. By default, All is selected, but you can publish only to specific users or groups if a label is only suitable for some users. When you’re ready, click Next.
Set the options for Policy Settings that are appropriate for your label, including whether it should be applied by default; if users must provide a justification before removing or selecting a lower classification; or whether users must apply some label. You can also add a link to a custom help page, such as an internal SharePoint Online page. When you are ready, click Next.
Give the policy a Name and a Description. It’s suggested that you name the policy for the label and add a description that is informative for users. Click Next.
As shown in Figure 4-22, review your settings, edit any if necessary, click Submit, and then click Done.

Figure 4-22 Sensitivity Label Policy
It can take up to an hour before the policy is available to users.
Skill 4.4: Manage data governance and retention
Data governance and retention focus on ensuring that organizations keep what they need and can get rid of what they no longer need; more importantly, they allow organizations to rid themselves of what they don’t want to keep around anymore. Many laws, regulations, and compliance standards set requirements for how long certain types of data must be kept, while the litigious nature of business leads some companies to minimize how much data is just lying around and for how long it remains lying around. That’s where data governance and retention come into play. Data governance helps you keep what you want and get rid of what you don’t. Retention policies help to ensure that data is maintained for the required period of time and can make that data immutable when necessary. Once the retention period is over, retention policies can either relax and allow users to keep or delete data as they wish, or businesses can then delete the data, so it is no longer available.
Plan for data governance and retention
Organizations create, store, manage, and dispose of many different types of data that falls under many different sets of requirements, including business processes, laws and regulations, and compliance standards. Sometimes, the same data might fall under differing requirements. For example, in the United States, payroll records must be maintained for three years according to federal regulations, while in California they must be maintained for six years. Payroll tax records need to be maintained for four years. Some organizations might also determine that they need to ensure certain data is not maintained after a period of time. It might be that the data is no longer relevant and those companies don’t want to allocate space to store and back it up, or it might be that maintaining certain data beyond a specific period of time could expose them to legal risk from discovery if litigation occurs.
Many organizations either struggle with manually dealing with this, or they do nothing about it, allowing data to accumulate and consume ever-increasing amounts of storage space. Data governance uses labels that can be manually or automatically applied to data so that proper storage and proper disposal can be handled with a minimum of effort. Using labels, data can be identified such that both the retention and the disposal of data can be enforced. Manual labeling relies upon users making the determination of what needs to be done with data, while automatic labeling can be applied when data contains certain conditions that can be matched, such as keywords or tags in the metadata. Organizations might also need to identify and classify certain data as records, which indicates the data must be retained and that it cannot be modified.
Administrators need to work with others in their organizations to develop the requirements for retention and disposal based on departmental, regulatory, or legal requirements. Both human resources and legal departments will likely create large amounts of data that must be retained and disposed of in a timely fashion. Larger organizations might have data retention officers or departments responsible for defining the requirements and ensuring they are met.
Data can only be tagged with one retention label. Manual labels take precedence over automatic labels, and the longest retention period takes precedence over shorter retention periods, so it’s important to plan out labels that are well-named and meet the requirements for your data governance program. Without a good user training program that is regularly reinforced, relying upon users to apply manual labels might not be the best course of action. This means it can be well worth the additional licensing costs to use automatic labeling available in Office 365 E5, Microsoft 365 E5, and the Advanced Compliance add-on license.
Review and interpret data governance reports and dashboards
The Security & Compliance Center includes an Information Governance section, and within this section, administrators can find the Information Governance dashboard and the Label Activity Explorer. The first thing to notice is the Information Governance toolbox, which is a wizard-driven interface for importing data into Office 365. Here, you can create and publish labels, configure retention and supervision policies, and set up monitoring and alerts. Because this is a very useful tool for administrators who are starting out with Office 365, we will cover each of these functions separately.
The Information Governance dashboard shown in Figure 4-23 includes several graphical reports, which will help you understand how to classify your data, identify data that is being retained, and see users who are retaining data. It also highlights the top labels used in your environment, recommendations for content that might need to be retained, and your trending data consumption.

Figure 4-23 The Information Governance dashboard
Each of the sections can be clicked to drill deeper into the data, view reports, and filter if required. Figure 4-24 shows Label Usage Over The Past 90 Days. Related reports help administrators see what is happening in their environments.

Figure 4-24 A report on Label Usage Over The Past 90 Days
Configure retention policies
The process of creating a retention label is very similar to creating Sensitivity Labels. You can do this under the Information Governance section of the Security & Compliance Center, or the Classification section. We’ll use the Classification section because it has a more intuitive layout. The process when doing this in the Information governance section is similar:
Log in to the Security & Compliance Center at https://protection.office.com.
In the left panel, expand Classification and then click Retention Labels.
Click the +Create A Label button.
Give the label a short, intuitive name. You can also add descriptions for admins and users, though neither is required. When you are ready, click Next.
If you want the retention label to be automatically applied, enter one or more values that can be used to match data with the requirement. You can use existing values or create new ones for your tenant. Click Next when you are ready.
To enforce retention, click the Retention button to turn on retention, and configure the settings as required. Note that once a retention period passes, you can choose to delete the data, trigger a disposition review, or do nothing. You can also choose to allow data to be deleted at any time or to automatically delete the data when it reaches a certain age based on its original creation time, its last modification time, the time it was labeled, or upon an event occurring. If you need to designate data as a record, which means it must be retained and cannot be modified, check the Use Label To Classify Content As A Record. Click Next.
Review your settings, as shown in Figure 4-25, and then click Create This Label.

Figure 4-25 Creating a retention label
As with Sensitivity Labels, you need to publish a retention label before it can be used. You can use the Information Governance portal of the Security & Compliance Center or the Classification section. For this example, we’ll use the Classification section because it has a more intuitive layout, though the process for doing this in the Information Governance portal is similar.
Publishing retention labels follows a similar process to publishing Sensitivity Labels:
Log in to the Security & Compliance Center at https://protection.office.com.
Expand Classification and click Retention Labels.
Select the label you want to publish. A new screen will appear for the retention label with the name of the retention label you selected.
Review the settings and edit if necessary. When you are ready, click the Publish Label button.
On the Choose Labels To Publish screen, you can click Edit to add additional labels to publish if necessary. Click Next.
Choose the locations to which you will publish the labels. By default, the option is set to All Locations, which includes Content In Exchange Email, Office 365 Groups, and OneDrive and SharePoint Documents. If you only want to apply this retention label in certain locations, you can select Let Me Choose Specific Locations. From there, you can select locations or Users And Groups to which or whom you want to publish the label. When you’re ready, click Next.
Give the policy a name and a description. It’s suggested that you name the policy with a name that includes the label name and that you provide a description that is informative for users. Click Next.
On the Review Your Settings screen, review your settings, edit any if necessary, and then click Publish Label.
When you select a label, you can see the options to interact with the label in Figure 4-26.

Figure 4-26 A retention label policy
Remember, it might take up to an hour before the policy is available to users.
Define data governance event types
In addition to retention based on when something was created or when it was modified, you can take action based on an event. This can be useful in situations such as retaining all data for an employee who leaves the company; in this case, you might want to retain all the employee’s data for a specific period of time after the employee leaves, rather than when the data was last modified or created. You might also associate data retention with the expiration of a contract or the end-of-life for a product. You can use existing event types or create your own.
To use event-based retention, you create a label to associate it with an event rather than a time stamp for its creation or its last modification. Finally, you publish a retention label policy in the same way as before. To create an event-based label, do the following:
Log in to the Security & Compliance Center at https://protection.office.com.
In the left panel, expand the Classification section and then click Retention Labels.
Click the +Create A Label button.
Give the label a short, intuitive name. You can also add descriptions for admins and users, though neither is required. When you are ready, click Next.
If you want the retention label to be automatically applied, enter one or more values that can be used to match data with the requirement. You can use existing values or create new ones for your tenant. When you are ready, click Next.
To enforce retention, click the Enable Retention button and configure the settings as required. Note that once a retention period passes, you can choose to delete the data, trigger a disposition review, or do nothing. To see the next two options, either choose to trigger a disposition review or delete the content automatically.
From the Retain Or Delete The Content Based On drop-down menu, select An Event. Then, click Choose An Event Type.
You can select one of the existing Event types, or you can create a new event type. Choose the desired type, check the box next to it, click Add, and then click Next.
Review your settings, then click Create This Label, as shown in Figure 4-27.

Figure 4-27 Creating an event-based retention label
Define data governance supervision policies
Data governance supervision occurs when a manager or an auditor needs to review some or all employee communications. This can be to ensure compliance, for training purposes, as part of an investigation, or other reasons. Supervision is part of Advanced Compliance, and it requires that all users who will be under supervision have a Microsoft 365 E5 license, an Office 365 E5 license, or an Office 365 E3 license with the Advanced Compliance add-on.
To use supervision, you should follow these steps:
Create a group for users who will be supervising communications. You can use an existing Office 365 or AD group that is synchronized to Office 365, but you cannot use dynamic groups.
To set up and to use supervision, all users must be in the Supervisory Review role group. Log in to the Security & Compliance Center at https://protection.office.com, open the Permissions pane, and add users to the Supervisory Review group.
If required, you can create sensitive information types using labels or custom keyword dictionaries to search for specific content, such as customer numbers, product names, or other words/phrases specific to your business. To create a custom dictionary, use a text editor to create a list of terms. Use a new line for each followed by a hard return and save the text file in Unicode/UTF-16 (Little Endian) format.
In the Security & Compliance Center, on the left panel, click Supervision.
Click the +Create button to create a new supervisory policy.
Give the policy a name and (optionally) a description, and then click Next.
Add the Supervised users or groups. If you choose a group and want to exempt one or more group members from supervision, you can add those users to the Non Supervised Users section. By default, Supervision will apply to email and chat within Office 365, but you can deselect Chat if desired. Email cannot be deselected. When finished, click Next.
On the What Communications Do You Want To Review? page, external communications (Inbound and Outbound) are selected by default. You can also add Internal communications and deselect Inbound and/or Outbound if desired. You can also set up conditions by clicking Add A Condition if you need to scope your supervision policy (see Figure 4-28).

Figure 4-28 Conditions for supervisory policies
You can also select the checkboxes next to Use Match Data Model Condition and/or Use Advanced Sensitive Information Condition, if required. At the time of this writing, the Data Model Condition is set to Offensive Language, and the Advanced Sensitive Information Conditions include 42 types, as shown in Figure 4-29.
Select the options you require and then click Next.

Figure 4-29 Use advanced sensitive information condition
If you selected Advanced Sensitive Information, you can select sensitive information types including Financial, Medical And Health, Privacy, and Custom Types. Select what you require and then click Next.
Enter the percentage of communications you want to review and then click Next.
Enter the reviewers you want to perform the review, remembering that they need to be in the Supervisory Review group. You need to select the users here because you might have different supervision requirements involving different supervisors. When you are ready, click Next.
Review your settings, edit if required, and then click Finish (see Figure 4-30).
Once you have created a supervisory policy, email should be available for review in the console almost immediately. It can take up to 24 hours for Microsoft Teams instant messages to begin to appear for review. To review, do the following:
Log in to the Security & Compliance Center at https://protection.office.com.
In the left panel, click Supervision.
Select the Supervision policy from the list and then click Open.
If any communications have taken place that are in scope for the supervision policy, you will see them listed.

Figure 4-30 Supervisory policy settings
Configure information holds
Information holds can be set up using eDiscovery and might be necessary to comply with a regulation or contractual obligation, when investigating an alleged violation of policy, or in response to a court order. You might also choose to put information on hold proactively for certain key employees. Holds are different from retention in that they apply automatically to all data within scope regardless of any tag and might or might not be apparent to the users involved. Users can modify or delete data that is on hold, and that data will appear to be deleted or modified as expected. Versions and deleted items are kept within the system and accessible by administrators using eDiscovery. Each hold is managed as a “case.” To configure an information hold, do the following:
Log in to the Security & Compliance Center at https://protection.office.com.
In the left panel, click eDiscovery and then click eDiscovery again; finally, click the +Create A Case button.
Enter a case Name and Description and then click Save.
From the list of cases, click Open next to the case you just created. This will open a new browser tab.
Click Holds, and then click the +Create button.
Name your hold, provide a Description, and then click Next.
In the Choose Locations dialog box, select the locations where you want to apply the information hold. This can include email, chats, to-do items, data stored in SharePoint Online and OneDrive for Business, Office 365 groups, Teams sites, or in Exchange public folders. When you have made your selection(s), click Next.
On the Query Conditions tab, you can add Keywords or use a query to limit the scope of data to be held; or you can leave the Keywords and Conditions fields blank to hold all data. When you have your options (if any) set, click Next.
Review your settings, edit if necessary, and then click Create This Hold.
Note that, unlike retention, holds have no defined end date. Data is held until you remove or delete the hold.
Import data in the Security and Compliance Center
Administrators can use the Security & Compliance Center to import data, including archived email in legacy PST files and data from social media and instant messaging platforms using connectors. Customers who have existing PST files or third-party archive systems that can export data to PST can import PSTs into archive mailboxes, either over the wire or by shipping hard drives to Microsoft.
Before beginning a PST import, you must be a member of the Import Export role in Exchange Online. Once an account has been added to that role, it can take up to 24 hours before you can create an import job. To import PST data to Office 365, do the following:
Log in to the Security & Compliance Center at https://protection.office.com.
In the left panel, expand Information Governance and then click Import.
Click Import PST Files.
Click the +New Import Job button.
Give the job a name and then click Next. The name must be all lowercase and may include only letters and numbers. The only other character you can use is a hyphen. Create a name that clearly indicates the purpose of the specific PST import.
Select whether you want to import the PSTs over the network or want to ship drives to Microsoft. See the Real World sidebar, “Network versus drive shipping,” for the differences. In this example, we will import a PST over the network.
Click Next.
Click Show Network Upload SAS URL and copy the URL you will use to upload your data.
Click Download The Azure AzCopy to download the tool used to copy your PST files.
The Azure AzCopy tool will walk you through creating the mapping file you need to map PSTs to individual archive mailboxes and upload the data. When you are done, check both boxes to confirm I’m Done Uploading My Files and I Have Access To The Mapping File, as shown in Figure 4-31, and then click Next.
Click the +Select Mapping File button to browse to and select the mapping file you used with Azure AzCopy to upload your PST files, and then click Validate. When validation is successful, click Save.

Figure 4-31 Importing PST data to Office 365
Administrators can also import and archive data on an ongoing basis from the following services:
Social media. Facebook, LinkedIn, Twitter, and Yammer
Instant messaging. Yahoo Messenger, GoogleTalk, and Cisco Jabber
Document collaboration. Box and DropBox
Vertical industries. Customer Relationship Management (such as Salesforce Chatter) and Financial Services (such as Bloomberg and Thomson Reuters)
SMS/text messaging. BlackBerry
Once imported, you can place data on hold and set up auditing and retention policies to maintain this data, even though it originates outside of Office 365. To import data from a web service, you need to set up a connector and a paid Azure subscription. To import data, do the following:
Log in to the Security & Compliance Center at https://protection.office.com.
In the left panel, expand Information Governance and then click Import.
Click Archive Third-Party Data.
Click the + Add A Connector button and choose the service desired. For this example, we will use Twitter.
Read and accept the Terms Of Service.
In the Add Connector App window, click the link under Documentation to download the step-by-step instructions for the connector.
Follow the steps for the specific connector to complete the process.
Configure data archiving
The Security & Compliance Center can be used to enable or disable archive mailboxes for users with at least an Exchange Online Plan 2 license. Once enabled, the default policy moves all content older than one year from the user’s primary mailbox to the archive mailbox. You can use retention tags created through the Exchange Admin Center (EAC) to create or modify the default archive policy. To do this, follow these steps:
Log in to the EAC at https://outlook.office.com/ecp.
In the right-hand pane under Compliance Management, click Retention Tags.
Click the + sign to create a new tag and select where you want the tag to apply.
Give the tag a name, select the Move To Archive option, and enter the age in days for when an item should be moved.
Enter a comment if desired and then click Save.
Click Retention Policies.
Click the + button to add a new retention policy.
Give the policy a name, click the + sign under Retention Tags, and add the retention tag you created.
Click Save (see Figure 4-32).

Figure 4-32 Creating an archive policy
Manage inactive mailboxes
It’s common for organizations to want to maintain ex-employees’ mailboxes for ex-employees for a period of time after they leave the company. This might be for compliance, it might be an internal policy, or it might because the employee might return or someone else in the company needs something from the employees’ email. Of course, because the user is no longer employed by the organization, it doesn’t make sense for that mailbox to remain active, accepting new mail and consuming a license. When you remove a license from a user, delete the user, or (if it is an on-premises object) move the user out of sync scope, the license assigned to that user is returned to the pool of available licenses, and the mailbox is disconnected. The data remains for 30 days, during which time you can restore the user account or map the mailbox to a different account. However, after the 30-day period, if you have done nothing else, the mailbox is gone, and the data is unrecoverable.
If you need to retain the mailbox past the 30-day period, you need to turn the mailbox into an inactive mailbox before you free up the license from the user account. You can place the user on hold or apply a retention policy to the user. An inactive mailbox will be maintained for the duration of the hold or the retention policy and will not consume a license.
There are several things to consider with an inactive mailbox, including the following:
The user account associated with the mailbox needs to be covered by an Exchange Plan 2 license, which is included in Microsoft 365 E3 and E5 and Office 365 E3 and E5.
The mailbox cannot be used to send or to receive new email while it is inactive.
The mailbox is available to be reconnected to a restored user account or a newly created account but is not accessible to any user until it is. Reconnecting to a restored user or connecting it to a new user will again consume a license.
The mailbox is accessible to eDiscovery searches for the duration of the inactivity period.
Retention policies can be used to hold only a subset of data, if desired. However, there is a limit of 1,000 maximum mailboxes per policy, so you might need to create multiple policies.
Some organizations might want to reuse the UPN and/or the SMTP address associated with a former employee. This can have implications for inactive mailboxes. See https://docs.microsoft.com/en-us/microsoft-365/compliance/inactive-mailboxes-in-office-365 for more on that.
MRM policies used to delete items will continue to apply. Deleted items will be held in the Recoverable Items folder for the duration of the hold or retention period.
MRM policies used to move items to the archive are ignored.
There are four typical management activities involving inactive mailboxes. These include creation and management, changing the hold duration, recovery, and restoration.
Create and manage inactive mailboxes in Office 365
To convert a mailbox to inactive, first confirm the user associated with the mailbox has an appropriate license. Then you can either place the mailbox on litigation hold or apply a retention policy to the mailbox. Both can be set for a limited or unlimited duration. If you are going to use a retention policy, it’s best to have a retention policy specifically created and named for the purpose, so you can distinguish it from others. As we previously went over retention policies, here, we will review the steps to place a mailbox on litigation hold:
Log in to the Exchange Admin Center at https://outlook.office.com/ecp.
In the left panel, click Recipients, and then at the top, click Mailboxes.
Find and double-click the mailbox on which you want to put a hold.
Click Mailbox Features.
Scroll down to the Litigation Hold: Disabled setting and click Enable (see Figure 4-33).

Figure 4-33 Enabling litigation hold
In the Litigation Hold Duration (Days) field, enter the duration in days. If the hold is indefinite, leave this field blank.
In the Note field, you can enter a note, such as the date and reason for the hold. Be aware that this will appear to the user in Outlook and OWA, so don’t add a note here if the user is still active, and you do not want the user to know something is happening.
In the URL: field, you can enter a URL to an internal site on SharePoint Online or elsewhere with more information about the hold. Again, do not add anything here if you do not want the user to know something is happening.
Click Save, and then click Save again.
It might take up to 60 minutes for the hold to take effect. You can also do this using PowerShell. To set a hold for one year, use this syntax:
set-mailbox mailbox@yourdomain -LitigationHoldEnabled:$true -LitigationHoldDuration 366
If you want an unlimited hold, specify the LitigationHoldDuration as Unlimited. Once the hold is in place, you can remove the license from the user or delete the user object. The mailbox will remain in an inactive state.
Change the hold duration for an inactive mailbox
To change the hold duration, simply use the EAC to change the duration or PowerShell to set a new duration.
Recover an inactive mailbox
You might need to recover an inactive mailbox if the employee who left the organization returns, or if you want to associate an inactive mailbox with a new employee. This process converts the inactive mailbox to a new mailbox associated with a user account, and the inactive mailbox is no more. You must use PowerShell to recover an inactive mailbox. To do this, follow these steps:
Connect to Exchange Online using PowerShell.
Run this command to list your inactive mailboxes, so you can get the attributes you need to complete this process:
Get-Mailbox -InactiveMailboxOnly | FL Name,DistinguishedName,ExchangeGuid,Primary
    SmtpAddress
Use the New-Mailbox command with the InactiveMailbox parameter to recover. First, you need to populate a variable with information from the previous command and then create the new mailbox using this command syntax:
$InactiveMailbox = Get-Mailbox -InactiveMailboxOnly -Identity <identity of inactive
    mailbox>
New-Mailbox -InactiveMailbox $InactiveMailbox.DistinguishedName -Name
    name -FirstName firstname -LastName lastname -DisplayName “displayname”
    -MicrosoftOnlineServicesID UPN -Password (ConvertTo-SecureString -String
    ‘P@ssw0rd’ -AsPlainText -Force) -ResetPasswordOnNextLogon $true
Restore an inactive mailbox
You may might to restore the content of an inactive mailbox if the employee who left the organization returns and you have created a new mailbox for him or her already, or if you want to merge the contents of an inactive mailbox with another mailbox that already exists. This process copies data from the inactive mailbox to another mailbox, and the inactive mailbox remains as is. You must use PowerShell to recover an inactive mailbox. To do this, follow these steps:
Connect to Exchange Online using PowerShell.
Run this command to list your inactive mailboxes, so you can get the attributes you need to complete this process:
Get-Mailbox -InactiveMailboxOnly | FL Name,DistinguishedName,ExchangeGuid,Primary
    SmtpAddress
You first need to populate a variable with information from the previous command and then create the new mailbox:
$InactiveMailbox = Get-Mailbox -InactiveMailboxOnly -Identity <identity of inactive
    mailbox>
Run this command to restore the content into an existing mailbox, matching existing folders and creating any that do not already exist:
New-MailboxRestoreRequest -SourceMailbox $InactiveMailbox.DistinguishedName
    -TargetMailbox [email protected] -AllowLegacyDNMismatch
Run this command to restore the content to a specific top-level folder and create a new folder structure underneath that matches the original mailbox:
New-MailboxRestoreRequest -SourceMailbox $InactiveMailbox.DistinguishedName
    -TargetMailbox [email protected] -TargetRootFolder “Inactive Mailbox”
    -AllowLegacyDNMismatch
Delete an inactive mailbox
Before you can delete an inactive mailbox, any holds upon the mailbox or retention policies must either expire or be removed. If all expire, the mailbox will be marked for deletion and removed automatically.
Skill 4.5: Manage search and investigation
Whether from an internal investigation, litigation, or simply because something has been misplaced by a user, finding data will be a component of managing your Office 365 environment. Content search can be handled by administrators or delegated to specific individuals and uses both web-based and command-line tools.
Plan for content search and eDiscovery
Content search and eDiscovery are very similar, and both can be performed from either the Security & Compliance Center or by using PowerShell. Both content searches and eDiscovery can find data throughout Office 365 services. The biggest difference is in how the found data will be used. Content searches are typically ad hoc, where data needs to be found because you are trying to assess the state of things, you are looking for data that might be sensitive or needs protection, or you have a one-off need. You can export the results of the search. Content search queries can be saved to be used again but do not enforce any sort of restrictions or preservation of the data that is found. eDiscovery is most often used for specific requirements and when the results of the search must be preserved, typically in response to a search warrant, discovery motion, or because you wish to pursue legal action and must preserve the results as evidence of wrong-doing. eDiscovery searches and their results are maintained as cases, and you can have separate administrative rights delegated to each case if you need to have multiple users running searches while keeping them out of one another’s activities.
In larger organizations, particularly those that are multinational, you might need to establish compliance boundaries so that only certain individuals or teams can search specific locations (specific users’ mailboxes, SharePoint sites, and the like) and not all locations. You can read more about how to set up compliance boundaries at https://docs.microsoft.com/en-us/microsoft-365/compliance/set-up-compliance-boundaries.
Delegate permissions to use search and discovery tools
There are two built-in groups in the Security & Compliance Center related to Content Search and eDiscovery. eDiscovery Managers can use both Content Search and eDiscovery and perform all the actions within both for their own searches, but they cannot access cases created by other eDiscovery Managers. eDiscovery Administrators can do everything an eDiscovery Manager can do, can access case data for any Advanced eDiscovery case in the organization, and can add themselves to any eDiscovery case and then manage that case. These two roles are the only two that can preview or export data, and decrypt RMS-encrypted data. In the Security & Compliance Center, both are listed as the eDiscovery Manager role. Open the properties of that role to see or assign the eDiscovery Administrator role to a user.
In addition to these two roles, there are three others that might be involved in Content Search and/or eDiscovery. Compliance Administrators can perform searches and create/manage their own cases and place data on hold. Users in the Organization Management role can do that as well, plus they can perform search and purge actions, and of course, they can add themselves to any of the other roles. The last role is Reviewer, which can review the results of existing cases only.
An Organization Management member or higher can use the Permission panel in the Security & Compliance Center to assign membership to users for other roles.
Use search and investigation tools to perform content searches
Content searches can be performed in the Security & Compliance Center by anyone with the appropriate role membership. To perform a content search, do the following:
Log in to the Security & Compliance Center at https://protection.office.com.
On the left panel, expand Search and click Content Search to open a new tab.
Click the +New Search button or the +Guided Search button. The only difference is that the Guided Search GUI is more wizard driven, so we will use that for this example.
Enter a Name and a Description for your search and then click Next.
Select the locations to search. You can select All Locations, which will include all Exchange mailboxes and public folders, all SharePoint Online sites, all OneDrive for Business locations, all Office 365 group sites, and all Teams sites. Alternatively, you can select Specific Locations and specify which of those you wish to search; also, you can limit your search to specific mailboxes and SharePoint sites. While you can search all locations, the larger the volume of data you have in Office 365, the longer such a search will take. If you can narrow down the locations to search, the search will complete more quickly. Make your selections and then click Next.
Enter keywords relevant to your search, one word or phrase per line. A search will logically OR any words or phrases in the Keywords list when conducting a search. If you want to logically AND two or more words or phrases, enter them on the same line with an AND between them.
You can click the + Add Conditions button shown in Figure 4-34 to add things to narrow down the search, such as Subject in an email or a Date range.

Figure 4-34 A content search condition card
When you have your query ready, click Finish. The content search will begin as soon as you click Finish. How long it takes depends upon how broad your search is and how much data is within your tenant. Once it completes, you can view the results. If you get no results, as shown in Figure 4-35, you can edit the query in the results pane and re-run the search.
You can view the items that were found, and statistics about the search including the number of locations, the number of items, and the size (see Figure 4-36).

Figure 4-35 A content search with no results

Figure 4-36 A content search with results
You can download the original item, or you can click the Search Statistics drop-down menu in the upper-right corner to switch from results to statistics to see the number of items searched, the number found, and the size (see Figure 4-37). You can download the statistics as a CSV if desired.
Once you have a search results, you can click the Save button to keep the results available for later review.

Figure 4-37 A content search’s statistics
Export content search results
Search results might need to be exported for further review, either by internal or third parties. Once you have the search results, here is how you can export the information:
Click the More button to export either a report or the results. In this example, we will export the results.
Select whether to export only messages that matched the query; items that matched or could not be ruled out due to encryption and so on; or to only export items that could not be ruled out.
For Exchange content, select whether to export one PST per mailbox; one PST for all messages; or one PST with one folder for each location containing matches.
For Exchange data, you have the option to check the Deduplication box to enable deduplication, which reduces the amount of data that exists in multiple locations.
For SharePoint data, you can include versions if desired and if versioning was enabled.
You also have the option to export files as zipped folders.
When you have the desired options set, click Export.
This will return you to the Searches page, where you click the Exports tab.
If you do not see your export, click the Refresh button, and then click your export when it appears.
Click Download Results. You will be prompted to install the Microsoft Office 365 eDiscovery Export Tool. You need this small download to be able to access the export. The eDiscovery Export Tool will install, and the dialog box shown in Figure 4-38 will appear.

Figure 4-38 The eDiscovery Export Tool
Go back to the Export screen in the Security & Compliance Center. In the Export Key: section, click Copy To Clipboard to copy the export key, and then paste it into the Select The Location That Will Be Used To Store Downloaded Files field in the export tool, which is shown Figure 4-39. Browse to where you want to save the export, and if desired, change the name of the PST.

Figure 4-39 The eDiscovery Export Tool with all fields completed
Click Start and wait for the download to complete. The amount of time this takes depends upon the amount of data and your download speed, but you should expect several minutes, even with a small amount of data and a very fast connection. Think lunch break, not coffee break; or you might even need to come back tomorrow.
Once the download completes, you can work with the exported data or provide it to others.
Manage eDiscovery cases
Everything in eDiscovery involves a case. That does not necessarily mean an actual legal case, but nevertheless, we refer to eDiscovery actions as “cases.” eDiscovery options that are available to you depend upon your licensing. Standard eDiscovery is available for customers with Office 365 E3 or Microsoft 365 E3 licensing, while Advanced eDiscovery is available with Office 365 E5 or Microsoft 365 E5. Both give you the ability to search for content across all of Office 365, place relevant content on hold, and export the results.
Advanced eDiscovery adds capabilities to this, including the ability to better manage cases, perform search and analytics of the case data, perform near-duplicate detection, thread conversations instead of individual emails, perform OCR on several graphics formats, and evaluate relevance. In addition to making this a much more powerful and specific search, it can greatly reduce the costs of analysis by external council through the deduplication and relevance capabilities. For organizations involved in significant legal activities, that alone can more than offset the additional costs of a full E5 license.
To create and manage an eDiscovery case, do the following:
Log in to the Security & Compliance Center at https://protection.office.com.
In the left panel, click eDiscovery > Advanced eDiscovery.
Click the Create A Case button.
Enter a Name for your case. You can also enter a Case Number and Description if you like.
You can choose to make additional settings now or later. For this example, we will select Yes so that we can specify additional settings.
Click Save.
This brings you to the Settings tab for your case. You will see additional tabs along the top. You can edit the Case Information or even delete the case if necessary. Also, you can add members who can access and manage the case, and you can configure the advanced settings such as deduplication and threading on the Settings tab.
Click the Searches tab and then click the New Search button to create a search.
Give the search a Name and Description and then click Next.
On the next screen, add any custodians you need to include and then click Next.
Select the locations for searching content. These are the same options as those that are available to you when you are using Content Search. Click Next.
Enter the search criteria. Again, these criteria are the same as those that are available when you are using Content Search. When you are done, click Next.
Review your search and then click Run.
You will return to the Searches tab where you can see that your search is running. You might periodically want to click the Refresh button to see when your search is complete (see Figure 4-40).

Figure 4-40 An Advanced eDiscovery search running
Once the search is complete, you can preview the results by selecting the Searches tab. From there, you can preview the results, view statistics, and add the results to a review set. A review set is where you have the collection of search results for further analysis, collaboration, or export:
Click the Review Sets tab.
Select the review set you created for the search.
Click the Action button and select Export.
Complete the Export Options to export the search results (see Figure 4-41).

Figure 4-41 Exporting an Advanced eDiscovery case
Skill 4.6: Manage data privacy regulation compliance
Compliance with data privacy regulations like the General Data Protection Regulation (GDPR) or the California Consumer Privacy Act (CCPA) are extremely important for organizations, both because it’s the right thing to do and because violations of the regulations contained within these and other regulations carry significant financial penalties. There are several other regulatory compliance standards that organizations might be required to comply with, either by law or by contract.
Plan for regulatory compliance in Microsoft 365
Microsoft Compliance Manager is a tool that administrators can use to track compliance, assign actions to others, and to verify compliance with many different compliance regulations and standards.
Compliance Manager helps administrators to ensure compliance through several different components:
Provides customers with access to the reports and results of independent auditors’ assessments of Office 365, along with supporting information.
Gives administrators a place to assign actions to others in their organization, track actions, upload documents, and record compliance with applicable standards.
Tracks a Compliance Score so that organizations can track their progress toward full compliance with all relevant standards they select.
Skill 4.2 earlier in this chapter covers the Microsoft Compliance Manager tool. In the next section, we will look more closely at things specific to GDPR.
Review and interpret GDPR dashboards and reports
The GDPR Dashboard in the Security & Compliance Center includes tools for administrators to discover, govern, protect, and monitor personal data within their organization. Remember, in this case, personal data refers to any data that can be used to identify an individual. The dashboard includes shortcuts to the GDPR toolbox and to Data subject requests (more on this below). The dashboard also provides visual reporting on cases; data classification; labels; risks and threats; and DLP policy matches. These are the same things we have previously discussed and are available in other areas of the Security & Compliance Center. By collecting them all here, admins can more easily focus on things directly related to GDPR.
To use the GDPR toolbox, do the following:
Log in to the Security & Compliance Center at https://protection.office.com.
In the left panel, expand Data Privacy and then click GDPR Dashboard.
Click the Open The GDPR Toolbox shortcut, which is shown in Figure 4-42.

Figure 4-42 The GDPR toolbox
The GDPR toolbox includes shortcuts to several actions or tools that are relevant to GDPR. They are grouped as follows:
Discover. This helps you to identify personal data related to GDPR in your organization. It includes shortcuts to Import Data and Content Search so you can find existing personal data.
Govern. This helps you to manage the classification, use, and access of personal data, and includes shortcuts to Labels and Compliance Manager.
Protect. This helps you to secure personal data and detect and respond to threats. It includes shortcuts to DLP and to Office 365 Advanced Threat Protection policies.
Monitor And Respond. The largest section includes what you need to track label usage, respond to DSRs, and conduct investigations. It includes shortcuts to Data Subject Requests, eDiscovery, Labels, Alert Policies, Reporting, and the Service Assurance portal.
Again, while all these tools exist in other locations, centralizing them both makes it easier to focus on GDPR compliance, and highlights their relevance to GDPR compliance.
Manage Data Subject Requests (DSRs)
Data subject requests (DSRs) are requests by individuals, known as data subjects, to an organization, known as the data controller, to take action on data held by the controller and is personal data about the data subject. This might be a request to update data or even delete it. The GDPR provides all residents of the European Union with the legal right to submit DSRs to any organization that holds data about them, regardless of where the organization operates or is incorporated. That means while yours might be an incorporated business operating within the United States, if you have any personal data about a resident of the EU—either because they are a customer or filled out a form on your website—that EU resident can submit a DSR to you, and you must comply with it.
If you receive a DSR, you should create a DSR case. To do that, follow these steps:
Log in to the Security & Compliance Center at https://protection.office.com.
In the left panel, expand Data Privacy, and click Data Subject Requests.
Click the + New DSR Case button.
Enter a Name and, optionally, a Description. When you are done, click Next.
Enter the name of the person who filed this request. This should be the name as it appears in any personal data. If a data subject goes by more than one variant of his or her name, you will have to modify the search to include variants. Enter the most commonly used variant, then click Next.
Review the settings, edit if necessary, and then click Save.
You can immediately run a search if desired by clicking the Show Me Search Results button, as shown in Figure 4-43.

Figure 4-43 Creating a DSR case
Clicking Show Me Search Results will open a new tab and run a Content Search on all locations, as shown in Figure 4-44.

Figure 4-44 An in-progress content search for a DSR case
You can then export the results if the request is for a copy, or you can take other actions based on the DSR.
While GDPR does provide EU residents with the right to be forgotten, litigation holds or the retention of data necessary to meet other compliance requirements or regulations make take precedence over this. To ensure you meet all obligations, your legal counsel should be involved whenever a request to remove data about a data subject is received.
Review Compliance Manager reports
As mentioned previously, Microsoft has rolled out changes to compliance reports with which the exam has not yet caught up. Compliance Manager reports are accessed through the Compliance Manager tool. You can access this through the Security & Compliance Center in the Service Assurance section or directly at https://aka.ms/compliancemanager.
To review Compliance Manager reports the “old way,” you can do the following:
Log in to https://servicetrust.microsoft.com.
If prompted, authenticate using your Office 365 administrative account credentials.
At the top of the page, click Compliance Manager and select Compliance Manager (Classic).
You can see the assessments already associated with your environment, or you can click the +Add Assessment link at the top to add one or more assessments to your portal (see Figure 4-45).

Figure 4-45 The classic Compliance Manager dashboard
Click the name of an assessment to view details.
You will see several sections, including in-scope items, Microsoft Managed Controls, and Customer Managed Controls.
Expand the Customer Managed Controls section, and you will see the sections and controls relevant to the compliance standard. You can manage documents that you or others have uploaded related to testing and affirmation of a compliance standard, update the status if you are working on one, or assign the control to a user for completion.
Create and perform Compliance Manager assessments and action items
Action items are those things your organization must do to assess and confirm you are in compliance with your responsibilities for any compliance standard. The user who is assigned the item will perform the necessary testing; also, this user can upload supporting documents to the Compliance Manager for storage and update the status as appropriate (see Figure 4-46).
The user will receive an email notification of the assignment that includes a link to the Compliance Portal. The user can upload supporting documentation and update the status as appropriate.

Figure 4-46 Assigning an action item in Compliance Manager
Thought Experiment Answers
This section contains the solutions to the thought experiments and answers to the review questions in this chapter.