
3. Working with Artboards
Artboards let you place designs on different size layouts, helping you visualize how they will appear on different size pages and devices.
Artboards are also useful for creating video storyboards or laying out animation elements.
Artboards Overview
An artboard defines the area that contains your document’s printable or exportable artwork (Figure 3.1).

FIGURE 3.1 Artboard selected with Artboard tool active and Artboards panel open
Access an artboard’s settings
Do either of the following:
Select the Artboard tool from the toolbar.
In the Artboards panel, click the Artboard Options icon.
Tip
Once artboard features are activated, they are accessible in the Properties panel and Control panel as well at the Artboards panel.
Open the Artboards panel
The Artboards panel helps you create, manage, and navigate through artboards. To access the Artboards panel, do the following:
Choose Window > Artboards (Figure 3.2).

FIGURE 3.2
A. Active artboard B. Artboard Options icon C. Panel menu D. Rearrange All Artboards button E. Move Up / Move Down buttons F. New Artboard button G. Delete Artboard button
Tip
To learn about adding artboards to new documents, see “Creating a New File” in Chapter 1.
Adding Artboards
All Illustrator files must contain at least one artboard. You can create up to 1,000 artboards for each file.
Add using the Artboard tool
Do the following:
Select the Artboard tool in the toolbar (Figure 3.3).

FIGURE 3.3 Using the Artboard tool to manually create an artboard
In the document window, click+drag to define the size and position of the new artboard.
Add using the Properties panel or Control panel
Do the following:
With artboard features active, click the Add Artboard icon (Figure 3.4).

FIGURE 3.4 The Add Artwork icon in the Control and Properties panels
Add using the Artboards panel
In the Artboards panel, do either of the following:
Click the New Artboard button (Figure 3.5).

FIGURE 3.5 Clicking the New Artboard button in the Artboard panel to create an artboard
Click the panel menu and select New Artboard.
Tip
The dimensions of artboards created using the Artboard panel are determined by the active artboard, or the top-level artboard if no artboard is active in the panel.
Modifying Artboards
Artboards can be modified in the Artboards Options dialog box (Figure 3.6).

FIGURE 3.6 The Artboard Options dialog box displaying the settings for the selected artboard
Open the Artboard Options dialog box for a selected artboard
Do any of the following:
Double-click the Artboard tool.
In the document window, double-click the artboard.
In the Artboards panel, click the Artboard Options icon or select Artboard Options from the panel menu.
From the Control panel, click the Artboard Options button (Figure 3.7).

FIGURE 3.7 The Control panel and Properties panel with Artboard Options highlighted
In the Properties panel, click Artwork Options under Quick Actions. (Figure 3.7).
Tip
An artboard must be selected to open its Artboard Options dialog box.
Rename an artboard
Do either of the following:
In the Artboard Options dialog box, enter a new name in the Name field, and then click OK.
In the Artboards panel, double-click the artboard label and type a new name. Then, press Enter or Return to apply the change (Figure 3.8).

FIGURE 3.8 Renaming an artboard using the Artboards panel
Tip
Applying descriptive names to artboards is useful when working with multiple sizes.
Change dimensions using presets
Presets determine the dimensions of the artboard using the appropriate settings for the document type.
With the artboard selected, do any of the following:
In the Artboard Options dialog box, select an option from the Preset menu (Figure 3.9).

FIGURE 3.9 Selecting a preset in the Artboard Options dialog box
In the Properties panel, under the Artboards section, select an option from the Preset menu.
From the Control panel, select an option from the Preset menu (Figure 3.10).

FIGURE 3.10 Preset menu in the Control and Properties panels
Change dimension and orientation options
In either the Artboard Options dialog box, Properties panel, or Control panel, do any of the following:
Change the dimensions by entering new sizes in the Width (W) and Height (H) fields (Figure 3.11).

FIGURE 3.11 Dimension and orientation settings in the Artboard Options dialog box
Change the orientation by selecting either portrait or landscape.
Constrain dimension proportions
Do any of the following (Figure 3.12):
In the Artboard Options dialog box, select Constrain Proportions.
In the Properties panel or Control panel, click the Maintain Width and Height Proportions icon.
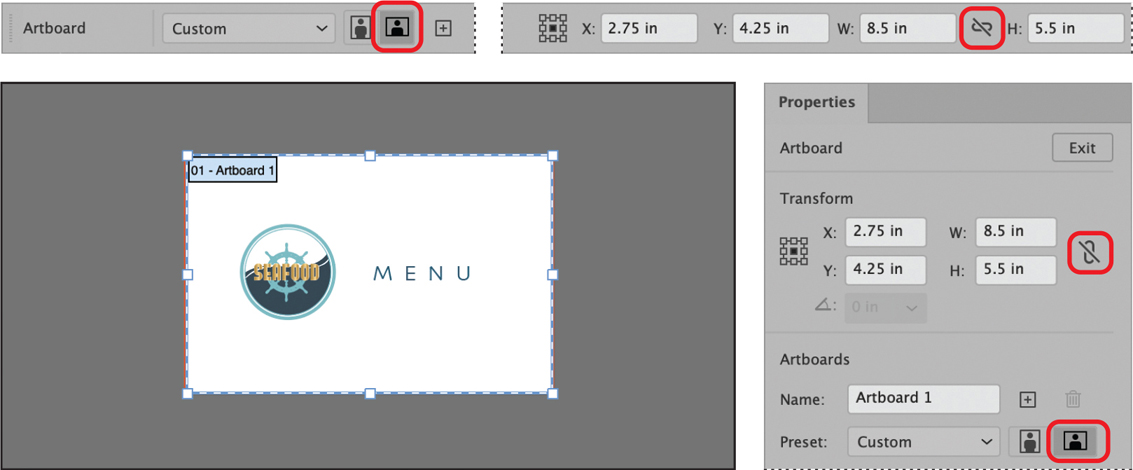
FIGURE 3.12 Artboard dimensions in the Control and Properties panels (with Maintain Width and Height Proportions deselected)
![]() VIDEO 3.1
VIDEO 3.1
Customizing artboards
Change dimensions manually
With the artboard selected, do the following:
In the document window, select the artboard (Figure 3.13).
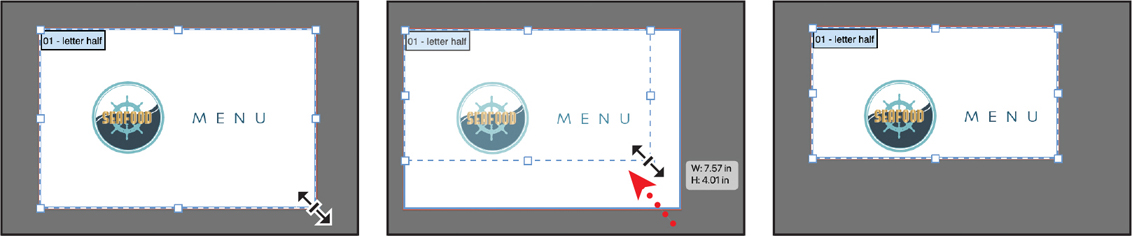
FIGURE 3.13 Manually changing artboard dimensions in the document window
Hover over a corner or edge of the artboard boundary until the cursor displays as a double arrow.
Click+drag to adjust the dimensions.
Reposition manually
With the artboard selected, do the following:
In the document window, click inside the artboard boundaries and drag to a new position.
Set artboard display options
In the Artboard Options dialog box (Figure 3.14), do any of the following (Figure 3.15):
Select Show Center Mark to display the center point.
Select Show Cross Hairs to display lines crossing the center of each edge
Select Show Video Safe Areas to display an artboard’s boundary lines for the video’s viewable area.

FIGURE 3.14 Artboard display options

FIGURE 3.15 Artboard display options
Tip
Deleting an artboard does not remove its contents.
Managing Artboards
Organizing artboards helps maintain document efficiency.
Remove unused artboards
In the Artboards panel, do the following:
Select Delete Empty Artboards from the panel menu.
Delete artboards
With the artboard selected, do any of the following:
Press Delete.
Click the Delete Artboard button in either the Artboards panel, Properties panel, or Control panel (Figure 3.16).

FIGURE 3.16 Delete icon in the Control and Properties panels
In the Artboards panel, select Delete from the panel menu.
Duplicate an artboard and its contents
With the artboard selected, do the following:
Select Move/Copy with Artwork in either the Control or Properties panel.
In the Artboards panel, select Duplicate Artboards from the panel menu (Figure 3.17).

FIGURE 3.17 Move/Copy with Artwork selected in the Control panel while duplicating an artboard and its contents
Select multiple artboards
With an artboard selected, do any of the following (Figure 3.18):
In the Artboards panel, shift+click to select additional artboards.
In the document window, press shift+click to select additional artboards.
In the document window, click+drag to select additional artboards.

FIGURE 3.18 Selecting an additional artboard using the Artboards panel
Redistribute artboards
Do the following (Figure 3.19):
Either select Rearrange All in the Properties panel or click the Rearrange All Artboards button in the Control or Artboards panel.
In the dialog box, customize the artboard arrangement settings as needed.
Click OK to redistribute the artboards.

FIGURE 3.19 Rearranging a document’s artboards using the Artboards panel