
4. Working with Color
In This Chapter
Illustrator provides a robust array of tools and controls for applying and managing colors to suit your project needs.
Accessing Fill and Stroke Controls
Fill is a color, pattern, or gradient inside a path or object.
Stroke is the visible outline of a path or object.
Tip
To learn more about working with strokes, see Chapter 8.
Controls on the toolbar
The toolbar contains detailed fill and stroke control options (Figure 4.1).

FIGURE 4.1
A. Fill box B. Default Fill and Stroke C. Swap Fill and Stroke D. Stroke box E. Color F. Gradient G. None
Fill box shows the current fill.
Stroke box shows the current stroke.
Swap Fill and Stroke switches the fill and stroke colors.
Default Fill and Stroke changes the fill to white and the stroke to black.
Color is the last-selected solid color.
Gradient is the last-selected gradient.
None removes a fill or stroke from the selected object.
Select fill or stroke
Do the either of the following:
To make fill the active choice, click the fill box.
To make stroke the active choice, click the stroke box.
Tip
To learn more about gradients and patterns, see Chapter 13.
Controls in other panels
Basic fill and stroke controls are also available in the Control, Properties, Swatches, and Appearance panels (Figure 4.2).

FIGURE 4.2 Fill and stroke controls in the Control, Properties, Swatches, and Appearance panels
Tip
To access one of the panels with fill and stroke controls, choose Window > [panel name].
Using the Eyedropper Tool
The Eyedropper tool lets you easily change the active or selected fills and strokes by sampling objects.
Update a document’s active fill and stroke using the Eyedropper tool
Select the Eyedropper tool from the toolbar (Figure 4.3).
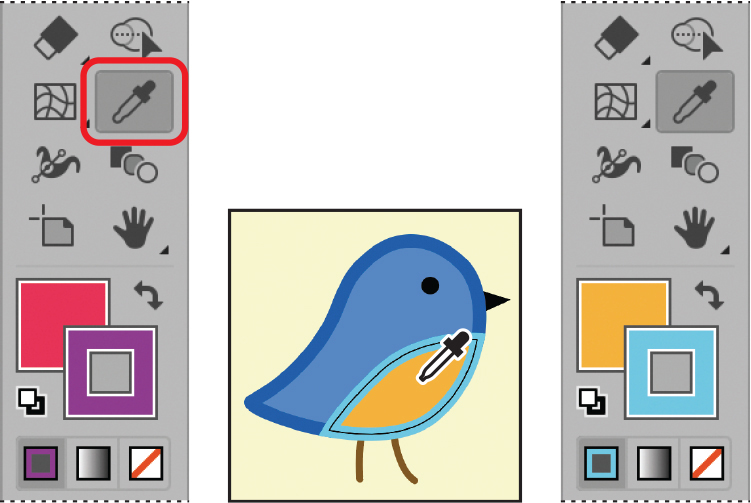
FIGURE 4.3 Using the Eyedropper tool to update the active fill and stroke by sampling an object
In the document window, click the object with the fill and stroke you want to be the active settings.
Tip
Objects do not need to be selected to be sampled using the Eyedropper tool.
![]() VIDEO 4.1
VIDEO 4.1
Applying fills and strokes using the Eyedropper tool
Change an object’s fill and stroke using the Eyedropper tool
In the document window, select the object with the fill and stroke you want change (Figure 4.4).

FIGURE 4.4
A. Selecting the object to change B. Using the Eyedropper tool to sample the new fill and stroke C. Updated fill and stroke in both the toolbar and the selection
Select the Eyedropper tool.
In the document window, click the object with the fill and stroke you want to be the selected object’s new settings.
Using the Color Picker
The Color Picker opens when you activate a change to a current color (Figure 4.5).

FIGURE 4.5
A. Color field B. Picked color C. Color slider D. Adjusted color E. Original color F. Out of Gamut Color warning and correction swatch G. Out of Web Color warning and correction swatch

FIGURE 4.6 Simplified color field with Only Web Colors selecte
The Color Picker lets you accurately customize colors using four color mode options: HSB, RGB, Hexadecimal, and CMYK.
Correct color warnings
Out of Gamut Color means the color cannot be printed accurately (F in Figure 4.5). To correct this, do the following:
Click the warning icon or the correction swatch to accept the substitute.
Out of Web Color means the color may not display correctly on all browsers or platforms (G in Figure 4.5). To correct this, do either of the following:
Click either the warning icon or the correction swatch to accept the substitute.
Select the Only Web Colors checkbox to reduce the color options to 256 web-safe color settings (Figure 4.5).
Tip
When using a color mode different than the document’s, the color will be converted to the document color mode automatically. This is most striking when working in CMYK documents and specifying color as RGB.
Tip
Double-clicking the fill or stroke box opens the Color Picker even if a gradient or pattern is applied.
Tip
To learn more about swatches, see “Using the Swatches Panel” section in this chapter.
Access the Color Picker
Double-click the fill box or stroke box in any of the following (Figure 4.7):
Toolbar
Swatches panel
Color panel

FIGURE 4.7 Double-clicking the fill box to open the Color Picker
Apply a new active fill or stroke color using the Color Picker
Do any of the following, and then click OK:
In the Color field, click to select the desired tint.
Enter new color values in the appropriate fields.
If Hue (H) is selected, use the Color Slider to adjust the color.
Click Color Swatches to choose a document swatch as the new color (Figure 4.8).

FIGURE 4.8 Opening the Color Swatches section in the Color Picker
![]() VIDEO 4.2
VIDEO 4.2
Working with the Color Picker
Using the Color Panel
The Color panel provides several controls and settings for modifying color type and mode settings, including:
Fill and stroke settings
Color mode value sliders and text boxes
Color type conversion option
View color options
To view the Color panel’s full controls and settings, do the following:
Select Show Options from the panel menu (Figure 4.9).
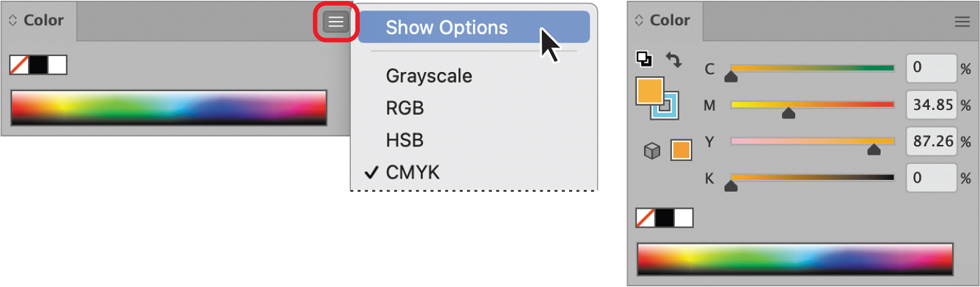
FIGURE 4.9 Showing the Color panel’s options
Convert a spot color to a process color
Spot colors have limited editing capabilites. Converting them to process colors provides greater flexibility. Do the following:
Click the Spot Color button (Figure 4.10).

FIGURE 4.10 Converting a spot color to a CMYK process color
Tip
Spot colors should be used only when printing with the respective inks. When they are used in a file for this purpose, they should not be converted to process colors for convenience.
Tip
Adjusting spot color value changes the tint, not the hue, and does not alter the opacity.
Tip
Changing a color mode controls does not change the document color mode. To learn how to change the document color mode, see the “Apply Color Changes Using Menus” section in this chapter.
Tip
Spot colors must be converted to process colors before applying complement or inverse actions.
Adjust a color value
Do either of the following:
Click+drag the color value slider.
Enter new color values in the text boxes.
Change the color mode controls
Do the following (Figure 4.11):
In the Color panel, click the panel menu button.
Select a different color mode view.

FIGURE 4.11 Changing the Color panel’s color mode view from CMYK to HSB
Change an object’s process color to its complement or inverse
With the object selected (Figure 4.12), do the following:
Select the fill or stroke process color box you want to change.
In the Color panel, click the panel menu and select either of the following:
Invert changes a color to its opposite value.
Complement changes a color to a value calculated using its lowest and highest RGB values.

FIGURE 4.12 Applying inverted and complement colors to an object
Using the Swatches Panel
The Swatches panel (Figure 4.13) is an essential tool for organizing a document’s colors, tints, patterns, and gradients.

FIGURE 4.13
A. Active swatch B. Panel menu C. Show List / Thumbnail View buttons D. Color group E. Swatch libraries F. Open Color Themes panel G. Add Swatch to My Library H. Show Swatch Kinds menu I. Swatch Options J. New Color Group K. New Swatch L. Delete Swatch
Tip
To learn more about gradients and patterns, see Chapter 13.
View swatch details
To change from thumbnail to list view to see the names of the swatches, do either of the following:
Click the Show List View button.
From the panel menu (Figure 4.14), select a list view option.
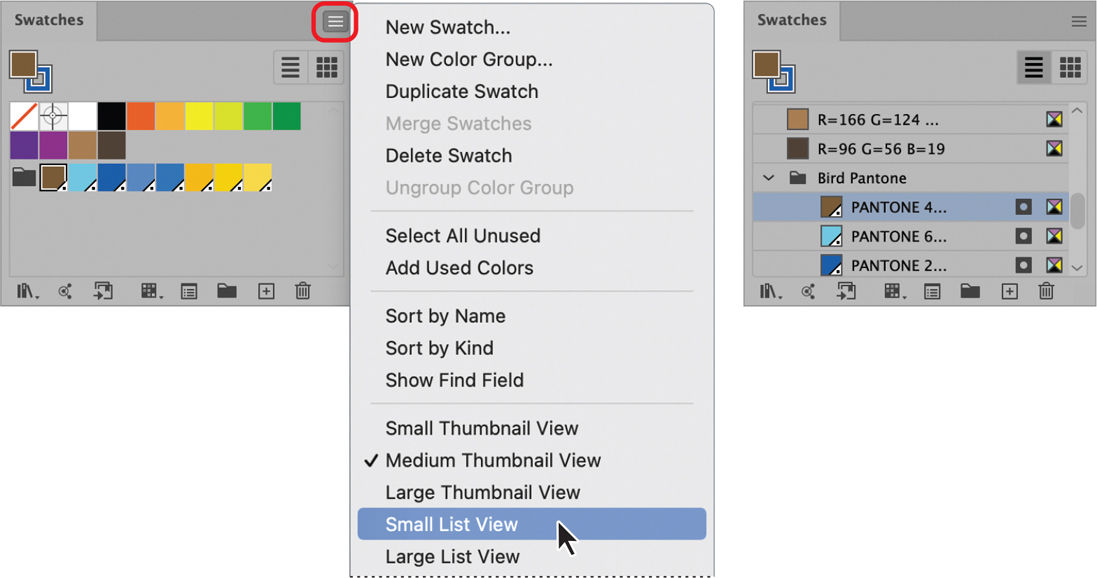
FIGURE 4.14 Switching from a thumbnail to a list view using the panel menu
Change swatch display size
To increase or decrease the size of the swatches in either list or thumbnail view, do the following:
Select a swatch size view option from the panel menu.
Display certain swatch types
In the Swatches panel, do the following:
Click the Show Swatch Kind button and select an option (Figure 4.15).

FIGURE 4.15 Showing color group swatches (and hiding all others) using the Show Swatch Kinds menu
Arrange swatches by type
In the Swatches panel, do the following:
From the panel menu, select a Sort By option to arrange the swatches by name or type.
Create a swatch from an active fill or stroke color
In the Swatches panel, do the following:
Click+drag the color box onto the swatches section (Figure 4.16).

FIGURE 4.16 Dragging an active color to create a new swatch
Create a swatch using customized settings
In the Swatches panel, do the following (Figure 4.17):
Either click the New Swatch button or select New Swatch from the panel menu.
In the New Swatch dialog box, customize the settings by doing any of the following, and then click OK:
Change the Swatch Name.
Change the swatch Color Type.
Adjust the color settings using the Color Mode options.

FIGURE 4.17 Creating a customized global spot color swatch from a process color
![]() VIDEO 4.3
VIDEO 4.3
Working with swatches
Tip
Hovering over a swatch thumbnail displays the name.
Create a swatch using the Color panel
In the Color panel, do the following (Figure 4.18):
Adjust the active color, as needed.
Select Create New Swatch from the panel menu.
In the New Swatch dialog box, customize the settings as needed and then click OK.

FIGURE 4.18 Creating a swatch using the Color panel menu
Modify a swatch
In the Swatches panel, do the following (Figure 4.19):
Either double-click the swatch thumbnail or choose Swatch Options from the panel menu with the active swatch selected.
In the Swatch Options dialog box, customize the settings by doing any of the following and then click OK:
Change the swatch Name.
Change the swatch Color Type.
Adjust the color settings using the Color Mode options.

FIGURE 4.19 Modifying swatch options by double-clicking the thumbnail
Create a color group from selected swatches
Do the following:
Either click the New Color Group button (Figure 4.20) or select New Color Group from the panel menu.

FIGURE 4.20 Creating a new color group from selected swatches and the result
In the New Color Group dialog box, enter a Name for the group and click OK.
Create a color group from selected objects
Do the following:
Either click the New Color Group button (Figure 4.21) or select New Color Group from the panel menu.

FIGURE 4.21 Creating a new color group from selected objects and the result
In the New Color Group dialog box, enter a Name for the group and then click OK.
Tip
To add swatches to a color group, drag them onto the group.
Access swatch libraries
Illustrator provides a robust collection of ink-based and thematic color libraries.
To access a swatch library, do either of the following:
Click the Swatch Library button and select an option from the menu.
Select Open Swatch Library > [library name] from the panel menu (Figure 4.22).

FIGURE 4.22 Opening a swatch library using the Swatch library button
Create a custom swatch library
With the Swatches panel organized as needed, do the following:
Click the Swatch Library button and select Save Swatches.
In the Save Swatches as Library dialog box, enter a Name and select a location for the library; then click Save.
Add library swatches to the Swatches panel
With the library swatch(es) selected, do either of the following:
Click a library swatch.
Drag the swatch(es) from the library panel onto the Swatches panel.
Select Add to Swatches from the library panel menu.
Tip
The default location for swatch libraries is Illustrator/Presets/Swatches.
Using the Color Guide Panel
The Color Guide panel (Figure 4.23) provides harmonious color variation suggestions based on the current color.

FIGURE 4.23
A. Set as Base Color B. Active color group C. Panel menu D. Harmony Rules menu E. Color variations F. Limits colors to specified swatch library G. Edit Colors H. Save Group to Swatches panel
Set the Color Guide base color
Do either of the following:
Use the Eyedropper tool to sample a color in the document
Select a swatch from the Swatches panel.
Change the Color Guide options
Do the following:
Select Color Guide Options from the panel menu (Figure 4.24).

FIGURE 4.24 The Color Guide Options dialog box
Adjust the Steps and Variation as needed; then click OK.
Tip
To learn more about the Edit Colors button, see the “Apply Color Changes Using Menus” section in this chapter.
Apply a color variation to a selected object’s fill
Do either of the following:
Click an Active Color Group swatch.
Click a Color Variations swatch.
Change the harmony rule
Do the following:
Click the Harmony Rules menu button (Figure 4.25) and choose a new rule.
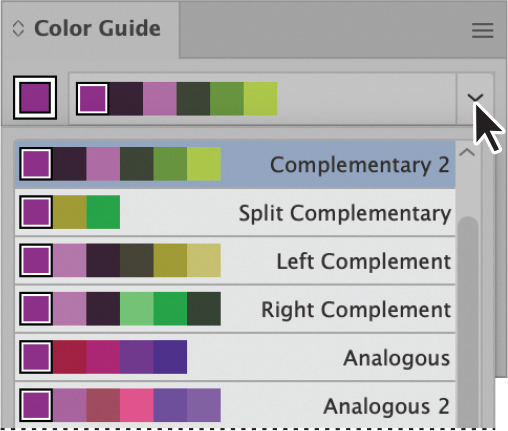
FIGURE 4.25 Clicking the Harmony Rule menu to view the options
Change the color options using swatch libraries
Click the Limit the Colors to a Specified Swatch Library button and select an option from the menu (Figure 4.26).

FIGURE 4.26 Selecting a swatch library to limit the Color Guide suggestions
Change the type of color variation
Select any of the following from the panel menu:
Show Tints/Shades adds black (tint) and white (shades) to the variations.
Show Warm/Cool adds red (warm) and blue (cool) to the variations.
Show Vivid/Muted increases (vivid) and decreases (muted) saturation.
Add a color group to the Swatches panel
Do the either of the following:
Click the Add Group to Swatches Panel button (Figure 4.27).

FIGURE 4.27 Adding the active color group to the Swatches panel
Select Save Colors as Swatches from the panel menu.
Applying Color Changes Using Menus
Change the color mode for an entire document
With the document open, select the appropriate color mode for your project by doing either of the following (Figure 4.28):
Choose File > Document Color Mode > RGB Color for digital projects.
Choose File > Document Color Mode > CMYK Color for printed projects.

FIGURE 4.28 Selecting a new color mode for a document using the File menu
Change the color mode for objects in CMYK documents
With the objects selected, do either of the following:
Choose Edit > Edit Colors > Convert to RGB to convert CMYK objects (Figure 4.29).
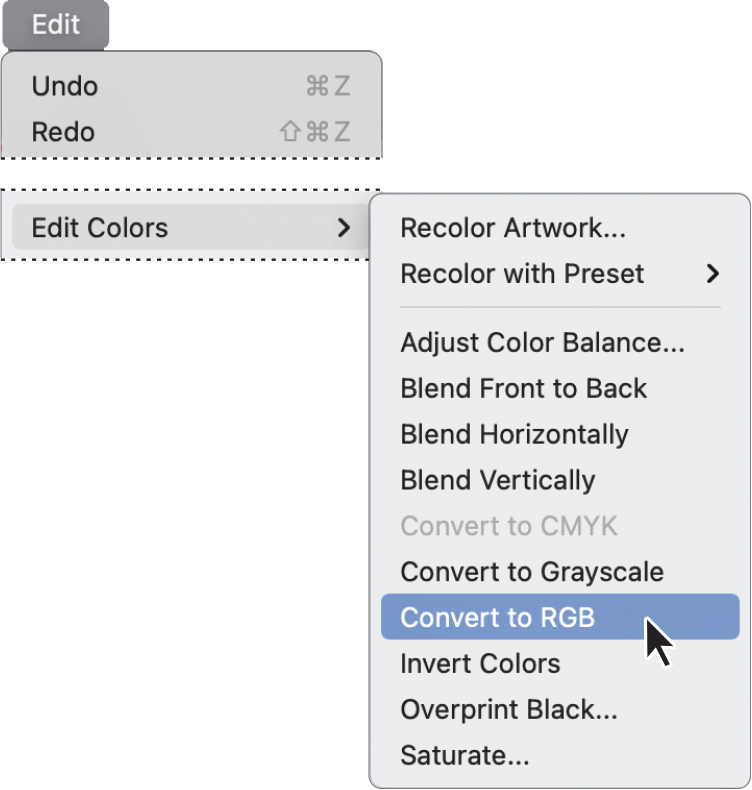
FIGURE 4.29 Converting a CMYK object to RGB
Choose Edit > Edit Colors > Convert to CMYK to convert RGB objects.
Tip
When the document color mode is changed, the embedded RGB objects are converted to CMYK automatically and vice versa.
Change objects to their inverse color
With the objects selected, do the following (Figure 4.30):
Make sure all selected objects are assigned process colors.
Choose Edit > Edit Colors > Invert Colors.

FIGURE 4.30 Inverting colors of selected objects
Change object colors to grayscale
With the objects selected, do the following (Figure 4.31):
Make sure all selected objects are assigned process colors.
Choose Edit > Edit Colors > Convert to Grayscale.

FIGURE 4.31 Converting the colors for selected objects to grayscale
Change the color saturation of objects
Do the following:
Select the objects you want to change and choose Edit > Edit Colors > Saturate.
In the dialog box, adjust the intensity and then click OK (Figure 4.32).

FIGURE 4.32 Desaturating selected objects
Change the color balance of objects
Do the following:
Select the objects you want to change and choose Edit > Edit Colors > Adjust Color Balance.
In the dialog box, adjust the color settings for the fill and/or stroke, and then click OK (Figure 4.33).

FIGURE 4.33 Adjusting the color balance for selected objects by increasing the green RGB value
Tip
Spot and global colors cannot be inverted or changed to grayscale.
Edit or recolor artwork
To open the Edit Colors / Recolor Artwork dialog box, do the following (Figure 4.34):
Select the objects you want to edit or recolor.
Choose Edit > Edit Colors > Recolor Artwork.
Adjust the color settings as needed using the options in the dialog box.

FIGURE 4.34 Recoloring selected objects
Tip
The dialog box name and appearance varies depending on how it is activated. These controls are also available in the Control panel, Color Guide panel, and Swatches panel (if a color group is selected).
![]() VIDEO 4.4
VIDEO 4.4
Using menus to apply color changes