
11. Channels
In this chapter, we start exploring concurrency in Go. We begin by discussing the difference between concurrency and parallelism. We cover goroutines—what they are and how they behave. Finally, we discuss channels and how they can be used to communicate between goroutines as well as control them.
Before we get too far into concurrency and channels, there are some quotes about them that may help guide you in their usage:
“I can’t tell you how many times I start with channels, and by the time I’m done, I’ve completely optimized them out.”
— Cory LaNou
“When I first learned about channels, I wanted to use them everywhere. Now, I rarely use them at all.”
— Mat Ryer
The preceding quotes are not intended to steer you away from using channels, but more to encourage you to think about whether you in fact need a channel. It is common for developers new to Go to overuse channels, which leads to unnecessary code complexity with no benefit to program performance.
Concurrency and Parallelism
According to Rob Pike, “concurrency1 is the composition of independently executing computations, and concurrency is not parallelism: concurrency is about dealing with lots of things at once but parallelism is about doing lots of things at once. Concurrency is about structure, parallelism is about execution, concurrency provides a way to structure a solution to solve a problem that may (but not necessarily) be parallelizable.”
Concurrency Is Not Parallelism
Concurrency is not parallelism, although it enables parallelism. The following statements explain the difference between concurrency and parallelism:
Concurrency is about dealing with a lot of things at once.
Parallelism is about doing a lot of things at once.
If you have only one processor, your program can still be concurrent, but it cannot be parallel.
If you have a single resource and multiple tasks, you can share your time across those tasks, thus working on all tasks concurrently. However, to work on all tasks in parallel, you need need more than one resource.
Understanding Concurrency
Consider the task of feeding a dog, as shown in Figure 11.1. The dog is hungry and needs to be fed, and the treats are in a box. To feed the dog, you need to open the box, take a treat out of the box, carry the treat in your hand, and then feed the dog the treat.

Figure 11.1 Feeding one dog, one treat, with one hand (Images: box courtesy of valdis torms/Shutterstock; hand courtesy of croisy/123RF; dog bone courtesy of doomu/123RF; puppy courtesy of Mhm Amin1/Shutterstock)
Adding Dogs
In Figure 11.2, a second dog also needs to be fed a treat. However, there is a resource constraint of just one hand. With one hand, you can only carry one treat at a time, and thus feed only one dog at a time.

Figure 11.2 Feeding two dogs, one treat, with one hand
To feed both dogs, you have to feed a treat to one dog and then take another treat from the box in your hand to feed a treat to the other dog. It’s important to note that because you can only feed one dog at a time, the other dog is waiting.
This is a concurrent operation.
Concurrency takes advantage of tasks in a “waiting” state. Instead of waiting for the first dog to finish the treat before going to the second dog and feeding it a treat, we immediately started the second dog on the task of eating a treat while the first dog was busy.
More Hands
The one-hand resource constraint can be lifted by using your other hand, as shown in Figure 11.3. With two hands, you can carry two treats at a time, and thus feed two dogs at a time. However, only one hand at a time can be placed into the box to retrieve a treat. This is a serial operation and requires the scheduling of one hand at a time to retrieve a treat.

Figure 11.3 Feeding two dogs, two treats, with two hands
Feeding the dogs is a concurrent, not parallel, operation. Even though there are enough hands to feed both dogs, only one hand can retrieve a treat at a time.
More Scenarios
If more treat boxes and dogs are added, as shown in Figure 11.4, there are still only two hands. Although this may allow for a faster concurrent operation (less waiting to get the treats because there is less contention with scheduling), there is always at least one dog waiting for a treat. This is one of many common design challenges that software engineers need to solve for when creating concurrent solutions.

Figure 11.4 Feeding multiple dogs, from multiple boxes, with two hands
Go’s Concurrency Model
In a lot of languages, concurrency is achieved through the use of creating heavyweight system processes,2 kernel threads, third-party libraries, or other means. There are mechanics for joining threads, managing threads, implementing thread interfaces, and more.
In Go, concurrency is built directly into the language without the need for third-party libraries, system processes, or kernel threads.
Goroutines
Go uses the coroutine3 model to achieve concurrency. In Go, these coroutine functions are called “goroutines.”
3. https://en.wikipedia.org/wiki/Coroutine
Simply put, a goroutine is an independent function launched by a go statement and capable of being run concurrently with other goroutines. See Listing 11.1 for examples of creating goroutines.
Listing 11.1 Examples of Launching Goroutines
A goroutine is NOT a system thread or process. It is a lightweight thread of execution that is managed by the Go runtime scheduler.
But if it helps you to think of a goroutine as a very cheap thread, you won’t be far off.
Goroutine Memory
Goroutines have their own memory call stack that starts with a small amount of memory and grows as needed. The amount of memory each goroutine starts with can change with releases based on changes to the Go runtime, garbage collector, and language.
Because goroutines are cheap and easy to use, it is not uncommon to have hundreds, thousands, or even millions of goroutines running at once.
The Go Scheduler
The scheduler in Go is responsible for distributing the runnable goroutines over multiple OS threads that run on one or more processors.
Goroutines are created in code and are then scheduled by the Go runtime scheduler (see Figure 11.5). The scheduler is then responsible for managing those goroutines across multiple OS threads.

Figure 11.5 The Go runtime scheduler
Work Sharing and Stealing
Go uses a dual model of “work sharing” and “work stealing”4 to manage goroutines.
4. https://en.wikipedia.org/wiki/Work_stealing
Work Sharing
With work sharing, the scheduler tries to distribute the work to the available processes, which makes better use of the available CPUs.
Listing 11.2 has an uneven distribution of goroutines across the CPUs. Work sharing makes sure that the goroutines are distributed evenly across the available CPUs, Listing 11.3.
Listing 11.2 CPU Load Before Work Sharing
Listing 11.3 CPU Load after Work Sharing
Work Stealing
Unlike work sharing, work stealing works from the other side of the scheduler. An underutilized process in the scheduler attempts to steal work from another process.
Listing 11.4 shows an uneven distribution of goroutines across the CPUs. Work stealing in Listing 11.5 steals work from the other CPUs to make the distribution even.
Listing 11.4 CPU Load before Work Stealing
Listing 11.5 CPU Load after Work Stealing
Don’t Worry about the Scheduler
Go offers little to developers in the way of managing, controlling, or tuning the scheduler. Each release of Go makes subtle, sometimes large, and sometimes unobvious changes to the scheduler and garbage collector. Because of this, there is little point to worrying about the inner workings of the scheduler on a daily basis.
The runtime5 package provides a number of functions that can be used to query and make small changes to the Go runtime. One of the most useful functions is runtime.GOMAXPROCS,6 Listing 11.6, which allows you to set the number of OS threads that the Go runtime will use.
6. https://pkg.go.dev/runtime#GOMAXPROCS
Listing 11.6 The runtime.GOMAXPROCS Function
Goroutine Example
Consider the program in Listing 11.7. This program should be familiar to you; it is a basic “Hello, World” program. The difference is that it uses a goroutine to print the message.
Listing 11.7 Using a Goroutine to Print Hello, World!
When this code is run, Listing 11.8, no message is printed out. The reason is that before the scheduler has a chance to run the goroutine, the program has exited. Later in Chapter 13, we explain how to prevent premature exiting from a program before the scheduler has a chance to run its goroutines. We also discuss how to let your running goroutines know when it is time for them to stop.
Listing 11.8 The Goroutine Was Never Run
Communicating with Channels
Channels are used in Go as a conduit to communicate between goroutines. This section covers basic channel usage along with the corresponding patterns for each. We explain the difference between a buffered and unbuffered channel and when to use them. We also discuss how to use channels for signaling for concepts such as graceful application shutdown. Finally, we demonstrate how to spot common concurrency pitfalls and how to properly structure your concurrent code to avoid them.
What Are Channels?
Channels are a typed conduit through which you can send and receive values. All channels have the following characteristics:
They are typed. You can only send and receive values of the same type. For example, you can’t send a string and an int over the same channel.
The values are transmitted/received in a synchronous manner. The sender and receiver must wait for the other to finish before sending or receiving.
The values are transmitted/received in a FIFO (first in, first out) manner. The first value sent is the first value received.
They are either unbuffered or buffered. A buffered channel holds a limited number of values. When the channel is full, the sender blocks until a value is received. When the channel is empty, the receiver blocks until a value is sent.
They are directional. Channels can either be bidirectional or unidirectional. You can use a bidirectional channel to send and receive values. You can use a unidirectional channel only to send or receive values.
Understanding Channel Blocking/Unblocking
To understand channels, you need to understand when they block and when they unblock. Consider the idea of making a phone call. When you call someone, you are blocked until they answer the call. Once connected, you are unblocked and can start bidirectional communication—in this case, audio can now be exchanged back and forth between you and the person you are calling. The channel type would be audio, and you would not be able to pass each other a fruit over the phone line.
Figure 11.6 shows the caller is blocked until the receiver picks up the call. Once the receiver picks up the phone, the call is unblocked, and bidirectional communication can start. In this scenario, a phone call is a bidirectional and unbuffered channel. The caller and receiver are both blocked until the other unblocks them. Finally, the channel would have a type of audio. To reiterate, a phone call has the following characteristics:
A bidirectional channel
An unbuffered channel
Type of
audio
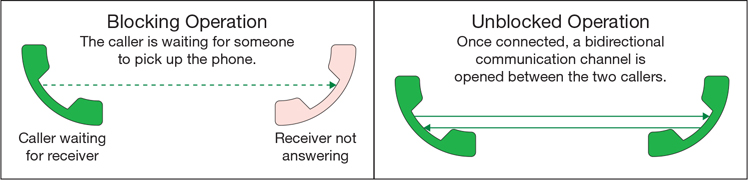
Figure 11.6 Blocking and unblocking for a telephone call
Creating Channels
Channels are indicated by the chan keyword followed by the type of the channel. For example, chan string indicates a channel of strings, chan int indicates a channel of integers, and so on.
New channels are created with the built-in make function, Listing 11.9. For example, make(chan string) creates a channel of strings.
Listing 11.9 The make Function
Sending and Receiving Values
In Go, the <- operator is used to indicate sending or receiving information on a channel. At first, it can be difficult to remember where the arrow goes and what the arrow indicates.
When working with channels, the arrow (as shown in Listing 11.10) points in the direction in which the data is traveling in regard to the channel.
Listing 11.10 Arrows Indicating Sending and Receiving Data
Consider the code in Listing 11.11. The first line blocks trying to send Hello, Janis! to the phone channel: phone <- "Hello, Janis!". This line only unblocks when someone else is ready to receive the message. Once the message is sent and received, the application is unblocked and may continue to run.
The second line blocks trying to receive a message from the phone channel: msg := <-phone. This line only unblocks when someone else is ready to send the message. Once the message is sent and received, the application is unblocked and may continue to run.
Listing 11.11 A Simple Example of Blocking and Unblocking
A Simple Channel Example
Consider the example in Listing 11.12. In this example, the Janis function is running as a goroutine. Because it is in a goroutine, it can be blocked waiting to send/receive messages on a channel and without impacting the main function.
Listing 11.12 A Simple Example of a Channel
If we stop using a goroutine for the Janis function and instead run the function serially in the main function, as in Listing 11.13, the application would deadlock and crash. This is because the Janis function is blocking waiting for a message on the phone channel, but the main function is unable to send a message on the phone channel because Janis is blocked.
Listing 11.13 Deadlock Caused by a Channel That Can’t Be Unblocked
Ranging over a Channel
Often you will want to keep listening for messages on a channel until the channel is closed. You can do this with an infinite loop, but the more appropriate way is to use a for range loop, Listing 11.14. When the channel is closed, the range loop stops iterating, and the listener function returns. We discuss closing channels in more detail shortly.
Listing 11.14 A Simple Example of a range Loop
Listening to Channels with select
When writing concurrent applications, it is often useful to listen to multiple channels at the same time. For example, an employee might need to listen to multiple channels at the same time, such as to receive work from their boss or be told that it is time to stop. The select statement lets a goroutine wait on multiple channels and respond to the first channel that is ready.
Consider the old telephone, such as the one in Figure 11.7. The telephone operator waits for incoming calls into the switchboard. When a call comes in, the operator answers the call and redirects the call to the appropriate destination. The operator then goes back to waiting for the next incoming call and so on.

Figure 11.7 A telephone switchboard (Photo courtesy of Everett Collection/Shutterstock)
Using select Statements
The select statement lets a goroutine wait on multiple channels and respond to the first channel that is ready. The select statement blocks until one of the channels is ready. Once it is ready, the select statement executes the corresponding case, and the select statement exits. Because the select can be run only once, it is often wrapped inside of an infinite for loop to rerun the select statement after every case is executed.
Consider Listing 11.15. The operator function takes three different channels as arguments. The select statement listens to each channel and responds to the first channel that is ready.
Listing 11.15 An Example of a select Statement
Channels Are Not Message Queues
Only one goroutine receives a message sent down a channel. If multiple goroutines are listening to a channel, only one receives that message.
It is also possible, and likely, that one goroutine receives more messages than another goroutine. For example, in Listing 11.16, the goroutine with the ID of 0 is receiving half of the total messages being sent.
Listing 11.16 Messages Are Pulled off a Channel by the First Goroutine to Read from It
Unidirectional Channels
By default, channels are bidirectional, meaning you can both send and receive data from the channel.
A common use for unidirectional channels is when you are passing a channel as an argument or receiving a channel as a return value. This allows for control of the channel for the function/method and prevents outside callers from polluting the channel.
The standard library does this in the time package with methods like time.Ticker, Listing 11.17.
Listing 11.17 The time.Ticker Function
Understanding Unidirectional Channels
Consider Listing 11.18. The Newspaper contains a bidirectional channel, headlines chan string, as a field. It also exposes two methods: TopHeadlines and ReportStory.
Listing 11.18 The Newspaper Type
The TopHeadlines method returns a read-only version of the headlines channel that can be consumed by newspaper readers.
The ReportStory method returns a write-only version of the headlines channel that can be used by newspaper reporters to report their stories to the newspaper.
In both cases, Go casts the bidirectional channel, headlines, to the appropriate unidirectional channel returned by the method.
Closing Channels
As we have previously mentioned, when a message is sent to a channel, only one receiver can pull that message off the channel. Channels do not provide a “fan-out” type of functionality where many receivers can pull the same message off of a channel.
The exception to this rule is when a channel is closed. When a channel is closed, all receivers are notified that the channel is closed. This can be exploited to signal to many listeners (goroutines) that it is time to stop what they’re doing.
Consider Listing 11.19. The listener function takes a <-chan struct{} as the last argument, quit. The function listens for a signal on the quit channel, which is a blocking operation. When the quit channel is closed elsewhere, the listener function exits.
Listing 11.19 The Listener Function
In Listing 11.20, we create a chan struct{} named quit. Then we create a handful of goroutines for the listener function passing it the loop index and the quit channel.
Listing 11.20 The main Function
We sleep shortly to allow the listener goroutines to start and listen to the quit channel. Then we close the quit channel: close(quit). Finally, we sleep again to allow the listener goroutines to exit.
Detecting Closed Channels on Read
When listening to a channel, it can often be useful to know if the channel is closed or not. Like we’ve seen with type assertions and map key assertions, we can use the magic ok value to check whether a channel is closed.
In Listing 11.21, we ask for not just the incoming message from the channel but also the second boolean argument ok, which is true if the channel is open and false if it is closed.
Listing 11.21 Reading from a Closed Channel
Zero Value on Closed Read
When reading from a channel that has been closed, we get the zero value of the channel’s type returned, Listing 11.22. This is similar to when we ask for a map key that doesn’t exist, and we get back the zero value of the map’s value type.
Listing 11.22 Returning a Zero Value When Reading a Closed Channel
In Listing 11.23, by checking whether the channel is closed, we can avoid the zero value and take appropriate action.
Listing 11.23 No Zero Value Returned When Reading a Closed Channel
Closing an Already-Closed Channel
Care must be taken when closing a channel. If the channel has already been closed, a panic is raised, and the application crashes, as in Listing 11.24.
Listing 11.24 Panicking When Closing an Already-Closed Channel
Later in Chapter 13, we discuss different synchronization primitives that can be used to help prevent this sort of situation.
Writing to a Closed Channel
If you attempt to write to a closed channel, as in Listing 11.25, a panic is raised, and the application crashes. Unfortunately, there is no way to check whether the channel is closed before writing. With proper synchronization, good architecture, and solid tests, you can prevent this situation.
Listing 11.25 Panicking When Writing to a Closed Channel
Buffered Channels
By default, channels are unbuffered. Someone trying to send a message down a channel blocks until someone else is ready to receive the message. A buffered channel, however, is a channel that can hold N messages before writing to the channel blocks.
Consider a phone call that results in a voicemail, as in Figure 11.8. It’s a buffered operation. The caller isn’t blocked waiting for the recipient to pick up the phone. The caller can leave a voicemail message, and the recipient can retrieve the message later. The size of the buffer is dependent on the number of messages that can be held in memory.
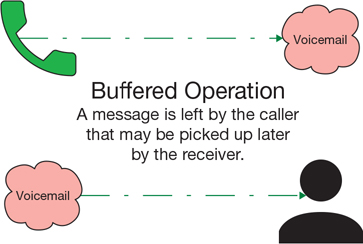
Figure 11.8 Leaving a voicemail is a buffered operation.
Basic Buffered Channel Example
With slices, you have seen that you can use the make function to create a slice of a particular length. make([]int, 10) creates a slice of 10 integers.
To create a buffered channel, you use the make function with a second argument, just as with slices. In Listing 11.26, we are creating a buffered channel of strings: make(chan string, 2).
Listing 11.26 A Buffered Channel Example
If we were to try to write a third message into the channel before it has had a chance to be read, the program would block. In the case of Listing 11.26, because it is impossible for someone to read the message, the application crashes with a deadlock, as in Listing 11.27.
Listing 11.27 A Deadlock Caused by Trying to Write to a Channel When No One Can Read from It
Buffered Channel and Delivery
Use buffered channels cautiously. They do not guarantee delivery of the message. It is your responsibility to ensure a channel is drained before exiting a routine.
Consider Listing 11.28. The goroutine is able to write two messages into the queue before blocking. The main function blocks and waits for the first message in the channel and then exits. The second message is never read. In fact, the goroutine has had the opportunity to write one more message into the channel before the program exits.
Listing 11.28 A Failure to Drain a Buffered Channel
Reading from Closed Buffered Channels
If a buffered channel is closed but still has messages in it, those messages can still be read from the channel until it is empty, as in Listing 11.29. You can’t, however, continue to write to the closed channel.
Listing 11.29 Reading from a Closed Buffered Channel
Capturing System Signals with Channels
All programs should attempt a graceful shutdown. This means that instead of crashing or exiting an application before resources are released, the application should instead wait for the resources to be released. The following list covers the rules for graceful shutdown:
Detecting that the program was requested to shut down
Shutting down all internal processes, including long-running goroutines
Having a reasonable timeout in the event that internal processes are taking too long to shut down or are deadlocked
Responding to an actual user request for immediate hard shutdown
Recording the result of the shutdown (success, timeout, user intervention)
The os/signals Package
Using channels and the os/signal7 package, you can capture system signals and respond accordingly. The signal.Notify8 function in Listing 11.30 allows you to register a channel to receive notifications of os.Signal,9 Listing 11.31.
7. https://pkg.go.dev/os/signal
8. https://pkg.go.dev/os/signal#Notify
9. https://pkg.go.dev/os#Signal
Listing 11.30 The signal.Notify Function
Listing 11.31 The os.Signal Type
In Listing 11.32, we register a channel, ch, to listen for os.Interrupt10 with signal.Notify.
10. https://pkg.go.dev/os#Interrupt
Listing 11.32 Listening for os.Interrupt
Implementing Graceful Shutdown
Consider Listing 11.33. It creates a new Monitor and starts the monitor in a goroutine, giving it a quit channel to listen for shutdown. The application runs for a bit and then closes the quit channel.
Listing 11.33 An Application without Graceful Shutdown
In Listing 11.34, the Monitor listens to both the quit channel and a ticker channel that sends the time down the channel at the set interval. If a tick is received, a message is printed, and the for loop and select statement go back to listen to the two channels. If the quit channel is closed, the function returns.
Listing 11.34 Listening to Multiple Channels with a Select Statement
If we were to interrupt the program in Listing 11.33, then in Listing 11.35, you would see that the Monitor was never shut down properly.
Listing 11.35 Output from Interrupting Listing 11.34
Listening for System Signals
The first step in implementing graceful shutdown is to listen for system signals. In Listing 11.36, update the main function to listen for the Interrupt signal on a new channel, sig. Finally, instead of the application sleeping for a while, we can listen for the Interrupt signal on the sig channel and respond accordingly.
Listing 11.36 Listening for os.Interrupt
From the output in Listing 11.37, you can see that the Monitor was still not properly shut down.
Listing 11.37 Output from Interrupting Listing 11.36
The reason that the monitor was not shut down properly is because we didn’t give the Monitor goroutine enough time to shut down gracefully.
Listening for Shutdown Confirmation
To ensure that the Monitor was shut down properly, the Monitor has to provide the main function with a way of receiving confirmation that the Monitor was shut down.
You can update the Monitor to have an internal done chan struct{} channel, as in Listing 11.38. The Monitor also exposes a Done method that returns a read-only channel that closes when the Monitor has properly shut down.
Listing 11.38 The Monitor with the done Channel
In the main function in Listing 11.39, after we close the quit channel, close(quit), we can block and wait for the <-mon.Done() channel to be closed. This happens when the Monitor has properly shut down.
Listing 11.39 Listening for Shutdown Confirmation
Now, when you look at the output in Listing 11.40, you can see that the Monitor was shut down properly, and the application shut down gracefully.
Listing 11.40 Output from Interrupting Listing 11.39
Timing Out a Nonresponsive Shutdown
Occasionally, the resources you are waiting on to shut down properly fail to respond and cause the application to hang indefinitely. The user is then required to manually force the application to stop. To prevent this from happening, you can use a timeout.
In Listing 11.41, we update the main function to no longer wait for the <-mon.Done() channel to be closed before exiting. Now, the main uses a select statement to listen for the <-mon.Done() channel and a <-time.After(timeout) channel. If the <-mon.Done() channel is closed before the timeout, the application gracefully shuts down.
Listing 11.41 Listening for Shutdown Confirmation
As you can see from the output in Listing 11.42, if the Monitor does not shut down within the specified timeout period, the application exits with an error.
Listing 11.42 Output from Interrupting Listing 11.41
Summary
In this chapter, we started to explore concurrency in Go with channels. We explained the differences between parallelism and concurrency and how to use goroutines and channels to achieve concurrency. We discussed channels and how they can be used to communicate between, and control, goroutines. We pointed out the differences between buffered and unbuffered channels and when each one blocks and unblocks. Finally, we showed you how you can use channels to listen for system signals so you can gracefully shut down your applications.