![]() Splines can wrangle you, or you can wrangle them. Not into being wrangled? Keep reading! (And I just won a bet to use “wrangle” in a caption three times.)
Splines can wrangle you, or you can wrangle them. Not into being wrangled? Keep reading! (And I just won a bet to use “wrangle” in a caption three times.)
2
Splines
SPLINE CURVES, or just “splines” (or even just “curves”), are the lifeblood of computer animation. They're a surprisingly efficient and comprehensive method of representing motion. Much of your time animating will be spent perusing these little red, blue, and green intertwined curves, so it makes sense to get comfortable with them. This chapter is all about facilitating your comfort.
Opening the Graph editor to what looks like a spaghetti dinner gone bad can be intimidating, but we'll make understanding splines a quick study. We'll go through the simple concepts that make reading them easy and powerful. Then we'll try out some cheats on editing splines that will have you wrangling them under control in no time. Get ready to meet your new best friends in animation!
How Splines Work
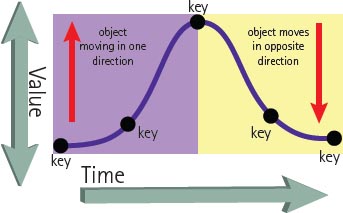
U NDERSTANDING HOW SPLINES display their information is the key to making them work for you. Some beginner animators are intimidated when they see all those intertwined curves, but the concepts behind them are really quite straightforward. It takes a little practice to make it second nature, but only a few moments to really grasp the concepts we'll go over in this cheat. In no time, you will find that they are a surprisingly elegant way of working with your animation, and understanding them thoroughly will quickly create a noticeable improvement in your work. The main idea with splines is that they represent changes in value over time. As the curve travels to the right, frames are ticking by. As the curve rises and falls, it's an increase (travelling up) or decrease (travelling down) in the value of the attribute. If the curve changes direction, as it does at the middle key in the following diagram, the object it represents will change direction. The thing to remember, and where it's easy to get confused, is that up and down do not necessarily correspond to up and down for what you are seeing in the viewport. That may seem counterintuitive at first, but it has to do with how the character rig is set up and there are many possible scenarios with that. For some attributes, like translate Y, the curve will actually look like what the body part is doing, but most don't. The thing to take from this cheat is that up and down are simply changes in value, not a direct visual correlation to what you see in the viewport.
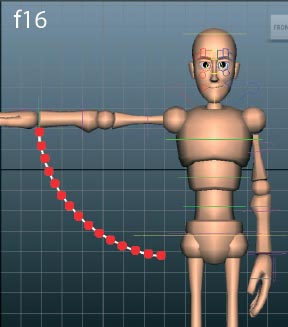
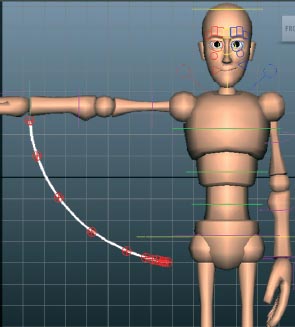
1 Open HowSplinesWork.ma. From f01-f16 the character is raising his arm. Take note of how even the movement is. Every frame, the arm moves the same amount.
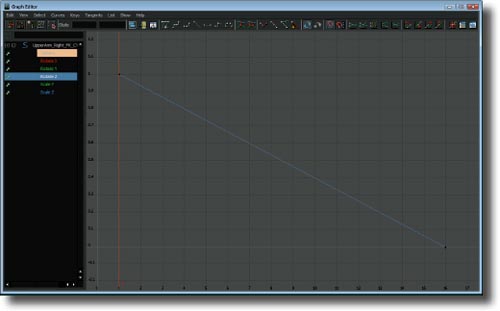
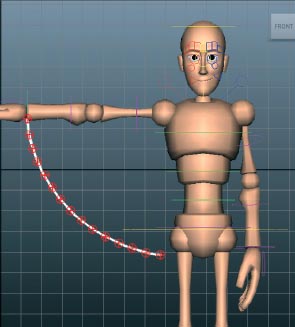
2 Open the Graph Editor and look at the upper arm's rotate Z curve. Notice that it's a perfectly straight line. This corresponds to the even spacing of the motion we see in the viewport.

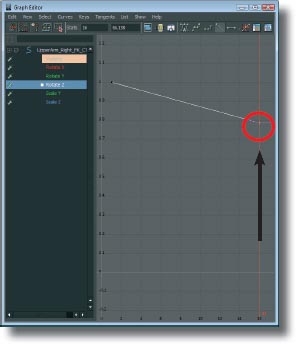
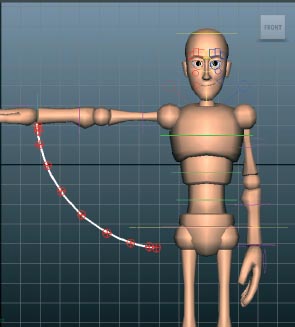
3 If I plot each frame along the curve, we see that they are all equidistant, just like the spacing tracked in the viewport. (Some curve colors in this chapter were changed in Photoshop for better clarity on the page.)

4 Also notice that the curve is travelling downward while his arm is rising. Remember that we said the up-down in curve direction is simply a change in value, not a direct representation of the viewport.

HowSplinesWork.ma
When you first start working with splines, one of the best things to do is have both a viewport and Graph Editor open. Instead of manipulating the character with the tools or channel box, move the keys in the Graph Editor and observe how it affects the character. Then do the opposite, moving the character in the viewport and observing the changes in the splines. This will help you learn how everything correlates.
5 Select the upper arm control and rotate it in Z while watching the channel box value. Notice that rotating the arm up makes rotate Z increase in negative value. This has to do with how this particular character was rigged and is why the curve travels down, since down represents an increase in negative value in this case.
6 In the Graph Editor, select the key at f16. Use the move tool ![]() and
and ![]() MM drag it up. Shift dragging with the move tool will constrain movement to either horizontal or vertical motion, whichever you do first.
MM drag it up. Shift dragging with the move tool will constrain movement to either horizontal or vertical motion, whichever you do first.

7 Since the curve travels downward a much shorter distance, therefore increasing negative value only a little, his arm now moves up only a short distance. Tracking the motion shows us how much tighter the spacing is.

8 Continue making adjustments to the keys in the curve and watching the animation until you're comfortable with the concepts. Here I switched the positions of the keys and now he does the opposite motion.

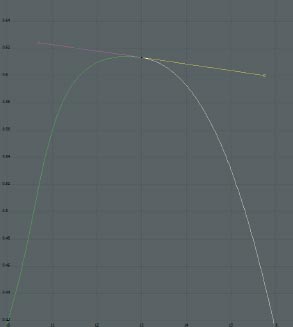
9 Hold ![]() and middle click the curve at f08 to insert a key. Select the entire curve and press the flat tangents button. Then use the move tool to MM drag f08's key down and f16's up to look like the graph above.
and middle click the curve at f08 to insert a key. Select the entire curve and press the flat tangents button. Then use the move tool to MM drag f08's key down and f16's up to look like the graph above.

10 From f01-f08 the arm travels up. When the curve changes direction, the arm travels back down.
Every character can be rigged differently. While rotating this one's arm up in Z increases the negative value of the attribute, another could increase the positive. That's why it's important to get a grasp on up-down simply representing value, not direction.
Splines and Spacing
LET'S TAKE A MORE IN-DEPTH look at how changes in our spline curves affect the spacing of a motion. If the curve's direction over a given range of frames is mainly horizontal, the value is not changing much. Therefore the attribute will be moving very little in the viewport.

If the direction over the frame range is predominantly vertical, a larger change in value is happening and the movement will be large.

Finally, if the curve is perfectly horizontal for a frame range, that curve's attribute will hold perfectly still, as there is no change in value. We'll try some things in this cheat that will make these ideas perfectly clear.
Throughout this cheat, we'll make some pretty stark changes in the speed of the movement while never changing the number of frames it happens over (timing). Timing and spacing are intertwined, but problems in spacing tend to be less forgiving than the number of frames you're using.
1 Open TimingSpacing.ma. We'll start with the upper arm moving up with linear, even spacing. Open the graph editor and select the R upper arm's rotate Z curve.
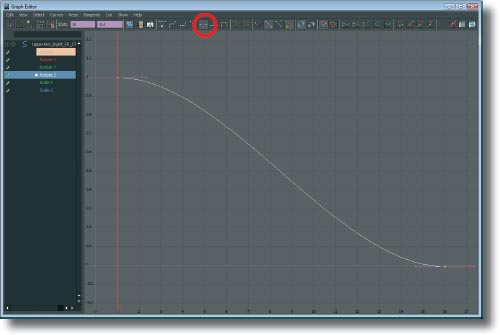
2 Select the entire curve and press the flat tangents button. The curve's shape will change from a straight line to a smooth “S” shape.

3 Play the animation and notice how the movement is much smoother. There is an ease out when the arm starts moving, and an ease in to where it stops.
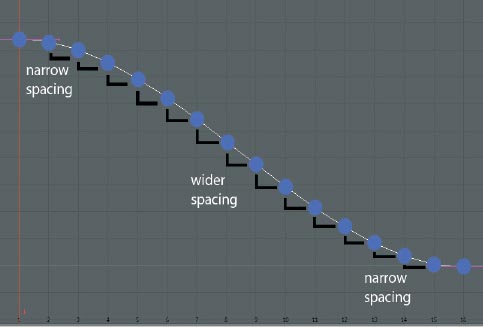
4 Plotting the spacing on the rotate Z curve shows how the curve's spacing corresponds to what we see in the viewport. The arm moves shorter distances in the beginning and end, and longer distances in the middle.

TimingSpacing.ma
To track the spacing of a movement, many animators use dry erase markers right on their monitor. If your monitor is an LCD, put clear plastic over it to avoid staining the screen, and press very gently. CRT monitors should be fine as-is, since they have glass screens.
5 Go to frame 10 and set a key on the R upper arm. Select the key you just set in the Graph Editor and click the AutoTangent button if the curve is not smooth. This will keep that key's tangents smooth no matter where you move it.
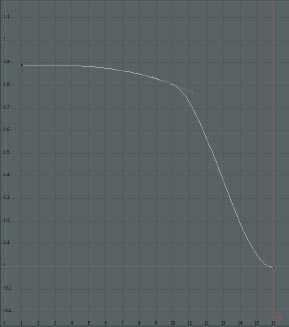
6Use the move tool ![]() and
and ![]() MM drag the key up so it's a little under the value of the first key.
MM drag the key up so it's a little under the value of the first key.
7 Play the animation and notice how much we've affected it. The arm moves very little during the first 10 frames since the spacing is so close. The value changes very little until f11, where the wide change makes it move quickly.
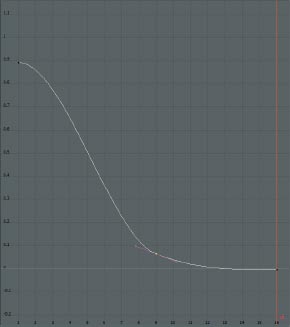
8 Edit the key at f10 so it's close to the value of the end key.
9 Now the opposite happens, with the arm moving quickly at the beginning, and easing into the end pose more gradually.

10 Select the last key at f16 and look at the value field. In my case it's -0.4.
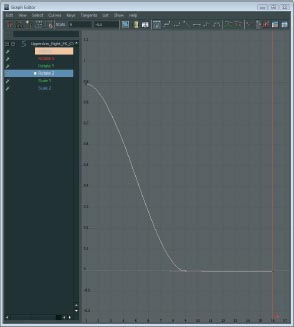
11 Select the key at f10 and enter the value of f16's key into the field to make it the same. Since we set this key to AutoTangent, it will automatically become flat. This will ensure that the curve holds at the same value through those frames.

12 Now the arm travels with an ease out and ease in from f01-f10, but holds still until f16. Since there is no change in the up or down of the curve while the frames tick by, the arm holds still.
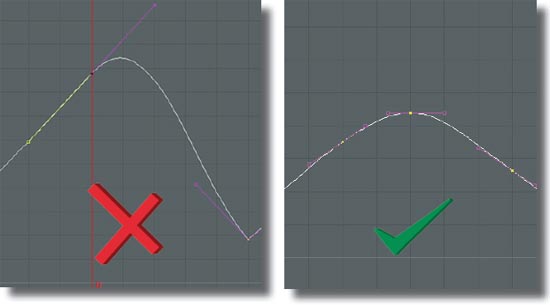
We'll go over spline technique in later cheats, but it's good practice to avoid letting curves drift past the value of a key where it changes direction, like in step 11. Curves that do this are much more trouble to edit predictably.
Tangent Types
TANGENTS AND THE STYLES AVAILABLE in Maya are the other side of understanding splines. If you've used graphics programs like Illustrator, tangents will be familiar to you. They're the handles that exist around a keyframe and are used to adjust the curve's angle and direction before and after the key. As we've just seen in the previous cheats, the curve's slopes have a profound effect on the animation's spacing, so having a solid grasp on how tangents work is invaluable.
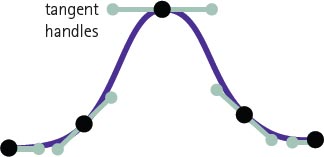
Maya has several different tangent types, which are really just preset angles for the handles (albeit useful ones). The handles are completely customizable, and Maya's tangent types are mostly a starting point. Using only the “out-of-the-box” tangent types tends to make the motion look very “CG” and uninteresting. However, knowing which ones will bring you most of the way to your desired result will go a long way towards speeding up your workflow.
Here we'll take a look at Maya's tangent types and what sort of situations they're best for. The icon with the “A” over it is the AutoTangent function, which is a great time saver. This isn't a tangent type per se, it's a setting that will adjust your keys' tangents automatically depending on their location. Keys at the extremes (wherever a change in curve direction happens) will be flat, while transitional keys (keys where the curve is the same direction on both sides) will be smooth. As you edit the keys, the tangents will automatically orient to whatever situation they're in. Awesome!

1 The tangent type icons are along the top of the Graph Editor. Simply select any or all keys and click whichever type you need. The first icon (with the “A”) will enable the AutoTangent functionality for the selected keys and/or curves.
2 Open TangentTypes.ma. In the front view we have a very basic animation of a ball moving in an arc.
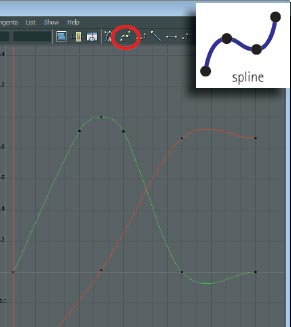
3 Select the ball control (Show > Nurbs Curves in the viewport menu if you don't see it) and open the Graph Editor. Select all the curves and click the spline tangents button. Notice how the ends of the curves become straight.

4 Spline tangents make a smooth transition between keys and don't flatten out. They're great for keys that are transitional (going the same direction each side of the key), but with extremes (keys at which the curve changes direction) they can overshoot, which is difficult to control.
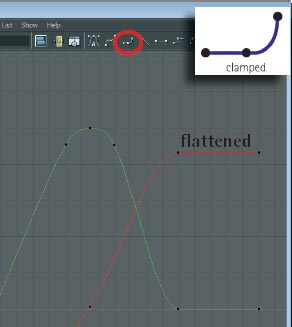
5 Select all the curves and press the clamped tangents button. Clamped are almost the same as spline tangents, except they will not overshoot on adjacent keys that are the same value or very close in value. Notice that the overshoots from before are now flat.
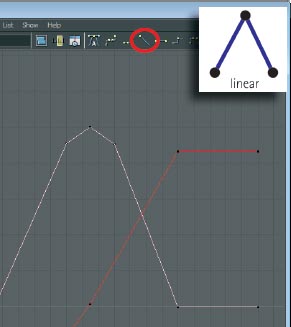
6 Next press the linear tangents button. Linear tangents simply make a straight line from key to key and therefore make very sharp angles and transitions.

TangentTypes.ma
Once you're refining an animation, you usually won't use one tangent type for all keys, but rather the appropriate type for the particular key and situation you're working on.
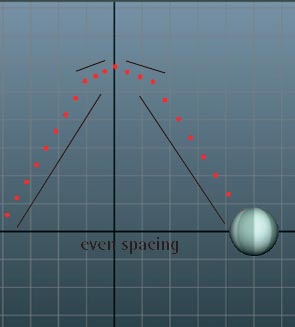
7 Notice the spacing in the path of the ball is even between each key. Linear tangents are good for times when an object is traveling and then impacts another object at full momentum, such as when a ball hits the ground.

8 Next are flat tangents, which make a plateau at each key. They're common at the extreme keys, where a curve is changing direction, easing in and out of the key. In transitional keys, they will make the object slow down in mid path.
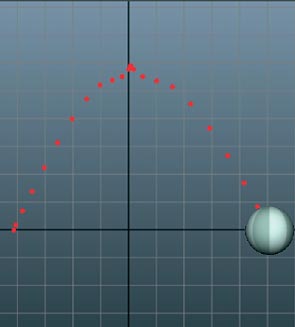
9 Notice the spacing on the ball easing out of and into each key. Flat tangents are a good starting point for keys you want ease outs and ins on. They will also hold flat through keys of the same value and never overshoot.

10 Next are stepped keys, which do not interpolate at all. They will hold still until the next key frame. Because of this they create these stair-like keys.

11 We see here that the ball pops to each position when it gets to that frame. Stepped keys are most commonly used for blocking in full animations, and for attributes that need to change over a single frame, like IK/FK switching or visibility.

12 Finally we have plateau tangents, which are almost identical to clamped in that they won't overshoot, and will flatten out extreme keys. The main difference is that they also flatten the start and end of the curve as well.
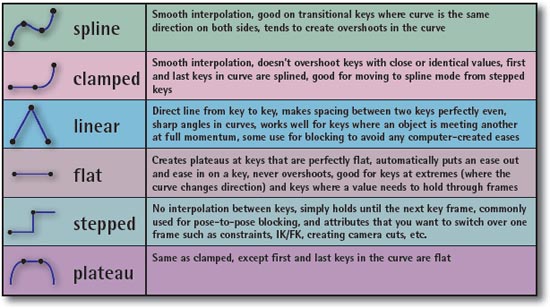
13 To recap, here's a chart of some common uses for different tangent types. To reiterate, these are just starting points that may be helpful, and not rules by any means. AutoTangent isn't a tangent type, but rather an automation function. It basically sets keys to spline or flat tangents dynamically as you edit key frames, depending on the situation. Keys at extremes (where the curve changes direction) are made flat, while transitional keys (where the curve continues in the same direction) are smoothed to a spline tangent.
Plateau, clamped, or auto tangents are the best all-around choice when you're moving out of stepped blocking into splined curves. They're a great starting point since you don't have to worry about cleaning up overshoots, and manually making transitional keys spline and extreme keys flat.
Tangent Handles
NOW THAT WE HAVE A GOOD UNDERSTANDING of Maya's tangent types, we can look at customizing the handles to create any type of curve we want. Maya's tangent handles offer the most flexibility of any animation/graphics program, so we should obviously take advantage of this power. Keep thinking about the spacing you want for your animation, then how a spline should look when it has that spacing, and use the handles to make it happen.

There are two types of tangent handles: weighted, and non-weighted. We'll go over them in this cheat, but they're really just styles of working and all up to preference in the end. Everything we talk about here is simply a way to get differing levels of control using the tangent handles. Note that I didn't say more control! Any curve shape you can get using handles you can also get by using more keyframes. At the end of the day, it's up to you and how you like working, so experiment with everything. My philosophy is it's best to get a handle (ahem) on all of the tools available, and then pick the best one for the job at hand.

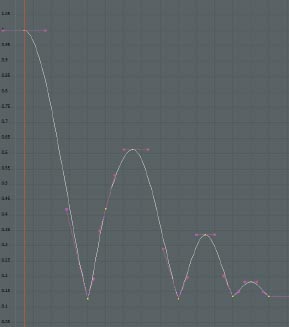
1 Open TangentHandles.ma and you'll find a simple bouncing ball animation. Select the ball control and open the Graph Editor.
2 Select the translate Y curve and examine the tangent handles. They are currently non-weighted handles, which means they are all the same relative length and have the same amount of influence on a curve.

3 Select the move tool ![]() and select any handle. MM drag it to rotate it. These handles are unified, which means they are attached and act as a single piece when moving either of them.
and select any handle. MM drag it to rotate it. These handles are unified, which means they are attached and act as a single piece when moving either of them.
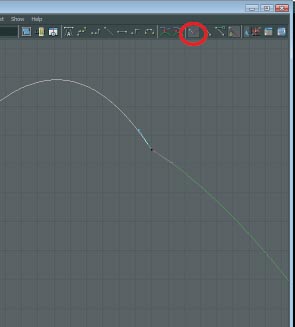
4 Select a handle and press the break tangents button. The left handle will turn blue, indicating it is now independent and you can drag select and then move the handles individually to get any curve shape you want.
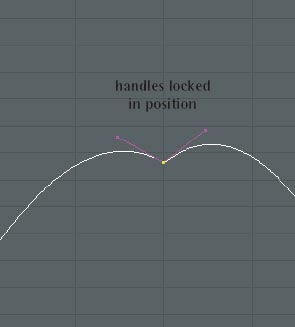
5 You can break tangents, position them, and then press the unify tangents button to lock them in that shape. They will then rotate as a single unit again. You may get erratic curve behavior if you do this with a very sharp angle, however.

6 Undo all your edits and select the entire translate Y curve. In the Graph Editor, go to Curves > Weighted Tangents and the handles will change.

TangentHandles.ma
As powerful as tangent handles can be, they do add another layer of complexity to your spline editing. Don't break handles or free their weights needlessly. Using the simplest solution is always the best.
7 Weighted tangents have differing lengths which depend on the distance in terms of value between the keyframes. The longer the distance, the longer the handle, and the more influence it will have along the curve.

8 You can break and manipulate the handles just like you can with non-weighted tangents, but you have an additional option with weighted tangents. Select a key and click the free tangent weight button.
9 The ends will turn into open squares indicating free weights. You can now use the move tool and make the tangents any length you wish, increasing or decreasing the amount of influence they have on the curve.

10 You can even break the tangent handles as we did before to create any shape of curve possible.

11 Continue to experiment with the tangent handles and learn how to use them to create the spacing you want.
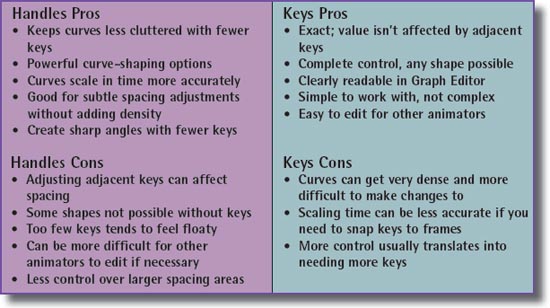
12 Remember that using handles is just another way to approach animating, not something you need to do or should never do (depending on who you talk to). Some animators never use tangents and only set keys, others use broken weighted handles all the time, but many use both methods when necessary. It's up to you in the end, but here are some factors to consider with the various methods. Ultimately, choosing the best approach for the task at hand will ensure that everything stays as simple as possible.
If you're new to animation, it may be a good idea to hold off on a lot of tangent handle weighting and breaking. Once you learn to control the animation using only keys, it will be much easier to understand what the handles are doing to the spacing.
Spline Technique
Y OU NOW HAVE a good grasp of the capabilities splines have and how you can approach using them, so let's go over some things that can tighten up your spline workflow. We're all about making things easier here, and there are a few tendencies splines have which can sabotage that. Having good spline technique means you have control, and that means you're making the animation look the way you want, not the way the computer happens to do it.
As I've said before, none of these things are really rules and there will be situations where actually doing them may be the best approach. But those are the exceptions and for general guidelines, especially if you're still becoming acclimated to splines, this cheat will go a long way towards helping you get ahead.
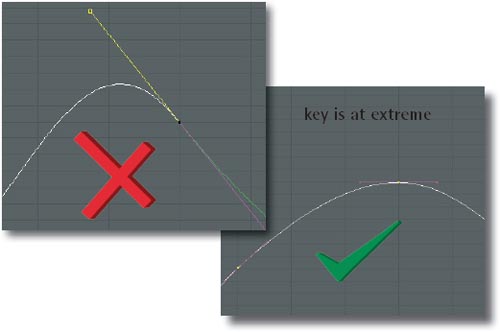
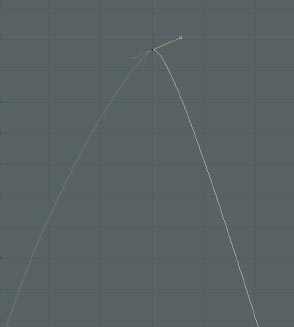
1 Open SplineTechnique.ma and select the ball's move control. Look at the translate Y curve at f12. F13 is the extreme key, but the tangents are making f12 a higher value, also known as an overshoot. Use flat or linear tangents at extremes and adjust the eases to what you need.
2 At f21, there's another type of overshoot, where the curve was shaped this way purposely with tangent handles. While this may look fine in the viewport, it's definitely not the best way. When the extremes have keys representing them, it makes things clear, easy to edit, and the values can't be changed without us knowing. With any kind of overshoot, moving an adjacent keyframe or handle can change where your extreme is. As much as we all love Maya, we don't want it making these kinds of decisions for us!

3 Look at the translate X curve. Often when setting keys on all controls, we can get a lot of redundant keys. Splining can turn these curves into a wobbly mess. Only use the number of keys you need and make sure the tangents are the way you want them. Too many keys makes changes very difficult. Since this curve should be a smooth translation, we can delete almost all of these keys.

4 Look at f24-f28 on the Rotate Z curve. Extreme angles are sometimes necessary, but if you need sharp angles, you're better off using keys rather than handles. Handles change when you shift keys around, but keys will always hold their value. It's good to avoid even one-frame glitches, like f27-f28, that aren't seen in the viewport. Some studios use motion blur in between the frames which will give strange results at render time with curves like this. This can actually be used to make motion blur look the way the animator wants, but unless this is intentional, don't do it!

SplineTechnique.ma
As awesome as the new AutoTangent functionality is, don't let it make you lazy! In the end it's still spacing and slow ins or outs generated by a computer algorithm. It will get your curves closer to what you want with less work, but you still need to maintain control of what the computer is doing. Finely calibrated curves are the mark of a great animator.
Spline Reference
W E'VE SEEN THAT SPLINES are simple tools, yet capable of describing any movement with pinpoint accuracy. It takes some practice to make looking at them second nature, and as you keep animating, you'll get better at reading them. One thing many beginning animators don't realize at first is that reading splines is just recognizing common shapes. An ease in will always look pretty much the same as far as the general spline shape goes. The size and angle of the shape will simply determine how big (or small) of an ease in it is. You know when a circle is a circle regardless of how large or small it is. It's really the same idea.
The file for this cheat, SplineReference.ma, contains six spline shape examples that you can use as a reference for common animation spacings. Every 50 frames has a separate animation and description. Move the time range slider to start at frames 1, 50, 100, 150, 200, and 250 to see each one. The upper arm's Rotate Z curve has the animation. Memorizing these shapes will make looking at the Graph Editor an enlightening experience, rather than a puzzling one. Happy wrangling!
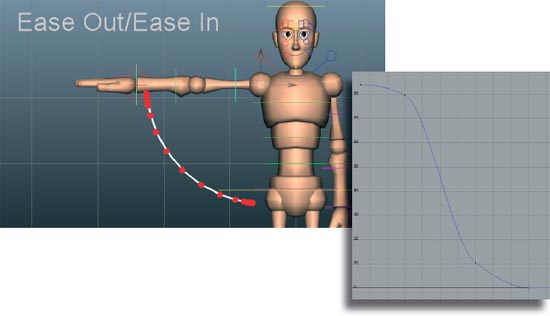
1f01-f49: Ease Out/Ease In
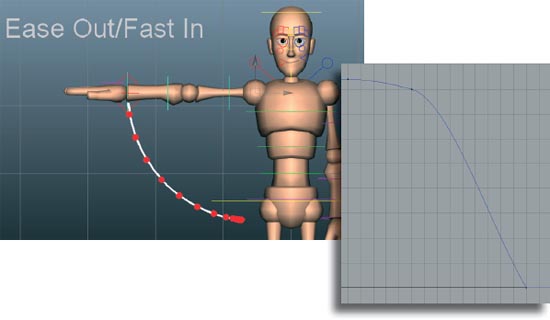
2 f50-f99: Ease Out/Fast In
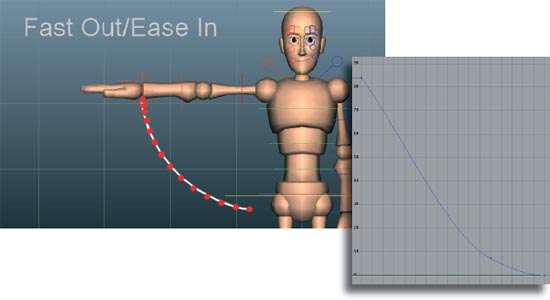
3f100-f149: Fast Out/Ease In

SplineReference.ma
Adding an extra key to shape your ease outs and ease ins will really help make them better. Maya's default eases are always the same ratio and tend to feel a bit flat timing-wise.
4 f150-f199: Anticipation
5 f200-f249: Overshoot
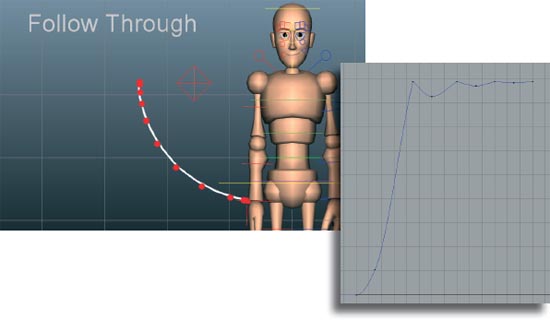
6 f250-f299: Follow-through
Linear tangents are a great starting point for any key where an object is hitting another and ricocheting off of it, such as when a bouncing ball hits the ground.
To School or Not to School?
Can You Teach Yourself Animation At Home?
by Kenny Roy
THESE DAYS, THE NUMBER of animation programs out there has young artists' heads spinning. Traditional colleges have added animation curriculums by the dozens, film schools have followed in lock-step, and it seemed the minute online animation training was en vogue, as a result of trailblazers www.AnimationMentor.com, a handful of similar programs sprouted around the globe. Is animation a skill that you can teach yourself and still be competitive in this burgeoning industry? I think so! But there are many common pitfalls and blunders that the self-taught animator must try to avoid if they want to make it to the big leagues one day.
Let's say you want to go it alone. I am entirely self-taught, just by the way. If you think this could work for you, congratulations, but let's start off with some tips that should hopefully keep you on your feet. First off, there really is no such thing as “entirely self-taught.” Okay, so I lied. You got me. What I mean is, animation is a medium that is made for consumption. If you are only animating in a vacuum, you'll never learn how to engage an audience. Viewers of your work will be left with a totally cold feeling; animation made just for oneself is a really lonely thing to behold. So if you are teaching yourself animation at the very least you need constant feedback from your peers or another audience.
Where do you go for the best feedback? Wherever there is a big audience willing to help. For me, it was posting at least five times a day on my favorite forums. Over three years, I had 5000+ posts. This kind of immersion in the craft does wonders for the speed of your learning. What happens is, the more you teach, the faster you master the concepts yourself. So giving feedback on forums is actually a very selfish thing to do! So, find a forum (for animation, the ones at www.11secondclub.com are fantastic, and for general CG, forums.cgsociety.org has an immense user base. See “Giving Feedback” on page 244 for more suggestions.) Once you have registered, put together a post with an introduction to your work. Put a couple of different pieces in there and ask for feedback on all of it. You may not actually be looking for feedback on anything you posted but you can see who comments right away on a newbie's animation. These people are going to become your best friends. Actually I've met three or four people who I knew only “digitally” when I was a member of the forums. They've all turned out to be great animators and great people. Take a second when you meet a few people on the forums to look at their old posts – maybe there's some animation that they posted for feedback, and you can oblige them. Basically, get to know your audience, and start right away looking critically at animation for the purpose of training your animation eye.
Once feedback is squared away, are you ready to really work hard to learn? Are you disciplined enough to ‘chew the fat’ of the early animation tests like a bouncing ball, a flour sack, a pendulum, a ball with a tail? Or are you a gung-ho animation daredevil that wants to start your education with a four-character, multi-shot dialogue sequence? SLOW DOWN! One of the biggest traps that snares beginner animators is the temptation to try to produce feature-quality animation from the get-go. This will have disastrous results. The most discouraging experience you can put yourself through is starting and stopping scene after scene, when you decide that the animation is not turning out good enough. For some reason, students of animation have a false sense of how much time and effort it takes to produce quality animation, even after they've been at it for years! To give you some perspective, it was about five years into my personal training before I was producing animation that I thought was at least worth showing to a company on a demo reel (VHS at the time!). And it was about three years after THAT I got my first feature animation job. So keep things in perspective, and don't try to create Pixarquality work when you are just starting out. Would you be disappointed if you didn't hit a home run your first time playing baseball? Would you be disappointed if you didn't win an Oscar with your first film? Then don't base your assessment of your current skill on the ULTIMATE goal!
Create some SHORT-TERM goals that you know you can achieve. You will feel the enjoyment of creating something start to finish and a sense of accomplishment that you hit a goal. Even though you know the goal is short term and was set at an easily achievable level, you'll still feel a lot better about your progress than attempting and failing at a really difficult shot. After enough of these little shots, you may be ready to move on to something more complex. But don't go too fast! I whole-heartedly support the idea of doing many bouncing-ball and flour-sack-type character shots before even attempting a shot with a biped or other complex character. There is an extra benefit to doing these tests with simple characters; you will become very well versed in using simple shapes to convey intent and meaning. When you finally are ready for bipeds and complex characters, the amount of practice you have creating performances from simple, inanimate objects will mean your humans and animals will ALWAYS look alive and meaningful. Their body language will be stronger because you had to create a complex idea using very simple shapes; now that you have limbs to work with, everything just got easier. The motion will also be more unified and appealing; again, practicing with simple shapes means that you are looking at the overall composition and body positions of your bipeds and creating stellar staging.
You will of course need learning materials. Books like this one (ahem) are great, and there are many free and paid resources online that offer tutorials and walkthroughs; like www.kennyroy.com (double ahem). But whatever resources you use to learn the techniques of animation, you'll need a constant flow of ideas for shots to animate. That's why I highly endorse the “Mini-Challenges” that go on over at www.11secondclub.com's forums, as well as the “Animation Sessions” on forums. cgsociety.org. The advantage of participating in these is two-fold: first, the constant practice will make you improve very quickly. Second, the fact that you are taking an outside idea and animating it replicates a production environment very closely. As animators, we rarely get to work on something that is 100 percent our own creation, so these challenges will give you valuable practice as a real animator.
The great thing about animation is that many of the skills required to be a great animator are free and easy to practice. Observing humans in public places is free and easy. Watching animated films and framing through the awesome shots is about as fun as it gets. Practicing acting out shots in front of a mirror is not only a great way to spend a Saturday afternoon, but it will improve your performance choices in your shots immensely. So before you think of any excuses, know that as a dedicated student of animation, you can always be busy learning what you need to rise to the top. Now, if you are indeed looking for a school, there are a few criteria that I think you should take into account.
Many city colleges and small trade schools add “CG” or “Computer animation” to their class lists, and then hire an animator or generalist to come in and teach the course. I've seen the job postings for these positions increase more and more each year. The problem is that, in all but a few cases, this person is a professional animator or 3D artist with little or no teaching experience. In nearly all cases, there is also no set curriculum and nobody is thinking or planning on how to make sure students are learning a logical and applicable progression of skills in these courses. In effect, these schools are just trying to offer a course they know will be popular. They are taking advantage of a trend. On the other hand, these courses can be EXTREMELY good value if the instructor is talented and thoughtful. Since city colleges and small trade schools are generally cheaper, getting training in animation from a professional who does have a course path in mind can be the best bang for your buck. Just be very careful choosing a course at a school like this. Look for schools that have had the course for a long time, and see if you can see how long the instructor has been teaching the course.
Large universities have their advantages and disadvantages as well. The main advantage is you know there is a curriculum and a path to graduation that has been pored over by the faculty. The main disadvantage (for some) is that you may be required to take general education credits and be paying high tuition while doing so. It's a tradeoff. Most accomplished animators are well educated and certainly well rounded. On the other hand, I've also met many animators, myself included, who only have a high school diploma. One of the other main factors for you might be financial. If animation is offered at a university and they have academic or athletic scholarships, you might actually have a better financial option in a four-year university. I was offered a full scholarship to a few schools on academic merit and this was the path I took. (I didn't graduate, I was recruited in my sophomore year).
The last category is online schools. No doubt you have heard (or perhaps are attending!) schools like AnimationMentor, AnimSchool, etc. Some of the most important criteria to consider are cost, job placements, availability for immediate help or feedback, size of classes, and the size of the student body. The teachers should all be working professionals and have good standing within the industry. Most of all, the school should offer more than a cold, online experience. Look for a school that seems like it still embodies the camaraderie and community feeling of a brick-and-mortar college.
In order to teach yourself animation, you have to be extremely self-motivated and passionate about the art. And in order to learn animation at a trade school or university, you need to be extremely self-motivated and passionate about the art! Really, it comes down to disciplining yourself to follow a steady and practical curriculum at home, or leaving the course design to a faculty. Either way, you are in for a very challenging road ahead. But it is a fulfilling road too; one that offers many rewards to the diligent and dedicated animation student.
