

![]() As your katana for cutting through a jungle of spline curves, the Graph Editor offers much in power, simplicity, and efficiency.
As your katana for cutting through a jungle of spline curves, the Graph Editor offers much in power, simplicity, and efficiency.
3
Graph Editor
MAYA'S GRAPH EDITOR is easily its most powerful and most used tool for animating. It's likely that you will spend much of your time working with it, so it's a no-brainer that we learn all the ins and outs of this fantastic editor. Maya 2013 introduces several new features to the Graph Editor that make it even more powerful and easy to use.
We spent the last chapter understanding splines, and now we'll learn how to use the Graph Editor to interact with, edit, and manipulate them.
Graph Editor Windup

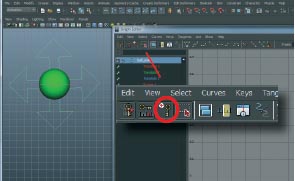
BEFORE WE LAUNCH INTO all the cool stuff the Graph Editor has in store for you, let's go over the basics of using it! One of the best features about Maya 2013 is the unified Graph Editor. This means that the curve editors in other Autodesk products like 3DS Max and MotionBuilder are exactly the same as what's here in Maya. We'll be using this unified editor throughout this chapter, as it's simpler and more streamlined, but you can always go back to the old editor by choosing View > Classic Toolbar.
1 Selecting a control initially displays all curves. Selecting attributes in the left panel displays only those curves. You can drag select or ![]() select for sequential attributes, or
select for sequential attributes, or ![]() select for multiple, non-sequential ones.
select for multiple, non-sequential ones.
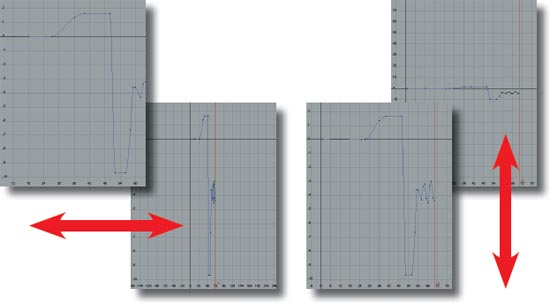
2 ![]()
![]() and right mouse dragging horizontally expands or contracts the frame range of the graph in view, while dragging vertically contracts or expands the value range.
and right mouse dragging horizontally expands or contracts the frame range of the graph in view, while dragging vertically contracts or expands the value range.

3 The move ![]() and scale
and scale ![]() tools work in the Graph Editor. Once selected, the middle mouse button will drag or edit the curves or keys selected.
tools work in the Graph Editor. Once selected, the middle mouse button will drag or edit the curves or keys selected.

4 ![]() middle mouse dragging will constrain the movement horizontally or vertically, depending on which way you initially move the mouse.
middle mouse dragging will constrain the movement horizontally or vertically, depending on which way you initially move the mouse.

5 If you get a circle when trying to edit, it just means you have the select tool ![]() active and need to select an edit tool, such as the move or scale tool, to do an edit.
active and need to select an edit tool, such as the move or scale tool, to do an edit.
Right clicking in the Graph Editor gives you a menu to quickly add keys, change tangent types, swap buffer curves, and more!
Visual Tools
THE GRAPH EDITOR IS FULL of goodies, and some of the most important ones let you view the curves in the most efficient way for what you're doing. Whether you need to type exact values, search for keys that may be amiss, compare drastically different curves, or want to isolate specific attributes, the Graph Editor can accommodate you. In this cheat we'll use a simple bouncing ball animation to test out the options the Graph Editor gives us for ogling curves. Make sure you are using the streamlined Graph Editor by going to View > Classic Toolbar and making sure it's unchecked.
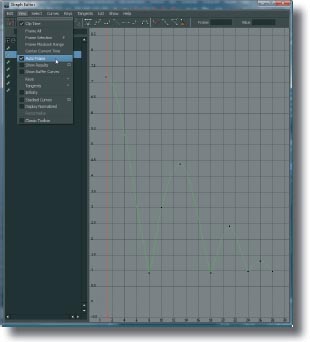
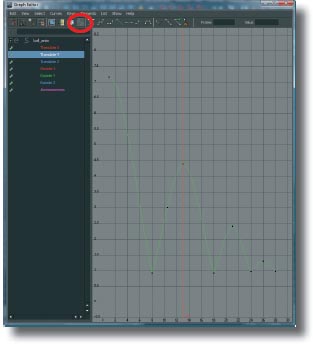
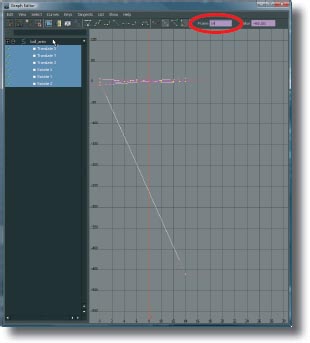
1 Open visualTools.ma, switch to the front camera, and open the Graph Editor. Select the ball's move control and its curves appear. Clicking on the attributes in the left panel isolates them, but some of the curves are difficult to see. Enabling View > Auto Frame will automatically focus on any attribute(s) you select.
2 Select a few keys and press ![]() to focus on them.
to focus on them.
3 Maya 2013 comes with a way to visualize multiple curves. Select multiple channels and go to View > Stacked Curves. Now all of your channels are displayed in their own stacked panes.

4 The stats fields show the frame and value of the selected key (or the frame length of a selected curve), which is useful for typing in precise frame numbers or values. You can also use ![]() +
+![]() to copy and
to copy and ![]() +
+![]() to paste values of one key to the fields for another key or curve.
to paste values of one key to the fields for another key or curve.
5 If you need to do precise entering of values for multiple keys, you can select curves and choose Curves > Spreadsheet. This gives you values for every key on the curve. You can use copy and paste here, and even change tangent types.
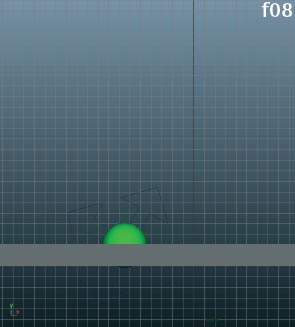
6 On the translate Y curve, select the key at f10. You'll see in the stat field that the current frame is 10.472. In the course of scaling keys or editing them, we can end up with keys that are between frames.
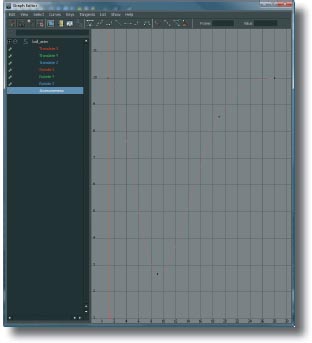
7 Select the Translate Y attribute and go to Edit > Select Unsnapped. All the keys that are not on exact frames will be selected. You can select multiple or all attributes as well. Go to Edit > Snap and the selected keys will be moved onto the nearest frame.
![]()
visualTools.ma
In addition to using the Graph Editor, you can also mute and unmute channels in the channel box by right clicking the attribute and selecting Mute/Unmute Channel.

8 The ball is travelling in X as it bounces, but sometimes it's helpful to watch an animation without one of the attributes playing. Select the Translate X channel in the Graph Editor and go to Curves > Mute Channel.

9 You may have to pan the camera to see it, but now the ball no longer moves in X and simply bounces in place. In the Graph Editor, mute channels have an X next to them. Muting will use the current value as the hold point.

10 To unmute, select the channel, and go to Curves > Unmute Channel. Everything will go back to normal.
11 To quickly isolate the curves of particular attributes, select them in the Channel Box and press the Isolate Curve Display button in the Graph Editor. This is great for quickly showing certain attributes when you have multiple controls selected.

12 Select the Translate Y and Rotate Z channels. Sometimes you'll want to edit curves while comparing them to others, but it's difficult because they are in completely different value ranges. Here, we can't see any of the shapes in the Translate Y curve.
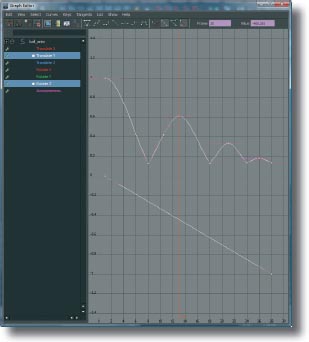
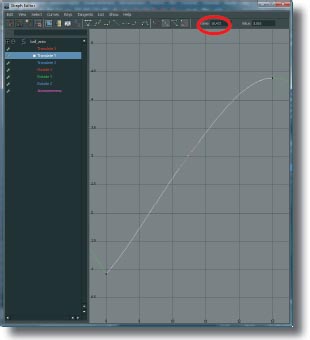
13 Select the curves and go View > Display Normalized. Now they are both displayed within a -1 to 1 range and easily comparable and editable. To go back to normal, uncheck View > Display Normalized.
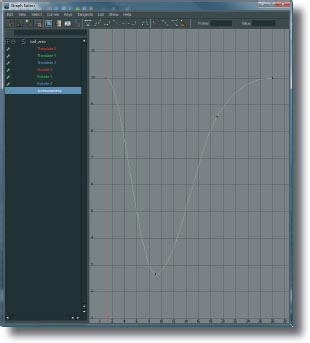
14 Extra attributes beyond the standard Rotate, Translate, etc. are colored gray, but you can change that so they stand out better. On the ball is an attribute called “awesomeness”, which doesn't do anything and is just for example's sake. Select the awesomeness curve!
15 Edit > Change Curve Color lets you pick any color you like for the curve. Now it will stand out when looking at multiple curves simultaneously. To remove it, just select and choose Edit > Remove Curve Color.
Go to the Select menu and enable Pre-Select Highlight and Maya will light up selectable objects when you hover over them. Very handy when selecting keys amongst overlapping curves!
Working with Keys
IN ADDITION TO its visual advantages, the Graph Editor offers some methods of working with keys that you can't get in the timeline or Dope Sheet. There are often times when we know the general shape of the curve we want to create, but setting keys and then dragging them to create that shape is time consuming. The Add Keys tool allows us to simply click keys where we need them and very quickly create a curve that can be tweaked for the results we want.
There will also be times where you want to add a key into a curve. Simply setting a key works, but the key is created with whatever Maya's default tangent is set to, which can alter the curve more than you want. Setting a key and editing the tangent is a lot of unnecessary work so Maya offers the Insert Key tool, which can be called upon instantly at any time.
Maya 2013 offers a new Retime Tool, an even simpler and more powerful way to retime animation, over the Lattice Deform Keys and Region Tools. By double clicking on a spot in the Graph Editor, you create a retime handle that can be moved back and forth in time, scaling the keys as you do so. This is an incredibly intuitive way to retime animation because the handles basically define “beats” of your scene. The Lattice Deform Keys and Region tools are still present, but the new Retime tool has far more potential to become a part of your regular workflow, so we'll show you how to use it here.
We'll be using the new streamlined Graph Editor which you can enable by going to View > Classic Toolbar and making sure it's unchecked.
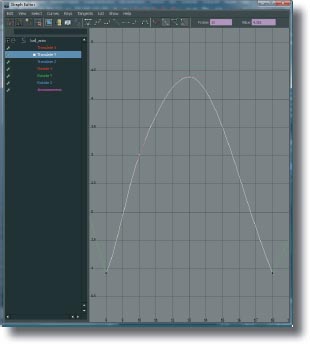
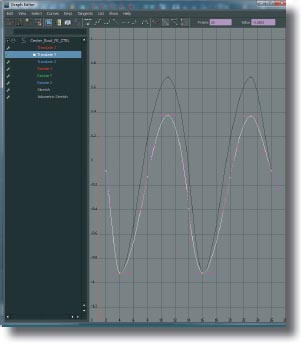
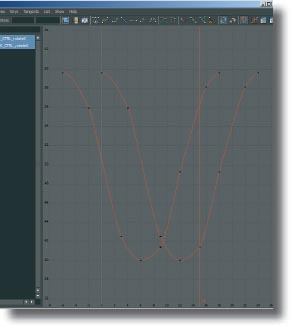
1 Open workingWithKeys.ma for the start of a bouncing ball animation. Currently we have it translating in X, but no up and down. Select the Add Keys tool in the Graph Editor, then select the Translate Y attribute and select the first key.
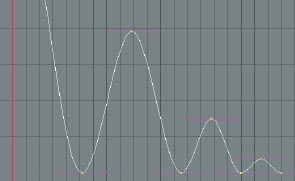
2 Middle click in the graph to add keys. In about 10 seconds I have the general shape of the curve and am ready to refine it.
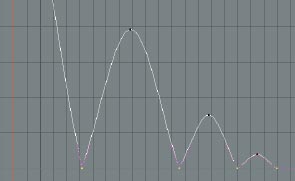
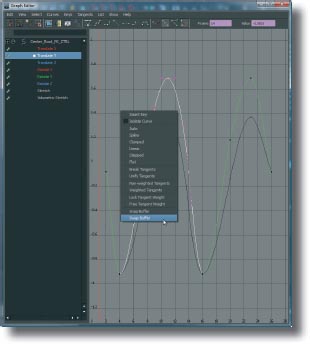
3 Converting the bottom keys to linear tangents gets us most of the way to a bouncing ball.

4 Without messing up our Translate Y curve, we need some extra keys at the peaks for a little extra hang time. Select the curve and hold down the ![]() key. The pointer will become a crosshair indicating the Insert Keys tool is active.
key. The pointer will become a crosshair indicating the Insert Keys tool is active.

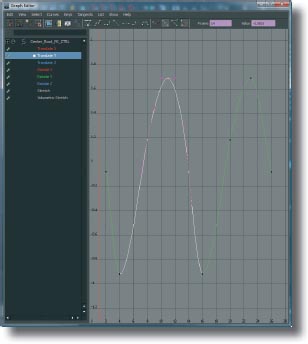
5 Middle clicking on the curve inserts a key without messing up the shape.
6 A few more tweaks and we have all the translation for a bouncing ball in about a minute.

7 New to Maya 2013 is the Retime Tool. This powerful tool allows you to scale the timing of keys in multiple user-defined regions. Select the Retime Tool and double click anywhere in the Graph Editor to create retime handles.

8 Now grab a retime handle and move it back and forth. Notice how the keys scale in time? You can add as many handles as you like, whenever you like!

9 To remove a handle, hit the circular “X” at the bottom. It disappears, but your retimed keys stay put. Very nice.
![]()
workingWithKeys.ma
Maya has a type of keyframe called Breakdown Keys, but they're not breakdowns as animators traditionally understand them. They're simply keys that maintain an exact ratio between the previous and following key. This can put them between frames if the other keys get moved. Generally speaking, most animators just use Maya's regular keyframes for everything.
Value Operators
THERE ARE OFTEN TIMES when we need to make specific changes in value to many keys at once. For instance, we might want to see what a walk looks like if we increase the spine's Rotate X by 20 percent. Or we need to quickly scale down a curve's frame range to 33 percent of its current value. Though you wouldn't know it by looking at them, Maya's stat fields can do calculations that you can use to quickly make precise mass edits on multiple keys. By using a set of value operators, we can get results fast, without clicking on and manipulating tools. Sounds like a great addition to the cheating portfolio, eh?
The value operators are as follows:
| +=value Add |
| −=value Subtract |
| *=value Multiply |
| /=value Divide |
So if we wanted to add 5 units in value to the selected keys, in the stat Value field we would type +=5 and hit ![]() . To increase them by 20% percent type *=1.2 and so on. This cheat will walk you through using value operators in several different situations.
. To increase them by 20% percent type *=1.2 and so on. This cheat will walk you through using value operators in several different situations.
We'll be using the new streamlined Graph Editor, which you can enable by going to View > Classic Toolbar and making sure it's unchecked.
1 Open valueOperators.ma for our familiar bouncing ball animation. There's a ground, but the ball is bouncing too low, about 1 unit or so, and intersecting it.

2 Select the Translate Y curve in the Graph Editor, and in the Value field type +=1 and hit ![]() . This adds 1 to every key selected.
. This adds 1 to every key selected.

3 Now every key is 1 unit higher and the ball lines up with the ground.

4 Let's bring the peaks of the Translate Y down 10%. Select the keys when the ball is in the air, and type *=.9 to reduce the Value by 10%.
5 We can scale the time for keys as well. Select all the curves for the ball and in the Frame stat field enter /=2 to divide by 2 and cut the frame numbers the keys happen on in half. The animation plays twice as fast now.
6 You can also use −=value to subtract. Remember that all the operators work for both the Frame and Value stat fields.
![]()
valueOperatros.ma
Infinity in the Graph Editor refers to what Maya does before a curve starts and after it ends. There are several options, but the default is Constant, which means stay at the first or last keyed value. For Cycles, usually Cycle or Cycle with Offset is used.
Buffer Curves
ANIMATION IS RARELY a linear process, and oftentimes we need to compare different ideas to see what works best. Looking at variations saved in different files is a hassle and inefficient, so Maya offers buffer curves in its Graph Editor functionality. We can have two different versions of any curve and switch back and forth between them instantly. For times when we're not sure if we like a certain movement over another, this allows us to experiment without having to redo or lose work.
Buffer curves are best for trying out variations on one or a few attributes. While it's possible to use them on a whole character, there's not a definitive interface for working with them. Switching between many attributes can make it easy to lose track of what you're looking at. Animation Layers are a much better approach for working with variations on a bigger scale, and they're covered in Chapter 12. But when it comes to comparing an attribute or two, buffer curves have a nice efficiency.

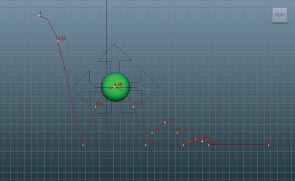
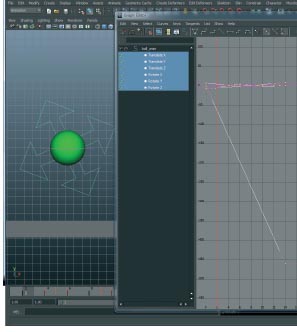
1 Open bufferCurves.ma, which has Goon doing the walk from chapter 9. Select the body control's Translate Y curve.

2 Buffer curves are not visible by default, so go to View > Show Buffer Curves. You won't see anything change yet, as both versions of the curve are currently the same.
3 Move some of the keys around and you will see a gray curve in the background with the shape you locked into the buffer. Now you can edit the curve as normal, keeping the buffer version intact and referencing it if necessary.
4 Hold the right mouse button and in the pop-up menu choose Swap Buffer to make the buffer curve active. The version you were working on goes into the buffer and you can edit the previous version.
5 In the right click menu, choosing Snap Buffer will snap the buffer to the current version of the curve. This is good for quickly saving the current state of the curve, and then moving on to further experimentation.

6 Use the different curves to compare varying amounts of up or down in the body. If the buffer curves get distracting, or you're finished working with them, just go back to View > Show Buffer Curves to toggle them off.
![]()
bufferCurves.ma
If you want to make a curve visible but uneditable or unselectable (for instance, if you're referencing it to another curve and keep selecting it accidentally), select the channel and go to Curves > Template Channel. To unlock it, choose Untemplate Channel.
Speed Cheats
YOU WILL NOTICE as you progress in animation that you are doing a lot of the same operations in the Graph Editor. Maya 2013's Graph Editor adds some great tools that allow you to remove some of the unnecessary tasks and clutter as you work. Specifically, we're going to take a look at setting bookmarks for our commonly used curves, and isolating specific attributes (very common when doing cycles).
It will become increasingly important as you move on in your animation training to develop ways to quickly access the controller or information you need. Professionals know that time spent hunting around a scene or a UI is time wasted. The following cheats will give you a few quick ways to side-step the clutter when your scene starts getting complex.

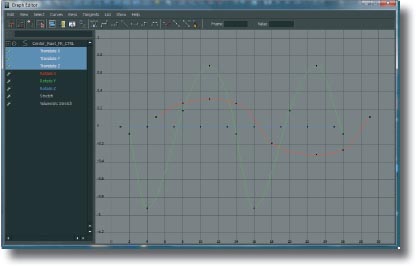
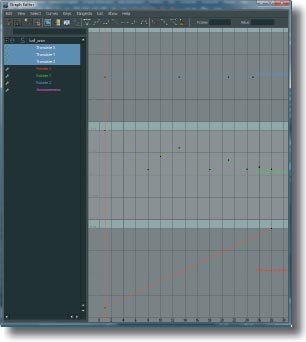
1 Open SpeedCheats.ma. In the Persp panel, drag a selection over the entire Goon rig and open the graph editor. It should look like this – spaghetti anyone?
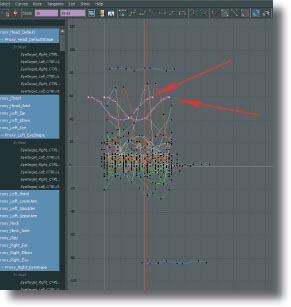
2 We're going to pretend that we want to work on the hand_IK Rotate X curves over and over. Select them carefully by clicking on the first and ![]() click the second one, as shown.
click the second one, as shown.
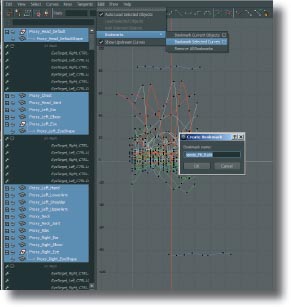
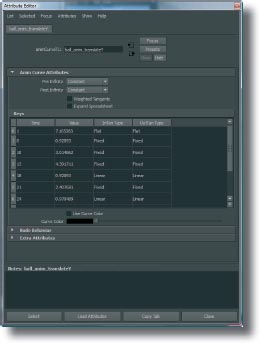
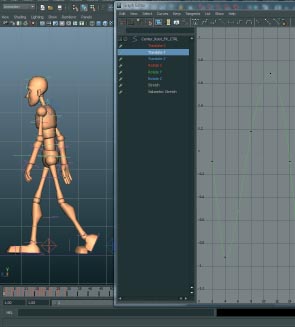
3 That's a pain! We don't want to have to do that again. Click on List > Bookmarks > Bookmark Selected Curves ![]() . Call the bookmark “hands_FK_RotX” and hit
. Call the bookmark “hands_FK_RotX” and hit ![]() .
.

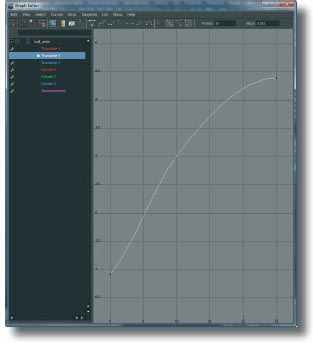
4 Now deselect everything in the panel and notice how the Graph Editor also clears out. Click on List > Bookmarks and find the “hands_FK_RotX” bookmark we just created and click on it.
5 Now just the two curves we want to see are loaded in the Graph Editor. We can use this bookmark any time. But what if we want to just look at a certain curve type? This is very easy to do.
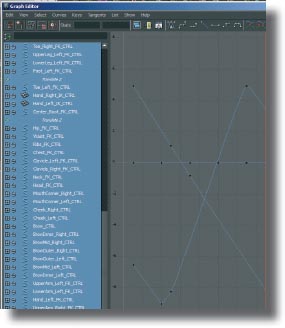
6 Select all of the controls in panel again, then select any Translate Z channel in the Graph Editor. Go to Show > Selected Type(s). If you select all of the channels on the left, you'll see only the Translate Z channels are in the Graph Editor!
![]()
SpeedCheats.ma
It is very common to need to access certain types of channels on the fly when working in production. Name your bookmarks according to the character's action rather than channels to give yourself an easier time finding them. For instance, instead of “head_FK_RotX” consider “Head_Bobbing.”