
Chapter 28. Eclipse Databinding
As we have seen, there’s an impressive stack of technologies available to you while building RCP applications. One of these technologies that we have avoided using in Hyperbola is called Eclipse databinding. At the highest level, Eclipse databinding is a set of abstractions that allow for synchronization between objects. The most relevant use case for RCP developers is simplifying user interface programming by using Eclipse databinding to bind user interface components to model objects.
In this book we’ve been careful to keep Hyperbola code as simple as possible while demonstrating the power of RCP. We avoided using Eclipse databinding in Hyperbola because of the initial complexity of learning any new framework. This chapter presents a dive into the design, capabilities, and usage of databinding. In particular, we
• Learn how to get started with databinding in RCP applications such as Hyperbola
• Introduce the architecture and terminology behind databinding
• Identify common coding patterns for working with databinding
28.1 Getting Started
To take advantage of Eclipse databinding, you need to add the main Eclipse databinding plug-in, org.eclipse.jface.databinding, to your application. Generally this is an easy task since Eclipse databinding ships with the org.eclipse.rcp feature. The main plug-in of interest is org.eclipse.jface.databinding which has very few dependencies, as shown in Figure 28-1.
Figure 28-1 Eclipse databinding dependencies

It’s important to note that Eclipse databinding was designed to be user-interface-agnostic. There is default support provided for SWT and JFace via the org.eclipse.jface.databinding plug-in. There is nothing preventing you from using Eclipse databinding in a headless fashion or with other user interface toolkits. As an example, Eclipse databinding support is available for the Eclipse Modeling Framework (EMF) and even the Google Web Toolkit (GWT).
28.2 Why Databinding?
While developing user interfaces, it’s common to have a domain model and some widgets that map to that domain model. For example, if you have a user address book application, you have a domain model that represents contact information, and you have a set of user interface controls that manipulate the domain model. So while you’re typing in the name of a contact, under the covers there’s some synchronization going on between the user interface control and the model to make sure the model is up to date. Or, if you look at it the other way around, if you invoke a change to the model, the user interface control must be aware of that change and update itself to show the latest model content.
Fortunately, many widgets have models that make this synchronization process easier, but the problem still remains that your domain model isn’t in the form of the widget model. This results in a lot of error-prone boilerplate synchronization code.
Databinding helps solve this synchronization problem by allowing you to bind data between two items, updating one side of the relationship when the other side changes.
28.3 Architecture
The general principle behind Eclipse databinding is the synchronization of values between objects. Synchronization is often carried out in both directions and includes steps like validation and conversion. In a typical example, the synchronization happens between model objects and user interface objects such as SWT. In Eclipse databinding, the value objects you’re interested in observing changes to are called observables. The object that represents the value synchronization of two or more observables is called a binding. The flow of data between observables and a binding is shown in Figure 28-2.
Figure 28-2 Eclipse databinding architecture

28.4 Observables
Observables represent an abstraction for setting values, getting values, and observing changes in objects. If you’re familiar with design patterns, an observable is simply an abstraction of the Observer pattern that is codified into two interfaces: IObservable and IObservableValue. The IObservable interface defines a way to listen for state changes. The IObservableValue interface extends IObservable to add the concept of a specific value, along with methods for getting and setting that value. To take advantage of databinding, you have to create observables for your model or view objects. Thankfully, Eclipse databinding comes with different types of observable factories to help you create observables.
28.4.1 PojoObservables
The PojoObservables factory is responsible for creating observables for Plain Old Java Objects (POJOs), as shown in Figure 28-3.
Figure 28-3 PojoObservables factory methods

To create observables, you must call the respective method on the PojoObservables factory. For example, if we had a Person POJO that had a name field, the coding pattern to create an observable would be as outlined in the following snippet:

Note
The downside of using PojoObservables is that your observables don’t support synchronization back to whatever you’re bound to. For example, if you’re using PojoObservables in combination with SWTObservables, your user interface won’t react to any changes that happen to your POJOs behind the scenes as there is no effective way to listen to changes in POJOs. However, changes that happen in your user interface will be propagated to your POJOs. It’s important to note this if your use cases require synchronization to happen both ways using Eclipse databinding.
28.4.2 BeansObservables
The BeansObservables factory is responsible for creating observables that adhere to the JavaBeans specification, as shown in Figure 28-4. The BeansObservables factory is identical to the PojoObservables factory except for the fact that it allows for property change events, which enables synchronization to happen both ways.
Figure 28-4 BeansObservables factory methods
To create observables, you must call the respective method on the Beans-Observables factory. For example, if we had updated our Person object to be a JavaBean, the coding pattern to create an observable would be as outlined in this snippet:

Tip
Advanced users of Eclipse RCP may use EMF in their projects to help develop their model-related code. If you’re using EMF, there’s Eclipse databinding support via EMFObservables via the org.eclipse.emf.databinding plug-in.
28.4.3 SWTObservables
The SWTObservables factory is responsible for creating observables for a variety of SWT widgets, as shown in Figure 28-5.
Figure 28-5 SWTObservables factory methods

To create observables, you must call the respective method on the SWTObservables factory. For example, if we wanted to observe an SWT Text field that would eventually bind to the Person object’s name field, the coding pattern to create the observable would look like the following snippet:

Tip
By default, if you observe a text value, you get updates per keystroke (SWT.Modify). This may not be the optimal strategy if any validation you do is expensive. To help with this problem, you can take advantage of SWTObservables.observe-DelayedValue(500, observable) to delay notification of a value change by a certain number of milliseconds.
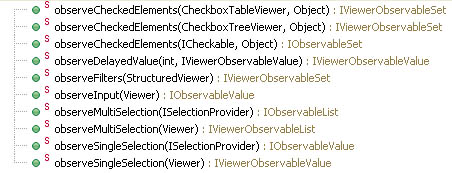
28.4.4 ViewersObservables
The ViewersObservables factory is responsible for creating observables for JFace viewers, as shown in Figure 28-6.
Figure 28-6 ViewersObservables factory methods
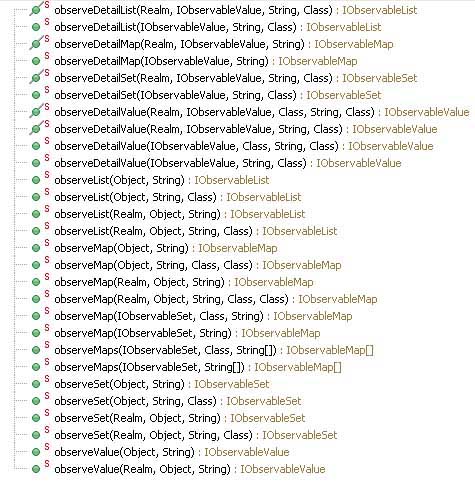
28.4.5 MasterDetailObservables
The MasterDetailObservables factory, as shown in Figure 28-7, allows for the observation of an attribute, the detail, of an observable representing selection or another transient instance, the master.
Figure 28-7 MasterDetailObservables factory methods

28.4.6 WorkbenchObservables
The WorkbenchObservables factory is responsible for creating observables for Workbench-related objects, as shown in Figure 28-8.
Figure 28-8 WorkbenchObservables factory methods
![]()
28.4.7 Realms
A realm can be thought of as a special thread or a lock that serializes access to a set of observables in that realm. Each observable belongs to a realm. It can be accessed only from that realm, and it will always fire change events on that realm. One example of a realm is the SWT UI thread. As for the SWT UI thread, you can execute code within a realm by using Realm.asyncExec(); in fact, the SWT realm implementation just delegates to Display.asyncExec(). This means that while the databinding framework can be used in a multithreaded environment, each observable is essentially single-threaded.
28.5 Properties
The properties framework is an improved set of observable factories and was created as an alternative to the existing set of observable factories we discussed in the previous section. The benefits that the properties framework provides over the existing set of observable factories are listed here:
Portability—It’s possible to pass around property values as a generic property factory in a type-safe fashion.
Immutability—This reinforces the portability benefit so users don’t have to worry about memory leaks.
Chainable—It’s possible to chain properties and observe deeply nested properties.
The properties framework as it stands should be used over the existing set of observable factories that we discussed in the previous section because of these benefits. For example, use BeanProperties instead of BeansObservables to create observables, WidgetProperties instead of SWTObservables, and so on.
28.5.1 PojoProperties
The PojoProperties factory is responsible for creating observables for POJOs, as shown in Figure 28-9.
Figure 28-9 PojoProperties factory methods
To create observables, you must call the respective method on the PojoProperties factory. For example, if we had a Person POJO that had a name field, the coding pattern to create an observable would look like this:

28.5.2 BeanProperties
The BeanProperties factory is identical to the PojoProperties API and is responsible for creating observables for JavaBeans (see Figure 28-9).
To create observables, you must call the respective method on the Bean-Properties factory as outlined in this snippet:

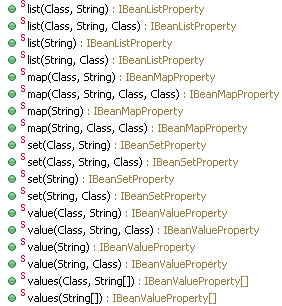
28.5.3 WidgetProperties
The WidgetProperties factory is responsible for creating observables for SWT widgets, as shown in Figure 28-10.
Figure 28-10 WidgetProperties factory methods

To create observables, you must call the respective method on the WidgetProperties factory as outlined here:

28.5.4 WorkbenchProperties
The WorkbenchProperties factory is responsible for creating observables for Workbench objects, as shown in Figure 28-11.
Figure 28-11 WorkbenchProperties factory methods
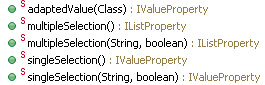
To create observables, you must call the respective method on the WorkbenchProperties factory as outlined in the following snippet:

28.6 Bindings
In Eclipse databinding, bindings synchronize the value of two observables, in particular two IObservableValue instances. To bind two observables, we need a DataBindingContext, which is the point of contact for the creation and management of bindings. In the following snippet, we expand upon our person example and use a DataBindingContext to bind an SWT Text field with a value representing a phone number in our Person object:

The synchronization process is composed of validation and conversion phases, as shown in Figure 28-12. The specific phases are dependent on the type of binding, whether it’s a value or list binding. In our example we are using a value-based binding.
Figure 28-12 A typical Eclipse databinding flow
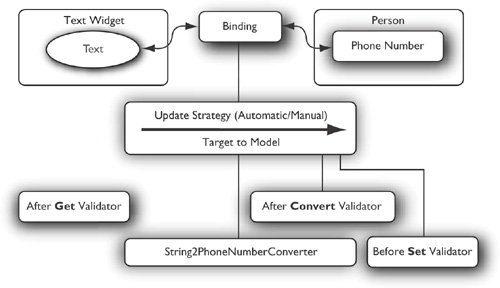
A binding has an associated update strategy which dictates how the synchronization between observables takes place. This update strategy is embodied in the UpdateValueStrategy class and includes the process of conversion and validation. To control the policy of how an update strategy is performed, there are four constants you can specify in its creation:
UpdateValueStrategy.POLICY_NEVER—This policy denotes that the source observable’s state should not be tracked and that the destination observable’s value should never be updated. This effectively makes bindings one-way and is used in cases like ComputedValue where one observable is unmodifiable.
UpdateValueStrategy.POLICY_CONVERT—This policy denotes that the source observable’s state should be tracked, including validating changes except before the set value phase. Furthermore, the destination observable’s value should be updated only on request.
UpdateValueStrategy.POLICY_ON_REQUEST—This policy denotes that the source observable’s state should not be tracked but the validation, conversion, and updating of the destination observable’s value should be performed explicitly when requested.
UpdateValueStrategy.POLICY_UPDATE—This policy denotes that the source observable’s state should be tracked and that validation, conversion, and updating of the destination observable’s value should be performed automatically on every change of the source observable’s value.
28.6.1 Conversion
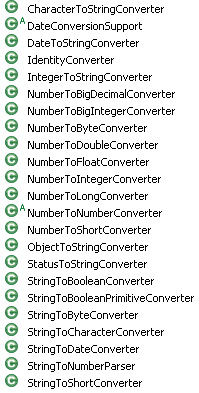
The conversion process will convert the value from the type of the source observable into that of the destination observable. For example, in Figure 28-13 we are converting a string to a value of whatever object represents a phone number in the person object. One can imagine a phone number object that has separate fields representing international and area codes along with a field for the rest of the phone number. The conversion process is controlled with an IConverter object that is registered as part of an UpdateValueStrategy via the setConverter (IConverter converter) method. To simplify working with Eclipse databinding, the UpdateValueStrategy class comes with default converters, shown in Figure 28-13, for common scenarios.
Figure 28-13 Default converters included in Eclipse databinding
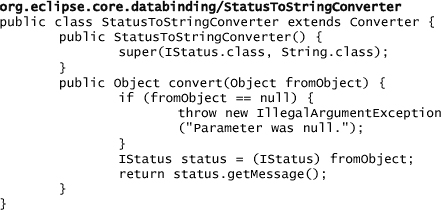
To write your own converter, it’s useful to look at how some of the default converters are written. For example, in the next snippet, StatusToStringConverter extends the Converter utility class that implements IConverter and does the processing required to convert an IStatus object to a string:
28.6.2 Validation
In Eclipse databinding there’s an opportunity to validate values in three unique phases, as shown in Figure 28-13:
setAfterGetValidator(IValidator validator)—This sets the validator to be invoked after the source value is retrieved at the beginning of the synchronization process.
setAfterConvertValidator(IValidator validator)—This sets the validator to be invoked after the source value is converted to the type of the destination observable.
validateBeforeSet(IValidator validator)—This sets the validator to be invoked before the value is set on the destination at the end of the synchronization process.
The validation process is controlled with IValidator objects which are responsible for determining if a given value is valid. The statuses returned from the validation phases are aggregated in a MultiStatus object until a status of IStatus.ERROR or IStatus.CANCEL is encountered, which aborts the update strategy process. In the following snippet it’s easy to see how to create a validator using the ValidationStatus utility class to create the proper statuses and then binding two observables with the update strategy:

Tip
Validation in the context of bindings can look at only one value at a time. To enable cross-field validation involving more than one value in databinding, see the MultiValidator helper class. Furthermore, MultiValidator prevents data from being copied to the model while there is a validation error.
28.6.3 Support Classes
To simplify the usage of databinding in the context of common Eclipse user interface facilities such as dialogs, viewers, and wizard pages, Eclipse databinding provides a set of support classes:
WizardPageSupport—connects the validation result from the given databinding context to the given wizard page, updating the wizard page’s completion state and message accordingly
TitleAreaDialogSupport—connects the validation result from the given databinding context to the given TitleAreaDialog, updating the dialog’s error message accordingly
DialogPageSupport—connects the validation result from the given databinding context to the given dialog page, updating the page’s error message accordingly
PreferencePageSupport—connects the validation result from the given databinding context to the given preference page, updating the page’s valid state and error message accordingly
ViewerSupport—helper methods for binding observables to StructuredViewer or an AbstractTableViewer
28.7 Summary
After reading this chapter, you should have a grasp of the fundamentals of Eclipse databinding and how to use it in RCP applications. Eclipse databinding avoids repetitive, error-prone code and has the power to simplify the process of building user interfaces for RCP applications.
28.8 Pointers
• The databinding wiki contains useful tips, snippets, and tutorials: http://wiki.eclipse.org/JFace_Data_Binding.