
Chapter 11. Adding a Login Dialog
At the end of Chapter 10, “Messaging Support,” you hard-coded a login server and account so that you could test the newly enabled Hyperbola prototype. That was great for testing but clearly not realistic. In this chapter we walk through the creation and use of a login dialog and configuring Hyperbola to automatically log you in when it is started. In addition, we talk about how to
• Display a login dialog before the Workbench starts
• Ensure that the Hyperbola application’s branding icon is shown on the dialog
• Manually take down the splash screen before showing the login prompt
• Add a preferences page
• Remember login preferences
• Store preferences securely using Equinox secure preferences
11.1 Adding the Login Dialog
The first thing to decide when adding a login prompt to an application is at what point in the application’s lifecycle the prompt should actually appear. In this iteration of Hyperbola, we want to be logged in as soon as possible—even before the first Workbench window is shown. This has a number of advantages: It keeps the rest of the code simple since the connection information is assumed to be available and the connection open; the application can check licensing information; and the application can configure itself based on the logged-in user. For example, the name of the logged-in user can be used to determine what the UI looks like, what actions are available, and so on.
The first place that the Hyperbola application gets control is in the Application method start(IApplicationContext). This method simply creates an SWT Display and opens the Workbench using that Display. We want to prompt after creating the Display but before starting the Workbench. Note that there is no magic here—the run() method is not special. You are free to do as much UI work as you like before creating the Display or starting the Workbench. The only restriction is that you have to create the Display before anything can be drawn.
Note
Think of the Display as SWT’s model. When a Display is created, it does not mean that a window or dialog has been opened. The Display is the single point of contact for all UI capabilities of SWT. It provides capabilities such as running the event loop, inter-thread communication, timers, fonts, and colors.
At the end of Chapter 10, you modified the Application’s run(IApplicationContext) method to call login(Session). Now you have to change the login() method to prompt the user instead of automatically connecting with hard-coded connection details. You can write the login dialog yourself, or you can use the BasicLoginDialog class from the sample code for this chapter. You may notice another login dialog, LoginDialog, in the code for this chapter. This is the final version of the dialog as it appears at the end of the chapter. We included the BasicLoginDialog to help you get started. If you get the BasicLoginDialog from the code for this chapter, rename it LoginDialog.
Modify the login(Session) method to open the login dialog as shown below. Notice that whenever a dialog is shown before the first Workbench window is opened, it should not be parented. Here the BasicLoginDialog constructor takes a null argument. Dialogs without parents are managed by the windowing system and as such have an entry in the task bar. This means that users can tell that a dialog is open and can easily bring it to the front if needed.

The method login(Session) loops forever, prompting the user for login information and trying to log in using that information. The details of the LoginDialog are not particularly important here. It suffices to say that if the user clicks OK in the dialog, the login code gets the required information and attempts to log in by calling the connectWithProgress(Session) method. If the user clicks Cancel, the method returns and Hyperbola exits. If the login attempt fails, the user is prompted again.
Progress reporting during login is vital. In particular, during login you cannot be sure how long it will take to contact the remote server. Users appreciate feedback about the status of the login and expect the opportunity to cancel if it is taking too long.
As part of the refactoring in Chapter 10, a new login method that tracks progress during the initial connection and login was added to Session. The technique for reporting progress is to add an XMPP packet listener to the connection. The Session reports progress on an IProgressMonitor and checks for cancellation as packets are sent.
It’s a good habit to ensure that long-running methods have some sort of feedback. In Hyperbola, the only thing we can tell the user is whether he or she is authenticating or receiving the roster from the server. The user can cancel between these operations.

The caller of Session.connectAndLogin(IProgressMonitor)—the Application, in our case—provides a monitor and displays the progress to the user. There’s an existing dialog called ProgressMonitorDialog that shows progress that can be used for this purpose. The connectWithProgress(Session) method called from the application opens a progress dialog, then connects using the Session, as shown here:

Now when you run Hyperbola, it should appear as shown in Figure 11-1. Enter the user information used in Chapter 10—that is, the user is “reader,” the server is eclipsercp.org, and use “secret” as the password. Click Login and you should once again be able to chat with Eliza. Of course, now you can log in to your own XMPP account and chat with your friends if you like.

You might have noticed that while the login dialog was up, the Hyperbola splash screen was showing. That seems a bit strange. Splash screens are there to reassure the user that something is happening. Once the Hyperbola application is up and interacting with the user, the splash screen is no longer needed. You can fix that by adding the following code just before calling login(Session) in Application.run(IApplicationContext):
org.eclipsercp.hyperbola/Application
context.applicationRunning();
Note that the Workbench automatically closes the splash screen, if it is still up, when the startup sequence is completed. Once the splash screen is down, it cannot be redisplayed.
Note
It’s actually possible to run code before the application is run. If you need to perform more advanced configuration, such as determining which plug-ins are loaded, see Chapter 27, “OSGi,” for information about starting plug-ins from within the config.ini file using start levels.
11.1.1 Branding the Dialog
The best practice of setting the dialog’s parent to null means that it does not inherit the icon set by the Workbench on the top-level window. Actually, there isn’t even a Workbench or a top-level window. As a result, the Hyperbola icon is missing from the login dialog and the task bar entry, as shown in Figure 11-2.
Figure 11-2 Task bar and dialog missing the Hyperbola icon

The quick fix for this is to directly access a Hyperbola icon and call Dialog.setImage(Image). Since you’ve already configured the product icon via the product configuration, a more elegant solution is to use the icon from the Hyperbola product description. This isolates the login dialog from changes to the product’s branding.
Every running Eclipse has at most one product—the IProduct returned from Platform.getProduct(). The product contains all of the information provided in the related extension to the org.eclipse.runtime.product extension point. Of course, getProduct() can return null since you can run an Eclipse application directly without having a product.
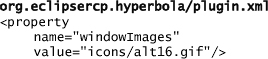
Most of the information related to a product comes as free-form key/value pairs. Eclipse defines some canonical keys such as the application name, the About text, and so on in org.eclipse.ui.branding.IProductConstants. The IProductConstants.WINDOW_IMAGES property is of particular interest here. The value is a comma-separated list of image paths for different-size images that can be used to represent product windows. Update the LoginDialog method configureShell(Shell) to get the window images and use them for the dialog, as shown in the following snippet:

This code is doing more than you think. In particular, the AbstractUIPlugin static method imageDescriptorFromPlugin(String, String) isolates you from the form of the image paths. Contributed image paths can be a fully qualified uniform resource locator (URL) to the image or a relative path from within the declaring product plug-in. Here is an example of a fully qualified window image URL:

This example, on the other hand, shows the value as a relative image path:
Most of the images and icons contributed to UI extension points can take either relative or absolute URLs. This is useful as it allows you to put all your images and branding in one spot and then refer to them from wherever they are needed. Note, however, that if you are forcing or expecting other plug-ins to access your images, this effectively makes the image locations and names API—if you change them, the other plug-ins break.
11.2 Remembering Login Settings
If you have been following along and testing Hyperbola, you are likely tired of typing the same login information every time. These login settings should be saved between invocations of Hyperbola. In this section we augment the LoginDialog to show a list of users and also save the list of users and their information for next time.
11.2.1 The Basics
You could just remember the last set of login information, but chat users often have several different identities. To accommodate this, Hyperbola needs a login dialog, as shown in Figure 11-3. The dialog has a list of user names instead of a single user. When a user name is selected in the User ID combo box, the Server and Password fields are updated with the information for that user. Furthermore, if you can add users, you should be able to delete them. The Delete User button allows users to delete the current account.
Figure 11-3 Improved login dialog

Note
To keep the code snippets concise, many of the details of building the UI and data structures have been omitted. The most interesting code is how to save and restore the list of users. Enough context is provided for you to understand the scope of the changes, but you should look at the sample code for this chapter for the complete story.
To minimize concurrent code changes, you should stage the implementation of this feature. First, refactor the dialog to accommodate several connection lists, and then add the code to save and restore the user information. This approach makes it easier to test and pinpoint problems since you are changing fewer things at once.
The LoginDialog class currently has a single ConnectionDetails field to track the login information for one user. You must refactor the dialog to support sets of connection details. Here is an overview of the refactoring:
1. Update the UI to allow selecting from a list of users. Replace the User ID text field with a combo box.
2. Add listeners to the User ID field to update the Server and Password fields when the user changes.
3. Update the data structures to track multiple user logins. Replace the ConnectionDetails field with a Map, called savedDetails, whose keys are user names and whose values are ConnectionDetails.
The first code snippet below shows the new savedDetails that track the connection information loaded and saved using the preferences mechanism—more on that a bit later. In addition, the userIdText field has been changed to a Combo. The code registers a listener on the Combo so that when the value is changed, the serverText and passwordText values are updated based on the saved connection information from savedDetails.

The user combo should be initialized with the list of known user names from previous sessions and with the name used in the last session selected at startup. For the time being, just add a couple of sample connection details to the savedDetails field. The initializeUsers(String) method shown below can be called any time after the combo is created, for example, at the end of createDialogArea(Composite). It may be convenient to use this method in other scenarios to reset the list of names in the combo.

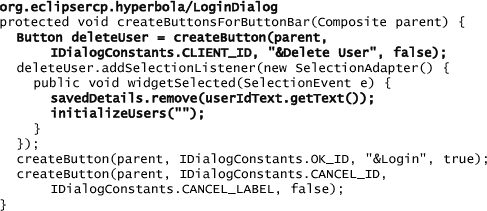
Finally, the dialog refactoring is rounded out by adding the Delete User button to the button bar. When the button is clicked, the current user in the combo is removed from the ConnectionDetails map and the combo is reinitialized.
Now you can test the new dialog by initializing the savedDetails map with a set of dummy users:
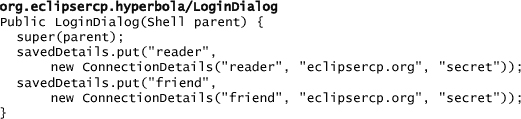
When you run the Hyperbola application, you should get the login dialog first. The dialog shows the sample users and allows you to delete users. Of course, Hyperbola does not remember your deletions yet—that’s next.
11.2.2 Using Preferences
Now that the UI is mocked up, let’s think about how to save connection information between sessions. There are many options for saving the user data from the login dialog. The brute-force approach is to use Platform.getStateLocation(Bundle). This gives you a location on the user’s machine where the given plug-in can store any files it likes. This is useful if the plug-in needs to save large files or already has a persistence story. It is, however, a bit too heavyweight for storing simple preferences. All you really need here is a way to store a small set of key/value pairs. An easier approach is to use the preferences mechanism provided by the org.eclipse.equinox.preferences plug-in.
Preferences are key/value pairs where the key is an arbitrary name for the preference and the value is one of several types: boolean, long, int, String, float, or double. Preferences are stored and retrieved by the org.eclipse.equinox.preferences plug-in, so you don’t have to be concerned with how this works. This makes it easier than having to write and read the file yourself.
Note
Eclipse preferences are very similar to java.utils.prefs.Preferences with additional support for searching, storing, and scoping. If you have already used Java Preferences, Eclipse preferences should be familiar.
Think of preferences as a hierarchical node structure where each node has a name and a unique and absolute path, as shown in Figure 11-4. Nodes in a preference tree are named and referenced in a similar manner to directories and files in a file system. The root node is referenced as “/” and children are referenced as absolute paths followed by the child’s name. Each preference node has zero or more properties associated with it, where a property consists of a key and a value.
Figure 11-4 Preference node structure

The direct children of the root node are special and are referred to as scopes. Each scope is the root for all the preferences in that scope. The structure of the nodes in each scope is specified by the scope itself. Scopes are an open-ended set that controls the visibility and persistence of preferences. This means that the scope determines the location on the file system where preferences are stored. For example, in Hyperbola it may make sense to maintain some preferences on a peruser basis and some on a global, application basis. The set of scopes is extensible, but the Eclipse Runtime defines three basic scopes:
Instance scope—Preferences that are stored per workspace, or per running instance of Eclipse. If your product can run on different data sets, preferences stored in this type of scope are not available across the data sets.
Configuration scope—Preferences that are stored per Eclipse configuration. Such preferences are shared between multiple running instances of an Eclipse configuration. Configuration-scoped preferences are best suited for preferences that apply across the product regardless of the user or data set.
Default scope—Preferences that represent the default values for preferences. These are not changed or stored by the Eclipse Runtime but rather supplied by initialization files in plug-ins and product definitions.
Most of the preferences in the Hyperbola application are product-level—there is no real data set or workspace—so we should use the configuration scope. The instance scope could be used, however, to store preferences specific to particular servers. For example, the user’s preferred chat mode and initial state may vary from server to server.
Scopes are just specially named preference nodes, so the following two lines are equivalent methods of accessing the configuration scope and getting a preference node called pluginid:

Let’s return to Hyperbola and store and retrieve the list of connection information using the configuration scope. The following snippet from the LoginDialog class shows the use of Preferences to save the connection information:
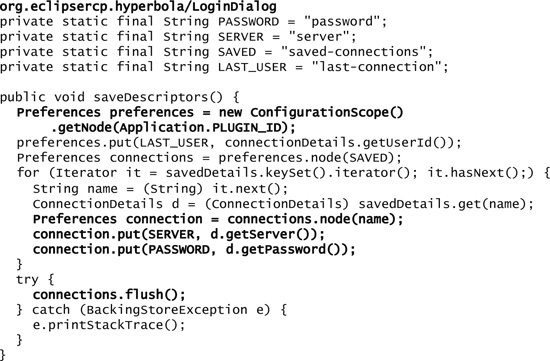
The basic pattern when accessing Preferences is to start with the scope and then use your plug-in ID to isolate your preferences from those of other plug-ins. You can see this in the first line of saveDescriptors(). The last connection information is stored right on the node for the Hyperbola application in the configuration scope. This information is used to prime the login dialog with the previous selection the next time it is shown.
The hierarchical nature of Preferences is used to create a node for all saved connections. Effectively, this is a folder, just as you would use on the file system. In this node there is a node for each user. The node name is the user name and its map contains the server name and password.
Warning
It is generally not a good idea to save passwords in preferences because they are stored as text and are easily read by anyone who has access to your machine. Since the Hyperbola application is sending its login information as text, we don’t worry about this for now. If you need to store passwords on the user’s machine, you can use the secure preferences mechanism in Eclipse, which saves passwords in a lightly encrypted file.
When the preferences have been created, calling Preferences.flush() ensures that they are saved to disk. The connection information is saved when the login dialog is closed. Overriding the Dialog.buttonPressed() method allows you to run arbitrary code based on the button that was pressed. It’s important to eventually delegate to the overridden method so the standard behavior, such as closing the dialog, is still performed.

The LoginDialog must also load the preferences when it’s created. Loading is a mirror image of storing, as shown in the LoginDialog snippet below. You simply ask for the same Preferences node and scan its properties and child nodes. You do not have to explicitly load the preferences from disk; they are loaded by the Eclipse Runtime as needed.

11.2.3 Storing Preferences Securely
Now that we have an idea of how to store preferences in general, how can we store user-sensitive information securely within Eclipse? Eclipse has an ISecurePreferences API that mimics the preferences mechanism discussed in the previous section. Logically speaking, the secure preferences API combines the functionality of a key ring with that of the normal preferences API. To access secure preferences, one simply calls the SecurePreferencesFactory in the org.eclipse.equinox.security plug-in.
ISecurePreferences preferences = SecurePreferencesFactory.getDefault();
ISecurePreferences connections = preferences.node("pluginid");
Let’s return to the place we load preferences in Hyperbola. In the snippet below, the SecureLoginDialog obtains an ISecurePreferences node via the SecurePreferencesFactory instead of just a Preferences node. Otherwise, the code to load preferences is identical to what you did using the normal preferences mechanism in Eclipse.
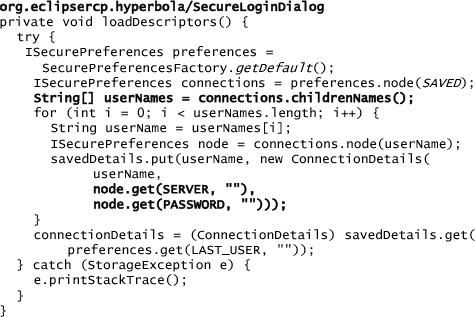
Secure preferences are stored in a similar fashion to normal preferences with one minor difference. When you store secure preferences in a node, there’s an additional argument to specify whether you want the preferences encrypted or not using a password provider from Equinox security. The snippet below demonstrates encrypting the password for a connection but not the other information. If we deemed the other preferences important to encrypt, it’s a matter of simply changing the false statement to true when storing the preferences.

Warning
Note that secure preferences are intended to store only relatively small amounts of data, such as passwords and other lightweight sensitive information. If you need to securely store large objects, consider encrypting such objects in a symmetric way using a randomly generated password and use secure preferences to store the password.
11.3 Adding Auto-login Preferences
Even though previously entered login information is now saved, users often appreciate the option of logging in automatically at startup. The Hyperbola application can present this option directly from the login dialog, as shown in Figure 11-5, or from a Preferences dialog, as shown in Figure 11-7. Let’s do both!
Figure 11-5 Login dialog with the auto-login preference

11.3.1 Creating a Preference Page
Preference pages contain a grab bag of application settings that users normally do not have to change. They are there to allow specific configuration of your application. Basic support for preference pages in Eclipse is provided by JFace. This support is extended by the Workbench to allow contributing preference pages in a plugin.xml. The Workbench also adds helper widgets that are useful in building preference pages.
To add a preference page for the auto-login preference, you first need to define a preference page extension for the Workbench’s org.eclipse.ui.preferencePages extension point. Preference pages contributed this way automatically appear in the Workbench’s standard Preferences dialog. You have added extensions a few times by now, so we will skim over it quickly here.
Open the Hyperbola plug-in editor, flip to the Extensions page, and click Add.... Choose the org.eclipse.ui.preferencePages extension point and click Finish. That creates the extension. Right-click on the extension itself and choose New > page. Once you have the page element, fill in the details as shown in Figure 11-6. For the class field, use the normal trick of clicking on the class link to create a skeleton for the preference page class.
Figure 11-6 Preference page extension point

All preference pages must implement the interface IWorkbenchPreferencePage by subclassing either PreferencePage or FieldEditorPreferencePage. The skeleton you created likely subclassed PreferencePage—change this to subclass FieldEditorPreferencePage. Field editors are very useful controls that are linked to underlying preferences. FieldEditorPreferencePage has various helpers for creating FieldEditors.
For the Hyperbola application, all we want to do is display a check box that allows toggling the auto-login preference. The resulting preference page is shown in Figure 11-7. The following code snippet shows the source for that preference page:

Figure 11-7 Standard Preferences dialog

When the preference page is constructed, a ScopedPreferenceStore is created to wrap the configuration-scoped preferences for the Hyperbola plug-in. This is a backward-compatible layer that allows using preferences with FieldEditors. The FieldEditors APIs predate the use of the Runtime preferences and thus are not compatible without a helper class.
When the page is drawn, createFieldEditors() is called by the Workbench. The BooleanFieldEditor here is given the key for the auto-login preference. It then reads and writes that preference automatically. When the user clicks the Apply button, the preferences are saved to disk.
11.3.2 Adding the Action
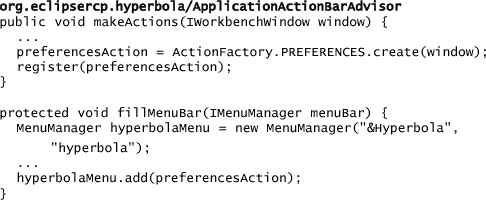
Now that the preference page is defined, you have to add an action that opens the Preferences dialog. The Workbench provides an action called ActionFactory.PREFERENCES that opens the standard Preferences dialog and shows all registered preference pages. Update Hyperbola’s ActionBarAdvisor to create and place the preferences action. The following snippet shows the relevant lines and leaves you to place them accordingly:
Start the Hyperbola application and select Hyperbola > Preferences to see the Preferences dialog, as shown in Figure 11-7.
11.3.3 Accessing Preferences
To implement auto-login, Hyperbola must be updated to check the preference value and react accordingly, as shown in this snippet:

11.3.4 Default Preference Values
The preference page is up and working, but there is still one last detail to address—the default value of the auto-login preference.
The Workbench provides a default preferences scope called DefaultScope, which contains default values for preferences. Having a default scope and searching multiple scopes allows you to have defaults for a preference initialized in the DefaultScope but customized in another scope.
There is also an extension point called org.eclipse.runtime.preferences that can be used to register a class that initializes default preference values. The preference initializer ensures that a plug-in’s preferences are initialized before another plug-in can access them.
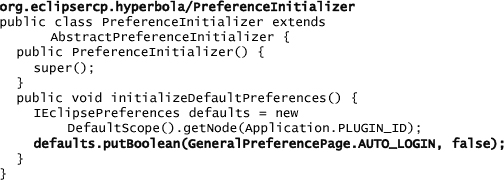
Let’s add a preference initializer for the Hyperbola application that sets the auto-login default to false. First, add an extension to the org.eclipse.runtime.preferences.initializer extension point. For the class attribute, create a class called PreferenceInitializer. The implementation for this preference initializer is shown below. Eclipse ensures that the preference initializer is run before any preferences are accessed in the node that matches this plug-in’s ID. This implies that each plug-in is storing its preferences under a node with its plug-in ID.
11.3.5 Preferences on the Login Dialog
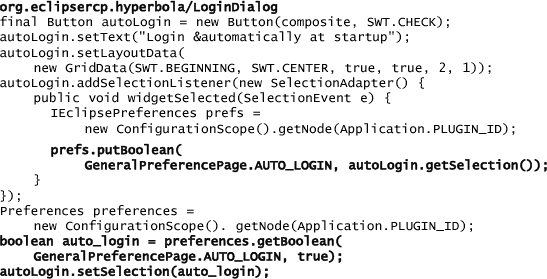
Although the auto-login preference is available in the Preferences dialog, it’s convenient to also allow users to set this preference in context, for example, when they are using the login dialog. This is very easy to add. In the LoginDialog method createDialogArea(Composite), create an extra check box that is initialized with the preference value. Then we update the preference value when the check box state changes, as shown in the following snippet:
11.4 Summary
The login dialog greatly improves the usability of Hyperbola. Here you learned how to add preferences to your application. Notice that again, Eclipse takes care of most of the hard work. The Eclipse RCP is full of frameworks for adding standard elements, such as preferences, to your application. Later chapters highlight additional facilities, but there are too many for us to cover them all. The online Eclipse Help is a good source of information on the ones we omit.
11.5 Pointers
• Eclipse Help > Platform Plug-in Developer Guide > Runtime overview
• Eclipse Help > Platform Plug-in Developer Guide > Runtime overview > Security