
Chapter 10. Messaging Support
Eclipse RCP tooling makes creating RCP applications easy—there are wizards and editors that help automate the error-prone tasks of branding, exporting, and configuring an application. You could stop here, but the real fun of developing an RCP application is writing the domain-specific code. Hyperbola is no exception.
These tools and programming constructs are generic; they are not specific to application domains such as banking, stock trading, streaming video, instant messaging, or Mars space missions. That’s where you come in. You will spend most of your time working on the code for your domain. Again, this is one of the benefits of Eclipse—it is essentially middleware that allows you to focus on your problems rather than on the infrastructure.
This chapter makes Hyperbola a real instant messaging client. The goal is to get Hyperbola into a state where you can chat and add more of the features you expect from an instant messaging application. As such, this chapter focuses somewhat more on the instant messaging domain and the details of getting set up to chat rather than generic RCP issues. Specifically, we show you how to
• Integrate a third-party XMPP library called Smack
• Replace the prototype model with Smack
Note
There are several places in this chapter that require more code changes or new code than we can detail in the text. Instead, the sample code for this chapter contains all the changes; we essentially take you on a tour of the code and highlight the points of particular interest. If you have the time, you may want to follow along and make the changes yourself.
10.1 Integrating a Third-Party Library
Alas, not all Java code is structured as Eclipse plug-ins. There is a vast array of useful Java code available in standard Java JAR files. Whether it is third-party libraries or in-house legacy functionality, reusing this code is extremely attractive and efficient. Fortunately, integrating these libraries into Eclipse is reasonably straightforward. The process of transforming non-Eclipse code libraries into Eclipse plug-ins is referred to as bundling.
10.1.1 Bundling Smack
Writing your own XMPP messaging library is quite a challenge. Fortunately, the folks at Jive Software (http://jivesoftware.org) wrote and open-sourced their Smack messaging library. We use this throughout the Hyperbola examples and have found it to be stable and easy to use.
First, download the Smack library from www.igniterealtime.org/downloads/index.jsp. At the time of this writing, the latest version was 3.1.0. Expand the archive somewhere convenient on disk.
Create a plug-in project using File > New > Project... > Plug-in Development > Plug-in from existing JAR archives. On the next page, identify the JARs you want in the plug-in. Click on Add External... and locate and select both smack.jar and smackx.jar from the Smack 3.1.0 install. Click Next to get the page shown in Figure 10-1.
Figure 10-1 New plug-in project for bundling the Smack libraries

Fill in the Project name and Plug-in ID. As discussed previously, the plug-in ID and project name should match, and the plug-in ID should be based on the plug-in originator’s Java package naming conventions. Here, the plug-in’s code is coming from Jive Software, whose package naming convention for Smack is org.jivesoftware.smack. Use that as the project name. As you fill in the project name, the wizard automatically completes the plug-in ID. Update the plug-in version to 3.1.0 to match Smack’s version and fill in the provider.
Note
Some see this use of org.jivesoftware.* (i.e., Jive Software’s spot in the plug-in ID namespace) and their name as the provider as bad form. Others feel that using your own ID (e.g., org.eclipsercp.smack) and name seems to claim credit for the Smack code and implies that the code is being forked. There is likely no right answer here. Eclipse itself does both. The Eclipse teams have tended to use the originator’s package naming (e.g., org.apache.ant) if the code is being included verbatim. If the code is being modified or adapted, the Eclipse namespace is used (e.g., org.eclipse.ant). The best bet is to ask the originator to deliver the code as bundles!
When the wizard is finished, you should have a Smack plug-in project that looks like the one in Figure 10-2.
Figure 10-2 Smack project after creation
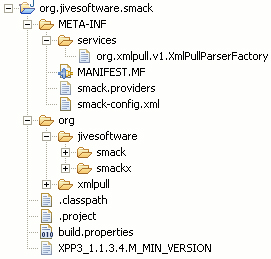
The option to unzip the JAR archives is useful if you want to ship the new plug-in as a JAR itself. Otherwise, the JARs would simply be copied into the plug-in and the plug-in would have to be shipped as a directory.
Aside from creating the project and exploding the JARs, the wizard generates a MANIFEST.MF file. The generated file is shown below. Notice that the various values you entered are embedded in the manifest. Notice also that there is a list of exported packages. These are all the packages the wizard discovered in the Smack JAR.

The Export-Package header lists those packages available to other plug-ins. Since the point of bundling is to make the library classes available to others, exporting them is a good thing. Note that without the exports, the Smack code would be usable inside the Smack plug-in, but not visible outside.
Notice that the bundling did not import any of the other files that were included in the Smack download. If you want the other files in the project, run the Import wizard and select the File system import option. Then browse to the expanded Smack directory and choose the files to import into the existing Smack plug-in project.
10.1.2 Testing the Bundling
It’s a good idea to test your newly bundled Smack just to be sure everything is in order. The easiest way to do this is to create another plug-in that uses Smack and then ensure that you can compile against it and run with it. The Smack API is very convenient, so let’s just create an RCP application that sends a message using the new Smack plug-in.
First, create a new plug-in project and call it smack.testing. Make it an RCP application, and on the Templates page select Hello RCP. This is similar to the procedure you followed in Chapter 4, “The Hyperbola Application,” to create the Hyperbola shell. When the wizard is done, the smack.testing plug-in editor is left open. On the Dependencies page, add org.jivesoftware.smack to the Required Plug-ins list and save the file.
We don’t really care about a UI for our little test, so open the generated Application class and replace the run() method with this little Smack example:

As you type the code, notice that code completion works and classes are resolved by the Java editor. This is a good sign—the smack.testing plug-in can see the Smack classes. Ultimate proof comes when you save the Application class and it compiles without errors.
To run the test, right-click on the project, and from the context menu select Run As > Eclipse Application. If all goes well, the test code connects to the eclipsercp.org chat server as the user “reader” and sends a message to “eliza.”
Eliza is actually a chat robot that responds to your messages in various ways. You should see her response in the regular Eclipse Console view. Depending on your UI setup, you may have to open it using Window > Show View > Other... > Basic > Console.
Returned message: HI THERE!
Here, Eliza has simply changed your message to uppercase and sent it back. Even if you get a time-out, the test has proven itself—you were able to write a plug-in that compiled and ran with the bundled Smack library.
Bundling Smack was relatively easy. Other libraries may be more complicated depending on what they are doing and how they work. The typical problems encountered revolve around Eclipse’s strong notion of component, class loading, and how the classpath is managed. Many libraries assume that all classes are available on the classpath, but Eclipse puts constraints on what classes are visible and from where. The most common programming patterns that can cause problems when bundling are the following:
• Does the code use reflection, Class.forName(String), or class references such as Foo.class?
• Does the library use the context class loader?
• Does it make assumptions about seeing classes from the Java Extensions class loader?
There are also some general issues to consider when bundling existing libraries:
• Are the original JARs signed and is the signature important?
• Does the license allow you to repackage?
• Can multiple JARs be combined and still work? For example, are there overlapping package structures that rely on classpath ordering?
10.2 Refactoring the Model
It’s time to refactor Hyperbola to use Smack rather than the prototype model. Doing this requires quite a number of minor but pervasive changes to accommodate new class and method names. Rather than detailing each of these changes, we take this opportunity to step back and show you how to use more Eclipse tooling, for example, code completion, organized imports, and refactoring. We also take you on a tour of the final code to highlight some of the transformation.
With the information provided here, it is quite feasible for you to do the refactoring yourself. Of course, if you would rather skip to the final code, you can compare the sample code for this chapter.
10.2.1 Introduction to Smack
Now that you have a Smack plug-in, let’s look at the Smack APIs. Smack and XMPP are based on a few very simple concepts. The XMPP protocol is an IETF standard for instant messaging and presence awareness. The basic idea is that a client connects to a server. The server manages a list of contacts for each user and routes chat messages from one user to another.
Messages are sent to and from the server in packets that are simple blocks of XML. There are only three basic message types: <message />, <presence />, and <iq />. For example, the following XMPP message is sent by a client to indicate a presence change to “away” or that the user has been idle for some time. The details of the markup are not particularly interesting except to note that the protocol is extensible and packets can have subtypes. The XMPP specification process includes a number of Jabber1 Enhancement Proposals (JEPs) that seek to add all manner of functionality such as file transfer.
1. Jabber is the historical name for XMPP.

Of course, no one really wants to write code to parse XML and manage streams of packets. Smack does all of the message parsing and stream management for you. It also provides clients with APIs that hide the XMPP implementation details.
Smack provides helpful classes that take care of listening to common packets and maintain models of many of the basic messaging concepts such as chats (Chat), the contacts list (Roster), individual contacts (RosterEntry), groups of contacts (RosterGroup), and connections to the server (XMPPConnection). It’s pretty easy to do things with Smack without intimate knowledge of XMPP—that is why we like it!
The typical workflow for a Smack client is to connect to the server and then send and receive messages while listening to packets sent and received using PacketListeners. The following code snippet illustrates how to use a PacketListener to look for incoming chat requests and tell the chat editor when one arrives:
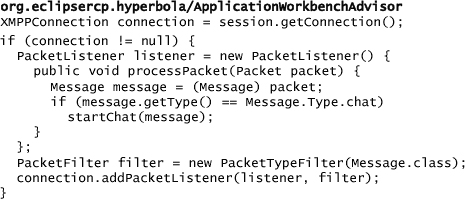
The packet listener is added to the connection for a particular server. It is triggered when a message arrives from that server. This is a standard pattern in Smack: Register a listener and do something as a result of an incoming or outgoing message.
Another common example is listening for presence and contacts list changes. In XMPP, the server manages your contacts list. Changes to the list or the state of those in the list are sent to the client by the server. As such, you can use a PacketListener to track the state of the contacts list and the status of your contacts.
10.2.2 Design Objectives
When the Hyperbola prototype was created, the hope was that by decoupling the UI from the domain logic, we could ignore the details of messaging and eventually replace the prototype model with a real messaging library without major changes. Indeed, the Smack domain model is close to that of the original prototype. For example, in the prototype there are three main classes called Contacts, ContactsGroup, and ContactsEntry; in Smack, the equivalent classes are called Roster, RosterGroup, and RosterEntry.
There are two approaches to integrating the Smack infrastructure into Hyperbola:
• Proxy all the Smack classes behind the existing prototype model and try to run without any changes to the actions and UI.
• Delete the prototype model and replace it with Smack directly.
The proxy approach is attractive as it isolates the changes. Unfortunately, it creates duplicate classes and overhead for keeping the proxies synchronized with the Smack classes. It is an interesting approach if you have the requirements to support different XMPP libraries—that is not the case here. So instead, the Hyperbola model is replaced entirely by that of Smack. The Session class is retained as it is still useful and does not have a Smack equivalent.
10.2.3 Deleting Prototype Classes
To start the refactoring, add a dependency from the Hyperbola plug-in to the newly created org.jivesoftware.smack plug-in. This is what you did with the smack.testing plug-in a little earlier via the plug-in editor’s Dependencies page. Be sure to include the org.jivesoftware.smack plug-in in the Hyperbola product by adding it to the Plug-ins list on the Configuration page of the product editor.
Now that the Smack classes are available in Hyperbola, it’s time to change the code. The general strategy for the refactoring is to do all the following steps on each model class in turn:
1. Rename a model class to match the simple name of the related Smack class.
2. Delete the renamed model class.
3. Go to each file that has errors and organize the imports and fix-up methods that changed names or signatures.
Renaming and deleting are relatively easy. In the Package Explorer, right-click on the Contacts class and select Refactor > Rename.... You are prompted for a new name and given the option to Update references. Ensure that that option is selected. You can also select some of the other update options, but they are not particularly needed here. Click OK and the tooling renames the class and updates all references. Use this to rename Contacts, ContactsEntry, and ContactsGroup to Roster, RosterEntry, and RosterGroup, respectively. You also need to rename IContactsListener to RosterListener. The Chat and Presence classes have equivalent names in Smack, so you can leave them alone. Note that you do not need to change the package name here. This step serves to update all the references to use the new short class names.
Tip
When “following the little red x’s,” it is convenient to use Ctrl+. to cycle between lines with compilation errors in the Java editor. Typically this is much easier than scrolling the file manually.
Next, delete all the renamed model classes except for Session. The Session class is still needed and is augmented with a ConnectionDetails class to track information about the user logged in. Then start working through the compile errors. For example, open the AddContactAction class and use Source > Organize Imports to fix the import list. Alternatively, click on the project or package in the Package Explorer and select the same operation to organize imports in all classes in the project or package. Then look at the remaining errors and fix the method calls. In general, the changes are just updates to referenced method names. For example, the following snippet shows the AddContactAction class’s run() after being updated:
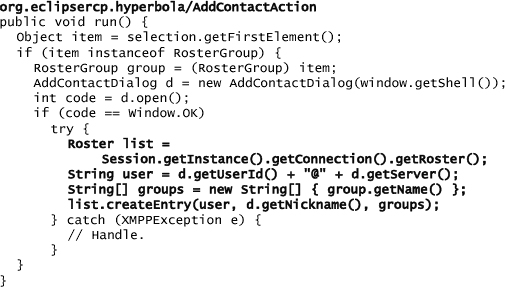
Once the refactoring is done, you are left with just Session in the original model package—Smack does not have an equivalent class. Smack does have an XMPPConnection class that manages the notion of server connections, but it connects to the server in its constructor. This makes it impossible to model connections before they are actually connected. When a connection field is added to Session, a session can simply have a null connection until the user has logged in.
For convenience, we also added a simple ConnectionDetails class as a data structure to store login information.
10.2.4 Adding Chats
Smack provides an object that models chats. To expose this in the UI, ChatEditors need to hook into Smack so that new chats cause an editor to be opened and incoming messages are directed to the correct ChatEditor.
Previously when we were introducing the PacketListeners, we showed an example of hooking a listener that calls startChat(Message) for all incoming chat messages. The following snippet shows the implementation of startChat(Message) and the logic for directing messages:
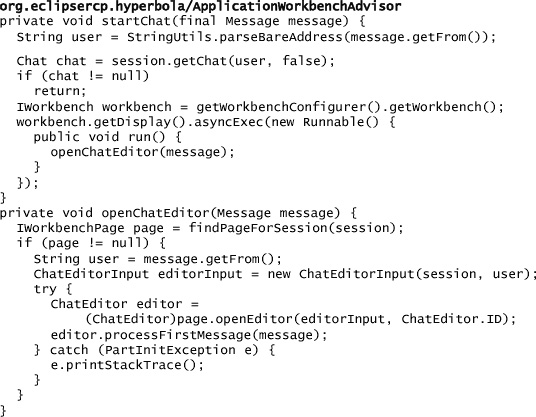
The code first looks for a Chat object matching the sender of the current message. If one is found, a chat already exists and the related ChatEditor is already listening for messages. No further action is needed since the editor gets its own notification and has a chance to display the message.
If, however, this is a new chat, we have to open a new ChatEditor, as shown in openChatEditor(Message). Note that since the new editor will have missed the first message—it didn’t exist and so was not listening—we have to prime it with the first message.
Note
There is an important pattern shown in startChat(). All Eclipse UI drawing and interaction must take place on the UI thread. So, when a method can be run on any thread, you must ensure that any UI-related code is wrapped in either Display.asyncExec(Runnable) or Display.syncExec(Runnable). Here the startChat() is called when an XMPP packet is received and there are no guarantees about the current thread. This pattern is very common in Eclipse applications using SWT.
10.3 Updating the UI
In Chapter 5, “Starting the Hyperbola Prototype,” we saw that TreeViewers use content and label providers to determine what elements to show and how to show them. The setup there was quite straightforward:
• The chat model objects implemented IAdaptable.
• Hyperbola registered an adapter factory that produced different IWorkbenchAdapters for the different chat objects.
• The TreeViewer was configured with standard Workbench content and label providers that knew how to use instances of IWorkbenchAdapter to produce the information needed by the TreeViewer.
Now that we have moved to Smack model objects such as RosterEntry and RosterGroup, we no longer have IAdaptables. These classes cannot be modified to implement IAdaptable or extend PlatformObject as we did in the chat model. While it is still possible to map Smack model objects to IWorkbenchAdapter, the standard TreeViewer and provider infrastructure expect IAdaptable instances. In the next section we replace the standard providers with something more flexible.
Before doing that, let’s update the adapter factory from Chapter 5, “Starting the Hyperbola Prototype,” to adapt instances of RosterEntry and RosterGroup to IWorkbenchAdapter. While we’re at it, we’ll change the adapter factory to be registered declaratively using extensions rather than registering it programmatically as we did before. The snippet below shows the XML markup that identifies the HyperbolaAdapterFactory class as being able to supply IWorkbenchAdapters for the new Smack RosterGroup and RosterEntry model objects. This also highlights the fact that the factories and types being adapted need not be in the same plug-in.

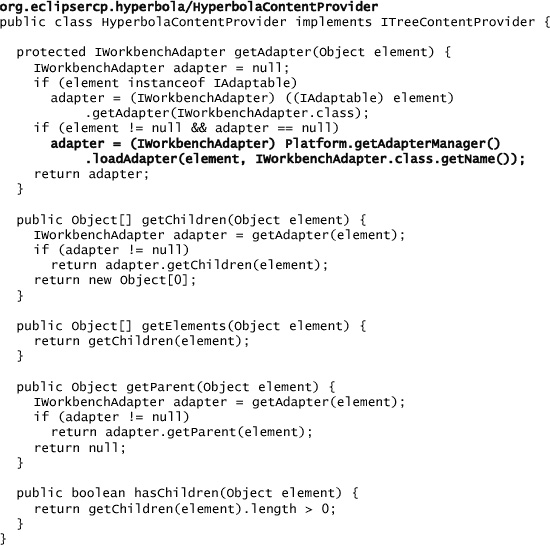
10.3.1 The Content Provider
Now that we have Smack model objects adapted to be IWorkbenchAdapters, we should be able to use the default providers to populate the Contacts TreeViewer with RosterGroups and RosterEntrys. Unfortunately, the Workbench’s built-in content and label provider classes require instances of IAdaptable, not just objects that can be adapted to IWorkbenchAdapter. This is a quirk of the implementation, not a design point. To work around this, we have to implement our own providers. Luckily this is reasonably easy.
The required content provider simply implements four methods that map almost directly onto the IWorkbenchAdapter methods. Go ahead and create the content provider as shown below. Notice that this content provider is completely generic and does not mention anything about Smack, chats, or Hyperbola. It just interprets IWorkbenchAdapters as needed by TreeViewers.
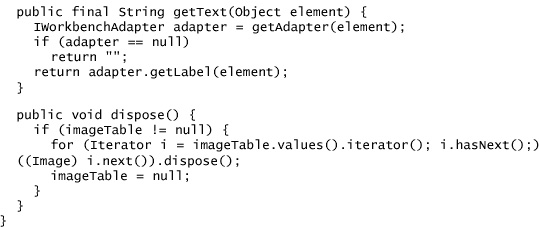
10.3.2 The Label Provider
The label provider is a little more complex because it has to manage images, but as you can see from the snippet below, it otherwise follows exactly the same pattern as the content provider. Notice again that this provider is generic.

10.4 Chatting with Eliza
Now that Hyperbola has a real messaging library behind it, exercising it gets a little trickier. You need to have a real messaging server and someone to chat with. When you tested the bundled Smack, you connected to eclipsercp.org as “reader” and then chatted with “[email protected],” a robot chat agent. Let’s do the same thing with Hyperbola.
Open the Application class and modify run(Object) to call a login method before starting the Workbench as shown in the following snippet:

Add the login(Session) method as shown. This is basically the same code from when you were testing earlier. The code opens the connection, stashes it and the connection details in the given session, and returns. If the login fails, false is returned and Hyperbola exits.
Now start the Hyperbola application. You are automatically logged on to the server as “reader.” Hyperbola shows you the contacts list that contains only one entry, “eliza.” Select that entry and use Hyperbola > Chat to start chatting with Eliza, as shown in Figure 10-3.
Figure 10-3 Chatting with Eliza

That’s it. The Hyperbola application is now a functioning chat client.
10.5 Summary
This chapter covered a lot of details. Although most of it was specific to the Hyperbola application and XMPP, it’s worthwhile to step back and see how the experiences apply more generally to your RCP applications:
• We can’t say this enough: Separate the UI from the domain model. Build actions that manipulate the model and UIs that update accordingly. This makes your application easier to test and evolve. Many applications take this one step further and split the UI classes from the domain model classes into separate plug-ins. This is a popular pattern with Eclipse platform plug-ins, where related plug-ins are split and post-fixed with core and ui to differentiate them. We have not done this here just to keep things simple. The examples in Chapter 23, “RCP Everywhere,” go into plug-in structuring in great detail.
• Your domain model is important and is something that is not addressed by Eclipse. Eclipse does, however, provide frameworks such as the extension registry and reusable UI components that make it easier to quickly get a product-quality application running. As we mentioned at the outset, this is the power of the Eclipse RCP. It is all the middleware code that you need to have but don’t really want to write.
If you had trouble following along with all the code changes, import the code for this chapter and browse it to see the complete picture of changes that occurred.
10.6 Pointers
• The Smack library is available at www.igniterealtime.org/projects/smack/.