Chapter 9. Packaging Hyperbola
The good news now is that you have a branded product configuration. But even though Hyperbola is fully branded, you still can’t send it to your friends because it lives in your workspace. In this chapter we show you how to package that configuration and export it in various forms. The goal is to take Hyperbola from a laboratory prototype to a complete and ready-to-install Eclipse application. By the end of this chapter you will be able to impress your mother with the application you’ve written.1 This chapter also covers
1. Don’t laugh. The “Mom test” is actually quite challenging.
• The different shapes that RCP products can have
• Exporting Hyperbola and running it outside the workspace
• Exporting Hyperbola for other platforms
• Moving Hyperbola out of the laboratory and into the real world
9.1 Exporting Hyperbola
So far you have been running Hyperbola in place in the workspace. To export it, you have to identify what parts of the org.eclipsercp.hyperbola project go into the org.eclipsercp.hyperbola plug-in.
Open the plug-in editor for the Hyperbola plug-in and switch to the Build page. The Binary Build section shown in Figure 9-1 lists the set of development-time files and folders that are also part of the Runtime plug-in structure. PDE takes care of adding the compiled Java classes to the build output, but you have to manage the other files. For example, the whole META-INF directory and plugin.xml are required at runtime as they describe the plug-in. These were added to the list in Chapter 4, “The Hyperbola Application,” when the project was first created.
Figure 9-1 Binary build specification

In Chapters 5, “Starting the Hyperbola Prototype,” and 8, “Branding Hyperbola,” you added an icons directory, the splash.bmp file, the about.html file, and the plugin.properties file—all of which are runtime artifacts. Update the build specification for the Hyperbola plug-in by checking these resources in the list. If a resource is not checked, it is not included in the output.
Tip
Failure to correctly set up the Binary Build list is a very common source of errors. Typically, the plug-in works fine when run from the workspace, but when exported, various images, text messages, and other elements are missing. If this happens to you, first check the Binary Build list.
To start off, find the hyperbola.product file in the Package Explorer or Navigator. Right-click and choose Export... > Eclipse product. Alternatively, open the product editor, select the Overview page, and click on the Product Export wizard link. Either way, you should see the Product Export wizard, as shown in Figure 9-2.
Figure 9-2 Product Export wizard
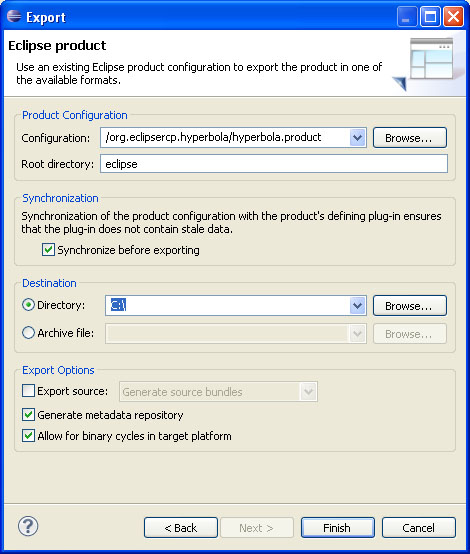
First, ensure that the Hyperbola product configuration is selected in the Configuration drop-down. Then fill in the Root directory, the top-level directory that is embedded in the export output. For example, it is useful to set this to be the name of your product with the version number. This way, people can extract the product and it gets laid out on disk in a descriptive directory structure. For now, use “Hyperbola 1.0” in this field.
Earlier we talked about how the product configuration is an aggregation of information maintained in several different files. Checking the Synchronization check box ensures that the product configuration is properly synchronized before exporting. This helps avoid any surprising, and typically quite hard to debug, problems when running the exported product. Leaving this checked is highly recommended.
Next, pick the export Destination and set the shape of the export Archive file or Directory. This setting does not affect the content of the output—it is the same either way. Choose Directory so you can easily test what you are exporting. Later you can export as an archive to make Hyperbola easier to distribute. Put the output in any convenient location, but remember that the root directory entered earlier is appended to the location specified here.
Having set the various options, click Finish and PDE starts the export in the background (i.e., you can continue using Eclipse while the export completes). First, it compiles the code from the workspace according to the configuration you described. The Export wizard then gathers the compiled code and the required parts of the target and outputs them to the specified location.
When the export is done, c:Hyperbola contains a fully branded Hyperbola that runs outside the workspace. Navigate to c:Hyperbolahyperbola.exe. Notice that the executable has a branded icon. Run the executable and enjoy your completed RCP product!
Undoubtedly you will want to share Hyperbola with your friends and coworkers. Go back and export the product again. This time, specify an Archive file output and mail them the archive.
9.2 Exporting for Other Platforms
But what about your friends who use different operating or window systems or run on different hardware? They can’t run the Hyperbola you just built because it contains platform-specific code. To package for other platforms, either you need to run on that platform, which is hard to manage, or you must have the code for those platforms on your machine. This is a typical cross-platform development scenario.
The first problem is to acquire all the platform-specific Eclipse code needed for these other platforms. Fortunately, the Eclipse platform team supplies a delta pack for every release. The delta pack contains all parts of the Eclipse SDK that are platform-specific. So, for example, if you are on Windows and want to export Hyperbola for Linux/GTK, you need the delta pack.
Note
The issue of platform-specific code shows up for several plug-ins in the Eclipse platform. SWT, for example, has a considerable amount of platform-specific code. Several other plug-ins have platform-specific fragments that deliver natives and Java code to support optimizations. In some cases the plug-ins work fine without the platform fragments, but with the fragments they are faster or support enhanced functionality.
Thankfully, in Chapter 3, “Tutorial Introduction,” we already added the delta pack to the Hyperbola target definition. However, you can get the delta pack from the Eclipse downloads site, http://eclipse.org/downloads, by going to the Eclipse Platform downloads page. Scroll down to the section labeled Eclipse RCP SDK and download the RCP delta pack.
Note
In Chapter 3, “Tutorial Introduction,” we talked about the importance of keeping your target and development Eclipse installs separate. Using the delta pack is a fine example that motivates that practice. If you were using the development Eclipse install as a target, the simple default setup, the preceding steps would have added the delta pack to the development install. As a result, the development environment would be cluttered with extra and irrelevant plug-ins.
Now your target has all the plug-ins, fragments, and launchers for every platform supported by Eclipse, but you have to set up your product to use them. Return to the Hyperbola product editor and switch to the Dependencies page. In the Plug-ins and Fragments section click Add... and select all the SWT-related elements listed, that is, all elements starting with org.eclipse.swt. These are the SWT implementations for all supported platforms. Since SWT is the only platform-specific part of Hyperbola, that is all you need. Save the product configuration and open the Export wizard from the Overview page.
Open the Export wizard as before and this time check the Export for multiple platforms option. Complete the first page of the wizard as before and click Next to get to the Cross-platform export page shown in Figure 9-3. Select the set of platforms for which you want to export and click Finish.
Figure 9-3 Cross-platform export
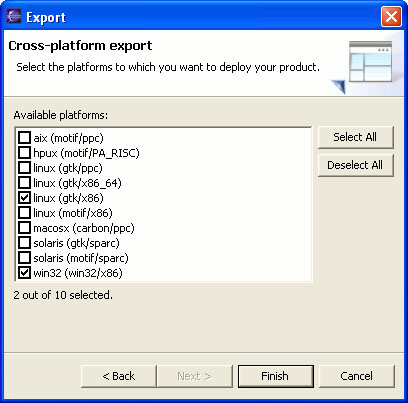
The export output goes to the archives or directories specific to the related platform. For example, the Windows output appears in the directory named c:win32.win32.x86Hyperbola.
9.3 Summary
Exporting Hyperbola is effectively the final step in branding the application. Without exporting, Hyperbola is just a wad of code in your workspace. Exported, Hyperbola becomes a full-fledged stand-alone application. PDE’s exporting facilities make it easy to create these fully branded product packages—even across platforms. Now you have something to send to others.
9.4 Pointers
• Chapter 24, “Building Hyperbola,” describes how to automate this build process.
• Chapter 26, “The Last Mile,” details how to sign the output JARs and how to export for use in Java Web Start scenarios.