Chapter 8. Branding Hyperbola
Hyperbola is looking pretty good at this point—you can add contacts, initiate chats, and exercise the UI. Hyperbola shows images for the various online states, has actions in all the right places, and puts forward the look and feel we want. The people around you are in awe. But it still does not feel like a normal application—it is missing the splash screen, the images in the window title bar, a branded launcher, and other elements. We’ll take care of that here. More generally, the goals of this chapter are to
• Detail the branding for Hyperbola
• Show how product configurations are created
• Enumerate the various aspects of Eclipse product branding and how to configure them
• Create a fully branded Hyperbola product
8.1 Defining the Hyperbola Product
Before you can do any branding or packaging of Hyperbola, you must define a product configuration. Product configurations gather all the information about splash screens, launcher icons, window images, About text, plug-in and feature lists, and so on into one place. Select the org.eclipsercp.hyperbola project and, if you are in the Plug-in Development perspective, use File > New > Product Configuration to start the New Product Configuration wizard as shown in Figure 8-1. Otherwise, use File > New > Other... > Plug-in Development > Product Configuration.
Figure 8-1 New Product Configuration wizard

In the wizard, pick a location for the product configuration. The configuration file can go in any project associated with the product, but so far we have only one project, so there’s not much choice. Now give it a file name such as hyperbola.product. The configuration file name must end in .product.
Next, choose a technique for initializing the configuration. The wizard can extract information from an existing product or launch configuration or simply create a basic product. If you have been following along, you already have a launch configuration called “Hyperbola” or “Eclipse Application.” The currently defined configurations are listed in the Use an existing launch configuration drop-down. Enable this option and pick a configuration you have already used and you know works.
Note
If you don’t have a suitable launch configuration, launch Hyperbola by opening the Hyperbola plug-in editor and clicking on one of the Launch links in the Testing section of the Overview page. Then continue creating the product configuration.
When you click Finish, the wizard reads the launch configuration and uses it to build a product definition. In particular, it gets the list of plug-ins and the ID of the application extension used in the launch. The new product configuration is opened in an editor, as shown in Figure 8-2.
Figure 8-2 Hyperbola product overview

As with the plug-in editor, the product configuration editor gathers together information from many different files and presents it all in one place. The configuration information is grouped onto several tabs within the editor. The Overview page in Figure 8-2 shows the Product Definition section.
Here you specify the ID, the Version, and the Name of the product. Furthermore, you specify the Product and Application identifiers. You need a product definition and ID to tell Eclipse how to brand your application, so click New... to get the New Product Definition dialog shown in Figure 8-3.
Figure 8-3 New Product Definition dialog
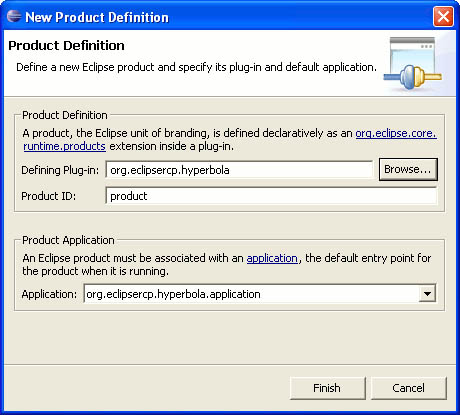
As with applications, product extensions are contributed via extensions. They have an ID and identify the application to run when the product is run. Choose the Hyperbola plug-in and type product in the Product ID field. The Hyperbola application should already be selected, but it’s worth checking. Click Finish to return to the product editor. The new product and application values show up on the Overview page.
You still need to fill in the Product Name, Hyperbola Chat Client. This is the string that appears in the title bar of the Hyperbola windows. Launch the product using the links in the Testing section of the Overview page. Hyperbola should now look something like Figure 8-4.
Figure 8-4 Ignored window title branding
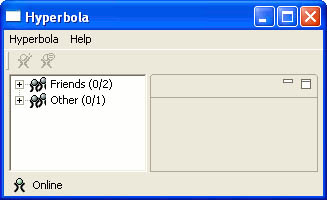
Notice that the title bar of the window still says “Hyperbola.” It should be “Hyperbola Chat Client” as you entered in the product configuration editor. Where’s that coming from? Remember all the way back to Chapter 4, “The Hyperbola Application,” when you first generated Hyperbola from the template? You entered “Hyperbola” in the template wizard and the string was embedded in the code snippet:
org.eclipsercp.hyperbola/ApplicationWorkbenchWindowAdvisor
configurer.setTitle("Hyperbola");
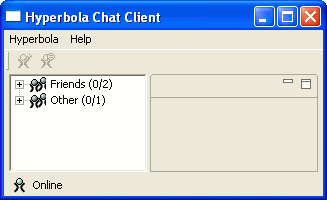
Go back and delete the setTitle() call and then run the application again. Figure 8-5 shows Hyperbola with a properly branded title bar label.
Figure 8-5 Good window title branding
You may not have noticed, but launching the product caused a new launch configuration to be created. Open up the launch configuration dialog (Run > Run...) and take a look at the list. There is Hyperbola, which you used as a base for the product configuration, and a new one called hyperbola.product (assuming that is the name you used for your product configuration file). The product editor uses this new configuration to launch your product. Since it is a normal launch configuration, you can run or debug it directly and use keyboard shortcuts such as F11 to debug the last launched configuration.
PDE keeps the launch configuration and product configuration synchronized. If you change the list of plug-ins in the product configuration and save, the launch configuration is updated. This relationship is one-way—launching from or changing the launch configuration does not trigger any synchronization of the product configuration.
8.2 Window Images
Now that Hyperbola has a product configuration and the window title is set correctly, the next step is to add the graphical branding cues such as the splash screen, images, and icons. The next few sections go over each element of product branding.
Select the Branding page in the product editor and review the options for window images. Window images are the images that are typically shown at the top left corner of the window, in the task bar, and in other locations; it really depends on the window system you are running. Figure 8-6 shows the Window Images section of the Branding page. Here you identify two GIF images, one 16 × 16 and the other 32 × 32.
Figure 8-6 Window Images configuration
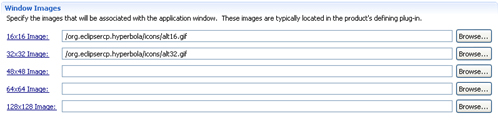
Typically, the images are stored in the plug-in that contributes the product extension. The images for Hyperbola are in the sample code for this chapter, as outlined in Chapter 3, “Tutorial Introduction.” Use the Samples Manager to copy the contents of the org.eclipsercp.hyperbola/icons folder into the org.eclipsercp.hyperbola project in your workspace and fill in the image locations as shown. Save the product configuration and then launch Hyperbola to see how the window images show up. Figure 8-7 shows the new look of Hyperbola.
Figure 8-7 Window image branding

The running Hyperbola now looks like any other application on your system. The next step is to provide a custom launcher with proper icons.
8.3 Customizing the Launcher
The launcher is the program that end users run when they want to start Hyperbola, for example, hyperbola.exe on Windows. You could just use the launcher that comes with Eclipse, but of course you don’t want to tell users to “double-click on eclipse.exe” to run Hyperbola—you want a hyperbola.exe for them to run. Furthermore, the Eclipse launcher has Eclipse icons associated with it. It makes more sense that these be Hyperbola-specific icons.
To set this up, use the Program Launcher section on the Launching page of the product editor as shown in Figure 8-8.
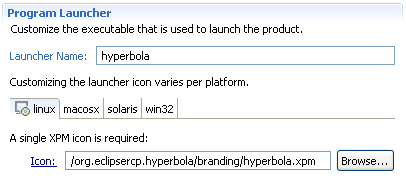
The Launcher Name box allows you to enter the simple name of the launcher. You should not append .exe. That information is platform-dependent and PDE takes care of it when the product is exported.
The next section contains a series of entry fields for identifying the icons associated with Hyperbola’s launcher. It turns out that each OS requires different image sizes and formats, so the product editor has a section for the supported OS. Figure 8-8 shows the sections for linux, macosx, solaris, and win32.
Fill in the image names for the OSs in which you are interested. The Hyperbola images are in the sample files you imported earlier in the branding folder. The launcher images are used in the process of exporting the products. During export, PDE creates a launcher program that behaves exactly like the standard Eclipse launcher but is named hyperbola and is branded with the icons you specified. We talk about launcher branding here to complete the branding story, but you cannot test it until the next chapter where you learn how to export Hyperbola.
8.4 Splash Screen
The splash screen is the first visible part of Hyperbola. Figure 8-9 shows the Location section of the Splash page in the product editor. Eclipse expects the splash screen to be called splash.bmp, so all you need to do is identify the plugin that contains the file. You can get Hyperbola’s splash screen from the sample code for this chapter. Note that if you leave this field blank, the splash screen is assumed to be in the same plug-in as the product. We recommend making an explicit choice here for completeness.
Figure 8-9 Defining the splash screen

Note
Currently, the Eclipse launcher can only display splash screens that are saved as BMP images, the standard bit-mapped graphics format used on Windows. Although BMPs are a Windows standard, they can be saved and read on any platform.
Shipping Locale-Specific Files
If you need to have locale-specific splash screens or message catalogs, you have to put the relevant files into a locale-based directory structure, as shown in Figure 8-10. Under the nl directory, there is a structure that mimics the structure of Java locale strings. For example, the splash screen for the English locales is in the directory nl/en. The directories under nl/en contain data for English locale variations. Note that the root of the plug-in still contains splash.bmp and plugin.properties files. These are used when matching locale-specific files cannot be found.
Figure 8-10 Locale-specific file structure
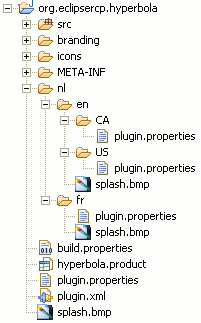
The nl directory structure can be carved off and shipped separately in one or more fragments. When fragments are installed, their resources and code are seamlessly merged with those of their host plug-in. See Section 27.3, “Fragments,” for more details on fragments. Using the fragment approach, the nl file structure in Figure 8-10 is simply moved to a set of fragments.
The locale-specific files in the structure are automatically searched when looking for translated strings. For example, many of the values in a plugin.xml are displayed in the UI and should be translated to support multiple locales. To enable this, %variables are used instead of the real text. The variable names correspond to keys in a plugin.properties file. The values in the file are translated for each locale and shipped separately in fragments. The text for the About dialog discussed later in this chapter is a good example of text that could be translated.
Now when you run Hyperbola, the splash screen appears. Hyperbola is a modest-size application and it comes up very quickly on average machines—so quickly, in fact, that there is barely time to read the splash screen. However, if the machine is slower or bogged down, or Hyperbola is installed on a network drive, the startup time may be longer. Without a splash screen, users may begin to wonder what, if anything, is happening. Including a splash screen helps set user expectations and gives your product a somewhat more polished feel.
8.5 About Information
Most applications have an About dialog that reports product version, license, and copyright information to the user. The Eclipse Workbench includes a standard dialog that presents this information and gives users access to configuration information that is useful if they need to report problems. You are, of course, free to ignore this dialog and write your own. If you want to use the standard About dialog, read on.
8.5.1 Product About Information
The About action, accessed via Help > About Hyperbola, was added to Hyperbola in Chapter 6, “Adding Actions,” but the About dialog is currently empty. Let’s add branding information to update the dialog, as shown in Figure 8-11.
Figure 8-11 Hyperbola About dialog
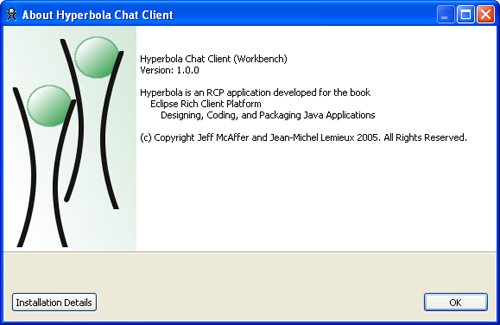
The standard About dialog is branded by supplying an About image and some About text. The About image is the graphic shown at the left side of the dialog. This image can be anything you want, but it should be in GIF format. If the image is smaller than 250 × 330 pixels, the About text is shown at the right of the image in the dialog, as in Figure 8-11. If the image is larger, the About text is not shown and the image fills the entire top portion of the dialog. In any event, the image should be smaller than 500 × 330 pixels.
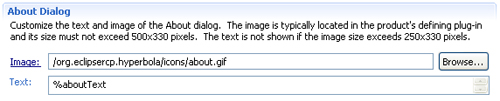
The branded About image and text are defined in the About Dialog section of the Branding page in the product editor, as shown in Figure 8-12. Notice that the About text has a value of %aboutText. You could put real text here. Using %aboutText indicates to Eclipse that the value is human-readable and the real text can be found in the plugin.properties file associated with the product plug-in. This allows the text to be adjusted to suit different locales. Create a plugin.properties file at the root of org.eclipsercp.hyperbola and add the following content:
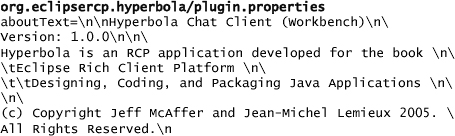
Figure 8-12 Defining About dialog branding
As one final check, run Hyperbola and open the About dialog. Don’t forget to synchronize. Click on the Installation Details button. There should be a collection of Eclipse plug-ins and a single Hyperbola plug-in. Notice that our plug-in does not have a provider. Open the plug-in editor for Hyperbola by double-clicking on the plugin.xml file. On the Overview page, enter eclipsercp.org in the Provider field. Now rerun and check the plug-in details page.
8.5.2 Installation Details About Information
You may have noticed a Legal Info button at the bottom left of the installation details dialog. When you select a plug-in and click Legal Info, you are shown the contents of the about.html file in the root of the plug-in. Typically this contains detailed licensing information about the plug-in, but since it is a standard HTML page, it can present anything you like.
Note
If your plug-in is shipped as a JAR file and the about.html references other pages in the plug-in, the additional pages must be in a directory called about_files at the root of the plug-in. This is required because Eclipse extracts the files from the JAR before presenting the root file in the Web browser—browsers typically cannot see inside JARs.
8.6 Summary
Now you have a fully branded, somewhat functional Hyperbola product. There is enough here to give users a real idea of the look and feel of the final product on their desktop.
The only problem is that your office is getting crowded with all the people wanting to take Hyperbola for a spin. You really should distribute it for them to see. Unfortunately, Hyperbola is still in the laboratory—your workspace. Giving it to other users means giving them your entire workspace and getting them to install the full Eclipse SDK. That’s where product exporting, the subject of the next chapter, comes in.
8.7 Pointers
• The Eclipse User Interface Guidelines can help you with branding your application: http://wiki.eclipse.org/User_Interface_Guidelines.