Lesson Files | Lessons > Lesson_07 > 07Photo Portfolio.key Lessons > Lesson_07 > 07Financials.key Lessons > Lesson_07 > Portfolio Samples |
Time | This lesson takes approximately 90 minutes to complete. |
Goals | Print a presentation as a useful handout Export a presentation as PDF and PowerPoint documents Export a presentation as a QuickTime movie Post a presentation on the web either as HTML or with iWeb Post a presentation on YouTube Export a presentation for display on iPods and iPhones Create a DVD of your presentation |
So you gave your presentation, and it was a hit, but not everyone could attend. Now you’re being asked not only to send it, in various formats, to all those who missed it but also to share it with a wider audience on the web. Fortunately, Keynote is good at sharing.
The concept is essentially “Create once, publish many.” By enabling you to export to a PDF file, a PowerPoint file, a DVD, the Internet, and even to an iPhone or iPod, Keynote ensures that you can distribute your good ideas and important information to the world.
In this lesson, we’ll export the photographer’s portfolio presentation in a variety of formats for easy publishing.
It’s often useful to hand out printed copies of your slides so attendees can take notes or review the presentation after the meeting—a great takeaway for your audience. Keynote also lets you publish selected slides, slides with presenter notes, slides without backgrounds, just the outline, and much more.
Tip
In some situations, you may want to distribute handouts after your speech. That way, audience members won’t skip ahead or browse the handouts during the presentation.
Open 07Photo Portfolio.key, and choose File > Print (or press Command-P).
From the Print options, select Handout. Notice that you can select the number of slides per page as well as various display options, including the ability to print each stage of your builds on separate pages.

To preview printed pages, click the PDF button and choose Open PDF in Preview.

Keynote will generate a temporary PDF file from your document and display it in the Preview application.
Return to Keynote by clicking its icon in the Dock.
The PDF file format has become the format of choice for creating and sharing documents. A PDF file retains its original appearance (including fonts and images) when viewed on computers running Mac OS X, Windows, or UNIX, as well as on mobile devices such as PDAs and cell phones.
Exporting your Keynote presentation as a PDF file is a versatile way to distribute your slides or speaker notes for onscreen viewing. In this exercise, we’ll create a PDF and password-protect it.
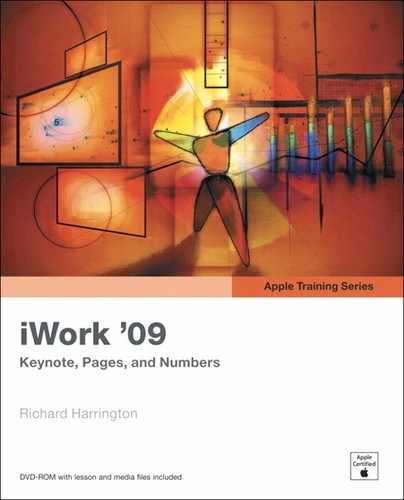
With your presentation open, choose Share > Export. Click the PDF button.
Select either Slides (to export slides only) or Slides With Notes. Then select any additional print options:
Print each stage of builds—. Creates a separate image for each stage of an object build.
Include skipped slides—. Includes skipped slides in the PDF file.
Add borders around slides—. Shows borders around slides.
Include slide numbers—. Shows a slide number next to each thumbnail.
Include date—. Adds the current date to your PDF file.
Tip
Keynote does not give you precise control over the file size of the PDF. If you want to optimize the file for the Internet, you can use Automator, which is found in your Applications folder. Just open Automator and follow the guided steps to choose a file. You can then use Compress Images in PDF Document Workflow to shrink the file.
Specify an image quality of Good to create the smallest file.
Click the disclosure triangle next to Security Options.
In the area “Require a password to,” select the checkbox next to open document.
Click Next. Then give the PDF file a name and choose a location for the file.
Click Export.
Note
Most presentations exported as a PDF are intended to be viewed onscreen. If you want to create a PDF for printing, choose File > Print, and from the PDF popup menu, choose Save as PDF. You can also create PDFs when printing speaker notes. Just click the PDF button in the Print dialog and choose Save as PDF.
In Lesson 5, “Importing from PowerPoint and Working with Charts,” you imported a Microsoft PowerPoint presentation and enhanced it. But you can also build a presentation in Keynote and then save it as a PowerPoint file, which can be useful when sharing presentations with Windows users.

PowerPoint handles graphics differently than Keynote, so slight variations may exist between the original Keynote file and the exported PowerPoint slideshow (especially when presented on a Windows computer).
PowerPoint does not support some Keynote features:
Be sure not to disable text by deselecting Body in the Slide inspector. Otherwise bulleted text will be lost when you export to PowerPoint.
PowerPoint does not recognize features such as picture frames and Instant Alpha (transparent images). Alpha channel graphics may work on Macs running PowerPoint, but are less likely to function properly under Windows.
Certain builds and transitions are unique to Keynote and will not export to PowerPoint. If a transition isn’t supported, it will be replaced with the closest match or a dissolve.
Keynote gives you flexible export options to save your slides as image files, which is very useful when preparing graphics for use with a page layout program such as Pages.
With your presentation open in Keynote, choose Share > Export. Click the Images button.
Select the images you want to export.
You can choose all the slides or specify a range of slides.

If you want to create a separate image for each stage of an object build, select “Create an image for each stage of builds.”
From the Format pop-up menu, choose a file format suitable for your project and delivery platform:
JPEG (variable quality)—. JPEG files support variable compression rates that can be optimized for Internet delivery.
PNG (high quality)—. PNG files work well for multimedia use and support embedded transparency.
TIFF (highest quality)—. TIFF files work well for print projects.
Click Next. Give the file a name and choose a location in which to save the exported file.
It is a good idea to specify a folder that will contain the images.
Click Export.
Keynote exports each image and adds a sequential number to the filename you specified.
Making a QuickTime movie of your presentation makes sense for many reasons: to share it with others as a podcast, to edit it together with video footage, or to play it on a computer without Keynote.
In Lesson 3, “Adding Video and Animation” we imported and played back QuickTime movies in a presentation. The QuickTime exporting options in Keynote are just as powerful. Let’s make a movie.
With the presentation open, choose Share > Export. The Export dialog opens.
Click QuickTime to access movie options.

The QuickTime options you choose will depend on the way you intend to use your QuickTime movie. For example, do you want to make a movie that runs interactively on a desktop computer, or do you want to convert your presentation to a video file and combine it with other video clips in iMovie?
For this exercise, let’s assume you’re creating a simple video of the presentation to put on a CD.
From the Playback Uses pop-up menu, choose Manual Advance.
The Playback Uses pop-up menu includes several choices that are suitable for a variety of presentation situations:
Manual Advance—. Gives viewers total control over the slideshow and requires them to manually click to advance slides. This is a good option to use for a self-paced viewing of slides or to create a QuickTime backup of your presentation. This method works well if you’re creating a version to run from a CD or DVD-ROM, especially on a machine running Windows.
Hyperlinks Only—. Lets the movie run as an unattended kiosk presentation. The user can only click hyperlinks to navigate to other slides.
Recorded Timing—. Uses timings that you previously recorded into the slideshow by choosing File > Record Slideshow.
Fixed Timing—. Runs the slideshow with no user interaction. You must set slide duration and build options. If slides contain automatic build timings, those will be used.
Note
You learned how to create hyperlink navigation in Lesson 2, “Adding Photos, Charts, and Sound.”
Select the “Enter full screen mode when opened” checkbox.

Now let’s choose the playback quality settings for the movie.
Keynote offers three quality settings to choose from. The Small option is best for publishing to the Internet, because a smaller file size means a faster download. The Medium option provides more image quality at a larger file size, so use it in situations where downloading time is not an issue. The Large option works best when you want maximum image quality, such as when the movie will play from a hard drive.
From the Formats pop-up menu, choose CD-ROM Movie, Medium to set an appropriate playback quality for CD-ROM distribution.
This presentation has no audio, so deselect the “Include audio (sound files, movie audio)” checkbox, and click Next.
Note
The “Include audio” checkbox is selected by default and can increase the file size of your movie. Even a silent soundtrack increases file size, so be sure to deselect “Include audio” if your presentation is silent.

Give the movie a name, and choose the location where you want to save the exported file.
Click Export.
Depending on the number of slides and the speed of your Mac, the exporting process can take a few minutes. The preview window may distort wide-screen slide presentations, but they will play correctly in the final movie.
In the Finder, navigate to the file and double-click the file to open it.
The movie opens in the QuickTime Player application. It should fill your screen and loop indefinitely if you used the settings in this exercise. Because the movie was exported at CD-ROM quality, the image quality will be reduced (especially during animated transitions).

Press Esc to close the full-screen movie.
Close QuickTime Player and return to Keynote.
The Export to iPod command automatically creates a movie properly sized and compressed for playback on an iPod or iPhone. Publishing your presentation in this format is a great way to take a presentation to a small group or a one-on-one setting.
The exporting process is nearly identical to the Export to QuickTime method, with the following exceptions:
The movie is automatically added to your iTunes library.
The movie is sized to 640 × 480 pixels (the maximum size for a video-capable iPod).
The movie is compressed using the H.264 codec using iPod-compatible settings. (This is identical to the Share > Send to iTunes option.)
Note
If you want to include a voiceover narration with your presentation, see “Creating a Self-Running Slideshow” in Lesson 6, “Rehearsing and Delivering Your Presentation.”
Tip
To publish a movie of your presentation as a podcast, you can use GarageBand. In Keynote, choose Share > Send To > GarageBand to create a movie file. You can use the podcasting tools in GarageBand to enhance the movie with music and then publish it as a podcast. For more information on podcasting, see Apple Training Series: iLife ’09 (Peachpit Press, 2009).
Publishing a presentation on the Internet has several benefits. After a public presentation, the Internet is a great place for attendees to find your notes. Posting a presentation can also drive potential customers to your website. Keynote can build webpages from a presentation and place each slide as a graphic on a webpage.
Tip
Want to share the presentation with others during the construction stage? See “Sharing a Presentation on iWork.com” later in this lesson. Sharing a document on iWork.com can be helpful if you’re developing a group presentation or creating one for a client.
Creating a webpage with Keynote is easy:
If necessary, in the Lesson_07 folder, open 07Photo Portfolio.key.
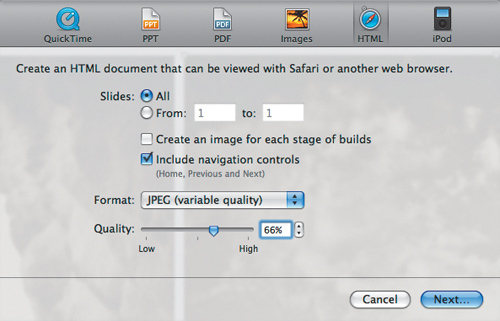
Choose Share > Export; then click HTML.
In the Slides area, choose All.
You’re going to export all the slides to a website.
To include navigation controls (which is a good idea), select the “Include navigation controls” checkbox.
This option adds Home, Previous, and Next navigation buttons.
For maximum compatibility with all web browsers, from the Format pop-up menu, choose JPEG.
Adjust the compression quality to suit your needs.
A value between 50% and 80% is acceptable for most uses. Smaller numbers mean a quicker download, but also reduced image quality.
Click Next.
Name the webpage Photo Portfolio, and choose a location in which to save the exported file.
Click Export.
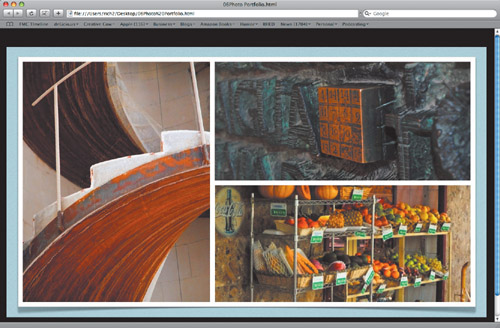
The webpage takes a moment to generate and then can be viewed by opening the HTML file that Keynote creates.
Another way to share a presentation on the Internet is to create a website by using iWeb. This option is different from exporting HTML because you can share a video podcast. It also offers file-sharing capabilities for PDF and Keynote files.
With your presentation open, choose Share > Send To > iWeb.
From the File Type pop-up menu, choose PDF, and for this exercise, leave the default values unchanged.
The menu includes three file-type choices:
PDF—. Creates a PDF file for download and viewing.
Keynote Document—. Shares the Keynote file with others on your presentation team.
Video Podcast—. Converts the presentation to an iPod-compatible movie and offers a subscription option.
Click Send to export the presentation to iWeb.
iWeb opens as the active application.
Note
If you don’t have a MobileMe account active, iWeb presents a MobileMe signup dialog that you’ll need to fill out before iWeb will display the template chooser. You can choose to register, sign up for a trial, or click Cancel.
In iWeb, you can specify a page type, as well as choose from several different themes.
For this exercise, choose the Darkroom theme and the Blog page type.
iWeb offers several themes to stylize the website. The Darkroom theme is designed for photography-oriented projects. Using a blog page allows you to describe the presentation and make the source file available for download.
Click Choose to create the webpage.
Keynote ’09 allows you to publish your presentation to YouTube, the popular video-sharing website owned by Google. You can convert a Keynote presentation into a self-running movie configured for public or private viewing; and then, to share the presentation, you can distribute the link to potential viewers. This is an easy way to share a portfolio, a presentation, or other slides with a broader audience.
With your presentation open, choose Share > Send To > YouTube.
A dialog appears prompting you for additional input about your YouTube account.
Note
You’ll require a YouTube account to publish your video. You can set up a free YouTube account at www.youtube.com.
Enter your user name in the Account field.
Enter your password in the Password field.
From the Category pop-up menu, choose a category for your movie.
Categories will help others find your content while browsing YouTube.
Enter whatever information you choose into the Title and Description fields.
Add keywords into the Tags field that will help people find your movie when searching for it on the YouTube website. Be sure to put a comma between each tag to separate them.

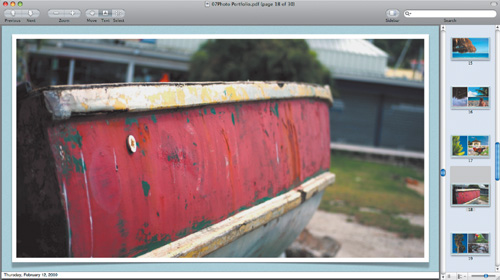
From the Size To Publish pop-up menu, choose a resolution to identify how large the movie should be. You can choose Mobile – 480 × 272 (which is good for mobile devices) or Medium – 640 × 360 (for use on a computer or Apple TV.)
Click Next.
A new dialog opens with options to control the movie playback. The controls are similar to the iDVD export options discussed later in this lesson.
For this slideshow, let’s have a slower-paced presentation that allows the viewer to enjoy the slides. Use the following options to set the pace of your show:
Playback Uses—. Fixed Timing
Slide Duration—. 10 seconds
Build Duration—. 2 seconds
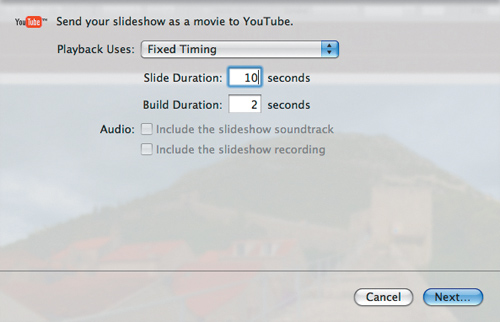
Click Next.
Read the YouTube Terms of Service, and be sure you have permission to upload the content.
Click Publish to create the movie.
Keynote prepares the slideshow and sends it to YouTube. Depending on the size of your presentation, as well as your Internet connection speed, this may take several minutes. When the export is complete, a new dialog appears.
Click the View button to see your movie on YouTube.

The video may not be immediately available after publishing. You can log in to your account later to see if it has been populated to the YouTube site. This process can take a while depending on how many videos have been published that day. If many new videos are submitted, yours may be queued for the server.
YouTube offers a special interactive controller for advancing slides. The YouTube player can also be embedded into blogs or websites. See the YouTube site for more information on sharing and playing YouTube files.
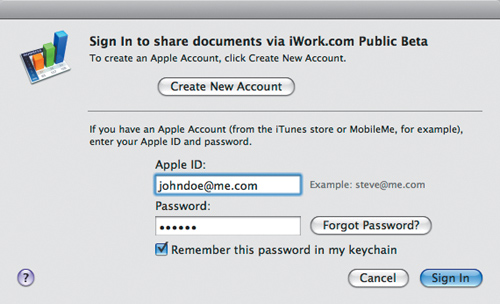
To more efficiently collaborate with others, you can post a document to iWork.com, a document-sharing service hosted by Apple. This service is currently in beta, which means it is open to public trial while still under development. The service is currently offered free of charge and allows others to view, comment on, or download presentations you have posted there.
Choose Share > Share via iWork.com.
If this is your first time using the service on your current computer, you’ll have to sign in.
Note
If you already have an Apple ID—from the iTunes store, MobileMe, or the Apple Discussions forums—you can use the same ID for iWork.com. Otherwise, you must click Create New Account to sign up for a free Apple ID.
If necessary, enter your Apple ID and password, and click Sign In.
A new dialog opens and prompts you for information required to share the file.
Note
You must be connected to the Internet to share a file with the iWork.com Public Beta. You must also have an email account set up on your computer to send invitations to view the document.
In the To and Message fields, enter the email addresses to which you want to deliver your document, along with any message for the recipients of the presentation.
Modify the Subject field as necessary.
From the From pop-up menu, choose the email account that you want to use as the sender.
To enable viewer comments and downloads, leave the “Leave comments” and “Download the document” checkboxes marked.
Tip
To set specific options for uploading and downloading files, click the Show Advanced button at the bottom of the dialog. Here you can choose which file formats to make available for download. The upload options also allow you to specify a name for the file to be posted. If you are reposting a previously shared document, you can choose to overwrite the old file or to enter a new name in the “Copy to iWork.com as” field.
Click the Show Advanced button to specify which files you want to make available in the Download Options.
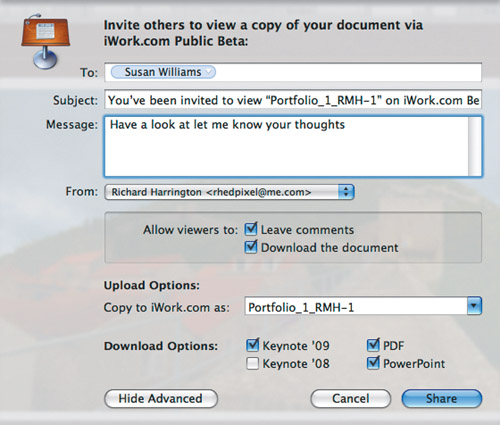
Click Share.
Keynote uploads any files you have chosen to share. When the documents are posted, Mail will send invitations. When the documents are online, Keynote will tell you and offer you a chance to view the webpage.
At times, you may want to remotely share your presentation. By using iChat Theater, you can present your slides and talk to another person at a distance if both parties are running Mac OS X v10.5 or later. You’ll also require a broadband Internet connection in order to share the file.
Open iChat and log in.
In iChat, choose File > Share a File With iChat Theater.
Select the Keynote presentation you want to share.
When you select a presentation, the first slide opens in the iChat video window. Keynote also opens the file so that you can control the slides.
When a message prompts you to start a video chat, select a name in your buddy list.
Choose Buddies > Invite to Video Chat to start the conference.
Click the forward and backward arrows to control the slides.
When finished, close iChat and your Keynote document.
In case your portable computer is lost or stolen, you may want to publish your presentation to a DVD as a safety measure.
You can also create DVDs to distribute your presentation to people who could not attend. Support for iDVD requires that you have both iWork ’09 and iLife ’09. In this exercise, you’ll create a DVD of your photo presentation, including an interactive DVD menu.
If necessary, open 07Photo Portfolio.key, and choose Share > Send To > iDVD.
For this presentation, from the Video Size pop-up menu, choose Widescreen (16:9).
This menu allows you to specify the size of the video you want to create, based on whether you will be showing it on standard or wide-screen video displays:
Standard—. Exports slides for viewing on a standard video display. Use this option if your original presentation has a 4:3 aspect ratio, such as 800 × 600 or 1024 × 768 pixels.
Widescreen (16:9)—. Exports the slides for viewing on a wide-screen video display. Use this option if your original presentation has a 16:9 aspect ratio, as used by HD video displays (such as 1280 × 720 or 1920 × 1080 pixels).
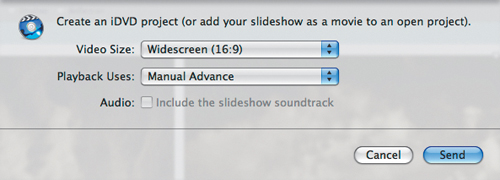
For this presentation, from the Playback Uses pop-up menu, choose Manual Advance.
This menu allows you to choose a presentation style:
Manual Advance—. Gives viewers total control over the slideshow as they click a mouse button or a skip button on a remote control to advance slides. This is a good option for self-paced reading or for creating a DVD version of your presentation.
Recorded Timing—. Uses timings that you previously recorded for your slideshow by choosing the command File > Record Slideshow.
Fixed Timing—. Runs the slideshow with no user interaction. You must set slide duration and build options. If slides contain automatic build timings, those will be used.
Click Send. Then give the file a unique name and choose your Movies folder as the Save destination.
Click Export.
A QuickTime movie file writes to disk. Depending upon the number of slides, the process can take a few minutes to create the DVD video file.
Before exporting finishes, iDVD will open automatically. Do not click any buttons on the welcome screen. Wait for Keynote to complete its export.
The theme you were using the last time you used iDVD will be active, and the theme’s soundtrack may be playing. You can click the Start or Stop motion button in the DVD main menu to stop the animation and sound.

When Keynote finishes exporting the DVD file, click the Play button in iDVD to test the DVD project:
Click Play Movie to watch the entire movie.
Click Scene Selection to see an index of the presentation.
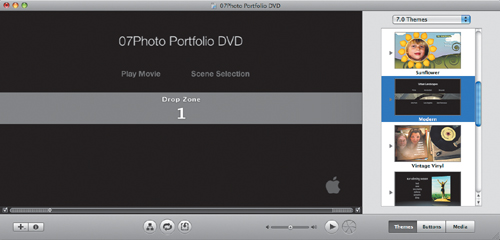
Now let’s choose a theme for the main menu of your DVD, a theme that will match the look of the slideshow.
Click the Themes button to view all available themes.
From the pop-up menu, choose 7.0 Themes.
Click the Modern theme to apply it to the main DVD menu.
A warning dialog explains that the DVD is going to perform a Change Project Aspect Ratio operation. That is, iDVD is going to switch the menus to a 16:9 ratio. This is OK, because that is the aspect ratio you used in the portfolio presentation.
Click Change to apply the theme.
Click OK to apply the theme family so that all submenus are also customized.
Now you can populate the DVD menu to complete its design.
Click the Edit Drop Zones button to access all of the drop zones for the project.
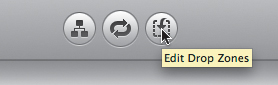
Drop zones are places in the menu layout where you can add your own content, giving you great flexibility when customizing a menu.
In the Lesson_07 folder on your hard drive, open the Portfolio Samples folder.
Drag the photo Portfolio 1.jpg into Drop Zone 1.
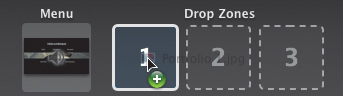
Drag the photos Portfolio 2.jpg and Portfolio 3.jpg into Drop Zones 2 and 3.
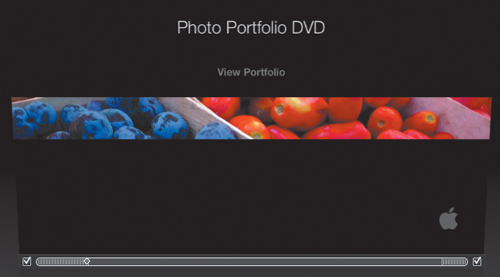
In the main DVD menu, click the Scene Selection button and press Delete.
This removes the Scene Selection submenu. If the DVD were longer, this menu would be useful for jumping direct to a scene (where each scene would correspond to one of your Keynote slides). However, in this case, you want the viewer to watch the entire portfolio, so you can remove this element.
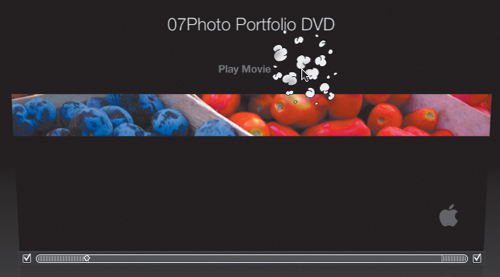
Click the Play Movie button to select it.
Click the Play Movie button again to edit it. Rename the button View Portfolio.
Click the menu title; then click again to rename it Photo Portfolio DVD.
Click the Preview button to preview the DVD.

Watch the project all the way through to ensure smooth playback. Because you chose Manual Advance, click the Play button on the remote control to advance to each slide. When finished with the preview, click the Exit button on the remote to stop previewing the DVD.

You can now click the Burn button to create the DVD.
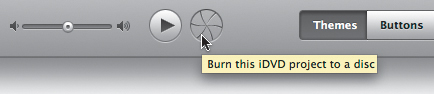
The Burn button will open to reveal a yellow and black icon, and you will be prompted to insert a blank DVD. If you’d like to try burning a DVD, insert a blank disc. This step is optional.
When you are done with the DVD project, close iDVD and save your project.
If you’re assembling a video from a meeting or event, you may want to combine live footage with Keynote slides to convey visual information. You can export the Keynote slides for use in iMovie, Final Cut Pro, or another video editing tool.
For this exercise, let’s export some slides for editing in Final Cut Pro.
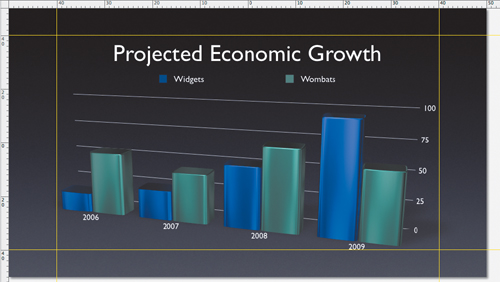
From the Lesson_07 folder, open 07Financials.key. This presentation contains a single animated chart.
Open the Document inspector and examine the slide size. The document is currently 1280 × 720, proportions that work well for many HD video formats. Select one of the following values depending upon your video editing format; for this file, we chose to leave it at 1280 × 720.
NTSC DV—. choose 720 × 534 (choose Custom slide size in the Document inspector)
NTSC D1—. choose 720 × 540 (choose Custom slide size in the Document inspector)
PAL—. choose 768 × 576 (choose Custom slide size in the Document inspector)
1080 HD—. choose 1920 × 1080
720 HD—. choose 1280 × 720
Click OK. The slide is resized to a video-ready proportion.
Next, let’s make sure that no elements are too close to the edge of the slide, so we avoid cutting off part of the slide when it’s converted to video (called video overscan).
If necessary, choose View > Show Rulers.
Drag alignment guides from each ruler to the 40 percent mark for the left, right, bottom, and top edges of the image.
Keynote measures from the center, so you are marking off a 10 percent margin in each direction, leaving the innermost 80 percent as your title safe area.

Adjust the sizes and positions of the graphic elements so that they are contained inside the yellow lines.
Choose Share > Export and click QuickTime.
For Playback Uses, choose Fixed Timing; then enter a build duration that meets your needs.
From the Formats pop-up menu, choose Custom.
Choose a size that matches your video editing system (in nonsquare pixels for SD formats or square pixels for HD formats). Here, we chose 720 HD.
NTSC DV—. choose 720 × 480
NTSC D1—. choose 720 × 486
PAL—. choose 720 × 576
1080 HD—. choose 1920 × 1080
720 HD—. choose 1280 × 720
In the Video area, click the Settings button to customize the output file.
The Standard Video Compression Settings dialog opens.
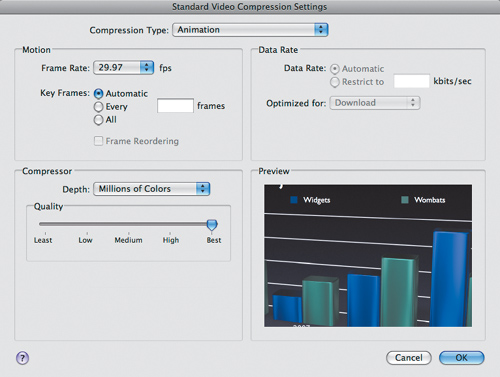
Select the Compression Type and Frame Rate to match the video you’re editing; here, we’ve selected Animation as the compression type, 29.97 frames per second, and Automatic key frames.
Although Final Cut Pro can handle many different codecs, it’s a good idea to match the sequence settings of your footage to minimize rendering time.
Click OK to apply the settings, and then click Next.
Specify a name and destination for the file and click Export. The file is written to your computer’s hard drive and is ready for import into Final Cut Pro.
Tip
Keynote can export an animation with transparency. Just open the Slide inspector and choose the Appearance tab. Choose None from the Background pop-up menu, then export using the above steps. If you pick the Animation codec, you can choose “include transparency” in the QuickTime export. This adds a standard alpha channel that Final Cut Pro can see.