Lesson Files | Lessons > Lesson_09 > 09Phoenix Mission_START.pages Lessons > Lesson_09 > 09Phoenix Mission_FINAL.pages Lessons > Lesson_09 > Leg_Deployment.jpg Lessons > Lesson_09 > Touchdown.jpg |
Time | This lesson takes approximately 60 minutes to complete. |
Goals | Use styles to format text and lists Add graphics to a document Create headers and footers Use tracked changes and comments Add a table of contents to a document Share a document on iWork.com |
In the last lesson, you explored word processing features in Pages and created a professional-looking letter and matching envelope. In this lesson, you’ll explore the more advanced word-processing features of Pages that are particularly useful when creating long form documents such as reports.

You’ll manage large documents by using section breaks; discover how to format margins, headers, and footers; and use printing commands for special purposes (such as binding). You’ll also enhance a report by adding pictures and charts that help the reader to more clearly understand the information.
In this lesson, you are going to work with an existing document. A colleague has started a report but wants you to review the document, make some additions, and then return the document with comments. Pages offers several tools that make these tasks a snap. Let’s open a previously created document to make some additions and edits.
If necessary, open Pages by clicking its icon in the Dock.
In the Template Chooser, click the Open an Existing File button.

Navigate to the Lesson_09 folder and select the file 09Phoenix Mission_START.pages.
Click Open to ready the document for editing.
Pages opens the document and displays the first page. The document contains a comment from your colleague, as well as some potential changes that you can make to improve the report.

It is a standard editorial practice for each editor of a shared document to save that document with a different name to identify the version that each participant modified and to retain a complete record of the document’s changes. This process is often called version control, and it clarifies which variation of a document is being viewed.
To maintain version control, let’s save the document under a new name.
The File Navigation Services dialog opens.
Navigate to the Lesson_09 folder.
Name the file Phoenix Mission Revision 1.pages and click Save.
You have successfully opened a peer’s document and resaved it with a new version number. You are now ready to start to enhance and format the document for printing.
Pages incorporates powerful collaboration features that make it easy for you to share documents with other users and develop a document as a group. One of those features, tracked changes, accurately tracks changes as each collaborator works on a document.
By using tracked changes, the collaborators on a document can review the changes you have made and decide whether to accept or reject those changes. Because tracking changes requires multiple users, you will simulate it in this exercise.
Choose Edit > Track Changes to start tracking changes.

The document window changes slightly, displaying comments as you work and showing the tracking bar below the format bar.
On page 1, select the title, The Phoenix Lander.
In the format bar, click the Bold button.
Move the insertion point after the word Lander; then type Project.
As each change is made, Pages records the change, along with its author, time, and date.
Tip
You can change the color of change bubbles for clarity. Click the Action menu in the upper right corner just below the format bar. Here you can choose Author Color and choose one of seven colors. Each author can use one of the colors. This makes it easier to spot changes and who made them.
Pages assigns unique colors to each author’s change bubbles, making it easier to see who suggested which changes.
Examine the change bubbles to see what already has been changed in this document.

Normally a colleague or supervisor would examine your document and suggest changes. With tracked changes enabled, you can quickly review her suggestions.
Tip
Several advanced controls are available when you’re tracking changes. Here are a few tips for getting more from this powerful tool.
To show or hide all tracking bubbles, click View in the toolbar. You can then select Show Comments and Changes Pane or Hide Comments and Changes Pane.
If you only want to see tracking bubbles for a specific section of text, select the text, and from the Tracking Bubbles pop-up menu, choose Show Only for Selection.
If you don’t want to see tracking bubbles for minor formatting edits (such as formatting text with italics), click the Tracking Bubbles pop-up menu and make sure no checkmark is present next to Show Formatting Bubbles.
If you want to simplify the way tracked changes are displayed, from the View Markup menu, choose View Markup Without Deletions. You’ll see how the final text will read, but edits are displayed in a different color by author.
Placing comments into a document is a great way to make a point without actually editing the text. If you or another reader wants to suggest a document change, you can insert a comment. Comments can include questions to other authors, or any suggestion or observation about a document’s content.
Examine page 1 to locate a yellow comment bubble.
A colleague asked you to make a change to the document.

Click in the empty space next to the comment where you would insert the figure.
Choose Insert > Choose.
A file navigation dialog opens that allows you to choose a photo.
Navigate to the Lesson_09 folder and choose Touchdown.jpg.
Click Insert to add the photo to the page.

The photo is added to your document and fills the entire width of the text box. Let’s resize the photo so that it is a little smaller.
Drag the resize handle in a corner of the photo until the picture is approximately 5 inches wide.

The picture is better sized for the page. Let’s stylize the image with a custom border so that it stands out more clearly.
In the format bar, click the “Choose line style” button and choose the second picture frame, as in the following figure.

Now the photo is easier to see and matches the other photos throughout the report. However, with the border added, the photo is bigger and has pushed a few lines of text to the next page. (You can see this in the thumbnail view.) You can reduce the size of the photo and avoid the title page’s being broken up.
Drag a resize handle to scale the photo to approximately 4.5 inches wide.
Now that the text fits on one page, let’s add a comment for the original author.
In the toolbar, click the Comment button.
An empty comment is added to the document, ready for text input.
Add the comment in the following figure to the document:

Choose File > Save to save your work.
Tip
When you choose to print your document, what you see is what you get. If comments are visible, they will print on the page. This is a useful way to print a document for review purposes. If you don’t want to print your comments, you’ll want to hide them. To remove comments temporarily, choose View > Hide Comments.
A cover page is commonly added to a report before it is distributed. This helps to identify the contents of the report and its authors. When using the report templates provided by Pages, you’ll find that most include a cover page.
Let’s add a cover page to your mission report and credit its authors.
In the toolbar, click the Sections button.
Choose the Cover section.

A new page 2 is added to your document after the current page. You can move this page to the top of the thumbnail view to reorder it in your document.
In the thumbnail view, drag the thumbnail for page 2 above the page 1 thumbnail.

Now that the pages are in the right order, you can replace the placeholder text and media on the new page.
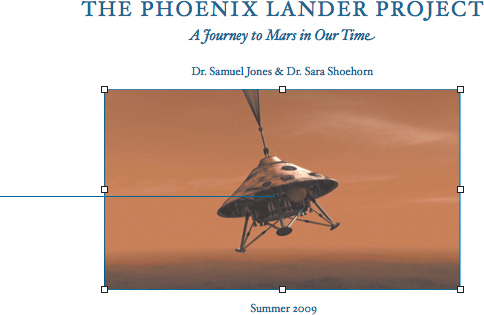
Click the placeholder title labeled Astronomy 101 Report, and type The Phoenix Lander Project.
Replace the other text on the cover page to match the following figure. Be sure to replace only one line of text at a time to preserve formatting.

After the text is replaced, you can customize the photo area. Pages can use images in a wide range of file formats, including TIFF, PSD, and JPEG. Let’s add a photo to the first page.
Select the space photo.
Choose Insert > Choose and navigate to the Lesson_09 folder.
Choose Leg_Deployment.jpg.
The photo is added to the page, but the text shifts position due to the different size of the new photo. You may adjust the image to place the names and dates below the picture.
Option-drag the image’s lower right resize handle.
The image enlarges in all directions at the same time. Resize the image to a width of approximately 5.5 inches.
If you give the photo a custom border, it will stand out more on the printed page.
Click the Line Style button and choose the second picture frame.

The photo looks good, but a little more space between the edge of the photo and the bottom text would improve readability.
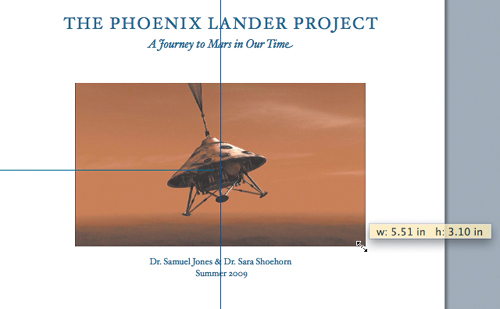
Choose View > Show Inspector and click the Wrap inspector.
Increase the Extra Space value to 24 pt.
The text is now farther from the photo and easier to read.
Choose File > Save to save your progress.
When working with a Pages document, it’s a good idea to use sections. Sections help keep a large document organized by keeping together all of the pages for each part of a report. When sections are present in your document, you will find it much easier to reorganize or add to it.
Many template documents have sections already inserted for elements like cover sheets or tables of contents. You can also manually add a section break where you’d like to split a report by choosing Insert > Section Break. Your Phoenix mission document has seven sections. Let’s split some sections apart to help reorganize the document.
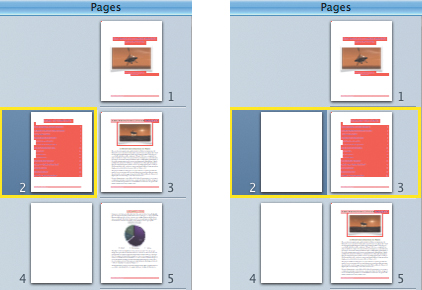
In the thumbnail view, select the page 12 thumbnail.
The conclusion of the document and a two-page listing of Mars Missions are currently placed in the same section. These pages can be moved only as a group. However, you’ve decided that you want the Mars Missions section relocated after the conclusion. To do so, you’ll want to split the section.
Click to place the insertion point before the title Annex - Mars Missions.
Choose Insert > Section Break.
A new section break (and a blank page) is added. Don’t worry, you’ll clear the extra space later.
You can place the Bibliography page earlier in the document.
Click and hold the thumbnail for page 15 (the Bibliography).
Drag the current page 15 thumbnail higher in the Pages thumbnails list so that it goes after the current page 12.
The Bibliography now appears before the Mars Missions section.
More Info
The bibliography in this report was built using EndNote X2. Many research and academic professionals use EndNote X2 to manage their citations and bibliographies. Pages ’09 works with EndNote X2 software, so that you can search and manage references as well as create bibliographies. To use these features, you must install EndNote X2 and assign Endnote X2 a default library. See the Help article “Adding Citations and Bibliographies Using EndNote” for more information.
Choose File > Save to capture your progress so far.
Congratulations—you have successfully reordered the sections of your document. Using sections is the best way to keep a long document organized.
When you prepare a document for printing, you’ll often want to adjust its margins. Every Pages document uses margins that define how much empty space exists on the left, right, top, and bottom borders of the page. It is traditional to leave empty space in this area to improve the document readability. The default margins for Pages templates are set to 1 inch around all four sides of a document; however, you can easily modify these margin sizes.
Note
Be sure you understand the capabilities of your output device. Many printers can’t print to the farthest edge of a page, and most documents require at least some margin.
Let’s adjust the margins of the current document so that it is ready for printing and binding. You’ll want to leave extra space on the inside edge of each page so that the printed document can be placed into a binder or sealed with a bound edge. This area of the page is unusable for text or graphics, so you’ll adjust the margins.
Open the Document inspector.
Select the Facing Pages checkbox to print the document as a double-sided report.
Because you are preparing a document that is going to be printed on both sides of the page and bound, you will want to make room for that binding. In the Document inspector, you can increase the inside margin by the necessary amount. Pages will automatically put the larger margin on the side closest to the binding.
Change the Inside margin field to 1.5 in to allow more room for the binding.
Changing the margin size has modified your page breaks because you have reduced the overall area available for the text. You can adjust the Outside margin by .5 inches to restore the text area to its previous capacity.
Change the Outside margin to .5 in.
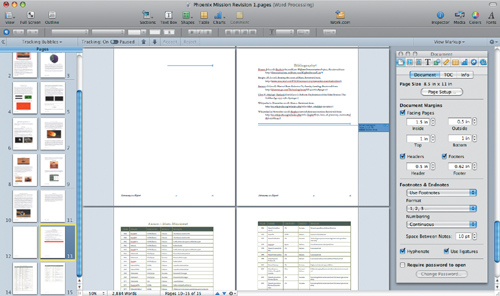
The document now has the same pagination as it had previously. What’s important is that you still have the larger inside margin. The extra space is used by the binding for the printed report.
It is standard to start each section on a right-facing page. You will notice that the chapters of some books include blank pages at the end so that the next chapter can start cleanly on a right-hand page. This is an easy task for you to perform in Pages.
Switch to the Layout inspector.
You should select all the pages so that your changes will affect every page in the report.
Click in the thumbnails view and press Command-A to select all the page thumbnails.
In the Layout inspector, click the Section button to modify only the Section properties.
Select the “Use previous headers & footers” checkbox to retain the current headers and footers. (You’ll change them in the next exercise.)
From the “Section starts on” pop-up menu, choose Right Page.
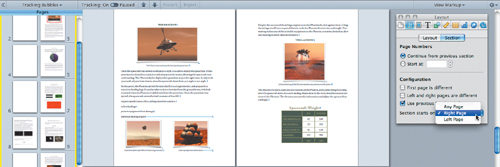
Each section now begins on a right-facing page (like chapters in a book). To accomplish this, Pages has added some blank pages to the document. This is a publishing standard and makes it easier to find the start of each section.
When writing a report, you’ll often want to repeat some of the same information on multiple pages. Among the most common information repeated on multiple pages is page numbers. When combined with a table of contents, page numbers help the reader to find information more effectively.
You can choose to add recurring information at the top of a page (which is called a header) or at the bottom (a footer). You can choose to add your own text manually or to employ formatted text fields that update automatically.
Let’s add page numbers to your Phoenix report.
Choose View > Show Layout to make the headers and footers easier to see by displaying the layout of your document.
Boxes on the page help identify the header, footer, and body areas.
Select page 3, and then click to place the insertion point in the footer area.

Adding the filename to the footer will help identify which document is being read, which is particularly helpful when people are reviewing physical printouts for comments.
Choose Edit > Select All and press Delete.
This clears the current content of the footer.
Choose Insert > Filename.
Pages adds the document’s full filename to the footer. You can simplify this filename by removing the .pages extension, which isn’t necessary for this kind of label.
Double-click the filename text; then deselect the “Always show filename extension” checkbox.

Click after the filename text to move the insertion point.
In the format bar, click the Left Justify button, then press Tab twice to align the next text field with the right edge of the footer.
Choose Insert > Page Number.

Highlight the page number, and in the format bar, click the Bold button to reformat just the page numbers.
You can quickly format your document text by using styles. Highlight the desired text and click a style in the Styles pane. Using styles allows you to concentrate on your writing and lets Pages attend to its appearance. Styles maintain consistency within and among your documents. Each template includes default styles that you can use, modify, or enhance with your own styles. Styles are also used when creating a table of contents or using outline mode, as they let Pages identify titles and headings.
Pages offers three types of styles for text and list formatting:
Paragraph styles—. In a Pages document, a paragraph is defined as any block of text that is followed by a Return character. A paragraph style can include specifications for font, size, text color, and so on. If you don’t find a suitable paragraph style, you can modify an existing style or create a new one.
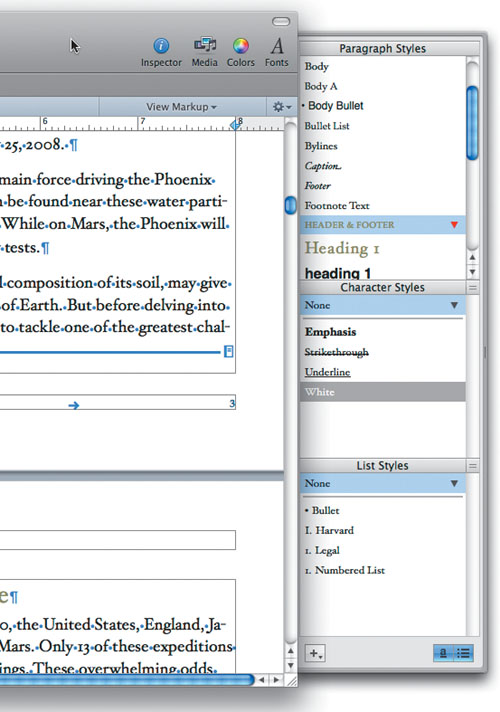
Character styles—. These styles apply attributes to a section of text without changing the style of the rest of the paragraph. For example, you might change a single phrase to a bold style and change its font color. If you can’t find a suitable character style, you can modify one of the existing character styles or create a new one.
List styles—. Pages includes preformatted bullet and numbering styles for creating ordered lists. These are useful for visually organizing information for the reader. Just as you can customize character and paragraph styles, you can modify a list style to match your requirements.
Every Pages document contains several styles that define the text appearance. These styles are set by default, but you can easily update them for your current document.
In the thumbnails view, select page 5.
Triple-click the section title, The Mars Curse, to select it.
Let’s adjust the text formatting for this style.
In the format bar, click the Bold button so that the text stands out.
Change the section title’s point size to 20 pt.

The text is now bolder and larger, which makes it easier to read. The section title stands out more clearly.
Closely examine the Paragraph Styles list.
Heading 1 (the current style) has a red triangle icon next to it that indicates the style has been overridden. Let’s make your style change global and apply it to this entire document.
Click the red triangle icon and choose Redefine Style from Selection.
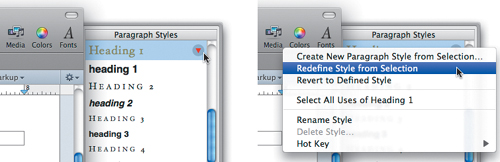
The red triangle turns black as the modified style is applied and saved. Throughout the current document, all instances of text using the Heading 1 style are updated.
Choose File > Save to save your progress.
The key advantage to using character styles is that they can be used to make part of a paragraph more visible. For example, you could italicize all cited references in a report to make them easier to spot.
Switch to page 15, a page titled, “Learning from the Past.”
Select the reference at the bottom of the page, (Ulivi, 2007, p. Page 147; Wikipedia, 11 November 2008).

Let’s italicize the text with a character style.
In the format bar, click the Italic button.
The text is italicized.
Closely examine the Character Styles list.
The red triangle next to the word None indicates that the style has been modified. Let’s create a new style that can be reused in future documents.
Click the red triangle and choose Create New Character Style from Selection.

A dialog opens asking you to name the style.
Name the style Italicize.
You can take precise control over how this style is applied.
Click the disclosure triangle next to “Include these character attributes.”
Click Select Overrides to keep only those properties that have been changed.
In this case, only Italic: On remains selected.
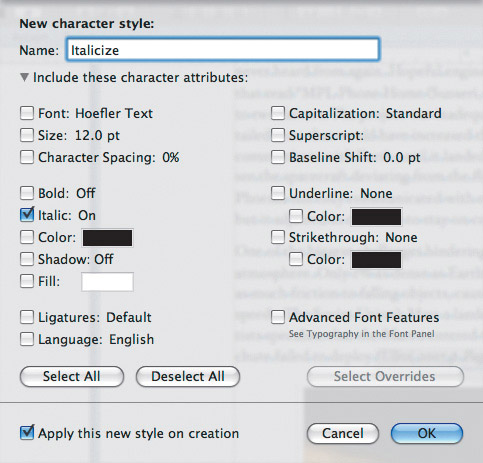
Click OK to create the new character style.
Let’s reuse the style on another citation.
In the Pages thumbnails list, select page 8.
Select the citation, Wikipedia, 19 November 2008.
Click Italicize Character Style to apply your new character style.
You’ve used character styles to change the appearance of your document.
More Info
On this page of your document, you’ll notice that complex visual formulas are displayed. Pages can work with MathType to display mathematical expressions and equations. You must install MathType 6 or later on your system to create and manipulate an equation. After an equation is inserted into a Pages document, it is treated as a graphic. If you open the document on a system that does not have MathType installed, the equations still display correctly. If the current system includes MathType, you can double-click the equation to edit it. See the Help menu entry “Adding Mathematical Expressions and Equations Using MathType” for more information.
Let’s use list styles to format a list. By adding bullets or numbers, a list is easier to spot and comprehend.
Select page 12, titled “The Descent.”
As in the following figure, highlight the last three lines of text above the photos: soften landings, protect equipment from damage, and minimize landing impact.
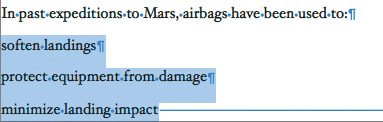
These three items are a list and should be formatted as such. Because they are not a list of numbered steps, the use of a bulleted list style is most appropriate.
In the List Styles area, choose the Bullet style.
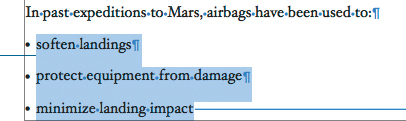
The text is reformatted as a bulleted list. You can improve its readability by tweaking the default formatting.
Open the Text inspector and click the List button.
Set both the Bullet Indent and Text Indent fields to 0.25 in to move the text inward.
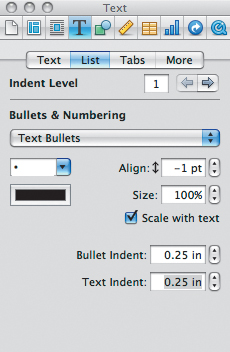
The text is easier to read, so you’ll want to store the formatting for continued use.

Click the red triangle icon next to the Bullet list style and choose Redefine Style from Selection.
This saves the changes you made to the style.
Choose File > Save to save your progress.
You have successfully formatted the text in your document using styles. In our next exercise, you’ll create a table of contents for your document. Pages uses the styles to help identify the levels of headings in the document, so the work you have done with styles is important.
Creating a table of contents is easy in Pages ’09. Pages can automatically generate a table of contents based on the use of paragraph styles for document headings. A good TOC helps the reader to quickly find sections in a document and provides an overview of the contents.
In the thumbnails view, select page 1.
In the toolbar, click the Sections button and choose Table of Contents.
Note
A table of contents can be added to any word processing document. If the template you are using doesn’t offer a Table of Contents section, simply choose Insert > Table of Contents.
A new page is added as a left-facing page. Because other sections of your document start on a right-facing page, you’ll want your TOC to start that way, too.
Open the Layout inspector and click Section.
From the “Sections start on” pop-up menu, choose Right Page. The document layout is fixed and the TOC starts on page 3. Now let’s modify that table of contents.
Open the Document inspector.
In the Document inspector, you can modify the formatting of your TOC.
Click the TOC button.
In the Document inspector, for the Title style, deselect the checkbox in the #’s column.

Pages removes the page numbers for the Title headings in the TOC. This simplifies the TOC and avoids unnecessarily repeating a page number for page 5.
Choose File > Save to save your progress. You can compare your work with the file 09Phoenix Mission_FINAL.pages.
You’ve added a table of contents to your document. It’s now ready to post online for your other team members to review.
To facilitate collaboration with others, you can post word processing documents on iWork.com, a document-sharing site. This site is in beta, which means it is currently being developed and enhanced but open to public trial. The service is free, and allows others to view, comment on, or download your word processing document.
Choose Share > Share via iWork.com.
If this is your first time using the iWork.com service on your current computer, you’ll have to sign in.
Note
If you already have an Apple ID from the iTunes store, MobileMe, or the Apple Discussions forums, you can use that ID to log in to iWork.com. Otherwise, you must click Create New Account to sign up for a free Apple ID.
If necessary, enter your Apple ID and password, and click Sign In.
A new dialog opens and prompts you for important information required for sharing the file.
Note
You must be connected to the Internet to share a document on the iWork.com Public Beta. You must also have an Apple Mail account set up on your computer to send invitations to view the document.
In the To and Message fields, enter the email addresses and a message for the intended recipients of the word processing document.
Modify the Subject field as necessary.
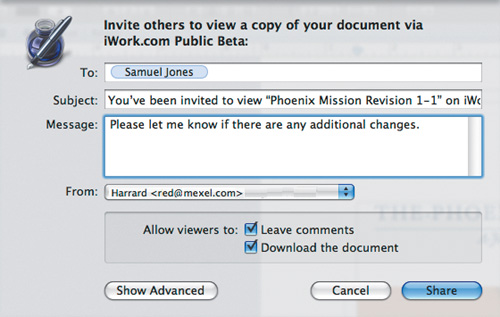
In the From pop-up menu, choose an email address as the sender.
To enable viewer comments and downloads, select the “Leave comments” and “Download the document” checkboxes.
Tip
To set specific options for uploading and downloading files, click the Show Advanced button at the bottom of the dialog. Here you can choose which file formats to make available for download. The Upload options also allow you to specify the name of the file to be posted. If you are reposting a previously shared document, you can choose to overwrite the old file or to enter a new name in the “Copy to iWork.com as” field.
Click Show Advanced to specify download options.
Deselect the Word checkbox so that you post only a PDF and a Pages ’09 file.
Click Share.
Pages uploads the document and sends an invitation to anyone you listed in the To field. When the job is done uploading, you can click View Document Now to see it posted online.
You’ve opened and modified a multipage word processing document. By turning on change tracking, you’ve enabled others to identify and comment on any changes you’ve made. The skills you’ve learned in this lesson will be important because you’ll frequently use styles, sections, and document sharing in your day-to-day work.

You can access styles through the format bar or the Styles drawer. | |
There are three ways to do this: You can use the Media Browser (see Lesson 3, “Adding Media to Your Presentation”), you can drag the file from your hard drive, or you can choose Insert > Choose and navigate to the file on your hard drive. | |
Open the Document inspector and modify the Top, Bottom, Left, and Right fields as necessary. | |
Click the Sections button in the toolbar and choose Table of Contents, or choose Insert > Table of Contents. | |
You can post a Pages ’09 or Pages ’08 file as well as a PDF or a Microsoft Word document. |