
Chapter 6: Using the New Central Administration
What’s In This Chapter?
- Using the Farm Configuration Wizard
- Setting up Managed Accounts
- Finding your way around the new and improved interface
- Using the Ribbon in Central Administration
- Backing up and restoring your site with Central Administration
Now that you’ve laid down the SharePoint bits and finished running through the SharePoint Configuration Wizard, you get your first taste of using SharePoint 2010 when Central Administration launches.
This chapter mainly serves as a general overview of Central Administration. Many topics require more than just a few pages to adequately cover; in fact, some topics actually have entire chapters dedicated to them. In this chapter we’ll hit the major highlights of Central Administration, and point you to different areas in this book that cover certain topics in more detail.
A Quick Overview of the New Central Administration Interface
If you could navigate Central Administration in SharePoint 2007 with your eyes closed, you might be in for a bit of a shock when you first look at Central Administration in SharePoint 2010. One of the first things you will notice about the new Central Administration is that it looks nothing like the Central Administration in SharePoint 2007 that we came to know and love. In SharePoint 2010, all tasks and links are divided into one of eight categories. You can see these categories on the home page of Central Administration, both in the Quick Launch and in the body, as shown in Figure 6-1. Underneath each category header are several links, which enable you to access some of the more frequently used pages in each category, right from the home page. Clicking the headings of each category will take you to that category’s page, which features additional subcategories and links related to the category. Although this new layout is vastly different from SharePoint 2007’s Central Administration, it may also seem somewhat familiar to you: the new categorical approach is visually and structurally similar to the look and feel of the Control Panel in Windows Vista and Windows 7.

As you click through some of the links in the various pages, you will encounter several pages that look nearly identical to their SharePoint 2007 counterparts. In many instances, how you configure certain settings hasn’t changed a bit, only the way they are accessed.
Aside from the reorganized settings, Central Administration also makes use of another major change to the SharePoint platform: the Ribbon. The Ribbon interface (also known as the Fluent UI) was introduced with the Office 2007 suite of clients. In the Office clients, the Ribbon was used to make more tasks available to the user at one time, while logically grouping them together. In SharePoint 2010, this same idea is carried over. The Ribbon interface is designed to make accessing settings and performing tasks easier for both administrators and users.
Using the Ribbon interface from a user perspective is covered in Chapter 2.
The Ribbon isn’t used in Central Administration as extensively as it is in the normal user interface, but understanding how it works will make your life easier. This chapter covers some of the basics of the Ribbon as it pertains to Central Administration.
As you start using Central Administration, you’ll notice that its structure is much “flatter” than SharePoint 2007. By using the categorical approach to organizing the content in Central Administration, tasks and settings can usually be accessed in fewer clicks than it used to take in SharePoint 2007. Because the links are divided among eight categories, many administrators will likely discover that finding links is much quicker, as there is less guesswork as to where a link would logically be located.
You just finished up the install and are greeted by Central Administration. This section gives you an overview of the steps taken the first time you access Central Administration post install. (If the install has already been done and you are just accessing the server for the first time you can skip this section and jump forward a page or two to the “Managed Accounts” section.)
Central Administration fires up for the first time immediately after the SharePoint Configuration Wizard finishes its tasks. A pop-up window opens first, and you’ll be asked if you’d like to participate in the Customer Experience Improvement Program (CEIP) to make SharePoint better. Make your selection and click OK to close the pop-up. Central Administration offers to help you through the initial setup process right off the bat by asking if you’d like to run through the Farm Configuration Wizard (see Figure 6-2). You can choose to run through the wizard now or run it later if you wish. Generally, you’ll probably want to run through the wizard, as it enables you to provision a default set of service applications and create a web application to start exploring SharePoint 2010. It’s pretty short — only a couple of options and questions and you’ll be ready to go. Of course, you can also configure the farm manually and skip the wizard altogether if you wish. The wizard simply provides a one-stop-shop for getting up and running with SharePoint 2010. Chapter 7 covers the manual process for provisioning service applications.

If you accidentally close the Central Administration window, or are accessing the server for the first time and are looking for the site, you can easily open it from the Start menu. Simply click Start All Programs Microsoft SharePoint Products SharePoint 2010 Central Administration.
The Farm Configuration Wizard
If you decide to walk through the Farm Configuration Wizard, select the option to Walk me through the settings using this configuration wizard … and click Next. If you chose to skip the Farm Configuration Wizard, you can always run it later from the Central Administration home page.
The first screen in the Farm Configuration Wizard lets you choose or create a managed account (see the following section) that will be used as the service account. This service account will run the service applications that you select to have the wizard create. You can set up additional instances of the service applications with any account you choose later as well.
Below the Service Account section, you’ll see that you can choose which service applications will be provisioned by the wizard for the farm. Note that nearly all the services are checked for you. If you know you aren’t going to be using certain services, you can deselect them. It’s easy to create new service applications later and add them to the default set, so don’t get too hung up on choosing the right set of services out of the gate.
Managed Accounts
Managed accounts are a brand new concept in SharePoint 2010. They are designed to give administrators more control over the domain accounts that are used to run the various components of SharePoint. When an account is registered with SharePoint, administrators can maintain the account from within SharePoint, without worrying about how a change, such as a password change, will affect the SharePoint farm.
When a domain account is registered with SharePoint as a managed account, it can be used to run various components of the farm, such as application pools or service applications. The account used to install SharePoint is automatically registered as a managed account. When you run the Farm Configuration Wizard for the first time, you have the option to register as many service accounts as you will need. You can also add more accounts later by clicking the Security category from the Central Administration home page and selecting Configure managed accounts under the General Security subcategory. When registering a managed account, you simply need to provide the username (with the domain) and password.
Next, you can configure whether you’d like to have SharePoint automatically handle the password changes for you. If you decide to use the automatic password change option, SharePoint will take over setting the password for the account in Active Directory for as long as the account is registered as a managed account. This is extremely useful because it completely removes the burden of managing several account passwords. If your organization also enforces a password change policy, SharePoint will detect this and change the password a set number of days before the expiry of the policy. The default is two days, but you can configure the number of days beforehand that SharePoint will change the password. You can also have SharePoint notify a user or group of users via e-mail before the password is changed by checking the option to start notifying by e-mail. Below this checkbox is the scheduler for setting when and how often the password will be changed. You can have the password changed automatically every week, specifying the days and times during which the change can occur; or you can have the password change monthly, choosing a day and time range during which the password can be changed, or choosing a specific day and time, such as the fourth Tuesday at 3:00 a.m. All of the preceding options are shown in Figure 6-3.

You don’t have to allow SharePoint to change the passwords automatically; you can still easily manage password changes from within Central Administration now, knowing that changing the password on a managed account will go smoothly. (In SharePoint 2007, administrators often ran into issues when changing passwords on accounts SharePoint relied on, but this is no longer a problem.) From the Managed Accounts page, you can click the Edit button next to the account whose password you’d like to set. From this screen, you can change the password by checking the box next to Change password now, and either have SharePoint automatically generate a strong password, use a new password, or use an existing password.
Accounts can also be removed from SharePoint as long as they are not associated with any farm services (see Chapter 7 for more on service applications). In that case, you can click the X in the Remove column of the Managed Account list. If SharePoint has been managing the password for this account, you will not know what it is, but fortunately you have the option to change the password as you disassociate the account from SharePoint. You can check the box to change the password on the Remove Managed Account screen, and specify a new password for the account.
An additional consideration: If someone goes into AD directly and changes the password for the account without telling SharePoint, your managed accounts will not work. SharePoint needs to know the account’s password to use it. If you need to change the password it is best to use the preceding option of changing the password from SharePoint and not using an AD tool.
Central Administration Categories
From the Central Administration home page, you’ll notice that some of the most commonly used actions are immediately available under the heading for each category. For instance, you can start creating site collections in a single click from the home page with the link Create site collections under the Application Management header. Similarly, you can quickly start a backup by clicking the Perform a backup link under the Backup and Restore header. The rest of the actions found in each category can be accessed by clicking the category’s header or its corresponding link in the Quick Launch. Another nice feature added to this new Central Administration site is the use of tooltips when hovering over a link. Throughout Central Administration, hovering the mouse over a link will give you a brief description of what that link opens.
The following sections describe the various categories and what you can do with each.
Application Management
The Application Management category is likely the area of Central Administration you will use the most. As you might guess from its name, Application Management is the location from which you manage your web applications and service applications and related items, such as site collections and databases. This category includes a good portion of the links that were found in the Application Management tab of SharePoint 2007’s Central Administration. In SharePoint 2010, the Application Management category is further divided into several subcategories, each pertaining to a specific area.
Web Applications
In the Web Applications section (see Figure 6-4), you can access a list of all the web applications available in the farm, as well as configure alternate access mappings. Clicking the Manage web applications link will open a list of all of the web applications you have running in the farm.

You’ll notice that initially you can’t do a whole lot with the Ribbon, as nearly every button is grayed out with the exception of the New button. Once you select a web application on the page, the Ribbon lights up and gives you many other options that can be used for changing the settings for the selected web application. You’ll also notice that many options that were available from the Application Management tab in SharePoint 2007 now live on the Ribbon, reducing link clutter on the page (see Figure 6-5).

Managing the Web Applications enables you to make widespread changes to your sites. Because Web Applications are one of the highest levels of SharePoint containment, any settings you make from the Manage Web Applications screen will affect any site collections contained in the selected Web Application.
A few notable Ribbon items that you may end up using include the Extend button, which enables you to extend the selected Web Application to a different IIS website than the one on which it is currently hosted. You can use this in conjunction with Alternate Access Mappings to allow the same content to be accessed from more than one URL.
The Delete button enables you to remove the Web Application from SharePoint. You also have the option to remove the IIS website and the content database as well if you wish.
The General Settings button, as you might guess, enables you to set some of the basic settings for the Web Application. Here is where you can enable RSS feeds for all the site collections in the Web Application, as well as set the maximum upload size for files. The General Settings button also has a drop-down from which you can set other options. Some of these are covered in subsequent chapters, so we won’t cover the rest of the options in great detail.
Some of these options can be accessed from other areas of Central Administration, too. While exploring Central Administration, you will find that several options can be found in more than one place.
Let’s head back to the Application Management page. Alternate Access Mappings (AAMs), under the Web Applications subheader Configure alternate access mappings, provide a way to access the same SharePoint content from different URLs. This can be useful if external users in an organization will access the SharePoint site using a different URL than the internal users. If you are familiar with setting up AAMs in SharePoint 2007, there’s nothing new this time around. The interface is exactly the same. SharePoint enables you to configure up to five different zones, or entry points, as alternative URLs that point to the same Web Application.
AAMs also need to be configured if the SharePoint site is behind a reverse proxy server (such as Microsoft Forefront Threat Management Gateway 2010). In this scenario, the URL that end-users type to access the site may not be the actual URL of the SharePoint site, but rather a URL that the reverse-proxy server hands off to SharePoint. An alternate access mapping allows SharePoint to receive the request and return the correct content.
Site Collections
In this subcategory, all your site collection needs are met. Most of these items, which were found on the Application Management tab in SharePoint 2007, now have their own featured page, enabling you to more easily find what you need. You can create and delete site collections from the various Web Applications in the farm, set quota templates and apply quotas to individual site collections, change the administrators of the site collections, and set up self-service site creation for users. For the most part, working with site collections in Central Administration is exactly the same as it was in SharePoint 2007. In most cases, you choose the web application and site collection you’d like to work with, and then configure the settings available on the screen.
The process of creating a site collection in SharePoint 2010 is identical to that in SharePoint 2007. You still choose the web application that will contain the site collection, give it a name, pick the template, and assign an administrator and quota (if desired). Configuring and applying quotas is also the same, as is the capability to set up confirmation e-mails and notification for site usage and deletion. One addition to the site creation process is the ability to create a site collection without specifying a site template. This is done by selecting the Custom tab on the site template selector and choosing <Select template later…>. The first time the new site collection is accessed by a site collection administrator, the template selector will be displayed. Using this new feature means that a SharePoint administrator can set up a site collection for a group of users, but let the site collection’s administrator make the call on which template is most appropriate for his or her needs.
Service Applications
Service applications are a new concept to SharePoint 2010. In a nutshell, service applications are the replacement for the Shared Services Provider (SSP) used in MOSS 2007. Unlike the SSP, which housed all available services, such as search, people services, Excel Calculations, and other services shared between web applications in the farm, in SharePoint 2010, service applications are individual components that can be individually associated with web applications. This approach offers much more flexibility than the SSP model from SharePoint 2007. Because not all services need to be running on any given web application, this can save on overhead. You will learn much more about service applications in Chapter 7, so this section serves more as a quick introduction to working with service applications in Central Administration.
When you click the Manage service applications link, you are presented with a list of all the available service applications that were configured during the initial farm configuration. This management page also utilizes the Ribbon for efficient management of the service applications. You can create additional instances of service applications using the New button. You can select which type of service application you’d like to create, and a pop-up window opens, enabling you to create a new service application. Figure 6-6 shows a list of service applications, with the Managed Metadata Service highlighted.
When working with service applications, you’ll probably use the Manage and Properties buttons most often. The Properties button enables you to adjust general settings for the service application (such as its name), while the Manage button opens the management options for the selected service application. This is where you’ll actually work with the service application. For example, selecting the Search Service Application and clicking Manage in the Ribbon opens the Search Administration page.
Service applications aren’t contained in a completely separate web application like the SSP was. Instead, they’re all individual components that can be accessed directly from Central Administration. Each service application has a slightly different interface, but you’ll find that it’s a rather seamless transition from working in Central Administration to managing a service application.

Databases
Also finding a home in the Application Management category is the subcategory Databases. Using these links enable you to specify the default database server, as well as manage the content databases in the farm. The interface on the Manage content databases screen is nearly the same as in SharePoint 2007, with the addition of a couple of extra columns that provide some additional information. In addition, the column headers are now more descriptive, specifically indicating that they are referring to site collections.
Just as in SharePoint 2007, clicking the database name will enable you to configure properties of the database, but this time around you get more information and options to set. You can specify a failover database server on this screen, set the search server, and adjust the database capacity for the number of site collections permitted in the selected Web Application. By default, you can create 15,000 site collections, and a warning event is triggered when the number of site collections reaches 9,000. You can adjust these values to meet your needs. You may want to revisit Chapter 3 for more information on architecture and capacity planning.
From this screen, you can also check the database schema versions by clicking on the database name. This is helpful to determine the patch level of the SharePoint farm. In SharePoint 2010, you can actually install patches to SharePoint without upgrading the databases at the same time. This enables you to mitigate downtime during patch installations. Although you can run SharePoint and the databases at different patch levels, you will want to synchronize them as soon as it’s feasible by running the SharePoint 2010 Products Configuration Wizard.
New to SharePoint 2010 is the capability to assign a specific server to be responsible for the timer jobs that run against a particular content database. While this likely wouldn’t be a common setting, if you do need to take advantage of it, the interface for setting that is also on this page. You can read more about this in Chapter 15.
Finally, you can remove the content database from the web application from this screen. This won’t delete the database from SQL; it simply removes the association with the web application.
System Settings
Administrators familiar with SharePoint 2007 will recognize many of the pages in this category. As stated earlier, many of the screens in SharePoint 2010 are nearly identical to SharePoint 2007, but how you get to them has changed. System Settings houses many of the pages that can be used to make farmwide settings.
Servers
As shown in Figure 6-7, there are only two links in the Servers subcategory: Manage servers in this farm and Manage services on server. Clicking the former link will open a page that lists all the servers that are part of the SharePoint farm. This includes all servers with SharePoint actually installed on them, but not the SQL servers where the databases reside.
To remove a server from the SharePoint farm, click the Remove Server link in the row of the server’s name. This page is largely informational. Clicking on the server name will open the Services on Server page (which is actually the equivalent of clicking the Manage services on server link from the System Settings category page and selecting the desired server).

On the Services on Server page, you’ll see all the services currently running on the selected server. These services are configured based on the type of role the server plays in the farm. Next to the service name is the service’s status. This is either stopped or started, and next to that is the related action that can be performed (i.e., stopped services can be started and vice versa). You’ll notice that some of the service names are hyperlinks and some are not. Clicking the hyperlinked names opens a page where you can make additional configurations before or after the service has been started.
E-mail and Text Messages (SMS)
This subcategory has three links. Configure outgoing e-mail settings enables you to specify a server in your network set up with SMTP to send messages from the SharePoint farm. There isn’t much to configure here; simply enter the server, the From: address, and the Reply to: address, and you’ve just enabled outgoing e-mail from the SharePoint farm.
Setting up incoming e-mail is only a little more involved. To use incoming e-mail, the SMTP feature needs to be enabled on the server. If it’s not enabled, you’ll receive a notice dialog box when you access the Configure incoming e-mail settings page. Once again, the settings page for incoming e-mail is identical to SharePoint 2007. First, decide whether you are going to enable incoming e-mail for your farm. Then, decide whether you want to let the server handle all the dirty work (with Automatic mode) or whether you want to configure the SMTP drop folder yourself (with Advanced mode).
Next, you can specify if you want to enable Directory Management Service, which is basically a fancy way of saying that the e-mail can be tied in with your Active Directory and Exchange systems if you so desire. You can also set the e-mail display address and the e-mail drop folder as well, if you are working in Advanced mode. If you chose Automatic mode, you have the option to either specify safe e-mail servers or simply allow e-mail from all e-mail servers. Once incoming e-mail is configured, a SharePoint timer job will check the e-mail drop folder that the SMTP service uses to drop off messages, and route them to the appropriate list or library.
Finally, you can enable SharePoint to send out text message alerts via an SMS service. If your organization subscribes to a text message service, you should have a username and password for your account. Simply specify the URL of the service, enter the username and password you have been provided with, and you have set up a mobile account to send alerts to any user who has chosen to be alerted with a text message when an item in SharePoint changes that meets the alert criteria. If you aren’t subscribed to an SMS service, Microsoft has made the process easy by providing a link directly on the Mobile Account Settings page that displays a list of compatible services.
Farm Management
The last stop in the System Settings category is the Farm Management subcategory. This section contains links to various widespread settings that affect the entire farm.
Notice that you have another link to configuring AAMs here. Because we’ve already covered AAMs, we’ll skip right over that link.
You can manage features scoped to the farm level from this subcategory by clicking the Manage farm features link (you’ll learn more about Features in Chapter 13). Essentially, features are bits of functionality that can be turned on or off in a subsite, a site collection, a web application, or the entire farm. This list happens to include all out-of-the-box features scoped to the farm level. If you know you won’t be using a particular feature in your organization, you can deactivate it to remove its functionality. Generally, however, you will probably want to leave most of these features activated, as they affect every server and web application in your farm.
The Manage farm solutions link is the SharePoint 2010 equivalent of the Solution management link from SharePoint 2007. Also known as the Solution Store, this is where any installed solution packages that have been added to the farm are stored. From here, you can deploy or retract solutions using a GUI interface. If you prefer using STSADM or PowerShell, you can also deploy and retract solutions from a command prompt.
Any user-submitted solutions can be managed with the Manage user solutions link. This screen offers administrators the option to block any solutions they wish. To block a solution from running in the farm, simply browse for the solution file and optionally provide a message informing users that their request is being blocked. You can also set how SharePoint handles multi-server scenarios and solutions. You can allow solutions to run only on the server on which the request was made, or on other servers running the User Code Service.
The Configure privacy options link is simply a page where you can specify whether you would like to send information to Microsoft regarding the SharePoint farm. You can opt in or out of the Customer Experience Improvement Program, as well as decide if you’d like to automatically send any errors related to Microsoft. Finally, you can choose whether you’d like to display help from the locally installed help files or whether you’d like to use the online help from Microsoft.
Lastly, administrators can use the Configure cross firewall access zone link to enable SharePoint to send externally accessible URLs in alerts. This is useful if the site is being set up with SSL. Choose the web application, and then choose the zone that will be used as the cross firewall access zone from the drop-down list.
Monitoring
Monitoring in SharePoint 2010 has been improved, offering more insight into the state of your farm. The Monitoring category contains three subsections: Health Analyzer, Timer Jobs, and Reporting (see Figure 6-8). This section is meant only as a primer and the real meat on these topics is presented in Chapter 15.

Health Analyzer
SharePoint 2010 introduces a new feature called the Health Analyzer (sometimes called the Best Practices Analyzer). This rule-based tool periodically scans the farm, checking various components and settings of SharePoint and comparing them to a rule bank.
If any settings are found that don’t match the rule, the Health Analyzer will display a prominent notice on the home page of Central Administration, as shown in Figure 6-9. This alerts administrators to potential issues they should be aware of: A yellow bar indicates that the Health Analyzer has found items that may need attention, while a red bar indicates more serious issues.

This section covers the Health Analyzer only briefly. To learn more about this and other monitoring capabilities, see Chapter 15.
In the Health Analyzer subcategory, you can take a look at any issues that have been detected during the various scans performed on the farm. If you have received a notice about any issues on the home page of Central Administration, you can also click the link within the notice to access this same page. On the Review problems and solutions page, you can scan through the various reports, which are divided by category. Out of the box, the Health Analyzer uses more than 50 rules, spread out among four different categories. Also indicated is which server is causing the error, and even which service is triggering the Health Analyzer. Clicking the name of an issue will open a pop-up window with more detailed information about the rule. Some rules even provide an option to allow SharePoint to automatically correct the problem. If you have already corrected the issue that SharePoint is complaining about, you can use the Reanalyze Now button in the pop-up’s Ribbon to rescan the farm for that rule ahead of its scheduled scan.
But what about the rules themselves? The second link in the Health Analyzer subcategory, Review rule definitions, is for actually seeing what rules the Health Analyzer is using to compare the farm settings. You can manually launch a scan with any rule by clicking the rule name and choosing Scan Now from the Ribbon in the pop-up window that opens. This screen also lets you adjust the settings and schedule of the rules. You can even disable rules you find to be incessantly irritating by setting their schedule to OnDemandOnly. This way, SharePoint won’t automatically scan the farm with that rule. For instance, you may have set up a single-server test farm, and every week a warning message appears informing you that databases exist on servers running SharePoint Foundation. In this case, such behavior is expected and required, so you could open the rule, click Edit Item in the Ribbon, change the schedule drop-down to OnDemandOnly, and then save the rule.
Timer Jobs
Timer jobs are somewhat similar to the Health Analyzer in that they run periodically, but their function is to keep the farm up and running, not to scan for issues. Each of these small scheduled jobs has a particular task to accomplish according to a schedule, which you can look at by clicking the Review job definitions option under the Timer Jobs subcategory. From this screen, you get view the schedule for each job, as well as the web application(s) some jobs are associated with. Clicking on a job’s title gives you more information about the function of the job, and you can set the schedule for the job. There is even an option to run the job immediately if needed, as well as a button to disable the job completely. Generally, you probably won’t need to change the default schedule settings for the timer jobs, unless you need to adjust them for troubleshooting purposes. Note that you can’t change what each timer job does; you can only set its schedule.
You can also check the status and history of timer jobs with the Check job status link. Scroll through the page to look at the various timer jobs and their states. The report displays jobs that are scheduled, jobs that are currently running, and jobs that have run. If something in the farm seems to be hung up, checking this page can indicate whether the problem is being caused by a timer job.
Reporting
In the Reporting subcategory, you can check out a variety of different reports that SharePoint automatically compiles. Clicking the View administrative reports opens a library that houses performance reports. For example, you can look at several search-related charts to see how the search function is performing.
Clicking the Configure diagnostic logging link enables you to customize the logging for SharePoint events to the Windows Event Log and trace logs. You can drill down through the various categories of events and change the settings for a specific component by checking the box next to its name, then setting the drop-downs below the category list. Any category that has been modified will appear in bold text. This can help you troubleshoot if you know you are only logging errors, or you can turn on verbose logging to get more information about what a particular component is doing. Remember, however, that enabling verbose logging on services can create larger log files, so you may want to temporarily change the logging type, and then reset the logging levels to their defaults.
Below the Event Throttling section on the Diagnostic Logging page, you can toggle Event Log Flood Protection (EVFP). EVFP is designed to keep your logs from becoming cluttered with hundreds or thousands of the same events repeating every couple of seconds if a server component begins to have issues. If SharePoint detects that the same event has been logged five times in two minutes or less, EVFP kicks in and stops logging that event for another two minutes. This can help manage the size of the log files significantly.
Speaking of log files, below the EVFP toggle is a section where you can set the location of the SharePoint trace logs. Because the trace logs can eventually grow rather large, it’s recommended that you set up a location on a drive other than C: for the log files. You can set the number of days that log files should be kept, and even set the amount of disk space they should be allowed to consume, which helps you keep logs under control if you don’t move them from the C: drive.
Also in the Reporting subcategory is a link for viewing health reports. These reports can give administrators a good snapshot of who is using the farm and how pages in the farm are performing. Select the Slowest Pages report from the Quick Launch menu on the left to see which pages in the farm suffer from the slowest performance. This can be helpful for finding any performance issues with pages or Web Parts in the site.
In addition to viewing the health reports, you can also configure the usage and health reports by clicking the Configure usage and health data collection link. This screen enables you to configure whether or not SharePoint should collect site usage information and health information. Ideally, you want to ensure you’re collecting this information to better understand how the site is being utilized, what pages are most popular, and who is using the site. You can also configure what types of events are logged. By default, all types of events are logged, but you may want to consider logging only specific events you really care about. Like the trace logs, you can specify where the log files should be kept, and how much disk space they should be allowed to take up. An important note about both trace logs and usage logs is that if you choose to change the log file location, you must select a location that exists on every SharePoint server in the farm. For example, if you decide that the logs should reside on F:SharePointLogs, then every server in the farm needs to have an F:SharePointLogs folder so that the log files are written to the same location on each server. The usage and health monitoring configuration page also lets you choose whether to log health data collection or not; and it provides links to modify the health logging schedule and the log collection schedule, which are simply timer jobs.
Last in the Monitoring category is the Web Analytics Report. This informative page shows you the running total for the number of page views for each of the web applications in the farm, the total number of unique visitors per day, and the number of search queries performed. Clicking a web application’s name opens a more detailed view of the usage for that web application. You can also modify the date range by clicking the Change Settings link in the blue Date Range bar and selecting one of the preset date ranges, or setting your own custom date range from the More drop-down in the Ribbon.
Backup and Restore
Chapter 12 is dedicated to SharePoint backup and recovery, so this section will serve more as a general overview of using Central Administration as a backup and recovery tool. Figure 6-10 shows the backup and restore tasks that you can perform through the Central Administration interface (see Figure 6-10).

A new and welcome addition to SharePoint 2010 is the capability to perform more granular backup and recovery. Instead of only being able to back up content databases or the entire farm, as you were limited to in the SharePoint 2007 Central Administration backup, you can now back up site collections, subsites, and even lists from this interface. Previously, restoring any content smaller than a content database from a backup generally meant having to set up a separate recovery farm, restore the content database, then export the content from the recovery farm using STSADM.EXE and import it back into the production farm. Now, this can all be done from the Central Administration interface. In addition, SharePoint databases and database snapshots that aren’t even attached to the farm can be used to browse and recover content from within Central Administration.
The Backup and Restore category is divided into two subcategories: Farm Backup and Restore, and Granular Backup. The Farm Backup and Restore subcategory enables you to perform high-level backups of the entire farm or individual Web Applications, as well as recover from these backups. Conversely, the Granular Backup subcategory is where you perform your backups and exports of site collections, webs, and lists.
If the backup and restore functionality in Central Administration has you frothing at the mouth, wait until you read Chapter 12, which is all about backups and high availability. It’ll drive you wild.
Security
The Security category, shown in Figure 6-11, is all about … well, security! From this page, you can manage user security to the farm and set web application user policies, configure the farm’s managed accounts, block file types, and set up information rights management.

Users
Let’s start with the Users subcategory. Your SharePoint farm always needs at least one administrator. The account used to run the SharePoint 2010 Products Configuration Wizard is automatically added to the farm administrators group, as is the local server administrator. If you need to add specific users in your organization to the farm administrators group, you can do so here. One thing to consider, however, is that anyone in this group essentially has rights to anything and everything contained in the farm. That’s important to keep in mind when determining who should get what permissions. Consider whether a user could accomplish the tasks he or she needs with fewer permissions, such as to a Web Application or a site collection. It’s generally considered best practice to not go wild and give a large number of people farm administrator access if you can avoid it.
The Approve or reject distribution groups link opens a list from which you can manage the distribution groups used for incoming e-mail. This can be useful if your users have created so many distribution groups within e-mail-enabled document libraries that the number has become unwieldy. This is actually nothing more than a SharePoint list, which makes it easy to manage.
The Specify web application user policy link opens the Policy for Web Application page, which enables you to add users and groups to the Web Applications in the farm. Select a web application and you can manage the users already associated with it, or add users. This can be used as an alternative to giving users full Farm Administrator access if they need access to multiple web applications. You can choose one of four permission policies for users and groups for the web applications: full control, full read, deny write, and deny all. Keep in mind that these policies affect the entire web application, so any setting made for a user or group here applies to all site collections contained in that web application. Notice that the account used to run search crawling is automatically given full read permissions to the site.
You also have the option to make an account operate as a system account, whereby any changes made to SharePoint will register as being made with the name System Account, rather than the user who actually made the change. It’s worthwhile to note that this is the only place in SharePoint where you can deny someone access in SharePoint.
General Security
Moving on to the General Security subcategory, you’ll find items pertaining to the overall security and accounts used in the farm. The first two links, Configure managed accounts and Configure service accounts, sound fairly similar, but their function is different. The Configure managed accounts link is where you can register domain accounts with SharePoint so that SharePoint is responsible for them (as described earlier in the section “Managed Accounts”), whereas the Configure service accounts link opens a page from which you can manage existing account associations with the various services on the farm.
You can have the passwords of managed accounts registered with SharePoint automatically changed to comply with the organization’s policies, and a few settings related to changing passwords can be found in the link Configure password change settings. Despite the name, this page doesn’t actually allow you to set the passwords for your accounts; it simply allows you to configure notifications and set a timer for the password change. You can configure how many days prior to the change the notification will be sent out (the default is 10 days), and how many days prior to the change the e-mail should be sent out. In the last section on the Password Management Settings page, you can adjust the amount of time SharePoint waits to change the password after notifying the services that new passwords are about to be applied. This time window is necessary for the services to finish up any running tasks before their managed accounts receive a new password. The default is 45 seconds. You can also adjust how many times SharePoint should attempt to change a password before failing.
Next up is the link Specify authentication providers. Here you can see a list of the various authentication zones and provider names. Clicking on the zone name will enable you to edit the authentication for that zone. Several common configuration options are available here, including the capability to enable or disable client integration for the Office clients, and enabling or disabling anonymous access for the site. Like many settings in Central Administration, these are also configured per web application. Additional settings that can be made include the authentication type and IIS authentication method, and whether or not users should be required to have Use Remote Interfaces Permission.
In the General Security subcategory, you can also manage inter-farm trusts and the associated root certificates. This page employs light use of the Ribbon, allowing you to create new trusts or edit existing trusts. Clicking an existing trust name will open the options Edit and Delete in the Ribbon. Creating a new trust involves giving the trust a name and pointing SharePoint to the root authority certificate. All trusts require a root authority certificate. If you are setting up a trust to provide trust to another farm, you need to provide SharePoint with a token issuer certificate. Once you have configured your trust, you can return to them later to edit the settings if desired.
You can manage how an antivirus program interacts with SharePoint by clicking the Manage antivirus settings link. You can set how the antivirus scanner will treat documents that are uploaded and downloaded, and whether or not it should attempt to clean any infected documents it discovers. You can also adjust the length of time the scanner runs before it times out, as well as the number of threads used for scanning. Depending on your server performance when running scans, you may want to adjust these numbers.
Another important security practice SharePoint employs is to limit the types of files that can be uploaded. You can find the list of blocked files by clicking the Define blocked file types link. SharePoint 2007 also had a blocked file list, and it’s largely the same in SharePoint 2010. Out of the box, SharePoint 2010 blocks nearly 100 file types, but you can add your own to the list by entering the extension of the file type. This is configured per web application, so if you have more than one web application you can have a different set of files blocked for each.
The last major link in the General Security subcategory is Manage web part security. This page enables you to configure how users are allowed to interact with aspects of Web Parts. As in previous SharePoint versions, Web Parts are still one of the building blocks for providing information on a SharePoint page; and also like previous versions, many of those Web Parts can be connected to provide and consume data from one another, allowing for dynamic presentation of content. You can choose to disable the Web Part connections option (its default is enabled), and specify whether or not they are allowed to access the Online Web Part Gallery, which contains Web Parts developed by Microsoft and potentially other third-party vendors. If you choose to allow users to access the Online Web Part Gallery, you may need to modify the web.config file to allow the server access to outside galleries. Finally, on this page you can allow your users to edit scriptable Web Parts; and you can restore the default settings if necessary. Again, these settings can be changed per web application.
The General Security subcategory also provides another link to configuring self-site creation, which can be accessed from a number of other areas in Central Administration as well.
Information Policy
The Information Policy subcategory lets you configure information rights management (IRM) for the farm by clicking the Configure information rights management link. By default, IRM is turned off, but you have the option to use the default server running Windows Rights Management Services listed in Active directory, or specify your own server running RMS. Once IRM has been enabled, you can set the IRM policies for the farm by clicking Configure Information Rights Management Policy. Out of the box, SharePoint 2010 comes with four preconfigured policies: Labels, Barcodes, Auditing, and Retention. Clicking the policy name enables you to edit the settings for that policy, such as whether or not the policy should be decommissioned or remain active. Decommissioning a policy doesn’t remove it from any document libraries and lists that currently use it, but it will prevent new libraries and lists from being able to consume it.
Upgrade and Migration
As shown in Figure 6-12, the Upgrade and Migration category only has one subcategory, Upgrade and Patch Management. This subcategory contains only a handful of links.

This is where you will find links to convert your SharePoint license type (for example, from a trial version to a licensed version), as well as select which feature set to use if you’ve recently activated an enterprise license. To activate a license, simply click Convert farm license type and type or paste your license in the field and click OK. Once you’ve done that, you can head over to the Enable Enterprise Features link to switch the set of features from the standard set to the Enterprise set. Once you turn on Enterprise features, you can’t undo it.
If you’ve been running SharePoint 2010 for a while and have created several sites, and you then upgrade your license type, the newly available Enterprise features may not be activated in your existing sites. You can use the Enable Features on Existing Sites link to push down the newly activated set of features to any sites that were created before the license conversion. Any sites made after the license conversion will already have the new feature sets.
The Check product and patch installation status option provides a report of all the various components and products on the server, including their current patch level. This can be useful in determining what version of a particular product you’re running. This is a nice centralized place to find version information, especially if you are running a larger farm with many services running on the various servers. You can show all the products installed on the farm, or view the list filtered by individual servers.
Selecting View database status provides another report of all the various databases connected to the farm, and what type of database they are (content database, metadata service database, configuration database, etc.).
Finally, if you are upgrading from SharePoint 2007 to SharePoint 2010 using the database attach method (which you learned about in Chapter 5), the Check upgrade status link will become a good friend of yours. Once you add a SharePoint 2007 database to the farm, you will see any active and previous upgrade sessions (see Figure 6-13). The page refreshes periodically during the upgrade process, keeping you informed of the status, and reports any errors encountered during the upgrade. Refer back to Chapter 5 for more information on using this page during the upgrade process.

General Application Settings
The General Application Settings category, shown in Figure 6-14, is one of the larger categories found in Central Administration. There’s a lot that you can do here to change how users will interact with SharePoint 2010. In this category, you’ll find options for controlling how client-side applications interact with SharePoint 2010, such as InfoPath and SharePoint Designer, as well as settings in SharePoint that apply to Web Applications. In addition, because Central Administration’s interface is pluggable, it is possible for additional links and sections to display here when using products that integrate with SharePoint. For instance, a Reporting Services section is added if the SQL server is running Reporting Services in SharePoint integration mode.

External Service Connections
Starting in the External Service Connections subcategory, you’ll find a couple of links that can be used to send and convert documents in the SharePoint farm. The Configure send to connections link enables you to configure custom send to locations for the selected web application. This makes use of the Content Organizer feature available in SharePoint 2010. In a site collection, this feature can be enabled and configured to allow management of documents submitted to a drop-off folder. Using the Configure Send To Connections page in Central Administration, you can take this a step further and enable documents to be submitted across multiple site collections, a boundary that many organizations found themselves up against in SharePoint 2007.
Configuring send to locations requires that the Content Organizer site collection feature is enabled on the site collection that will receive the documents. Once the feature is activated, you will have additional options on the Site Settings page under the Site Administration headers: Content Organizer Settings and Content Organizer Rules. You can use these pages to customize the settings for the drop-off folder and how the documents will be routed in the site collection.
At the very bottom of the Content Organizer Settings page is a URL for a web service. Copy this URL; and then back in Central Administration, paste the URL in the Send to URL field on the Configure Send to Connections page. You can give the new connection a name, decide what action will be taken, and give the send to an explanation of what will happen. Once configured, your new send to destination will be available in the Send to menu in the Documents tab of the Ribbon.
SharePoint 2010 also allows for document conversions using pre-installed and third-party software. Settings for managing document conversions can be found in the Configure document conversions link under the External Service Connections subcategory. In order for document conversions to be enabled, two services must be started first (by default, they are disabled). To enable them, open the System Settings category and click Manage services on server. Look for the two services Document Conversions Launcher Service and Document Conversions Load Balancer Service. Next to each, click the link to start the services. You can configure additional options by clicking the service names, such as specifying the communication scheme for the services to utilize (http or https), the port number the services will use to communicate, and which server in a multi-server farm will act as the conversion load balancer. Once these services have been started, you can continue the configuration of document conversions under the General Application Settings category. SharePoint 2010 comes with four converters preinstalled, and third-party applications may add additional converters.
InfoPath Forms Services
This subcategory contains all the links you need to start utilizing the tight integration between InfoPath 2010 and SharePoint 2010. Use the Manage form templates link to keep track of all the available InfoPath forms that are enabled on the server. You can filter the list using the List View filters in the Quick Launch menu, and you can upload your own custom templates. You can further manage the templates by clicking the drop-down arrow around each template name: You can activate, deactivate, quiesce, and delete the templates (keeping in mind that templates tied to existing workflows or deployed using a feature can’t be removed or modified). If you upload a custom InfoPath template, you can also deploy it to site collections using the drop-down menu.
To quiesce a template means that no new connections will be allowed to use the template, and any existing connections will be gradually timed out in an effort to minimize data loss.
The Configure InfoPath Forms Services link opens a page of general settings related to the InfoPath Forms Service. Most of these options are fairly self-explanatory. You can use this page to set additional options that can enable additional features in InfoPath forms, such as allowing forms to use embedded SQL authentication when connecting to external data sources; to configure thresholds for user sessions when using InfoPath forms; and even to set the time-out settings and maximum amount of data transfer allowed for sessions.
The Upload form template link opens the same page that can be accessed from the Manage Form Templates page. Simply browse for a form and verify its compatibility with the Verify button. Below that, you have the option to choose how existing forms are upgraded. You can choose to upgrade existing forms while preserving active connections to the older version of the template, or you can choose to upgrade the forms immediately and close any existing connections. When you have made your selections, click the Upload button to upload your form template into the template gallery. Similar to the template gallery is the data connection library, accessed with the Manage data connection files link. You can upload InfoPath data connection files to Central Administration to manage them centrally if you wish.
Finally, clicking the Configure InfoPath Forms Service Web Service Proxy link gives you the option to enable a proxy to be used for connections between web services and the InfoPath Forms service application. You can read more about service application proxies in Chapter 7.
Site Directory
The Site Directory subcategory contains just a couple of options. In SharePoint 2007 you had the option to create a master site directory that would automatically list all site collections in a single location. This could be very useful if your organization has a large number of site collections throughout the farm, as having a centralized list of all the available site collections could be a time saver. This idea is carried over to SharePoint 2010. While each site collection can have its own site directory, you can also create a site that will become the master site directory. Click the link Configure the Site Directory in the Site Directory subcategory and simply enter the URL of the site directory site collection in the field. You can specify whether all sites should be added to the site directory, and whether or not they are required to be categorized.
Clicking the Scan Site Directory Links option under the Site Directory subcategory enables you to specify a scan on a view of the site directory list to check for broken links. Each view in SharePoint 2010 has a unique URL, which can be copied and pasted into the field for scanning. Your site directory may have views that display only sites in a particular category, and you may want to only scan a particular view instead of scanning the entire site directory.
SharePoint Designer
When Microsoft began offering SharePoint Designer 2007 as a free download, many administrators immediately began having visions of the SharePoint Apocalypse: users wreaking havoc on a finely tuned SharePoint deployment, unghosting pages left and right, and deploying custom designs. There were a few ways to address how SharePoint Designer 2007 could interact with SharePoint and keep it under control, but in many cases administrators simply kept SharePoint Designer under wraps in hopes that their general user base wouldn’t discover it.
SharePoint Designer 2010 is also available as a free download from Microsoft, but now it offers more options for restricting its use, which can be set on a more granular level. Individual site collections can have the use of SharePoint Designer restricted as needed. The use of SharePoint Designer can be set per Web Application, which will affect all site collections in that Web Application. As shown in Figure 6-15, all the options for using SharePoint Designer are checked by default in Central Administration, but not at the site collection level, which provides flexibility regarding who can do what with it.
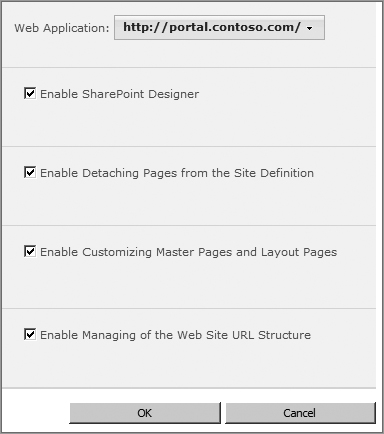
For example, in Central Administration you can completely disable the use of SharePoint Designer for all site collections in a Web Application if you wish, or you can select which set of permissions administrators will be allowed. Keep in mind that deselecting an option in Central Administration for SharePoint Designer will make that option unavailable in all site collections within the selected Web Application.
Search
Under the Search subcategory you’ll find a link to the Farm-Wide Search Administration page and a link to the Crawler Impact Rules page. Both of these links can also be found in the Management page for the Search Service Application. Briefly, the Farm-Wide Search Administration link will open a page that gives you a general overview of the Search topology in the farm. You can see any proxy servers set up for Search, how long the timeout is set to, and whether or not Search should ignore SSL warnings. You can configure all of these options by clicking the respective values set to each property. Below that is a list of all search-related service applications. Clicking the name of the service application will open the management screen for that service application, while clicking the Modify Topology link enables you to view and modify the topology of Search in the farm. You can also add new search databases or modify the properties of existing databases.
Clicking the Crawler Impact Rules link enables you to control how the crawler affects performance. For example, you can choose whether you want a specific number of simultaneous requests to be made by the crawler, or if you’d rather have only one document requested at a time with a specified pause between requests. This is all handled on a per-site basis, so different sites can have different rules.
You can read all about Search and its various settings in more detail in Chapter 14.
Content Deployment
We’ve nearly made it to the end of our tour of the General Application Settings category. Last up we have the subcategory of Content Deployment. Content deployment is the production of content in one site collection that will then be ported to another site collection. Often, in public-facing websites, authors will create content in an authoring or staging environment, and the content deployment schedule will port that content to the production destination. These can be as elaborate as separate farms or as simple as separate site collections in different Web Applications. This enables authors to develop in one location without worrying about accidentally publishing content that isn’t ready yet.
Although the links wouldn’t indicate it by the order they’re in, creating a content deployment path and schedule begins with clicking the Configure content deployment link if you’re going to be deploying content to the same server. Once you have actually configured content deployment for the server, you’ll be able to return to the Configure content deployment paths and jobs link to set up the paths that will be used for deployment. If you have a second environment that will receive the content, you can begin creating paths to the second environment right away.
Clicking the Configure content deployment link opens the Content Deployment Settings screen. Before your server can accept content deployments, you’ll need to enable it. Choose the option to Accept incoming content deployment jobs, which allows you to set up Web Applications and site collections on the same server to receive deployments. Next, you choose which server will handle the deployment jobs and export of content, set whether you’d like to use SSL encryption to deploy the content, and specify where the temporary files for incoming content should be stored. By default, the location is set to C:ProgramDataContentDeployment, but you can set your own location. It would be advisable to move this location off the C: drive, especially if you know you will be relying heavily on content deployment in your organization. Lastly, you can configure how many records should be kept for each deployment job that runs. The default is 20. When you are finished, click OK to save your configuration.
Once you’ve configured the content deployment for the server, you can start creating deployment jobs. Click the Configure content deployment paths and jobs link to see a list of the deployment jobs you have set up (obviously the list will be empty the first time you click it). Create a new deployment job by clicking the New Path link. You need to specify a name, and optionally a description, for the path you want to create for deploying content from one location to another. Next, choose the source Web Application and source site collection. Once that is specified, you provide the URL of the Central Administration site on the destination server (or, if the destination is on the same server, the URL of Central Administration you’re already working in). If you configured content deployment to utilize SSL, you need to ensure that the Central Administration URL begins with https://. If you don’t use SSL, then you will receive a warning message as you type the URL, letting you know that the traffic won’t be encrypted.
Below that, enter the username and password of an account that has access to the destination Central Administration. Click the Connect button to verify that the connection works. Choose the destination Web Application and site collection from the respective drop-downs. By default, the option to deploy user names is checked, which will associate the username of the original author with the deployed content. To finish creating your path, choose what security information you want to send with the deployment and click OK. You’ve successfully created a path through which you can deploy content.
Once you have configured content deployment and set up a path, you can now set up a job schedule. From the Manage Content Deployment Paths and Jobs page, click the New Job link to associate a deployment job with a particular path. Give the new job a name and description. Next, choose which path you will be associating the job with from the drop-down. If your version of SQL Server supports SQL snapshots, SharePoint can utilize them to speed up the deployment process significantly. By default, SQL snapshots are not used. Next, choose whether an entire site collection or individual webs (subsites) within the site collection will be deployed with the job. To select individual subsites, click the Select Sites button and from the tree that opens, you can select individual sites or entire branches of the site tree by clicking the name and selecting either the site or the branch to be deployed. Click OK to close the pop-up.
Next up you can create the deployment schedule. You can run the job as a one-time only deployment or you can create a repeating schedule. Deployments can run once a month, once a week, once a day, once an hour, or every so many minutes. Choose your option and set the desired time schedule for the deployment. Under the schedule, you can optionally choose to send e-mail notifications to people when the deployments run. Clicking OK will create the job. Paths can have multiple jobs associated with them, which can be useful if different areas of the destination site need to be updated on different schedules, or if a one-time job needs to be run before the next scheduled job. If you create a new job for a path, you will have one extra option in the job creation screen, enabling you to deploy only new content to the destination or all content regardless of whether it is new or not.
From the Manage Content Deployment Paths and Jobs link, you can manage your paths and jobs by clicking the drop-down around them. You can even test jobs to ensure that they will run and to spot any potential issues before actually running a job, and view the history of previously run jobs (see Figure 6-16). The Status column also creates hyperlinks to view more details about the current status of the job in question.

Finally, the last link on the General Application Settings category is Content Deployment Object Status. This page provides a report on the content deployment jobs that have run. You can check specific content by entering a URL into the field and clicking the Check Status button. This will return a report of the source and destination object details. You can use this page to check for warnings and errors if the content doesn’t seem to have deployed properly.
Configuration Wizards
The final category we’ll cover in Central Administration is the Configuration Wizards category. There isn’t a lot to explain here; this category contains a link to run the Farm Configuration Wizard (see Figure 6-17).

If you skipped that step during the initial configuration of SharePoint, you can run it from here. SharePoint 2010’s wizard framework is fully pluggable as well, so it’s conceivable that this list could be expanded in the future, either by Microsoft or by third-party vendors. For example, a third-party tool might include a wizard to walk you through the setup, and a link to it could be stored here.
Whew, we made it! We’ve covered nearly every aspect of SharePoint 2010’s Central Administration. What a ride! There is definitely a lot to take in, but the more you work with Central Administration the more you will find that it makes your life as an administrator easier. You’ll find more detailed information about many of these topics we’ve covered here later in the book. This chapter was basically a start-to-finish tutorial demonstrating where you can find the various settings in the newly designed interface. Hopefully, you now have a better idea of where to look when searching for an elusive setting.