
Chapter 7: Understanding the Service Application Architecture
What’s In This Chapter?
- What happened to Shared Services Providers?
- Service application basics
- Administering service applications
- Multi-tenancy in SharePoint 2010
Put your thinking cap on. This chapter is going to plunge you headfirst into the depths of SharePoint service applications. On the surface, they are pretty straightforward — heck, you can just run a wizard to get started — but truly unlocking their power takes a bit more effort. Service applications are the way SharePoint 2010 provides most of its services. Think of something like Search or Excel Services. These are offered as individual services that can be consumed in a variety of ways. Out with the rigid Shared Services Providers and in with the flexible service applications.
Groups, connections, proxies, services, delegated administrators — what is all of that stuff? As with most things technical, terminology is critical; and unfortunately, once you learn the key SharePoint terms, you will find that half of them have a doppelganger in Windows PowerShell. Ugh.
However, once you have a grip on the terminology and the plumbing, it’s time for the fun part. After looking at the fundamentals in Central Administration and then strolling through some of the key cmdlets, you’ll be ready to get your hands dirty.
Then once you think you have things under control, you learn a new trick. Some of the service applications can be configured to be multi-tenant, meaning that a specific instance of the service application can be set up in a way that makes each site collection think it is using a dedicated service, when in reality they are sharing.
Get excited. You may think this chapter will be boring, but it’s a non-stop thrill ride through one of the most important pieces of SharePoint.
Farewell to the Shared Services Provider
If you are familiar with MOSS 2007, then you know all about those lovely things called Shared Service Providers (SSPs). They enabled services to be packaged and provided in MOSS. An SSP consisted of Search, Profiles, Audiences, and My Sites; and if you were cool enough to have the Enterprise CAL, then they also brought Excel Services and the Business Data Catalog (BDC) to the party. You would then associate one or more SharePoint web applications with the SSP to consume these services. The web application had to get all of its services from one SSP, which caused scaling nightmares for many administrators.
For example, suppose you currently host your intranet at http://intranet and it is associated with the Enterprise SSP. Then Human Resources comes to you and says they need to have their own, isolated copy of the BDC to protect their data. First you would have to create for them a unique web application, http://hrweb. Then you would have to create an HR-only SSP and associate their web application with the new SSP. Then you could set up the BDC. The only problem is that when you create the new SSP, you also get a new instance of all of those other services, like Search, as shown in Figure 7-1. If HR would like to be able to search, then you have to configure Search for this SSP because they could not associate their web app with the corporate SSP and its Search index. You can see how this could quickly become a black hole of redundant services and duplicate data.
In SharePoint 2010 this is no longer the case. Instead, all of those individual services can stand on their own as service applications. Table 7-1 shows the list of the service applications available and some information about them.
Table 7-1 Service Applications
| SharePoint Foundation Service Applications | ||
| Has Database | Cross-Farm Capable | |
| Business Data Connectivity | Yes | Yes |
| Usage and Health Data Collection | Yes | No |
| Web Analytics | No | Yes |
| Microsoft SharePoint Foundation Subscription Settings Service | Yes | No |
| SharePoint Server 2010 Standard Service Applications | ||
| Has Database | Cross-Farm Capable | |
| Managed Metadata Service | Yes | Yes |
| Search | Yes | Yes |
| Secure Store Service | Yes | Yes |
| State Service | Yes | No |
| User Profile Service | Yes | Yes |
| SharePoint Server 2010 Enterprise Service Applications | ||
| Has Database | Cross-Farm Capable | |
| Access Service | No | No |
| Excel Service | No | No |
| Visio Graphic Service | No | No |
| Word Automation Services | No | No |
| PerformancePoint Service | No | No |
Note that service applications are part of all the SharePoint 2010 editions, including Foundation. This is great news for administrators and should help reduce some of the previous inconsistencies in administering SharePoint.
The best way to think about service applications is take the old SSP and explode it out so that each piece stands alone. So instead of buying a combo meal, now you can get the burger, fries, and drink separately — and if for some reason you want two drinks and no fries, that’s fine too. Everything is ala carte. To put that in SharePoint terms, we can return to the example described earlier.
Currently, your company uses http://intranet for all SharePoint sites. For security reasons, the Human Resources group wants to have its own BDC, so you begin by creating a web application for them, http://hrweb. Then you provision a new BDC service application named HR only BDC. Now you can associate http://hrweb with that service application and all of the other service applications, as shown in Figure 7-2.
As you can see, now HR has access to all of the same service applications as before, including the Enterprise BDC, and they have their own BDC. The other Intranet users are unaffected in terms of access; they are merely excluded from the HR only BDC, thus giving HR its desired isolation.
What was such a huge nightmare in the previous version of SharePoint is now a piece of cake in SharePoint 2010. Even better, the service application architecture is infinitely configurable. Of course, as you already know, infinitely configurable also means it can be infinitely complex. Fear not; this chapter will help you work through those infinite loops.
Service Application Fundamentals
Before you can begin to work with service applications it is important to get a handle on all of the pieces involved and how they interrelate. There are a series of connections and associations to get from your web application to search results and the better you understand the pieces the easier it is to wire it all together.
The Connection Structure
In order to provide service applications that are flexible and scalable, the services are actually offered through a series of connections and associations (see Figure 7-3).

SharePoint web applications are associated with service application groups, which are made up of one or more service application connections. Each service application connection connects the service application to the service application group. A given service application consumes one or more service application services. Finally, some of those service applications have databases for storage, while others do not. You already know what web applications are, so the following sections will help you make sense of these interrelated elements.
Service Application Groups
The group is the piece you associate with your web applications. When you created your first web application back in Chapter 4, it was set to use the default service application group, as shown in Figure 7-4. Notice that when the default is selected, all of the checkboxes are grayed out. You cannot edit the default group from this screen.

The default group is automatically provisioned for you. If you used the initial Farm Configuration Wizard, then all of the service applications are part of this group. When you manually create a service application, you can choose to include it in the default group or not by using the checkbox shown in Figure 7-5 (more on that later in the chapter).

This group enables you to associate a web application with a bunch of service applications. If the default group doesn’t meet your needs, you can use the [custom] option. This enables you to specify which service applications you want to use for the web application. Keep in mind that although [custom] appears in the group drop-down menu, you cannot reuse this “group.” When you create a web application and specify [custom], you choose the service applications available to that web application. If you then create a second web application and select [custom], you will not see the service applications you chose for the first web application. This is a unique instance of [custom]. It is not reusable.
Proxy groups or application proxy groups are other terms you may hear for service application groups. This is how they are referred to in the SharePoint 2010 Management Shell and in the object model (OM).
To create a group you can reuse, you need to use the SharePoint 2010 Management Shell and run the New-SPServiceApplicationProxyGroup cmdlet. You will learn more about this cmdlet in the section “Service Application Administration” later in the chapter.
Service Application Connection
The service application connection is actually what most people are thinking about when they create the service application from Central Administration. This connection connects the web service that runs for the service application and accepts requests from the web application to the service application group. In other words, the web application is associated with a service application group that says, “Here are all the service applications you can use.” That way, when the web application wants profile information, for example, it knows what User Profile web services to call. If you look in IIS, you will see a website named SharePoint Web Services. If you drill through this list, you can find these service application connections and their web services. If you configured your farm with the Farm Configuration Wizard, then they will be named and listed as a 32 character GUID and not a logical name.
Like the service application group, the service application connection is known by a few other names. Proxy and application proxy are sometimes used, especially when dealing with the SharePoint 2010 Management Shell and the OM. Avoid the temptation to use these terms, as the word “proxy” is one of those overused IT words, used in about a bazillion places. Just don’t do it.
Service Application
The service application is your main purpose in this somewhat complicated connection matrix. Service applications provide the services you need once you have access to them. When you create a new service application, you automatically get the accompanying service application connection point and the database(s), covered next.
Service Application Database(s)
As mentioned earlier, not all service applications have a storage requirement. For example, Excel Services does not store data; it only facilitates the display of data stored somewhere else, so it doesn’t need a database. Conversely, Search has intensive storage needs, so it actually has multiple databases. The Managed Metadata service only needs one database to do its job.
When a service application needs a database, you will be prompted to provide a name when manually creating the service application. Each database is unique to an individual service application. For example, if you create an Enterprise BDC service application and an HR Only BDC service application, you will have two unique databases. A single database and service can be used to host data that needs to be kept logically separate, but additional planning and PowerShell cmdlets are required. More on that later.
Service Application Service(s)
Last, but certainly not least, are the service application services. You can find these hanging out in Central Administration on the Application Management page. Under Service Applications, click Manage services on server. The link is also on the System Settings page.
The services are the true workhorses in the stack. When you make a request to Excel Services, for example, you go through the connections listed above and finally get to the service application. It facilitates your request but all the actual processing and work is done by the Excel Calculation Services running on one or more servers in your farm.
These services are one of the key ways you scale service applications. If, due to heavy usage, you find that you need more performance from Excel Services, then you could start the Excel Calculation Services on another server in your farm. That way, when you make requests of the Excel service application, it will distribute the request between both of the servers running the services. You can continue to add servers running the service until you achieve your performance target.
You will find that each service application can handle this load balancing of the services in its own way. Excel services has a setting to control the load balancing. Managed Metadata just does the load balancing on its own. And Search… well, you’ll find several pages in Chapter 14 to explain how Search balances the load.
Tying It Up with an Example
Take a look at Figure 7-6, which provides a schematic diagram of the concepts just described.
Looking first at the left side of the diagram, the company has a SharePoint web application, http://intranet (1a), that is associated with the default (2a) service application group. The default service application group has three service applications in it: Enterprise BDC (4a), Enterprise Managed Metadata (4b), and Enterprise Excel Services (4c). These are connected to the default service application group by the three service application connections (3a, 3b, 3c). These connections are not something that administrators can actually touch; they are created when the service application is created and they enable the web applications to talk to the associated service applications. The Enterprise BDC stores its content in its database (5a) and uses the Business Data Connectivity Service (6a) running on the server. You can also see that the Enterprise Managed Metadata service application has a database (5b) and a service (6b). Finally, Enterprise Excel Services does not have a database but is using the Excel calculation service (6c).

That was pretty straightforward, so now take a look at a slightly more complicated scenario by looking at the right side of the figure. The company has a second web application at http://marketing (1x). They are using the [custom] (2x) service application group. Now for the twist. There are once again three service application connections. The connection (3b) to the Enterprise Managed Metadata (4b) and the connection (3c) to the Enterprise Excel Services (4c) are reused, demonstrating that a service application can be connected to multiple service application groups. Enterprise Managed Metadata continues to use the same database (5b) and service (6b) as before, because it is the same service application. The same is true for Enterprise Excel Services and its service (6c).
And the final twist: Marketing has a unique service application, Marketing Managed Metadata (4x) that is connected (3x) to the [custom] group. This service application has a unique database (5x) for its storage but it uses the same Managed Metadata Service (6b) as the Enterprise Managed Metadata service application did.
That’s it, folks. If you grasp these relationships, you know everything you need to know about service applications. Ok, maybe not everything, but you are off to a solid start. Dig in and keep reading.
Connecting across Farms
Once you understand the service applications and all of their connections in your farm, the next logical step is to add more connections. Some of the service applications are capable of being published and then consumed across different SharePoint farms. Even more impressive is the fact that all of the service applications except the User Profile service application don’t even require the two SharePoint farms to be in trusted Active Directory domains.
Before you can publish or consume the service applications between two farms, you have to establish a farm trust. This is done by using the SharePoint 2010 Management Shell to create and register certificates between the two farms. This is covered in greater detail in the section “Service Application Administration” later in the chapter.
After the farm trust is configured, you can go to the publishing farm and select the service application you want to publish. Once it is published, you will get a URL for accessing the published service.
From the consuming farm, you simply connect to the published service by providing the URL. Then the connected service application can be added to a service application group, and will provide services just as if the service application had been part of the farm. Figure 7-7 shows an example of four farms at work.

Farm 1 introduces a new concept, an enterprise services farm. This is something typically seen only in large companies. The idea is that a farm is created and maintained exclusively to provide services to other SharePoint farms throughout the organization. This way, the services farm can be optimized for hosting services and can be maintained in the same manner. For example, a Search index might contain several million items, requiring several days to do a full crawl, and hours to do an incremental crawl. In order to do this efficiently, you need to optimize your hardware for Search. If you have three SharePoint farms and each maintains its own Search service application, it would be very expensive to do a lot of repetitive crawling of content. Instead, a much better solution would be to maintain the index in one farm and just consume the service from the other farms.
Farm 2 is a simple farm for publishing content, maybe hosting just informational websites or similar content. In this farm, the demand for service applications is low, and all of the service applications it does require are provided by the enterprise farm. Therefore, this farm actually has no local service applications and is just optimized for displaying SharePoint content.
Farm 3 is a collaboration farm and is a busy place. This farm has demands for all types of service applications — some are consumed from farm 1, and others are hosted locally. The locally hosted service applications are those that are not capable of being published across farms, so they must reside in the farm where they are needed. Note that the Managed Metadata service application from farm 4 is being consumed. Other than that, there is nothing special about this scenario other than the flexibility of consuming service applications from multiple farms.
Farm 4 is very similar to the collaboration farm in nature. It is hosting its own web applications and is consuming local and remote service applications. Additionally, it has published the Managed Metadata service application for consumption by farm 3. Although all three farms are using the default group in this example, this isn’t a requirement. You very well could have configured the [custom] group in any of the farms to consume the cross-farm service applications.
Service Applications As a Framework
You have probably noticed by now that all of the service applications act slightly different. This is because service applications are really a bunch of individual services built to plug into a framework. The great thing about this framework is that anyone can plug into it. It is hoped that as third-party vendors and developers start writing code for SharePoint 2010, they will take advantage of the framework and use it to add their functionality. That way, instead of needing to create a custom third-party application to administer their added SharePoint functionality, they will just plug right into Central Administration. If they need a service to run, they can just add it to services on the server, giving administrators a consistent experience.
There are already two instances of this today. The Microsoft Office Web Applications and Project Server 2010 are not strictly parts of SharePoint 2010. But when they were developed, their respective groups at Microsoft chose to add their functionality through the service application framework. That way, when you need to administer either tool, you can simply select Central Administration Manage service applications. For example, after you install the Office Web Applications you will see both a service application and a service on the server named Word Viewing Service, along with a few others. From an administrator’s perspective, there is no difference between these service applications and one provided out of the box with SharePoint 2010.
Service Application Administration
Now that you have a working knowledge of the fundamentals, it is time to put that knowledge to work. In this section, you will learn how to operate all the knobs and switches that enable you, as a SharePoint administrator, to do your job.
Creating a New Instance of a Service Application
In Chapter 4, you took advantage of the Farm Configuration Wizard to create several default service applications. That was a great way to quickly get up and running with SharePoint 2010.But now you are ready for prime time, and HR is screaming for its own instance of the Managed Metadata service application. They would like to name it HR Only Metadata. The following steps describe how you would create it for them:
1. Open Central Administration.
2. In the Application Management section of the home page, click the link to Manage service applications.
3. Here you can see all of the service applications currently available in your farm. In the Ribbon, click the New button and select Managed Metadata Service, as shown in Figure 7-8.

4. For Name, enter HR Only Metadata.
5. Confirm you have the correct Database Server listed.
What If Everyone Wants Their Own Managed Metadata Service?
If there are other divisions in the company that feel they need to have their own Managed Metadata service, there is an additional way to solve this. By using what Microsoft terms a partitioned service application, data and processing can be kept separate despite being in a single process and database. This is discussed in greater detail later in this chapter.
If you want to host this database, or any other database, on a different SQL Server, you merely need to ensure that permissions are set up. Once that is done, you can just enter the new server’s name. Typically, the permissions you need are found in your farm administrator account. This is the account you specified when you ran the SharePoint Products and Technologies Configuration Wizard (the gray one) when the farm was first configured. The SQL rights this account needs include dbcreator and securityadmin on the existing or new SQL Server that you are trying to use. Also, the SQL Server will need to meet the minimum SharePoint requirements for SQL.
6. Most of the time you will choose Use existing application pool for Application Pool. Then, in the drop-down menu, select SharePoint Web Services Default, as shown in Figure 7-9.

For optimal performance, the current best practice is to keep all of your service applications in one application pool. This may change as the product evolves, but it makes the most sense for now. Application pools consume a great deal of resources, and performance testing has shown that you will get the best results if all of your service applications are in one application pool.
7. At the bottom of the window you will see some stuff about Content Type hub and Report syndication errors. Leave these two fields alone for now (and check out Chapter 16 for more information on their use).
8. The last checkbox, Add this service application to the farm’s default list, is checked by default. Leave it as is. Later in the chapter you will learn how to change this setting after the fact if necessary.
9. Leave all other settings at their default and click OK. After the service application is created, you will be returned to the Manage service applications page.
Using the Ribbon to Manage Service Applications
Service applications are built and then bolted into SharePoint through the framework. Part of that framework allows developers to utilize the Ribbon to manage their service applications. But because there is no hard set of rules about what they do with the buttons on the Ribbon, you will see a variety of behaviors. In this section you will learn the primary uses of the various Ribbon commands.
When looking at the various management screens and options you will see that some service applications use all of the buttons on the Ribbon, while others use almost none. This flexibility is the power at work. As an administrator you will just have to apply the knowledge learned here to each service application and figure out exactly how it works.
The Manage and Properties Buttons
Now that you have your HR Only Metadata service application, you need to be able to administer it. The first thing to take a look at is the properties. You do this by clicking once to the right of the service application. This will highlight the service application, enabling the available options on the Ribbon, as shown in Figure 7-10. (If you are taken to the Manage service application screen after clicking, then you accidently clicked the name of the service application. Press the Back button in your browser and try again.)

Now click the Properties button on the Ribbon. That pops up a window showing the same settings you specified when you created the service application. Most of the service applications allow you to access this screen. Here, you can check information (such as what database name you used) or adjust settings if you change your mind about something (such as the application pool). After you are done looking around, click Cancel to return to the Manage service application screen.
Now click the Manage button on the Ribbon. This will take you to the page for managing the actual service application. In the case of HR Only Metadata, you are now taken to the screen for defining terms and all of those other fun things you can do with managed metadata. All of the service applications that have something to manage have their own manage interface. This is just another piece of the framework.
In short, use Properties to look at or change settings you configured when creating a service application. Use Manage to access the service application and do whatever it is your service application was meant to do.
Setting Up a Delegated Administrator
Now that you have found this awesome manage screen for managing the managed metadata terms, wouldn’t it be great if you could give someone in HR access to add all of the terms? Well, you are in luck. You can add someone from Human Resources as a delegated administrator quite easily:
1. Ensure that you are still at the Manage service applications screen in Central Administration.
2. Click to the right of HR Only Metadata.
3. Click Administrators from the Ribbon.
4. Enter the name of the HR user and click Add (for example, ContosoJenniferH).
5. You will now see the user’s name in the middle section. Make sure the name is highlighted.
6. In the bottom section, click the box to the right of Full Control and click OK. Figure 7-11 shows an example.

Now the HR user is a delegated administrator who can access Central Administration, but will only see those service applications to which they have been granted permissions. If ContosoJenniferH logs into Central Administration, she will see something very similar to Figure 7-12.

That’s a lot of white space. Security trimming has removed everything to which she doesn’t have access, which is pretty much everything. If she clicks on the Manage service applications link, she will see what is shown in Figure 7-13.

She can see only the one service application she has access to, and when she clicks on it she only has the option of Manage. This is a delegated administrator at work. This level of trimming enables you to delegate the management of specific components without worrying about compromising security.
If you were to log back in as the real administrator and check the permissions, you would see the user has been added to a special group called Delegated Administrators. This makes it simple to find everyone who has been granted access. Note, however, that even if you remove users from managing all of the service applications, they still will not be removed from this Delegated Administrators group. Therefore, be sure to do a little cleanup from time to time if you often change delegated administrators.
Managing Service Application Groups
After all that very exciting information about how great these groups are, it is time you learned how to use and consume them. After a brief walk through the GUI tools, we’ll take a look at some of the hardcore things you can do with the SharePoint 2010 Management Shell.
Using Your Mouse to Manage Groups
Put that fancy mouse you have on your desk to work and follow these steps:
1. Open Central Administration.
2. Click Application Management.
3. In the Service Application section, click Configure service application associations.
From this screen you will see a list of all of your service applications and the Application Proxy Group with which each one is associated. This is where all that terminology you studied comes in handy. You already know that “application proxy group” means service application group, and that “application proxies” really means service application connections, right? The nice thing about this screen is you can now click on one of the proxy groups to change its connections if necessary. For example, if you wanted to remove HR Only Metadata from the default group, this is how you would do it:
1. Click on the proxy group Default.
2. Deselect HR Only Metadata.
3. Scroll down the page and click OK.
Now all of the web applications that are associated with the default service application group will no longer have access to the HR Only Metadata group.
When you first got to the Configure Service Application Associations screen, you may have noticed that because you have multiple Managed Metadata service applications in your farm, one appears as [default] and the other(s) as [set as default], as shown in Figure 7-14.
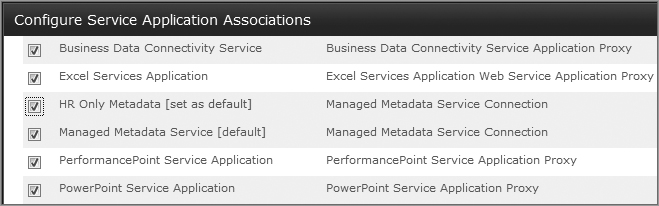
This is because you can associate multiple Managed Metadata services with one service application group, so you need to specify which one should be the default. Both are equally accessible; one of them just needs to be presented to the user first. You will see the set as default option with other service applications as applicable.
This interface for manipulating the service application connections in a service application group is the same whether you are modifying the default, [custom], or even a custom group created with the SharePoint 2010 Management Shell.
Using the Keyboard to Manage Groups with Windows PowerShell
As with just about everything related to SharePoint 2010 administration, anything you can do in a GUI you can do better with Windows PowerShell cmdlets in the SharePoint 2010 Management Shell. Chapter 10 has all of the awesome details about working with Windows PowerShell for administrative tasks. This section covers some of the key cmdlets you can use for service applications, and skips right over all of the details about using the SharePoint 2010 Management Shell. If you are new to Windows PowerShell, you might find it easier to put this section on hold until you have had a chance to dig into Chapter 10.
Depending on which components you have installed, there are approximately 105 different components related to service applications. Because it would be impossible to cover all of these without doubling this book’s page count, we will instead take a look at a few of the more important ones. To discover most of the cmdlets, run the following command from the shell:
Get-Command *serviceapplication*
Have fun with the list that is returned. You will notice that each service application, such as Excel Services, has its own cmdlets, which you can use to provision a new service application without the need to use Central Administration.
Creating a New Service Application Group
After spending all that time learning about service application groups, you were no doubt dismayed to learn that you cannot create reusable groups in Central Administration. As you might guess, you can create your own group.
The cmdlet you need is New-SPServiceApplicationProxyGroup, and you just need to provide the -name property. The command is as follows:
New-SPServiceApplicationProxyGroup -name YourCustomGroup
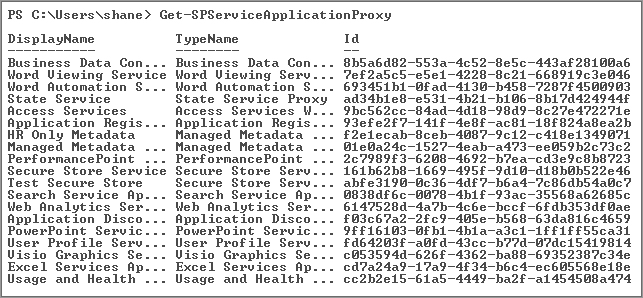
Now you have a group called YourCustomGroup. The group is empty, of course, so now you can add a connection to it. To do this, you first need to get the Id of the connection you want to add. To achieve that, run the following cmdlet:
Get-SPServiceApplicationProxy
This will give you the DisplayName, TypeName, and Id, which is a GUID. The Id is the important part. See Figure 7-15 for example output. Keep in mind that your GUIDs will be different — or at least they should be; if they are not, you have bigger problems than this book can solve.
To add the Access Services connection to the group, you would run the following command:
Add-SPServiceApplicationProxyGroupMember YourCustomGroup -member
9bc562cc-84ad-4d18-98d9-8c27e472271e
Remember that you need to enter the GUID for your service application.
If you are thinking that was a very long way to go to add a service application connection, you’re right.
An Easier Way to Add Connections
Let’s cheat. Now that you have the new group, you can go back to the GUI and do a little click, click, click to add the other connections to it. Navigate back to Central Administration Application Management Configure service application associations. Confused? When you get to that page, you will not see YourCustomGroup. You will not be able to see it on this page until you associate it with a web application. To change a web application’s service application group association, follow these steps:
1. From the Application Management page, select Manage web applications.
2. Select the service application for which you want to change associations.
3. From the Ribbon, click Service Connections.
4. From the drop-down, select YourCustomGroup.
5. Scroll down the page and click OK.
Now go back to Configure service application associations. You should see YourCustomGroup. Click YourCustomGroup. A simple web interface will appear for selecting the service application connections you want to include in the group.
Publishing a Service Application Across Farms
Time for some more fun with Windows PowerShell cmdlets. Publishing a service application and consuming it isn’t too terribly difficult and can mostly be done through the UI. The tricky part is setting up the farm trusts and getting the Application Discovery and Load Balancer Service Application secured properly. Once you knock out those two pieces the rest is a breeze.
Setting Up the Farm Trust
Follow these steps to set up the farm trust:
1. On the publishing server, create a folder at c:PubCerts.
2. From the publishing server, open the SharePoint 2010 Management Shell. To get the certificate, type the following line and press Enter:
$rootCert = Get-SPCertificateAuthority | Select RootCertificate
3. To export the certificate, type the following line and press Enter:
$rootCert.Export("Cert") | Set-Content C:PubCertsPublishingRoot.cer
-Encoding byte
4. Copy the c:PubCerts folder from the publishing server to the consuming server.
5. On the consuming server, create a folder at c:ConsumerCerts.
6. From the publishing server, open the SharePoint 2010 Management Shell.
7. To get the certificate, type the following line and press Enter:
$rootCert = Get-SPCertificateAuthority | Select RootCertificate
8. To export the certificate, type the following line and press Enter:
$rootCert.Export("Cert") | Set-Content C:ConsumerCertsConsumingRoot.cer
-Encoding byte
9. To get the STS certificate, type the following line and press Enter:
$stsCert =
(Get-SPSecurityTokenServiceConfig).LocalLoginProvider.SigningCertificate
10. To export the STS certificate, type the following line and press Enter:
$stsCert.Export("Cert") | Set-Content "C:ConsumerCertsConsumingSTS.cer"
-Encoding byte
11. Copy the c:ConsumerCerts folder to the publishing server.
12. Still on the consuming server, to load the publishing server’s certificate, type the following line and press Enter:
$trustCert = Get-PfxCertificate "C:PubCertsPublishingRoot.cer"
13. To set up the trust using the certificate, type the following line and press Enter:
New-SPTrustedRootAuthority PublishingFarm -Certificate $trustCert
14. Return to the shell on the publishing server.
15. To load the consuming server’s certificate, type the following line and press Enter:
$trustCert = Get-PfxCertificate "c:ConsumerCertsConsumingRoot.cer"
16. To set up the trust using the certificate, type the following line and press Enter:
New-SPTrustedRootAuthority Collaboration -Certificate $trustCert
17. To load the consuming server’s STS certificate, type the following line and press Enter:
$stsCert = Get-PfxCertificate "c:ConsumerCertsConsumingSTS.cer"
18. To add the STS certificate to the trust, type the following line and press Enter:
New-SPTrustedServiceTokenIssuer Collaboration -Certificate $stsCert
19. Return to the shell on the consuming server.
20. Type the following line and press Enter:
Get-SPFarm | Select Id
21. Record that number for use later.
22. Return to the Shell on the publishing server.
23. To get the security object for the topology service application, type the following line and press Enter:
$security = Get-SPTopologyServiceApplication | Get-SPServiceApplication
Security
24. To get the farm’s claim provider object, type the following line and press Enter:
$claimProvider = (Get-SPClaimProvider System).ClaimProvider
25. To set up the new claim principal for the consuming farm, type the following line and press Enter:
$principal = New-SPClaimsPrincipal -ClaimType
"http://schemas.microsoft.com/sharepoint/2009/08/claims/farmid"
-ClaimProvider $claimProvider
-ClaimValue <Type the ID from Step 21, don't include the <>>
26. To give that principal permissions in your publishing farm to the topology service application, type the following line and press Enter:
Grant-SPObjectSecurity -Identity $security -Principal $principal
-Rights "Full Control"
27. To set the access just given, type the following line and press Enter:
Get-SPTopologyServiceApplication | Set-SPServiceApplicationSecurity
-ObjectSecurity $security
That does it. You now have completed the process of establishing a trust between the two farms so that the publishing server can serve up service applications to the consuming farm. If you want to look at the trusts or possibly remove one, you can do that through the GUI by navigating to Central AdministrationSecurityManage trust.
Publishing a Service Application
For this part, you could dive back into PowerShell, or you could use the GUI in Central Administration. Let’s be “efficient” (aka lazy) and use the GUI. For this example, we will publish a managed metadata service application:
1. On the publishing server, open Central Administration.
2. Navigate to Application ManagementManage service applications.
3. Click to the right of the service application you want to make available.
4. In the Ribbon, click Publish.
5. On the Publish Service Application page, check the box for Publish this Service Application to other farms.
6. For the Publish URL, copy all of the string that begins with “urn:” and ends with “.svc.” For example, it will be similar to the following:
urn:schemas-microsoft-com:sharepoint:service:ac40e8f87daa43d9bec93f9fa99360c7
#authority=urn:uuid:de389296913c4f00b7970f50ea298fd4&authority
=https://server:32844/Topology/topology.svc
7. Scroll down the page and click OK.
8. Click to the right of the service application.
9. From the Ribbon, click Permissions.
10. Enter the Farm Id of the consuming farm. You found this using step 21 in the previous section, “Setting Up theFarm Trust.”
11. Click Add.
12. Highlight the Remote Farm: <Your Farm Id>.
13. For permissions, check the box to assign the permissions you wish to give to the remote farm. The permissions available will vary based on the service application being published.
14. Open Central Administration on the consuming farm.
15. Navigate to Application Management Manage service applications.
16. From the Ribbon, click Connect.
17. Enter the URL for the service application you want to access from step 6 in this section.
18. Click OK.
19. Click the service application name so that it is highlighted in yellow.
20. You can choose whether or not to include this service application in the default service application group. When you are done, click OK.
21. Now you can accept the default connection name or enter your own. When you are finished, click OK.
22. At the success screen, click OK.
You can now work with the service application just as if it were part of your farm. The first time you work through this process, take your time; it is very easy to make a small mistake that causes yourself hours of troubleshooting.
Multi-Tenancy in SharePoint 2010
No conversation about service applications would be complete without digging into the multi-tenant capabilities that have been built into SharePoint 2010. Under normal circumstance, the multi-tenant discussion usually pertains to hosted environments where a SharePoint farm is providing services to any number of different companies. But as you will see in this section, the concepts of multi-tenancy apply very directly to the enterprise as well.
Segmentation of Data and Processing
In SharePoint 2007, the walls of security and the isolation of data and services fell along the lines of Web Application to Site Collections to webs (if you need a refresher check out the “Terminology” section Chapter 3). New to SharePoint 2010 is the capability to create a new layer of segregation of data and services between the Application layer and the associated site collections. This segmentation is possible through the use of site subscriptions. Site subscriptions enable you to group together site collections that are part of the same web application. Site subscriptions are a logical group of site collections that can share settings (in the Subscription Settings database), features, and service data. Site Subscriptions are identified with a subscription ID. The subscription ID is used to map services, features, and sites to tenants, and to partition service data by tenant. Note the following characteristics of site subscriptions:
- A site can be a member of only one site subscription at a time. This prevents any conflicts with licensing schemas.
- There is no Central Administration interface for managing site subscriptions. Management must be handled through PowerShell, including creating, managing, and removing sites from a site subscription.
- Sites can only join a site group in the same web application as that specific site subscription. Sites can’t join site groups associated with other Web Applications.
- Site subscriptions can span multiple content databases.

Once you have a site subscription with associated site collections, they can now consume data from service applications. While this concept is not necessarily new, what is new is that some of these service applications can be provisioned such that their functions and data are kept separate from other tenants who may be consuming that service application. SharePoint 2010 refers to this type of service application as a partitioned service application. For instance, if Enterprise Search were provisioned as a partitioned service application and associated with two site subscriptions, then search results from customer A would never be returned to customer B. It should also be pointed out that no changes or additions are made to the number of databases required to support this capability. SharePoint merely segments the content within the single database (see Figure 7-16).
Although nonpartitioned service applications can be created with Central Administration or PowerShell, the latter is required to provision a partitioned service application. When creating a partitioned service application in PowerShell, the addition of the –Partitioned switch is all that is required.
Some service applications do not lend themselves to being partitioned, such as those that do not store user-specific data. Table 7-2 shows which service applications within SharePoint 2010 can be partitioned.
Table 7-2 SharePoint 2010 Service Application Partitioning
| Can Be Partitioned | Cannot Be Partitioned |
|
People
Managed Metadata Business Data Connectivity SharePoint Search Secure Storage Service Web Analytics Usage and Health Data Connection ProjectSubscription Settings |
Excel Calculates Services
Access Services Visio Service Word Service Word Viewing PowerPoint State Service InfoPath Fast Search |
Another set of capabilities that was previously managed at the web application layer was Features. When a Feature was installed and activated at a Web Application layer, it was automatically available for activation at the Site Collection level. In SharePoint 2010 you can now group Features together into what are called Feature sets. Feature sets are logical groupings of Features that are then made available for activation to a site subscription by an administrator of that site subscription.
SharePoint 2010 is smart enough to prevent the use of Web Parts that are part of a service application that is not partitioned to a specific site in a site subscription. For instance, if the farm is built with SharePoint Server Enterprise but the site subscription does not have Enterprise Search available, then SharePoint will not make the Search template (and Web Parts) available for use by the end users.
Once a site subscription is created and sites are associated with it, the sites are managed through a new site template called a Tenant Administration site. (It’s called this because a hosted customer (or department) is referred to as a “tenant.” The Tenant Administration site gives the administrator full administrative rights over the site collections, including permissions to create new sites if self-service site creation is enabled.
Creating a Site Subscription
When you are ready to start working with SharePoint in the Hosted mode, keep in mind that nearly all of your system administration will be done through PowerShell, as these new features are not built into the SharePoint Central Administration console. This is true for creating site subscriptions, feature sets, and partitioned service applications, and provisioning Tenant Administration sites. The PowerShell cmdlet to create a new site subscription is:
New-SPSiteSubscription
When building your site subscriptions, using variables for your commands will enable them to be reused and/or nested within other cmdlets. For example, to create and view a new site subscription, use the following:
$SiteSub = New-SPSiteSubscription
Once you have the subscription, you need to get the site collection(s) you want to add to the subscription into a variable. To add a single site collection to a variable use the following command:
$TargetSite = get-spsite http://portal.contoso.com/sites/marketing
To add all site collections within a web application to a variable, use this command:
$TargetSite = Get-SPWebApplication http://portal.contoso.com | Get-SPSite
Now that you have your site collection(s) in a variable, use the following command to add their subscription:
$TargetSite | foreach-Object{set-SPSite -Identity $_ -SiteSubscription $SiteSub}
To view all the site collections that are now part of the site subscription you would just type the name of the variable:
(Get-spsitesubscription $SiteSub).sites
From here you could create the Tenant Administration site using the PowerShell cmdlet new-spsite, making sure to identify the site template as tenantadmin#0:
New-spsite –url http://portal.contoso.com/sites/tasite -template "tenantadmin#0"
–owneralias domainusername –sitesubscription $SiteSub
As previously mentioned, site collections aren’t the only SharePoint artifacts that can be grouped; Features can be grouped into Feature sets.
Another benefit to site subscriptions is that usage analysis data and logging data is also segmented, like the user data. This enables the IT pro to troubleshoot and debug based on a specific site subscription. In addition, segmenting the usage data enables a hosting company or enterprise that’s using a charge-back model for IT services to charge according to usage based on data, processes, or number of users.
Multi-Tenant Use Cases
You should now have a basic understanding of the use of multi-tenancy in the traditional hosted services scenario. To summarize:
A hosting company decides that they would like to be able to sell SharePoint services to their customers. All of the customers will be different individuals or companies that want to ensure that their information is kept separate from the other sites that are hosted on the common infrastructure. Windows SharePoint Services (WSS) 3.0 included mechanisms to keep a customer’s content separate from other customer’s data, but what was lacking was the ability to separate processing and data from additional services like Enterprise Search.
These customers would need to be provisioned using an STSADM command and be given site collections that would be held in shared web applications. The hosting company was also bound to using WSS because of the common Shared Service Provider found in MOSS. One of the challenges that the SSP created in this specific scenario was with Enterprise Search. Enterprise Search was designed to index all content associated with that SSP. The query service would then provide results to users when requested. The challenge specific to this scenario is that there was the very real possibility of exposing customer A’s data to customer B via Enterprise Search as there we lacked the capability to segment the data based on site collection. Adding SSPs was not an option as there is a limit on the number of SSPs that can be provisioned in a single farm.
SharePoint 2010 fixes this through Service Application Partitioning. Partitioning creates very real boundaries between information and processing based on site subscriptions, making it impossible to expose customer A’s data to customer B. As previously mentioned, provisioning must be done when the service application and proxy are created. Now let’s apply the concept of partitioning to the enterprise.
Partitioning in the Enterprise
Just as it would in a hosted scenario, a large enterprise needs to handle data and services in ways similar to the Hosted world. Consider, for instance, managed metadata. There are terms within the organization that need to be controlled by one central group and consumed by the entire organization. There are also terms that ought to be defined and managed by individual corporate divisions or departments. The same holds true for Enterprise Search. A partitioned Enterprise Search service application would enable content from the General Council department to remain wholly separate from content from other divisions, as depicted in Figure 7-17.

The ability to segment this data and to create Feature sets gives both the multi-tenant hoster as well as the enterprise customer an opportunity to offer different tiers of services to their customers. The hosting company can provision a single farm and provide SharePoint Foundation, SharePoint Server Standard, and SharePoint Server Enterprise products. To take things one step further, they could also layer on additional third-party tools to enhance their product offering and more easily manage the provisioning and billing of those services.
From the enterprise customer’s point of view, they can now provide multiple versions of SharePoint to their users on a single farm. For instance, only half of a company’s 10,000 employees may need SharePoint Foundation capabilities. The remaining user community may need SharePoint Server Enterprise features. Individual SharePoint farms can now have multiple licensing schemas associated with them in a way that is easier to manage and control. In this case, only 5,000 users would need SharePoint Server Enterprise licenses, while the remaining users would use SharePoint Foundation licensing — and all of this would be perfectly acceptable to Microsoft.
The additional capabilities provided by the service application architecture, as well as the partitioning features available in SharePoint 2010, provide additional scalability previously not available in SharePoint. For instance, as Enterprise Search grows in content size and usage, it can now be segregated into its own SharePoint farm created for the purpose of providing Search services to the content farm(s). These types of farms, known as service application farms, provide services and data to other SharePoint farms; they are not directly consumed by users (see Figure 7-18).

The new service application framework in SharePoint 2010 provides a vast improvement over the shared service provider model offered previously. This new paradigm for sharing resources and managing services is scalable, flexible, and robust. As a SharePoint administrator who needs to make your farm sing, it is relatively easy to scale from a small, simple farm all the way up to multi-server farms with just a few simple clicks of the mouse or taps of the keyboard. And when you start to feel like even all of that flexibility isn’t enough, you can also incorporate the use of multi-tenancy.
Now that you are familiar with all of the options for connecting your web applications to service applications, even from remote farms, you can rest easy. Although SharePoint can be configured in a seemingly infinite number of ways, this chapter has described how you can harness and manage its impressive capabilities. You have Central Administration for the easy tasks, and a large set of Windows PowerShell cmdlets for when you need to take things to the next level or just show off how cool you really are.