
Chapter 11: Managing Navigation and Understanding Governance
What’s In This Chapter?
- SharePoint navigation on the Team site, the Portal site, and the Publishing site
- Navigating the Workspace
- Developing governance policies and procedures
This chapter begins by walking you through the various types of navigation and the SharePoint navigation features. We show you how to configure navigation so your users can easily access the tools and content they need.
In exploring navigation, it will become clear that an organization can benefit by implementing some type of strategy to ensure consistency. Users find it disconcerting when similar sites have different layouts or behavior; they find it easier to navigate if common menus or features are standard across the SharePoint environment. Navigation is one area of SharePoint where a commitment to strong governance can help ensure consistency.
The second part of the chapter shows you how to develop governance policies and procedures that ensure that your SharePoint environment is able to consistently provide a robust, stable working environment for your users. Good governance requires input from across the organization — management, designers, developers, and end users as well as SharePoint administrators. We explain the process by which governance is created and maintained, and give some examples of areas such as navigation where governance policies are useful.
SharePoint has several different types of navigation that can be configured within a site collection. In the first half of this chapter we review the different types of navigation available and discuss the different ways they can be used and configured within your environment. As you read this chapter, note that we are covering only what is available for configuring navigation out of the box. If further customizations are needed, custom approaches to navigation can be used. This chapter will give you the baseline you need to determine what is available out of the box, and then help you identify how to use the tools presented to build a consistent navigation for your users.
Before getting started, first consider the effect of navigation within your SharePoint environment. Navigation provides the users with the tools they need to successfully locate the different areas within your environment. This can be as simple as navigating to the Human Resources department to look for a form or to the IT department to submit a help desk request. When users access your site, they must use the navigation provided to them to access the specific content they are looking for. Users expect to access the site and easily move throughout it locating the content relevant to their specific tasks. Moreover, as with most WEB based resources, they expect to do this with very little training or effort. This also means that regardless of your site’s content or design, if users cannot easily find things they will not be satisfied with the overall site.
As the SharePoint administrator, you are continuously presented with various solutions, ideas, and projects that are being developed within SharePoint. As you review and work with teams that are developing these solutions, the information in this chapter will help you understand your options and how they can be combined to ensure a consistent approach throughout your environment.
Understanding the Different Types of Navigation
Several types of navigation are available within SharePoint. Some are available in all cases, and others are available only when certain features, such as the SharePoint Server Publishing Infrastructure, have been enabled. This section provides a brief overview of the different elements available. The remainder of this section covers each area in additional detail. Following are the main navigation tools:
- Bread crumbs — These are links that provide users with information about their location within the site, relative to the rest of the site structure. From these bread crumbs, users can easily navigate to a different part of the site. These links are dynamically generated as the site is built.
- Portal site connection — This link, configured in the site collection administration settings, is displayed as the top-most link in the bread crumbs for the site. It enables you to always point users back to a common location, regardless of the site collection.
- Tree View — This setting enables you to display the hierarchy of the site in place of the Quick Launch. It provides users with a very structured view of the site.
- Metadata navigation — This feature enables you to navigate through lists and libraries based on the configuration of the managed metadata.
- Team site navigation — This provides the tools needed to navigate through team sites or sites for which publishing has not been activated. This includes the Quick Launch and top link bar tools.
- Publishing site navigation — This provides all the tools needed to configure navigation throughout publishing sites and includes the Global Navigation and the Current Navigation configurations.
- Workspace navigation — Workspace navigation is used specifically within meeting workspaces and provides additional functionality that enables navigation between meeting pages.
- Navigation Web Parts — These provide additional navigation that can be added to the various pages within the site. These Web Parts are available to all publishing sites.
Navigation is configured per site collection and the preceding list identifies the different ways navigation is provided out of the box with SharePoint. The options available to you will vary according to the different features you have activated within your site collections.
Bread Crumbs
Bread crumbs provide a “trail” that enables users to easily navigate back to the top of the site as they work within it. They are available within both Publishing and Team site collections and are dynamically created as the site content is created. The bread crumbs are displayed in the top-left corner of the site, next to the Site Actions command. A user has the ability to navigate to any point in the bread crumb with a single click. The bread crumbs are displayed only when the icon is selected and they show the hierarchy of the site based on the user’s current location. Figure 11-1 shows the bread crumb for a team site collection. Within the site collection is a project site that contains several document libraries. The bread crumbs indicate that the user is currently located within the Shared Documents Library in the Project site that is part of the Team site collection.

Bread crumbs are included in all site templates. As you build sites based on the Publishing Portal template, you will notice that the appearance of the bread crumb is different from other site templates. This is because the template is referencing a different master page. Figure 11-2 is an example of the bread crumb for the Publishing Portal template.

Current Location Navigation
Another type of bread crumb navigation available for users is the current location navigation that is available for various locations within the site. A specific example is within a list or a library. This navigation displays where the user is located within the site and it can be used to navigate to a location above the current location or to additional views available for the list or the library. Figure 11-3 shows an example of this type of navigation within a document library. The view drop-down contains the different options available for the current view, as well as links to return to the Shared Document Libraries default view or the Project site home page.

Portal Site Connection
A portal site connection is a configuration setting that enables you to configure a single link as the topmost link in the bread crumbs. This link is configured once per site collection and is displayed for all sites. It can represent any valid URL. When configuring the link, you are required to enter the address as well as a friendly name, which will be displayed within the bread crumbs. Figure 11-4 shows an example of a site collection that has configured the portal site connection to be the Company Intranet site.

The capability to connect a site collection to a different site collection is a great tool to bring consistency to your environment. As you know from Chapter 3, it is important to plan for multiple site collections so that your data can be stored in multiple databases. When your design requires the use of multiple site collections, the portal site connection functionality enables you to provide users with a shared link to a single location. This provides a seamless navigation experience, and enables administrators to divide content as needed across site collections without compromising the navigation experience for users.
Tree View
Tree View navigation provides a way to show a complete hierarchical view of the site from within the site pages. When activated, the Tree View (shown in Figure 11-5) is displayed on the left side of the site.

The Tree View is available in most site collections, and it can be combined with other page navigation elements, such as the Quick Launch or Current Navigation. The settings to control the Tree View are located in the Look and Feel options in the Site Settings page.
Team Site Navigation
This section covers the navigation options available in team sites. We are defining a team site as any site collection or site that does not have the SharePoint Server Publishing Infrastructure site collection feature activated, referred to as the publishing feature in the context of this chapter. You can determine whether the site collection is using the publishing feature by reviewing the features enabled for that site collection. This information can be accessed on the Site Settings page under the Site Collection Administration group.
Two navigation options are available within team sites: the Quick Launch and the top link bar. The Quick Launch provides a way for you to create on-page links that are persistent throughout the entire site, and the top link bar enables you to provide persistent tabs across the top of each page. Each of these options is described in more detail below.
Keep in mind that the features available to your site collections and sites are based on licensing within the farm. Out of the box, if you create a site collection using the Team Site template, a site will be created that is using only team site features. To take advantage of the publishing navigation features, you could easily activate the publishing feature for the site collection. Once the publishing feature has been activated, the links within site actions that pertain to navigation will represent the publishing elements, which are described in detail in the next section.
Quick Launch
When a new site is created using the Team Site template, the Quick Launch is enabled by default. It contains links to the libraries, lists, and discussions within the site. The Quick Launch headings are links to a page displaying all the content of that specific type within the site, and the items under each heading are direct links to the specific content. Figure 11-6 shows an example of the default Quick Launch configuration for the Team Site template. You will also sometimes hear it referred to as the Quick Launch bar, left-hand navigation, and current navigation.

The Quick Launch can be configured dynamically as content is created or built manually through the addition of links and headings. The options for dynamically adding content to the Quick Launch are provided for you when new lists, libraries, or sites are created. As you create new content, an option will be available that enables you to select items to be added to the Quick Launch. Selecting yes for this option will add the item to the Quick Launch under the appropriate heading.
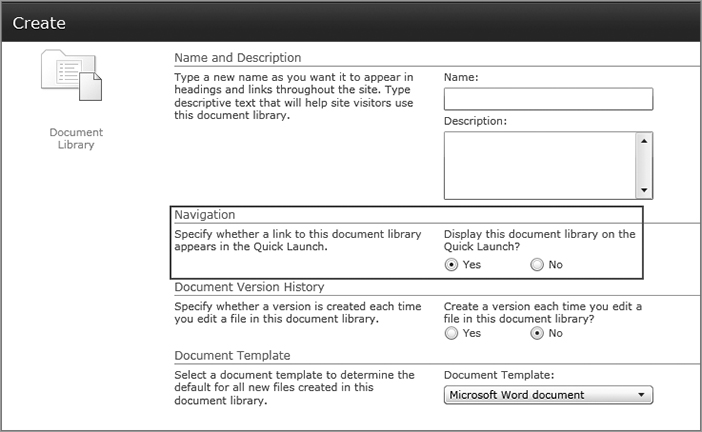
All links added to the Quick Launch, either manually or dynamically, are security trimmed. Links that are manually added to the Quick Launch that are items outside of the site collection are not security trimmed. Security trimmed refers to the process of only showing the links or items to users who have access to them. Figure 11-7 shows the default options for creating a new document library and adding it to the Quick Launch. Once you create a new list or library, you can modify its visibility on the Quick Launch through the Title, description and navigation configuration page found in the settings for the library or list.
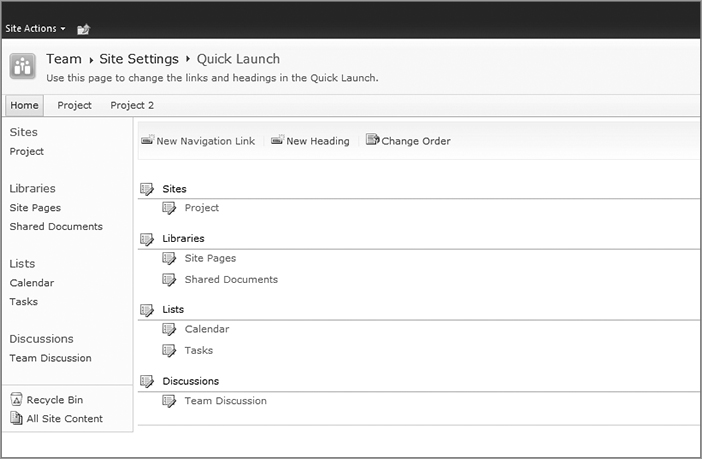
You can manually configure the Quick Launch through the Quick Launch option under Look and Feel in Site Settings. From this screen you can create new headings and navigation links, and you can reorder existing links. When creating new headers you have to provide a URL and the header title. When creating new links you have to provide the URL, the link title, and the associated header. Each link must be associated with a header. To edit an existing link, simply click the edit icon displayed next to the item. Figure 11-8 shows the configuration screen for the Quick Launch.
The Quick Launch is configured per site and there is no way to inherit the Quick Launch from a parent site. If inheritance is a requirement, then the publishing feature (available only with SharePoint Server) should be used. The Quick Launch can also be disabled for the site. The setting to disable the Quick Launch is provided in the Tree View settings located in the Look and Feel group on the Site Settings page.
Top Link Bar
The top link bar is used to provide tabbed navigation throughout the site collection. When new sites are created, they can use the same top link bar as their parent site, or use one specific to their site collection. Like the Quick Launch, the top link bar can be controlled either dynamically or manually. Any links added dynamically are security trimmed, whereas any links added manually are available to all users. You can configure the top link bar when a new site is created. On the options page that is displayed when you create a new site, select More Options. On the screen that appears, you will see the following available settings for the top link bar:
- Display this site on the Quick Launch of the parent site — This option adds the site link to the Sites header on the parent site Quick Launch Bar. If no heading for Sites exists, it will be created for you when you select this option.
- Display this site on the top link bar of the parent site — This option adds a link to the parent site’s top link bar.
- Use the top link bar from the parent site — This option causes the site you are creating to inherit the top link bar from the parent site.
To change the link to a site once it has been created, you must access the top link bar options under Look and Feel in the Site Settings page and make manual modifications. From this configuration screen, shown in Figure 11-9, you can create new links, and reorder and modify existing links.

If the site you are working with has been configured to inherit the top link bar from its parent site, when you access the configuration screen you will see an option to Stop Inheriting Links (see Figure 11-10). Likewise, if the site is not set to inherit from its parent, when you access the configuration screen you will see an option to Use Links from Parent (shown in Figure 11-11).


Publishing Site Navigation
Navigation options within a site that has the publishing features enabled provide additional functionality over sites for which these features have not been enabled. This added functionality includes items such as multi-level navigation links and the capability to inherit the current navigation from the parent site. This section covers these differences and describes the various configuration options available.
Once you activate publishing for a site collection, every template within that site collection will use the publishing navigation controls. This means that if you create a team site as a subsite to a publishing site, that team site will use the publishing navigation, not the team site navigation described earlier.
The first big difference in the publishing sites is the replacement of the top link bar and Quick Launch with the Global Navigation menu. Once publishing has been enabled for the site collection, the Navigation link is displayed in the Look and Feel section of the Site Settings page. This Navigation link provides the configuration settings for both the global and current navigation settings.
When working with publishing sites, keep in mind that it is likely that they are using a custom master page. Within the master page, it is possible to hide controls or move their locations. This commonly occurs with the navigation elements. If the site you are working with does not display the navigation you are expecting based on the information provided in this chapter, the master page has probably been customized.
Global Navigation
The Global Navigation settings allow you to select the navigation inheritance, as well as limit the total number of dynamic elements displayed. The options for display include sites and pages. If you select to show sites and pages, any sites or pages created will be displayed on the Global Navigation bar. From this option you can also configure the navigation inheritance. You can select to use the same navigation elements as the parent site or create your own navigation. Figure 11-12 shows the global configuration of a site that is opting to show pages and sites. In this case, HR Department is a site and Vacation-Policy is a page.

Current Navigation
The Current Navigation settings allow you to determine what content is displayed on the left pane of the site. These settings can be thought of as a replacement for the Quick Launch. In fact, when you create new content you can still select to add it to the Quick Launch — it will be added as a link under the corresponding heading category. For example, a document library that is created with the option of being added to the Quick Launch will be displayed as a link to the Libraries heading.
From this screen you can also configure what level of content to display. Your options include the following settings:
- Displaying the same current navigation as the parent site.
- Display the current site, the navigation items below the current site, and the current site’s siblings.
- Display only the navigation items below the current site.
The options just listed enable you to configure your current navigation in a variety of ways. Figure 11-13 shows an example of a site that is displaying the current items, items below that, and the sibling site’s items.

Keep in mind that if none of the options listed so far for either the Global Navigation or the Current Navigation provide what you are looking for, you can always customize the links for your specific needs. The options for customizing are covered in the section “Navigation Editing and Sorting.”
Sorting
From this setting you can configure to sort your content automatically or manually. If you select to sort your content manually, options for arranging the content are provided in the following section. If you select to automatically sort your content, you will be required to select a field and a sort order from the options provided.
Navigation Editing and Sorting
From the Navigation Editing and Sorting option, shown in Figure 11-14, you can create custom headers, or link or modify existing headers and links. To modify an existing item, select the item and use the toolbar to make your changes. You can modify the link, change the title, or move the link to a new location. Links can be moved between different headers, but a link cannot become a header and a header cannot become a link.

Show and Hide Ribbon
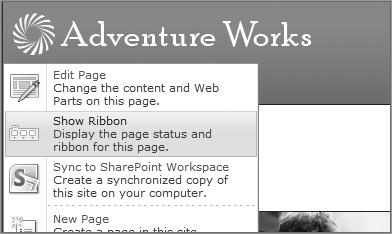
The last option you have in the publishing navigation configuration is to use the Show/Hide Ribbon option instead of automatically showing the Ribbon. This feature is only available within publishing sites. When selected, the Ribbon will not automatically display on pages; instead users access the Ribbon through the Site Actions menu. From this menu item, shown in Figure 11-15, they can select to show or hide the Ribbon.
Workspace Navigation
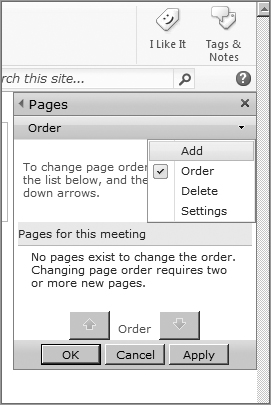
The final piece of navigation to look at is the Workspace templates. These templates are used to store meeting information and come in several different varieties, such as social, decision making, and multi-page. By default, these sites use the concept of pages to manage their content. This page is a little different from the type of page in a publishing site. They are used to store additional content within the meeting. They are also used to provide navigation in place of the Quick Launch or Current Navigation. This means that the settings you configure for the Quick Launch or Current Navigation will not be displayed on the meeting site. The only way to add navigation to these templates is through the creation and management of pages. The options to create and manage the pages are available within the Pages tool pane, shown in Figure 11-16. To access this tool pane, select Manage Pages from the Site Actions menu.
Next Steps
At this point in the chapter, you are likely trying to assimilate all this information and figure out which method is best to implement a navigation strategy. Who knew there could be so many options! On the one hand, you could let everyone fend for themselves and have each site develop its own methods of managing navigation. On the other hand, you could develop some guidelines and enforce that each site use the same navigation strategy.
This is just one of many examples in which SharePoint governance should be implemented. If each site used a different navigation strategy, then how would users know how to navigate? And if the system administrator is responsible for building the navigation strategy, how will that person know what the business needs? In this situation, the best-case scenario would be the business units working together with the system administrators. The system administrators know what is possible and the business units know what is needed. Working together they can develop an approach that is manageable and meets the needs of the organization. This process of working together to define strategies is the development of SharePoint governance. The remainder of this chapter covers governance and reviews different approaches to implementing it. By the end of the chapter, you will see that navigation is just one of many areas that require governance!
This section provides a high-level overview of SharePoint governance. We first define governance and then work through some different approaches to building your team. Finally, we will review each of the major areas within SharePoint and describe the different types of policies that should be developed to support your environment.
What Is Governance?
Governance, in the SharePoint context of this chapter, is the set of policies and procedures developed to ensure that your SharePoint environment is able to consistently provide a robust, stable working environment for your users. These policies and procedures are the guiding principles that keep your environment configured for the best possible support. They are usually based on best practices that are adjusted to fit your organization’s needs. Governance covers many different aspects of the environment, including the following:
- Infrastructure
- Information architecture
- Development and customization
- Support and availability
The following sections cover each of these areas and provide insight on the different questions and scenarios that should be considered as you develop your governance policies. We will also look into different ways to build your governance team, and even ways to help promote the need for governance within your environment.
Getting Started with Governance
One of the hardest parts of SharePoint governance is simply getting started! If you are in an organization like most, governance comes in one of two flavors — the lifeline to keeping things going or the thing that should have been done to avoid issues. In some places governance doesn’t tend to be high on the list of priorities until something major happens that causes everyone to say, “Wow, if we had just done X, all of this could have been avoided!”
When handled correctly, governance will be the driving force of your implementation. When ignored, your implementation will be at risk on several fronts. The most common elements to suffer when governance is ignored are funding, usability, and supportability. For example, consider the situation in which many different projects are developed at once by different groups, all using SharePoint. If none of the teams building the solutions are working together using common standards, you are likely to get several drastically different solutions. This may seem fine at first; different problems require different solutions, right?
It’s fine until an end user encounters a completely different look and feel for each similar site they have to access. Consider the Quick Launch — what if its location differs on every site users access? Imagine the confusion and frustration that could cause, and then imagine all the extra help desk support you would need to answer all the questions it would be flooded with! Conversely, imagine what the situation would have been like if, when new departments wanted to use SharePoint, clear guidelines were in place that outlined the purpose of the environment and the things that could and should be done to the site.
At the same time, you don’t want to have to be the gatekeeper for every action, especially those that don’t really matter to you and your responsibility to keep the farm running and happy. How do you find the balance? You build a team and implement governance policies! The remainder of this chapter is dedicated to providing you with the information needed to begin building and developing governance policies within your SharePoint implementation.
While it’s easy to find existing best practices and standards for governance policies, keep in mind that they need to be integrated into your specific, unique environment. Because governance policies consist of guidelines to ensure that your environment remains stable and supportable, it is critical that your team reviews the best practices and adapts them as appropriate.
Governance Team
Because SharePoint can be used for many different purposes within the organization, the team that supports the environment should be representative of the entire company. By working together, this cross-functional team will be able to develop specific policies and guidelines that represent the needs and requirements of the entire organization. The following list describes some of the key players that you should include in your governance planning:
- SharePoint Owner — This role should be filled by the person responsible for the SharePoint budget. By including them in the governance planning, you ensure that they hear firsthand the needs of the organization and how SharePoint can be implemented to solve those needs.
- SharePoint Farm Administrator — This should be the person responsible for keeping the farm up and running and happy. It is essential that this person be a key player in developing the governance policies. After all, administrators cannot successfully fulfill their job responsibilities unless they have a say in what can and cannot be done within the environment.
- SharePoint Solution Architect — This role should be filled by the person who is usually responsible for configuring the information architecture. This should be someone who understands both the technology and the business, and then merges the needs with the product to deliver the overall layout for the organization.
- SharePoint Designer — This is the person responsible for the “look and feel” of the site. Usually, this is someone who is part of the marketing or communications department, and who directs the way the organization brands its SharePoint environment.
- SharePoint Developer — This is the person responsible for developing custom solutions that will be deployed to the environment.
- SharePoint End Users — This is the person or group that represents the end users. This is a key role to include in your planning. You can build the best, most advanced system in the world, but if users are confused they won’t use it or appreciate all the hard work that went into creating it. In larger organizations, this should be a cross-departmental team that represents the larger community of users.
At this point, you are likely thinking, “Who wants to put all those roles in a room and get them to work together toward one common goal? Won’t it make decision making harder with multiple roles included?” The simple answer is yes — involving more people, who represent more opinions, will probably make the decision-making process take longer and will add more complexity. However, the end results will be much better than mandating decisions without input. The process of defining governance is a business activity, not technical. It will be up to the SharePoint Administrator to guide the team about what is possible then to implement the team’s decisions.
Take branding as an example. As the farm’s administrator, it’s likely that you do not care what is being built, but you probably care quite a bit about how it is built. It is irrelevant to you what colors and fonts are chosen. What does matter to you is what is being done to the farm in order to deliver the branding solution. Are custom master pages being built? If so, are they being deployed to the farm via Features and Solutions or are they being manually deployed to each site collection? Typically, the SharePoint designer doesn’t really understand the environment and how things need to be done; the designer just knows what needs to be done — the fonts, colors, and layouts that will convey the company’s brand.
Or imagine if your business users were responsible for configuring the governance policies around the search feature. Clearly, this wouldn’t work; they don’t have the tools and skill sets needed to make decisions like that, or info about the best time to run indexing to avoid slowing down other processes. While their input is critical to ensure that search will ultimately meet the business needs, the final decision on implementation should be left to the team that is responsible for managing the server.
Defining Policies and Procedures
A governance policy can take many forms. It can be a long, detailed process that identifies everything that needs to be done for the configuration and management of SharePoint. It can also be a simple statement that identifies what is being done to manage specific areas within the environment. As stated earlier, the purpose of governance is to help you manage your SharePoint environment. That may mean you need to develop detailed corporate policies, or it may mean you just need to work through the list of recommended areas and make notes. Before creating any policy, the most important thing to do is to think through all of the business areas that will be affected and carefully plan how they will be incorporated into your environment.
Another thing to keep in mind is that governance policies should be considered “living” policies. In other words, they are not created once and never changed. They are created once and then maintained by a group of individuals, updating as necessary so that they can continually support the organization. Just as organizations change over time, so must your governance policies if they are to retain their value.
Sample SharePoint Governance Policies
To help you get started, here are two different sample governance policies.
Client Configurations
In order to best support the SharePoint environment, support needs to be limited to specific client configurations. While every effort will be made to support multiple environments, [company name] will need to put limitations around the standard environments that are used to access SharePoint. The following list identifies the different supported environments and configurations:
- Windows Vista, Windows 7
- Office 2007, Office 2010
- IE 7, IE 8
In addition to the supported environments, the following environments will be tested and any issues identified and communicated to users:
- Mac OS
- Office 2003
- Mozilla Firefox
- Windows XP
[Company name] will make every effort to provide solutions for multiple environments, but under certain circumstances it will be necessary to use the supported configurations to take full advantage of the features available within the portal.
Site Quota Templates
Site quotas will be used to manage the team collaboration sites. Three different quota levels will be created. By default, each site will start at the level 1 quota. When a site is approaching the quota limit, the help desk will review it and make any necessary adjustments to the existing content. If no adjustments can be made, the site will be elevated to the level 2 quota. If the team is notified that they are reaching the level 2 quota, the help desk will again review the site content. If it is determined that the site will continue to require additional storage space, then downtime will be scheduled and the site will be migrated to a dedicated database.
These are just two examples of the many governance policies that can be created to support your environment.
Infrastructure
Now that we have looked at the team and how its members work together, we can start to focus on some of the key areas for which governance policies are created. Let’s start by looking at infrastructure. The following list contains some of the key things that should come to mind when you start thinking about the physical environment:
- Client machine configurations
- Server topology
- Installation and configuration policies
- DNS settings
- Site management
- Quota templates
- Recycle Bin settings
- Usage reporting
- SQL management
- Server monitor
- Backup and restore policies
- Anti-virus/security
For each of these areas, you should record what you are doing to configure, manage, and maintain the desired configuration. By developing a plan for each area, you will be able quickly respond when issues are identified.
Information Architecture
Information architecture (IA) defines how content will be organized within your environment. Some of the key questions addressed in IA planning include the following:
- How many web applications will be created?
- When are new site collections created and where are they created?
For example, let’s look at a common scenario for a mid-size organization that is getting ready to implement SharePoint. They have purchased SharePoint because of the value it provides to the organization through the fulfillment of multiple efforts. Specifically, they are looking for SharePoint to provide the following functionality:
- Corporate intranet
- Team collaboration sites
- Department collaboration sites
- Corporate extranet
- Corporate website
SharePoint probably provides an unlimited number of combinations that could be used to configure the preceding requirements — but just because you can, doesn’t mean you should. Imagine what would happen if you just started creating sites as they were requested. What if you end up mixing your collaboration and intranet sites? How would your users know where they needed to be to collaborate and share content versus where they needed to be if they wanted to consume information from the organization?
At this point in the book, you are already aware of the need to plan your environment, and you are probably well on your way to planning exactly what you should be implementing. What may not be clear, however, is what planning the IA has to do with governance. It’s simple, really; by creating an IA plan and assigning an owner, you are ensuring accountability — for the proposed structure, for future requests, and for all of the “exceptions” that are generated along the way. You know it will happen: As soon as you build and implement the perfect solution, a manager with enough budget money or power comes along and wants something just slightly different from what you planned. No matter how hard you plan to include everything, there will always be an exception. In this case, you deal with the exception through governance. Because you have created a governance policy that outlines the IA for the environment, you have something to fall back on as you deal with the exception. The person on the governance team responsible for creating and defining the IA will then be responsible for making a decision about where and how to address the requested exception.
Development and Customization
Development and customization governance policies will define how and when customizations are made to your environment. The customizations include anything that is not created using out-of-the-box tools, such as Office and Internet Explorer, and includes things such as SharePoint Designer customizations, sandbox solutions, and custom Web Parts. Keep in mind that these customizations can be things created in house, as well as third-party tools that can be purchased.
The key point with this area of governance is understanding what types of customizations are being made to your environment. A simple example is the deployment of customizations. Are they being deployed manually (i.e., changes are made to each web front end individually) or are they being deployed through a solution package? As you learned in Chapter 13, the only supported method of deployment is through solution packages. This is a primary example of the type of policy that should be included within your governance plans.
Another example is the use of SharePoint Designer within your organization. As detailed in Chapter 22, SharePoint Designer is a powerful tool that can be used to make many power customizations to SharePoint sites. However, like any editing tool, training is required to use it properly. Imagine what would happen to the number of support requests if every user simply opened SharePoint Designer and starting making changes to their sites! Just think of all the potential things you would have to fix or recover. Now imagine if the use of SharePoint Designer were controlled in some fashion, and only trained and educated users were able to make changes to their site using SharePoint Designer. Sure, you would still have support issues but they would be nothing compared to the first scenario.
The final area we should cover in this section is the process for deploying content to the production environment. How will customizations be approved and processed before they are deployed to production? This area includes everything from the initial deployment to any required maintenance over time. Here are some of the questions you should be thinking through as you develop your governance policies for deployment of customizations:
- Who needs to approve customizations? Keep in mind that this should be determined early in the process before any development or purchasing is started.
- What criteria and standards must customizations meet in order to be added to the farm?
- What is the schedule for deploying customizations to production?
- What development and QA environments will be in place to support the process of testing and deploying customizations?
- What processes and procedures need to be put in place to ensure that customizations made today will work correctly with customizations made in the future?
By taking the time to work through each of these questions, you should be able to identify specific policies and procedures that should be included within your governance plan.
Support and Availability
Support and availability covers the users’ expectations of support within the environment, and is often referred to as the service-level agreement (SLA). This SLA is basically a statement clarifying what can be expected from the farm. Your organization may already have SLAs, in which case SharePoint will just become part of those same agreements. If no SLAs exist, it is important to define them for your implementation. This should be communicated clearly, so that users are not caught off guard.
For example, users may be caught off guard in the following scenario. A group or project has a tight deadline and the team is working overtime and through the weekend to wrap it up. They are storing and collaborating all of their information within their project SharePoint site. What would happen if one of their big project deadlines was scheduled during your weekend patching window? While it is true that even with an SLA in place there is no guarantee that this scenario won’t happen, having one in place at least ensures that you did all you could to avoid the situation.
Another thing to consider in this area of governance is content restoration and what users should expect. This would include the different levels of restoration, such as site or list, and the expected duration of the restoration. Documenting all of this before users create content in SharePoint will go a long way toward setting realistic expectations about what they can expect in terms of support. It should be a part of a department’s expectation as they adopt SharePoint that they understand the SLAs and recovery time of the farm in the event that their content is more mission critical than the SharePoint farm. If this is the case, then the department needs to either not adopt SharePoint or work through normal management channels to modify the SLAs for SharePoint. This will often include additional hardware, third-party software, or personnel.
Selling the Need for Governance
SharePoint administrators frequently claim that they want to implement governance, but just don’t have the time, resources, or support from management. It’s important for those administrators to understand that something is better than nothing, and anything they can do to create governance policies will help them better support their environment. It’s also essential to convey the benefits of a good governance policy to others in your organization. The following sections offer some advice on different strategies you can use to help foster the need and importance of governance within your environment.
Start Small and Grow
One of the most common mistakes in the SharePoint community is that when an implementation project starts, those responsible either go all out in developing their governance plan or they do nothing at all. We would encourage those who fall under the “nothing” end of the spectrum to consider starting small. To do this, think of the key things that you will be doing within your environment, and then think of the key policies or procedures that you could put in place to better support those initiatives. Start small, and start only with the areas that make sense for your implementation. Prioritizing is critical: determine which areas of governance will be most useful and start with those. If you are going to spend the first months of your implementation focusing on using SharePoint out of the box, put the task of defining policies for customization on the back burner. If you have limited time and resources to dedicate to governance planning, start with what is most relevant and build the remainder into the future project timeline.
Communicate the Value
If you want to convince the organization to provide the resources needed to plan for governance, management needs to see and understand the value of the governance being developed — and it is your job to help them see this! If your organization is already using some form of governance, then whenever possible you should be communicating to management how it is helping and improving the way you are able to provide service. Conversely, if you don’t have any governance enforced, communicate how not having it is causing problems that could be avoided. It may take time and it may take a few big events for them to recognize the value, but eventually they should provide you with the resources you need to develop, implement, and maintain the governance polices. You should also piggy-back on any defined informational governance that your company has in place. For instance, if HR has a defined plan around information that creates an availability, recoverability, and update timeline, then tie those expectations to the data in the sites (site collection) on which the data resides.
We have covered a lot of ground in this chapter! We started by looking at all of the different ways to configure navigation and then discussed the importance of setting standards or guidelines concerning its use. That led to a discussion about governance and its importance within the SharePoint implementation. We concluded by looking at the different areas of SharePoint and the role that governance plays in each of these areas. Realize also that these activities are not one-time occurrences but are in a constant state of “update” as long as you have your farm. By this time, you are ready to move forward with the implementation, but not without first creating that governance plan!