
Curt Hibbs, who maintains both Instant Rails and the One-Click Ruby Installer, contributed much of this section.
In this section we are going to set up a fully functional, integrated Rails development environment by installing only two pieces of software—Instant Rails and RadRails. This environment is used by many new developers and is an excellent way to get started with Rails quickly.
Instant Rails is a complete Ruby on Rails development environment that includes Ruby, Ruby on Rails, Apache, MySQL, MyPhpAdmin, and Mongrel—all pre-configured and ready to run. If you don't know what all the components are, don't worry; we will cover them as we progress through this section.
One of the best things about Instant Rails is that it doesn't modify your system in any way. It doesn't touch your system registry or your environment variables. It doesn't even have an installer—you simply unzip Instant Rails, run its management application, and you're ready to develop Rails applications.
Download the current version of Instant Rails (version 1.7 at the time of this writing) here: http://rubyforge.org/frs/?group_id=904
Unzip it into a destination that does not contain any space characters in its path (this means, for example, you cannot place it in c:Program Files). Figure 1 shows the top-level layout of the Instant Rails directory tree.
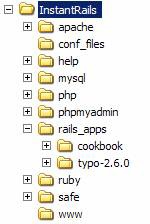
It should be pretty obvious what each directory is used for. All Rails applications that are under development should be kept in the rails_apps subdirectory. Here you can see the two preinstalled sample applications. The first is the cookbook application from the popular Rolling with Ruby on Rails tutorials (http://www.oreillynet.com/articles/author/2109), and the other is version 2.6.0 of the Typo blog application.
In the root of the unzipped Instant Rails directory tree, run the program file named InstantRails.exe. This starts up the Instant Rails manager. Instant Rails will detect that it is being run from a new location and will ask if you want to update the configuration files with the new location (see Figure 2).
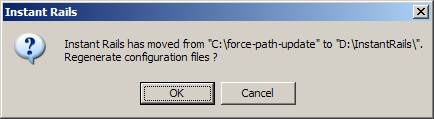
Click on OK and Instant Rails will update the paths in the configuration files and then start up (see Figure 3).

You can see the stoplight-style status indicators for both the Apache web server and the MySQL database server. Both should be green, indicating that they are up and running. We won't be using Apache much during development of web applications; we'll use Mongrel (a fast web server written in Ruby) instead. We still need Apache, however, to run MyPhpAdmin, which we will use to create and edit our application databases.
We can use the preinstalled cookbook application to ensure that Instant Rails is properly configured. Click on the ![]() button to display the main Instant Rails menu. Navigate to and select the Manage Rails Applications menu item, as shown in Figure 4.
button to display the main Instant Rails menu. Navigate to and select the Manage Rails Applications menu item, as shown in Figure 4.

Then check the cookbook application and start the Mongrel Web server (as shown in Figure 5).

Once Mongrel has finished starting up (see Figure 6), you can open your browser and go to http://127.0.0.1:3001/ and you should see the cookbook application (see Figure 7).


It doesn't get much easier than that!
If you prefer to develop with a text editor instead of an Integrated Development Environment (IDE), Instant Rails includes the SciTE text editor, which has Ruby syntax highlighting and code-folding features (see Figure 8).

Since Instant Rails does not modify your system, there is no shortcut to the editor. But you can easily create one yourself. The SciTE editor can be found at:
...InstantRails ubysciteSciTE.exe
RadRails is an Eclipse-based IDE specifically designed for developing Ruby on Rails applications. It's one of the many choices you have when developing Rails applications on Windows. For more information on other IDEs and editors, see the section on Development Environments for Windows.
Download the current version of RadRails (version 0.7.2 at the time of this writing) here: http://radrails.net/page/download
Just like Instant Rails, RadRails doesn't have an installer and doesn't modify your system. Simply unzip the downloaded RadRails archive into your desired destination directory and run the program radrails.exe.
Java™ Required!
If RadRails won't start, it's most likely due to the fact that you don't have a Java runtime environment installed on your machine. I can't tell you how many times I have forgotten this step!
Visit Sun's website and grab the Java Runtime Environment (JRE) version 1.6, which can be found here: http://java.sun.com/javase/downloads/index.jsp. Be sure to grab the version for Windows!
At this point you'll be asked to select a workspace directory (see Figure 9). This should be the rails_apps subdirectory inside of your Instant Rails directory tree.

Select the checkbox and RadRails will remember the directory and not ask you again. Select the rails_apps directory as your workspace and press the OK button, and next you'll see the main RadRails screen (see Figure 10).

Because you chose the rails_apps directory as your workspace, Instant Rails automatically configured RadRails' Ruby and Rails settings (see Figure 11).

While this setup is easy, it does have some issues that may cause you trouble down the road:
Instant Rails does not install Ruby system-wide, which means you either need to do all of your Ruby (or Rails) development within RadRails or by opening a command prompt from within the Instant Rails management application. You could manually place the included Ruby interpreter on your path, but you also need to do that with MySQL if you intend to use it heavily.
The Apache web server is not really needed for Rails development. It's only used to host the PHP-based MySQL management application.
Instant Rails is great for setting up a development environment in a few minutes, and you can't beat how easy it is to integrate it with RadRails. However, the next few sections will show you how to easily set up a solid, flexible environment on your system with all the tools you'll need.
If you want to set up everything manually, read the next section. If you're quite happy with Instant Rails and RadRails, then you can skip the next two chapters and proceed to the chapter Working with Microsoft SQL Server.