
Chapter 19
Debugging and Deploying Web Parts
IN THIS CHAPTER
In most development scenarios, debugging and deploying your Assemblies is an integral part of the software development life cycle. This chapter shows you how to debug a Web Part using Visual Studio 2005 and how to compile an .msi installer file that can be deployed to your SharePoint servers.
Debugging Web Parts
Because the majority of your Web Parts will be developed and tested from within Visual Studio 2005, a lot of the headaches of debugging your Web Parts are solved. However, in some instances, you need to utilize the debugger to determine what’s going on inside the code of your Web Part as it executes. This section covers how to debug a Web Part that is executing inside of Microsoft Office SharePoint Server (MOSS) with Visual Studio.
The Developer’s Machine Configuration
To effectively debug your Web Parts that are running inside of SharePoint, you need to install SharePoint on your development workstation because it isn’t realistic to install and run Visual Studio on your SharePoint server. A SharePoint development workstation typically has the following items installed:
- Windows Server 2003
- Internet Information Services 6
- SQL Server 2005/2000
- Windows SharePoint Services 3.0
- SharePoint 2007
- Office 2007
- Visual Studio 2005
Note
Note that this is only a recommended setup of a developer’s workstation and might or might not reflect your desired workstation configuration.
The aforementioned software should be installed so that you are able to debug code with the Visual Studio that’s physically running inside of the SharePoint server. The next section discusses how to debug a Web Part that is running inside of SharePoint 2007.
Debugging
If you are in a situation where you must debug a Web Part that is running in an instance of SharePoint 2007, you should note two things: First, you are going to need A LOT of random access memory (RAM) and second, debugging Web Parts that run in SharePoint is a slow process. Because of the amount of resources that SharePoint, SQL Server, and Visual Studio require, your machine will be very busy trying to keep up with the debugging process.
With that said, the debugging process is very straightforward. The method that you use to debug your Web Parts in SharePoint is very similar to debugging a standard server control. You can use the following steps as a guide:
- Develop the Web Part.
- Deploy the Web Part to your “debugging” SharePoint workstation.
- Set breakpoints in your Web Part.
- Attach to the SharePoint process.
- Step through the code.
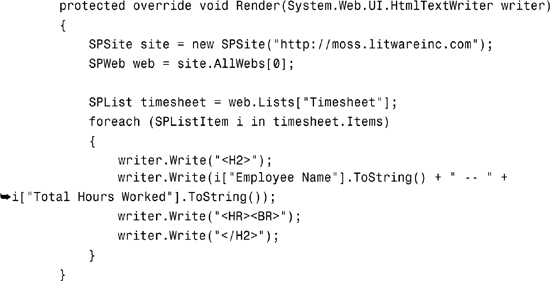
The following examples show you how to use Visual Studio 2005 to debug a Web Part. For the sake of demonstrating the functionality of debugging a Web Part, the simple Web Part in Listing 19.1 is used.
Listing 19.1. Simple Web Part to Debug
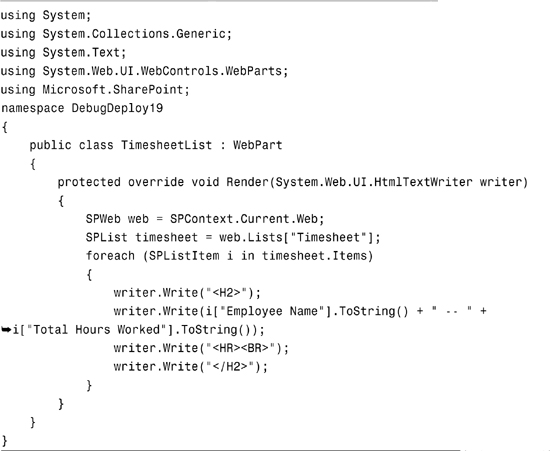
In this example, the Web Part simply iterates a list and outputs items in the list in a string format. The line of code that will bomb if this Web Part isn’t running in SharePoint (or Windows SharePoint Services [WSS]) is where the SPWeb object is created from an instance of the current SharePoint web’s context object, as follows:
SPWeb web = SPContext.Current.Web;
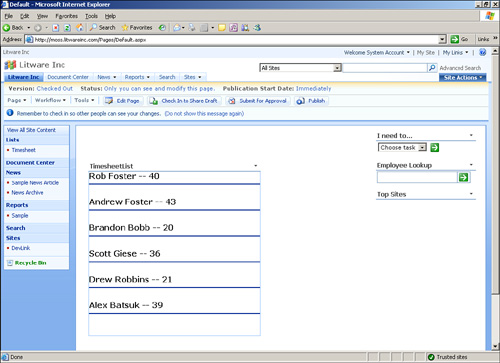
To properly step through this code, you must do so while the Web Part is running inside of the context of SharePoint. Figure 19.1 illustrates the sample Web Part as it is rendered inside of SharePoint 2007.
Figure 19.1. Timesheet list Web Part.
To begin the debugging process, you need to compile and deploy your Web Part library with the debug symbols (including the .pdb files). If you don’t compile with the debug symbols, your Web Part library will execute in SharePoint, but you will not be able to debug it because there is nothing for Visual Studio to map to. This process is very important, but often overlooked. Deploying Web Parts is covered later in this chapter.
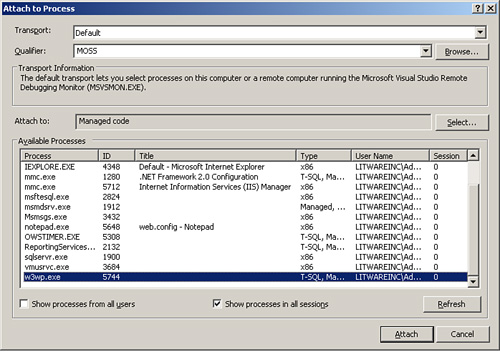
To begin the debugging process after you deploy your Web Part, you need to first set a breakpoint in your code in Visual Studio and then manually attach to the process in which your portal is running. Figures 19.2 and 19.3 illustrate attaching to the w3wp.exe process. Note that this functionality is not available in the Visual Studio Express editions.
Figure 19.2. Open the Attach To Process window.
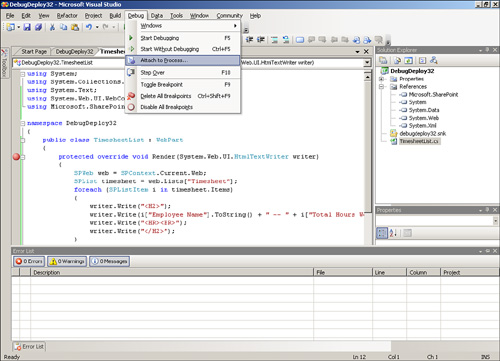
Figure 19.3. Attach to w3wp.exe.
When you click the Attach button, Visual Studio enters a Running state and appears as if it is running an application in Debug mode, but your breakpoint does NOT occur until you navigate to a page in the portal that executes the code where your breakpoint is located.
After you start hitting your breakpoints, you will notice that most of the functionality of the Visual Studio debugger is available; however, making changes is a bit more involved than traditional ASP.NET development. When you need to make a change, you must uninstall your Web Part classes from the Global Assembly Cache (GAC), redeploy your changes, and reattach to the w3wp.exe process. After doing this once or twice, you will discover that this isn’t the most efficient process.
So, what if you don’t want to go through the hassle of configuring SharePoint or WSS on your local development machine but still want the ability to debug Web Parts? Remember that Web Parts are really developed on top of the ASP.NET 2.0 Portal Framework, so you can actually debug them without SharePoint or WSS! Take the following modified code excerpt:
Notice now the web’s context is gained by first connecting to a SharePoint site (SPSite object) by uniform resource identifier (URI) and then gaining access to the web. If you use this method to connect to your SharePoint webs, you can easily debug your Web Parts by using the ASP.NET 2.0 Portal Framework as a host.
Note
Note that even though you can deploy this solution to production as is and it will run, you still need to change the code to get access to the web’s context by using the SPContext object because it is easier to manage and performs much better in a server environment.
Debugging Web Parts is a fundamental part of your Web Part development. Whether you choose to install a full-blown version of SharePoint 2007 on your development workstation, set up a Virtual PC image with SharePoint installed, or test your Web Parts against a common instance of SharePoint is up to you. Tables 19.1 and 19.2 list the pros and cons of each method.
Table 19.1. Install SharePoint Locally

Table 19.2. Debug Against a Common SharePoint Server

Deploying Web Parts
You can deploy Web Parts to your SharePoint servers in several ways. This section shows you how to deploy Web Parts by creating an .msi file from within Visual Studio 2005.
Like with any .NET application or component, the two most popular ways to deploy Web Parts are 1) creating an .msi installer file and 2) manually deploying the files to the appropriate directories. There are numerous advantages of using an MSI-based deployment model. One such advantage is being able to query your servers to determine not only which components are installed, but also which versions of which components are currently installed in an environment. This can be easily done with a custom Windows Management and Instrumentation (WMI) query or via Systems Management Server (SMS) (as well as many other tools). In addition, MSI files make for a very clean deployment in that you simply run an installer and your component can immediately be used on the server to which it was deployed.
To create an installer file for your Web Parts, complete the following steps:
- Add a setup project to your solution.
- Configure setup application.
- Compile setup application (creates an MSI file).
- Deploy the components.
Adding a Setup Project to Your Solution
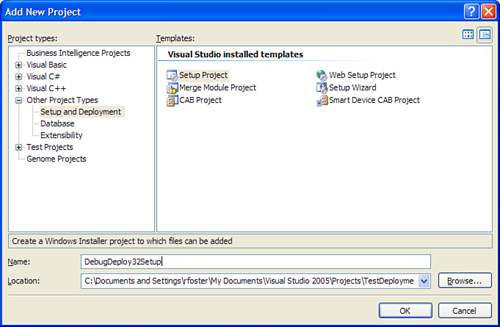
To add a setup project to your solution, click the File menu, click New, and then click Project. The Add New Project window opens. In the Project Types section, select Other Project Types, select Setup and Deployment, and then select Setup Project, as illustrated in Figure 19.4.
Figure 19.4. Create a new setup project.
Configuring Setup Application
After creating the setup project, you need to configure your project to include the primary output from the DebugDeploy32 project. Because the components need to be deployed to the GAC, you need to add a Special Folder to the project by opening the File System Editor, right-clicking the File System item, and selecting Add New Special Folder. You need to add a Global Assembly Cache Folder to the list so that your component can be deployed to the GAC.
Note
Note that this process assumes that your project will be deployed to the Global Assembly Cache, so it must have a strong name associated with it.
Figure 19.5 displays the option to add a Global Assembly Cache Folder to the File System Editor.
Figure 19.5. Add a Global Assembly Cache Folder.

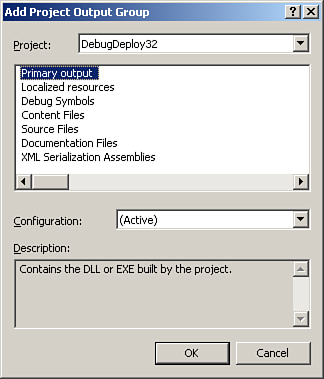
After the Global Assembly Cache Folder has been added, you will need to add the primary output of the DebugDeploy32 project to the Global Assembly Cache Folder. You can do this by right-clicking the Global Assembly Cache Folder and then clicking Add, Project Output, as shown in Figure 19.6.
Figure 19.6. Add a Project Output.
Compile Setup Application (Creates an .msi File) and Deploy the Components
Next, you need to compile your setup project. This builds an .msi file that can be installed on your SharePoint server. When you run the installer, your components are registered in the GAC on that server and can then be shared by multiple sites and webs.
Caution
If your Visual Studio 2005 settings are configured to automatically increment the version number of your assembly when you compile, then you will need to update this setting in the safeControls section of your web’s Web.Config file.
After your components have been deployed, you can verify that they got deployed to the GAC by opening the .NET Framework 2.0 Configuration Utility from the Administrative Tools menu. This is illustrated in Figure 19.7.
Figure 19.7. Verifying the Global Assembly Cache.

Summary
Debugging and deploying Web Parts is an essential part of your SharePoint development experience. This chapter showed you how to successfully debug a Web Part using Visual Studio 2005 and how to deploy this Web Part to the Global Assembly Cache on your SharePoint servers.