
Chapter 21
Using the Imaging Web Service
IN THIS CHAPTER
- Overview of Picture Libraries
- Introducing the Imaging Web Service
- Locating Picture Libraries and Images
- Managing Photos
- Building a Practical Sample: Photo Browser
The bane of most programmers who write code that works in a back-end environment or performs “under the hood” functionality is that there is typically very little in the way of visible results. Everyone likes having the satisfaction of being able to sit back and look at their work, but developers rarely get that chance when working with “code plumbing” and web services. Fortunately, working with the Microsoft Office SharePoint Server (MOSS) picture libraries is a much more visible exercise. This chapter contains an overview of the concept behind picture libraries and a complete, in-depth coverage of how to consume the Imaging Web Service for programmable control of picture libraries.
Overview of Picture Libraries
A SharePoint picture library is really just a custom document library where the documents stored are images. Picture libraries can contain subfolders and maintain metadata on the image, such as the image height, width, title, description, keywords, and more.
As you would expect any decent photo album software to do, MOSS picture libraries can be browsed using thumbnail representations of the images, allowing users to click through and view the original, full-sized image if they want.
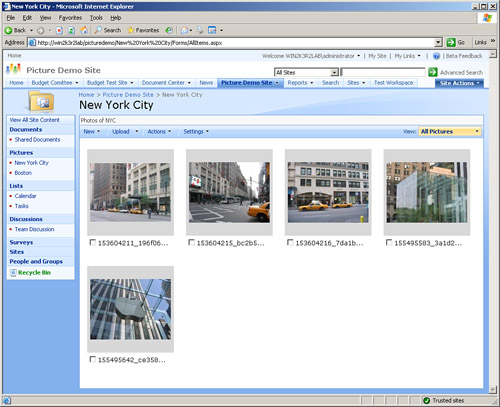
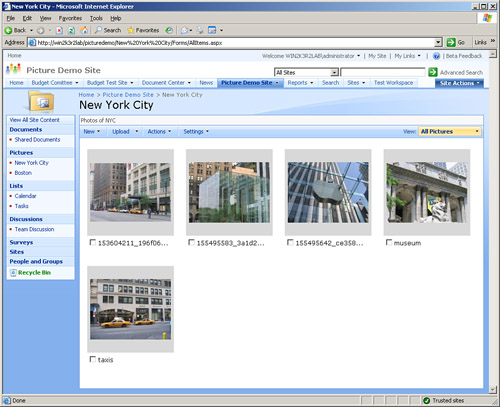
Picture libraries can be created within any SharePoint site regardless of the site template. This allows for a wide range of uses. Picture libraries can be used “out of the box” to provide convenient, secured, and shared image storage or they can be used as back-end image stores that support custom front-end applications, as you will see throughout this chapter. Figure 21.1 illustrates browsing a picture library called “New York City” on a team site.
Figure 21.1. Browsing a MOSS picture library.
Introducing the Imaging Web Service
The Imaging Web Service is the programmable interface to all things related to picture libraries. Although picture libraries are, at their core, document libraries and can be manipulated by document library code, none of the image-specific information or features is available unless you use the Imaging Web Service.
The Imaging Web Service can be found at the following uniform resource locator (URL): http://[server]/[site]/_vti_bin/imaging.asmx.
As with all other MOSS web services, access to the service is secured and the web service client must provide valid credentials to gain access to the service. The user account supplied to the web service client proxy must have at least read access to the site and to the picture library to perform any imaging functions.
Table 21.1 contains a summary of the methods available on the Imaging Web Service.
Table 21.1. Imaging.asmx Methods
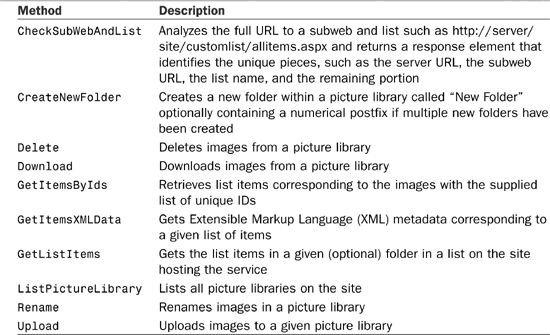
Methods on the Imaging Web Service fall into two basic categories:
- Browse—These methods provide the ability to iterate through the list of picture libraries on a site, list all images contained in a given picture library, obtain image metadata, and retrieve image detail results based on a list of IDs.
- Manipulate—These methods provide the ability to manipulate images and the picture libraries in which they are contained. Using manipulation methods, client code can upload, download, rename, and delete images and create folders.
The next two sections provide an in-depth look at the code involved in browsing and manipulating images and picture libraries.
Locating Picture Libraries and Images
Before you can manipulate images or the image libraries, you need to be able to locate them. This section shows you the various techniques for enumerating picture libraries, getting a list of images contained in a library, selecting image items by ID, and obtaining image item metadata.
Enumerating Picture Libraries
Enumerating picture libraries is done with the ListPictureLibrary method on the Imaging Web Service. It returns a list of all picture libraries on the site that hosts Imaging.asmx. For instance, if you want to retrieve a list of all picture libraries contained in the site “Our Hawaiian Vacation,” you might first connect to the web service at http://theserver/hawaiianvacation/_vti_bin/Imaging.asmx.
After you had a proper web reference, you would then invoke the ListPictureLibrary method as follows:
XmlNode libraryListNode = serviceProxy.ListPictureLibrary();
This method returns an XML node with the following structure:

When run against the sample team site used later in the chapter, this method returns the following XML:
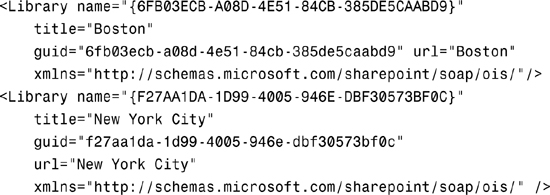
As you work more with the Imaging Web Service, you will see that the outputs from certain methods are reused over and over again in other method calls. If you know this up front, you can make sure your code takes that into account. For example, you will make extensive use of the url attribute returned by ListPictureLibrary for virtually every other method call on the web service. The url attribute is in the XML and is required for subsequent method calls to drill down into individual libraries.
Obtaining Picture Library List Items
After you have the list of picture libraries on the site, the next thing you might want to do is obtain a list of all items in each picture library. The GetListItems method returns XML data in the “row” format. This is the same format used by the Lists Web Service (Chapter 22, “Using the Lists Web Service”). That chapter provides you with more details on this XML format. This chapter takes advantage of the fact that the XML “row” format can be read by an ADO.NET DataSet and converted into the tables and rows paradigm.
The following code illustrates how to obtain a list of items and immediately turn that list into a DataSet that can then be used in data binding or whatever other operations are required:

In the preceding code, the url variable contains the data from the url XML attribute returned by the ListPictureLibrary method. The XML returned by GetListItems is not a complete, well-formed document. It contains a list of <z:row> elements but no root element. As a result, the code to create a DataSet from this XML needs to wrap the method output in its own root element.
When converted from XML, the row attributes become columns. Table 21.2 shows a list of the most commonly used column names and their descriptions.
Table 21.2. GetListItems Columns

Getting Items by ID
If you aren’t interested in obtaining the entire list of images, but instead want to retrieve only a subset based on a list of IDs, the GetItemsByIds method is exactly what you need. This method comes in extremely handy when you are creating an application that might be maintaining a list of IDs with which the user wants to work. The syntax of this method call is fairly simple:
XmlNode itemsNode = imageService.GetItemsByIds("[list]", array-of-uint-ids);
After you have a valid web reference for the Imaging Web Service, you can then call this method with the name of the list in question and an array of uints representing the list of IDs. These are the same IDs that are stored in the ows_ID column from other list item retrieval methods. The format of the XML returned by this method is the same row-style format used by GetListItems and the Lists Web Service discussed in Chapter 22.
Obtaining Item XML Data
The GetItemsXMLData method provides a trimmed-down alternative to retrieving the row-format XML returned by the GetListItems and GetItemsByIds methods. Where the GetItemsByIds method relies on an array of uint identifiers to select items from the library, the GetItemsXMLData method relies on an array of filenames as well as a folder name, as follows:
XmlNode metaNode = imageService.GetItemsXMLData(
url, "", new string[] { fileName });
The method returns an XML fragment that looks like the following:

The format of the XML returned by this method does not contain the ows_ attribute prefix of some of the other methods. In addition, the values that appear in lookup format (two values separated by the character pair ;#) in other methods do not appear in lookup format in this method.
This is because the picture library is simultaneously a custom list, a document library, and an image library. As such, there are many different perspectives from which you might want to examine its items. If you are purely interested in seeing the image-specific data and don’t care about the internal SharePoint identifiers for various elements, this method provides the easiest data to consume. However, if you are relating images to other data contained within SharePoint, you need the internal identifiers and lookup information supplied by the other methods.
Managing Photos
Picture libraries provide a tremendous amount of functionality above and beyond simple browsing and locating. Using the Imaging Web Service, you can upload and download photos, rename photos, delete photos, and create subfolders within existing libraries. This section covers how to perform all of those tasks.
Uploading Photos
Uploading a photo is actually quite easy. The Upload method takes the list name, the folder name, the filename, and an array of bytes containing the raw data of the image to upload. The following few lines of code read a file from disk and upload them to a SharePoint picture library:

The Upload method takes the following parameters:
strListName—The name of the picture library into which the code will be uploading an image.strFolder—The name of a folder within the picture library. If the image is being uploaded to the root of the picture library, leave this parameter as the empty string.bytes—The array of bytes containing the raw image data.fileName—The name of the file for the uploaded image. This is only the filename and should not include any path information.fOverWriteIfExist—A Boolean indicating whether the uploaded file should overwrite any existing file with the same filename in the same location. If false, and a file exists, an exception will be thrown.
Downloading Photos
Downloading is a little trickier than uploading, but is still pretty easy. You might think that the Download method would return an array of bytes. However, it actually returns an XML node that contains a base-64 encoded array of raw bytes. Thankfully, the .NET Framework comes with the Convert.FromBase64String method that comes in extremely handy in situations like this. The following code downloads a file from a picture library and sets the Image property of a Windows Forms PictureBox to the bytes retrieved from the web service:
XmlNode imageNode = imageService.Download("My List", "",
new string[] { "thepic.jpg" }, 0, false);
string fileByteString = imageNode.InnerText;
byte[] fileBytes = Convert.FromBase64String(fileByteString);
pictureBox.Image = Image.FromStream( new MemoryStream(fileBytes));
The Download method takes the following parameters:
strListName—The name of the liststrFolder—The name of the folder in which the image resides, can bestring.Emptyif the image is in the root folder of the libraryitemFileNames—An array of strings representing the list of files to downloadtype—The type of file to download: 0 = Original, 1 = Thumbnail, 2 = Web ImagefFetchOriginalIfNotAvailable—A Boolean value indicating whether to retrieve the original image if a desired alternate image is not available
Renaming Photos
Renaming pictures is a simple matter of supplying a list of old filenames and a list of new filenames in an XML fragment sent to the Imaging Web Service, as shown in the following example:
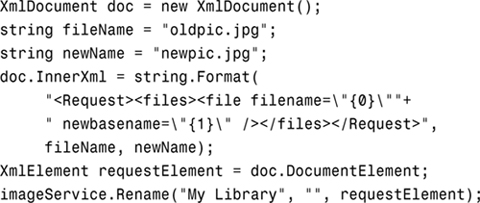
As with the rest of the image and library manipulation methods, Rename takes the name of the list and the optional name of a folder. Finally, it takes an XML element that contains a list of files to rename.
Deleting Photos
Deleting pictures is another straightforward process using the Delete method. It takes the name of the list, the name of the folder (optionally string.Empty), and an array of filenames to delete. The filenames in the array must be pure filenames and cannot contain any path information. The Delete method returns an XML document containing <result> elements indicating whether each file was deleted. The following code provides a simple example of deleting images in a picture library:
XmlNode resultNode = imageService.Delete("Boston", "Museum",
new string[] { "entrance1.jpg" });
The preceding code deletes an image named entrance1.jpg from the folder Museum in the picture library Boston on whatever site imageService is associated with. The result of this operation returns an XML document like the following one:
<results xmlns="http://schemas.microsoft.com/sharepoint/soap/ois/">
<result name="entrance1.jpg" deleted="true"/>
</results>
Creating Folders
Creating new folders is an interesting task. The CreateNewFolder method allows you to create a new folder, but it will be named “New Folder”. You can optionally specify the parent folder name to create nested folders. The following is a line of code that creates a new folder:
XmlNode resultNode = imageService.CreateNewFolder("New York City", string.Empty);
Picture Library Folder Creation
One can only guess at the reasoning behind not allowing this web service to specify the name of the new folder to be created. The strongest argument for not allowing this functionality is that folder management is already provided in a full implementation using the Lists Web Service. What most developers discover as they work with the MOSS web services is that they can rarely use a single service on its own. More often than not, code requires a main web service and then an additional service to supplement functionality. In the case of folder management in picture libraries, developers should probably be using both an instance of Imaging.asmx and Lists.asmx. The Lists Web Service is discussed in Chapter 22.
Building a Practical Sample: Photo Browser
As the functionality of the Imaging Web Service has been unfolding throughout this chapter, it has probably become pretty clear that the features exposed by the web service lend themselves perfectly to creating a photo album application either in ASP.NET or in Windows Forms (or Windows Presentation Foundation for those developers working with the .NET Framework 3.0).
This author has always believed strongly in the idea that simple “Hello World” code snippets are only useful when combined with a real-world application showing how the individual snippets can be applied to a real problem. As a result, there is a fully functioning Windows Forms photo album application included in the code downloads for this chapter.
Before illustrating some of the more important pieces of the source code, take a look at the application in action in Figures 21.2 through 21.7.
Figure 21.2. Downloading thumbnails from a library and using “bubble”-style ToolTips to display picture titles.

Figure 21.3. Renaming an image using the photo album application.
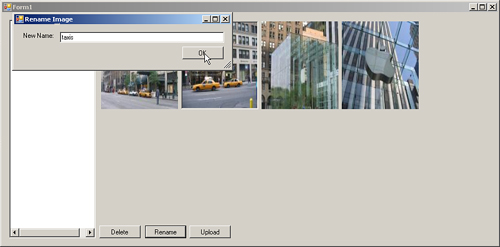
Figure 21.4. Image library showing the renamed photo.
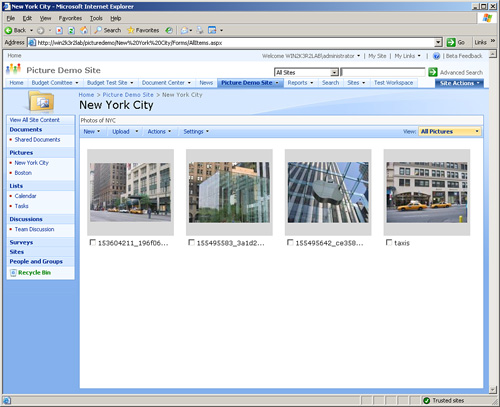
Figure 21.5. Downloading and displaying a full-sized picture with accompanying metadata.
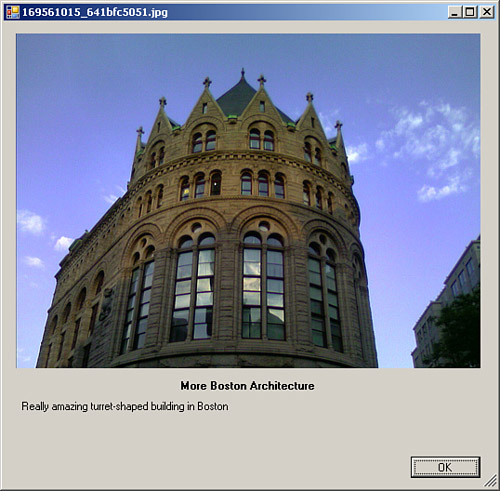
Figure 21.6. Open dialog box for uploading files to the picture library.
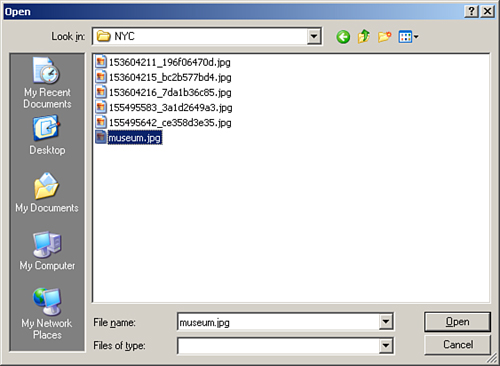
Figure 21.7. The picture library after uploading a new image.
All of the web service code used in the photo album application has been covered earlier in the chapter, so there are no new methods being used that have not already been explained.
The application makes use of the asynchronous method invocation model that is new to the .NET Framework 2.0. This new feature adds event handlers to the auto-generated client proxy to which your application can subscribe. There is an event handler to signal the completion of each asynchronous method call. This makes it extremely easy to set up the asynchronous background downloading of a list of thumbnails.
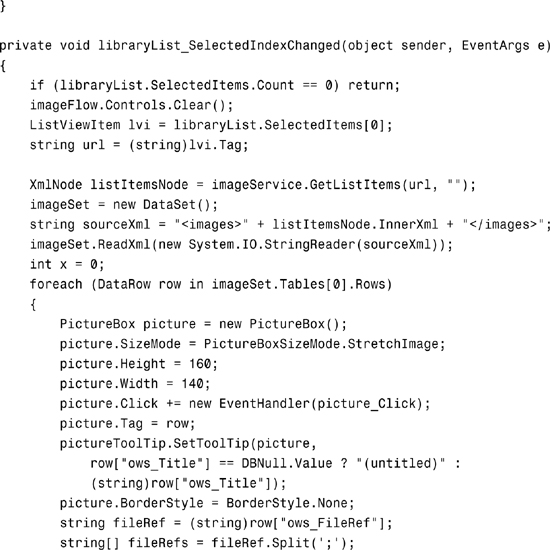
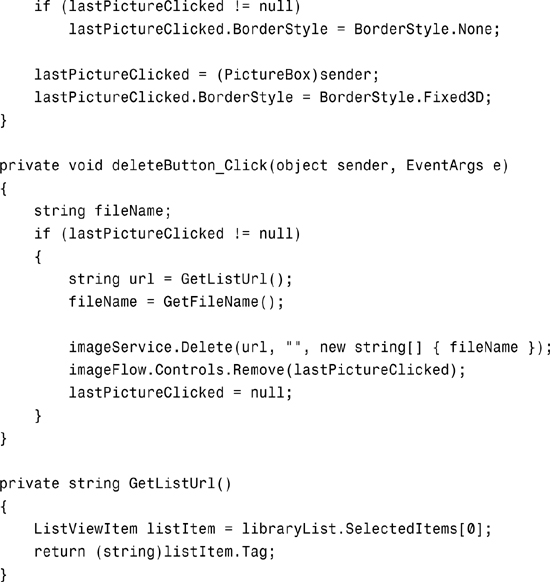
The main form of the application has a List view on the left that will be populated with the list of all picture libraries on the site. There is also a FlowLayoutPanel that serves as the container for the downloaded image thumbnails. Clicking on an image changes its border to reflect that it has been selected. This enables the buttons at the bottom of the form that allow for uploading, renaming, deleting, and detail viewing. There is also a button that displays the XML metadata for a selected image. Listing 21.1 shows the entire source code for the main form.
Listing 21.1. Form1.cs (Main Form of the Photo Album Application)


The full source code of the application is available with the code downloads for this book, available at http://www.samspublishing.com. Make sure you have the ISBN of the book available to download the code.
Summary
This chapter illustrated the flexibility and the power of MOSS picture libraries and the Imaging Web Service. Using the Imaging Web Service, client applications can create subfolders, upload and download thumbnails and full-sized images, delete and rename images, and retrieve image metadata, including the image height and width. At the end of this chapter, the Photo Album application put all of the individual methods of the Imaging Web Service to use in a practical example. Armed with the information in this chapter, you should be ready to start creating powerful, flexible, compelling applications that use MOSS picture libraries as a back-end image and data store.