The idea behind the new interface in Microsoft Office 2007 is that the most commonly used tools are present on the ribbon rather than buried in dialog boxes, and the tools you use less often, though accessible, aren’t part of the main interface by default. Sometimes the only way to access a function you may have used in previous versions of PowerPoint is to place a command on the Quick Access toolbar. By default this toolbar contains only the Save, Undo, and Redo commands, but you can add as many commands as you wish.
Add Buttons to the Quick Access Toolbar
Click the Office button.
Click the PowerPoint Options button.
Caution
Although you can add many tools to the toolbar, don’t overdo it. Only add the tools you use most often, or add a tool to use a particular function, and then delete it to clear clutter off the toolbar.
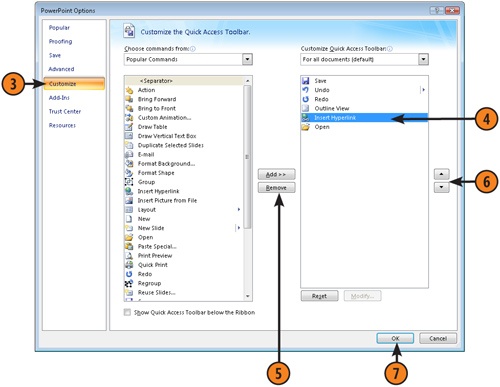
Click Customize.
Click the arrow on the Choose Commands From drop-down list and select a category of tool, or simply scroll down and choose the Commands Not On the Ribbon category.
Click on a command in the list on the left and then click the Add button to add it to the toolbar. Repeat this with all tools you wish to add.
Click OK.
The tools are added to the toolbar.
Tip
If you have filled up your Quick Access toolbar and want to put it back the way it was when you first installed PowerPoint, go to the PowerPoint Options, select Customize window and click Reset. The default tool settings are restored.
Remove or Rearrange Tools
Click the Office button.
Click the PowerPoint Options button.
Try This!
You can change the Quick Access toolbar settings only for a currently opened document, not for all documents. When you are in the Customize window of PowerPoint Options, click the arrow on the Customize Quick Access Toolbar drop-down box and choose the name of the presentation for which you want to save the changes.
Tip
If you want to add some space between sets of tools on the tool bar, simply click on the item labeled <Separator> at the top of the list on the left of the Customize window and click Add.
Click Customize.
Click an item in the list on the right.
Click Remove to remove it from the toolbar.
Click Move Up or Move Down to rearrange the tools.

 Click the arrow on the Choose Commands From drop-down list and select a category of tool, or simply scroll down and choose the Commands Not On the Ribbon category.
 Click on a command in the list on the left and then click the Add button to add it to the toolbar. Repeat this with all tools you wish to add.


 Click the PowerPoint Options button.