Chapter 2. Managing data and availability groups
One of your most important tasks as a Microsoft Exchange Server 2013 administrator is managing the Information Store. The Information Store processes were rewritten in Exchange 2013 to improve performance and manageability. The new Information Store (Microsoft.Exchange.Store.Service.exe) is written in C# and is fully integrated with the Microsoft Exchange Replication service (MSExchange-Repl.exe) and the Microsoft Exchange DAG Management service (MSExchangeDagMgmt.exe).
Each Mailbox server deployed in an organization has an information store, which can contain databases and information about database availability groups (DAGs). This chapter introduces databases and focuses on the management of database availability groups. After completing this chapter, you should know how to:
Enable, create, and use database availability groups.
Manage databases and their related transaction logs.
Improve Mailbox server availability.
Manage full-text indexing of Exchange databases.
To learn how to manage databases, see Chapter 3.
Navigating the Information Store
Exchange 2013 integrates high availability and messaging resilience into the core architecture, providing a simple unified framework for high availability, management, and disaster recovery. This approach allows Exchange 2013 to improve continuous replication, provide a robust solution that doesn’t require expensive clustering hardware, and reduce maintenance overhead.
Basic database options
Exchange Server 2013 uses Extensible Storage Engine (ESE) databases for mailbox storage. When you install a Mailbox server in an Exchange 2013 organization, this server’s information store has a single, default mailbox database. Mailbox databases have a single, dedicated log stream, which is represented by a series of sequentially named log files. Each log file is 1 megabyte (MB) in size. In addition to log files, databases have several other types of files associated with them, including one or more checkpoint files, a temporary working file, and one or more transaction log files. Depending on the state of Exchange Server, you might see other working files as well.
Note
Exchange 2013 does not use public folder databases. Public folders are now stored in a special type of mailbox.
When you create a mailbox database, you can specify separate folder locations to use for database files and transaction logs. Each database has content-indexing files associated with it as well. These files are generated by the Exchange Search service, which is enabled by default and running on all Mailbox servers. Exchange Search indexes new mail items in the transport pipeline or immediately after the items are created and delivered to a mailbox.
You use Exchange databases to ease the administrative burden that comes with managing large installations. For example, instead of having a single 10-terabyte (TB) database for the entire organization, you can create ten 1-TB databases that you can manage more easily.
Tip
As a best practice, 2 TB is the largest recommended size for Exchange Server 2013 databases. Often you’ll find that large databases make it easier to support the large mailboxes that might be required by your organization’s managers and executives. Still, most mailboxes should be limited to between 2 GB and 10 GB in size.
When you create a mailbox database, you specify the name for the database, and this name sets the name of the primary database file as well. For example, if you create a mailbox database called MarketingDept, the primary database file is set as MarketingDept.edb. With Exchange Server 2013, the default location for database files is the same as the log folder. If you want a database to be in a different location, you can specify the location you want to use. Separating database files and log files from the same database and putting them on different volumes backed by different physical disks can help you scale your organization while ensuring high performance and recoverability.
Tip
Recoverability is a key reason for separating database files and log files. For example, in the case of a failure on a drive where a database is stored, the transaction logs needed for complete recovery would then be on a different (and probably functioning) drive. Whether you want to use this approach depends on the size and configuration of your Exchange Mailbox servers in addition to the service level agreements with which you need to comply.
The many files associated with databases provide granular control over Exchange Server, and if you configure the data files properly, they can help you scale your Exchange organization efficiently while ensuring optimal performance. In a small implementation of Exchange, you might want to place all the data files on the same drive. As you scale from a small organization to a larger organization, you’ll generally want to organize data according to databases, placing all the data for each database on physically separate drives. You can’t always do this, however, in a small-to-medium sized organization with limited resources. For example, if you have ten 1-TB databases and only five data drives, you might want to have the five data drives configured as follows:
Drive 1 with Database 1 and Database 2 and all related data files
Drive 2 with Database 3 and Database 4 and all related data files
Drive 3 with Database 5 and Database 6 and all related data files
Drive 4 with Database 7 and Database 8 and all related data files
Drive 5 with Database 9 and Database 10 and all related data files
In a storage area network (SAN) implementation in which you are using logical unit numbers (LUNs) and don’t know about the underlying disk structure, placing the databases on separate LUNs should be sufficient. To protect the data, you might want to consider using hardware RAID (redundant array of inexpensive disks), which is likely already implemented if you are using a SAN. However, if you configure a database availability group with multiple member servers that each have one or more copies of mailbox databases, you likely don’t need to use any type of RAID, and you likely won’t need daily backups either. Just remember that Microsoft recommends having at least three database copies in addition to the active copy.
Real World
If the idea of not needing RAID seems like a radical concept, the idea of not needing to perform backups of your Exchange data might seem revolutionary. However, when you have multiple copies of your data on separate servers, you really might not need to create daily backups of your Exchange data. This doesn’t mean that you won’t need to create backups ever—it just means you might not need daily backups of Exchange data. You will probably still want to create regular backups of your Exchange servers and still create periodic full backups of all server and Exchange data to rotate to off-site storage as a safeguard against catastrophe.
Database available groups can also make you rethink your use of SANs. Rather than having a single, massive (and likely very expensive) storage device, you might want to rely on a server’s internal drives or multiple smaller (and likely much less complex) storage devices. One reason to use internal drives is that reliable, multiple-terabyte hard drives are becoming increasingly available, and several servers with multiple, large internal hard drives will likely cost a fraction of the price of a single massive SAN. If you use SANs, you might find that multiple smaller storage devices are better than a single, massive storage device because you’ll then be protected against a single source of failure (the storage device) causing an outage on all your mailbox servers. I know, I know…the SAN should never go down, but it can (and does) happen.
High availability database options
Exchange 2013 allows you to protect mailbox databases and the data they contain by configuring your mailbox databases for high availability automatically when you use database availability groups. Database availability groups allow you to group databases logically according to the servers that host a set of databases. Each Mailbox server can have multiple databases, and each database can have as many as 16 copies. A single database availability group can have up to 16 Mailbox servers that host databases and provide automatic database-level recovery from failures that affect individual databases. Any server in a database availability group can host a copy of a mailbox database from any other server in the database availability group.
Mailbox servers in a database availability group can also host the Client Access server role. Member servers must be in the same Active Directory domain.
Exchange 2013 integrates high availability and messaging resilience into the core architecture, providing a simple unified framework for both high availability and disaster recovery. This approach reduces the cost and complexity of deploying a highly available solution. How does this work? Exchange 2013 has enhanced continuous replication and has replaced clustering features in Exchange 2007 with a more robust solution that doesn’t require expensive hardware and also requires less maintenance.
In early versions, Exchange was a clustered application that used the cluster resource management model for high availability. In contrast, Exchange 2013 is not a clustered application and therefore does not use the cluster resource model for high availability. Instead, Exchange 2013 uses its own internal high-availability model. Although some components of Windows Failover Clustering are still used, these components are now managed exclusively by Exchange 2013.
To support continuous replication, early versions of Exchange offered several approaches, including Local Continuous Replication (LCR), Cluster Continuous Replication (CCR), and Standby Continuous Replication (SCR). LCR was a single-server solution for asynchronous log shipping, replay, and recovery. CCR combined the asynchronous log shipping, replay, and recovery features with the failover and management features of the Cluster service, and it was designed for configurations in which you had clustered Mailbox servers with dedicated active and passive nodes. SCR was an extension of LCR and CCR that used the same log shipping, replay, and recovery features of LCR and CCR but was designed for configurations in which you used or enabled the use of standby recovery servers.
Exchange 2013 includes some aspects of the continuous replication technology previously found in CCR and SCR, but the technology has changed substantially. Because storage groups have been removed from Exchange 2013, continuous replication operates at the database level. Exchange 2013 still uses an Extensible Storage Engine (ESE) database that produces transaction logs that are replicated and replayed into copies of mailbox databases. Because each mailbox database can have as many as 16 copies, you can have one or more database copies on up to 16 different servers.
When a Mailbox server is added to DAG, the server works with other members of the DAG to provide automatic recovery from failures that affect mailbox databases, including disk failures, server failures, and other critical failures. When a failure affecting a database occurs and a new database becomes the active copy automatically, this process is known as a failover. When an administrator establishes a database copy as the active mailbox database, this process is known as a switchover.
Failover and switchover occur at the database level for individual databases and at the server level for all active databases hosted by a server. When either a switchover or failover occurs, other Exchange 2013 server roles become aware of the switchover almost immediately and redirect client and messaging traffic automatically as appropriate.
Although you can perform most management tasks for availability groups in the Exchange Admin Center, you have additional options when you work with the Exchange Management Shell. Table 2-1 provides an overview of commands you can use to manage availability groups and their various features.
MANAGEMENT AREA | RELATED COMMANDS |
Database availability group management | Get-DatabaseAvailabilityGroup New-DatabaseAvailabilityGroup Remove-DatabaseAvailabilityGroup Set-DatabaseAvailabilityGroup |
Database copy management | Add-MailboxDatabaseCopy Get-MailboxDatabaseCopyStatus Remove-MailboxDatabaseCopy Resume-MailboxDatabaseCopy Set-MailboxDatabaseCopy Suspend-MailboxDatabaseCopy Update-MailboxDatabaseCopy |
Database management | Dismount-Database Get-MailboxDatabase Move-DatabasePath New-MailboxDatabase Remove-MailboxDatabase Set-MailboxDatabase |
Network configuration | Get-DatabaseAvailabilityGroupNetwork New-DatabaseAvailabilityGroupNetwork Remove-DatabaseAvailabilityGroupNetwork Set-DatabaseAvailabilityGroupNetwork |
Switchover management | Move-ActiveMailboxDatabase Start-DatabaseAvailabilityGroup Stop-DatabaseAvailabilityGroup Restore-DatabaseAvailabilityGroup |
Server membership | Add-DatabaseAvailabilityGroupServer Remove-DatabaseAvailabilityGroupServer |
As part of database availability group planning, keep in mind that you can create database copies only on Mailbox servers in the same database availability group that do not host the active copy of a database. An active copy differs from a passive copy in that it’s in use and being accessed by users rather than offline. You cannot create two copies of the same database on the same server. Other guidelines to keep in mind when working with database copies include the following:
Mailbox databases can be replicated only to other Mailbox servers in the same database availability group. You cannot replicate a database outside a database availability group.
All copies of a database use the same path on each server containing a copy. The database and log file paths for a database copy on each Mailbox server must not conflict with any other database paths.
All Mailbox servers in a database availability group must be in the same Active Directory domain. Database copies can be created in the same or different Active Directory sites and on the same or different network subnets. However, database copies are not supported between Mailbox servers with roundtrip network latency greater than 250 milliseconds (by default).
The Microsoft Exchange Replication service is responsible for replicating databases. The replication service and components that run within the service, including Active Manager, the TCP listener, and the Volume Shadow Copy Service writer, write results to the event logs. In Event Viewer, you can find these logs by navigating to Applications and Services Logs > Microsoft > Exchange > High Availability. In these logs, you’ll find details on database actions, such as database mount operations, log truncation, and cluster action within DAGs. Events related to failures that affect replicated mailbox databases are written to the logs under Applications and Services Logs > Microsoft > Exchange >MailboxDatabaseFailureItems.
Working with Active Manager
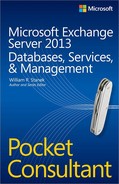
In Exchange 2013, Active Manager provides the resource model and failover management features previously provided by the Cluster service. When you create your first database availability group in an Exchange organization, Exchange creates a Windows Failover Cluster, but there are no cluster groups for Exchange and no storage resources in the cluster. Therefore, as shown in Figure 2-1, Failover Cluster Manager shows only basic information about the cluster, which includes the cluster name and networks, and the quorum configuration. Cluster nodes and networks will also exist, and their status can be checked in Failover Cluster Manager; however, Exchange manages all cluster resources, including nodes and networks. Exchange makes use of the cluster’s node and network management functions, and you can check the node and network status in Exchange Admin Center.
Real World
Failover Cluster Manager is the primary management tool for working with the Cluster service. Although you need to use the Exchange Management tools to view and manage database availability groups and related features, Failover Cluster Manager does show the status of clustering in the following ways:
By selecting the cluster name in the left pane, you get a quick overview of the cluster configuration, including the current quorum configuration, which can be either Node Majority or Node and File Share Majority depending on the number of nodes in the database availability group.
By selecting the Nodes entry in the left pane, you can quickly check the status of all the nodes in the database availability group.
By expanding the Networks entry in the left pane and then selecting available cluster networks, you can check the status of the network and individual network connections.
By selecting the Cluster Events node, you can check the event logs on all cluster nodes for errors and warnings.
Active Manager runs on all Mailbox servers as a subcomponent of the Microsoft Exchange Replication service. On Mailbox servers that aren’t part of a DAG, Active Manager operates as a Standalone Active Manager. On Mailbox servers that are members of a DAG, Active Manager operates as either a primary role holder or a standby secondary role holder with respect to a particular database. The primary role holder, referred to as the Primary Active Manager, decides which database copies will be active and which copies to activate. It also receives topology change notifications and reacts to server failures. Only one copy of a database can be active at any given time, and that copy can be mounted or dismounted.
The group member that holds the primary role is always the member that currently owns the cluster quorum resource and the default cluster group. If the server that owns the cluster quorum resource fails, the primary role automatically moves to another server in the group and that server takes ownership of the default cluster group. Before you take the server that hosts the cluster quorum resource offline for maintenance or an upgrade, you must first move the primary role to another server in the group.
Secondary role holders, referred to as Standby Active Managers, provide information about which server hosts the active copy of a mailbox database to other Exchange components. The secondary role holder detects failures of replicated, local databases and the local information store, and it issues failure notifications to the primary role holder and asks the primary role holder to initiate a failover. The secondary role holder does not determine which server takes over, nor does it update the database location state with the primary role holder. With respect to its local system, the primary role holder also performs the functions of the secondary role by detecting local database and local information store failures and issuing related notifications.
Active Manager determines which database copy should be activated by attempting to locate a mailbox database that has characteristics similar to the following:
The database has a status of Healthy, DisconnectedAndHealthy, Disconnected- AndResynchronizing, or SeedingSource.
The database has a content index with a status of Healthy.
The database has a copy queue length that is less than 10 log files.
The database has a replay queue length of less than 50 log files.
The server hosting the database has all components in a healthy state.
If no database copy meets all of these criteria, Active Manager continues looking for the best choice by lowering the selection requirements through successive iterations. Active Manager uses the managed availability framework to perform health checks. After one or more copies have been selected, Active Manager attempts to copy any missing log files from the original source to a potential new active copy by using a process called attempt copy last logs (ACLL). After the ACLL process is complete, Active Manager compares the value of the AutoDatabaseMountDial property for Mailbox servers hosting copies of the database to the copy queue length of the database being activated. If the value of the AutoDatabaseMountDial property is greater than the number of missing log files, the Primary Active Manager tries to activate the next best copy (if one is available).
If the value of the AutoDatabaseMountDial property is equal to or less than the number of missing log files, the Primary Active Manager issues a mount request. At this point, either the database mounts and is made available to clients or the database doesn’t mount and the Primary Active Manager tries to activate the next best copy (if one is available).
Understanding managed availability
In Exchange 2013, the active monitoring and high availability functions are integrated into a single architecture called managed availability, which is implemented on Mailbox servers and Client Access servers. Managed availability is a framework that includes a probe engine for taking measurements and collecting data, a monitor engine for determining the status of Exchange components, and a responder engine for taking recovery actions.
Managed availability is implemented by using:
Exchange Health Manager Worker process (MSExchangeHMWorker.exe). A working process that performs the runtime management tasks.
Exchange Health Manager Service (MSExchangeHMHost.exe). A controller process used to execute and manage the work process. If the worker process becomes nonresponsive or otherwise fails, the controller process is used to recover the worker process.
During startup, the health manager worker process reads XML configuration files and initializes the probes, monitors, and responders used by the managed availability framework. The worker process stores runtime data in the registry and writes results to the event logs as well. In Event Viewer, you can find these logs by navigating to Applications and Services Logs > Microsoft > Exchange > ManagedAvailability.
As discussed further in Chapter 9 in the Tracking server health section, you can check the state and health of Exchange resources by using Get-HealthReport and Get-ServerHealth. Each tracked resource has customized sets of probes, monitors, and responders that help to ensure its availability. Probe definitions identify the Exchange resource to track and the time interval in which the resource is checked. Monitor definitions identify the specific state of the resource based on the collected data. In Event Viewer, you can find definitions and results for probes, monitors, and responders under Applications and Services Logs > Microsoft > Exchange > ActiveMonitoring.
Exchange tracks the transition state internally by using the TargetHealthState property associated with a responder, where
0 indicates an alert threshold is no longer met.
1 indicates a healthy state.
2 indicates a degraded state.
3 indicates an unhealthy state.
4 indicates an unrecoverable state.
5 indicates a Degraded1 state.
6 indicates a Degraded2 state.
7 indicates an Unhealthy1 state.
8 indicates an Unhealthy2 state.
9 indicates an Unrecoverable1 state.
10 indicates an Unrecoverable2 state.
When a resource transitions from one state to another is determined by the monitor definition. As soon as the monitor engine detects an unhealthy or degraded state for a responder, the transition state of that resource is shown as Unhealthy or Degraded respectively, which will trigger a recovery action. Whether a resource is shown as Unhealthy or Degraded depends on the data collected. For example, if a resource is unavailable, the resource might be listed as Unhealthy. If a resource is available but is slow to respond due to high latency or a high level of activity, the resource might be listed as Degraded.
Once in an Unhealthy state, the health manager might transition the resource to another state. For example, after 30 seconds in an unhealthy state, the resource may be transitioned to an Unhealthy1 state. After 300 seconds in an unhealthy state, the resource may be transitioned to an Unhealthy2 state. After 3000 seconds in an unhealthy state, the resource may be transitioned to an Unrecoverable state. Once in an Unrecoverable state, the health manager may transition the resource through the related Unrecoverable, Unrecoverable1, and Unrecoverable2 states.
Responder definitions detail the specific recovery actions to take based on the transition state of the Exchange resource. The exact response to an unhealthy state depends on the affected resource. Although the initial response to an unhealthy state might be to restart the related service or application pool, a subsequent response might be to restart the server, and a final response might be to take the server offline so that it no longer accepts traffic.
Creating and managing database availability groups
Database availability groups are a container in Active Directory and a logical layer on top of Windows Clustering. You can create and manage database availability groups in a variety of ways. Establishing a database availability group and making it operational requires the following at a minimum:
Pre-staging and preparing for each deployment
Creating a database availability group
Adding member servers to the group
Designating a witness server
Creating an availability group network
These tasks and general management tasks for database availability groups are discussed in the sections that follow.
Pre-staging and preparing for database availability groups
A database availability group defines a set of servers that provide automatic database-level recovery from database failures. Only members of the Organization Management group or the Database Availability Groups Role can create database availability groups. Only members of the Organization Management group or the Database Copies Role can manage mailbox database copies.
When you create a database availability group, you can specify a witness server or let Exchange choose one for you. The witness server’s role is to help maintain the state of the group. It does this by maintaining the quorum when there is an even number of members in the group. On the witness server, you can designate a directory, called the witness directory, for use by the database availability group, or you can let Exchange create a default directory for you. By default, the witness directory is created as a subdirectory of %SystemDrive%DAGFileShareWitnesses with the name set the same as the fully qualified domain name of the DAG.
Exchange creates and secures the witness directory automatically as part of configuring the witness server for use. The witness directory should not be used for any purpose other than for the database availability group witness server. The requirements for the witness server are as follows:
The witness server cannot be a member of the database availability group.
The witness server must be in the same forest as the database availability group.
The witness server must be running a current version of Windows Server.
To be sure that Exchange administrators are aware of the availability of the witness server and that the server remains under the control of an Exchange administrator, Microsoft recommends using an Exchange 2013 server to host the witness directory. Using an Exchange 2013 server as the witness also ensures that Exchange has sufficient permissions to remotely create and share the witness directory. The preferred witness server is a Client Access server in the same Active Directory site as the majority of the members of the database availability group.
A single server can serve as a witness for multiple database availability groups; however, every database availability group must have a separate witness directory.
The witness directory doesn’t need to be fault tolerant and doesn’t require any other special considerations. If you need to reset permissions on the witness directory or recreate the witness directory in its original location, you can use Set-Database-AvailabilityGroup as long as the cluster quorum is intact.
Note
Cluster quorum ensures consistency of the DAG. Quorum represents a shared view of members and resources and also is used to describe the shared physical configuration within the DAG. Having quorum ensures that only one subset of cluster members is functioning in the DAG.
Tip
Ideally, you’ll locate the witness server in the same datacenter as DAG members. Although a server cannot act as a witness server for a DAG of which it is a member, a DAG member can act as a witness server for another DAG.
To set up the database availability group, Exchange creates an msExchMDB-AvailabilityGroup object and related objects in Active Directory Domain Services (AD DS). These objects represent the database availability group, its members, networks, and attributes. The msExchMDBAvailabilityGroup directory object is used to store information about the database availability group, such as server membership information. Information about the included databases is stored in the cluster database. When you add the first server to a database availability group, a failover cluster is automatically created for the database availability group and failover monitoring is initiated. The failover cluster heartbeat mechanism and cluster database are then used to track and manage information about the database availability group.
After a database availability group has been created, you can add servers to or remove existing servers from the database availability group. When the first Mailbox server is added to a database availability group, the following occurs:
The Windows Failover Clustering component and related management tools are installed, if they are not already installed.
Important
Windows Failover Clustering is available on servers that are running Windows Server 2008 R2 Enterprise or Datacenter, Windows Server 2012 Standard or Datacenter, or Windows Server 2012 R2 Standard or Datacenter. Each Mailbox server in the database availability group should have at least two network interface cards in order to have separate replication and messaging networks.
A failover cluster is created using the name of the database availability group. For the purposes of authentication and access permissions, the cluster is represented by a computer account that is created in the default container for computers. This computer account is referred to as the cluster virtual network name account or the cluster network object.
The server is added to the msExchMDBAvailabilityGroup object in Active Directory.
When you create a database availability group, an IP address is assigned to the group. When you add the first server to the group, the name and IP address of the database availability group are registered in Domain Name System (DNS) using a Host (A) record. The name must be no longer than 15 characters and must be unique within the Active Directory forest.
The cluster database is updated with information about the databases that are mounted on the server.
Exchange examines the current network configuration, as presented by the cluster. If the server has a properly configured network card, the configuration of that network card is used to create the replication network. If the server has two network cards, the configuration settings of those network cards are used to create separate replication and messaging networks.
A base directory is created on the witness server. If you specified a directory during DAG creation, this directory is created. Otherwise, the %SystemDrive%DAGFileShareWitnesses directory is created. Permissions are set so that the local Administrators group has full control.
Note
The witness directory and witness file share aren’t created until needed. Permissions are set so that the network name account representing the cluster has full control.
When you add the second and subsequent servers to the DAG, the following occurs:
The server is joined to the failover cluster for the DAG.
The server is added to the msExchMDBAvailabilityGroup object in Active Directory Domain Services.
The cluster database is updated with information about the databases that are mounted on the server.
When a database availability group has a single member server, the failover cluster initially uses the Node Majority quorum mode. When you add the second Mailbox server to the database availability group, Exchange changes the cluster quorum to the Node and File Share Majority quorum model and begins by using the Universal Naming Convention (UNC) path and directory for the cluster quorum. If the witness directory does not exist, Exchange automatically creates it at this point and configures its security with full control permissions for local administrators and the cluster network computer account for the database availability group.
Real World
Every failover cluster has a resource that is responsible for maintaining the witness logs. This resource is called the quorum or witness resource. The quorum resource writes information about all cluster database changes to the witness logs, ensuring that the cluster configuration and state data can be recovered. When you create a database availability group, Exchange automatically determines the appropriate quorum configuration for your cluster based on the number of member servers. When a DAG has an odd number of members, Exchange uses the Node Majority quorum model. When a DAG has an even number of members, Exchange uses a Node and File Share Majority quorum model.
In a Node Majority cluster configuration, servers have a local quorum device. This device stores the cluster configuration information. In a Node and File Share Majority cluster configuration, servers use a witness file share rather than a quorum (witness) device. Otherwise, the Node and File Share Majority configuration works like the Node Majority configuration. The change from one model to the other should happen automatically. If it doesn’t, run Set-DatabaseAvailabilityGroup with only the -Identity parameter, which will update the quorum settings for the DAG.
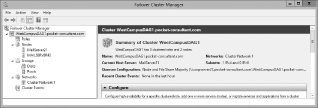
Before you create a database availability group, you should pre-stage and prepare the cluster name object. Although these preparations aren’t required with Windows Server 2008 R2 (unless account creation is restricted or computer accounts are creating in a container other than the default Computers container), these preparations are required with Windows Server 2012 RTM and Windows Server 2012 R2. You pre-stage the cluster name object by creating a computer account that will be used as the cluster’s name resource. The name resource is a Kerberos-enabled object that acts as the cluster’s identity and provides the cluster’s security context.
To pre-stage the cluster name object, complete the following steps:
In the Active Directory Users And Computers console tree, press and hold or right-click the container in which you want to place the computer account, tap or click New, and then tap or click Computer. This starts the New Object—Computer wizard shown in Figure 2-2.
In the Computer Name text box, enter the name that you want to use for the DAG. For example, if you are creating the first DAG in the Active Directory forest, you may want to enter DAG01 as the name. The name can be up to 15 characters. The name must be unique in the Active Directory forest and cannot contain spaces or other special characters.
If Windows Deployment Services are not installed, tap or click OK to create the computer account. Otherwise, tap or click Next twice, and then tap or click Finish.
If the witness server isn’t running Exchange 2013 or Exchange 2010, you must add the Exchange Trusted Subsystem group to the local Administrators group on the witness server prior to creating the DAG. Adding this group ensures that Exchange 2013 can create and share the witness directory. To add the Exchange Trusted Subsystem group to the local Administrators group, follow these steps:
In Control Panel, select User Accounts, and then select Give Other Users Access To This Computer.
In the User Accounts dialog box, on the Advanced tab, select Advanced, which opens the Local Users And Groups console.
In the left pane, select the Groups node, and then double-tap or double-click Administrators.
In the Administrators properties dialog box, select Add.
In the Select Users, Computers, Service Accounts, Or Groups dialog box, enter Exchange Trusted Subsystem and then tap or click OK.
You prepare the cluster name object by completing the following steps:
In Active Directory Users And Computers, press and hold or right-click the computer account for the DAG, and then select Disable Account. When prompted to confirm that you want to disable the account, select Yes and then select OK.
If Advanced Features aren’t enabled in Active Directory Users And Computers, enable them by selecting Advanced Features on the View menu.
Press and hold or right-click the computer account for the DAG, and then select Properties.
In the properties dialog box, select the Security tab and then select Add.
In the Select User, Computer, Service Account, Or Group dialog box, enter Exchange Trusted Subsystem as the name of the group to which you want to grant privileges, and then tap or click OK.
With Exchange Trusted Subsystem selected in the Group Or User Names list, select Full Control in the Allow column, and then select OK to grant full control permissions on the cluster name object to the Exchange Trusted Subsystem.
Security Alert
The Exchange Trusted Subsystem group has as members all the machine accounts for Exchange servers in the domain and as such, this group can be used to manage the cluster name object. Alternatively, you can enter the name of the first Mailbox server you are adding to the DAG and then grant full control permissions to the related computer object to ensure that the LOCAL SYSTEM security context on that server will be able to manage the cluster name object.
Real World
When Windows Firewall is enabled, you must enable inbound exceptions for Windows Management Instrumentation (WMI) and File And Printer Sharing on the witness server. Keep in mind that if you don’t specify a witness server, Exchange searches the local Active Directory site for a Client Access server that doesn’t have the Mailbox Server role installed and configures this server as the witness server. To create the required inbound exceptions for Windows Firewall, follow these steps:
In Control Panel, select System And Security, and then select Windows Firewall.
In the left pane, select Allow An App Or Feature Through Windows Firewall.
If File And Printer Sharing is not selected for the Domain profile, select it under Allowed Apps And Features.
If Windows Management Instrumentation (WMI) is not selected for the Domain profile, select it under Allowed Apps And Features.
If you made changes to the Windows Firewall configuration, select OK.
If Windows Firewall is enabled and these exceptions are not created, you may see error messages warning that Exchange wasn’t able to create the default witness directory or that Exchange is unable to access file shares on the witness server. You might see an error message stating: The network path was not found. Or you might see an error message stating: WMI exception occurred on the server. The RPC server is unavailable.
Creating database availability groups
Once you’ve pre-staged and prepared the cluster name object, you can create the database availability group by completing the following steps:
In the Exchange Admin Center, select Servers in the feature pane, and then select Database Availability Groups.
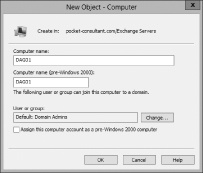
Select the New button to create the DAG. You should now see the New Database Availability Group dialog box, as shown in Figure 2-3.
In the Database Availability Group Name text box, enter the name of the pre-staged computer account for the DAG.
Optionally, provide the name of a server in the same Active Directory forest as the DAG to act as the witness server. Because this server cannot be a member of the database availability group, be sure that you don’t select servers that will be members of the database availability group you are configuring.
Note
The server you select as the witness server can be a member of a different database availability group. Also note that if you don’t specify a witness server, Exchange attempts to automatically select a witness server by looking in the same Active Directory site as the majority of the DAG members for a Client Access server that does not have the Mailbox role installed.
Optionally, provide the local folder path for a directory that will be used to store witness data, such as C:WitnessDir. If the directory does not exist, Exchange attempts to create it for you on the witness server. If you don’t specify a witness directory, Exchange attempts to create a directory named relative to the database availability group on the witness server’s system drive.
Note
Exchange must have appropriate permissions on the server to create and then share the witness directory. Although you can set the local directory path, the share name is set automatically in the form DAGName.DomainName, such as WestCampusDag1.POCKET-CONSULTANT.COM. This share is configured so that the cluster name object has full control.
Tip
As long as the witness server is an Exchange server in the same forest, Exchange should be able to create and share the directory. If Exchange is unable to create and share the directory, you’ll see an error message and will need to take appropriate corrective actions. You can use the Set-DatabaseAvailabilityGroup with the –WitnessDirectory parameter to specify a new directory to use at any time. You also can set a new directory by double-tapping or double-clicking the DAG in the Exchange Admin Center, entering a new directory path in the Witness Directory field, and then tapping or clicking OK.
If the witness server is not an Exchange 2013 server, you have to add the Exchange Trusted Subsystem security group to the local Administrators group on the witness server.
You can assign one or more static IPv4 addresses to the DAG or allow any necessary IPv4 addresses to be assigned by DHCP. To assign a static IP address, enter an IP address to use, and then select Add. Repeat this process to specific other static IP addresses to use. To use dynamically assigned IP addresses, don’t enter any IP addresses.
Select Save to create the database availability group. If an error occurred, you’ll need to take the appropriate corrective action. Otherwise, you can now add member servers to the database availability group.
In the Exchange Management Shell, you can create database availability groups by using the New-DatabaseAvailabilityGroup cmdlet. New-DatabaseAvailabilityGroup cmdlet syntax and usage provides the syntax and usage. Set the -Name parameter to the name of the pre-staged computer object. Set the -DatabaseAvailabilityGroupIpAddresses parameter to the static IP address or addresses that the DAG should use. Alternatively, if the DAG should use dynamically assigned IP addresses, enter 0.0.0.0 as the IP address to use.
Note
Don’t confuse the local witness directory with the witness file share. The local witness directory has a local file path on the witness server, such as C:WitnessShare. When you specify the witness directory, Exchange creates the base directory and then creates and shares a subdirectory within this directory as appropriate.
Managing availability group membership
When you add a server to a database availability group, the server works with the other servers in the group to provide automatic, database-level recovery from database, server, and network failures. When member servers have only one network adapter card, the DAG uses the same network for both messaging and replication traffic. When member servers have two network cards, the DAG uses one network card primarily for messaging traffic and the other network card is typically dedicated to replication traffic. If you add more than two network cards to member servers, these additional network cards can be configured for replication, giving the DAG additional replication networks to handle increased workloads.
Note
Member servers in a DAG can have zero or more replication networks but only one messaging network. For optimal operation, servers should have at least two network interface cards with each network interface card configured to use a different subnet.
Keep the following in mind when planning database availability group membership:
All servers in a DAG must be running the same operating system, which can be Windows Server 2008 R2 Enterprise or Datacenter, Windows Server 2012 Standard or Datacenter, or Windows Server 2012 R2 Standard or Datacenter.
When you add the first Mailbox server to a database availability group, the group must be assigned an IP address. If no IP address is assigned, Exchange uses DHCP to obtain an IP address for the group.
If you no longer want a server to be a member of a group, you can remove it from the group and the server will no longer be automatically protected from failures. Keep in mind that you must remove all replicated database copies from the server before you can remove it from the group.
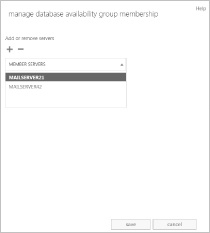
You can add a Mailbox server to or remove a Mailbox server from a database availability group by completing the following steps:
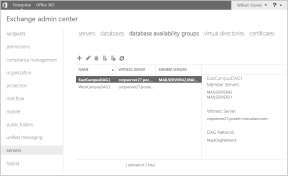
In the Exchange Admin Center, select Servers in the feature pane, and then select Database Availability Groups to view existing availability groups, as shown in Figure 2-4.
Select the DAG you want to configure, and then select the Manage DAG Membership button. In the Manage Database Availability Group Membership dialog box, shown in Figure 2-5, any current DAG members are listed by name. You can now:
Tap or click the Add button to add a server to the database availability group. In the Select Server dialog box, select a server, tap or click Add, and then repeat as necessary to select other servers.
Select a server and then tap or click the Remove button to remove a server from the database availability group.
When you are finished selecting servers, choose OK and then choose Save. For each server you added, Exchange Admin Center will install the required Windows Failover Clustering components, and then add the server to the DAG. Subsequently, Exchange Admin Center will create and configure the witness directory and file share. For each server you removed, Exchange Admin Center will attempt to remove the server from the DAG. If an error occurs during these tasks, you will need to take the appropriate corrective action; otherwise, tap or click Close when these tasks have completed successfully.
In the Exchange Management Shell, you can list database availability groups by using Get-DatabaseAvailabilityGroup. If you enter Get-DatabaseAvailabilityGroup without additional parameters, you’ll see a list of all availability groups in the current Active Directory forest and in the member servers and operational servers for those groups, as shown in the following example and sample output:
Get-DatabaseAvailabilityGroup
Name            Member Servers               Operational Servers
----            --------------               -------------------
EastCampusDAG1  MailServer42, MailServer21   MailServer42, MailServer21
WestCampusDAG1  MailServer44, MailServer18   MailServer44, MailServer18
Use the –Identity parameter to specify the name of the database availability group to query. Add –Status to any query to include real-time status information.
You add or remove group members by using Add-DatabaseAvailabilityGroupServer and Remove-DatabaseAvailabilityGroupServer. Add-DatabaseAvailabilityGroupServer cmdlet syntax and usage and Remove-DatabaseAvailabilityGroupServer cmdlet syntax and usage provide the syntax and usage.
Managing database availability group networks
Each database availability group should have a minimum of two networks: one for replication traffic, referred to as the group’s replication network, and one for MAPI and other traffic, referred to as the group’s messaging network. Although a DAG can have only one messaging network, you can create additional replication networks in a database availability group and configure them by using the Exchange Management tools. Having multiple replication networks helps scale the DAG to meet increasing requirements.
By default, Exchange 2013 automatically creates DAG networks based on the configuration of network adapter cards installed on member servers. If a DAG member has multiple network cards and those cards are configured on separate networks, Exchange normally will configure the DAG members with one messaging network and one or more dedicated replication networks automatically. You can manually configure DAG networks as well but must first disable automatic network configuration.
You can enable manual network configuration for a DAG by completing the following steps:
In the Exchange Admin Center, select Servers in the feature pane, and then select Database Availability Groups to view existing availability groups.
Double-tap or double-click the DAG you want to manually configure.
In the properties dialog box, on the General page, select the Configure Database Availability Group Networks manually check box, and then select Save.
You can now manually configure and manage the networks for the DAG. Keep in mind that if you later disable manual configuration, any manually created networks and related settings will be removed and Exchange Admin Center will create new DAG networks based on the current configuration of DAG members.
Note
You can enable a manual network configuration by using the –ManualDagNetworkConfiguration parameter of the Set-DatabaseAvailabilityGroup cmdlet. Set the parameter to $true to enable or $false to disable manual network configuration.
After you enable manual network configuration, you can manually create and manage network settings for the DAG. Each database availability group network must have a unique name of up to 128 characters, one or more subnet associations, and an optional description of up to 256 characters. When you configure a network, you can dedicate the network to replication traffic or dedicate the network to MAPI traffic.
Note
Disabling replication does not guarantee that Exchange will not use a network for replication. If all configured replication networks are offline, failed, or otherwise unavailable, and only a nonreplication network remains, Exchange will use that network for replication until a replication-enabled network becomes available.
Real World
Every network address has a network identifier that identifies the network and a host identifier that identifies the individual host on the network. The network ID is seen as the prefix of an IPv4 or IPv6 address, and the host ID is the suffix. When you define an availability group network, you need to identify the network and then specify the number of bits in the network number that are part of the network ID (and the remaining bits are understood to be part of the host ID). To write a block of IPv4 addresses and specify which bits are used for the network ID, you write the network number followed by a forward slash and the number of bits in the network ID, as follows:
NetworkNumber/# of bits in the network ID
The slash and the number of bits in the network ID are referred to as the network prefix. By default, Class A IPv4 networks have 8 bits in the network ID, Class B IPv4 networks have 16 bits, and Class C IPv4 networks have 24 bits.
IPv6 doesn’t use subnet masks to identify which bits belong to the network ID and which bits belong to the host ID. Instead, each IPv6 address is assigned a subnet prefix length that specifies how the bits in the network ID are used. The subnet prefix length is represented in decimal form. If 48 bits in the network ID are used, the subnet prefix length is written as FEC0:1234:5678::/48 to represent the IPv6 addresses FEC0:1234:5678:: through FEC0:1234:5678::FFFF:FFFF:FFFF:FFFF.
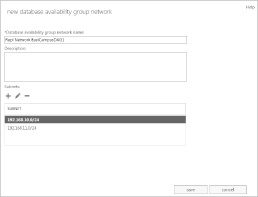
You can create a network for a database availability group by completing the following steps:
In the Exchange Admin Center, select Servers in the feature pane, and then select Database Availability Groups to view existing availability groups.
Select the DAG you want to configure and then select the New DAG Network button.
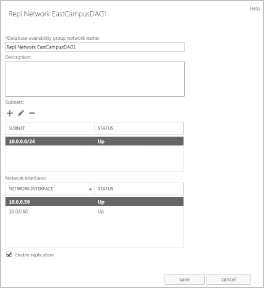
In the New Database Availability Group Network dialog box, shown in Figure 2-6, enter a unique name for the database availability group network of up to 128 characters and then provide an optional description for the database availability group network of up to 256 characters.
Under Subnets, tap or click Add to add a network subnet to the database availability group network. Subnets should be entered by using a format of IPv4Address/Bitmask, such as 192.168.15.0/24, or IPv6Address/NetworkSubnetPrefix, such as FEC0:1234:5678::/48. The subnet must match the subnet used by one or more DAG members. If you add a subnet that is currently associated with another database availability group network, the subnet is removed from the other database availability group network and associated with the network being created.
Tap or click Save. If an error occurred, you need to take the appropriate corrective action before you can create the network. If a warning is displayed, Exchange Admin Center will create the network but the network might not be operational until you correct the problem that prompted the warning. Otherwise, tap or click Close when the task completes.
When the DAG is selected in Exchange Admin Center, the details pane lists the networks associated with the DAG. If manual configuration of networks is enabled, you’ll see options for managing each network in the details pane, as shown in Figure 2-7, and these options include:
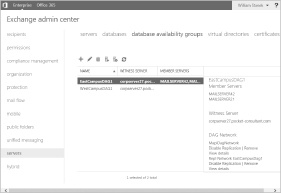
Disable Replication. Configures the network with a preference for messaging; however, the DAG will use the network for replication if necessary. Note also that a DAG can have only one dedicated messaging network.
Remove. Removes a DAG network, providing the network doesn’t have any active subnets. Before you can remove a network with active subnets, you must assign the subnets to other networks.
View Details. Opens the properties dialog box for the network. You can use the options in this dialog box to change the network name, network description, and associated subnets. By selecting or clearing the Enable Replication checkbox, you can enable or disable replication on the network.
The properties dialog box for a DAG network also shows the status of subnets and network interfaces. Subnets and interfaces listed as Up are active. Subnets and interfaces listed as Down are inactive.
In the Exchange Management Shell, you can list availability DAG networks and their status by using Get-DatabaseAvailabilityGroupNetwork. If you enter Get-DatabaseAvailabilityGroupNetwork without additional parameters, you see a list of all configured networks for all availability groups. Use the –Identity parameter to specify the name of the network to query. Use the –Server parameter to obtain health information for the network from a specific Mailbox server. This example lists detailed information for all the networks associated with EastCampusDAG1:
Get-DatabaseAvailabilityGroupNetwork -Identity EastCampusDAG1 | fl
The following example lists detailed information for network associated with EastCampusDAG1 that have names starting with Repl:
Get-DatabaseAvailabilityGroupNetwork -Identity EastCampusDAG1Repl* | fl
The detailed information is helpful as it lists the status of associated subnets and interfaces as shown in the following sample:
Name               : Repl Network EastCampusDAG1
Description        :
Subnets            : {{10.0.0.0/24,Up}}
Interfaces         : {{MailServer21,Up,10.0.0.50},
                     {MAILSERVER42,Up,10.0.0.60}}
MapiAccessEnabled  : True
ReplicationEnabled : True
IgnoreNetwork      : False
Identity           : EastCampusDAG1Repl Network EastCampusDAG1
IsValid            : True
You create or remove group networks by using New-DatabaseAvailabilityGroupNetwork and Remove-DatabaseAvailabilityGroupNetwork. New-DatabaseAvailabilityGroupNetwork cmdlet syntax and usage and Remove-DatabaseAvailabilityGroupNetwork cmdlet syntax and usage provide the syntax and usage.
Changing availability group network settings
Database availability group networks have several properties that you can configure, including the network name, description, associated subnets, and replication status. The replication status determines whether the network is used as the replication network for the group or the messaging network for the group. When replication is enabled, the network is used as the replication network for the group. When replication is disabled, the network is used as the messaging network for the group.
When manual network configuration is enabled, you can manage the settings for a group network by completing the following steps:
In the Exchange Admin Center, select Servers in the feature pane, and then select Database Availability Groups to view existing availability groups.
When you select the DAG you want to work with, the details pane lists the associated networks. Each network has a related set of management options. Select the View Details option for the network you want to configure. This opens the properties dialog box for the network, as shown in Figure 2-8.
You can enter a new name if desired and optionally change the network description.
Each network must contain at least one subnet. Subnets must be added by using a format of IPAddress/Bitmask, such as 192.168.15.0/24, or IPv6Address/NetworkSubnetPrefix, such as FEC0:1234:5678::/48. Use the options provided to add, edit, or remove subnets for the network.
To establish the network as the replication network for the group, select the Enable Replication check box. Otherwise, clear the check box to use the network as the messaging network for the group.
Tap or click Save to apply your settings.
You can use Set-DatabaseAvailabilityGroupNetwork to configure basic settings for Set-DatabaseAvailabilityGroupNetwork. Set-DatabaseAvailabilityGroupNetwork cmdlet syntax and usage provides the syntax and usage.
Advanced options for the networks associated with availability groups are set at the group level. Advanced options you can configure include encryption, compression, and the TCP port used for replication. Database availability groups support data encryption by using the built-in encryption capabilities of the Windows Server operating system. When you enable encryption, database availability groups use Kerberos authentication between Exchange servers to encrypt and decrypt messages. Encryption helps maintain the integrity of the data. Network encryption is a property of the database availability group and not a property of a database availability group network.
You can configure database availability group network encryption by using the –NetworkEncryption parameter of the Set-DatabaseAvailabilityGroup cmdlet in the Exchange Management Shell. The possible encryption settings are as follows:
Disabled. Network encryption is not used for any database availability group networks.
Enabled. Network encryption is used on all database availability group networks for replication and seeding.
InterSubnetOnly. Network encryption is used only with database availability group networks on the same subnet.
SeedOnly. Network encryption is used on all database availability group networks for seeding only.
Database availability groups also support built-in compression. You configure network compression by using the –NetworkCompression parameter of the Set-DatabaseAvailabilityGroup cmdlet in the Exchange Management Shell. The possible compression settings are as follows:
Disabled. Network compression is not used for any database availability group networks.
Enabled. Network compression is used on all database availability group networks for replication and seeding.
InterSubnetOnly. Network compression is used only with database availability group networks on the same subnet.
SeedOnly. Network compression is used on all database availability group networks for seeding only.
You can specify the TCP port to use for replication by using the –ReplicationPort parameter of the Set-DatabaseAvailabilityGroup cmdlet in the Exchange Management Shell.
Configuring database availability group properties
You can use the Exchange Admin Center or the Exchange Management Shell to configure the properties of a database availability group, including the witness server and witness directory used by the database availability group. By using the Exchange Management Shell, you can configure additional properties, such as encryption and compression settings, network discovery, the TCP port used for replication, alternate file share witness settings, and data center activation coordination mode.
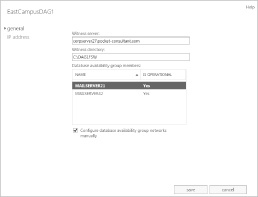
To view or modify the properties of an availability group, complete the following steps:
In the Exchange Admin Center, select Servers in the feature pane, and then select Database Availability Groups to view existing availability groups.
Double-tap or double-click the database availability group with which you want to work.
In the Properties dialog box, shown in Figure 2-9, you’ll see a list of member servers, the witness server’s fully qualified domain name, and the location of the witness directory on the witness server.
Using the Witness Server text box, you can specify a new witness server by entering the fully qualified domain name of the new witness server. This server should be in the same Active Directory forest as the member servers and cannot be a current or future member of the database availability group.
Using the Witness Directory text box, you can specify a new witness directory on the witness server. If the directory does not exist, it will be created on the witness server.
Tap or click Save.
In the Exchange Management Shell, you can configure properties of database availability groups by using the Set-DatabaseAvailabilityGroup cmdlet. Set-DatabaseAvailabilityGroup cmdlet syntax and usage provides the syntax and usage.
Options for working with encryption, compression, and replication ports were discussed previously in “Changing availability group network settings.” Options that weren’t discussed include the datacenter activation coordinator mode, the alternate witness server, and alternate witness server directory. These options can be used as part of a datacenter switchover process. The alternate witness server must not be a part of the database availability group.
The data-center coordinator mode should be set for all database availability groups with three or more members that are extended to two or more physical locations. This mode cannot be enabled for groups with less than three members. When the datacenter coordinator is enabled, you can start, stop, and restore member servers in an availability group individually or collectively by using the following:
Start-DatabaseAvailabilityGroup. Activates member Mailbox servers in a recovered data center after a data-center switchover, as part of the failback process to the recovered data center. This command sets the configuration and state so that the servers are incorporated into the operating database availability group and joined to the group’s cluster. You use the –MailboxServer parameter to start a specific member server or the –ActiveDirectorySite parameter to start all members in a particular site.
Start-DatabaseAvailabilityGroup –Identity DAGName
[-MailboxServer ServerName | -ActiveDirectorySite SiteName]
[-ConfigurationOnly <$true | $false>]
[-DomainController FullyQualifiedName]
Note
You can also reactivate servers from a previously failed datacenter that has been restored to service. Before you can reactivate member Mailbox servers in a primary data center, the servers must first be integrated back into the operational database availability group. You reintegrate servers by running the Start-DatabaseAvailabilityGroup cmdlet and then using the Move-ActiveMailboxDatabase cmdlet to activate databases in the primary data center.
Stop-DatabaseAvailabilityGroup. Deactivates member Mailbox servers after a datacenter switchover. You use the –MailboxServer parameter to deactivate a specific member server or the –ActiveDirectorySite parameter to deactivate all members in a particular site.
Stop-DatabaseAvailabilityGroup –Identity DAGName
[-MailboxServer ServerName | -ActiveDirectorySite SiteName]
[-ConfigurationOnly <$true | $false>]
[-DomainController FullyQualifiedName]
Restore-DatabaseAvailabilityGroup. Activates member Mailbox servers in a standby data center. Typically, this process is performed after the failure or deactivation of the active member servers in a primary data center. You use the –ActiveDirectorySite parameter to activate all members in a particular site.
Restore-DatabaseAvailabilityGroup –Identity DAGName
[-ActiveDirectorySite SiteName]
[-AlternateWitnessServer ServerName]
[-AlternateWitnessDirectory DirectoryPath]
[-DomainController FullyQualifiedName]
[-UsePrimaryWitnessServer <$true | $false>
Removing servers from a database availability group
Before you can remove a server from a database availability group, you must also remove all database copies from the server. To remove member servers from a DAG, select the DAG you want to manage, and then select the Manage DAG Membership button. In the Manage Database Availability Group Membership dialog box, select a server on the list of current members, and then select the Remove button. Repeat as necessary to remove members. Tap or click Save to apply the changes. If an error occurs during these tasks, you will need to take the appropriate corrective action. Otherwise, tap or click Close when these tasks have completed successfully.
After you remove the member servers, you can remove the database availability group by selecting it and selecting the Delete button. When prompted to confirm, tap or click Yes.
Removing database availability groups
You can remove a database availability group only if it has no member servers. Therefore, before you can remove a database availability group, you must first remove any member servers from the group.
You can remove an empty availability group by completing the following steps:
In the Exchange Admin Center, select Servers in the feature pane, and then select Database Availability Groups to view existing availability groups.
On the Database Availability Group tab, select the database availability group you want to remove, and then select the Delete button.
When prompted to confirm the action, tap or click Yes.
In the Exchange Management Shell, you can remove database availability groups by using the Remove-DatabaseAvailabilityGroup cmdlet. Remove-DatabaseAvailabilityGroup cmdlet syntax and usage provides the syntax and usage.
Maintaining database availability groups
The Microsoft Exchange Information Store service manages the active and passive databases configured on a Mailbox server. To improve performance, the service running on each server maintains a database cache of changes to active databases that haven’t been applied to passive copies. In the event of a failover or switchover, the service can apply the changes in the cache to a passive copy and then make the passive copy the active copy. Most of the time, failover completes in about 30 seconds.
The difference between failover and switchover is important. When Exchange detects a failure of an active database, regardless of whether it is from database failure, server failure, or network failure, Exchange uses failover processes to mark the active database as inactive and dismount it and then mount and mark a passive database copy as the active copy. Prior to performing maintenance on a server or for testing or troubleshooting, you might want Exchange to switch from one database to another by marking an active database as inactive and then marking a passive database copy as the active copy.
Switching over servers and databases
Failover and switchover occur at the database level for individual databases and at the server level for all active databases hosted by a server. When either a switchover or failover occurs, other Exchange 2013 server roles become aware of the switchover almost immediately and redirect client and messaging traffic automatically as appropriate.
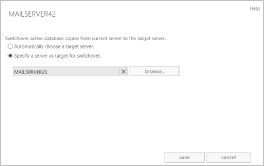
You can switch over all active databases on a server by completing the following steps:
In the Exchange Admin Center, select Servers in the feature pane, and then select Servers. In the main pane, select the server that you are performing maintenance on, testing, or troubleshooting.
In the details pane, select Server Switchover. In the Server Switchover dialog box, shown in Figure 2-10, the default option is to allow Exchange to handle the switchover and select a server to take over the databases from the source server automatically. To accept the default, select Save. Otherwise, select Specify A Server As Target For Switchover and then select Browse. In the Select Server dialog box, select the server to take over, select OK. Keep in mind that you can select only a server that is already a member of the database availability group. You can’t have copies outside the group either.
Select Save to apply the changes. When prompted to confirm the action, tap or click Yes.
You can perform a switchover of an individual database by completing the following steps:
In the Exchange Admin Center, select Servers in the feature pane, and then select Databases.
In the main pane, select the database you want to work with. In the details pane, you see the available database copies, which are listed according to their copy status and health. Only the active copy will have a status of Active Mounted. All other database copies will display the current status of replication for the database copy, such as Passive Healthy.
Using the management options for the passive copy you want to activate, you can select View Details to display detailed information about the database copy, including the content index status, the overall status, the copy queue length, the replay queue length, and error messages.
To activate the copy, tap or click the related Activate option. When you tap or click Yes to confirm that you want to activate this copy, Exchange will dismount the current active mailbox database and establish the selected database copy as the active mailbox database.
If an error occurred, you need to take the appropriate corrective action before you can create the network. If a warning is displayed, Exchange Admin Center will create the network but the network may not be operational until your correct the problem that prompted the warning. Otherwise, tap or click Close when the task completes.
When you are working with the Exchange Management Shell, you can initiate switchover by using Move-ActiveMailboxDatabase. Move-ActiveMailboxDatabase cmdlet syntax and usage shows the syntax and usage.
The –MountDailOverride parameter of the Move-ActiveMailboxDatabase cmdlet controls the way databases mount on switchover or failover. Every Mailbox server has a database automount setting and the default is Best Availability. Values you can select to control the database mount behavior include:
None. The database uses the currently configured setting for automatically mounting.
Lossless. The database does not automatically mount until all logs that were generated on the original source server have been copied to the target node.
Good Availability. The database automatically mounts if the copy queue length is less than or equal to 6. If the queue length is greater than 6, Exchange attempts to replicate the remaining logs to the target server and mounts the databases once the queue length is less than or equal to 6.
Best Availability. The database automatically mounts if the copy queue length is less than or equal to 12. The copy queue length is the number of logs that need to be replicated. If the queue length is greater than 12, Exchange attempts to replicate the remaining logs to the target server and mounts the databases once the queue length is less than or equal to 12.
Best Effort. The database automatically mounts regardless of the length of the copy queue. As this option essentially forces the database to mount with any amount of log loss, I don’t recommend using this value unless you are certain you want to accept what could be a large amount of data loss.
Real World
You can set the default database automount setting for a Mailbox server by using the –AutoDatabaseMountDail parameter of the Set-MailboxServer cmdlet. If you specify either Best Availability or Good Availability and all of the data has not been replicated to the target server, you might lose some mailbox data; however, the transport dumpster feature (which is enabled by default) helps protect against data loss by resubmitting messages that are in the transport dumpster queue. Because of latency problems or other issues, specifying one of these values can result in a database not being mounted, and you might need to use the -AcceptDataLoss parameter with Mount-Database to force the database to mount after a specified amount of time.
Checking continuous replication status
You can use Test-ReplicationHealth to monitor continuous replication and determine the health and status of the underlying cluster service, quorum, and network components. By default, Test-ReplicationHealth performs the following tests:
ActiveManager. Verifies that the instance of Active Manager is running on the server
ClusterNetwork. Verifies that all cluster-managed networks on the server are available
ClusterService. Verifies that the Cluster service is running and reachable on the server
DagMembersUp. Verifies that all DAG members are available, running, and reachable
DBCopyFailed. Checks whether any mailbox database copies are in a state of Failed on the server
DBCopySuspended. Checks whether any mailbox database copies are in a state of Suspended on the server
DBDisconnected. Checks whether any mailbox database copies are in a state of Disconnected on the server
DBInitializing. Checks whether any mailbox database copies are in a state of Initializing on the server
DBLogCopyKeepingUp. Verifies that log copying and inspection by the passive copies of databases on the server are able to keep up with log generation activity on the active copy
DBLogReplayKeepingUp. Verifies that replay activities for the passive copies of databases on the server are able to keep up with log copying and inspection activity
FileShareQuorum. Verifies that the witness server and witness directory and share configured for the DAG are reachable
QuorumGroup. Verifies that the default cluster group (quorum group) is in a healthy and online state
ReplayService. Verifies that the Microsoft Exchange Replication service is running and reachable on the server
TasksRpcListener. Verifies that the tasks remote procedure call (RPC) server is running and reachable on the server
TcpListener. Verifies that the TCP log copy listener is running and reachable on the server
Test-ReplicationHealth cmdlet syntax and usage shows the syntax and usage for Test-ReplicationHealth. If you want to include monitoring events and performance counters in the results, set the -MonitoringContext parameter to $true. Use -OutputObjects to output an array of results.
Restoring operations after a DAG member failure
If a Mailbox server has failed and cannot be recovered, you can recover operations in one of two ways:
You can remove the configuration settings for the Mailbox server from the database availability group.
You can install a new server and then restore the roles and settings for the original server.
Before you can remove the configuration settings for a Mailbox server, you’ll need to remove any mailbox database copies that the server hosted. You can list mailbox database copies by using Get-MailboxDatabaseCopyStatus and then remove the copies by using Remove-Mailbox-DatabaseCopy. Next, remove the configuration settings for the Mailbox server from the database availability group by using the Remove-DatabaseAvailabilityGroupServer cmdlet. After you remove the configuration settings, all settings associated with the Mailbox server are gone.
Real World
Before you install a new server and then restore the roles and settings of the original server, you should confirm the install location for Exchange 2013 on the original server. If Exchange 2013 is installed in a location other than the default location, you can use the /TargetDir option during the setup of the new server to specify an install location. Otherwise, setup will use the default location for the installation. You can determine the install location for the original server by completing the following steps:
In AdsiEdit.msc or LDP.exe, navigate to CN=ExServerName,CN=Servers, CN=First Administrative Group,CN=Administrative Groups,CN=ExOrg Name, CN=Microsoft Exchange,CN=Services,CN=Configuration,DC=DomainName,CN=Com.
Press and hold or right-click the Exchange server object for the failed server, and then select Properties.
The value of the msExchInstallPath attribute shows the installation path for the failed server.
To install a new server and then restore the roles and settings of the original server, complete the following steps:
Use Get-MailboxDatabase to list any replay lag or truncation lag settings for mailbox database copies that were hosted on the server being recovered. Enter the following command to list the databases associated with a specific server by their display name and lag settings:
Get-MailboxDatabase -server ServerNameServerName is the name of the failed server. After you list the databases associated with the server, list the lag settings for each database in turn by entering the following command:
Get-MailboxDatabase DatabaseName | fl *lag*DatabaseName is the name of a database hosted on the failed server.
Note
Alternatively, you can list all the databases associated with a specific server by their display name and lag settings by entering the following:
Get-MailboxDatabase -server Name | Get-MailboxDatabase | fl name, *lag*Name is the name of the failed server. In this example, you examine the mailbox databases on MailServer24:
Get-MailboxDatabase -server MailServer24 | Get-MailboxDatabase | fl name, *lag*
After you list the databases associated with the server by name and lag times, you need to remove any mailbox database copies the server hosted by entering:
Remove-MailboxDatabaseCopy DatabaseNameServerName
DatabaseName is the name of the database copy to remove and ServerName is the name of the failed server, such as:
Remove-MailboxDatabaseCopy EngDatabaseMailServer24
Remove the failed server’s configuration from the DAG by entering the following command:
Remove-DatabaseAvailabilityGroupServer -Identity DagName
 -MailboxServer ServerName -ConfigurationOnly
DagName is the name of the DAG and ServerName is the name of the failed server, such as:
Remove-DatabaseAvailabilityGroupServer -Identity EastCampusDag1
-MailboxServer MailServer24 -ConfigurationOnly
In Active Directory Users And Computers, locate and select the computer account for the failed server. On the Action menu, select Reset Account. When prompted to confirm, select Yes and then select OK.
Rename the new server so that it has the same name as the failed server. On the new server, run Exchange 2013 Setup with the /m:RecoverServer switch to have Setup read the failed server’s configuration information from Active Directory. After Setup gathers the server’s configuration information from Active Directory, Setup installs the original Exchange files and services on the server, restoring the roles and settings that were stored in Active Directory.
When the setup of the new server is complete, add the server to the DAG by entering the following command:
Add-DatabaseAvailabilityGroupServer -Identity DagName
-MailboxServer ServerName
DagName is the name of the DAG and ServerName is the name of the failed server, such as:
Add-DatabaseAvailabilityGroupServer -Identity EastCampusDag1
-MailboxServer MailServer24
Add mailbox database copies to the server by entering the following command for each database copy to add:
Add-MailboxDatabaseCopy -Identity DatabaseName -MailboxServer ServerName
DatabaseName is the name of the database copy to add and ServerName is the name of the server you are configuring, such as:
Add-MailboxDatabaseCopy -Identity EngDatabase
-MailboxServer MailServer24
If any of the database copies had replay lag or truncation lag times greater than 0, you can set those lag times by using the -ReplayLagTime and -TruncationLagTime parameters.
After the database copies have been configured, you can check their status by entering the following command:
Get-MailboxDatabaseCopyStatus -Server ServerNameServerName is the name of the server you are configuring, such as:
Get-MailboxDatabaseCopyStatus -Server MailServer24
The databases and their content indexes should have a healthy status.
Verify replication health for the server by entering the following command:
Test-ReplicationHealth -Identity ServerName