
Chapter at a glance
Add
Add the Shut Down, Restart, Sign Out, and other shortcuts to the Start screen, page 564
Name
Name groups of shortcuts on the Start screen, page 567
Set
Set Windows 8.1 to boot to the desktop, page 570
Optimize
Optimize startup items by using Task Manager, page 590
IN THIS CHAPTER, YOU WILL LEARN HOW TO
The learning doesn’t stop with the tips mentioned in the preceding list. This chapter aims to teach you twenty useful tricks to optimize your Windows 8.1 experience.
Because the Start screen represents a major change from earlier versions of Windows, you’ll find quite a few tricks to help you be more organized and productive when using it. You’ll see some tips for the desktop and the Windows taskbar you’ve grown to love from earlier versions of Windows.
Next, you’ll learn how to log on to Windows 8.1 automatically, without typing your password each time; run older apps as an administrator; add or remove features in Windows 8.1; turn off notifications; and optimize your drives. You’ll learn a few tricks about using Microsofts SkyDrive and the new Task Manager, too.
This chapter ends with tips on how to change the defaults for apps, file extensions, and AutoPlay dialog boxes.
Practice Files
Before you can complete the exercises in this chapter, you need to copy the book’s practice files to your computer. The practice files you’ll use to complete the exercises in this chapter are in the Chapter20 folder. A complete list of practice files is provided in the section “Using the practice files” in the Introduction of this book.
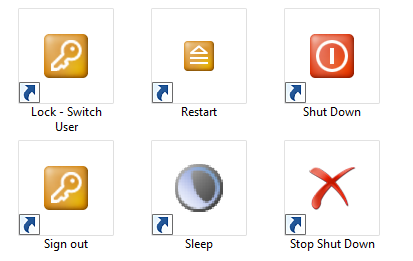
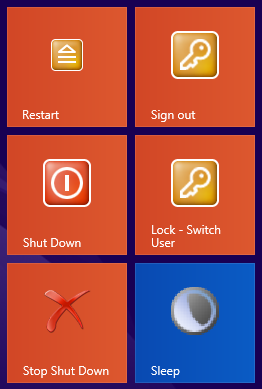
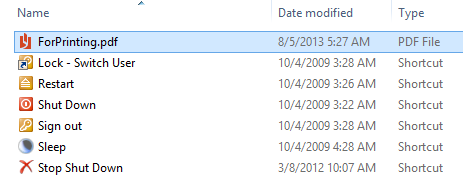
In the folder with practice files for this chapter are quite a few shortcuts for handy commands such as Shut Down, Restart, Sign Out, Sleep, Lock - Switch User, and Stop Shut Down.
Each shortcut does what its name says, and all shortcuts work on all editions of Windows 8.1. There are a few things to keep in mind, though:
The Shut Down shortcut won’t shut down your system immediately. It initiates the shutdown procedure, which takes a few seconds to finish.
The Stop Shut Down shortcut works only if you have used the Shut Down shortcut to shut down your system. If you have started the shutdown procedure by other means, running this shortcut probably won’t have any effect on your system.
In this exercise, you’ll learn how to add each of these shortcuts to the Start screen.
Set Up
To complete this exercise, you need the shortcut files in the Chapter20 practice files folder. After these files are downloaded to your computer, open File Explorer and browse to their location.
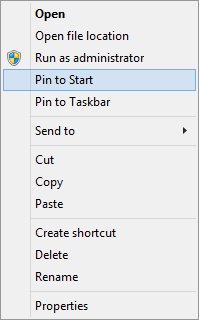
Right-click one of the shortcuts that you want to pin to the Start screen.
On the right-click menu that opens, click Pin To Start.
Repeat steps 1 and 2 for all the shortcuts that you want pinned to the Start screen and then open the Start screen.
Drag and drop the shortcuts on the Start screen so that they are in the same group and placed in the order you want.
Ensure that you don’t delete the shortcuts from the location to which you downloaded them. If you do, they will stop working because the Start screen will point to files that no longer exist.
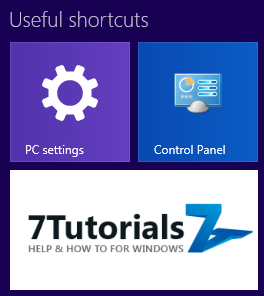
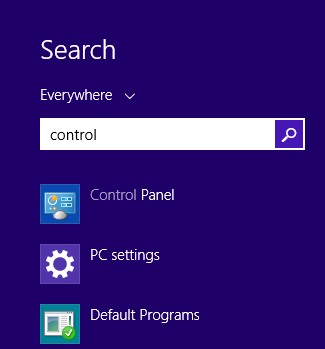
Another useful shortcut you might want to have on your Start screen is a shortcut for Control Panel. In this exercise, you’ll learn how to add this shortcut to the Start screen.
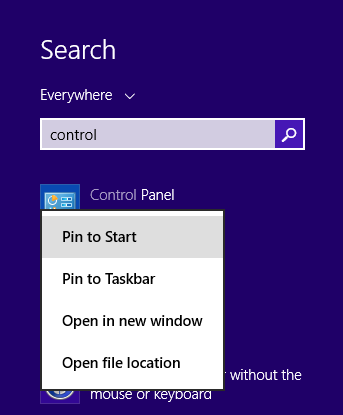
A Control Panel shortcut is now pinned and visible on the Start screen. Using the same procedure you can add lots of apps and Windows features to the Start screen, including File Explorer or any desktop app you install on your Windows 8.1 computer.
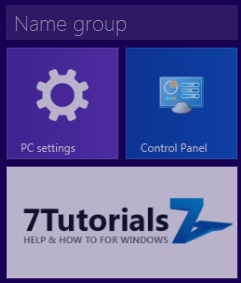
On the Start screen, you can drag shortcuts and tiles into groups and apply custom names to those groups.
If you like your Start screen well organized, you’ll want to name each group of shortcuts and tiles. In this exercise, you’ll learn how to to do just that.
Right-click somewhere in the empty space of the Start screen.
On the toolbar that appears at the bottom of the screen, click Customize.
Each group of shortcuts and tiles on the Start screen has a text box above it labeled Name Group or with a label you have created previously.
Click the text box above the group that you want to name.
Type the new name that you want to apply to the group.

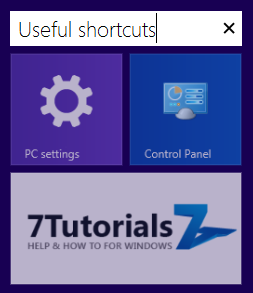
The selected group of shortcuts and tiles now displays the name you have set. You can rename it by following the same steps and typing a new name in place of the old one.
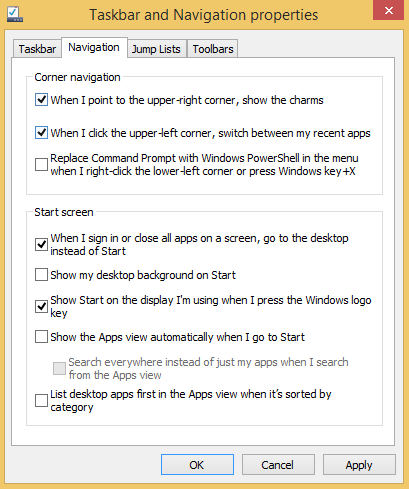
An important new feature in Windows 8.1 is the ability to change how it starts and what is loaded first, the Start screen or the desktop. If you are a traditional computer user who doesn’t use modern Windows 8.1 apps, you can also disable the charms and hot upper-right and upper-left corners. All these things and more are set from the Taskbar And Navigation Properties window.
In this exercise, you’ll learn how to set Windows 8.1 to boot to the desktop instead of the Start screen.
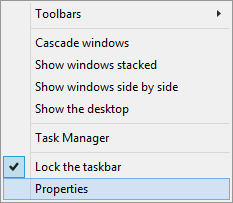
Right-click the empty space on the taskbar.
On the right-click menu that appears, click Properties.
The Taskbar And Navigation Properties window opens.
Click the Navigation tab.
In the Start Screen section, select the check boxes for When I Sign In Or Close All Apps On A Screen, Go To The Desktop Instead Of Start and Show Start On The Display I’m Using When I Press The Windows Logo Key.
Click OK.

Windows 8.1 will now boot to the desktop, instead of the Start screen. To access the Start screen you can press the Start button on the desktop or the Windows key on your keyboard.
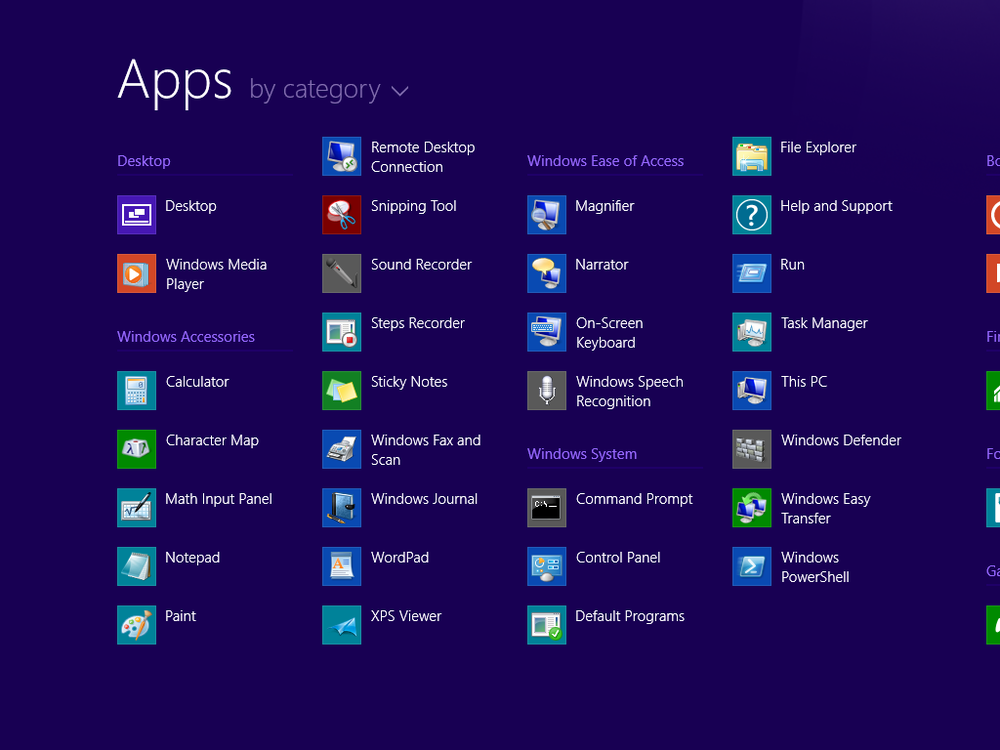
Another important change that that you can do from the Taskbar And Navigation Properties window is to set Windows 8.1 to display the Apps view when you press the Start button or the Windows key on your keyboard. This view is a full screen Start Menu, which looks familiar to die-hard Windows users. You see shortcuts for all apps and desktop apps, organized by folders, just like they were in the Windows 7 Start menu.
If you are one of those die-hard users and you would prefer this view, in this exercise you’ll learn how to set Windows 8.1 to display the Apps view instead of the Start screen. Also, you’ll learn how to prioritize desktop apps when using with this view.
Right-click the empty space on the taskbar.
On the right-click menu that appears, click Properties.
The Taskbar And Navigation Properties window opens.
In the Start screen section, select the check boxes for Show The Apps View Automatically When I Go To Start and List Desktop Apps First In The Apps View When It’s Sorted By Category.
Click OK.
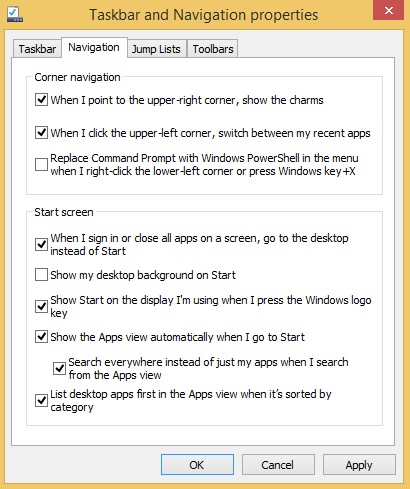
The Apps view is now displayed each time you press the Start button or the Windows key on your keyboard. You can still access the Start screen by pressing the Up arrow in the lower-left corner of the Apps view.
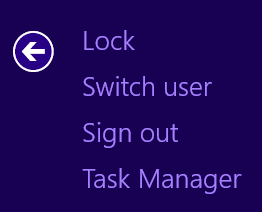
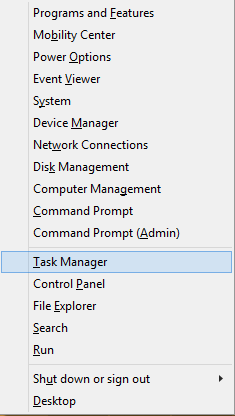
In Windows 8 and Windows 8.1, Microsoft removed the classic Start menu. In its place is a system menu that provides quick and easy access to many useful tools such as Computer Management, the Command Prompt, Task Manager, Control Panel, the Run window, and many others. In a further improvement, there are now options for shutting down or restarting your computer or device.
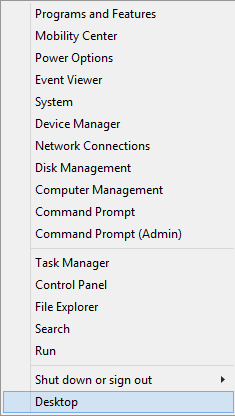
The fastest way to open this menu is to press Windows key+X on your keyboard, but in this exercise, you’ll learn how to access the hidden system menu by using the mouse.
Using the mouse, point to the Start button.
Right-click the Start button.
On the menu that appears, click the tool that you want to start.
Don’t hesitate to experiment with this procedure until you are comfortable accessing and using this menu.
In Windows 8.1, apps run by default without administrator permissions. This is a security feature which ensures that apps do not have the permission to make unwanted system changes. However, earlier apps that don’t run so well on newer versions of Windows might need to be run with administrator permissions so that they function without problems.
If the app has a shortcut on the Start screen, right-click to select it. On the menu that appears at the bottom of the screen, click Run As Administrator.

If you want to run the app from the desktop or File Explorer, right-click its shortcut or main executable and then, on the menu that appears, click Run As Administrator.
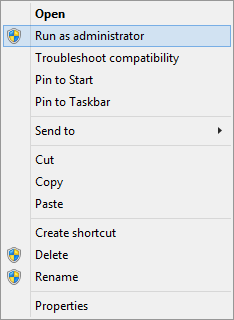
In this exercise, you’ll learn how to edit the properties of the app shortcut or main executable and have it always run as administrator.
Browse to where the main executable file of the app or its shortcut is stored.
Right-click the shortcut or executable, and then, on the menu that appears, click Properties to open the Properties dialog box.
Click the Compatibility tab.
In the Settings section, select the Run This Program As An Administrator.
Click OK.
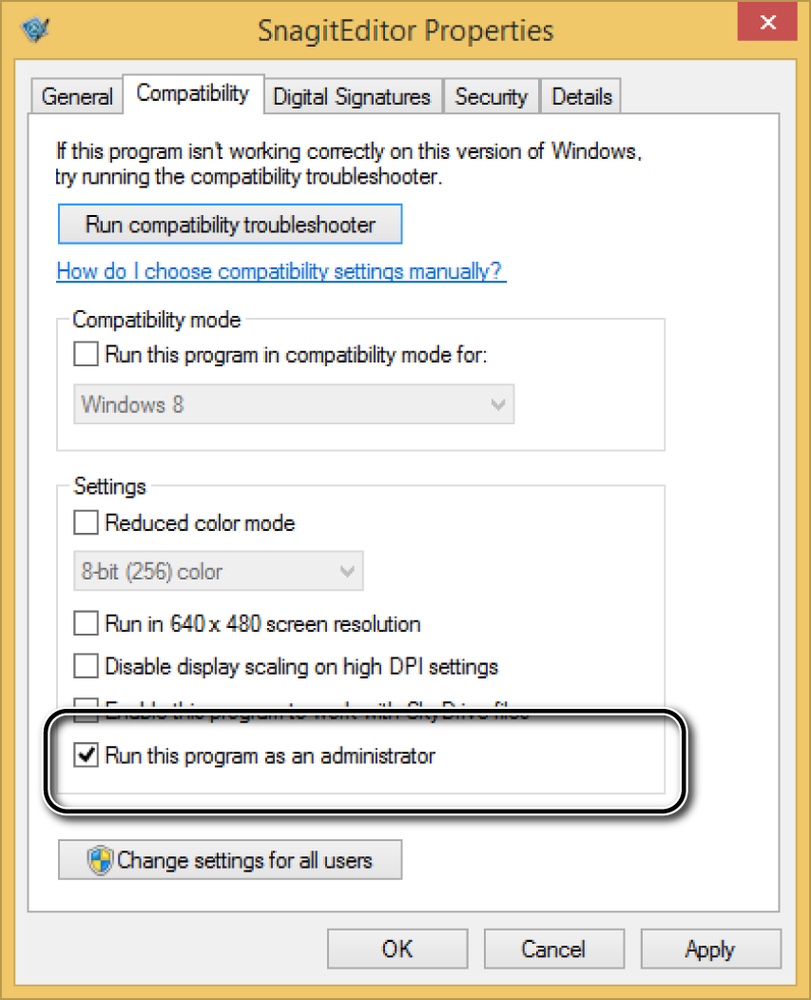
From this point forward, each time you run the selected app, a User Account Control (UAC) prompt appears asking for your permission to run the app as administrator. After you approve it, the app will be allowed to run with administrator permissions.
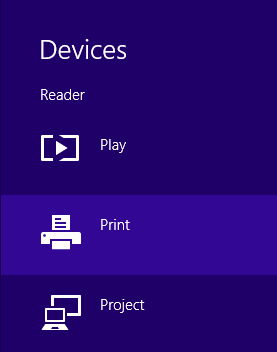
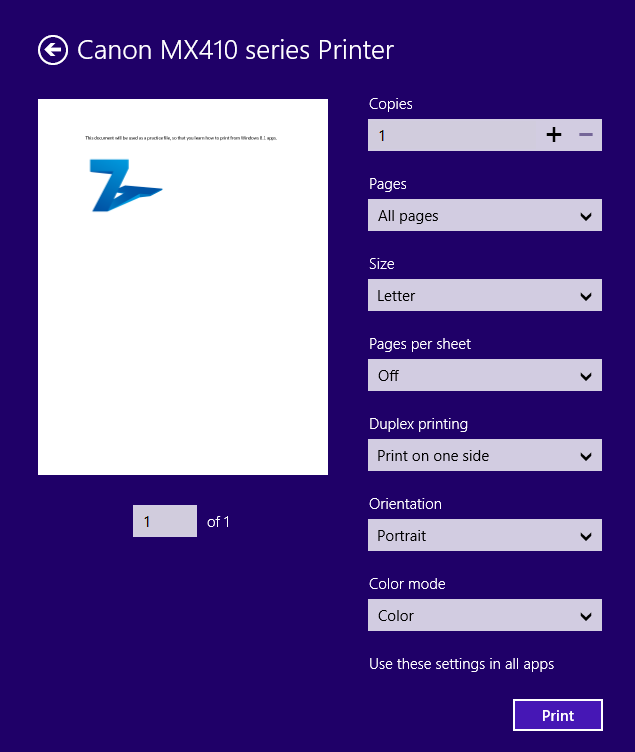
If you’re working with desktop apps, printing in the new Windows is the same as in earlier versions. However, when using Windows Store apps, printing is done by using the Devices charm. With this charm, you can interact with other devices in your network, including your printers.
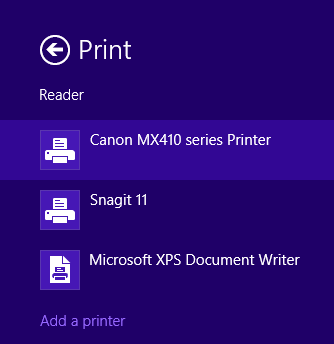
Before you print, you are shown a preview and given access to several printing options. You can set how many copies you can print, which pages, the size of the document, its orientation and other parameters.

In this exercise you’ll learn how to print from Windows Store apps via the Devices charm.
Set Up
To complete this exercise, you need the ForPrinting.pdf file in the Chapter20 practice files folder. Also, a printer must be installed and turned on, and be accessible on your Windows 8.1 computer or device. Then, open File Explorer.
Open the folder where you stored the ForPrinting.pdf practice file.
Select the file and then, on the ribbon, click the Home tab.
In the Open section, click the down-pointing arrow, near the Open button.
From the list of options, click Reader.
The ForPrinting.pdf file is opened in the Reader app.
Access the charms and then select Devices (Windows key+K).
In the Devices charm, select Print.
A list with all installed printers is shown.
Click the printer with which you want to print the document.
You can now set how you want to print the document.
Set the available printing options as you want them and then click Print.
The process for printing from all modern Windows 8.1 apps is the same. When you work with a modern app, bring up the Devices charm and follow the steps presented in this exercise.
Windows has a new system for showing notifications that is more verbose than earlier versions, which you will notice after you download and install a number of apps.
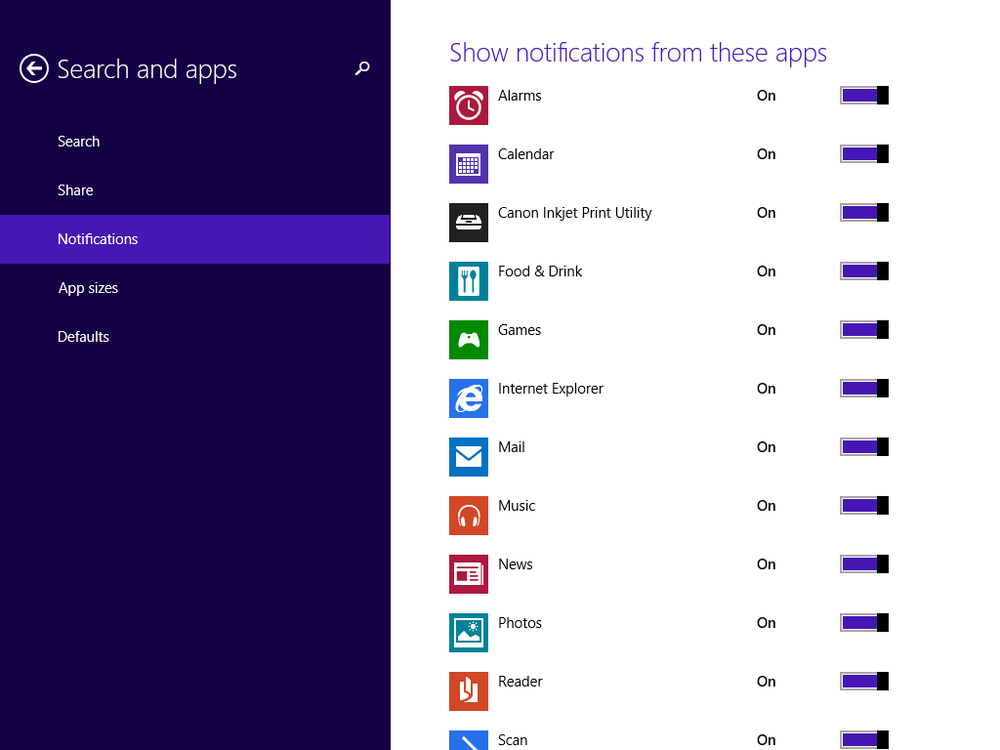
You can customize in detail, at an app level, which notifications you receive. To configure this, access PC Settings, click Search and Apps, and then click Notifications.

At the top are the following four settings with switches that affect all app notifications:
Show App Notifications. When this set to Off, you do not receive notifications from all apps.
Show App Notifications On The Lock Screen. When set to Off, no notifications appear on the lock screen.
Play Notification Sounds. When set to Off, notifications are not accompanied by sounds.
Turn On My Screen When I Get A Call. When set to Off, your screen won’t be turned on when you get a call via messaging apps like Skype.
Below Notifications is the Quiet Hours section, which includes several settings and switches. Quiet Hours are the times in a day during which you don’t want to be bothered by app notifications of any kind. By default, they are set from 12:00 AM to 6:00 AM, when most people are likely to sleep.
Slide the Quiet Hours switch to On to activate this feature.
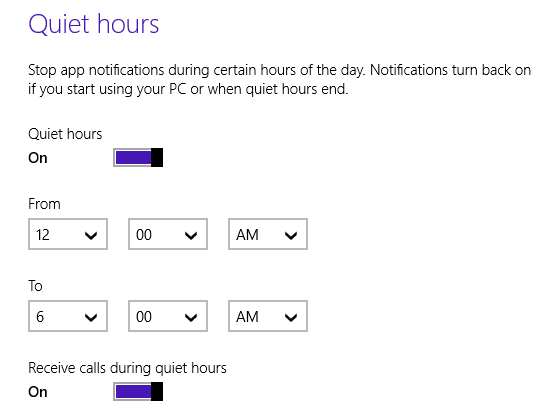
Then, you can set the time interval when you don’t want to be bothered. Last but not least, you can control whether you receive calls during quiet hours. By default, this is set to On, but if you would rather not be bothered by calls, switch this setting to Off.
Scroll down a bit and you’ll see the section named Show Notifications From These Apps. Here you have individual switches for all Windows Store apps. Setting the switch for an app to Off stops notifications from that app. Keep in mind that the list of apps displayed depends on the apps you install on your computer or device. On your Windows installation, probably won’t see the same number of apps listed as in the screen shots included in this section.
In this exercise, you’ll learn how to disable notifications for a group of apps.
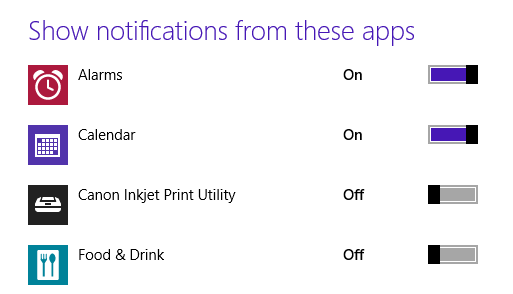
Your notification settings are now applied.
Windows 8.1 comes with many features. Some of them are installed and enabled by default, whereas others are not and need to be added manually. You add or remove Windows features in the Windows Features window.
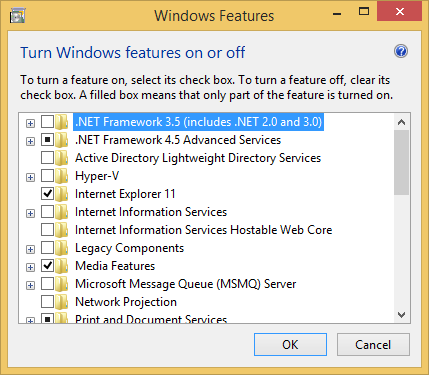
The features for which the check box is selected are turned on; those with clear check boxes are turned off. Similar features are grouped into folders that you can expand. Click the plus sign to the left of a folder name to view the individual features that are included. You can turn on or off the entire set of features in that folder or just individual features.
In this exercise, you’ll learn how to remove a Windows feature. To demonstrate the procedure, you’ll remove XPS Viewer, which you can add back after the exercise. However, for this exercise you can remove any Windows feature you don’t plan to use.
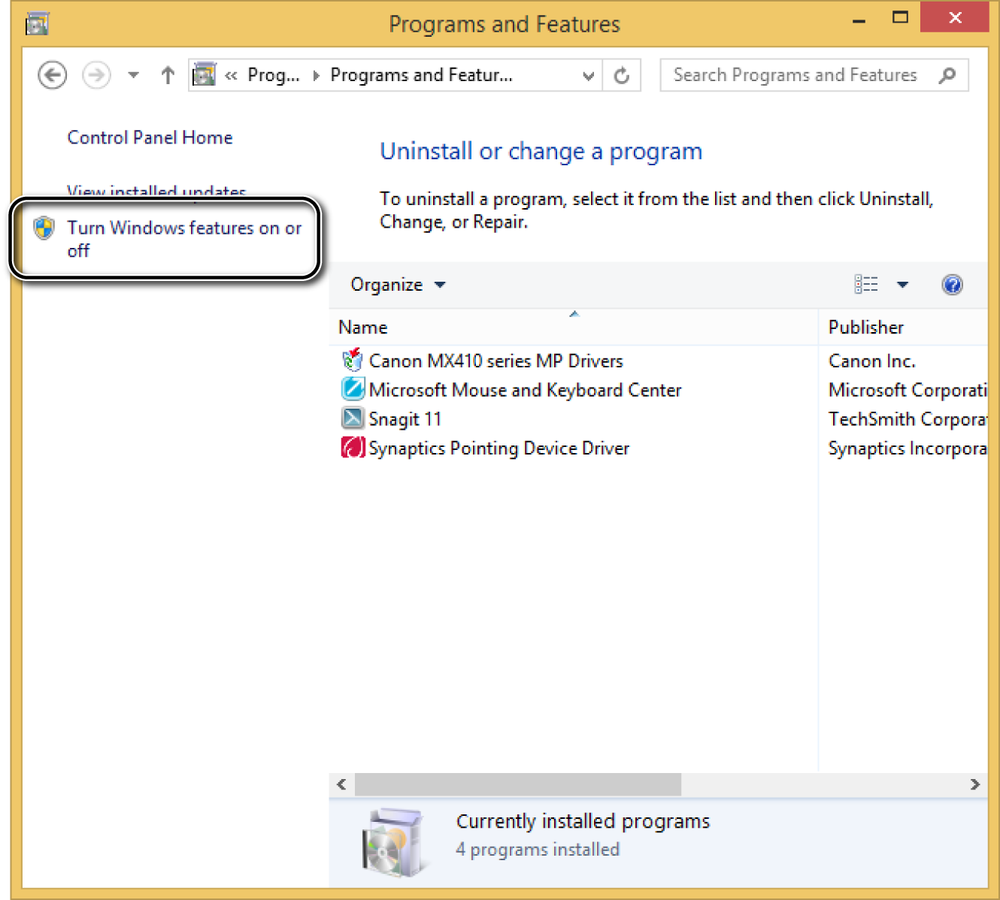
Click Programs and then choose Programs And Features.
In the Program And Features window, in the column on the left, click Turn Windows Features On Or Off to open the Windows Features window.
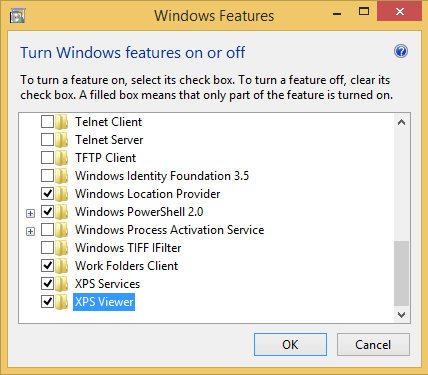
Scroll down until you find the XPS Viewer entry.
Clear the check box for XPS Viewer.
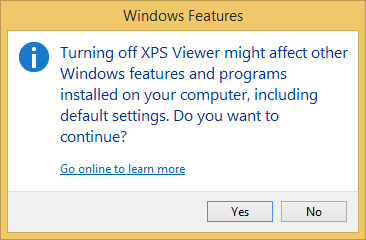
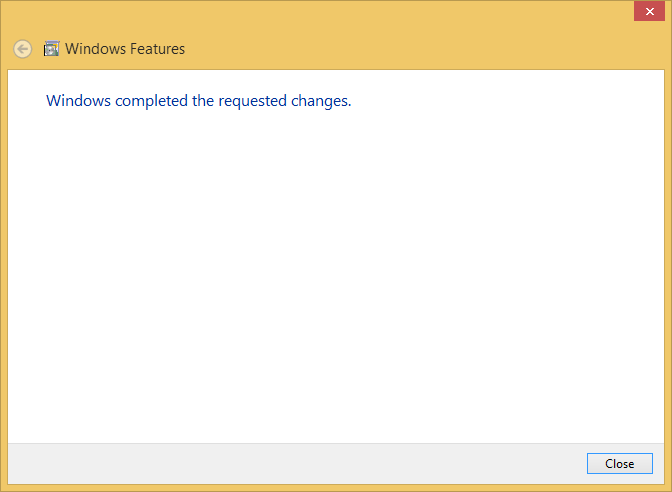
You are warned that this might affect other Windows features and programs.
Click Yes and then OK. Wait for Windows to complete the requested changes.
Click Close.
To add a Windows feature, go through the same steps. At step 4, you just choose the feature you want to add.
Chapter 21 covers the basics of using the Task Manager to manage running apps and services. However, it does not cover in detail the many ways by which you can access this tool.
The first and best-known method to access Task Manager is not necessarily the fastest: press Ctrl+Alt+Del and then click Task Manager.
If you prefer to use your keyboard, the fastest way to start Task Manager is to press Ctrl+Shift+Esc. That will open the tool without an additional click.
Another rapid method is to use the WinX system menu for power users, detailed in a previous tip in this chapter. To access that, press Windows key+X and then click Task Manager.
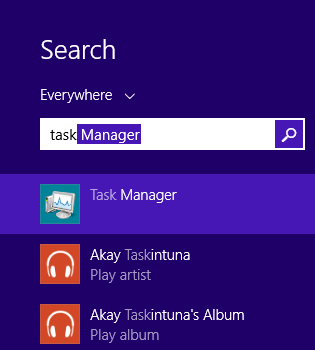
You can also perform a search on the Start screen; just type the word task and then click the appropriate search result.
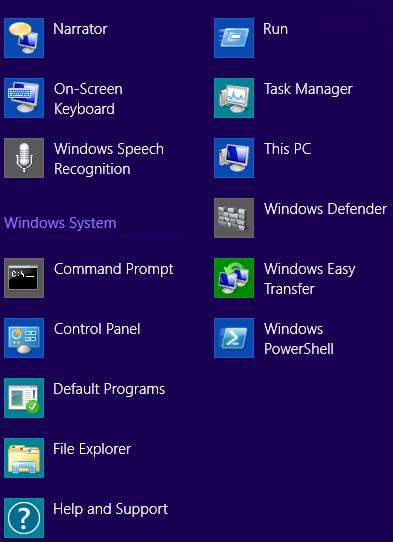
You can use the Apps view, which you can open from the Start screen. The Task Manager shortcut is in the Windows System section of shortcuts.
Finally, you can go to the desktop and right-click the notification area on the taskbar (on the right end, where the date and time are displayed). In the right click menu, select Task Manager.

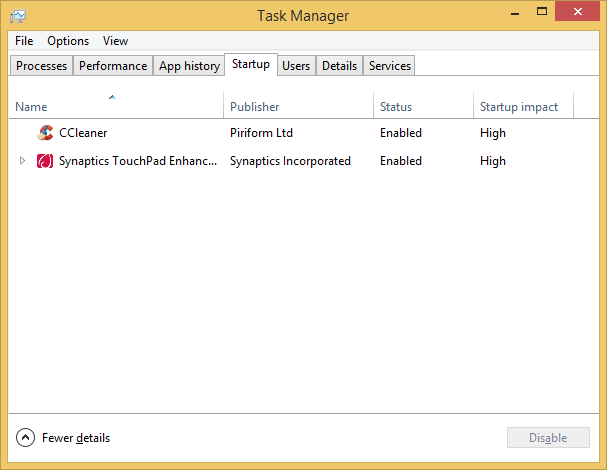
When you open the new Task Manager for the first time, you might have the impression that you can only use it to manage the apps that are currently running. This is a consequence of its rather simple interface and the apparent lack of options.
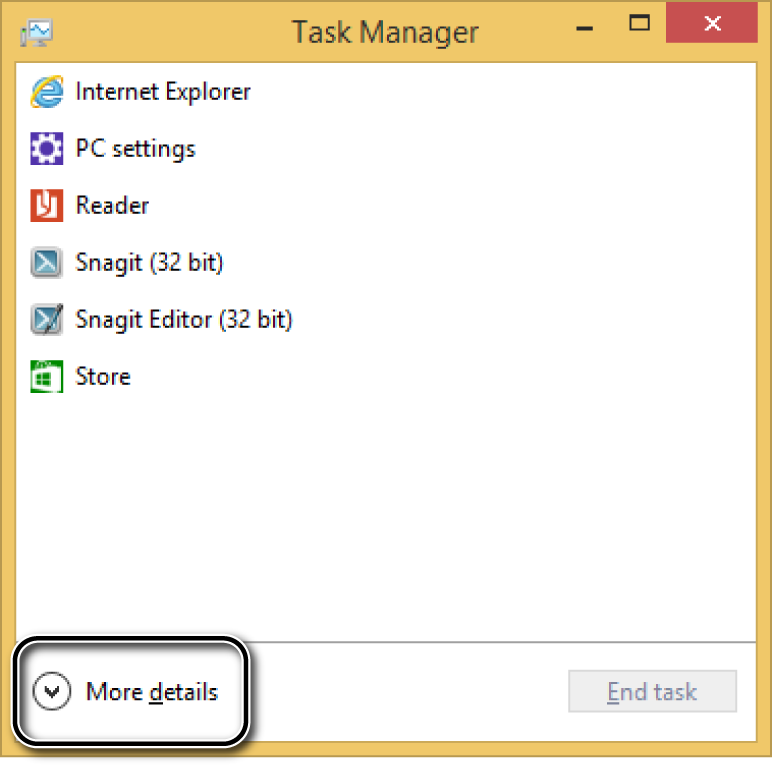
However, you can click the More Details button to enlarge the window and display several tabs and options. On the Startup tab, you can view the apps that run at the Windows startup. For each app, Task Manager shows its name, its publisher, its status (whether it is enabled or disabled to run at startup), and its impact on the startup procedure.
Based on this information, you can choose to prevent some apps from running at startup so that Windows 8.1 starts up more quickly.
In this exercise, you’ll learn how to disable apps from running at startup by using Task Manager.
Click More Details.
Click the Startup tab to view a list of all the apps running at startup.
Select the app that you want to prevent from running at startup, and then click Disable.
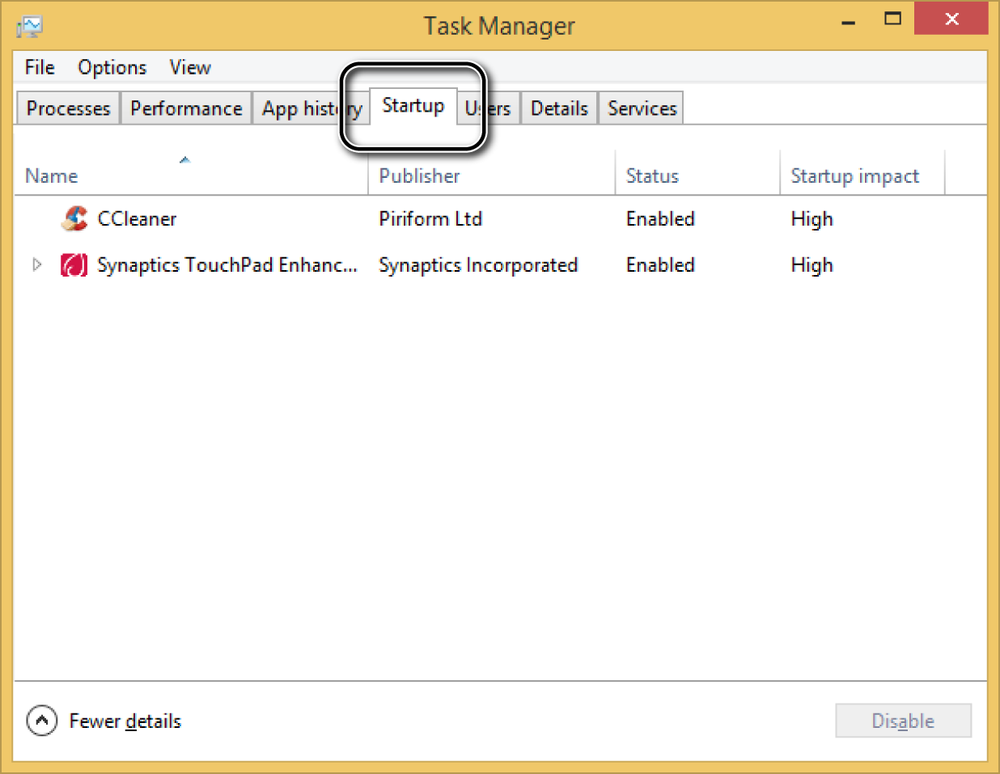

By using this method, you can disable all the items running at startup. However, it’s recommended that you disable only those apps that you don’t need to run at startup. You should not disable apps that are installed by the drivers of your hardware components (video card drivers, keyboard and mouse drivers, sound card drivers, and so on). If you disable them, you might encounter issues with the functioning of your hardware components.
If you interact with people all over the world, it is useful to quickly access the time for more than just your time zone. You can set Windows to display up to two additional clocks when you click or use the mouse to point to the clock shown on the taskbar.

In this exercise, you’ll learn how to add two clocks to the Windows taskbar.
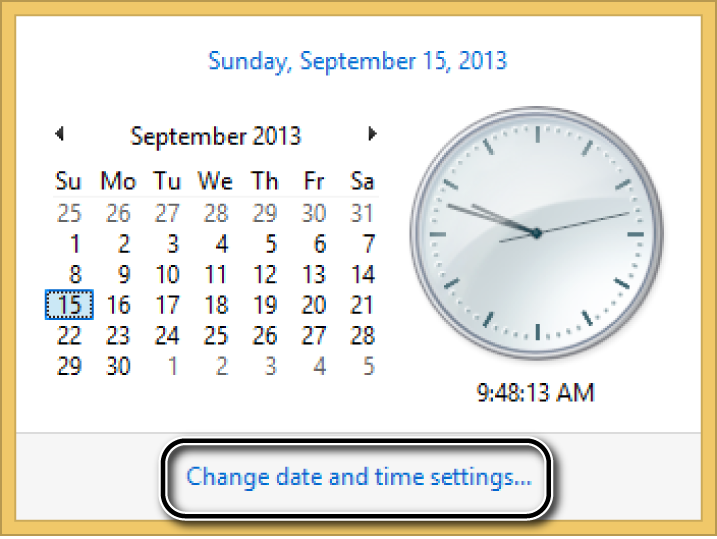
Click the area of the taskbar where the clock is displayed to open a window with details about the current date and time.
Click Change Date And Time Settings to open the Date And Time window.
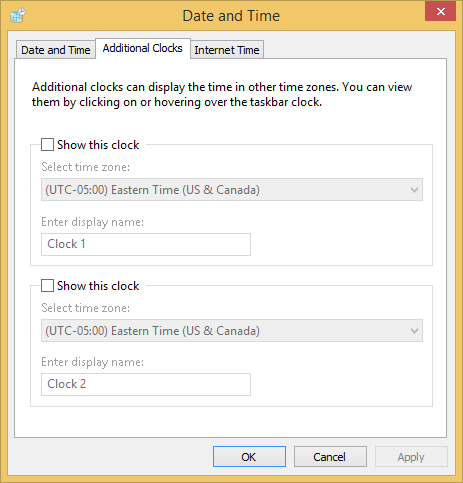
Click the Additional Clocks tab.
Select the Show This Clock check box and then select the time zone you want displayed for the first additional clock.
In the Enter Display Name box, type the name that you want to display for the first additional clock.
Repeat steps 4 and 5 for the second clock.
Click OK.
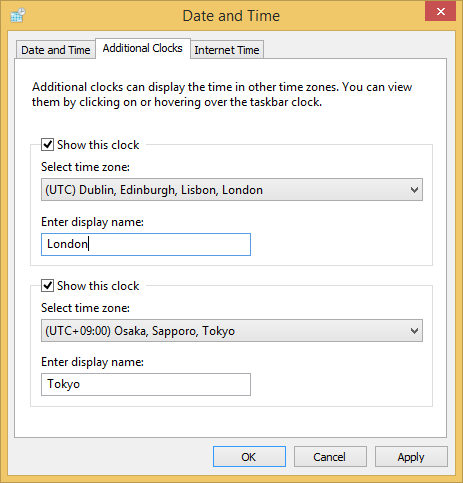
The additional clocks now appear each time you use the mouse to point to the clock on the taskbar or when you click the taskbar.
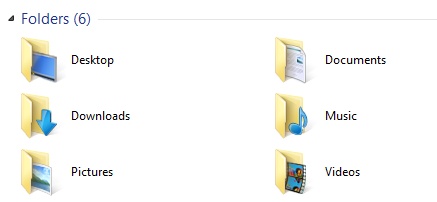
Windows stores all your user files and folders in C:Users, followed by your user name. There, you will find folders such as Desktop, Downloads, Documents, Music, Pictures, and so on. In Windows 8.1 they are also displayed in File Explorer, under This PC.
You might want to change the location of one or more of your user folders. For example, you might want to move the Downloads folder to another partition, so that you have enough room left on your system drive. This will help to ensure that your user folders and their contents are safe if Windows fails and you need to reinstall it. If you have a solid-state storage device (SSD) with little space available, moving your user folders to another drive makes even more sense. This way, you can use the precious space available on the SSD for apps and games that will benefit from its performance.
Important
When carrying out this operation, it is important to avoid this mistake: do not move the location of one user folder inside another user folder. This will break the internal references used by Windows and its apps and might cause malfunctions. For example, if you move the Downloads folder somewhere inside the desktop, Windows will display two desktop folders instead of a Downloads and a desktop folder. Also, some apps won’t know how to deal with two desktop folders and no Downloads folder.
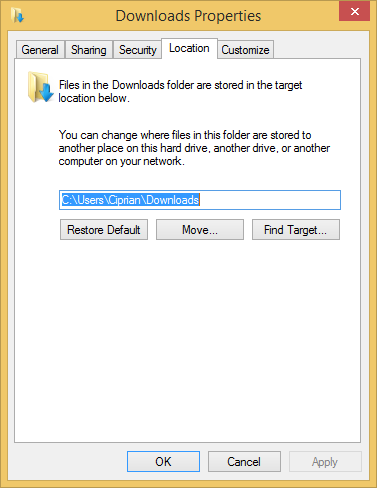
In Windows 8.1, you can easily change the location of your user folders. In this exercise, you’ll learn how to change the location of your Downloads folder.
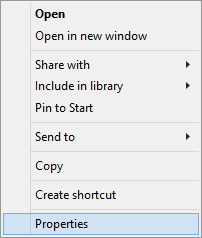
Right-click the Downloads folder to open the shortcut menu.
Click Properties to open the properties window for the Downloads folder.
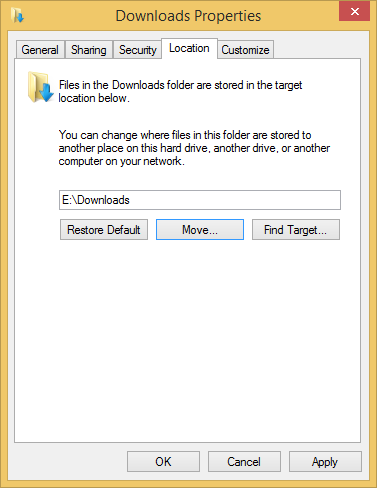
Click the Location tab.
Click Move, select the new location for the Downloads folder and then click Select Folder.
Click OK.
You are asked to confirm whether you want to move all the files from the old location to the new location.
Click Yes and wait for the process to finish.
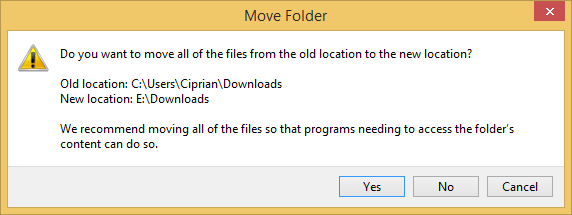
The Downloads folder and all its content has been moved to the new location. You can repeat the same procedure for other user folders that you would like to move to a different location.
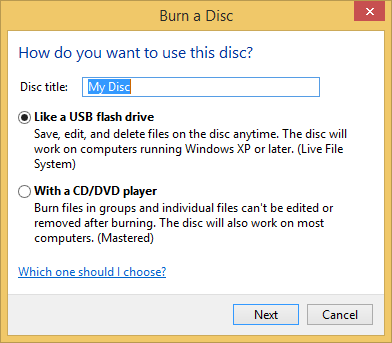
You can burn a disc directly from File Explorer without the need for a third-party solution. Even though third-party solutions are more complex and offer more features, File Explorer can do the job when you need to write a simple disc with files on it. When starting the burn process, you are prompted to choose between the following two types of discs:
Like A USB Flash Drive (Live File System). Discs formatted with this method work like a USB flash drive or floppy disk, meaning you can copy files to disc immediately. They are a good choice if you want to keep a disc in the burning drive and copy files whenever you need to. These discs are compatible only with Windows XP and later versions of Windows.
With A CD/DVD Player (Mastered). Discs formatted with this method don’t copy files immediately, meaning you need to select the entire collection of files that you want to copy to the disc and then burn them all at once. This is convenient when you want to burn a large collection of files at one time. These discs are compatible with older computers and devices such as CD players and DVD players.

In this exercise, you’ll learn how to burn a disc like a USB flash drive by using the Live File System.
Set Up
Open File Explorer and insert an empty disc (CD or DVD) into the burning drive. Wait for the disc to be detected.
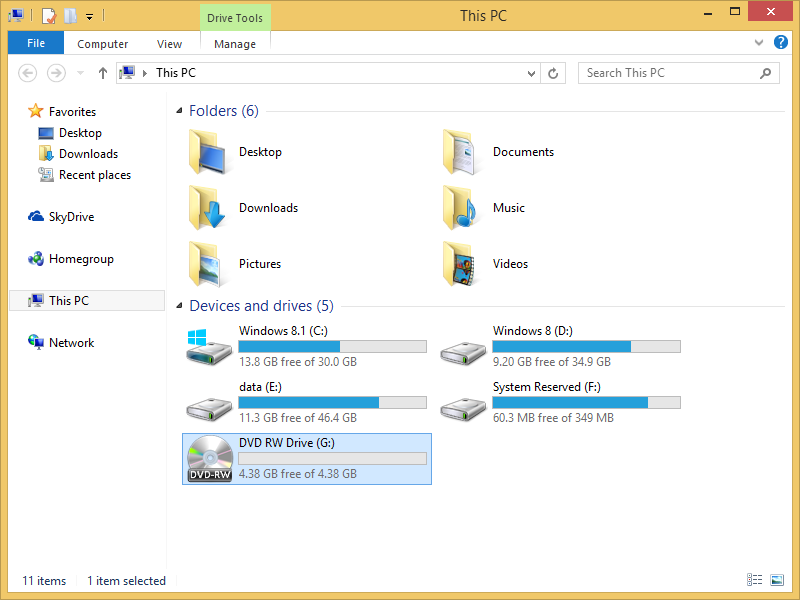
In File Explorer, click This PC.
Double-click the DVD-RW Drive.
You are asked how you want to use the disc you are about to burn.
Select Like A USB Flash Drive.
In the Disc title box, type a name for the disc, and then click Next.
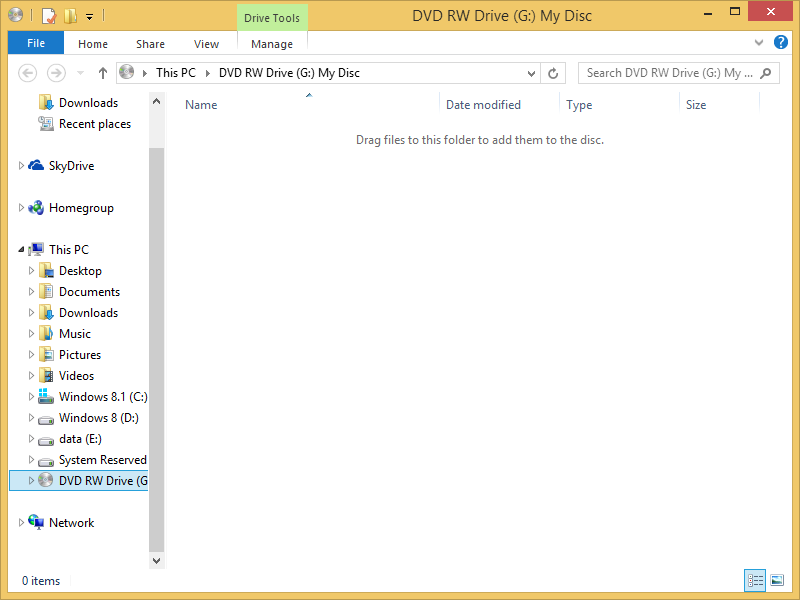
Wait for the disc to be formatted and become ready for writing.
When the disc is ready, use the newly opened File Explorer window to access the disc.
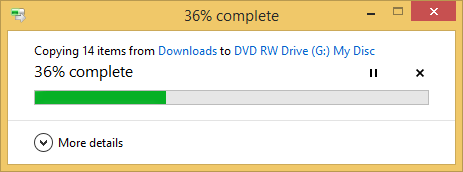
Drag or copy and paste the files and folders that you want to burn to the disc in to the newly opened File Explorer window.
Wait for the burn process to end.
Eject the disc and wait for the burning session to be closed so that the disc can be used later.
You can continue to add content to the disc until it becomes full, either on the same computer or on any other computer running Windows.
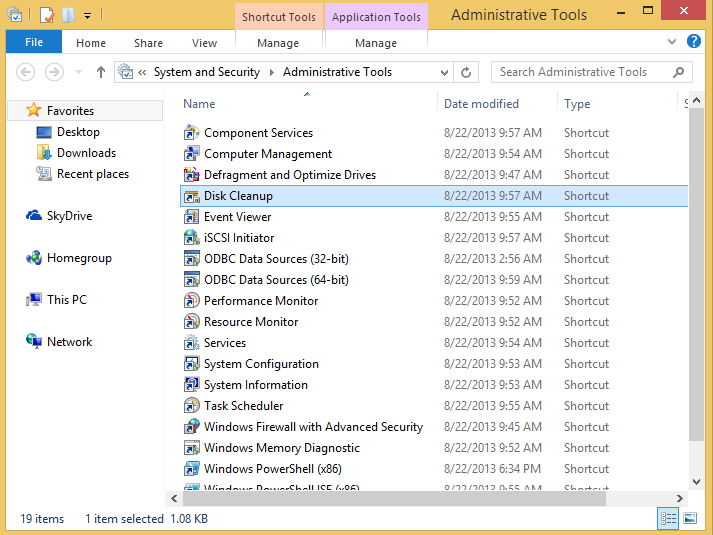
When you are running out of space, a good solution to free up some capacity is to use the Disk Cleanup tool. This tool scans a selected drive and looks for temporary files and log files that are no longer needed, cache files used by different apps such as Internet Explorer, file history data, and so on.
It’s recommended to use this tool once every few months to ensure that your hard disk doesn’t get overloaded with files that are not useful and to make more space available.
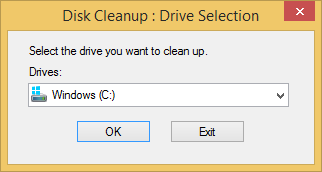
In this exercise, you’ll learn how to use the Disk Cleanup tool to save space on one of your drives.
Click System And Security and then Administrative Tools.
Click the Disk Cleanup shortcut.
If you have more than one drive in your computer, select the drive on which Windows is installed (by default, it’s the C drive), and then click OK. Otherwise, skip to the next step.
Wait for the tool to scan the selected drive and present its suggestions for files to delete.
Select all the types of files that can be deleted.
Click OK.
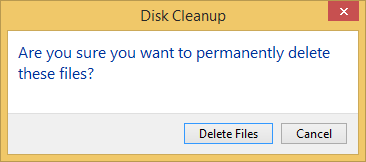
You are asked to confirm your choice.
Click Delete Files and wait for the cleanup process to finish.
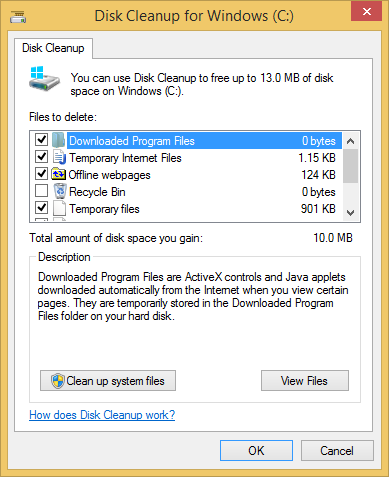
The selected files are deleted, and now more space is available on the selected drive. You can repeat the procedure on other drives in your Windows computer or device. If you want to clean up even more unneeded files, at step 5 you can press the Clean Up System Files button and have Disk Cleanup scan the selected partition also for system files that can be safely removed. Using this option, you can remove old Windows Update files that are no longer needed, old Windows installation files, and so on.
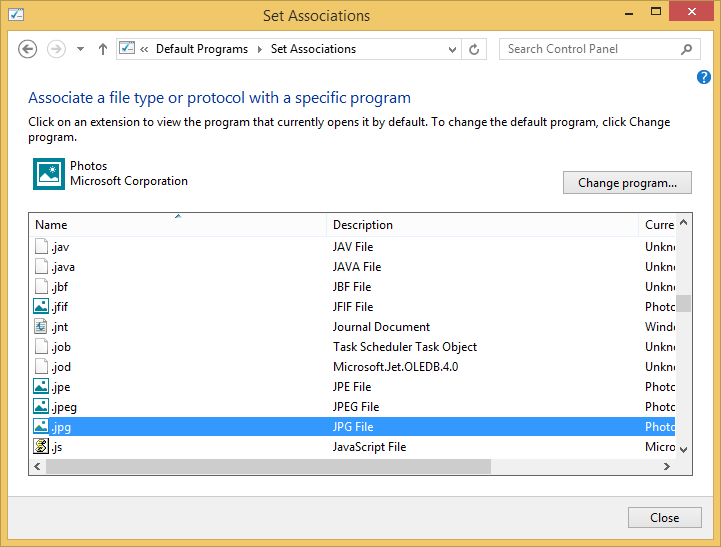
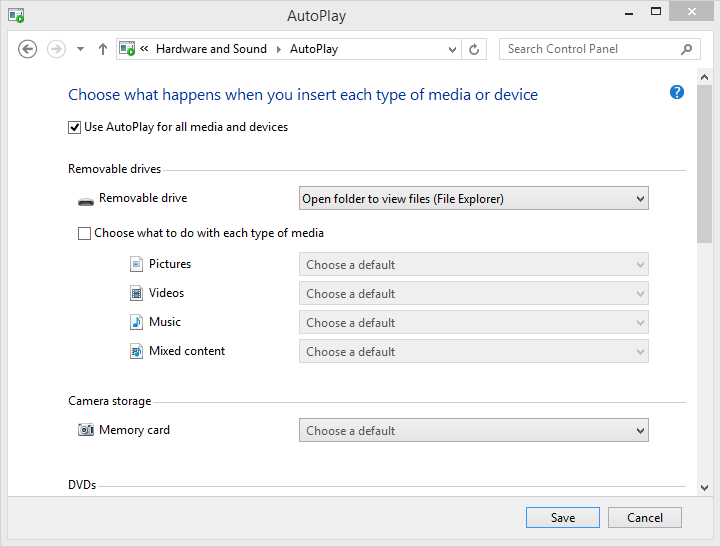
Windows 8.1 users can change the defaults for apps, file types, and AutoPlay settings. You can change these values from Control Panel by clicking Programs and then choosing Default Programs.
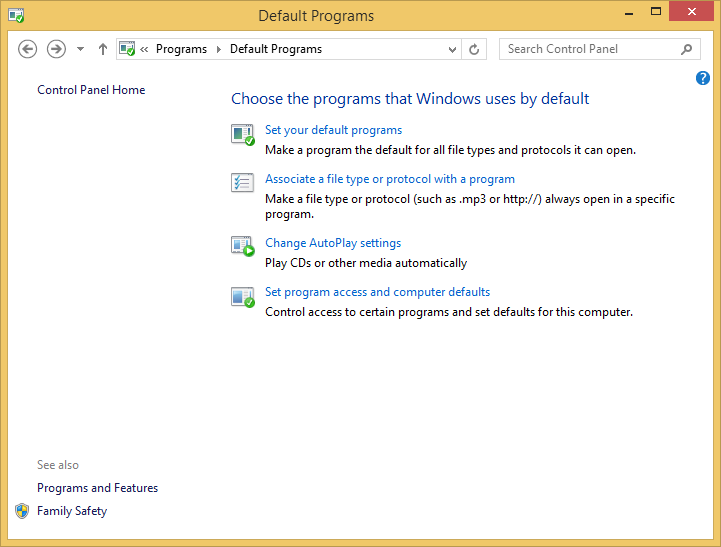
The following list describes the options that are available to you in the Default Programs window:
Set Your Default Programs. This setting lists all the apps you have installed so that you can choose the default file types and protocols that each will open.
Associate A File Type Or Protocol With A Specific Program. This setting lists all the file extensions registered on your Windows computer or device so that you can change the default app used to open each file extension.
Change AutoPlay Settings. These settings determine the behavior of the AutoPlay dialog boxes displayed for the following types of media and devices: removable storage devices, video and photo storage, DVDs, Blu-ray discs, CDs, software, and games.
Set Program Access And Computer Defaults. This setting changes the default apps you use for the most common computing activities: web browsing, email, playing multimedia, instant messaging, and the virtual machine used for Java. You can change the default apps so that they are the Microsoft Windows defaults, third-party apps you installed, or you can choose a different app for each type of activity.
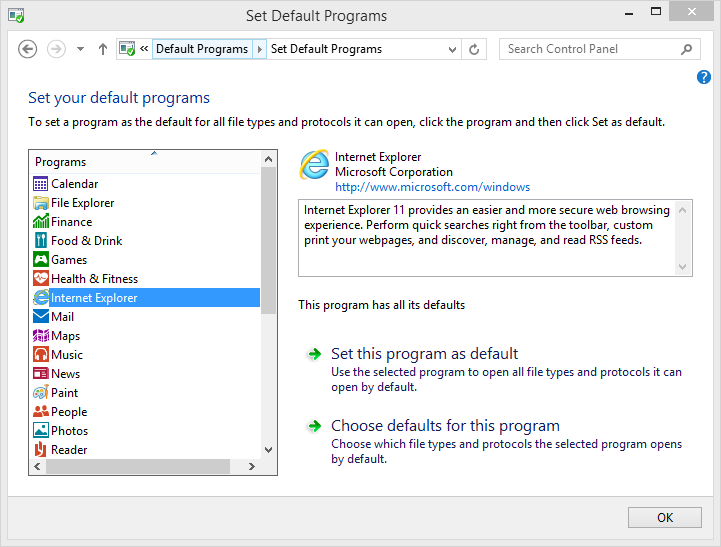

These tools come in handy after you have installed many apps on your Windows computer or device, which can cause your defaults to change in ways you don’t want. You can use these tools to customize default apps and have the computing experience you want.
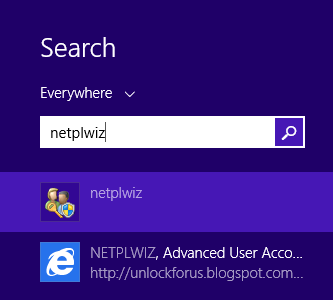
If you are using only one user account on your Windows computer or device, and you are using it where it is safe from strangers gaining unwanted access, you might want to set Windows to log you on automatically, without entering your password each time. Even though this isn’t a best practice recommended by Microsoft because it can lead to some complications detailed at the end of this section, it can make your life easier in certain scenarios.
In this exercise, you’ll learn how to set Windows 8.1 to log on to your user account automatically.
Type netplwiz.
In the search results, click netplwiz to open the User Accounts window.
Select your user account.
Clear the Users Must Enter A User Name And Password To Use This Computer check box.
Click OK.
You are asked to enter and confirm your password.
In both the Password and Confirm Password boxes, type your user account password, and then click OK.
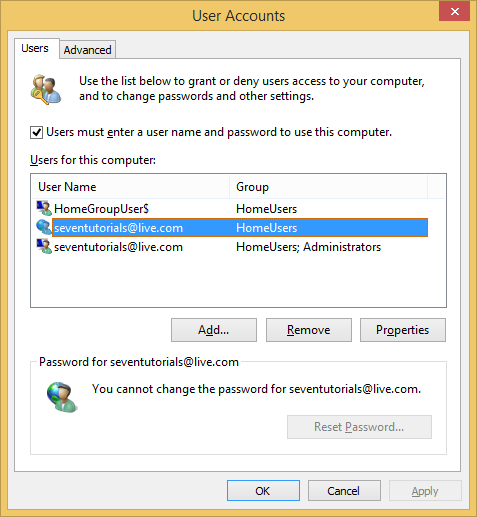
The next time you start Windows, you will be logged on automatically to the user account you just selected. This user account will become the default logon user to Windows 8.1.
If you have multiple user accounts on your computer or device, setting this up might be an inconvenience. Windows will always log on automatically to the user account you selected during this procedure. To log on by using another user account, you need to wait for Windows 8.1 to start up and log on automatically. Then, you must sign out and select the other user account to which you want to log on. If you want to reverse this setting, follow the same procedure and then, in step 4, select Users Must Enter A User Name And Password To Use This Computer.
If your Windows computer or device is part of a network domain, such as a corporate network, this procedure will not work. In network domains, the policies regarding the logon procedure are set by the network administrator and you cannot overwrite them.
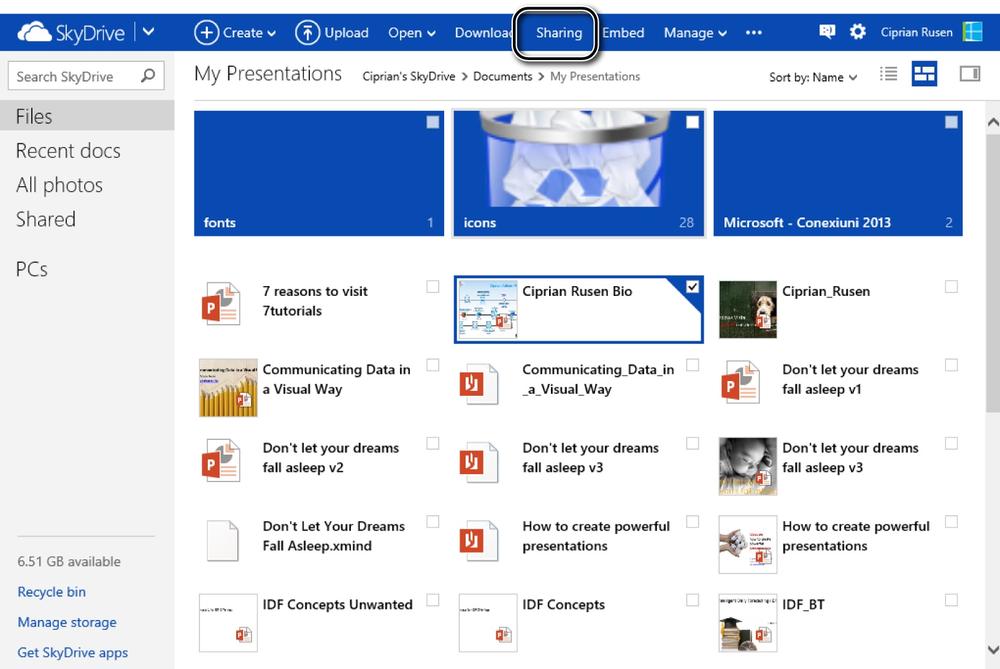
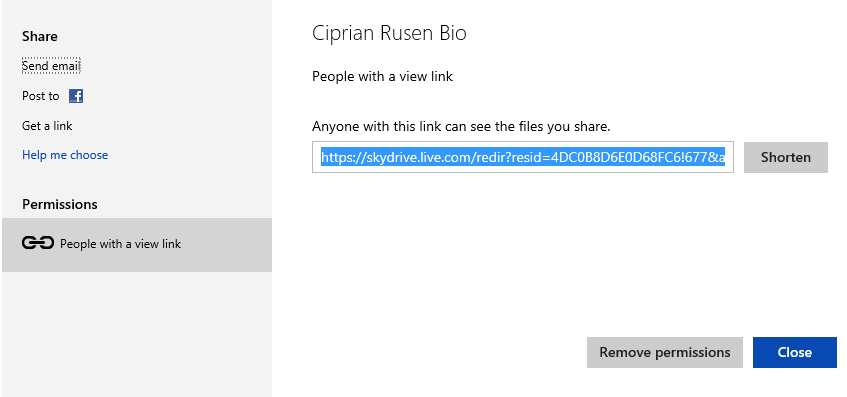
You can share files and folders from SkyDrive by using both the SkyDrive app and File Explorer in Windows 8.1 and from the browser. When sharing a file from the browser, you have access to more options for sharing, including using a shortened URL instead of a complete one.
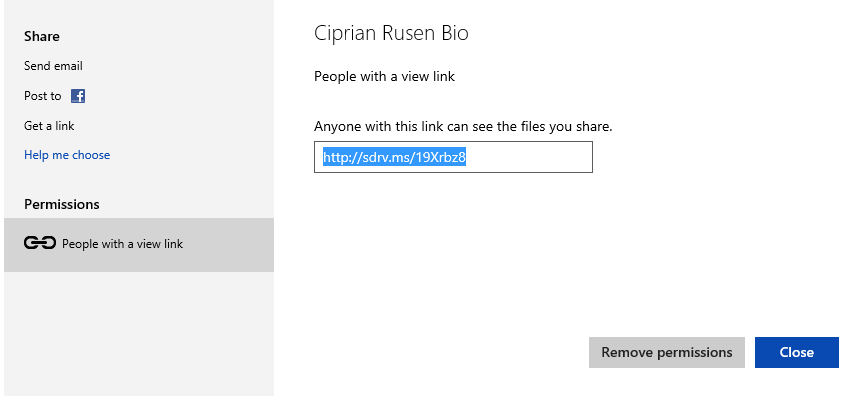
When generating the link for the file, you can also set permissions for accessing the file. The default is View Only permissions, but you can set them to View And Edit or to Public. Setting these kinds of sharing permissions is not available in the SkyDrive app. Therefore, if you want to share files and folders and set very specific permissions, it is best to use the browser and visit the SkyDrive website.
In this exercise, you’ll learn how to share a file from SkyDrive by using a shortened URL.
Set Up
Open Internet Explorer, browse to https://skydrive.live.com, and then log on by using your Microsoft account.
In SkyDrive, browse and select the file that you want to share.
On the toolbar at the top of the page, click the Sharing button.
This opens a pop-up window with options for sharing the file.
Click Get A Link.
In the View Only section, click Create.
Click Shorten.
Copy the short URL and use it to share the file with others.

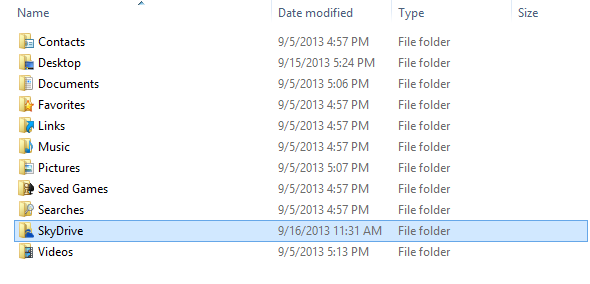
One of the subtle but important changes in Windows 8.1 is that SkyDrive is now embedded into the operating system. Therefore, SkyDrive now has a Windows app, a synchronization service running in the background, a special section in File Explorer, and its own user folder. Microsoft accounts in Windows 8.1 now include in their user folder (found at C:Users, followed by their user name) the SkyDrive folder, alongside traditional user folders such as Desktop, Downloads, Documents, Music, Pictures, and so on.
What does this mean? Well, it means that your entire SkyDrive data is stored at the following location: C:UsersYour User NameSkyDrive.
If you have multiple hard disks and very little space available on the hard disk where Windows is installed, this might constitute a problem because you will run out of space relatively quickly. What is the best solution when this problem occurs? Move the location of the SkyDrive user folder to another storage device where more space is available. When undertaking this operation, it is important that you do not move the SkyDrive user folder within another user folder. This will break the internal references used by Windows and its apps and might cause malfunctions.
In Windows 8.1, you can easily change the location of the SkyDrive user folder. In this exercise, you’ll learn how.
In File Explorer, on the left side of the window, right-click the SkyDrive folder.
Click Properties to open the Properties window for this folder.
Click the Location tab.
Click Move, select the new location for the SkyDrive folder, and then click Select Folder.
Click OK.
You are asked to confirm whether you want to move all the files from the old location to the new location.
Click Yes and wait for the process to finish.
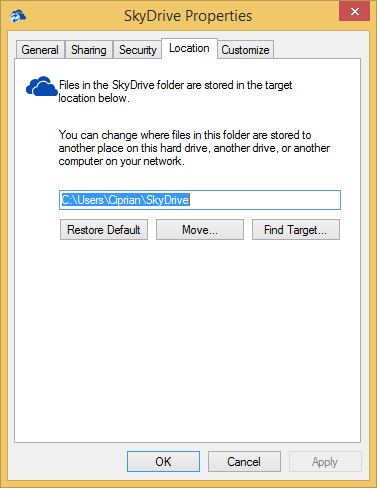
The SkyDrive folder and all its content is moved to the new location.
You can use the shortcuts that are available in the practice files folders of this chapter to shut down, restart, or lock Windows.
One of the many improvements in Windows 8.1 is the ability to boot directly to the desktop instead of the Start screen.
Notifications for Windows 8.1 apps can be set on a per-app level and you can also set quiet hours when you don’t want to be disturbed by any notifications.
You can use Task Manager not only to end apps that don’t respond to your commands but also to optimize the list of apps running at startup.