5
Facilitation
Tools

Learning Objectives
By the end of this chapter, you should be able to:
• List the steps used in successful brainstorming.
• Explain the rank-order process.
• Define force-field analysis.
• Explain the cause-and-effect diagram.
• Describe the storyboarding process.
• Describe when to use small groups.
 Utting Principles into Practice
By the end of this chapter, you will be able to:
• Develop a storyboard to illustrate a problem experienced during a recent facilitation assignment.
• Evaluate a team decision using the force-field analysis technique.
Effective facilitators use a variety of techniques to involve participants, generate ideas, and reach agreement on actions to be taken. Each technique is a tool that the best facilitators carry in their “toolkit” of ideas. They know which tool or tools work best in a particular situation. Many facilitators have personal favorites that they feel most comfortable using or that they think yield the best results. Depending on the nature of an assignment, a facilitator might use only one technique or perhaps several will be needed.
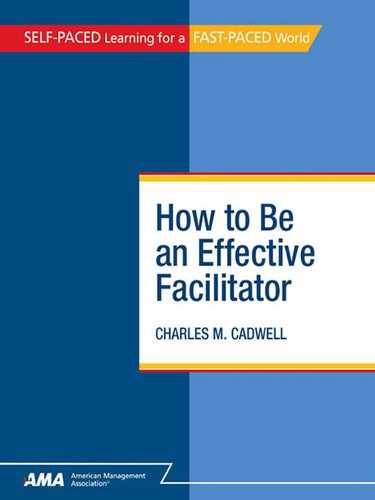
Eight of the most frequently used facilitation tools are presented in this chapter. The order in which they are presented is not intended to suggest an order of importance or effectiveness. Some of their uses are similar and in some cases the facilitator may want to combine one tool with another one. Selecting the best tool also depends on the facilitator’s knowledge of the group and which tools they are more likely to respond to when used by the facilitator. A description of when each tool might be used and what other tools it could be combined with are shown in Exhibit 5-1.
BRAINSTORMING
Brainstorming is one of the most, if not the most, frequently used facilitation tools. Brainstorming can unleash many ideas and alternatives that one person alone cannot identify. Brainstorming appeals to facilitators because it:
• Encourages a high degree of involvement by participants
• Gets the energy of the team flowing
• Requires few props (a flip-chart and markers)
• Allows a lot to be accomplished in a short period of time
• Can be fun
The key to a successful brainstorming session is to maintain a nonjudgmental atmosphere where all ideas are valued. Effective facilitators establish these expectations in the beginning and are alert throughout the process to keep participants from moving into the evaluation stage too early in the process. Successful brainstorming efforts follow these steps:
1. Explain the purpose of the session. What’s the issue to be addressed or the problem to be discussed?
2. Set up a flip-chart and select another person to be the recorder. If a lot of ideas are anticipated, consider using multiple flip-charts and multiple recorders.
3. Write the issue or problem to be discussed on a flip-chart page or marker board where everyone can see it.
4. Review the following ground rules:
a. Specify time restraints.
b. Explain that the goal is to go for a quantity of ideas—not quality at this stage.
c. Encourage people to free-wheel and not to hold back. Sometimes the crazier the ideas sound, the better.
d. Do not evaluate, make judgments, or criticize what someone says.
e. Explain that it is okay to ask questions to clarify, but not to debate.
f. When silence occurs, wait and then continue. Many good ideas will flow after people get a second wind.
5. Conduct the brainstorming session and stick to the ground rules. When the time limit has been reached, call the session to a halt.
6. Review and combine ideas. Only at this point is it okay for participants to become more discerning about the quality of the ideas that have been suggested. Go back through each idea and eliminate unrealistic or incompatible ideas. Assign some kind of label to the other ideas. For example, use an “M” for ideas that “may be” considered; use an asterisk for the ones that definitely are to be considered.
7. Review the ideas that are left and combine those that are similar.
8. The last step depends on the objective. In some cases, the team may develop an action plan based on the ideas that have been generated. In other cases, the ideas may be turned over to another team or a smaller work team who has the responsibility of using the ideas.
Many facilitators use the nominal group technique (see below) as a way to start a brainstorming session. They begin with one or two round-robins and then open up the session so everyone can contribute an idea at any time. This approach allows the facilitator more time to capture ideas on the flip-chart if there is not a designated recorder. The nominal group technique also prevents everyone from talking at the same time.
Another variation is to give participants a pad of sticky notes. They write their ideas on the notes and then stick their notes on the flip-chart. While at the chart, they explain their ideas to the rest of the team. This approach encourages participant movement and the facilitator does not have to act as a recorder.
THE NOMINAL GROUP TECHNIQUE
The nominal group technique is related to brainstorming and is used when facilitators want to ensure involvement from all team members. It is a useful technique at the beginning of a facilitation assignment when participants can be reluctant to express themselves because they are not yet comfortable with their role in the process. The nominal group technique can also be used to prepare the team for full-scale brainstorming or prior to using rank ordering. The nominal group technique involves these steps:
1. Identify the topic, issue, or problem to be addressed.
2. Have participants write their ideas about the topic on a piece of paper, in private, without consulting other participants. You can direct them to write down a specific number of ideas or ask them to write down as many as they can think of at the time.
3. Go around the room and ask each participant, in round-robin fashion, to give one idea.
4. Each person must share an idea unless it has already been given by someone else. In this case the participant would “pass.”
5. Record the ideas on the flip-chart as they are given.
6. Allow no discussion or debate of the ideas at this point.
7. Continue in a round-robin manner until all ideas have been given.
8. Once all the participants have given their ideas, either stop the process (if no more information is needed) or open it up for more discussion by using brainstorming.
The nominal group technique is an effective way to get participants thinking about a given situation. It also communicates the expectation that everyone will participate in the facilitation process.
What are some of the opportunities you have to use brainstorming or the nominal group technique? How might you combine these two facilitation tools? What do you need to keep in mind to be successful when using these tools?
RANK ORDERING
Rank ordering is a tool that can help a facilitation team sort through a great deal of information and identify the priorities. The process involves taking one or more votes to narrow the number of options for the team. As the rankorder process continues, the items that are most important to the team begin to emerge and the less important items are eliminated. Facilitators might use rank ordering immediately after a brainstorming session. For example, the team has generated many good ideas, but they can only act on a few. Rank ordering allows the team to identify the critical few that need to be addressed.
The voting process can be either by secret ballot or show of hands. Secret ballots may be used if the topics are extremely controversial or if the facilitator thinks that some participants’ votes might be influenced by seeing the votes of others. If there are multiple votes to be taken, a secret ballot might be used the first time and then a switch made to a show of hands. There are no hard and fast rules for when to use which method. Effective facilitators learn to read their teams and know which method will work best.
An alternative to a show of hands is to obtain colored stick-on dots and provide them to participants. When it comes time to vote, the participants place their dots next to the item or items for which they want to vote. This approach can add some fun and activity to the process and help reduce any tension that might be present.
The facilitator also needs to determine if discussion will be allowed prior to the voting. If the facilitator thinks strong personalities might influence the outcome of the voting, he or she may prefer to conduct the vote without any discussion—at least in the early rounds. On the other hand, if the facilitator thinks no one will be unduly influenced by other team members, then time may be given to discussing the items before the vote is taken. Once a decision has been made about discussion, the rank-order process can begin. It works like this:
1. Determine how many items or priorities need to be selected. Is the objective to select only one item, the top three choices, or some other number?
2. Count the number of items to be considered.
3. Determine how many votes each participant will get. If there will be several rounds of voting, participants might get more than one vote in the earlier rounds. A rule of thumb that is often used is to divide the number of items to be voted on by 3. For example, if the team were voting on 12 items, each participant would get 4 votes (12 divided by 3).
4. Allow participants enough time to make their selections.
5. Conduct the vote using the desired method (secret ballot, show of hands, etc.).
6. Count the votes and rank order the team choices. The process may end at this point if there are clear choices. If not, or if the vote is close on several items, the process may be repeated until the right number of priorities (see step 1) have been identified.
Effective facilitators confirm with the team that the ranking accurately reflects the opinions of all team members. Normally this will be the case if everyone has had a chance to participate and express opinions along the way. If there is strong disagreement with the outcome, the facilitator will acknowledge that the disagreement exists. However, the facilitation process must continue to move forward as one person cannot be allowed to dominate or slow the process.
FORCE-FIELD ANALYSIS
Force-field analysis helps identify the driving or restraining forces that need to be considered before introducing change. Force-field analysis is more than simply identifying the pros and cons of a particular idea. It requires thoughtful analysis on the part of all participants to consider factors that go beyond the obvious.
Force-field analysis can be used to evaluate team decisions that, if implemented, would require changes in the status quo. Facilitators often use the nominal group technique, brainstorming, or a combination of these techniques when identifying driving and restraining forces. They also use rank ordering during the decision-making phase. Exhibit 5-2 shows a force-field analysis diagram.
Facilitators should follow these steps when using force-field analysis:
1. Draw a copy of the force-field analysis diagram on the flip-chart so everyone can see it. Some facilitators use two flip-charts—one for driving forces and one for restraining forces.
2. Give each participant a copy of the diagram.
3. Write the “problem” in the top box. This is a statement of the problem the team wants to solve. Get agreement from the team before continuing.
4. Write the “goal” in the second box. This should be a specific statement of what will be changed or different if the problem is solved.
5. Use the nominal group technique or brainstorming and have participants identify the driving forces that will help the goal to be achieved.

6. Use the nominal group technique or brainstorming and have participants identify the restraining forces that stand in the way of achieving the goal.
7. Rank order the driving forces.
8. Rank order the restraining forces.
9. Determine what can be done to capitalize on or increase the driving forces by using brainstorming or another tool.
10. Determine what can be done to reduce or eliminate the restraining forces by using brainstorming or another tool.
When the force-field analysis is completed, the team should be able to identify the action required to implement their goal. Effective use of force-field analysis not only helps to solve problems, but can be a useful tool in helping participants see the “big picture” of the driving and restraining forces that are often at work in organizations.
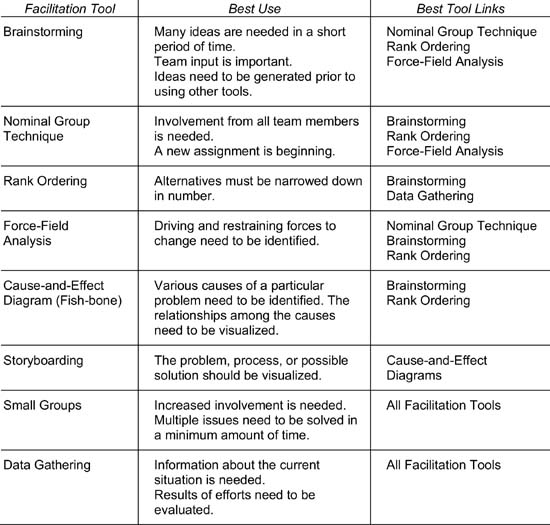
CAUSE-AND-EFFECT DIAGRAM
The cause-and-effect diagram, often referred to as a “fishbone” because of the way it looks, is used to identify possible causes for a particular problem (effect). Somewhat similar to the diagramming of sentences, the process visually depicts the relationships that exist among several causes. The fishbone is also useful because the team can subgroup causes under several key headings. Facilitators like it because it provides a graphic representation of a problem and its associated causes (see Exhibit 5-3). This makes it is easier to see that there are multiple causes and also to see the relationship among the causes.
The cause-and-effect diagram can be used after a specific problem has been isolated through the use of brainstorming or rank ordering. The fishbone enables participants to analyze the problem in detail and focus on the causes. The brainstorming tool can be used again to identify causes of the problem. Here’s how facilitators can use this problem analysis tool:
1. Draw a copy of the cause-and-effect diagram on the flip-chart so everyone can see it (see Exhibit 5-3).
2. Give each participant a copy of the diagram.
3. Write the effect (problem) in the box that represents the “fish’s” head.
4. Identify the categories you want to use for the causes. The most commonly used categories are methods, people, material, and equipment. Some facilitators add environment as a fifth category. Totally different categories may be useful depending on the nature of the problem. For example, some other useful categories might be customers, policies, procedures, and marketplace. Write the categories you want to use at the end of the “fish bones.”
5. Brainstorm the causes for each category. As the team identifies possible causes, these are added as branches along the bones of the diagram. In some cases there may even be subcauses of the main causes. The objective is to identify the root cause(s) of the problem.
Once the diagram is completed, the team can begin to discuss possible solutions to the problems they have identified. Some facilitators use the fishbone in this stage also. They write the team’s solution in the effect box. They then use the categories (bones) to identify what different actions or people will be required to implement the solution.
![]() Think About It...
Think About It...
What problems do you need to solve that would lend themselves to force-field analysis? Which ones would lend themselves to the cause-and-effect diagram?
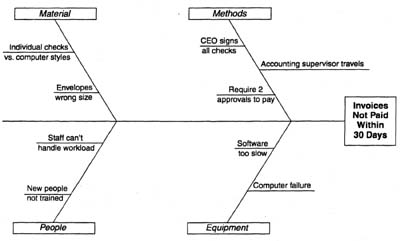
STORYBOARDING
Facilitators use storyboarding when they want team members to visualize a problem, a process, or possible solution to a problem. Instead of relying on words alone to describe a problem or situation (as in the previous techniques), storyboarding emphasizes the use of pictures or drawings.
Effective facilitators know that when using storyboarding it is important to clarify expectations and put the team members at ease. Their drawings do not need to be professional and there are no rules for how they should look. Stick figures and simple line drawings are acceptable. The facilitator is looking for ideas and concepts, not budding artists.
Here are the steps to follow when using storyboarding as a facilitation tool:
1. Identify the issue or concept to be storyboarded. The first time story-boarding is used with a team it may be helpful to define the issue in more detail by identifying the specific events or tasks they are to storyboard (see Exhibit 5-4).
2. Give each participant one or more sheets of flip-chart paper and colored markers. Or, give participants several index cards and have them draw one scene on each card.
3. Explain that the emphasis is on the issue not their drawing ability. Have participants begin their storyboard.
4. Have participants post their flip-chart page(s) on the wall. If they are using index cards, have them arrange the cards on a flipchart page and then post the page on the wall.
5. Have the participants explain their storyboard to the entire group. Allow for questions and discussion.
6. Reach agreement on the storyboard that best depicts the solution (not the best artwork). It might be necessary to combine scenes from several storyboards to come up with one that works for all participants.
7. Identify next steps in the process. What action is required to make the storyboard a reality or to solve the problem?
Storyboarding is a process that creates enthusiasm, involvement, and fun while keeping team members focused on a specific issue. A variation of the process described here is to have participants work in small groups rather than individually. This allows them to build off of each other’s ideas. Some facilitators also introduce the element of friendly competition by having the entire team select the “best” storyboard. Regardless of how storyboarding is used, it is a tool that adds a different twist to the facilitation process.
SMALL GROUPS
Small groups are used to increase involvement when the size of the entire group may inhibit participation by some members. In most cases, participants will open up when there are fewer people in the group. It is also difficult to “hide” in a small group when the expectation is that everyone will participate. Small groups are also useful when there are several issues to be addressed and time is limited. The small groups can be given an issue or problem to discuss and then report their findings back to the entire group.
Small groups can be used along with all other facilitation tools. For example, the nominal group technique can be used to start small group discussion. Small groups can be asked to brainstorm, rank order, do force-field analysis, or create cause-and-effect diagrams and storyboards. This wide variety of possible techniques makes small groups a very flexible tool in the facilitator’s toolkit. Here’s a typical way of using small groups:
1. Identify the topic(s) to be discussed.
2. Write the topic on the flip-chart. If there are multiple topics, consider writing each topic on a separate sheet of paper one topic can be given to each group.
3. Explain what the smaller groups are to do. Are they to come up with recommendations? solutions?
4. Let the participants know how much time they will have to work on their assignment.
5. Divide the overall team into smaller groups. The best size for small groups is 5 to 7 people. There are several ways to determine group make up. The easiest way is to have people count off and put all the l’s in a group, all the 2’s in a group, and so on. Another way is to randomly distribute colored index cards and have participants with the same color cards make a small group. In some cases, the group members may be hand-picked because of their expertise on the topic being discussed. If the same facilitation assignment lends itself to frequently using small groups, consider changing the group makeup periodically so a group does not become stagnant.
6. Direct each group to select a spokesperson and a recorder.
7. Monitor the time. Stick to the time limit given at the beginning. As the groups are working, move from group to group and be available to answer questions. While moving about, also keep participants informed of how much time they have left.
8. Bring all the small groups back together.
9. Have a spokesperson from each group report on what they accomplished.
10. Allow other participants to ask questions of the spokesperson or other group members.
Effective facilitators make frequent use of small groups as a way to break up their sessions. They understand that some people will contribute more if placed in a small group. Small groups often have more synergy and come up with more creative ideas than a large group.
![]() Think About It...
Think About It...
What issues or concepts do you need to address that would lend themselves to storyboarding? What are some situations in which small groups might be more effective than working with the entire group?
DATA GATHERING
Data gathering is a tool that is used outside the team session to prepare information to use during team meetings. The data gathered can be critical when it comes time to make decisions. Effective facilitators know that decision making without any facts or data can be disastrous. They understand that it may not be possible to have all the data needed, but they still make an effort to gather as much information as possible before asking the team to make a decision. The information is then presented to the group and becomes one of the factors to be considered when making decisions and evaluating courses of action.
Data gathering can also be used to evaluate the success of a facilitation effort. Data may be gathered before, during, or after a facilitation assignment or it may be done at all three stages. For example, if a team were assigned the task of reducing turnover, they would gather statistical data to determine what the turnover rate was before they started work on the problem. They would then track it over the following months as their plans were implemented to determine how their plans were affecting the turnover rate.
There are several different ways to gather data. The method used depends on the information needed and how timely it needs to be. Any of these approaches can be used at anytime during the facilitation process. Some of the more common techniques are these:
• Personal interviews, which involve obtaining information in a one-on-one conversation so that the information is not influenced by other people. This can be a lengthy process depending on the number of people to be interviewed.
• Review of financial reports, which involves looking at the financial implications of decisions. A potential drawback is that sometimes the financial information can be “old” news because it reflects a time period already past.
• Review of statistical reports, which involves looking at other factors besides personal opinions and financial data. However, as with financial reports, sometimes the information is “old” news.
• Questionnaires and surveys, which are ways to gather feedback from many people in a short period of time. Questionnaires can either be signed or anonymous depending on the wishes of the team. The number of surveys will affect how long it takes to compile the results.
• Focus groups, or other opinion-testing groups outside of the team, can share their ideas and provide the team with feedback. Several people from the same department within the organization can provide valuable insight by sharing their points of view. A group made up of some of the organization’s customers can provide interesting information about products or services. However, compiling usable data can be difficult if there are a wide variety of opinions.
• Observation involves examining the way a task is being performed to identify possible problems. This process can take more time than other forms of data gathering. Also, the fact that someone is observing can affect the way the person does the job. However, it is a very good method for gathering data first-hand.
Effective facilitators go through the following thought process before using data gathering as a facilitation tool:
1. Define the objectives for gathering the data.
2. Decide which method will get the most information in the time available. The cost of gathering the information will also be considered at this point.
3. Decide who will be responsible for collecting the data.
4. Determine how the information will be compiled and formatted.
5. Decide who will present the findings to the team.
After the facilitation process is over, the facilitator will evaluate whether or not the data gathered were helpful in view of the time and money invested in obtaining them. This will help in making decisions about using these data gathering techniques in the future.

Effective facilitators develop a toolkit of techniques to use when conducting their facilitation assignments. Although they may have personal favorites that they frequently rely on, the best facilitators have learned to use several tools so they will have appropriate alternatives for any situation. This chapter reviewed eight of the most frequently used facilitation tools. Brainstorming is a favorite facilitator tool because it unleashes the ideas of the team and encourages participants to let themselves go and think in terms of quantity rather than quality. Later in the process, they will combine and refine their ideas. The nominal group technique is often used in conjunction with brainstorming because it requires all participants to contribute to the discussion. Rank ordering is a tool that can be used after brainstorming to help teams narrow their choices. The rank-order process uses participant voting, either by secret ballot or by show of hands, to establish priorities.
Force-field analysis is an examination of the driving and restraining forces that can affect the implementation of change. The analysis process requires participants to give careful thought to the forces at work in their organization. The cause-and-effect diagram (fishbone) allows participants to look at several causes of a problem. Somewhat similar to the diagramming of sentences, the process visually depicts the relationships that exist among several causes of a particular effect or problem.
Storyboarding is a tool that encourages participants to think visually rather than with words. Team members create drawings to indicate how they think a situation should be addressed. Also, facilitators will frequently use small groups to encourage participant involvement. Team members who may be reluctant to open up to the full group will often contribute when working as a member of a smaller group.
Data gathering is used outside the facilitation session to gather information participants can use to make informed decisions. Some of the most frequently used data gathering methods are personal interviews, review of financial or statistical reports, questionnaires or surveys, focus groups, and observation.
 Review Questions
1. |
The facilitation tool that uses voting to establish priorities is called: |
1. (c) |
|
(a) data gathering. |
|
|
(b) force-field analysis. |
|
|
(c) rank ordering. |
|
|
(d) the nominal group technique. |
|
2. |
A facilitator who wants participants to see the relationships among several reasons for a particular problem will most likely use: |
2. (b) |
|
(a) force-field analysis. |
|
|
(b) a cause-and-effect diagram. |
|
|
(c) storyboarding. |
|
|
(d) small groups. |
|
3. |
The nominal group technique is useful when a facilitator wants to: |
3. (d) |
|
(a) get participants to think outside the box. |
|
|
(b) determine how participants visualize a problem. |
|
|
(c) show the driving and restraining forces. |
|
|
(d) involve all participants in the discussion. |
|
4. |
The facilitator who wants a lot of ideas and is not concerned about quality should use: |
4. (a) |
|
(a) brainstorming. |
|
|
(b) force-field analysis. |
|
|
(c) storyboarding. |
|
|
(d) small groups. |
|
5. |
Force-field analysis looks at the different______at work when an organization wants to implement change. |
5. (c) |
|
(a) participants |
|
|
(b) priorities |
|
|
(c) pressures |
|
|
(d) methods |
|