Inserting Merge Fields
Now that the two essential pieces are in place—the main document and data source—it's time to join them. To do this, you insert merge fields that reference the data source into the main document.
Inserting Single Fields
The most straightforward way to go is to insert individual fields, one at a time. When you insert a field, Word places a code with double angle brackets into the document, like this: <<City>>.
Note
The field names come from your specific data source, so they change depending on the data source you select and might not be the same as shown in these examples.
To insert merge fields into the main document one at a time, follow these steps:
- Position the insertion point where you want the field to be placed.
- On the Mail Merge toolbar, click Insert Merge Fields. A list of available merge fields from the data source appears.
- Click the desired field and click Insert. A code for it appears in the document. Repeat the process to insert additional fields in the document as needed.
- Click Close.
Make sure as you insert fields that you leave the appropriate spaces and punctuation between them. For example, press the spacebar once between a <<First_Name>> and <<Last_Name>> field.
Inserting Address Blocks
One of the most common uses for mail merge is to enter a mailing address block, like this:
Joe Smith
120 Main Street
Any Town, IN 46822
You can set up a mailing address block by inserting fields one at a time, as you learned in the preceding section, but doing so takes a long time. Assuming the first and last name are in separate fields, and so are the city, state, and ZIP code, you end up having to insert six separate fields, just to create a simple address block.
As mentioned earlier, Word offers a shortcut for setting up address blocks in the <<AddressBlock>> field. This field pulls the needed data from each of the applicable fields and creates a nicely formatted address block in a single step.
To insert an <<AddressBlock>> field, follow these steps:
- Position the insertion point where you want the block to appear.
- On the Mail Merge toolbar, click Address Block. The Insert Address Block dialog box opens (see Figure 1.12).
Figure 1.12. Specify options for the address block to be inserted.

- In the Insert Recipient's Name in This Format box, select the sample that best represents how you want the name to appear.
- If you do not want to include the company name, clear the Insert Company Name check box.
- In the Insert Postal Address area, specify how you want the country/region to be inserted (or not). The default setting is to include the country only if it is different from the value set in the drop-down list (United States is shown in Figure 1.12).
- Preview the addresses in the Preview area by clicking the right and left arrow buttons.
- Click OK to insert the address block.
How does Word know what fields to use in the address block? It attempts to match up the fields in your data source with the various placeholders in an address block. If the data source uses common naming conventions, it usually does a pretty good job. If it makes any mistakes, click the Match Fields button in the dialog box to make adjustments.
Inserting Greeting Lines
A greeting line is the line at the beginning of a letter that usually starts with "Dear." It's similar to an address block in that Word builds it automatically by drawing from multiple fields in the database.
To insert a greeting line, follow these steps:
- Position the insertion point where you want the greeting line to appear.
- On the Mail Merge toolbar, click Greeting Line. The Greeting Line dialog box opens (see Figure 1.13).
Figure 1.13. Specify options for the greeting line to be inserted.
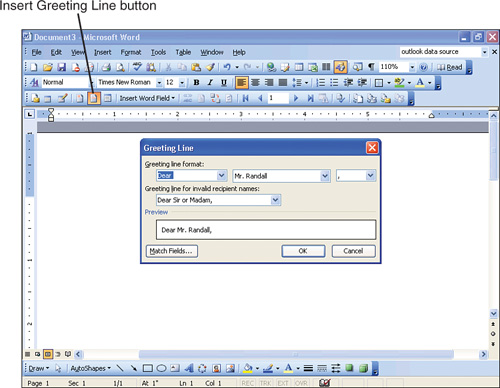
- Set up the greeting the way you want it by selecting from the drop-down lists provided.
For business letters, it is customary to start with "Dear," to use the person's title and last name, as in Mr. Jones, and to finish with a colon (not a comma). For personal letters, it is customary to start with "Dear," use the person's first name, and finish with a comma.
- Specify a greeting line for invalid recipient names. Word will use this setting if the field from which it is drawing the name is blank or unreadable.
- Click OK to insert the field code.
As with address blocks, you can remap the fields that Word uses in the data source. To do so, click the Match Fields button in the Greeting Line dialog box.
Setting Up Fields on Labels
If you set up your mail merge using the Letters, E-mail Messages, or Envelopes document type, then each record in the data source is used for a separate copy of the document. For example, you create a single letter in the master document, and then the merge process generates as many customized copies as needed for the data in the data source.
However, if you set up your mail merge for the Labels document type, there will be more than one record per page of the document. A label layout consists of a table with each record in its own cell.
If you use the Mail Merge Wizard, the cells of the table are populated with the <<AddressBlock>> field automatically. However, if you are setting up labels manually, you will need to enter the merge fields yourself. This is not difficult; you simply create one label's layout and then update all the other fields automatically.
Follow these steps to set up the fields in a label layout:
- Begin the mail merge by choosing the Labels document type. You can do this via the Mail Merge task pane or by clicking the Main Document Setup button on the Mail Merge toolbar, as you learned earlier.
- Select or create the data source, as you learned earlier.
After you've selected a data source, a<<Next Record>>field appears automatically in each cell of the table (except the first one). - (Optional) To make the table cells easier to see, do the following:
•On the Standard toolbar, click the Show/Hide ¶ button to toggle on the display of hidden characters.
•Choose Table, Show Gridlines.
4. Click in the top-left cell in the table and insert the field(s) you want. It is easiest to simply insert the <<AddressBlock>> field, but you can manually create the address block if you prefer.
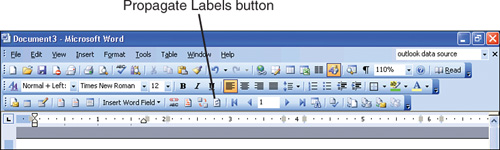
5. Click the Propagate Labels button. The <<AddressBlock>> field or whatever fields you entered in step 4 are copied to the remaining cells (see Figure 1.14).
Figure 1.14. Enter the field(s) in the top-left cell and then click Propagate Labels to populate the change in the rest of the cells.
6. Continue with the merge, as described in the following sections.
Setting Up Fields in Directories
A directory is a free-form type of mail merge document in which you can place many records on a page if you like. It's somewhat like a set of labels except there are no table cells to tell Word where to break things off. Instead, you must insert a <<Next Record>> field manually where you want one record to stop and the next one to begin.
For example, suppose you want a listing of people's names and phone numbers, as shown in Figure 1.15. This merge consists of three fields: first name, last name, and phone number.
Figure 1.15. A directory merge places information from multiple records on a single page.
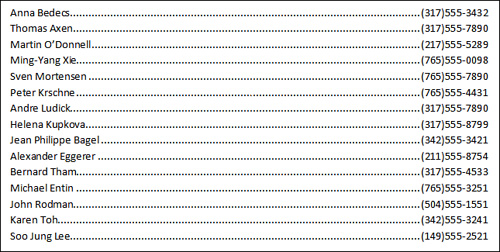
The merge shown in Figure 1.15 was created by inserting the name fields, pressing Tab, and inserting the phone number field. Then the tab stop was changed to a right-aligned stop and placed at the right margin, and a dot leader was added.
To create a directory merge, you need only to enter the desired fields once in the document and then enter a <<Next Record>> field. Follow these steps:
- Insert the fields to be displayed for each record.
- On the Mail Merge toolbar, click Insert Word Field and select Next Record. A
<<Next Record>>field is inserted. Figure 1.16 shows the fields that were used to create the merge shown in Figure 1.15, for example.Figure 1.16. The merge fields used for the listing shown in Figure 1.15.

- Continue with the rest of the merge, as described in the following sections.
Note
If you preview the merge results before performing the actual merge, you will not see the directory as it will actually be; instead, you'll see one record only. This is the normal behavior for a directory type of merge. The only way to see the full directory is to perform the merge to a new file or to the printer.