Selecting a Data Source
Word can pull data for a mail merge from a variety of data source types. Because Word is part of the Office suite, it's only natural that mail merge readily accepts data from Outlook, Excel, Access, Microsoft Works Database, and even other Word files (provided the data is in a formatted table). It also accepts data from a wide variety of other non-Microsoft sources too, including dBASE, Paradox, and Lotus 1-2-3, as well as from delimited data files. Or if the data source you need does not already exist, you can create a new data source via Word's own interface.
Understanding Delimited Data
A delimited data file is one that represents multiple columns without actually having any column lines. The break between columns is represented by a consistent character between entries, such as a comma or tab. Rows are represented by paragraph breaks.
For example, here's a plain-text delimited version of a table with three rows and three columns, with names in each cell:
Tom,Dick,Harry
Barbie,Ken,Skipper
Mary Ann,Ginger,Gilligan
Delimiters enable plain-text files to serve as databases. Almost all database programs can import and export delimited text files, which makes it possible to exchange data between almost any database program.
Delimited files also make it possible to do a Word mail merge based on virtually any data from any database program. If Word does not directly support mail merging from that database program, export the data to a delimited text file and then use the delimited text file for your Word merge.
Choosing an Outlook Contact List as a Data Source
Because Outlook is the default email and contact management program for Office 2003, Word makes it easy to use Outlook as the data source for a mail merge. The fields are already mapped between the two programs, so Outlook's address fields fit perfectly into the <<AddressBlock>> field, for example. There's little you need to do in the way of setup if you're planning on using an Outlook file for the merge.
In the "Performing a Letter Merge with the Mail Merge Wizard" section, you saw how to choose Outlook as a data source from within the Mail Merge Wizard. It's easiest to use this wizard when selecting an Outlook source:
- Choose Tools, Letters and Mailings, Mail Merge.
- If needed, click the Next hyperlink at the bottom of the task pane until Step 3 of 6 appears.
- Click Choose Contacts Folder.
- If prompted with a Choose Profile window, select your mail profile.
- In the Select List Folder dialog box, click the desired contact folder.
- Click OK. The Mail Merge Recipients dialog box opens.
- (Optional) Clear the check box next to each entry you want to exclude, if any.
- Click OK.
- (Optional) Close the task pane at this point if you prefer to continue going it alone, rather than using the wizard the rest of the way.
Note
After you select a valid Outlook contact list, the Mail Merge Recipients button becomes available on the Mail Merge toolbar. You can click it to return to the Mail Merge Recipients dialog box at any time to further restrict or filter which records will be included. If the Edit Recipient List button remains unavailable, try again to select the Outlook contact list.
Choosing an Existing Data Source
As mentioned earlier, Outlook is only one possible program from which you can draw data. Word can accept data from a variety of data sources, including Excel worksheets, Word tables, plain-text files, and files from various database programs including Paradox and dBASE. You can also pull data from server-based SQL and Oracle databases.
Choosing an Excel Data Source
An Excel worksheet works well as a data source for a mail merge, provided you set it up according to these guidelines:
- The first row of the file should contain the field names.
- The records should appear, one per row, immediately below the field names.
Some people set up an Excel worksheet with a sheet title in cell A1, a few blank rows, and then the data after that. Word cannot interpret such a layout as a valid data file for a merge, though, so you need to edit the Excel file beforehand to omit any rows at the top that are extraneous to the data. Figure 1.6 shows an Excel file that is correctly set up.
Figure 1.6. This Excel file is properly configured to be used in a Word mail merge.
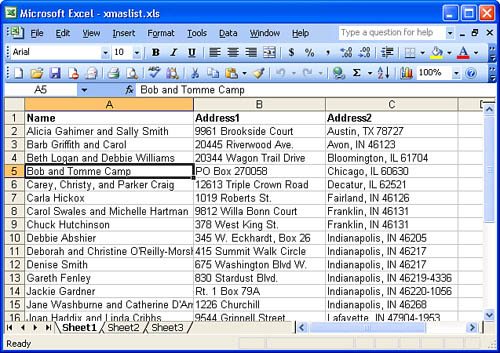
In addition, if you are planning on using the <<AddressBlock>> field to create an address block in the main document, rather than inserting individual fields, the field names in the first row of the worksheet should be similar to the field names used in Outlook: First Name, Last Name, Address, City, State/Province, ZIP/Postal Code, and Country/Region. The closer you get to that naming convention, the more flawlessly the data will map to Word's <<AddressBlock>> field. (The data file shown in Figure 1.6 would not work very well for that because its fields are too broad. Each is designed for a separate entire row of an address label. If you were using this as your data file, you would want to insert individual field names rather than an address block.)
To select an Excel file as a data source, follow these steps:
- From the Mail Merge toolbar, click the Open Data Source button. The Select Data Source dialog box opens.
- Select the Excel file to use as a data source and click Open. The Select Table dialog box opens.
- Select the worksheet that contains the data. If you are not sure, try Sheet1$ (see Figure 1.7).
Figure 1.7. Select the sheet that contains the data to be used in the mail merge.

Tip
You can rename the tabs in an Excel workbook by double-clicking a tab and typing a new name (in Excel). The names you assign appear in the Select Table dialog box if you have assigned any; otherwise, the sheet names appear generic, like those seen in Figure 1.7.
- Click OK. The Excel file is now connected as the data source for the mail merge.
- (Optional) To confirm that the field names have been set up properly, click the Insert Merge Fields button on the Mail Merge toolbar. The Insert Merge Field dialog box opens. See Figure 1.8.
Figure 1.8. Check the fields by displaying the Insert Merge Field dialog box.

The field names should appear in the Fields list as they appear in the top row of the worksheet. If generic names appear there instead, check the file in Excel to make sure the field names appear in row 1.
Choosing a Word Data Source
A Word file can serve as a data source, provided that one of these conditions is true:
- The Word document begins with a table, and that table contains the records, one per row, with the field names in the first row. In this case, the Word file is treated like an Excel worksheet.
- The Word document contains the records, one per paragraph, with the fields delimited by a consistent character such as a tab or comma. In this case, the Word file is treated like a delimited text file (discussed later).
To choose a Word document, follow these steps:
- From the Mail Merge toolbar, click Open Data Source. The Select Data Source dialog box opens.
- Select the Word document to use as a data source and click Open.
- If the records are delimited, rather than in a table, a dialog box might appear prompting you to specify the delimiter character. This happens only if Word cannot figure out the delimiters on its own. Enter the information required and click OK. See the next section for more information on dealing with delimiters.
Choosing a Delimited Text Data Source
In a data source file in which the fields are delimited, you might need to specify which character is used as the delimiter. Word will prompt you if this information is needed. Other than that, the steps are pretty straightforward:
- From the Mail Merge toolbar, click Open Data Source. The Select Data Source dialog box opens.
- Select the text file to use as a data source and click Open.
- If a Text File Connection Parameters dialog box appears prompting you to specify the delimiter characters, specify the characters used for field and row delimiters and then click OK. This happens only if Word cannot figure them out on its own.
Working with Fixed-Width Data
A fixed-width data file is one in which the break from one field to another in a record is not indicated by any particular character, but instead is decided by a fixed number of characters within the field. For example, in the following list, the field containing first names is 9 characters in size. There are six spaces after "Tom" but only three spaces after "Cheryl" and one space after "Marilynn."

Word cannot use a fixed-width data file in a mail merge; it accepts only delimited or tabular data files. However, Excel can import fixed-width data files. In Excel, choose Data, Import External Data, Import Data and then select the file containing the data. Excel takes you to a wizard that enables you to select the column widths and import the data. Save your work in Excel and then use that new Excel file as your data source for the mail merge in Word.
Setting Up an Oracle or SQL Database as a Data Source
Word can connect to a variety of database server types, including SQL and Oracle. You set up a data source once, and then you can reuse it without having to go through its configuration again.
To set up a SQL or Oracle database, follow these steps:
- From the Mail Merge toolbar, click Open Data Source. The Select Data Source dialog box opens.
- Click the New Source button. The Data Connection Wizard dialog box opens (see Figure 1.9).
Figure 1.9. Choose the type of data source you want to set up.
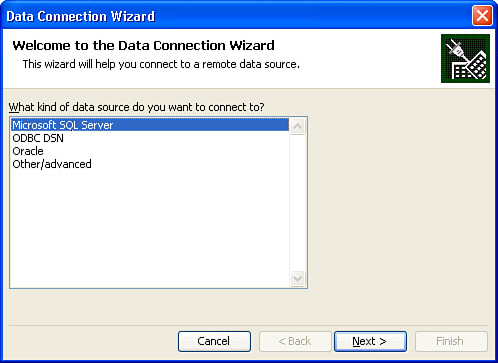
- Select the type of server to which you want to connect (Microsoft SQL Server or Microsoft Data Access – OLE DB Provider for Oracle) and click Next.
- Type the server name in the Server Name box.
- If the server is on your own network, you might be able to connect to it using Windows Authentication (the default Log On Credentials setting). If not, choose Use the Following User Name and Password and then enter the username and password required to log in to the server.
- Click Next to continue. Word logs in to the server.
- When prompted, select the data table or query from which you want to pull records and then click Next.
- At the Save Data Connection File and Finish screen, enter a filename in the File Name box for the shortcut that will be created to the database.
You can optionally also enter a description and friendly name. - Click Finish to connect to the data source and close the dialog box.
In the future, you can select the shortcut you just created from the Select Data Source dialog box (step 1) and bypass the other steps.
Using an ODBC Data Source
Open Database Connectivity (ODBC) is a widely used standard for connecting to databases. Data sources that use ODBC use SQL to connect, but they go through an ODBC driver installed in Windows. Using ODBC, you can access Excel workbooks, Access databases, dBASE databases, and other types of sources too if you have ODBC drivers for them, stored either on a server or on a local or network client. For example, if your company's customer database is stored in Access on the main server, you could access it via ODBC for your mail merge.
Note
You can also specify Excel and Access files as data sources by choosing them directly from the Select Data Source dialog box, as you would any file. In fact, that's what you did earlier, in the section "Choosing an Excel Data Source." The process is basically the same except the method described in the following steps sets up an .odb shortcut to the file for easier access.
Follow these steps to connect to an ODBC data source:
- From the Mail Merge toolbar, click Open Data Source. The Select Data Source dialog box opens.
- Click the New Source button. Choose ODBC DSN from the list of server types (see Figure 1.9) and click Next.
- Select the type of ODBC data source to which to connect. The items on the list depend on the ODBC drivers set up on your PC; by default, Windows XP and Windows Vista both provide dBASE, Excel, and Access. Then click Next.
- As prompted, specify the data file you want to use and the specific data table within it.
- At the Save Data Connection File and Finish dialog box, enter a filename in the File Name box for a shortcut to be created for this data source.
You can optionally also enter a description and friendly name. - Click Finish to connect to the data source and close the dialog box.
In the future, you can select the shortcut you just created from the Select Data Source dialog box (step 1) and bypass the other steps.
Creating a New Data Source in Word
If the data source does not already exist, you might find it easier to create it from within Word than to fire up some outside program to create it. Word makes it easy to create a simple Access database to hold mail merge data for a personal contacts mailing list, even if you do not have Access installed on your PC and don't know anything about that program. It's all just fill-in-the-blanks.
To create a new data source, follow these steps:
- Choose Tools, Letters and Mailings, Mail Merge.
- At the bottom of the Mail Merge task pane, click the Next hyperlink until Step 3 of 6 appears.
- Click Type a New List.
- Click Create. The New Address List dialog box appears.
- If desired, customize the field names. (See the "Customizing Fields" section of this chapter.)
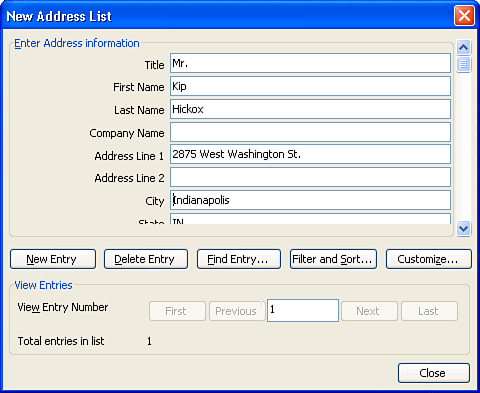
- Fill in the fields for the first record (see Figure 1.10).
Figure 1.10. Enter a record.
- To start a new record, click New Entry. Continue adding records until you are finished; then click Close. The Save Address List dialog box appears.
- Type a filename to use and change the location if needed.
- Click Save. Word creates a new Access database containing a single table with the data you just entered.
Caution
You can open this database in Access if you have Access installed. Do not change the table name or structure, though, or the connection to your main document in Word will no longer work.
To use the new database in future mail merge projects, choose it as an existing data source, as you learned earlier in "Using an ODBC Data Source."
Customizing Fields
The fields provided for a new data source are typical for a personal mailing list, including name, address, and phone number. Perhaps you do not need or want all those fields, or maybe you need some different fields instead or in addition. For example, if you are creating a new data source to store inventory or events, the default fields need to be almost totally changed.
Here's how to customize the fields in the New Address List dialog box:
- From the New Address List dialog box (from step 4 in the preceding section), click Customize. The Customize Address List dialog box opens (see Figure 1.11).
Figure 1.11. Change the columns (fields) that appear in the Customize Address List dialog box.

- Delete any fields you don't want. To delete a field, select it, click Delete, and then click Yes to confirm.
- Rename any fields as desired. To rename a field, select it, click Rename, type the new name, and then click OK.
- Add any new fields as desired. To add a field, click Add, type the new field name, and click OK.
- Reorder any fields as desired. To move a field, select it and then click Move Up or Move Down.
- Click OK to return to the New Address List dialog box.
Editing the Data Source
Normally, when you pick database records for your mail merge, you are not editing the data source; you're simply changing your usage of it. For example, if you exclude a certain person from a mailing, that person's record still exists in the database. To edit the database itself, you would normally go through the database program's own interface.
However, if you created the database from within Word, as in the preceding sections, then Word might be the only means you have of editing that database, particularly if you do not have Access installed.
To edit the data source from within Word, follow these steps:
- From the Mail Merge toolbar, click Mail Merge Recipients. The Mail Merge Recipients dialog box opens.
- Click the Edit button.
- Do any of the following:
•To create a new entry, click New Entry and fill in the fields.
•To delete a record, click the gray box to its left to select it and then click Delete Entry and click Yes to confirm.
•To change the columns, follow the steps in the earlier section "Customizing Fields."
4. Click Close to accept the changes to the data source.
5. Click OK to close the Mail Merge Recipients dialog box.