
With the worldwide success of WordPress, it's easy to understand why it's useful to be able to seamlessly translate plugins, themes and WordPress itself into other languages. However, that doesn't necessarily make it easily adopted, and for good reason. Localization (or internationalization, as it is sometimes referred to) is not a new concept, nor is the notion of doing business internationally. However, what we're beginning to see now amounts to a perfect storm for WordPress.
Initially a blogging platform popular among a niche of independent amateur journalists, WordPress’ growth has been fueled by its widespread adoption within the SME (small to medium-sized enterprises) market in the past few years. As of the time of writing, WordPress is being run by roughly 14.5% of all websites on the Internet, easily outpacing its closest competitors, Drupal and Joomla. The reasons for this are varied:
-
Since the social media explosion of the late 2000s, being online has become a way of life for professionals throughout the world. Online services and software that are functional and easy to use have exploded in popularity, and WordPress is arguably the easiest CMS available to nontech people.
-
WordPress is painfully easy to set up. Like many other CMSs, WordPress can be installed via a one-click installer like Fantastico or SimpleScripts. However, if you want to install WordPress manually, your time investment won’t be more than five minutes or so.
-
WordPress is incredibly flexible, as we’ve seen with plugins that are easy to use and install, essentially future-proofing the system. This has caused the typically frugal SME market to gain confidence and feel comfortable investing time and financial resources in WordPress websites.
-
We’re seeing a shift in the business climate, with many parts of the world decentralizing and moving away from a typical corporate structure. This is fueling a more independent-thinking SME market.
-
When properly set up and configured, WordPress has shown itself to be extremely attractive to search engines, often gaining organic ranking with ease where other CMSs fail (more on this in Chapter 12).
Understandably, localization has been the source of confusion for many a WordPress developer. After all, we’re web developers, not linguistic experts, and it’s a lot easier to just apply labels to fields in our programs in plain English. Plus, the idea of trying to figure out how to translate text strings into other languages on our own (much less having somebody else do it for us) might induce mild nausea in even seasoned developers who’ve never had the need or inclination to do so before. But trust me, it’s really not all that bad, and it can significantly increase the usefulness as well as the user base of your custom WordPress plugins and themes. Let’s break it down into bite-sized pieces, starting with the foundations.
Let’s examine that aforementioned development nausea just a bit. The way many of us learned to code, keeping language considerations in mind when coding a PHP program was, at best, rather academic. The majority of commercial coding projects have targeted scopes with defined audiences, so it’s often been reasonable to assume we can proceed without regard to translation. However, since WordPress plugins and themes ultimately become more functional when a user can employ them in their own language, we need a systematic way to correct this issue.
Enter i18n—another fun acronym to tuck under your belt. Named for the fact that there are 18 letters between the i and the n in the word internationalization, i18n describes the notion of creating software systems that are designed to be translated into other languages. The process of actually translating that software into a specific language is referred to as localization or L10n (can you guess how many letters are between the L and the n in the word localization?).[1] WordPress utilizes a specific framework to handle i18n called GNU gettext—the de facto standard system that is used in nearly all open-source software. GNU gettext is really just a library of PHP helper functions. Since it is coded right into core, WordPress has the hooks necessary to allow you as a developer to define text string variables in your themes and plugins, as well as a standardized system to provide translations for each string in an unlimited number of languages.
In general terms, the localization process is fairly straightforward. Conceptually, there are three key components to the process for either a theme or a plugin:
-
GNU gettext markers in your theme or plugin that tell WordPress which strings to translate
-
a function linking the markers in your theme or plugin to a file that provides a translation key
-
a file that provides a translation key, essentially creating a one-to-one relationship between translatable strings, and what the translation should be for a given string
Let’s talk in a bit more detail as to what each of these three components do.
In this first component, we need to let WordPress know which strings we want to translate. This is done directly in the output code of your theme or plugin by wrapping a specific string with a PHP function that identifies the type of localization you want, and then running your original string through a filter that will return the correct version. While there are an array of functions that exist within gettext that allow you to define or output localized strings in different ways (you can see a more thorough description of them in the Codex), there are really only two localization functions you’ll use the majority of the time:
Note that both __() and
_e() take two parameters, a string and a domain. In
this context, a domain is strictly a unique identifier; the label that
is attached to a specific translation file (many developers commonly
recommend that this be the unique plugin name). This relationship is
defined in the second component.
Secondly, within your theme or plugin, you’ll need to create a
relationship between the strings you want to translate and a translation
file that provides a key for the string translation. This is done using
the PHP function load_theme_textdomain() for
themes, or load_plugin_textdomain() for
plugins.
In the case of theme localization, you'll use
load_theme_textdomain() in your
functions.php file. The function
takes two parameters, which follows:
load_theme_textdomain( $domain, $path )
Theme localization is connected to the
WPLANG constant in
wp-config.php, but we'll discuss this
in more detail in a bit.
Plugin localization works very similarly to theme localization,
but with a few differences. Set within the core PHP files of the
i18n-enabled plugin,
load_plugin_textdomain() takes
three parameters:
load_plugin_textdomain( $domain, $abs_rel_path, $plugin_rel_path )
-
$domain: a unique identifier assigned to your custom translatable strings -
$abs_rel_path: an optional, deprecated function as of WordPress 2.7, which you can default to false or just omit—it’s nothing to worry about -
$plugin_rel_path: the relative path to your translation key file. If you fail to define this path, it will default to the root directory that the file is in. While this is by definition an optional parameter, it’s best practice to keep your language translation files separate from your logic files, so you’ll usually want to specify a value here.
In both these instances, $domain
is the unique identifier that we referred to in the first component. It
serves only to define a relationship between the strings in the code
that require translation, and the third component, the translation
key.
In this third component, GNU gettext offers us a systematic way of providing a mechanism to create one-to-one string translation relationships between individual default strings and their respective translations, and then feeding those various string translations to WordPress in an efficient manner. This is done through .PO and .MO files.
A .PO file is a file that provides a human-readable and editable translation key for a specific language. For instance, if your theme or plugin was written in English and you had translations readily available for French, German, and Pirate English, you would have three corresponding .PO files—one for each of the languages. When a specific string translation is made, it happens in this file.
While .PO files are human friendly and easily editable, they are not ideal for WordPress to use while processing translation in practice. Instead, WordPress will use an .MO file for its actual translation. .MO files are compiled files that can be automatically generated for you when you use helper tools like Poedit (see the section called “Introducing Poedit ”). Each .PO file has a corresponding .MO file that is updated each time the .PO file is updated.
The final file pertinent file type is the .POT file, or .PO Template file. A .POT file is an exact copy of any of the .PO files in a localization instance, with the exception that it is void of any translations. Making .POT files available to translators allows them to easily create translations for your themes and plugins into their own native language using helper tools.
So now that we know the main components in a localization process, let’s have a visual look at how they work together in WordPress. Consider the diagram in Figure 11.1.
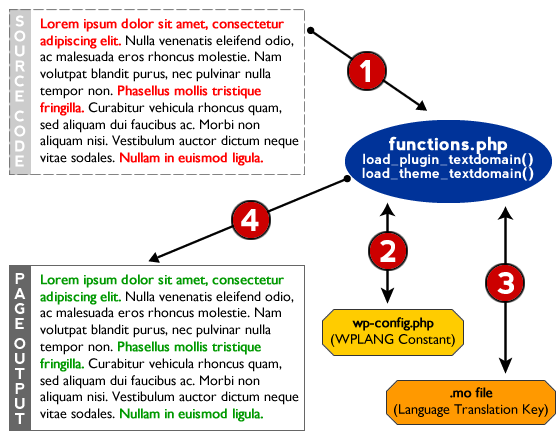
We’ll start with the program’s source code. When a browser
initially moves to call a specific page, the translation process is
initiated when it recognizes the
__() and
_e() functions in the source code
wrapping text strings. WordPress recognizes these functions because GNU
gettext is built into its core, and automatically seeks to translate them.
Your functions.php file has already been loaded here,
and WordPress is able to use the
load_plugin_textdomain() or
load_theme_textdomain() functions in
the functions.php file to identify and connect the
strings to a library location (depicted in Step 1 in Figure 11.1).
load_plugin_textdomain() or
load_theme_textdomain() then retrieve the locale
information from the
WPLANG constant set in
wp-config.php (Step 2 in Figure 11.1) and retrieve the proper
.MO file associated with the locale
(Step 3 in the Figure 11.1). If the properly named
.MO file exists, the functions output the translated
strings to the browser (Step 4 in Figure 11.1). If
a properly named .MO file does not exist, or for any
strings that do not have translated entries within the
.MO file, the default verbiage is instead output to
the browser. Finally, the .MO file is a compiled
version of a
.PO file, which is human editable.
Likewise, .PO files have template files that allow translators to easily modify
strings in your program into other languages.
Now let’s dig a little deeper and take a look at some real code, shall we?
When you are localizing a theme, you’ll usually only be addressing text strings that appear in different places of your theme. Let’s have a look at some basic HTML code that has a few strings in it:
<!DOCTYPE HTML>
<html>
<head>
<meta http-equiv="Content-Type" content="text/html; charset=UTF-8">
<title>Localization Sample</title>
</head>

<body>
  <p>My name is Mick.</p>
  <p>I have a dog named Lacie.</p>
  <p>My dog's name is Lacie, but we call her Bug.</p>
  <p>Sometimes, we call her Buggers.</p>
  <p>Lacie has a black coat.</p>

</body>
</html>
Not much to see here, really. We just have five different
strings of text entered into an HTML document in a pretty generic way.
However, we can localize this page by simply wrapping each of the
strings with the
_e() function:
<!DOCTYPE HTML>
<html>
<head>
<meta http-equiv="Content-Type" content="text/html; charset=UTF-8">
<title>Localization Sample</title>
</head>

<body>
  <p><?php _e( 'My name is Mick.', 'our-very-unique-domain' ); ?></p>
  <p><?php _e( 'I have a dog named Lacie.', 'our-very-unique-domain' ); ?></p>
  <p><?php _e( 'My dog's name is Lacie, but we call her Bug.',↵
               'our-very-unique-domain' ); ?></p>
  <p><?php _e( 'Sometimes, we call her Buggers.', 'our-very-unique-domain' );↵
     ?></p>
  <p><?php _e( 'Lacie has a black coat.', 'our-very-unique-domain' ); ?></p>

</body>
</html>
This is a bit more interesting now. We’ve wrapped each text
string with _e() and set our
textdomain constant for the
localization. Note that we use a constant called
our-very-unique-domain. It really doesn’t matter
what you call this domain so long as it’s unique to you, and that you
initialize the relationship with the same unique name.
Important: Be Consistent
You absolutely must use the same domain throughout the context of your theme or plugin in order for the localization process to work. Mismatched names will break the link, causing the translation to not work correctly (or at all).
How do we initialize the relationship within functions.php? Let's look at the code:
<?php
load_theme_textdomain( 'our-very-unique-domain', TEMPLATEPATH.'/languages' );

$locale = get_locale();
$locale_file = TEMPLATEPATH."/languages/$locale.php";
if ( is_readable($locale_file) )
     require_once($locale_file);
?>
As you can see, on line one we’ve fired up
load_theme_textdomain() and specified that our
language translation files will live in the
languages folder of our theme. So far, so good, but
now we see bunch of stuff that talks about locale.
Theme localization depends on the
WPLANG constant in
wp-config.php that defines the locale. The locale is a combination of both a country and
a language code specified by the GNU gettext framework—you can look up
country and language abbreviations in the gettext
manual. Open up your
wp-config.php file and look to see if you have a
custom WordPress locale defined; if you don’t, go ahead and define it
now. For example, if you are using German as the main language for your
site, you would see (or manually add) a line in your
wp-config.php file like this:
define ( 'WPLANG', 'de_DE' );
With the WordPress locale set, (in this case
de_DE), our code above will now seek to find a
German localization file called de_DE.mo in the
languages directory of our theme. Therefore, the
files in our sample theme directory might ultimately have a structure
that looks like Figure 11.2.

Localizing a plugin is similar to localizing a theme. Let’s take it from the top by looking at a simple plugin that is yet to be localized:
<?php
/*
Plugin Name: Our Sample Plugin
Plugin URI: http://www.sitepoint.com/our-sample-plugin
Description: Sample localization code demonstration
Version: 1
Author: Mick Olinik
Author URI: http://www.sitepoint.com
License: GPL2
*/

add_action( 'init', 'olin_osp_init' );
function olin_osp_init() {
  add_action( 'admin_menu', 'olin_osp_menu' );
}

function olin_osp_menu() {
  add_options_page( 'Our Sample Plugin Options', 'Our Sample Plugin',↵
    'manage_options', 'our-sample-plugin', 'olin_osp_settings' );
}

function olin_osp_settings() {
?>
<div class='wrapper'>
  <h1>Our Sample Plugin Settings</h1>
  <!-- Imagine there is some really exciting functionality happening here -->
</div>
<?php
}
?>
Again, there’s little to see here. We’re simply registering our plugin with WordPress, creating an Admin menu for our users, and then adding an Admin page to modify the settings of our sample plugin. However, when we move to localize the plugin, we’ll want to make some key changes. Let’s look at the same plugin with correctly localized code:
<?php
/*
Plugin Name: Our Sample Plugin
Plugin URI: http://www.sitepoint.com/our-sample-plugin
Description: Sample localization code demonstration
Version: 1
Author: Mick Olinik
Author URI: http://www.sitepoint.com
License: GPL2
*/

add_action( 'init', 'olin_osp_init' );
function olin_osp_init() {
  add_action( 'admin_menu', 'olin_osp_init' );
  load_plugin_textdomain( 'our-very-unique-domain', false, dirname↵
    ( plugin_basename( __FILE__ ) ) . '/languages/' );
}

function olin_osp_menu() {
  add_options_page( sprintf( __( '%s Options', 'our-very-unique-domain' ),↵
    'Our Sample Plugin' ), 'Our Sample Plugin', 'manage_options',↵
     'our-sample-plugin', 'olin_osp_settings' );
}

function olin_osp_settings() {
?>
<div class='wrapper'>
  <h1><?php _e( 'Our Sample Plugin Settings', 'our-very-unique-domain' ); ?>
  </h1>
  <!-- Imagine there is some really exciting functionality happening here -->
</div>
<?php
}
?>
Our first task is to initialize the localization, and it’s
conceptually the same for plugins as it is for themes. In the
init action we are using within our plugin, we’ll
add the
load_plugin_textdomain() function. As
you can see, we’re identifying our unique
textdomain as well as the location
of the translation files—in this case the
languages folder within the plugin.
Then, we can go about our business as usual preparing strings to be
localized within our code, just as in the case of themes. The files for
Our Sample Plugin might ultimately look like Figure 11.3.
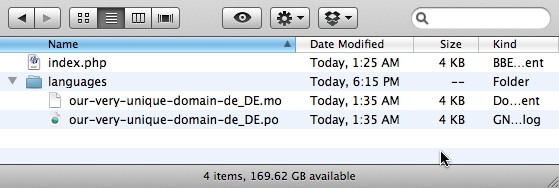
In looking at Figure 11.3, you may
notice that the nomenclature for our .MO files has
changed within a plugin as opposed to how we labeled it in our theme.
When looking for compiled .MO translation files,
WordPress looks for a different syntax for theme localizations than it
does for plugin localizations. With theme localizations, you’ll want to
name your .MO file in the format of
locale.mo. For example, in translating your theme
to German, your theme translation file in the
languages directory within your theme should be
named de_DE.mo. On the other hand, if you’re
localizing a plugin, WordPress will seek the translation file in your
specified languages directory within your plugin in
the format of pluginname-locale.mo. In this
instance, the plugin name corresponds directly to the
textdomain you assigned to the
localization in your plugin. Keeping with the previous examples, our
translation file would thus be named
our-very-unique-domain-de_DE.mo if we were
translating that plugin into German.
Poedit is a popular open-source tool that you can download
and install on your Windows, Apple, or Linux computer to help you create
and maintain all the files you’ll need. Poedit will automatically sort
through all the source code you have in your plugin or theme, and return
all strings that you’ve defined to be localizable through the
_e() or __() functions. Then,
it’s just a matter of going through each string and providing a
translation for a specific language. Let’s get started by downloading and
installing Poedit.
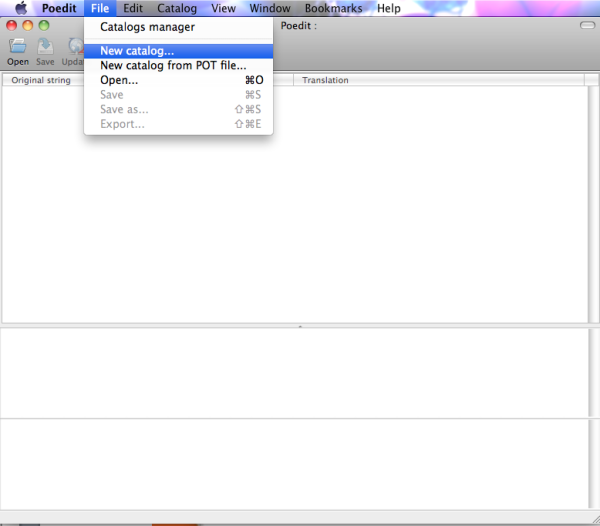
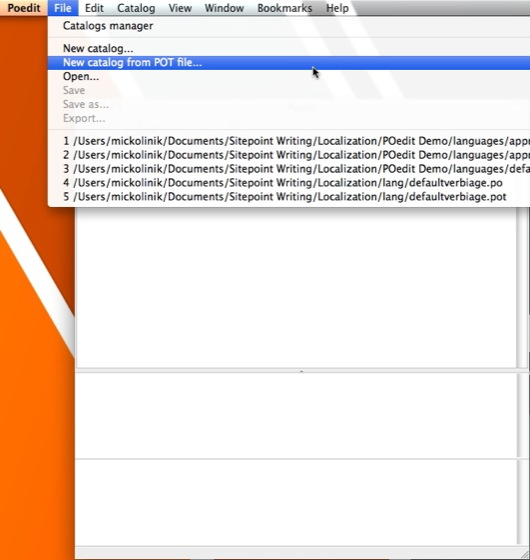
To localize our own plugin or theme, we’ll need to create a .POT file. To refresh your memory, a .POT file is just a .PO file that doesn’t have any definitions—it merely defines the strings that need to be translated. By default, Poedit looks for .POT files to open and work off of when a translator first seeks to localize our code, but since we don't have one yet we’ll need to make it first. To do this, fire up Poedit, click and then select as in Figure 11.4.
When creating a new catalog, the first place you’ll be brought to is the tab, as seen in Figure 11.5. You can fill this in as completely as you like, but all that is really required is to give our new catalog a project name. Give it a name, and then click on the tab.

Now we need to create the path to our translation file. This path is relative to the file or files being translated. Since we consider it best practice to create a separate directory for your language translations, we prefer adding ../ for the path as we’ve done in Figure 11.6. Once you have your path set, click the tab to continue on.

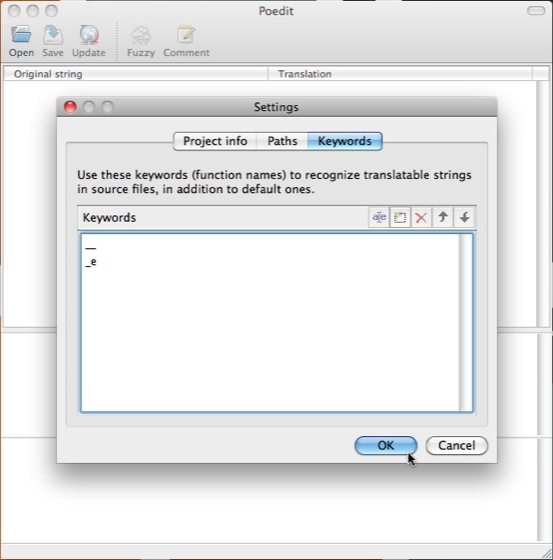
In the tab, we need only to
define the GNU gettext elements that we used to prepare our strings for
localization within our code. Again,
__ and
_e are the most common gettext
functions that are used, but if you happened to use
_n, _x, or any other gettext
functions, you will need to define them all here. It’s good to remove
the functions you don't need, and so we'll remove each of the functions
we’re not using, as in Figure 11.7.

This is a standard
configuration that will suit the purposes of our discussion very well.
We’ve added only __ and _e
because these are the functions being called in our code. Make your
additions and then click , as shown in Figure 11.8.
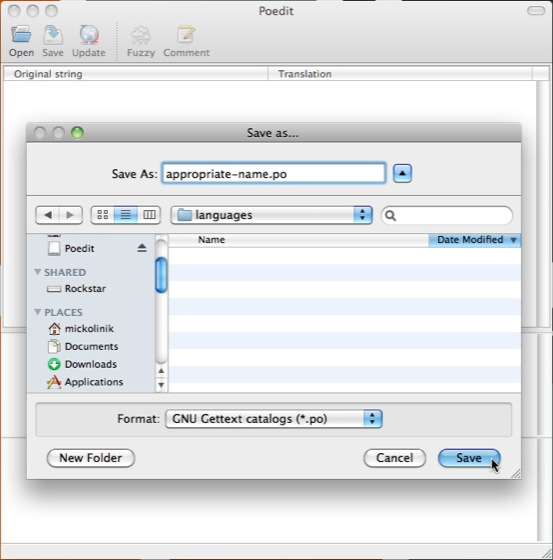
Upon clicking , we’ll be prompted to save our configuration as a new .PO file. Before you save your file, be sure to navigate to the correct location according to what you set in the tab of your catalog. Poedit will use the location you save your file to as a point of reference when it searches for the files to which you’ve added your localization strings. In our example, we’ve added a path of ../, so we’ll want to save the new .PO file in a subdirectory where our files are located. While any subdirectory will do, it’s best to be descriptive by using labels such as languages or lang. Save the .PO file with a name appropriate to your purpose. Just to be creative, we used appropriate-name.po, as you can see in Figure 11.9.
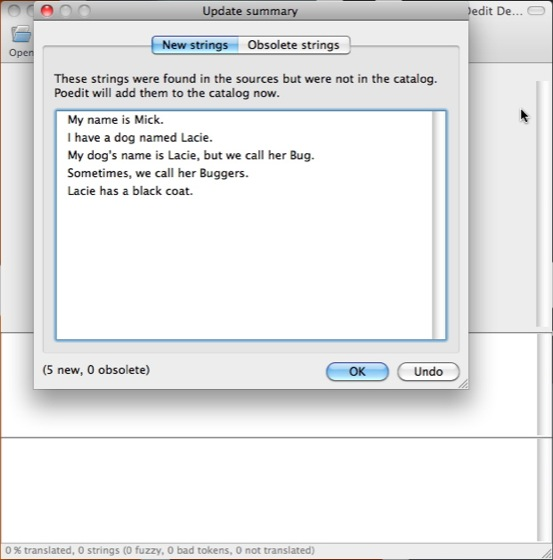
Upon saving the file, Poedit uses the path parameter that you set to find and index any files it sees. At this point, Poedit checks all of the files available against the list of gettext functions you defined in the tab and returns a list of translatable strings to you. Figure 11.10 shows a short list of strings revolving around me (Mick Olinik) and my dog, Lacie. Click , and you have a blank .PO file with a few string definitions.
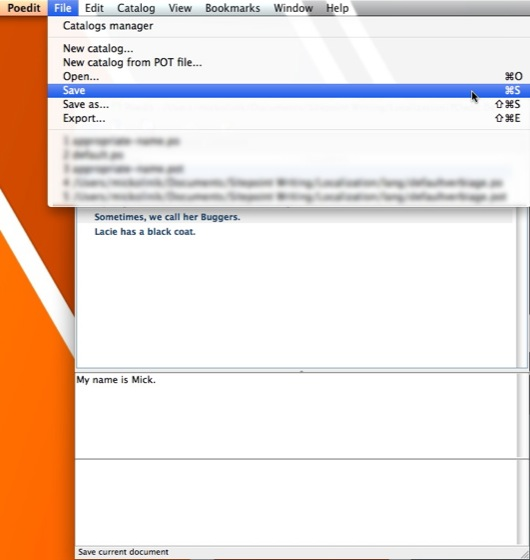
This is the tricky part—and essential for creating a .POT file with Poedit. Before you do anything else here, save the file a second time. The reason this is necessary is that when Poedit initially creates the .PO file, it saves the file first and then imports the translatable strings. If you fail to save the file a second time and close it, you'll end up with a blank .PO file that has no translatable strings, thus defeating the purpose. Once you save your .PO file a second time as in Figure 11.11 (with your translatable strings added), close the file and quit Poedit. Don't worry—we’ll be right back.
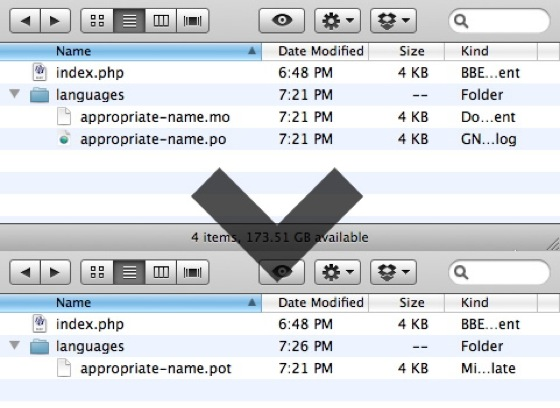
Now navigate to your directory structure where you’ve saved your .PO file. You’ll notice you actually have two files available: a .PO file that you created, and an .MO file that Poedit automatically compiled for you when you saved the .PO file. Because we first want to create a template file, we don’t need the .MO file—go ahead and delete it. Then, just rename the .PO file to a .POT file. When you’re done, you’ll end up with just one .POT file in your languages directory as highlighted by the arrow in Figure 11.12.
If all you are aiming to do is to set up your theme or plugin so that it can be easily localized by others, congratulations! At this point, you are all set, and you can move on with your life. So long as you include your shiny new .POT file in the correct directory, anybody will be able to work with and translate your theme or plugin into an infinite number of languages. That said, let’s assume you want to actually do a few translations. Get started by firing Poedit back up and instead of selecting , select , as in Figure 11.13.
Go ahead and find the .POT file you just created, open it, and then click to the subsequent catalog settings (they are the exact same ones you set yourself). Poedit will then ask you what you’d like to save your new .PO file as. Give it an appropriate name and save it as shown in Figure 11.14.

It’s clear sailing from here on. Just click on the string you’d like to translate in Poedit, and type a translation into the box on the bottom of the Poedit window as shown in Figure 11.15.

We’ll wash, rinse, and repeat this procedure until all the strings have been translated. Editing strings is just as easy … click on the string you want to edit, as in Figure 11.16, and make your modifications. Remember, each time you save a .PO file, a new .MO file will be compiled for you. It is the .MO file—not the .PO file—that WordPress will actually use when doing translations.
Tools like Poedit are really useful, but if you are planning on submitting your plugin to the Wordpress Plugin Directory, there’s an easier way to create a .POT file. Instead of going through all the hassle involved in saving and resaving a file in Poedit, you can choose to have your .POT file created automatically after your plugin has been accepted into the directory. Simply log in as an administrator for your plugin, and click the button underneath , and a .POT file will be generated for you to download. Since this is only useful if you’re submitting your plugin to the directory, we’ve included it here, as seen in Figure 11.17, as an extra way to get the job done, not the only way.

Funny you should ask that. There’s a pretty cool tool that’s been in
development for some time now called WPML. It’s a premium plugin and well worth
the investment. WPML greatly reduces the amount of time and effort it
takes to localize your theme or plugin, at least within the context of a
single website. All you need to do is identify your localization strings
properly within your plugin or your theme by wrapping them in
__() or _e() tags. Once you make
your string identifications, WPML takes over, eliminating the hassle of
setting up .PO, .MO and
.POT files and sorting out how to add them to your
files and themes.
When you initially run WPML on your WordPress site, WPML acts like Poedit and scans through all your theme and plugin files in search of translatable strings. Upon creating a list of strings, WPML asks which languages the website should be translatable to and automatically creates the necessary .PO and .MO files needed to support each. After that, WPML provides a really slick interface inside the WordPress backend that gives you options to translate strings as well as whole posts and pages. Even better, it creates unique, translated permalinks so that your posts and pages can be indexed in multiple languages by default! Finally, WPML integrates a translator management system. This lets you hire professional translators to do translation work directly on your site. Alternately, you can use WPML’s management system to assign specific members of your own staff to do translation in a particular language.
Of course, WPML isn’t the only game in town; as with most types of functionality in WordPress, there are several other plugins that you can use to accomplish the same purpose. At the time of this writing, the biggest competitor to WPML is qTranslate, and it has quite a solid following. While we won’t get into a feature comparison of the two, qTranslate is worth looking into, and is the translation plugin of choice for several popular plugins such as Google XML Sitemaps, which has released a specialized version to work with qTranslate, aptly named Google XML Sitemaps With qTranslate Support.
So far we’ve discussed localizing themes and plugins in detail, but what if that’s more than you’re looking for, and you instead want to know how to install WordPress itself in a different language? After all, it’s good to be able to localize themes and plugins, but it sure would be useful if we could make WordPress display in the language of our choosing, right? Well, there’s a good reason that we’ve waited until now to talk about this, as we’ll be able to utilize the localization concepts we’ve already covered to help it all make sense.
Thanks to the widespread use of WordPress across the globe, WordPress has already been translated into many languages for you, so you don’t have to mess around with the heavy lifting. For your convenience, a complete listing of available languages and links to their repositories is available within the WordPress Codex. As for installing the language of your choice, you can either install it manually, or you can look to see if the language translation team has a separate set of instructions that may be easier to work with (in some instances, you may be able to install WordPress with your preferred language already loaded and preconfigured). For our purposes here, we’ll show you how to do it manually from a regular old English installation:
-
Download the .MO file for your language of choice. Again, you can find links to these files in the Codex.
-
Next, open up your wp-config.php file in a text editor and locate
define('WPLANG', ''),, replacing the second parameter with the extension defined by your .MO file. For instance, if you were looking to use the British variant of English and downloaded the en-GB.mo file, you’d change this todefine ('WPLANG', 'en-GB'),. Conversely, if you were looking to translate WordPress to German and downloaded the de_DE.mo translation file, you’d change the line to readdefine ('WPLANG', 'de_DE'),. -
Once you have modified your
define ('WPLANG',
          ''),
appropriately, save wp-config.php. -
Now navigate to either wp-content or wp-includes and create a new folder called languages. So long as you create the languages directory in one of these two locations, WordPress will recognize it and look for your translation file there. Can you take a wild guess at what comes next?
-
If you guessed that we’ll need to add our .MO translation file to the languages folder, congratulations—you win the gold star!
That’s all there is to it. Next time you log in to your WordPress admin area, you’ll find it all pretty and new in the language you’ve enabled. Very cool stuff!
With WordPress’s continued increase in popularity and representation throughout the world, you’re fooling yourself as a developer if you don’t consider localization in everything you create for and with WordPress. In this chapter, we’ve touched on several aspects of localization, including:
-
why localization is now more important than it ever has been, and why you should care
-
the difference between internationalization and localization
-
an explanation of how the process works, in theory as well as in practice
-
a description of the three main types of files you’re going to deal with in the process: .MO, .PO, and .POT files
-
a detailed breakdown of how to use Poedit to create .POT files
-
a walk-through of how to translate text strings with Poedit and save them as your own .PO files
-
a description of plugins that can be used to help the localization process in your WordPress sites
-
an overview of the process involved in running WordPress in languages other than English
With the global market we now have available to us, it’ll be fun to dig into marketing and search engine optimization with WordPress in our next chapter. After all, we have so many new locations to explore!
[1] The “L” in L10n is generally upper-cased to distinguish it from “i,” which, when upper-cased, looks almost exactly the same.