While one of the main reasons for the massive popularity of WordPress is the approachable and simple-to-use GUI it boasts, ultimately it’s nothing more than a piece of software, and as a developer you’re going to have to get your hands dirty with some code. Not to fear, though; like everything else WordPress-related, there are systematic rules to follow that help you understand where different files live. Say hello to the standard WordPress file structure.
Like most content management systems, WordPress has a standardized way of describing how it’s put together as a cohesive piece of software by adhering to a standardized file structure. This is shown in Figure 3.1. This is the standard WordPress file structure shared by every single WordPress site running on the Web, regardless of what the site looks like or how it operates. It’s powerful because it’s fairly elegant, simple, and familiar to WordPress coders across the globe. Let’s take a moment to get familiar with the structure.

The file structure itself can be cleanly divided into two types of files and folders: system files and user-manageable files. System files include everything in the wp-admin and wp-includes directories, as well as all the actual files in the root directory except for wp-config.php. User-manageable files include everything that’s left: the wp-config.php file, the wp-content directory, and (on most servers) the .htaccess file. In case you’re curious, here’s a brief description of what everything is and does.
- System files and folders
-
-
These are all the .php files in the root directory, and serve as linchpins of WordPress, initiating the key functions that need to happen in order to make the system work. For example, index.php initiates the website page serving functionality, while wp-register.php contains all the logic necessary to initiate the user registration process, and wp-cron.php initiates the scheduled event functionality within WordPress.
-
wp-admin: All the files and folders within wp-admin comprise all the various tools and interfaces necessary to make WordPress run.
-
wp-includes: All the files and folders within wp-includes comprise the various pieces of code that actually execute WordPress and make all the magic happen.
-
- User-manageable files and folders
-
-
wp-config.php: We’ve already worked with this file quite a bit. wp-config.php begins its life in a newborn WordPress installation as wp-config-sample.php before being renamed, and controls all the primary settings and control keys for the installation. This includes defining the database location and credentials, setting the language being used in the site, and establishing unique keys that demonstrate authenticity and authority for the installation as a whole.
-
wp-content: This directory is where just about everything you ever add or modify will live in your WordPress installation, including plugins, themes, and absolutely every image you upload to the site.
-
.htaccess: While not visible in our screenshot, the .htaccess file is crucial in determining routing and general rules for how things operate. .htaccess is a file that can only be created on Linux and Unix-based servers, and doesn't ship with a typical WordPress installation; you have to actually make it for yourself, or WordPress will often create it on its own when you initially set your permalink settings (if the server you’re running WordPress on allows sufficient permission to do so).
-
Important: Color Inside the Lines
Unless you really know what you’re doing, it’s never a good idea to change the core WordPress files outside wp-config.php or the wp-content directory. As we’ve already learned, WordPress has the ability to update itself at the click of a button, and physically this is accomplished by overwriting what are considered to be standard system files. If you make changes to any of these files regardless of where they are, you run the risk of having your file modifications overwritten at some point in time. For this reason, it’s highly advisable to color inside the lines, and make sure that you make all your changes either in the wp-config.php file, or in the proper plugin and theme files in wp-content.
If where you hang your hat is where you call home, for the purposes of the WordPress universe, home may as well have the address of wp-content, as that’s where we’ll keep all our stuff. We’ve already had a cursory discussion of themes and plugins, but it’s important to realize that whether we have only a single theme and three plugins or 20 themes and 200 plugins, they’ll all be stored in either the wp-content/plugins or wp-content/themes directories. Additionally, when you begin to upload media to your website, the wp-content/uploads directory (or some form of it) will automatically be created, and will house all the media on your site.
So there you have it: a brief overview of where you can find just about anything inside a typical WordPress installation. While now we know where just about everything lives, it’s high time we rolled up our sleeves and started digging into some PHP code—so hold on to your hats!
Let’s start out by digging into a theme in our WordPress
installation and looking at the code we can find in the
index.php file therein. Now whenever you load that
WordPress page, WordPress queries the database for the posts that need to be shown. The posts that are returned
depend, of course, on what’s been asked for in the code of the page; for
example, a request for the home page generally results in a query asking
for the most recent posts. Even the templates for a single post or page
query the database and make a list, albeit a list with only one item.
WordPress loads up all these posts into a
posts object.
Once we have that object, we can use a piece of code called The Loop to control how these posts are treated. The Loop simply runs through the posts that are stored in the object, and defines how each should behave. We can use a blend of WordPress’s template tags—functions to display post data—and regular HTML markup to control the appearance of the posts.
If you’re working with templates like the home page, a tag or category listing, a date-based archive, or a search page, the query to retrieve the posts you need is built right into WordPress; this means that your only task is to manipulate The Loop. When you want to produce your own custom set of posts, however, you’ll need to create your own query for a custom loop to work with. In this chapter, we’ll start by playing with the basic loops, and once we have the hang of that, we’ll move on to creating custom queries.
Tip: What is the default loop doing?
It’s easy enough to find out what sorts of posts are being
retrieved in a given page’s loop. In WordPress, the
query_vars object stores all the
different parts of The Loop’s query. See what’s inside by echoing the
query’s query_vars:
<?php
echo "<pre>";
print_r($wp_query->query_vars);
echo "</pre>";
?>
You’ll soon find out a wealth of information about what’s been asked for in each query.
Because The Loop controls the appearance of a group of posts, you’ll often find yourself working with it when you’re editing template files. A quick trawl through the WordPress support forums will reveal that The Loop is, by far, one of the single most popular questions to ask about, and rightly so—it’s one of the most important parts of the WordPress experience. That has to be one big and scary bit of code, right?
Actually, it’s fairly lightweight. Stripped back to its basics, The Loop generally looks like this:
<?php if (have_posts()):
?>
     ... anything that should appear before your group of posts
<?php while (have_posts()) : the_post();
?>
     ... instructions for each post
<?php endwhile;
?>
     ... anything after your group of posts
<?php else:
?>
     ... what to show if there were no posts
<?php endif;
?>
What’s going on here? If you’re cosy with PHP, you
already know what an
if statement is
for—it’s checking to see if we have posts. If so, a
while loop kicks
in—that’s a piece of code that repeats based on a given condition. In our
case, we repeat this loop once for each post. And if there are no posts,
we’ll do the instructions that follow
else.
Of course, this is only as simple as it is because a lot of the hard
work has been abstracted away into different functions:
have_posts(), the_post(), and so
on. For our purposes in this chapter, it’s enough to know that they simply
work, but if you’re especially keen to find out, the Codex will explain it
all.
Of course, the above loop is stripped back to its most basic components, and if you were to go ahead and put it into your theme right now, you’d see very little indeed. In order to actually see anything interesting on your page, you’ll need to include some template tags.
As we mentioned earlier, template tags are the functions responsible for showing stuff—generally it’s information about your WordPress site, or about individual posts. There’s a dizzying array of these for all kinds of purposes; roughly, you could divide them into simpler approaches, and more complex ones.
Simpler tags are those functions that can be used with little or
no funny business with PHP. The easy tags are generally characterized
by starting with the word the.
-
the_title() -
This tag generates the post’s title. You’ll often use this within a heading element, in conjunction with
the_permalink(), like so:<h2> <a href="<?php the_permalink(); ?>"> <?php the_title(); ?> </a> </h2> -
the_permalink() -
This is used to output the URL of the post, or the URL of where the post would always be found, the latter which is known as permalinking. In our previous code example, we’ve used it to wrap around the title. You’ll also often find it in themes where a footer is used to provide post information. We used
the_permalink()in the<a>element in our previous example. -
the_author() -
This is the tag that shows the author’s name. In a user’s WordPress administrator profile screen, it’s possible to choose how you’d like your name to be displayed—login name, full name, first name, and so on. By default, the preference you choose is the one that’s shown for this tag:
<p>
Posted by <?php the_author(); ?>
</p>
-
the_author_meta() -
This is to show other kinds of information about the author, and accepts a parameter to define the information you’d like to show. For example, you can show a post author’s contact details or website, or different variations on their name:
<p>
<?php the_author_meta(’first_name’); ?>
  has been a member since
<?php the_author_meta(’user_registered’); ?>.
</p>
-
the_time()andthe_modified_time() -
These tags show the timestamp for when the post was made, or edited, respectively. They accept four arguments: format, text to show before, text to show after, and whether to echo the date (
trueis the default) or simply return it for your own use (false).The simplest way to call on either
the_time()orthe_modified_time()is to call it without arguments; WordPress will display the time that your post was made or updated with the format you specified in your blog’s time settings. If you want to use it to call a date as well, simply pass it a format, using the PHP date symbols:<p> Posted on <?php the_time(’jS F Y’); ?> at <?php the_time(’g:i a’); ?> </p>
-
the_date() -
the_date()acts a little differently tothe_time()in that it only appears once for each day; so for listing pages, like monthly archives, you can use it as a heading for groups of posts posted on the same day. As withthe_time(), it accepts four parameters: the format, text to show before, text to show after, and whether to echo or return the text. The following example will put a date inside a level 2 heading:<?php the_date( "jS F Y", "<h2>", "</h2>" ); ?>
-
the_excerpt() -
This displays the text that was entered in a post’s excerpt field. You’ll find that
the_excerpt()is put to good use in magazine-style themes where posts’ descriptions are used. If a post lacks an excerpt, WordPress will show the first 55 words of a post, with all markup stripped. This tag takes no parameters, so our example is simply:<?php the_excerpt(); ?>
-
the_content() -
This tag shows the contents of a post. On the home page or a listing page, if your post contains the
morequicktag (a quicktag is like an HTML formatting tag, but is used solely within WordPress),the_content()only shows content up to this point, followed by a link inviting a visitor to read more. When you’re on a single post’s page, the entire post is shown.the_content()accepts two parameters: a string that is shown for the link, and a Boolean to define whether you want to omit the text before themorequicktag—false is the default. In this example, we’ll combinethe_title()withthe_content()’s string (that is, its “read more”) parameter:<?php the_content("Continue reading " . the_title(’’, ’’, false)); ?> -
the_meta() -
If you’re making use of WordPress’s custom fields,
the_meta()is a quick way to display all the fields’ keys and values. These keys and values are output in an unordered list, and the function accepts no parameters. -
the_category() -
This shows a linked list of the categories that have been selected for this post. It accepts three parameters: a string to use as a separator, a choice of
multipleorsingleto show parent categories or just child categories, and a post ID if you were using this outside The Loop. Commonly, you’ll just pass the separator parameter. In the following example, we’ll receive a list of items separated by a comma:<p>We filed it under: <?php the_category(’, ’); ?> </p>By default—that is, when called without a separator parameter—the list of categories is printed as an unordered list.
-
the_tags() -
Like
the_category(), you’d use this tag to show a list of the categories you’ve used for this post. Unlikethe_category(), its parameters are for completely different purposes: text to show before the tags, a separator, and text to show after. By default, the output is the word Tags:, followed by each tag, separated by commas. In this example, we’ll use list items for our tags, so that they match the default behavior ofthe_category():<?php the_tags(’<ul><li>’,’</li><li>’,’</li></ul>’); ?>
Tip: More Tags
We’ve touched on just a few of the functions that are commonly used while you’re inside The Loop. You can find even more tags, and complete documentation on each, in the WordPress Function Reference.
For the most part, our arsenal of the_
template tags will do the job; but sometimes the output that WordPress
provides is less flexible than we’d like. Maybe we’d want to get at
the information about each post, but we’d like to make a few tactical
strikes with our PHP before it’s printed.
Fortunately, WordPress provides a number of tags that retrieve,
rather than simply print, post and page information (like our
the_ tags). These are generally prefixed with
get_. These get_ functions
return strings or arrays that we can stash in a variable and
manipulate. For every the_ function, there’s at
least one get_ function that can do a similar
job. Let’s look into how to use some of these.
-
get_the_category() -
Imagine that for a post, you want to list each of its categories’ names and descriptions as a definition list. Using
get_the_category(), we can retrieve an object describing each category associated with the current post:<dl> <?php foreach((get_the_category()) as $category) { echo "<dt>" . $category->cat_name . "</dt>"; echo "<dd>" . $category_description . "</dd>"; } ?> </dl> -
get_the_time() -
A common way to manipulate the time of a WordPress post is to use relative timestamps; that is, a statement like “Last posted 6 hours ago.” In this example, we’ll use
get_the_time()andget_the_modified_time()in conjunction withhuman_time_diff(), a built-in WordPress function, to provide a friendly depiction of when content was edited. Of course, if the post has never been edited after the fact, we have no need to show this section, so we’ll use anifstatement to check whether the post’s last edited timestamp is later than its published timestamp. Here goes:<?php $lastmodified = get_the_modified_time(’U’); $posted = get_the_time(’U’); if ($lastmodified > $posted) { echo "Edited " . human_time_diff(get_the_time(’U’), ↵ get_the_modified_time(’U’)) . " later"; } ?> -
get_post_custom() -
We learned earlier that
the_meta()fetches all the custom fields associated with a post. Custom fields are often used in plugins or for special post types, so it can be impractical to display them all indiscriminately. Instead, we can useget_post_custom()to retrieve just the fields we want. In this example, we’ve used this to retrieve any custom fields with a key ofsong, and then we’ll print them into an unordered list. Naturally, if there’s nosongfield for this post, we’ll display nothing:<?php $custom_fields = get_post_custom(); $song = $custom_fields[’song’]; if (isset($song)) { echo "<h3>Songs</h3>"; echo "<ul>"; foreach ( $song as $key => $value ) echo "<li>" . $value . "</li>"; echo "</ul>"; } ?>
Conditional tags are those that answer questions about common conditions, such as whether we’re viewing a single page, or whether a particular post matches certain criteria. It’s a great way to introduce some simple logic to your loops.
is tags are used in conjunction with
if statements in PHP. For example,
you may decide that on your home page a sticky post should display a
thumbnail, but a regular post should not. In your loop, you could simply
pop your thumbnail code inside an if statement that
checks to see if the post is sticky, and whether it has a thumbnail in
the first place:
<?php while (have_posts()) : the_post();
?>
<li>
  <h2><a href="<?php the_permalink() ?>">
      <?php the_title(); ?></a>
      <?php the_time("jS F"); ?>
  </h2>
  <?php if(is_sticky() && has_post_thumbnail()) {
          the_post_thumbnail();
        }
  ?>
  <p><?php the_excerpt(); ?></p>
  <p><?php the_tags( "Tagged with: ", " / ", "" ); ?></p>
</li>
<?php endwhile; ?>
You can pass arguments to conditional
tags, too, letting you perform actions at a very granular level. For
example,
is_page() will check if you’re on a
page, but if you pass it a page ID or a page title, you can perform
those actions only on that page. Here’s a snippet to
try:
<?php if(is_page(’About Us’)) { ?>
<div id="gallery">
  <h2>Gallery</h2>

      …

</div>
<?php }?>
Conditional tags are described in detail in the Codex.
Your readers often want to navigate backwards and forwards
through pages of posts—especially on blog- or news-style sites, so
remember to include options for pagination in your themes. In
WordPress, there are a few ways to achieve this.
posts_nav_link() is a single
template tag that creates a pair of links allowing the user to
navigate to the next or previous posts; you can use it in archive
templates or single post templates. If you want to split them up on an
archive page, you can use
previous_posts_link() and
next_posts_link() to print a link
to the previous and next set of results. To split these links on a
single template,
previous_post_link() and
next_post_link() print a link to
the previous and next single post.
posts_nav_link() accepts three parameters:
text to sit between the links, the text for the previous link, and the
text for the next link:
<p><?php posts_nav_link(’ • ’, ’Older posts’, ’Newer posts’);
?>.</p>Used on listing pages,
previous_posts_link() and
next_posts_link() each accept two parameters: the
link text, and the number of pages on which to show the links. The
default for the second parameter is 0, meaning all
pages:
<p><?php next_posts_link(’Go back in time...’, 0); ?></p>
For single posts,
previous_post_link() and
next_post_link() act a little differently. They
accept four parameters: a format for the link, the text of the link,
whether we only want to show a post from the same category, and any
categories from which we don’t want to show posts. In most cases, you
can go ahead and call this without passing any parameters, but if you
do have a need to fiddle with the links, you can use the
%title and
%link tokens to fine-tune the output.
In this example, we create a link to the previous and next post, and
adjust the text output accordingly:
<?php next_post_link(’Older: <strong>%link</strong>’); ?>
<?php previous_post_link(’Newer: <strong>%link</strong>’); ?>
Tip: That’s Backwards
WordPress considers the
next_post_link() function to actually refer
to the set of posts that came previously in
time. previous_post_link() refers to the ones
that came afterwards.
Find it a bit baffling? It helps if you think of this process as starting from your blog’s home page, which contains the newest posts, and digging backwards. When you’re working backwards, the next page is going to have older posts.
Now that we know what makes up a loop, let’s try filling in some of the blanks. The following example is a loop that will show each entry’s title, permalink, linked list of tags, and the excerpt. We’ll wrap up all those posts in a tidy unordered list, and if there are no posts to show, we’ll include a friendly message. Here goes:
<?php if (have_posts()) : ?>
  <h1>Latest Posts</h1>
  <ul class="mini-list">
    <?php while (have_posts()) : the_post(); ?>
      <li>
        <h2><a href="<?php the_permalink() ?>">
          <?php the_title(); ?></a>
          <?php the_time("jS F"); ?>
        </h2>
        <p><?php the_excerpt(); ?></p>
        <p><?php the_tags( "Tagged with: ", " / ", "" ); ?></p>
      </li>
    <?php endwhile; ?>
  </ul>
<?php else: ?>
<h1>No posts to show</h1>
<p>Sorry, we got nada. Nothing. Bupkis. Zippo.
Diddly-squat. Sorry to disappoint.</p>
<?php endif; ?>
Let’s see how that loop looks if we use it in a home page template reminiscent of WordPress’s Twenty Eleven style. Since it’s on the home page, it’s simply displaying the most recent posts in reverse chronological order. Figure 3.2 shows us what comes out of this loop.
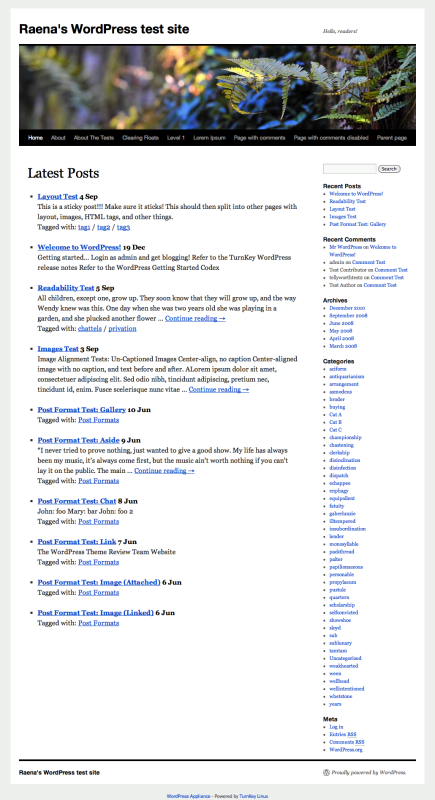
Exciting? Hardly, but it serves to demonstrate how quickly and easily you can have a simple loop up and running in your templates. Soon we’ll try some prettier examples.
We often find it’s useful to interrupt The Loop at a certain point, or to treat particular positions differently. For example, you might want to make the first post in your loop stand out more, or place an advertisement after the fifth post. You can accomplish this quite easily by introducing a counter to your loop. Every time The Loop prints out a post, we’ll increment the counter. All you need is a bit of code to check the value of the counter, and act accordingly.
In the following example, we’ll extend our simple mini loop from the previous section to show the first post’s full content, and leave the others as excerpts:
<?php if (have_posts()) : $postcounter = 1; ?>
  <h1>Latest Posts</h1>
  <ul class="mini-list">
    <?php while (have_posts()) : the_post(); ?>
      <li>
        <h2><a href="<?php the_permalink() ?>">
            <?php the_title(); ?></a>
            <?php the_time("j M"); ?></h2>
        <p>
          <?php if ($postcounter == 1) {
                  the_content();
                } else {
                    the_excerpt();
                  } ?>
        </p>
        <p><?php the_tags( "Tagged with: ", " / ", "" ); ?> </p>
      </li>
<?php $postcounter++; ?>


…
You’ll see that we start by creating a variable,
postcounter, and at the beginning we assign it a
value of 1. At the end of the while loop, we
increment the value of postcounter by 1. And in the
middle of the loop, we check the value of
postcounter and decide whether to show the excerpt
(the_excerpt()), or the post’s content
(the_content()).
Now, let’s put that same counter to work in the pursuit of cold
hard cash: we’ll insert advertising blocks after every third post.
After the end of the list items, we’ll check to see whether the value
of postcounter is divisible by three, and if so,
we’ll insert a subtle bit of advertising. The following example
extends further on our previous one:
…

</li>
<?php
  if (($postcounter % 3) == 0) { ?>
    <li class="break">
      <a href="http://www.example.com">Buy lots of widgets please
      </a>
    </li>
<?php  }
$postcounter++; ?>
Let’s see how that turned out, in Figure 3.3.

Of course, you might have better luck with raking in the cash if you use a more enticing ad from a reputable ad network, but no doubt you get the drift.
It’s all very well to be able to meddle with the default loops, but what about changing them completely, or even creating your own? Sometimes your project calls for a set of posts from a particular category or set of tags only. Maybe you’d like to show off your most recent photo attachments in a sidebar widget. You might want to change your author archives to show the posts in alphabetical order, instead of reverse chronological order. However you slice it, it’s a certainty that one day you’ll need to go beyond the safety of those default loops.
Like any CMS, WordPress’s most important job is to retrieve and display posts. Accordingly, there are a few different methods for querying the database. Let’s look at how these are done and when you might use each technique.
We learned earlier that WordPress, being a helpful type of CMS,
sets up its own queries on certain pages. What happens, though, when
you want to alter that behavior ever so slightly? If your goal is
simply to modify what should appear in the main WordPress loop, the
query_posts()
function is for you. It’s a function that overrides the
current page’s default loop, and it’s useful whenever you want to make
some quick tweaks to the type of posts that appear.
To use it, simply call on query_posts()
before your loop begins, and set up the parameters you need from the
available options. For example, we often find that we want to exclude
certain categories from date-based archives or the home page. We can
do this by simply adjusting the query to exclude those categories’ IDs
with a minus sign, like so:
<?php query_posts(’cat=-11,-8,-90’);
if (have_posts()): while (have_posts()) : the_post(); ?>
... continue your loop as normal
To add more parameters, just pass on more of them, separated by ampersands:
<?php query_posts(’cat=-11,-8,-90&post_type=reviews&tag=action’); ?>
Tip: What Parameters Can I Use?
All the available parameters are documented in the
WordPress
Codex’s
WP_Query
documentation, which is the class that underpins all the
functions around fetching content.
Once you start adding more and more criteria, it becomes a
little easier to read if you express these as a longhand-style array,
and then pass the array into the query_posts()
function:
<?php $args = array(
        ’cat’ => ’-11,-8,-90’,
        ’post_type’ => ’reviews’,
        ’tag’ => ’action’,
        ’posts_per_page’ => 30,
        ’order’ => ’ASC’,
        ’order_by’ => ’rand’
    );
    query_posts($args);
?>
When you’ve finished with your customized loop, it’s
important to clean up after yourself, and reset the query back to
normal. query_posts() modifies a lot of global
variables, many of which are also in use by plugins and themes; if you
neglect to reset your query once you’re done, it could have an adverse
effect on plugins and the elements that assume the query has been left
untouched. Overcoming it is simple—the
wp_reset_query() function avoids all the
drama:
    ... The Loop
<?php else: ?>
    ... the no posts message
<?php endif;
 wp_reset_query(); ?>
The query_posts() function is great if you
want to modify what happens on any given page’s default loop. When you
have a need to create completely customized loops, however, we have a
different tool at our disposal:
get_posts().
We often find ourselves using custom loops when we want to create complex pages. For example, the ever-popular magazine-style layout frequently makes use of a number of separate loops to achieve effects such as sliders and featured posts, or formats including topical sections. In this situation, modifying the existing loop isn’t going to be enough.
For example, let’s say that we’re creating a page template that lists a particular series of posts. Each post in the series is tagged with wordpress and tutorial. We want to show the list of posts in ascending date order, so that a reader of the page knows which order to read them in.
To set up a loop that works for this scenario, we’ll first need
to make a new array with all the parameters we want to use to retrieve
our posts. Then, we’ll use get_posts() to create
a new array of posts, tutorials, and use a
foreach loop to iterate through them.
By default, we’re unable to use template tags like
the_content in the usual way, so the addition of
the
setup_postdata() function takes
each post and prepares it for easier use:
<?php $args = array(
    ’numberposts’ => 30,
    ’tag’ => ’wordpress+tutorial’,
    ’order’ => ’ASC’,
    ’order_by’ => ’date’
);

$tutorials = get_posts($args);
foreach($tutorials as $post) : setup_postdata($post); ?>
    <h2><a href="<?php the_permalink(); ?>">
      <?php the_title(); ?>
      </a>
    </h2>
    <?php the_excerpt(); ?>
<?php endforeach; ?>
Tip:
setup_postdata() Requires a
post
In the above example, each item in the
tutorials array is referred to as
post. With the
setup_postdata() function, you must always
call on each post as post—no other variable
will do.
Tip: Post Query Parameters
When we’re building our own queries, we have some incredibly powerful tools at our disposal. As always, there’s no better place than the Codex to learn about all the different parameters and how to combine them.
As we progress through this book, and cover different techniques and topics, we’ll see how various parameters and methods help us get those jobs done.
The WP_Query class is what’s responsible
for returning the posts for a default loop,
get_posts(), and
query_posts(), alike; these functions call on the
same class, just in different ways. Calling on it directly gets you a
big object with a selection of posts, plus a good deal of information
about the request itself.
If you’re a creature of habit and consistency, a big benefit of
this approach is that you can instantiate a new
WP_Query object and treat it just like a
regular WordPress loop, but dealing with
get_posts() can be a little more
tricky. Most of the techniques and functions are the same as the ones
you’d use when you’re manipulating a regular old loop, so it’s very
easy to pick up and use this method right away. With
get_posts(), you’ll find that there are a few
caveats: pagination needs extra help, plugins work differently with a
loop made from get_posts(), and so on.
Another benefit of the WP_Query approach
is that you’ll often find it in use with plugins, especially ones that modify the WordPress back
end. If you’re an aspiring plugin ninja, it’s likely you’ll deal with
WP_Query often, so some consistency in how you
retrieve content is handy to have.
It’s still okay to use get_posts() to grab
simpler lists of posts—in fact, it’s been a popular method for so long
that it will probably be around for a little while yet—but the ease of
dealing with the WP_Query object directly makes
it a great choice overall. You may find that you never need to worry
about using get_posts() at all!
Let’s look at how easy it is to deal with a
WP_Query object. In this example, we’re
creating a similar loop to the one in the previous section, showing
our WordPress tutorial series in chronological order—this time, using
the WP_Query method. Before we begin, we’ll put
the existing query in a new variable for safekeeping:
<?php
$original_query = $wp_query;
$wp_query = null;

$args = array(
    ’numberposts’ => 30,
    ’tag’ => ’wordpress+tutorial’,
    ’order’ => ’ASC’,
    ’order_by’ => ’date’,
    ’paged’ => $paged
    );
$wp_query = new WP_Query($args);
?>
Tip: For Pagination, Only $wp_query Will
Do
In this example, we’ll be making our own query, but we’ll be
copying our original query to another variable and then naming
that variable
$wp_query. This is necessary for
pagination methods and their associated tags. They
simply fail to work when the query is stored in an object by any
other name. Of course, you’ll only need to concern yourself with
this issue when you need pagination.
With us so far? Now that we’ve stashed the old query away and set up our new one, we can start using the new query in a loop:
<?php if ($wp_query->have_posts()): ?>
<?php while ($wp_query->have_posts()) : $wp_query->the_post(); ?>
  <h2><a href="<?php the_permalink(); ?>">
      <?php the_title(); ?>
    </a>
  </h2>
  <?php the_excerpt(); ?>
<?php endwhile; else: ?>
    ... something to show if there were no posts
<?php endif; ?>
When you’re finished playing with your
WP_Query object, it’s time to return everything
to how you found it. We’ll put the contents of
$original_query back into
$wp_query, and ensure everything’s back to normal
by using the
wp_reset_postdata() function. This
function uses the page’s POST data to restore the
post global variable to its original
state:
<?php
  $wp_query = $original_query;
  wp_reset_postdata();
?>
With a combination of custom queries, loops, and good old-fashioned HTML elbow grease, you’ll be able to create some groovy features for your blog. Here are some examples of common techniques, and how queries and loops are used to achieve them. We’ve touched on a bit of theory in this chapter, but since The Loop is such an important part of the WordPress experience, you’ll find that we delve into more interesting aspects of it throughout this book.
For now, let’s just try out a few more examples.
Imagine that you’d like to pull out a series of posts matching a
given custom field. For example, if you’ve been keeping a note of the
music you were listening to while you wrote each post, it might be
amusing to pull out links to all the posts matching a given artist.
WP_Query provides two custom field arguments,
meta_key and meta_value,
to construct a query:
<?php
$original_query = $wp_query;
$wp_query = null;

$args = array(
    ’meta_key’ => ’artist’,
    ’meta_value’ => ’The Beatles’,
    ’order’ => ’DESC’,
    ’order_by’ => ’date’,
    ’post_count’ => ’10’
    );
$wp_query = new WP_Query($args);
?>
Now that we have our arguments and our query in place, we’ll
create a loop that shows a heading and list when there’s matching posts.
Since we have no need to show anything here if nothing exists, we’ll
just exit The Loop after our while loop:
<?php if (have_posts()): ?>
  <h3>This artist also inspired...</h3>
  <ul>
    <?php while (have_posts()) : the_post(); ?>
      <li><a href="<?php the_permalink(); ?>">
          <?php the_title(); ?>
          </a>
      </li>
    <?php endwhile; ?>
  </ul>
<?php endif; ?>
As we learned earlier, it’s important to clean up your mess afterwards:
<?php
// Reset post data
wp_reset_postdata();
// Restore some order
$wp_query = $original_query;
?>
If you’re super-organized, you probably have a bunch of future-dated posts waiting to go up. Why not tease your readers with a taste of what’s to come? In this example, we’ll create a query that retrieves future posts, and shows their titles, excerpts, and an idea of how long readers need to wait till they can see it.
As before, we’ll store away the original query in another object,
and create a new WP_Query. In this case, we’ll
use the post_status argument to ask for posts
that are set for publication in the future:
<?php
$original_query = $wp_query;
$wp_query = null;
$args = array(
    ’post_status’ => ’future’,
    ’order’ => ’ASC’,
    ’order_by’ => ’date’,
    ’post_count’ => ’3’
    );
$wp_query = new WP_Query($args);
?>
Easy enough so far. Now we’ll show a title, the excerpt, and a human-friendly explanation of how long our readers will have to bite their nails and wait to read it:
<?php
if (have_posts()) : while (have_posts()) : the_post(); ?>

<h2><?php the_title(); ?></h2>
<p><?php the_excerpt(); ?></p>
<?php
$now = time(’U’);
$posted = get_the_time(’U’);
echo "Going live in " . human_time_diff($posted, $now) . " time";

?>
<?php endwhile;
else: ?>
    <p>No future posts are planned.</p>
<?php endif; ?>
There are many different facets to developing a keen understanding
of WordPress, but the none of them will make sense until you understand
The Loop and template tags, how they work together, and where everything
lives. In this chapter, we covered the standard WordPress file structure
and described how and where to use The Loop. We went through a few
examples of simple versions of The Loop, and then dug into some more
custom manipulations where we created our own queries and looked at the
difference between query_posts(),
get_posts(), and WP_Query. On
the surface, The Loop isn’t the sexiest topic in WordPress, but it’s the
vital building block required to make everything else hum. Now let’s start
putting our new-found knowledge about template tags and The Loop into
action and delve into the world of custom post types.