
Chapter 4
Writing Your First Application
In This Chapter
![]() Working with the Integrated DeveLopment Environment (IDLE)
Working with the Integrated DeveLopment Environment (IDLE)
![]() Getting started with IDLE
Getting started with IDLE
![]() Writing the first application
Writing the first application
![]() Seeing how the first application works
Seeing how the first application works
![]() Formatting your application code
Formatting your application code
![]() Using comments effectively
Using comments effectively
![]() Working with existing applications
Working with existing applications
![]() Ending your IDLE session
Ending your IDLE session
Many people view application development as some sort of magic practiced by wizards called geeks who wave their keyboard to produce software both great and small. However, the truth is a lot more mundane.
Application development follows a number of processes. It’s more than a strict procedure, but is most definitely not magic of any sort. As Arthur C. Clark once noted, “Any sufficiently advanced technology is indistinguishable from magic.” This chapter is all about removing the magic from the picture and introducing you to the technology. By the time you’re finished with this chapter, you too will be able to develop a simple application (and you won’t use magic to do it).
As with any other task, people use tools to write applications. In the case of Python, you don’t have to use a tool, but using a tool makes the task so much easier that you really will want to use one. In this chapter, you use a tool that comes with Python, the Integrated DeveLopment Environment (IDLE). In the previous chapter, you use the command-line tool to play around with Python a little. However, IDLE goes further than the command line tool and makes it possible to write applications with greater ease.
 A vast number of other tools are available for you to use when writing Python applications. This book doesn’t tell you much about them because IDLE performs every task needed and it comes with Python. However, as your skills increase, you might find that tools such as Komodo Edit (http://www.activestate.com/komodo-edit/downloads) are easier to work with than IDLE. You can find a great list of these tools at https://wiki.python.org/moin/IntegratedDevelopmentEnvironments.
Understanding the Integrated DeveLopment Environment (IDLE)
You can literally create any Python application you want using just a text editor. As long as the editor outputs pure text rather than formatted text as a word processor does, you can use it to write Python code. However, using a text editor isn’t efficient or straightforward. To make the development process easier, developers have written Interactive Development Environments (IDEs). The IDE that comes with Python is IDLE. However, many other IDEs are capable of working with Python.
 The feature set provided by IDEs varies. In fact, that’s why there are so many of them on the market. IDLE provides a basic feature set that is shared by most IDEs out there. It provides the functionality required to
- Write Python code.
- Recognize and highlight keywords and certain types of special text.
- Perform both simple editing (such as cut, copy, and paste) and code-specific editing (such as showing the parentheses that surround an expression).
- Save and open Python files.
- Browse the Python path to make locating files easy.
- Browse and locate Python classes.
- Perform simple debugging tasks (removing errors from the code).
IDLE differs from the command-line version of Python in that you get a full-fledged GUI and you can accomplish many tasks much more easily through IDLE than through the command line. In addition, the command line doesn’t really offer all the same features as IDLE. Yes, you can debug your application using the command line, but it’s a difficult, error-prone process. Using IDLE is a whole lot easier.
Starting IDLE
You find IDLE in the Python 3.3 folder on your system as IDLE (Python GUI). When you click or double-click this entry (depending on your platform), you see the IDLE editor shown in Figure 4-1. The two lines of text contain information about the Python host and provide suggestions on the commands you can try. The precise information you see differs by platform. Your screenshots may differ from mine depending on the version of Python you use, the platform you use, how you have IDLE configured, and how you have your system configured.
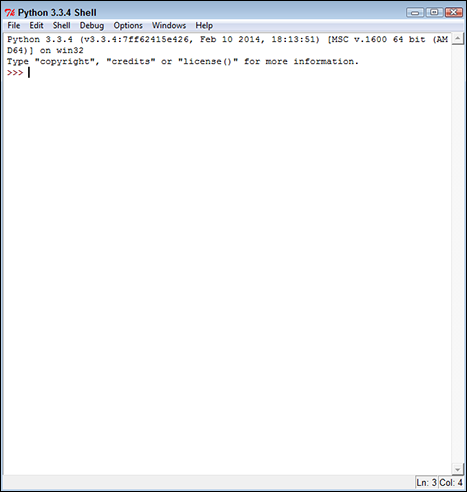
Figure 4-1: IDLE provides you with a GUI editing experience for your application code.
Using standard commands
IDLE provides all the same commands as the command-line version of Python. It doesn’t list them all because the assumption is that you’ll use the GUI features of IDLE to make things easy. However, if you want, you can type help() and press Enter to enter help mode, even though this command isn’t listed as one of the initial commands for IDLE as it is for the command-line version. Figure 4-2 shows the results.

Figure 4-2: You can access all the same commands in IDLE that you can with the command line version.
Understanding color coding
The book doesn’t show the color coding that you see when you type help( ), but you can see it in the editor. Color coding lets you see commands with greater ease and differentiate commands from other sorts of text. Press Enter to get out of help mode. As with the command-line version, you see descriptive text each time you perform an action.
Now, type print('This is some text.') and press Enter. You see the expected output, just as you normally would (see Figure 4-3). Notice the color coding, though. The print() command is in purple text to show that it’s a command. The text within the print() command is green to show that it’s data and not a command. The output is shown in blue. The color coding makes things a lot easier, which is just one of many reasons that using IDLE is easier than using the command line.

Figure 4-3: With color coding, you can easily determine the use for each kind of text in an application.
Getting GUI help
IDLE makes obtaining the help you need easy. Look at the Help menu and you see three entries for obtaining help:
- About IDLE: Provides you with the latest information about IDLE.
- IDLE Help: Shows you a text file containing information about working with the IDLE IDE. For example, this is where you find a list of the IDLE commands.
- Python Docs: Contains information required to work with Python commands and other elements.
Choose Help⇒About IDLE to see the About IDLE dialog box shown in Figure 4-4. Near the middle of the dialog box, you see URLs for obtaining additional help. Each of the buttons displays a text file containing useful information, especially in the README and NEWS files. Click Close to exit this dialog box.

Figure 4-4: The About IDLE dialog box contains useful information that you might not see otherwise.
Precisely what you see when you choose Help⇒Python Docs depends on the platform you use. Figure 4-5 shows the Windows version of the dialog box. The Python Docs file contains information about how to work with and use Python to create applications. It even has a tutorial section in which you can find additional helpful tips after working your way through this book.

Figure 4-5: Use Python Docs to discover more about using Python to create applications.
Configuring IDLE
IDLE is basically a fancy text editor, when you think about it, so it’s not surprising that you can configure it to perform the task of editing text better. Choose Options⇒Configure IDLE to see the IDLE Preferences dialog box shown in Figure 4-6. This is where you can choose things like what font IDLE uses when displaying text. In the figure, you see the Font/Tabs tab, which lets you choose the size and style font used for text, along with the number of spaces used for indentation (see the “Understanding the Use of Indentation” section of this chapter for details).
As previously mentioned, IDLE uses color coding to make reading and understanding the code easier. This tab lets you choose the colors used to perform highlighting, as shown in Figure 4-7. Notice that you can save your selections as a theme. You can create different themes for different needs. For example, you may use one theme when you use your laptop or other computing device in bright conditions and another theme in low light conditions.

Figure 4-6: Configure IDLE to meet your particular requirements.
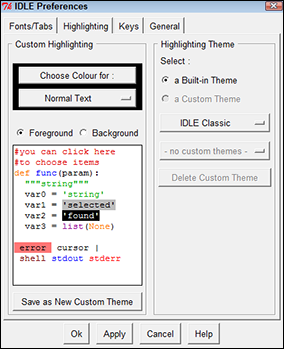
Figure 4-7: Change the highlighting used for text so that you can see it better.
Even though you won’t see shortcut keys used very often in this book due to platform differences, IDLE does support them. The shortcut keys on your platform may differ from those shown in Figure 4-8. IDLE comes with built-in key sets for Windows, Mac, OS X, and Unix. You can choose any of these themes by clicking the small button next to the IDLE Classic Windows entry (see Figure 4-8). You can also create your own custom theme that’s based on another application you use.

Figure 4-8: Use shortcut keys that make the most sense to you as a developer.
The General tab, shown in Figure 4-9, controls how IDLE works. For example, you can tell IDLE to open a Python Shell window (so that you can experiment) or an Edit window (so that you can write an application). The default is to open a Python Shell window so that you can experiment with Python and try new techniques. You can also control whether IDLE prompts you to save files before running applications (always a good idea in case the application causes the system to freeze) and the size of the initial window when you create one. Paragraph formatting keeps your text from becoming too long to comfortably see in the window. The defaults you see normally work just fine, so there really isn’t a good reason to change them.

Figure 4-9: The General tab controls the functioning of the IDLE application.
The Additional Help Sources feature lets you create new help sources for IDLE to use. For example, you can create a link to an online source, such as Python’s online documentation at https://docs.python.org/release/3.3.4/. To add a new source, click Add. You see the New Help Source dialog box, shown in Figure 4-10, where you can add the text that appears on the Help menu for this information source and the location of that source on a hard drive or online. When you finish adding the source, click OK and you’ll see it added to the IDLE Help menu. There are also buttons on the General tab of the IDLE Preferences dialog box for editing and removing help sources.
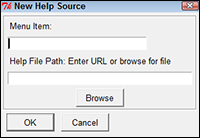
Figure 4-10: Create new help sources as needed to make your development experience easier.
Creating the Application
It’s time to create your first Python application. Your initial Python Shell window won’t work for creating an application, so you can begin by creating a new Edit window for the application. You’ll type the required commands and then save the file to disk.
Opening a new window
The initial Python Shell window is just fine for experimentation, but you need a nice, clean Edit window for typing your first application. The Python Shell window is interactive, which means that it gives you immediate feedback for any commands you type. The Edit window provides a static environment, where you type commands, save them, and then run them after you type enough commands to create an application. The two windows serve distinctly different purposes.
Choose File⇒New File to create a new window. A new window like the one shown in Figure 4-11 opens. Notice that the title bar says Python 3.3.4 Untitled instead of Python 3.3.4 Shell. A Python Shell window will always have the word “Shell” in the title bar. The two windows also have some unique toolbar entries. For example, an Edit window includes the Run command, which you use later to test your application.

Figure 4-11: Use the Edit window to create applications.
Working with the Edit window is just like working with any other text editor. You have access to basic editing commands such as Copy, Cut, and Paste. Pressing Enter moves to the next line rather than executing a command as it would when working in the Python Shell window. That’s because the Edit window is a static environment — one where you type commands and save them for later reuse.
The Edit window also provides special commands to format the text. The “Understanding the Use of Indentation” and “Adding Comments” sections of this chapter describe how to use the formatting features. What you need to know now is that these formatting commands act differently from those in a standard text editor because they help you control the appearance of code rather than of generic text. Many of the formatting features work automatically, so you don’t need to worry about them now.
Finally, the Edit window provides access to commands that tell Python to perform the steps in the procedure you create one at a time. This process is called running the application. The “Running the Application” section of this chapter describes this process in greater detail.
Typing the command
As with the Python Shell window, you can simply type a command into the Edit window. To see how this works, type print(. Notice that the Edit window provides you with helpful information about the print() command, as shown in Figure 4-12. The information is a little terse, so you may not understand it now. As the book progresses, you learn more about the print() command and the help provided by the Edit window will make more sense. For now, the word value is the one that you need to focus on. The print() command needs a value before it can print anything and you’ll encounter a host of different values as the book progresses.
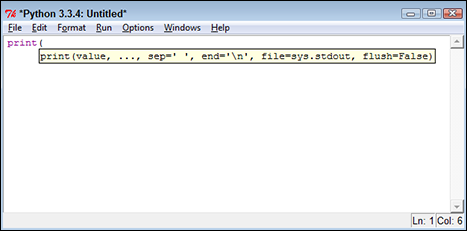
Figure 4-12: The Edit window provides helpful information about the commands you type.
Finish the command by typing “This is a simple Python application.”) and pressing Enter. Your application should look like the one shown in Figure 4-13. This is one of the simplest applications you can create using Python.

Figure 4-13: A complete application can be quite short.
Saving the file
You could run the application now if you wanted to. However, saving your application before you run it is always a good idea. That way, if you make a mistake that causes Python or the system to freeze for some reason, your application code is still safe. Saving the application makes it easier to go back later to determine what went wrong, make corrections, and try running the application again.
Choose File⇒Save to display the Save As dialog box, shown in Figure 4-14. The Edit window automatically chooses the Python33 folder to save the application in. However, this is where the Python code resides, and saving your application code in the same folder is a bad idea.
The example code for this book is contained in a folder named BP4D (Beginning Python For Dummies). The code for this chapter is found in the BP4DChapter04 subfolder of the downloadable source (see the Introduction for the location of the source code online). If you want, create a directory structure with similar names using a technique that works for your platform as you follow along in the book. You can also open the downloadable source code file for the book and avoid typing the example code. Type FirstApp.py in the Filename field of the Save As dialog box and click Save. Your application code is now saved on disk and you can access it anytime you want.

Figure 4-14: The Save As dialog box provides the means for saving your application.
When you return to the Edit window, the title bar text changes, as shown in Figure 4-15. Notice that the title bar includes the full path to the application.

Figure 4-15: An application on disk displays its name and path in the title bar.
Running the Application
Applications aren’t much good if you can’t run them. Python provides a variety of methods for running any application you create. This section explores the easiest method for running an application after you create it. You see additional methods in the “Loading and Running Existing Applications” section of the chapter. The important thing to remember is that Python provides an extremely flexible environment, so if one method of performing a task doesn’t quite work, another method will almost certainly succeed.
To run this first application, choose Run⇒Run Module. You see a new copy of the Python Shell window opens and then the output of your application appears, as shown in Figure 4-16.

Figure 4-16: The output of the example application appears in a Python Shell window.
The top two lines of the output in Figure 4-16 should be familiar by now — they’re the information that always appears when you start the shell. Next comes a
================================ RESTART ================================
message. You see this message every time you run the application. To see this for yourself, select the Edit window and choose Run⇒Run Module. The original Python Shell window is selected, another message appears, and you see the output from your application again, as shown in Figure 4-17.

Figure 4-17: The Python Shell window displays a Restart message each time you run the application.
Understanding the Use of Indentation
As you work through the examples in this book, you see that certain lines are indented. In fact, the examples also provide a fair amount of white space (such as extra lines between lines of code). Python ignores any indentation in your application. The main reason to add indentation is to provide visual cues about your code. In the same way that indentation is used for book outlines, indentation in code shows the relationships between various code elements.
The various uses of indentation will become more familiar as you work your way through the examples in the book. However, it’s important to know at the outset why indentation is used and how it gets put in place. So, it’s time for another example. The following steps help you create a new example that uses indentation to make the relationship between application elements a lot more apparent and easier to figure out later.
- Choose File⇒New File.
IDLE creates a new Edit window for you.
- Type print(“This is a really long line of text that will ” +.
You see the text displayed normally onscreen, just as you expect. The plus sign (+) tells Python that there is additional text to display. Adding text from multiple lines together into a single long piece of text is called concatenation. You learn more about using this feature later in the book, so you don’t need to worry about it now.
- Press Enter.
The insertion point doesn’t go back to the beginning of the line, as you might expect. Instead, it ends up directly under the first double quote, as shown in Figure 4-18. This feature is called automatic indention and it’s one of the features that differentiates a regular text editor from one designed to write code.
- Type “appear on multiple lines in the source code file.”) and press Enter.
Notice that the insertion point goes back to the beginning of the line. When IDLE senses that you have reached the end of the code, it automatically outdents the text to its original position.
- Choose File⇒Save.
You see the Save As dialog box.
- Type LongLine.py in the File Name field and click Save to save it.
- Choose Run⇒Run Module.
A new Python Shell window opens with the text displayed. Even though the text appears on multiple lines in the source code file, it appears on just one line in the output, as shown in Figure 4-19.
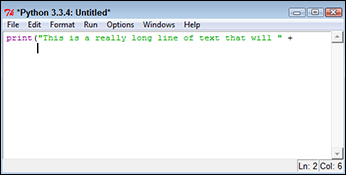
Figure 4-18: The Edit window automatically indents some types of text.

Figure 4-19: Use concatenation to make multiple lines of text appear on a single line in the output.
Adding Comments
People create notes for themselves all the time. When you need to buy groceries, you look through your cabinets, determine what you need, and write it down on a list. When you get to the store, you review your list to remember what you need. Using notes comes in handy for all sorts of needs, such as tracking the course of a conversation between business partners or remembering the essential points of a lecture. Humans need notes to jog their memories. Comments in source code are just another form of note. You add them to the code so that you can remember what task the code performs later. The following sections describe comments in more detail.
Understanding comments
Computers need some special way to determine that the text you’re writing is a comment, not code to execute. Python provides two methods of defining text as a comment and not as code. The first method is the single-line comment. It uses the number sign (#), like this:
# This is a comment.
print("Hello from Python!") #This is also a comment.
A single-line comment can appear on a line by itself or it can appear after executable code. It appears on only one line. You typically use a single-line comment for short descriptive text, such as an explanation of a particular bit of code.
When you need to create a longer comment, you use a multiline comment. A multiline comment both starts and ends with three double quotes ("""), like this:
"""
Application: Comments.py
Written by: John
Purpose: Shows how to use comments.
"""
Everything between the two sets of triple double quotes is considered a comment. You typically use multiline comments for longer explanations of who created an application, why it was created, and what tasks it performs. Of course, there aren’t any hard rules on precisely how you use comments. The main goal is to tell the computer precisely what is and isn’t a comment so that it doesn’t become confused.
Even though single-line and multiline comments are both comments, the IDLE editor makes it easy to tell the difference between the two. When you’re using the default color scheme, single-line comments show up in red text, while multiline comments show up in green text. Python doesn’t care about the coloration; it’s only there to help you as the developer.
Using comments to leave yourself reminders
A lot of people don’t really understand comments — they don’t quite know what to do with notes in code. Keep in mind that you might write a piece of code today and then not look at it for years. You need notes to jog your memory so that you remember what task the code performs and why you wrote it. In fact, here are some common reasons to use comments in your code:
- Reminding yourself about what the code does and why you wrote it
- Telling others how to maintain your code
- Making your code accessible to other developers
- Listing ideas for future updates
- Providing a list of documentation sources you used to write the code
- Maintaining a list of improvements you’ve made
You can use comments in a lot of other ways, too, but these are the most common ways. Look at the way comments are used in the examples in the book, especially as you get to later chapters where the code becomes more complex. As your code becomes more complex, you need to add more comments and make the comments pertinent to what you need to remember about it.
Using comments to keep code from executing
Developers also sometimes use the commenting feature to keep lines of code from executing (referred to as commenting out). You might need to do this in order to determine whether a line of code is causing your application to fail. In fact, it’s such a common and useful way to work with code that a technique for adding this sort of comment is built right in to IDLE. Here’s an example of how this feature works. Say that you have an application like the one shown in Figure 4-20 (found in the Comments.py file provided as part of the downloadable source code).

Figure 4-20: Sometimes developers need to comment out lines of code.
You might want to comment out the line that reads print("This code is commented out."). To make this happen, place the insertion point at the beginning of the line, or simply select the entire line, and choose Format⇒Comment Out Region. IDLE then adds a single-line comment to the code, as shown in Figure 4-21. Notice that this single-line comment uses two number signs (##) to differentiate it from a single-line comment you create by hand.

Figure 4-21: Comment out any code you don’t want Python to execute.
Of course, you don’t know yet whether the commenting has worked. Save the file to disk and then choose Run⇒Run Module. You see a new Python Shell window open with just a single line of output, as shown in Figure 4-22. So, the first print() command, which isn’t commented out, executes just fine, but the second one doesn’t.

Figure 4-22: Commented out lines of code don’t execute.
To add the code back into the application, place the insertion point at the beginning of the line, or highlight the entire line, and choose Format⇒Uncomment Region. IDLE removes the comment that it added earlier. Save the file and then choose Run⇒Run Module to see the result. This time, you see both print() commands execute, as shown in Figure 4-23.
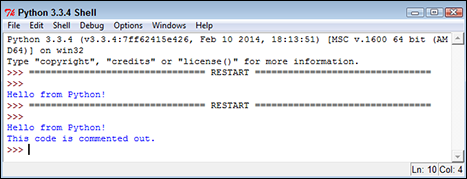
Figure 4-23: Both print() commands execute when neither is commented out.
You can comment out multiple lines of code at once by highlighting all of the lines and choosing Format⇒Comment Out Region. Likewise, you can uncomment out multiple lines of code by highlighting all the lines and choosing Format⇒Uncomment Region. It isn’t necessary to comment out or uncomment out one line at a time unless you have just one line of code to check.
Loading and Running Existing Applications
Running your application immediately after you write it is fun and interesting, but at some point you’ll close IDLE and be left with a file on your disk. The file contains your application, but you need to know how to use that file to execute it. Python actually provides a considerable number of ways to achieve this task. The following sections describe just three of these approaches.
Using the command line or terminal window
The command line, or terminal window, provides the means to execute commands by typing them in. You can also create batch files to execute a number of commands as part of a batch process. In this case, you’re looking at the native command environment provided by the platform you’re using, rather than at the specialized Python command line. When working in this environment, you type commands to start Python and perform specific tasks. For example, if you want to execute FirstApp (described in the “Creating the Application” section of this chapter), you type python FirstApp.py and press Enter. Figure 4-24 shows typical results. You can execute any other application this way as well.
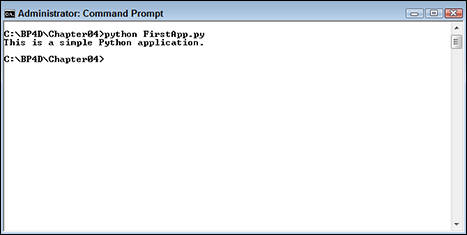
Figure 4-24: It’s possible to execute an application directly at the command line.
Using the Edit window
Any time you’re in IDLE, you can open an existing application in an Edit window and execute it, just as you have in previous sections of this chapter. To perform this task, load the file you saved earlier by choosing File⇒Open. You see an Open dialog box that looks similar to the Save As dialog box shown in Figure 4-14. Choose the folder containing the application in the Look In field and highlight it in the list provided. Click Open to open the file. At this point, you can choose Run⇒Run Module to run the application, just as you would normally.
Using the Python Shell window or Python command line
When you’re in the IDLE Python Shell window or at the Python command line, you’re in an environment where you can type commands and see them executed immediately. However, you need to know the right commands to perform specific tasks. In this case, the command is a little more complex than the print() command you’ve been using to date. If you want to execute FirstApp, you need a really odd-looking command like one of the two shown here:
exec(open("C:\BP4D\Chapter04\FirstApp.py").read())
exec(open("C:/BP4D/Chapter04/FirstApp.py").read())
 The preceding two commands are really the same one using a different type of slash. The command works equally well with forward slashes or backslashes. What this command says to do is this:
- Open the FirstApp.py file located in the BP4DChapter04 folder on the C drive (open() command).
- Read the content of this file into the Python environment (read() command).
- Execute the instructions found in the file after it’s loaded (exec() command).
It’s a little early for a command like this one, but you’ll discover that you can create combined commands of all sorts later in the book. For now, just try the command to see that it works. Figure 4-25 shows typical results.

Figure 4-25: Use forward slashes or backslashes to define the location of your application.
Closing IDLE
Eventually, you need to close IDLE when your session is finished. The commands for closing IDLE appear on the File menu, and there are actually two of them (which seems a bit confusing):
- Close: Closes just the window that currently has focus. This means that if you’re in a Python Shell window after running an application, just the Python Shell window closes and not the associated Edit window.
- Exit: Closes the current window and all associated windows. This means that if you’re in a Python Shell window after running an application, both the Python Shell window and the associated Edit window close.
When you close a window, IDLE checks to ensure that you have saved any content to disk. If you haven’t saved the content, you see a dialog box asking whether you want to save it.
The File⇒Close and File⇒Exit commands affect only the current session. For example, if you open two separate Python files, you need to close each file separately because each file is opened in a separate session.