Chapter 2
Understanding Excel’s Statistical Capabilities
IN THIS CHAPTER
Working with worksheet functions
Creating a shortcut to statistical functions
Getting an array of results
Naming arrays
Tooling around with analysis
Using Excel’s Quick Statistics feature
In this chapter, I introduce you to Excel’s statistical functions and data analysis tools. If you’ve used Excel, and I’m assuming you have, you’re aware of Excel’s extensive functionality, of which statistical capabilities are a subset. Into each worksheet cell you can enter a piece of data, instruct Excel to carry out calculations on data that reside in a set of cells, or use one of Excel’s worksheet functions to work on data. Each worksheet function is a built-in formula that saves you the trouble of having to direct Excel to perform a sequence of calculations. As newbies and veterans know, formulas are the “business end” of Excel. The data analysis tools go beyond the formulas. Each tool provides a set of informative results.
Getting Started
Many of Excel’s statistical features are built into its worksheet functions. In previous versions (pre-2003), you accessed the worksheet functions by using the Excel Insert Function button, labeled with the symbol fx. Clicking this button opens the Insert Function dialog box, which presents a list of Excel’s functions and the capability to search for Excel functions. (On the Mac, this button opens the Formula Builder, which is pretty much the same thing.) Although Excel 2016 provides easier ways to access the worksheet functions, this latest version preserves this button and offers additional ways to open the Insert Function dialog box. I discuss all of this in more detail in a moment.
Figure 2-1 shows the two locations of the Insert Function button and the Formula bar. Along with one Insert Function button, the Formula bar is to the right of the Name box. All three are just below the Ribbon.

FIGURE 2-1: The Function Library, the Name box, the Formula bar, the two Insert Function buttons, the Enter button, and the Cancel button.
Near the Name box, just to the left of the Insert Function button, are an X and a check mark. The X is the Cancel button, and the check mark is the Enter button. Clicking the Enter button is like pressing the Enter key on the keyboard: It tells Excel to perform a computation you type into a cell. Clicking the Cancel button removes anything you’ve typed into a cell, if you haven’t already entered it.
Inside the Ribbon, on the Formulas tab, is the Function Library. Mac users see a similar layout in Excel 2016 for the Mac.
The Formula bar is sort of a clone of a cell you select: Information entered into the Formula bar goes into the selected cell, and information entered into the selected cell appears in the Formula bar.
Figure 2-1, shown earlier, shows Excel with the Formulas tab open. You can see the other location for the Insert Function button. Labeled fx, it’s on the extreme left end of the Ribbon, in the Function Library area. As I mention earlier in this section, when you click the Insert Function button, you open the Insert Function dialog box. (See Figure 2-2.)

FIGURE 2-2: The Insert Function dialog box.
This dialog box enables you to find a function that fits your needs by either typing a search term or by scrolling through a list of Excel functions.
In addition to clicking the Insert Function button next to the Formula bar, you can open the Insert Function dialog box by selecting
Formulas | Insert Function
 Because of the way pre-Ribbon versions of Excel were organized, the Insert Function dialog box was extremely useful. In Excel 2016, however, it’s mostly helpful if you’re not sure which function to use or where to find it.
The Function Library presents the categories of formulas you can use and makes it convenient for you to access them. Clicking a category button in this area opens a menu of functions in that category.
Most of the time, I work with statistical functions that are easily accessible from the Statistical Functions menu. Sometimes I work with math functions on the Math & Trig Functions menu. (You see a couple of these functions later in this chapter.) In Chapter 5, I show you how to use a couple of logic functions.
 The final selection on each category menu (like the Statistical Functions menu) is Insert Function. Selecting this option is still another way to open the Insert Function dialog box. (The Mac version refers to this dialog box as the Formula Builder.)
The Name box is sort of a running record of what you do in the worksheet. Select a cell, and the cell’s address appears in the Name box. Click the Insert Function button, and the name of the function you selected most recently appears in the Name box.
In addition to the statistical functions, Excel provides a number of data analysis tools that you access from the Data tab’s Analysis area.
Setting Up for Statistics
In this section, I show you how to use the worksheet functions and the analysis tools.
Worksheet functions in Excel 2016
As I point out in the preceding section, the Function Library area of the Formulas tab shows all categories of worksheet functions.
The steps in using a worksheet function are
- Type your data into a data array and select a cell for the result.
-
Select the appropriate formula category and choose a function from its pop-up menu.
Doing this opens the Function Arguments dialog box.
-
In the Function Arguments dialog box, type the appropriate values for the function’s arguments.
Argument is a term from mathematics. It has nothing to do with debates, fights, or confrontations. In mathematics, an argument is a value on which a function does its work.
- Click OK to put the result into the selected cell.
Yes, that’s all there is to it.
To give you an example, I explore a function that typifies how Excel’s worksheet functions work. This function, SUM, adds up the numbers in cells you specify and returns the sum in still another cell that you specify. Although adding numbers together is an integral part of statistical number-crunching, SUM is not in the Statistical category. It is, however, a typical worksheet function, and it shows a familiar operation.
Here, step by step, is how to use SUM:
-
Enter your numbers into an array of cells and select a cell for the result.
In this example, I’ve entered 45, 33, 18, 37, 32, 46, and 39 into cells C2 through C8, respectively, and selected C9 to hold the sum.
-
Select the appropriate formula category and choose the function from its pop-up menu.
This step opens the Function Arguments dialog box.
I selected Formulas | Math & Trig and scrolled down to find and choose
SUM. -
In the Function Arguments dialog box, enter the appropriate values for the arguments.
Excel guesses that you want to sum the numbers in cells C2 through C8 and identifies that array in the Number1 box. Excel doesn’t keep you in suspense: The Function Arguments dialog box shows the result of applying the function. In this example, the sum of the numbers in the array is 250. (See Figure 2-3.)
- Click OK to put the sum into the selected cell.

FIGURE 2-3: Using SUM.
Note a couple of points. First, as Figure 2-3 shows, the Formula bar holds
=SUM(C2:C8)
This formula indicates that the value in the selected cell equals the sum of the numbers in cells C2 through C8.
After you get familiar with a worksheet function and its arguments, you can bypass the menu and type the function directly into the cell or into the Formula bar, beginning with an equal sign (=). When you do, Excel opens a helpful menu as you type the formula. (See Figure 2-4.) The menu shows possible formulas beginning with the letter(s) you type, and you can select one by double-clicking it.

FIGURE 2-4: As you type a formula, Excel opens a helpful menu.
Another noteworthy point is the set of boxes in the Function Arguments dialog box, shown in Figure 2-3. In the figure, you see just two boxes: Number1 and Number2. The data array appears in Number1. So what’s Number2 for?
The Number2 box allows you to include an additional argument in the sum. And it doesn’t end there. Click in the Number2 box, and the Number3 box appears. Click in the Number3 box, and the Number4 box appears — and on and on. The limit is 255 boxes, with each box corresponding to an argument. A value can be another array of cells anywhere in the worksheet, a number, an arithmetic expression that evaluates to a number, a cell ID, or a name that you have attached to a range of cells. (Regarding that last one: Read the upcoming section “What’s in a name? An array of possibilities.”) As you type values, the SUM dialog box shows the updated sum. Clicking OK puts the updated sum into the selected cell.
You won’t find this multiargument capability on every worksheet function. Some are designed to work with just one argument. For the ones that work with multiple arguments, however, you can incorporate data that reside all over the worksheet. Figure 2-5 shows a worksheet with a Function Arguments dialog box that includes data from two arrays of cells, two arithmetic expressions, and one cell. Notice the format of the function in the Formula bar — a comma separates successive arguments.

FIGURE 2-5: Using SUM with five arguments.
If you select a cell in the same column as your data and just below the last data cell, Excel correctly guesses the data array that you want to work on. Excel doesn’t always guess what you want to do with that array, however. Sometimes when Excel does guess, its guess is incorrect. When either of those things happens, it’s up to you to enter the appropriate values into the Function Arguments dialog box.
Quickly accessing statistical functions
In this section, I show you how to create a shortcut to Excel’s statistical functions.
You can get to Excel’s statistical functions by selecting
Formulas | More Functions | Statistical
and then choosing from the resulting pop-up menu. (See Figure 2-6.)

FIGURE 2-6: Accessing Excel’s Statistical functions.
Although Excel has buried the statistical functions several layers deep, you can use a handy technique to make them as accessible as any of the other categories: You add them to the Quick Access toolbar in the upper-left corner. (Every Office application has one, unless you’re a Mac user — in which case, no Office application has one. So the next steps are unavailable on the Mac. Sorry.)
To do this, select
Formulas | More Functions
and right-click Statistical. From the pop-up menu, pick the first option, Add to Quick Access Toolbar. (See Figure 2-7.) Doing this adds a button to the Quick Access toolbar. Clicking the new button’s down arrow opens the pop-up menu of statistical functions. (See Figure 2-8.)

FIGURE 2-7: Adding the statistical functions to the Quick Access toolbar.

FIGURE 2-8: Accessing the Statistical Functions menu from the Quick Access toolbar.
From now on, when I deal with a statistical function, I assume that you’ve created this shortcut so that you can quickly open the menu of statistical functions. The next section provides an example.
Array functions
Most of Excel’s built-in functions are formulas that calculate a single value (like a sum) and put that value into a worksheet cell. Excel has another type of function. It’s called an array function because it calculates multiple values and puts those values into an array of cells rather than into a single cell.
A good example of an array function is FREQUENCY (and it’s an Excel statistical function, too). Its job is to summarize a group of scores by showing how the scores fall into a set of intervals that you specify. For example, given these scores
77, 45, 44, 61, 52, 53, 68, 55
and these intervals
50, 60, 70, 80
FREQUENCY shows how many are less than or equal to 50 (2, in this example), how many are greater than 50 and less than or equal to 60 (that would be 3), and so on. The number of scores in each interval is called a frequency. A table of the intervals and the frequencies is called a frequency distribution.
Here’s an example of how to use FREQUENCY:
-
Enter the scores into an array of cells.
Figure 2-9 shows a group of scores in cells B2 through B16.
-
Enter the intervals into an array.
I’ve put the intervals in C2 through C9.
-
Select an array for the frequencies.
I’ve put Frequency as the label at the top of column D, so I select D2 through D10 for the resulting frequencies. Why the extra cell?
FREQUENCYreturns a vertical array that has one more cell than the frequencies array. -
From the Statistical Functions menu, select
FREQUENCYto open the Function Arguments dialog box.I use the shortcut I installed on the Quick Access toolbar to open this menu and select
FREQUENCY. -
In the Function Arguments dialog box, enter the appropriate values for the arguments.
I begin with the Data_array box. In this box, I enter the cells that hold the scores. In this example, that’s B2:B16. I’m assuming you know Excel well enough to know how to do this in several ways.
Next, I identify the intervals array.
FREQUENCYrefers to intervals as bins and holds the intervals in the Bins_array box. For this example, C2:C9 goes into the Bins_array box. After I identify both arrays, the Insert Function dialog box shows the frequencies inside a pair of curly brackets: {}. -
Press Ctrl+Shift+Enter to close the Function Arguments dialog box and put the values in the selected array. On the Mac, press Ctrl+Shift+Return or Command+Shift+Return.
 This is very important. Because the dialog box has an OK button (a Done button on the Mac), the tendency is to click OK, thinking that it puts the results into the worksheet. Clicking OK doesn’t get the job done when you work with an array function, however. Always use the keystroke combination Ctrl+Shift+Enter (Ctrl+Shift+Return or Command+Shift+Return on the Mac; but see the upcoming Tip paragraphs) to close the Function Arguments dialog box for an array function.

FIGURE 2-9: Working with FREQUENCY.
After you close the Function Arguments dialog box, the frequencies go into the appropriate cells, as Figure 2-10 shows.

FIGURE 2-10: The finished frequencies.
Note the formula in the Formula bar:
{= FREQUENCY(B2:B16,C2:C9)}
The curly brackets are Excel’s way of telling you that this is an array function.
I’m not one to repeat myself, but in this case I’ll make an exception: As I said in Step 6, press Ctrl+Shift+Enter (Ctrl+Shift+Return or Command+Shift+Return on the Mac) whenever you work with an array function. Keep this in mind because the Arguments Function dialog box doesn’t provide any reminders. If you click OK after you enter the arguments into an array function, you’ll be very frustrated. Trust me.
Weird behavior on the Mac: Before I press Ctrl+Shift+Return or Command+Shift+Return, I have to click in the Formula bar. Otherwise, the values don’t appear in the target array.
Here’s a cleaner way to do all this on the Mac: Instead of Ctrl+Shift+Enter or Command+Shift+Enter, hold down the Ctrl and Shift keys (or the Command and Shift keys) and click the onscreen Enter button (the check mark to the left of the Formula bar). So it’s Ctrl+Shift+Click the Enter button. Just holding down the Command key and clicking the Enter button works, too.
What’s in a name? An array of possibilities
As you get more into Excel’s statistical features, you work increasingly with formulas that have multiple arguments. Oftentimes, these arguments refer to arrays of cells, as in the preceding examples.
If you attach meaningful names to these arrays, it helps you keep straight what you’re doing. Also, if you return to a worksheet after not working on it for a while, meaningful array names can help you quickly get back into the swing of things. Another benefit: If you have to explain your worksheet and its formulas to others, meaningful array names are tremendously helpful.
Excel gives you an easy way to attach a name to a group of cells. In Figure 2-11, column C is named Revenue_Millions, indicating “revenue in millions of dollars.” As it stands, that just makes it a bit easier to read the column. If I explicitly tell Excel to treat Revenue_Millions as the name of the array of cells C2 through C13, however, I can use Revenue_Millions whenever I refer to that array of cells.

FIGURE 2-11: Defining names for arrays of cells.
Why did I use Revenue_Millions and not Revenue (Millions) or Revenue In Millions or Revenue: Millions? Because Excel doesn’t like blank spaces or symbols in its names, that’s why. In fact, here are four rules to follow when you supply a name for a range of cells. The name
- Must begin with an alphabetic character — a letter rather than a number or a punctuation mark.
- Must be unique within the worksheet.
- Cannot contain spaces or symbols (as I just mentioned) — use an underscore to denote a space between words in the name.
- Cannot duplicate any cell reference in the worksheet.
Here’s how to define a name:
-
Put a descriptive name at the top of a column (or to the left of a row) you want to name.
Figure 2-10, shown earlier, shows this.
-
Select the range of cells you want to name.
For this example, that’s cells C2 through C13. Why not include C1? I explain in a second.
-
Right-click the selected range.
This step opens the pop-up menu shown in Figure 2-12.
-
From this pop-up menu, select Define Name.
This selection opens the New Name dialog box. (See Figure 2-13.) As you can see, Excel knows that Revenue_Millions is the name of the array and that Revenue_Millions refers to cells C2 through C13. When presented with a selected range of cells to name, Excel looks for a nearby name — just above a column or just to the left of a row. If no name is present, you get to supply one in the New Name dialog box. (The New Name dialog box is also accessible by choosing Formulas | Define Name.)
When you select a range of cells, like a column, with a name at the top, you can include the cell with the name in it and Excel attaches the name to the range. I strongly advise against doing this, however. Why? If I select C1 through C13, the name Revenue_Millions refers to cells C1 through C13, not C2 through C13. In that case, the first value in the range is text and the others are numbers.For a formula such as
SUM(orSUMIForSUMIFS, which I discuss next), this doesn’t make a difference: In those formulas, Excel just ignores values that aren’t numbers. If you have to use the whole array in a calculation, however, it makes a huge difference: Excel thinks the name is part of the array and tries to use it in the calculation. You see this in the next section, on creating your own array formulas. -
Click OK.
Excel attaches the name to the range of cells.

FIGURE 2-12: Right-clicking a selected cell range opens this pop-up menu.

FIGURE 2-13: The New Name dialog box.
Now I have the convenience of using the name in a formula. Here, selecting a cell (like C14) and entering the SUM formula directly into C14 opens the boxes shown in Figure 2-14.

FIGURE 2-14: Entering a formula directly into a cell opens these boxes.
As the figure shows, the boxes open as you type. Selecting Revenue_Millions and pressing the Tab key fills in the formula in a way that Excel understands. You have to supply the close parenthesis (see Figure 2-15) and press Enter to see the result.

FIGURE 2-15: Completing the formula.
Using the named array, then, the formula is
=SUM(Revenue_Millions)
which is more descriptive than
=SUM(C2:C13)
A couple of other formulas show just how convenient this naming capability can be. These formulas, SUMIF and SUMIFS, add a set of numbers if specific conditions in one cell range (SUMIF) or in more than one cell range (SUMIFS) are met.
To take full advantage of naming, I name both column A (Year) and column B (Region) in the same way I named column C.
When you define a name for a cell range like B2:B13 in this example, beware: Excel can be a bit quirky when the cells hold names. Excel might guess that the name in the uppermost cell is the name you want to assign to the cell range. In this case, Excel guesses North for the name rather than Region. If that happens, you make the change in the New Name dialog box.
To keep track of the names in a worksheet, select
Formulas | Name Manager
to open the Name Manager box, shown in Figure 2-16. The nearby buttons in the Defined Names area of the Ribbon are also useful.

FIGURE 2-16: Managing the Defined Names in a worksheet.
Next, I sum the data in column C, but only for the North region. That is, I consider a cell in column C only if the corresponding cell in column B contains North. To do this, I follow these steps:
-
Select a cell for the formula result.
My selection here is C15.
-
Select the appropriate formula category and choose a function from its pop-up menu.
This opens the Function Arguments dialog box. I selected
Formulas | Math & Trig
and scrolled down the menu to find and choose
SUMIF. This selection opens the Function Arguments dialog box, shown in Figure 2-17.SUMIFhas three arguments. The first, Range, is the range of cells to evaluate for the condition to include in the sum (North, South, East, or West, in this example). The second, Criteria, is the specific value in the range (North, for this example). The third, Sum_range, holds the values I sum. -
In the Function Arguments dialog box, enter the appropriate values for the arguments.
Here’s where another Defined Names button comes in handy. In that Ribbon area, click the down arrow next to Use in Formula to open the drop-down list shown in Figure 2-18.
Selecting from this list fills in the Function Arguments dialog box, as shown in Figure 2-19. I had to type
Northinto the Criteria box. Excel adds the double quotes. -
Click OK.
The result appears in the selected cell. In this example, it’s 78.

FIGURE 2-17: The Function Arguments dialog box for SUMIF.

FIGURE 2-18: The Use in Formula drop-down list.

FIGURE 2-19: Completing the Function Arguments dialog box for SUMIF.
In the Formula bar,
=SUMIF(Region,”North”, Revenue_Millions)
appears. I can type it exactly that way into the Formula bar, without the dialog box or the drop-down list. When I don’t use the dialog box, I have to supply the double-quotes around the criteria.
The formula in the Formula bar is easier to understand than
= SUMIF(B2:B13,”North”, C2:C13)
isn’t it?
Incidentally, the same cell range can be both the Range and the Sum_range. For example, to sum just the cells for which Revenue_Millions is less than 25, that’s
=SUMIF(Revenue_Millions, "< 25", Revenue_Millions)
The second argument (Criteria) is always in double quotes.
What about SUMIFS? That one is useful if you want to find the sum of revenues for North but only for the years 2006 and 2007. Follow these steps to use SUMIFS to find this sum:
-
Select a cell for the formula result.
The selected cell is C17.
-
Select the appropriate formula category and choose a function from its pop-up menu.
This step opens the Function Arguments dialog box.
In this example, select
SUMIFSfrom the Formulas | Math & Trig menu to open the Functions Arguments dialog box shown in Figure 2-20. -
In the Function Arguments dialog box, enter the appropriate values for the arguments.
Notice that, in
SUMIFS, the Sum Range argument appears first. InSUMIF, however, it appears last. The appropriate values for the arguments appear in Figure 2-20. - The formula in the Formula bar is
=SUMIFS(Revenue_Millions,Year,"<2008",Region,"North") -
Click OK.
The answer, 46, appears in the selected cell.

FIGURE 2-20: The completed Function Arguments dialog box for SUMIFS.
With unnamed arrays, the formula would have been
=SUMIFS(C2:C13,A2:A13,"<2008",B2:B13,"North")
which seems much harder to comprehend.
A defined name involves absolute referencing. (See Chapter 1.) Therefore, if you try to autofill from a named array, you’ll be in for an unpleasant surprise: Rather than autofill a group of cells, you’ll copy a value over and over again.
Here’s what I mean. Suppose you assign the name Series_1 to A2:A11 and Series_2 to B2:B11. In A12, you calculate SUM(Series_1). Because you’re clever, you figure you’ll just drag the result from A12 to B12 to calculate SUM(Series_2). What do you find in B12? SUM(Series_1), that’s what.
Excel does not treat array names as case-sensitive. If your named array is Test, for example, SUM(Test), SUM(test), and SUM(tEST) all give you the same result.
Creating your own array formulas
In addition to Excel’s built-in array formulas, you can create your own. To help things along, you can incorporate named arrays.
Figure 2-21 shows two named arrays, X and Y, in columns C and D, respectively. X refers to C2 through C5 (not C1 through C5), and Y refers to D2 through D5 (not D1 through D5). XY is the column header for column F. Each cell in column F will store the product of the corresponding cell in column C and the corresponding cell in column D.

FIGURE 2-21: Two named arrays.
An easy way to enter the products, of course, is to set F2 equal to C2*E2 and then autofill the remaining applicable cells in column F.
Just to illustrate array formulas, though, follow these steps to work on the data in the worksheet. (Refer to Figure 2-21.)
-
Select the array that will hold the answers to the array formula.
That would be F2 through F5 — or F2:F5, in Excel-speak. (Figure 2-21 shows the array selected.)
-
Into the selected array, type the formula.
The formula here is
=X * Y -
Press Ctrl+Shift+Enter (not Enter). On the Mac, that’s Ctrl+Shift+Return or Command+Shift+Return.
The answers appear in F2 through F5, as Figure 2-22 shows. Note the formula
{=X*Y}in the Formula bar. As I told you earlier, the curly brackets indicate an array formula.

FIGURE 2-22: The results of the array formula {=X * Y}.
Another thing I mention earlier in this chapter: When you name a range of cells, make sure that the named range does not include the cell with the name in it. If it does, an array formula like {=X * Y} tries to multiply the letter X by the letter Y to produce the first value, which is impossible and results in the exceptionally ugly #VALUE! error.
The weird Mac behavior I mention earlier with regard to the FREQUENCY array formula does not occur in a homemade array formula — it’s not necessary to click the Formula bar before pressing the keystroke combination.
Command+clicking the Enter button (the check mark next to the Formula bar) works in this context, too.
Using data analysis tools
Excel 2016 has a set of sophisticated tools for data analysis. They reside in the Analysis ToolPak. Table 2-1 lists the tools I cover. (The one I don’t cover, Fourier Analysis, is extremely technical.) Some of the terms in the table may be unfamiliar to you, so I define them throughout this book.
TABLE 2-1 Excel’s Data Analysis Tools
Tool |
What It Does |
|
Anova: Single Factor |
Analysis of variance for two or more samples. |
|
Anova: Two Factor with Replication |
Analysis of variance with two independent variables, and multiple observations in each combination of the levels of the variables. |
|
Anova: Two Factor without Replication |
Analysis of variance with two independent variables, and one observation in each combination of the levels of the variables. It’s also a Repeated Measures Analysis of variance. |
|
Correlation |
With more than two measurements on a sample of individuals, calculates a matrix of correlation coefficients for all possible pairs of the measurements. |
|
Covariance |
With more than two measurements on a sample of individuals, calculates a matrix of covariances for all possible pairs of the measurements. |
|
Descriptive Statistics |
Generates a report of central tendency, variability, and other characteristics of values in the selected range of cells. |
|
Exponential Smoothing |
In a sequence of values, calculates a prediction based on a preceding set of values and on a prior prediction for those values. |
|
F-Test Two Sample for Variances |
Performs an F-test to compare two variances. |
|
Histogram |
Tabulates individual and cumulative frequencies for values in the selected range of cells. |
|
Moving Average |
In a sequence of values, calculates a prediction which is the average of a specified number of preceding values. |
|
Random Number Generation |
Provides a specified amount of random numbers generated from one of seven possible distributions. |
|
Rank and Percentile |
Creates a table that shows the ordinal rank and the percentage rank of each value in a set of values. |
|
Regression |
Creates a report of the regression statistics based on linear regression through a set of data containing one dependent variable and one or more independent variables. |
|
Sampling |
Creates a sample from the values in a specified range of cells. |
|
t-Test: Two Sample |
Three t-test tools that test the difference between two means. One assumes equal variances in the two samples. Another assumes unequal variances in the two samples. The third assumes matched samples. |
|
z-Test: Two Sample for Means |
Performs a two-sample z-test to compare two means when the variances are known. |
The ToolPak is an add-in. To use it, you first have to load it into Excel. To start (in the Windows version), click
File | Options(Do not click File | Add-ins.)
Doing this opens the Excel Options dialog box. Then follow these steps:
-
In the Excel Options dialog box, select Add-Ins.
Oddly enough, this step opens a list of add-ins.
Near the bottom of the list, you see a drop-down list labeled Manage.
- From this list, select Excel Add-Ins, if it’s not already selected.
-
Click Go.
This opens the Add-Ins dialog box. (See Figure 2-23.)
- Select the check box next to Analysis ToolPak, select the check box next to Solver Add-in, and then click OK.

FIGURE 2-23: The Add-Ins dialog box.
When Excel finishes loading the ToolPak and the Solver, you’ll find a Data Analysis button and a Solver button in the Analysis area of the Data tab.
The installation procedure for the Analysis ToolPak on the Mac is much simpler than the one for Windows.
To begin, click
Tools | Add-Ins
Figure 2-24 shows this menu choice.

FIGURE 2-24: The Tools | Add-Ins menu choice on the Mac.
Doing so opens the Add-Ins dialog box (see Figure 2-25). Select the check box next to Analysis ToolPak. Then click OK, and that’s it. The ToolPak then appears as a choice on the Tools menu.

FIGURE 2-25: The Add-Ins dialog box on the Mac.
Here are the general steps for using a ToolPak data analysis tool:
- Enter your data into an array.
- Click Data | Data Analysis to open the Data Analysis dialog box.
- In the Data Analysis dialog box, select the data analysis tool you want to work with.
- Click OK (or just double-click the selection) to open the dialog box for the selected tool.
-
In the tool’s dialog box, enter the appropriate information.
I know this step is vague, but each tool is different.
- Click OK to close the dialog box and see the results.
Here’s an example to get you accustomed to using these tools. In this example, I put the Descriptive Statistics tool through its paces. This tool calculates a number of statistics that summarize a set of scores.
-
Enter your data into an array.
Figure 2-26 shows an array of numbers in cells B2 through B9, with a column header in B1.
- Click Data | Data Analysis to open the Data Analysis dialog box.
- Click Descriptive Statistics and click OK (or just double-click Descriptive Statistics) to open the Descriptive Statistics dialog box.
-
Identify the data array.
In the Input Range box, enter the cells that hold the data. In this example, that’s B1 through B9. The easiest way to do this is to move the cursor to the top cell (B1), press the Shift key, and click in the bottom cell (B9). That puts the absolute reference format $B$1:$B$9 into input range.
- Select the Columns radio button to indicate that the data are organized by columns.
- Select the Labels in First Row check box because the input range includes the column heading.
-
Select the New Worksheet Ply radio button, if it isn’t already selected.
This step tells Excel to create a new tabbed sheet within the current worksheet, and to send the results to the newly created sheet.
- Select the Summary Statistics check box and leave the others deselected.
-
Click OK.
The new tabbed sheet (ply) opens, displaying statistics that summarize the data. Figure 2-27 shows the new ply, after you widen Column A.

FIGURE 2-26: Working with the Descriptive Statistics tool.
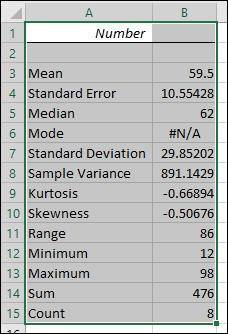
FIGURE 2-27: The output of the Descriptive Statistics tool.
For now, I won’t tell you the meaning of each individual statistic in the Summary Statistics display. I leave that for Chapter 7, when I delve more deeply into descriptive statistics.
Accessing Commonly Used Functions
Need quick access to a few commonly used statistical functions? You can get to AVERAGE, MIN (minimum value in a selected cell range) and MAX (maximum value in a selected range) by clicking the down arrow next to the AutoSum button on the left side of the Formulas tab. Clicking this down arrow also gets you to the Mathematical functions SUM and COUNT NUMBERS (counts the numerical values in a cell range).
The AutoSum button is labeled Σ. Figure 2-28 shows you not only exactly where it is but also the menu opened by its down arrow.

FIGURE 2-28: The Home | Σ button and the menu its down arrow opens.
By the way, if you just click the button
Formulas | Σ
and not the down arrow, you get SUM.
The last selection on that menu is yet another way to open the Insert Function dialog box.
One nice thing about using this menu — it eliminates a step: When you select a function, you don’t have to select a cell for the result. Just select the cell range and the function inserts the value in a cell immediately after the range.