
Chapter 4
Automatically Capturing Great Photographs
IN THIS CHAPTER
![]() Using camera menus
Using camera menus
![]() Capturing your first image
Capturing your first image
![]() Using Picture Controls
Using Picture Controls
![]() Seeing how exposure and focal length affect your images
Seeing how exposure and focal length affect your images
![]() Setting the focus
Setting the focus
![]() Being part of the picture with the self-timer
Being part of the picture with the self-timer
The Nikon D780 is definitely not a point-and-shoot camera. You can use your smartphone if all you want to do is point and shoot. However, you may still want to quickly capture an image with your D780. If so, you’ll be happy to know that there are some things you can do automatically to make your fancy Nikon behave like a point and shoot. If this is your first time using the Nikon D780, or your first time using a Nikon camera, creating pictures automatically will familiarize you with the plethora of buttons and dials and menus, oh my.
If you’re an experienced photographer, breeze through this chapter and you can show someone else how to create great pictures with your high-tech camera — that is, if you can part company with it long enough to allow someone else to use it.
Ordering from Your Camera Menu
Some of your picture-taking tasks involve using the camera menu. For example, when you format a memory card, you use the menu. You also use the menu to specify image size and quality, as well as set the parameters for tasks, such as creating stunning photos using Active D-Lighting and high dynamic range (HDR). I give you a brief introduction to the camera menu in Chapter 3, where I show you how to format a memory card and change the date and time. In this section, I give you a brief overview of the menu system. Throughout this book, I show you how to use the menu to perform specific tasks.

FIGURE 4-1: The multi selector is a multifaceted workhorse.
Using the multi selector
The multi selector (see Figure 4-1) is a very important tool, one that you use frequently to select menu items, highlight menu icons, and navigate from one menu command to another. You use the multi selector with the OK button to access menu items and invoke menu commands.
The multi selector has the following parts:
- Left arrow: The left arrow is used to highlight a menu icon and to navigate to the left when a submenu has multiple choices, such as when setting the date or time.
- Up arrow: The up arrow is used to select the desired menu option and to highlight a menu option. It’s also used to increase a value (for example, when setting the camera clock to the hour of the day). When you see an up arrow in a menu option, you use the multi selector up arrow to increase the value.
- Right arrow: The right arrow is used to position the cursor in the selected menu and to display options for a selected menu.
- Down arrow: The down arrow is used to select the desired menu option, to highlight a menu option, or to decrease a numeric value. When a down arrow is displayed in a menu option, you use the multi selector down arrow to decrease the value.
- OK button: The OK button is used to select a highlighted option or to apply a menu command.
Using the keyboard
The keyboard (see Figure 4-2) is used when creating a copyright, changing a folder name, changing image names, and so on. To enter text with the keyboard, follow these steps:
-
Use the multi selector arrows to navigate to the desired letter on the keyboard.
The selected letter is highlighted.
-
Press the OK button.
The letter appears in the area at the top of the keyboard.
- Repeat Steps 1 and 2 to add additional text to the text display area.

FIGURE 4-2: The Nikon D780 keyboard.
 Here are some tips for working with the keyboard:
- To switch from uppercase to lowercase or to add a symbol to the text, use the multi selector to move the cursor to the keyboard selection area at the lower-right side of the keyboard, and press OK until the character set you need is displayed.
- To move the cursor left or right in the text display area, rotate the main command dial.
- To delete the letter under the cursor in the text display area, press the delete button (it looks like a trash can).
- To complete a text entry, press the zoom in/QUAL button.
- To exit without making an entry, press the MENU button.
Using the menu
When you need to change camera options, format memory cards, and so on, you use a menu command. To access the camera menu, follow these steps:
-
Press the mode dial lock release and then rotate the mode dial to P (see Figure 4-3).
This is programmed auto (P) mode. Most of the menu commands are available with this mode.
-
Press the MENU button.
The tilting monitor refreshes and you can access the desired menu command.
-
Use the multi selector (refer to Figure 4-1) to navigate to a menu option, view the submenu, select an option, and put it into effect.
For the purpose of this tutorial, I’ll show you how to use the multi selector to specify how many frames per second the camera captures in continuous low speed, which occurs when you select CL from the release mode dial. (Continuous low speed is explained in detail in Chapter 9.)
- Press the down arrow on the multi selector until the Custom Setting option is selected.
-
Press the left arrow on the multi selector to highlight the option, then press the right arrow on the multi selector to place the cursor inside the menu (see Figure 4-4).
In this case, the a1 AF-C Priority Selection option is selected.
- Press the down arrow on the multi selector to highlight d1 CL Mode Shooting Speed (see Figure 4-5).
- Press the right arrow on the multi selector to view the d1 CL Mode Shooting Speed options (see Figure 4-6).
- Press the up arrow on the multi selector to increase the number of frames captured per second in continuous low speed mode; press the down arrow on the multi selector to decrease the number of frames captured per second in continuous low speed mode.

FIGURE 4-3: Use the dial to select a shooting mode.

FIGURE 4-4: Use the right arrow to place the cursor inside a menu.
-
Press OK.
The option will be in effect until the next time you access this option and change the setting.
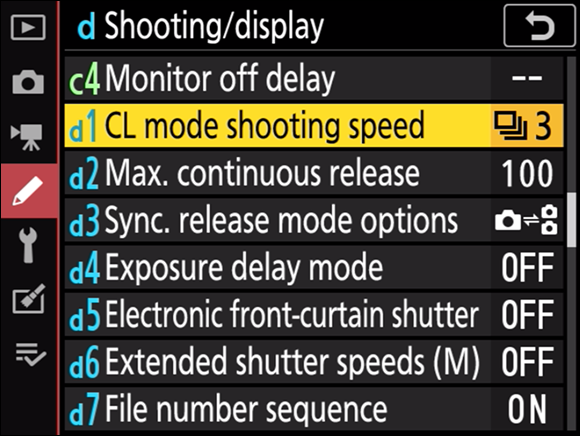
FIGURE 4-5: Use the down arrow to select the desired menu option.
Now that you’re up to speed with using a menu item, here’s an overview of each menu you see after pressing the MENU button and what can be accomplished with the many options in each menu:
- Playback menu: The playback menu has commands you use to manage your images. From this menu, you can delete multiple images, specify the playback folder, copy images, choose image review options, create a slideshow, rate images and more.
- Photo shooting menu: The photo shooting menu has commands you use to create storage folders; rename images; specify options for shooting with two cards; and specify image area, image quality, and image size. In addition, you use this menu to enable RAW shooting, set ISO sensitivity, set white balance, choose Picture Control, enable Active D-Lighting, set HDR options, create time-lapse movies, and more.
- Movie shooting menu: The movie shooting menu goes a long way toward making you the next Steven Spielberg. In this menu, you specify frame size, frame rate, movie quality, file type, microphone sensitivity, and more.
- Custom Settings menu: The Custom Settings menu is used to customize menus; assign functions to programmable buttons; and choose metering options, shooting and monitor options, and much more.

FIGURE 4-6: Use the right arrow to view the options for the selected item.
- Setup menu: The setup menu has commands you use to format memory cards; set language, time zone, time, and date; enable the virtual horizon; clean the image sensor; add comments to images; add copyright information to images; and more.
- Retouch menu: The retouch menu has commands you use to retouch images in your camera. From this menu, you can resize images, straighten images, correct perspective, and more.
- My Menu: My Menu enables you to create a custom menu of frequently used commands.
Taking Your First Picture
You can easily get great results with your Nikon D780 automatically. In Auto mode, all you have to do is compose the picture, focus, and press the shutter-release button. The camera takes care of everything else. You don’t have to mess with choosing the shutter speed, aperture, ISO, or anything else for that matter. The camera meters the amount of light coming into the camera and makes every decision for you.
When you’re shooting in Auto mode, the camera chooses the Picture Control deemed ideal for the subject matter (for more information about manually choosing a Picture Control, see the upcoming “Choosing a Picture Control” section of this chapter). In Auto mode, the camera chooses the shutter speed, aperture, and ISO used to create the image. The camera chooses a shutter speed and aperture to ensure a properly exposed image (see “Understanding Exposure and Focal Length” later in this chapter) and the ISO, which is determined by the amount of available light. When you’re taking pictures in dim lighting or at night, the camera will attempt to choose a shutter speed that ensures a blur-free image (see the sidebar “Shutter speed and image sharpness” later in this chapter). If the shutter speed is too slow, you need to mount the camera on a tripod to ensure a blur-free image.
Depending on the lighting conditions, the camera may have to increase the ISO, which makes the camera more sensitive to light. An ISO above 2,000 may result in digital noise in the darker areas of the image. When you shoot in Auto mode, the camera also determines the aperture, which, combined with the focal length of the lens you’re using, determines how much of the image is in apparent focus from front to back.
When you unpacked your camera and started exploring the controls, you probably noticed the mode dial on the upper-left side of the camera as you looked at it from behind — the same position from which you take pictures. The default setting for this dial is Auto, which of course, is short for automatic. To take a photograph automatically, follow these steps:
-
Insert at least one memory card in the camera, power on the camera, format the card, and then attach a lens to the camera.
If you’re not familiar with inserting or formatting a memory card or attaching a lens to the camera, check out Chapter 3.
-
If you’re using a lens with vibration reduction, move the switch on the lens to VR.
If you bought the camera kit with the 24–120mm lens, you’ll find this switch on the left side of the lens with the camera in front of you.
-
Make sure the lens is set to M/A.
Most Nikon lenses have an M/A switch on the left side of the lens when the camera is pointed toward your subject. This means you can switch from automatic focus to manual focus by twisting the lens focusing ring. If the switch is set to M, manual focus is your only option.
- Press the mode dial lock release and then rotate the mode dial to the Auto setting.
-
Look through the viewfinder and compose your scene.
When you look through the viewfinder, you’ll have a clear, uncluttered view of the subject matter in front of the camera as captured by the lens.
-
Press and hold the shutter-release button halfway.
The camera achieves focus and a bunch of small rectangles appear in the viewfinder. These are the points the camera uses to focus based on the information the camera gathers through the lens. In essence, the camera looks for objects with well-defined edges. You can customize the way the autofocus system works to suit your style of photography when shooting in one of the non-automatic modes (see Chapter 10).
Make sure your subject is under one of the autofocus squares. If you’re photographing a person, you can compose the image so that the person is or isn’t centered in the frame. If you want to get artsy-fartsy and place your subject on the left or right side of the frame, I show you how to do that in “Focusing on an off-center subject,” later in this chapter. When your camera achieves focus, a white dot appears on the lower-left side of the viewfinder and the camera beeps. If the camera can’t achieve focus, a flashing right or left arrow is displayed, which means focus is in front of or behind your subject. When this occurs, switch to a single autofocus point (see “Focusing on an off-center subject,” later in this chapter). If you see a left-pointing and right-pointing arrow, the camera can’t achieve focus, which is a rare occurrence with 51 — count ’em — 51 autofocus points when shooting through the viewfinder, or a staggering 273 autofocus points when shooting in live view mode. If your camera can’t achieve focus, switch to manual focus (see “Focusing manually,” later in this chapter). The autofocus points that the camera uses to focus on your subject are also illuminated (see Figure 4-7).
FIGURE 4-7: Taking your first picture.
On the control panel on the upper-right side of the camera and in the viewfinder, you see the shutter speed, aperture, and ISO the camera is using for the picture. If the light is too dim and the camera can’t achieve focus, you have to manually focus to capture the image. If the shutter speed is too slow to take a blur-free picture, a warning appears in the viewfinder and control panel.
-
Press the shutter-release button fully.
The camera takes the picture.
 When the camera records data to the memory card, the memory card access lamp illuminates. Do not turn off your camera while the light is on. If you do, the image won’t be recorded to the memory card. Powering off the camera while the memory card access lamp is illuminated may also damage the memory card, the camera, or both.
 -
Review the image on the tilting monitor.
You can view other information regarding the image on your tilting monitor. You can view exposure information, a histogram, and much more.
In most situations, you get a beautifully exposed image with Auto mode. If, however, you’re photographing a scene with tricky lighting conditions or a fast-moving object, the image may not be to your liking. Or maybe now that this brief tutorial has given you a taste of the camera’s brilliance, you want to move on and get the most out of your camera. If so, head to Chapters 9, 10, and 11.
Choosing a Picture Control
When you shoot in programmed auto (P), shutter-priority auto (S), aperture-priority auto (A), or manual (M) mode, you can choose one of the following Picture Controls:
- Standard: The camera uses standard processing, which works well for most situations.
- Neutral: The camera applies minimal processing for balanced results. The mode is recommended for most situations.
- Vivid: The camera increases saturation of primary colors for a vivid image.
- Monochrome: The camera produces a black-and-white photograph.
- Portrait: The camera softens complexions and wrinkles. This mode is recommended for shooting portraits of your loved ones.
- Landscape: The camera enhances colors and produces sharp images of landscapes, foliage, and urban scenes. This mode is perfect when shooting landscapes or cityscapes.
- Creative Picture Control: The camera offers 20 different Creative Picture Controls, which offer a unique combination of hue, saturation, and other options. With Creative Picture Control, you can create spectacular images. The Creative Picture Control options are as follows:
- Dream
- Morning
- Pop
- Sunday
- Somber
- Dramatic
- Silence
- Bleached
- Melancholic
- Pure
- Denim
- Toy
- Sepia
- Blue
- Red
- Pink
- Charcoal
- Graphite
- Binary
- Carbon
Experiment with the different Picture Controls to get an idea of the type of images you can create with this tool. When you use a Picture Control to create an image, the camera gives you a JPEG image. The camera does not apply picture controls to NEF (RAW) images. To see the type of image the camera delivers with each Picture Control, take a photo walkabout to one of your favorite places and shoot images with each Picture Control. Just remember that the Picture Control used to create an image is not recorded with the image metadata, so you’ll want to make a note of which image you photographed with which Picture Control.
In Figure 4-8, the image on the left was created using the Standard Picture Control, and the image on the right was created with the Binary Creative Picture Control. In Figure 4-9, the image on the top was photographed using the Pink Creative Picture Control, and the image on the bottom was photographed using the Carbon Creative Picture Control.

FIGURE 4-8: The Standard Picture Control (left) versus the Binary Creative Picture Control (right).

FIGURE 4-9: The Pink Creative Picture Control (top) versus the Carbon Creative Picture Control (bottom).
Creating images with a Picture Control
Picture Controls are yet another tool for a creative photographer. As noted in the preceding section, you have lots of Picture Controls from which to choose. Creating a unique picture of a place, person, or thing you love is as easy as choosing a Picture Control from the menu. Remember: The camera only applies Picture Controls to JPEGs.
To create images with a Picture Control, follow these steps:
-
Press the mode dial lock release, and rotate the mode dial to the desired shooting mode.
You can use a Picture Control while shooting in P, S, A, or M mode (for more information on these modes, see Chapter 9).
-
Press the MENU button.
The tilting monitor refreshes, and the camera menus are displayed in the left column.
- Press the down arrow on the multi selector to navigate to the Photo Shooting menu and press the left arrow on the multi selector to highlight the photo shooting menu.
-
Press the right arrow on the multi selector to place the cursor inside the menu commands, and then press the down arrow on the multi selector to highlight Set Picture Control (see Figure 4-10).
The menu command displays the last used Picture Control icon to the right of the menu command. In this case, Auto was the previously used Picture Control.
-
Press the right arrow on the multi selector.
The tilting monitor refreshes and the Picture Control options are displayed (see Figure 4-11).
-
Press the down arrow on the multi selector to select the desired Picture Control, and then press OK.
The next images you create will be processed as JPEGs using the desired Picture Control, until you revisit this menu and choose a different option.

FIGURE 4-10: The Set Picture Control command.
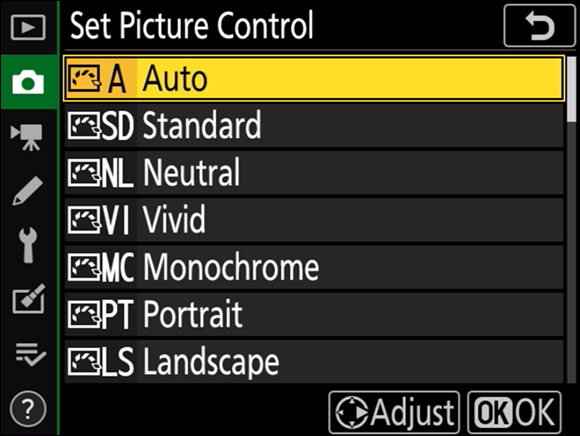
FIGURE 4-11: Choosing a Picture Control.
Modifying a Picture Control
The Nikon camera gurus have created an awesome set of Picture Controls that you use when you want to create an image with pizzazz. Of course, like everything else on your camera, the Picture Control settings used to create the unique look are malleable and can be changed to suit your preferences.
To modify a Picture Control, follow these steps:
-
Press the MENU button.
The tilting monitor refreshes, and the camera menus are displayed in the left column.
- Press the down arrow on the multi selector to navigate to the photo shooting menu, and press the left arrow on the multi selector to highlight the photo shooting menu icon.
-
Press the right arrow on the multi selector to place the cursor inside the menu commands, and then press the down arrow on the multi selector to highlight Set Picture Control.
The tilting monitor refreshes, and the icon for the last-used Picture Control is displayed to the left of the menu command (refer to Figure 4-11).
-
Press the down arrow on the multi selector to highlight the Picture Control you want to modify, and then press the right arrow on the multi selector.
The tilting monitor refreshes, and the options for the Picture Control you want to modify are displayed (see Figure 4-12).
-
Press the down arrow on the multi selector to highlight the option you want to modify, press the right arrow to modify the selected setting, and then use the right and left arrows to change the setting.
You can modify the following options:
- Effect Level: The default option is 100 percent. If the effect is a little too strong for your preference, lower the percentage.
- Quick Sharp: Adjust the level of sharpening the camera applies while processing the image.
- Sharpening: Modify this parameter to change the level of sharpening applied to details and outlines around the objects in the image.
- Mid-Range Sharpening: Modify this parameter to change the level of sharpening applied to patterns and lines.

FIGURE 4-12: Modifying a Picture Control.
- Clarity: Modify this parameter to change the level of sharpening applied to thicker lines without modifying the image’s brightness or dynamic range.
- Contrast: Modify this parameter to increase or decrease overall image contrast.
- Brightness: Modify this parameter to increase or decrease image brightness without losing highlight or shadow detail. Note that this option is not available for all picture controls.
- Saturation: Modify this parameter to increase or decrease image saturation.
- Hue: Modify this parameter to change the hue of colors in the image. For example, you can modify red colors to give them more of a magenta hue or more of a purple hue.
-
Filter Effects: Modify this parameter to simulate the use of color filters on monochrome images. You can choose from the following Filter Effects: Yellow, Orange, Red, or Green. Yellow, Orange, and Red enhance contrast and reduce the brightness of the sky in landscape images. Red increases contrast the most, followed by Orange and then Yellow. Use the Green filter to soften skin tones when creating portraits.
 Film photographers threaded filters onto the lenses they were shooting with to darken the sky or soften skin. Master landscape photographer Ansel Adams used a red filter to darken the skies when he photographed the breathtaking landscapes in Yosemite National Park.
 - Toning: Modify this parameter to choose the tint applied to an image when using a Picture Control. This option is only available when modifying a Picture Control used to create a black-and-white image.
- Toning (Creative Picture Control): Modify this parameter to choose the shade of color applied to an image. This option is only available when modifying some Creative Picture Controls.
-
Press OK.
The Picture Control is modified. An asterisk appears to the left of any modified Picture Control.
Creating a custom Picture Control
You can modify one of the default Picture Controls as noted in the preceding section. You can also create a custom Picture Control, and it appears as a new menu option.
To create a custom Picture Control, follow these steps:
-
Press the MENU button.
The tilting monitor refreshes, and the camera menus are displayed in the left column.
- Press the down arrow on the multi selector to navigate to the photo shooting menu, and press the left arrow on the multi selector to highlight the photo shooting menu icon.
- Press the right arrow on the multi selector to place the cursor inside the menu commands, and then press the down arrow on the multi selector to highlight Manage Picture Control (see Figure 4-13).
-
Press the right arrow on the multi selector.
The tilting monitor refreshes, and the Manage Picture Control options appear (see Figure 4-14). The default option is Save/Edit. In this case, we want to edit a Picture Control.
-
Press the right arrow on the multi selector.
The tilting monitor refreshes, and the Picture Control list appears (see Figure 4-15).
-
Press the down arrow on the multi selector to navigate to the Picture Control that will be the basis for your Custom Picture Control and then press the right arrow on the multi selector.
The tilting monitor refreshes and displays the options you can modify (see Figure 4-16).
- Modify the settings as outlined in the preceding section of this chapter.

FIGURE 4-13: The Manage Picture Control command.

FIGURE 4-14: Manage Picture Control options.
-
Press OK.
The tilting monitor refreshes with destination options for your custom Picture Control (see Figure 4-17).
-
Press the down arrow on the multi selector to select a destination.
Your options are C1 through C9.
-
Press OK.
The screen refreshes and the keyboard appears. For more information on using the keyboard, see the “Using the keyboard” section, earlier in this chapter.
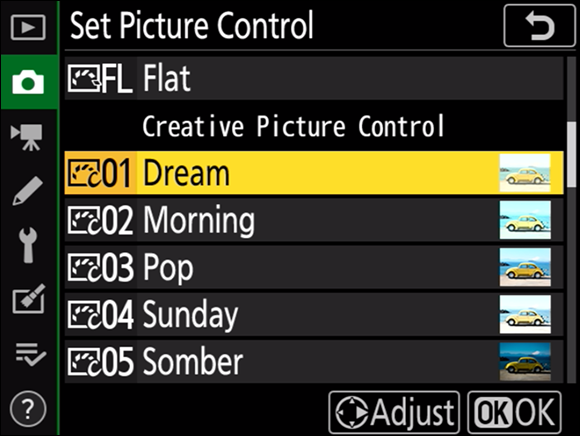
FIGURE 4-15: Choose a Picture Control to modify.
-
Enter a name for the custom Picture Control.
Choose a name that reflects the type of pictures you’ll create with the custom Picture Control. For example, if you use the Dream Picture Control as the basis for your custom Picture Control, a logical name would be Dream:02.
-
Press the zoom inQUAL button to finish entering text.
Your custom Picture Control is added to the Picture Control list.

FIGURE 4-16: Modify the Picture Control parameters to suit your needs.

FIGURE 4-17: Choose a destination for your custom Picture Control.
Saving and sharing custom Picture Controls
After you create one or more custom Picture Controls, you can save them to a memory card. You can also share it with another photographer or use it on another Nikon camera that supports custom controls.
To save a custom Picture Control, follow these steps:
-
Press the MENU button.
The tilting monitor refreshes, and the camera menus are displayed in the left column.
- Press the down arrow on the multi selector to navigate to the photo shooting menu, and press the left arrow on the multi selector to highlight the photo shooting menu icon.
- Press the right arrow on the multi selector to place the cursor inside the menu commands, and then press the down arrow on the multi selector to highlight Manage Picture Control.
-
Press the right arrow on the multi selector.
The tilting monitor refreshes, and the Manage Picture Control options appear (see Figure 4-18).
- Press the down arrow on the multi selector to highlight Load/Save.
-
Press the right arrow on the multi selector to display the Picture Controls, and then use the down arrow on the multi selector to highlight the Picture Control you want to save.
 Modified Picture Controls are preceded by an asterisk.
 -
Press OK.
The tilting monitor refreshes and the destination options are displayed (see Figure 4-19).
- Press the up arrow or down arrow on the multi selector to select one of the following options:
- Copy to Camera: Choose this option, and you can copy a custom Picture Control previously saved to a memory card to your camera.

FIGURE 4-18: Your options for a custom Picture Control.

FIGURE 4-19: Destination options for your custom Picture Control.
- Delete from Card: Choose this option to delete custom Picture Controls saved to a memory card.
- Save: Choose this option to select a custom Picture Control on your camera, save it to a memory card, and then load it to another Nikon camera or share it with a friend.
- Copy to Camera: Choose this option, and you can copy a custom Picture Control previously saved to a memory card to your camera.
- Follow the prompts for the selected option and press OK.
Understanding Exposure and Focal Length
When you take a picture in Auto mode, the camera determines the shutter speed and aperture (see Figure 4-20). The shutter speed is the amount of time the shutter remains open. When you use a fast shutter speed, the shutter is open for a short amount of time, which stops action. A slow shutter speed keeps the shutter open for a long time and is needed when you don’t have a lot of available light.
The aperture determines the size of the opening in the lens that admits light through the lens to the sensor. Each aperture equates to an f-stop number. The f-stop number is a value. A small f-stop number, such as f/2.8, designates a large aperture, which lets a lot of light into the camera. A large f-stop number, such as f/16, is a small aperture that lets a small amount of light into the camera. I know, it’s counterintuitive, but don’t shoot me, I’m only the messenger. Figure 4-21 shows a comparison of apertures and the amount of light each setting sends to the camera.

FIGURE 4-20: The shutter speed and aperture determine the exposure.
The f-stop determines another important factor: the depth of field. The depth of field is the amount of the image that’s in apparent focus in front of and behind your subject:
- Shallow depth of field: A large aperture (small f-stop number) gives you a shallow depth of field, especially when you’re shooting the image with a telephoto lens, which gets you closer to your subject and results in an even shallower depth of field. Telephoto focal lenses are 70mm and greater. Large apertures and telephoto lenses are ideal for portrait photography.
- Large depth of field: On the other hand, a small aperture (large f-stop number) gives you a very large depth of field, especially when you’re using a wide-angle focal length. A wide-angle focal length has a large angle of view. Wide-angle focal lengths have a range of 18mm to 35mm.

FIGURE 4-21: The aperture setting determines the size of the opening that admits light to the sensor.
When I got my first SLR — yup, I started taking pictures before the digital era — I had a hard time wrapping my head around how the f-stop value I chose would affect the resulting image. I remembered it like this: Small f-stop value equates to a shallow depth of field, and a large f-stop value equates to a large depth of field.
As you can see, a large number of factors determine what your image will look like.
The following list explains what action the camera takes when you take pictures in various modes:
- Auto mode: The camera determines the shutter speed and f-stop.
- Non-auto modes: These include programmed auto (P) mode, aperture-priority (A) mode, shutter-priority (S) mode, and manual (M) mode. Choosing a mode other than Auto enables you to take complete control by manually setting aperture and/or shutter speed.
- Programmed auto (P) mode: The camera chooses the aperture and shutter speed to ensure optimal exposures, but both values can be changed by the photographer.
- Aperture-priority (A) mode: You supply the aperture (f-stop value), and the camera calculates the shutter speed needed for a properly exposed image.
- Shutter-priority (S) mode: You supply the shutter speed, and the camera provides the aperture (f-stop value) to create a properly exposed image.
The decisions the camera makes regarding shutter speed and aperture are determined by lighting conditions. If you’re taking pictures in low-light situations or at night, the camera may choose a shutter speed that’s too slow to ensure a blur-free picture (see the upcoming sidebar, “Shutter speed and image sharpness”). If this is the case, you have to mount the camera on a tripod to ensure a blur-free picture. But if you want complete control over the exposure, use one of the non-automatic modes: programmed auto (P) mode, aperture-priority (A) mode, shutter-priority (S) mode, or manual (M) mode, which I outline in detail in Chapter 9.
Focusing on Your Subject
Nothing’s worse than a blurry image. Your camera has multiple focusing options designed to ensure blur-free images. But sometimes the camera doesn’t get it quite right (for example, when your subject is not smack-dab in the middle of the photo). Then there are other times, such as when shooting in dim light, that the camera cannot achieve focus. So, if your subject is off-center or you’re shooting in dim light, read on.
Focusing on an off-center subject
Your Nikon D780 has 51 autofocus points when shooting through the viewfinder and 273 autofocus points when shooting in live view mode. In many instances, the camera focuses on the most important parts of the scene. However, when your subject matter is not smack-dab in the middle of the frame, the camera may not focus on it.
Here’s how to focus on any subject within the frame:
-
Undo the focus selector lock.
If the focus selector lock is on L, rotate the selector to the white dot (see Figure 4-22).
-
Press the AF-mode button (see Figure 4-23) and rotate the main command dial until AF-S is displayed in the control panel.
This mode monitors a single autofocus point in the viewfinder.
- Use the multi selector to move the autofocus point over the subject you want to be in focus.
-
Press the shutter-release button halfway.
The in-focus indicator (a white dot) appears on the left side of the viewfinder when focus has been achieved; in addition, the autofocus point is illuminated and the camera beeps.
-
Press the shutter-release button fully.
The camera captures the image.

FIGURE 4-22: Undo the focus selector lock.
When you move the autofocus point to a specific point in the frame, rotate the focus selector lock to L to lock the autofocus point to that part of the frame. This prevents you from inadvertently moving the point. If you lock the autofocus point, remember to move the switch to its default position after taking the picture.
Press OK to move the autofocus point back to the center of the frame after you create the image.
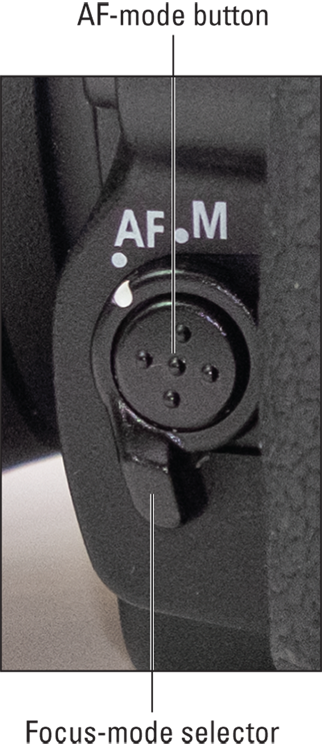
FIGURE 4-23: Use the AF-mode button to select the desired autofocus mode.
Focusing manually
You can have the greatest camera and lens in the world, but if your images aren’t in focus, nobody — including you — will care to look at your pictures. Your Nikon D780 has a sophisticated multipoint focus system. In Chapter 10, I show you how to modify the autofocus system to suit specific shooting scenarios.
When you shoot images with the lens set to autofocus mode (M/A on Nikon lenses), the camera looks for areas of changing contrast (edges) or objects that are under autofocus points, and then uses these areas to focus the scene. However, in low light or when you’re taking a picture of a scene with lots of detail in the foreground and background, the camera may not be able to achieve focus. The white indicator light in the viewfinder is solid when you achieve focus.
You may notice the autofocus motor on the lens is quite active as the camera tries to achieve focus. On the rare occasion when the camera can’t achieve focus, or you want to manually focus the lens to creatively blur your subject while keeping other areas of the image sharp, you have no choice but to manually focus the lens. Nikon lenses and most third-party lenses give you the option of switching to manual focus.
To manually focus the lens, follow these steps:
-
Move the focus switch on your lens to M, as shown in Figure 4-24.
On most Nikon lenses, you’ll find this switch on the left side when the camera is facing your subject. If you’re using a third-party lens, refer to the instruction manual.
-
Rotate the focus-mode selector to M.
The focus-mode selector is on the left side of the camera when the lens is pointed at your subject (refer to Figure 4-22).
-
Press the viewfinder to your eye and twist the lens focus ring until your subject is in clear focus.
Concentrate on areas with contrast or sharp lines. This makes it easier for you to see when your subject is in focus.
Focus on the center of interest in your scene. If you’re photographing a person, focus on his eyes, or if your subject has his head turned, focus on the eye nearest the camera. The curve of your subject’s eyelid should be in focus in the resulting image; it’s also an easy area to focus on. -
Take the picture.
Switch the lens back to autofocus (M/A) when lighting conditions permit the camera to focus automatically and rotate the focus-mode selector to AF.

FIGURE 4-24: Switching the lens to manual focus.
Using the Self-Timer
Your camera has a built-in self-timer that you use whenever you want to delay the opening of the shutter. This option is useful when you want to be in a picture with other people. The self-timer is also handy when you’re taking pictures on a tripod, especially when the shot requires a long exposure. The countdown allows time for any camera shake that was caused by pressing the shutter to subside.
To enable the self-timer, follow these steps:
- Press the mode dial lock release, and then rotate the mode dial to Auto.
- Press the mode dial lock release, and then rotate the release mode dial to self-timer (see Figure 4-25).
-
Press the AF-mode button (refer to Figure 4-23) and rotate the main command dial until AF-S is displayed in the control panel.
This mode monitors a single autofocus point in the viewfinder.
-
Compose your scene in the viewfinder.
If you’re shooting a self-portrait or you’ll be in the picture, mount your camera on a tripod. If you’re not looking through the viewfinder when you use the self-timer, you’ll also have to remove the rubber eyecup and place the eyepiece cap over the viewfinder. The eyepiece cap prevents stray light from changing the exposure.
Store the eyepiece cap in your camera bag so you’ll have it on hand when using the self-timer. If your eyepiece cap is not in your camera bag or you lost it, you can drape a dark cloth (such as a black microfiber lens cleaning cloth) over the eyepiece instead.
FIGURE 4-25: Choosing the self-timer release mode.
-
Press the shutter-release button halfway to achieve focus.
The in-focus indicator (a white dot) appears on the left side of the viewfinder when focus has been achieved, and the camera beeps.
-
Press the shutter-release button all the way.
The camera begins to count down. As the camera counts down, you hear a beeping sound and a light on the front of the camera flashes. Two seconds before the end of the countdown, the light stays on and the beeping sounds faster. If you’re taking a self-portrait, say “cheese” when the red light is solid.
You can change the duration it takes for the shutter to open when shooting in self-timer release mode using the c3: Self-Timer command in the Custom Settings menu. You can change the self-timer delay, specify the number of shots captured in self-timer mode, and change the interval between shots.