
Chapter 21
I Want to Add Stuff
IN THIS CHAPTER
![]() Adding memory
Adding memory
![]() Upgrading your internal drive
Upgrading your internal drive
![]() Adding USB and Thunderbolt devices
Adding USB and Thunderbolt devices
![]() Reviewing what add-ons are available
Reviewing what add-ons are available
“No iMac is an island.” Somebody famous wrote that, I’m sure.
Without getting too philosophical — or invoking the all-powerful Internet yet again — the old saying really does make sense. All computer owners usually add at least one peripheral (external device), such as a printer, backup drive, joystick, camera, or scanner. I talk about the ports on your iMac in Chapter 1. Those holes aren’t there to just add visual interest to the back end of your treasured iMac. Therefore, I cover your USB and Thunderbolt ports (and what you can plug in to them) in detail in this chapter.
Ah, but what about the stuff inside your supercomputer? That’s where things get both interesting and scary at the same time. In this chapter, I also describe what you can add to the innards of some iMac models as well as how to get inside there if you work up the courage to go exploring. (Don’t tell your family or your friends, but adding memory to a late-model 27” iMac is as simple as pressing a button and pulling a couple of plastic levers. There’s actually nothing to fear whatsoever.)
Here’s the trick: Just make it sound like an adventure from Mission: Impossible, and folks will crown you their new resident techno-wizard!
More Memory Will Help
Hey, wait a second. No however stuck on the end? You mean that, for once, there isn’t an exception? Aren’t all computers different? Hard as it is to believe, just keep in mind this Mark’s Maxim:
 More memory helps. Always.
Period. End of statement. No matter what type of computer you own, how old it is, or what operating system you use, adding more memory to your system (to the maximum it supports, of course) significantly improves the performance of your operating system (and practically every application that you run).
 Memory maximizes the power of your computer: The more memory you have, the less data your iMac has to temporarily store on its slower internal drive. Without getting into virtual memory and other techno-gunk, just consider that extra memory as extra elbow room for your applications and your documents. Believe me, both macOS and Windows efficiently make use of every kilobyte of memory that you can provide.
If your iMac is already stuffed with the maximum amount of memory it can hold, you can skip this section. However, if you’re using macOS Monterey on an older iMac with upgradeable memory — or a current 27” Intel iMac — read on!
Figuring out how much memory you have
To see how much memory you have on your computer, click the Apple menu (![]() ) and choose About This Mac.
) and choose About This Mac.
 The 8GB of standard memory supplied by Apple on any current iMac is enough for running any of the Apple applications bundled with Monterey. If your primary applications include video editing, playing the latest crop of immersive 3D games, or image editing, though, you can use all the memory your iMac can hold.
Ah, but there’s a caveat. (Go figure.) At this writing, only the 27” iMac from the current lineup has memory sockets that you — a Regular Human Being — can access. The 27” models provide slots for four 2666MHz DDR4 SO-DIMM memory modules at up to 32GB each. (Don’t fret over what those abbreviations mean. Rest assured that this memory type is fast.)
Unfortunately, the memory in the late-model 21.5” Intel iMac and the 24” M1 iMac can’t be replaced or upgraded by anyone except an authorized Apple Service Center technician. So if you’re using a 21.5” or 24” iMac, upgrading your memory by yourself is impossible. For this reason, if you’re ready to order a new 21.5” or 24” iMac from Apple, I strongly recommend that you opt for as much additional memory as you can afford while configuring your dream machine, since you can’t upgrade it yourself later.
In the past, Apple’s prices for RAM were … well … outrageous (as in, “Boy, howdy, I can’t afford that!”). Recently, however, Apple’s memory prices have become far more competitive, so I now recommend that you add memory while configuring and ordering either model of iMac.
How you plan memory upgrades depends on how much memory you want. If your 27” iMac uses the two default 4GB modules (8GB total) supplied by Apple, you can add RAM by inserting memory modules in the empty slots. At this writing, a 4GB memory module should set you back about $35 or so.
If your iMac already has all four memory slots filled and you’d still like to add more system RAM, it’s time to remove one or all of the existing modules and replace them with full 8GB, 16GB, or 32GB modules. (Current prices for an 8GB module hover around $80.) With all four slots filled with 8GB modules (bringing you to 32GB), 16GB modules (delivering 64GB) or 32GB modules (arriving at that coveted 128GB total), you’ll have a 27” iMac that marks you as one of the “In People.” (Oh, and it will fly. Trust me.)
If you’ve already bought your 27” iMac and you’d like to shop around for the best memory prices, I can heartily recommend any one of these online sources that cater to Mac owners:
- MacMall (
www.macmall.com) - CDW (
www.cdw.com/content/brands/apple/default.aspx) - Crucial (
www.crucial.com) - Small Dog Electronics (
www.smalldog.com) - Newegg (
www.newegg.com)
Installing memory modules
I’m happy to report that adding extra memory to a 27” iMac is one of the easiest internal upgrades that you can perform. Therefore, I recommend that you add memory yourself unless you simply don’t want to mess with your iMac’s internal organs. Of course, your local Macintosh service specialist will be happy to install new RAM modules for you (for a price).
As you’ve concluded by this point in this book, Apple has designed the world’s best all-in-one computer. That even includes making it EZ-Open. (Forgive me if your treasured work of art now reminds you of a longneck beer bottle. Come to think of it, the level of technical knowledge required to gain access to either one is about the same.)
Unlike earlier “picture frame” iMac models, however, you can’t remove the back completely. In fact, Apple allows the owner of a 27” iMac to perform only one kind of upgrade, and there’s only one opening you need to worry about. Naturally, an Apple repair technician can get deeper into the machine, but I hope that you never need aid from those folks.
 You’ll void your warranty by tinkering with anything other than your memory slots, so don’t even think about it. (Even if your warranty has expired, I’d still keep my distance.)
To add memory modules to a late-model 27” iMac, follow these steps:
- Get ready to operate:
- Spread a clean towel on a stable work surface, like your kitchen table. The towel helps protect your screen from scratches.
- Shut down your iMac.
- Unplug all cables from the computer.
- Tilt the computer over and lay the screen flat (face-down) on top of the towel.
Press the button directly above the power-cord socket.
The memory access door pops open.
- Remove the memory access door.
Stow the memory access door safely out of reach of kids and cats.
Tah-dah! That wasn’t much of a challenge, was it? Take a moment to gaze with rapt fascination at a small portion of the bare innards of your favorite computer.
Ground thyself!
Check out the “Let’s get grounded!” sidebar.
- Gently pull outward on the two plastic securing levers and then pull them toward the bottom of the access door (as shown in Figure 21-1).
Remove a module by gripping it by the corners and gently pulling it straight upward.
Save the old module in the static-free packaging that held the new module. Your old RAM (which you can now sell on eBay) will be protected from static electricity.- Position the new module in the socket:
- Line up the module’s copper connectors toward the socket.
- Line up the notch in the module aligned with the matching spacer in the socket. See what I mean in Figure 21-2, which shows the correct orientation for a late-2013 27” iMac.
- Press gently (but firmly) on both ends of the module until the module clicks into place.
- Repeat Steps 8–10 for each module you’re replacing.
Push the two securing levers back into their original positions.
You should hear a click when they’re seated.
- Replace the memory access door.
Return your iMac to its natural upright stance, and plug any cables you removed back into the back of the computer.
Waxing nostalgic: This is rather like changing the oil on my Dad’s 1970 Ford pickup truck.

FIGURE 21-1: Remove a memory module like a pro.
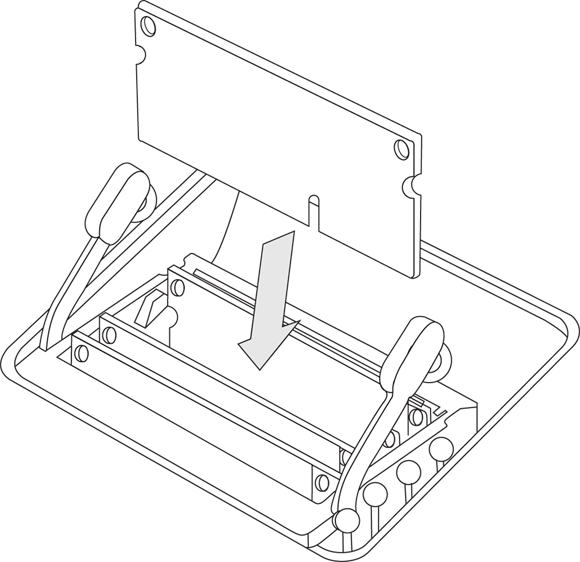
FIGURE 21-2: Installing the new module is a snap (pun intended)!
Congratulations! You’ve done it — and you’re now an iMac memory guru! To verify that all is well with your iMac, boot the computer, click the Apple menu, and choose About This Mac. Your iMac should report the additional memory. If your iMac doesn’t boot, check to make sure that the modules you installed are properly seated in the sockets.
Can I Upgrade My Internal Drive?
Asking whether you can upgrade your iMac’s internal drive is a trick question. Yes, you certainly can upgrade your drive. But before you start cruisin’ the Internet for a 4TB monster, I have two suggestions:
Be sure you really need an internal drive upgrade.
Apple is pretty generous when configuring drive storage for its base systems. (Current models run with anywhere from a 256GB to a whopping 8TB drive — yep, that’s 8 terabytes, or 8,000GB! Something tells me that your prized walnut brownie recipe will have plenty of elbow room on a 8TB drive, as will as a huge amount of digital video.) Naturally, if you’re purchasing a new iMac and you want to avoid a bad case of “storage pinch” in the future, I definitely recommend that you opt for as much storage as you can afford.
I’ll be honest here: Most folks simply don’t need more than 1 or 2TB of internal drive space. You’re likely to find that you still have plenty of wide-open spaces for a typical family’s needs on your internal drive unless you’re heavily into:
- Digital video (DV) or a large collection of movies
- Cutting-edge video games
- Tons of high-quality digital audio
- Four generations of high-resolution digital photos of your family (hey, it’s possible!)
If you decide that you do need to upgrade, don’t install your internal drive yourself.
Read more about dealing with the installation of an internal hard drive in the upcoming section “Gotta have internal.”
If you’re short on drive space, first clean up your existing internal drive by deleting all the crud you don’t need, such as game and application demos, duplicate or “work” copies of images and documents, archived files you downloaded from the Internet, and the contents of your Trash. You can read how in Chapter 22.
Consider your external options
If you do need additional drive space, I recommend using an external drive. Use a high-speed Thunderbolt 3 or USB 3.0 port to connect a second drive the quick and easy way. You simply plug a device into one of these ports, and it works. And you can move your external drive between different Macs with a minimum of fuss and bother.
An external drive can do virtually anything that your internal drive can do. You can boot from it, for example, or install (and boot from) a different version of macOS (great for beta testers like me).
Here’s one problem with external drives, though. Even Thunderbolt 3 connections transfer data more slowly this way than via an internal drive. That’s why most Mac owners (especially graphics and video professionals) use their external drives for storing backups, digital media, and little-used documents and applications. Their favorite applications, works in-progress, and often-used documents are housed on the internal drive.
Putting a port to work
Current iMac models carry two kinds of high-speed ports, either of which is a good match for connecting any external device.
USB 3.0
The USB standard is popular because it’s just as common in the PC world as in the Mac world. (Most PCs don’t have a Thunderbolt port.) Your iMac carries its USB 3.0 ports on the back of the case, which are fully compatible with older USB 2.0 devices. Hardware manufacturers make one USB device that works on both Macs and PCs.
 If you’re using an older iMac with USB 2.0 ports, there’s no need to spend extra money on USB 3.0 devices, because you won’t get the performance boost. ’Nuff said.
THUNDERBOLT 2 AND 3
Talk about raw speed. An older iMac’s second-generation Thunderbolt 2 connection provides a respectable 20Gbps, which is twice as fast as USB 3.0 — and the latest iMac models sport the Thunderbolt 3 port, which doubles that transfer speed to an unbelievable 40Gbps maximum! You can use a Thunderbolt port to connect an external drive or even a high-resolution monitor or HD-TV. Luckily, the price for Thunderbolt external drives has dropped significantly since the port first appeared on the Mac, so you no longer have to pay a premium price for Thunderbolt devices.
Connecting an external drive
With Thunderbolt or USB, you can install an external drive without opening your iMac’s case. With your iMac turned on and the external drive disconnected from the AC outlet, follow these steps:
- Connect the Thunderbolt or USB cable betwixt the drive and your computer.
- If the drive requires an AC adapter, plug the external drive into a convenient surge protector or UPS (uninterruptible power supply).
- Switch on the external drive.
If the drive is unformatted (or formatted for use under Windows), partition and format the external drive.
The drive comes with instructions or software to help you do this. (Don’t worry, external drives typically come from the factory completely empty, and you won’t damage anything by formatting it. To be sure, check the drive’s manual.) Partitioning divides the new drive into one (or more) volumes, each of which is displayed as a separate drive under macOS.
If the drive comes preformatted for use with a Windows PC, I strongly suggest reformatting it for use with macOS. Doing so results in much faster performance and more efficient use of space.
After the drive is formatted and partitioned, it immediately appears on the Desktop. Shazam!
Gotta have internal
If you decide that you absolutely have to upgrade your existing internal drive — or if your internal drive fails and needs to be replaced — you must take your iMac to an authorized Apple Service Center and allow the techs there to sell you a drive and make the swap. Here are four darned good reasons why:
- Warranty: As I mention earlier, you’ll void your iMac’s warranty by attempting a drive upgrade yourself.
- Selection: If you’re worried about picking the proper drive, an Apple technician can order the right drive type and size for you … no worries.
- Difficulty: Swapping a hard drive in your iMac is nothing like adding RAM modules. It’s quite complex and involves breaking into your iMac — not A Good Thing, even for the knowledgeable Mac guru.
- Backup: That very same Apple service technician can back up all the data on your existing drive and move it to the new drive, saving you from losing a single document. That will save you time and possible angst.
To those who truly won’t be satisfied with their lives until they upgrade an internal drive in an iMac all by themselves: Yes, I’m sure you can find a magazine article that purports to show you how. Even better, I’ve seen many how-to videos on YouTube that will lead you down a rosy path to an internal drive upgrade. Here’s my take on those seemingly savvy instructions: You’re walking into a field of land mines with someone else’s map, so you had better have complete faith in your tech skills. (And a darn good backup.)
Weighing Attractive Add-Ons
The external toys I cover in this section might add a cord or two to your collection at the back of your iMac, but they’re well worth the investment. And they can really revolutionize how you look at technologies such as television, digital audio, and computer gaming.
Game controllers
If you’re ready to take a shot at the enemy — whether they be Nazi soldiers, chittering aliens, or the latest jet fighters — you’ll likely find your keyboard and mouse somewhat lacking. (And if that enemy happens to be a friend of yours playing across the Internet, you’ll be ruthlessly mocked while you’re fumbling for the right key combination.) Instead, either pick up a USB joystick (for flying games) or a gamepad (for arcade and first-person shooting games)!
External drive arrays
In case you’re not familiar with a drive array (typically called a RAID array), it’s just a fancy moniker for an enclosure that holds multiple drives. “Grouping” hard drives like this provides a boost in speed, or you can use an array to make a self-maintaining redundant backup of all your data. Your Thunderbolt port is perfect for this high-tech magic. You can also pick up a wired or wireless network storage unit (commonly called a NAS, short for network-attached storage), which is essentially drive storage that’s connected and available to your entire Ethernet network.
Video controllers
For armchair directors, specialized USB digital video controllers make editing easier. The ShuttlePRO V2 from Contour Design (www.contourdesign.com) provides a 15-button jog control that can be configured to match any DV editor. For around $100, you’ll have the same type of editing controller as do those dedicated video-editing stations that cost several thousand dollars.
Audio hardware and MIDI controllers
Ready to put GarageBand to the test with your favorite version of “Chopsticks”? You need a USB piano keyboard, and I recommend the Keystation 88 MK3 from M-Audio (www.m-audio.com), which retails online for around $250. It provides 88 keys and uses a USB connection.