
Chapter 22
Tackling the Housekeeping
IN THIS CHAPTER
![]() Cleaning unnecessary stuff off your internal drive
Cleaning unnecessary stuff off your internal drive
![]() Backing up your data
Backing up your data
![]() Fixing permissions errors
Fixing permissions errors
![]() Automating tasks in Monterey
Automating tasks in Monterey
![]() Updating macOS automatically
Updating macOS automatically
Nothing runs better than a well-oiled machine, and your iMac is no exception. (But please, don’t ever oil your iMac; that’s just a figure of speech.) In this chapter, I demonstrate how you can make good use of every byte of storage space provided by your internal drive.
With a little macOS maintenance, such as Time Machine (for backing up and restoring your data) and frequent scans of your internal drive for disk errors, you can ensure that your iMac is performing as efficiently as possible. Automator allows your iMac to perform tasks automatically that used to require your attention. In addition, configuring Software Update to run automatically can allow you to live life free and easy, watching your favorite reality TV and eating ice cream (or yogurt — your pick).
Cleaning Unseemly Data Deposits
Criminy! Where does all this stuff come from? Suddenly, that spacious 1TB solid-state drive has 19GB left, and you start feeling pinched.
Before you consider buying a new internal or external drive (which you can read about in Chapter 21), take the smart step: Sweep your internal drive clean of unnecessary and space-hogging software.
Managing your storage in macOS (or cleaning things the elegant way)
Apple includes the Manage Storage feature within macOS to help identify and display (and optionally delete) those huge files that are taking up so much of your drive’s real estate. Right-click the Desktop icon for the hard drive you want to clean, and choose Manage Storage. After a pause (which may be considerable, depending on the capacity of the drive), you’ll see the window shown in Figure 22-1.
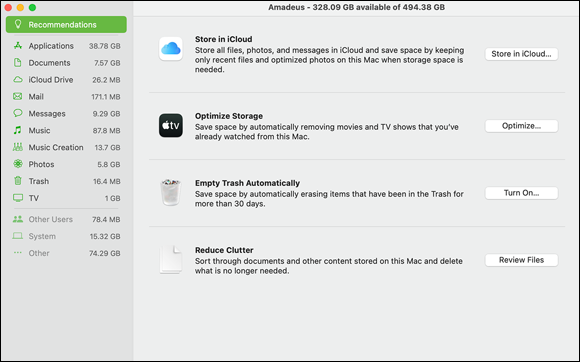
FIGURE 22-1: Manage your storage to reclaim drive space.
Note the categories in the list at the left side — from here, you can see the approximate amount of space taken up by notoriously spacious items like your documents and your Music media. Click a category to display the worst offenders, sorted by size. If you see an item that you no longer need (like that 2GB happy cat video you downloaded 2 years ago), move your cursor over that item and click the X button that appears to delete it. If only cleaning your house were this easy!
 The Recommendations category is unique because it offers space-saving features that macOS offers rather than displaying files. For example, if you’ve invested in additional iCloud storage, you can choose to “offload” files, photos, and messages to iCloud rather than store them locally. (Naturally, you must be connected to the Internet to retrieve them.) You can also choose to empty your Trash automatically from here.
Getting dirty (or cleaning things the manual way)
If you’re willing to dig into your data a little, you can eschew the Manage Storage feature and dive elbow-deep into your drive to hunt down every unnecessary file. All you really need is the willpower to announce, “I simply don’t need this particular item any longer.” (Sometimes, that’s tougher than it may seem.)
Unnecessary files and unneeded folders
Consider all the stuff that you probably don’t really need:
- Game demos and shareware that you no longer play (or even remember)
- Movie trailers and other QuickTime video files that have long since passed into obscurity
- Temporary files that you created and promptly forgot
- Log files that chronicle application installations and errors
- GarageBand loops and iMovie video clips you’ll never use
- Zip archive files that you downloaded and no longer covet
- Music, video, and movies that no longer appeal
How hard is it to clean this stuff off your drive? Easier than you might think!
- You can quickly delete files.
- You can remove items from your Music and TV media library (especially movies, which take up several gigabytes of space each). If you’ve purchased an item from the iTunes Store, don’t forget that you can download that item again in the future for free — perhaps when you’ve added an external drive to hold some of your stuff. You can also choose to stream your music and movies directly from the Music and TV apps, which takes up no space on your drive at all — just a fast broadband Internet connection.
- You can move seldom-used files and folders to external storage (such as a USB flash drive or a DVD).
- You can uninstall applications purchased from the App Store using Launchpad. From the Launchpad display, click and hold down the icon until it wiggles. If an X button appears on the icon, you can click the X to remove the application from your iMac. Again, these applications can be reinstalled at any time.
- You can get rid of most of the space taken by any application (often the whole application) by deleting its application folder that was created during the installation process.
 Always check the application’s README file and documentation for any special instructions before you manually delete any application’s folder! If you created any documents in that folder that you want to keep, don’t forget to move them before you trash the folder and its contents. In fact, some applications may come with their own uninstall utility, so checking the README file and documentation may save you unnecessary steps.
Removing an application or file from your drive usually takes two simple steps:
- Display the file or application folder in a Finder window.
- Delete the file or folder with one of these steps:
- Drag the icon to the Trash.
- Select the icon and press ⌘ +Delete.
- Right-click the icon and choose Move to Trash from the contextual menu.
- Select the icon and click the Delete button on the Finder toolbar (if you added one).
Truly, no big whoop.
 Unlike programs in the Windows world, most macOS applications don’t need a separate, silly uninstall program (although some larger Mac applications include one for convenience).
 Don’t forget to actually empty the Trash, or you’ll wonder why you aren’t regaining any drive space. (macOS works hard to store the contents of the Trash until you manually delete it, just in case you want to undelete something.) To get rid of that stuff permanently and reclaim the space, do the following:
- Click the Trash icon on the Dock and hold down the button — or right-click — until the pop-up menu appears.
- Choose Empty Trash.
As I mention earlier in the chapter, if you use the Manage Storage feature you can elect to set your Trash to empty automatically.
Associated files in other folders
Some applications install files in different locations across your internal drive. (Applications in this category include the Microsoft Office suite and Adobe Creative Cloud applications like Adobe Photoshop.) How can you clear out these orphan files after you delete the application folder?
The process is a little more involved than deleting a single folder, but it’s still no big whoop. Here’s the procedure:
Click the Search text box in a Finder window.
You can read more about Search and Finder windows in Chapter 7.
Type the name of the application in the Search text box and choose Name Matches from the pop-up menu.
Figure 22-2 shows a typical search. I wanted to remove orphan files associated with Adobe After Effects; I had already deleted the application itself. By searching for the word Adobe, I found a folder of After Effects startup scripts that are now no longer needed and could also be deleted. This trick displays files created in other folders that include your search word in their names, such as project files, PDF files, and the font files that appear in the system Fonts folder.
Decide which of these files belong to the to-be-deleted application.
Be sure that the files you choose to delete are part of the deleted application. If necessary, right-click the file and choose Get Info from the shortcut menu to display more information. In Figure 22-2, the Adobe Bridge folder is included in the search results, but it’s definitely not part of After Effects!Many associated files either have the same icon as the parent application or are in the Preferences, Caches, or Application Support folder.
In the Search Results window, click the associated file(s) that you want to delete and just drag them to the Trash.
Don’t empty the Trash immediately after you delete these files. Wait a few hours or a day. That way, if you realize that you deleted a file that you truly need, you can easily restore it from the Trash.
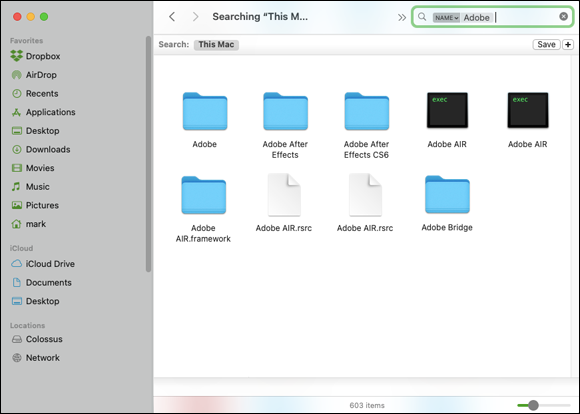
FIGURE 22-2: Mine your internal drive for additional files to delete.
Using a commercial cleanup tool
If you’d rather use a commercial application to help you clean up your drive, several applications are available, but most are shareware applications that perform only one task. For a good all-around cleanup utility, I recommend CCleaner for Mac, from Piriform (https://www.ccleaner.com/ccleaner-mac), as shown in Figure 22-3. This great utility can clean everything from Internet crud (browser cookies and your surfing history) to those macOS system caches that can grow so doggone huge. And you can easily fine-tune whatever CCleaner for Mac wants to remove. The utility can also uninstall many applications with a single click. Oh, and did I mention that it’s free? I really like free!
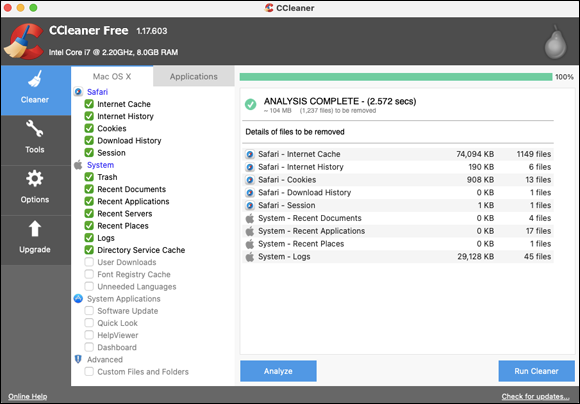
FIGURE 22-3: Piriform’s CCleaner for Mac is a great tool for cleaning your iMac’s drive.
Backing Up Your Treasure
Do it.
I’m not going to lecture you about backing up your internal drive … well, perhaps just for a moment. Imagine what it feels like to lose everything: names, numbers, letters, reports, presentations, saved games, photographs, video, and music. Then ask yourself, “Self, isn’t all that irreplaceable stuff worth safeguarding?”
Time for a Mark’s Maxim:
 Back up. On a regular basis.
Take my word for it; you will thank me some day!
You can back up your files either by saving them to external media or — as I strongly recommend — by using the awesome Time Machine feature included with Monterey. Read more about Time Machine in the “Putting Things Right with Time Machine” section, later in this chapter.
Saving Files
The simplest method of backing up files is simply to copy the files and folders to an external drive, USB flash drive, or a DVD. Nothing fancy — in fact, I call this procedure the “quick-and-dirty backup” — but it works.
Backing up to an external drive
If you have an external drive or USB flash drive on your iMac, you can easily drag backup files to it from your internal drive (I cover external drives in Chapter 21):
Open separate Finder windows for:
- The external drive
- The internal drive
Because you’re using macOS, you can also open a Finder tab within a single Finder window to accomplish the same task — from the keyboard, press ⌘ +T.
- Select the desired files that you want to back up from your internal drive.
- Drag the selected files to the external drive window.
“Mark, can I back up individual files to cloud-based storage like iCloud Drive, Dropbox, Google Drive, and OneDrive?” Of course! These services are fine for your most important files (much like backing up a handful of critical files to DVD or flash drive), but these cloud drives aren’t suitable for backing up the entire contents of your iMac’s internal drive. (You should always use Time Machine with an external drive for that important chore.) Also, don’t forget that you need an Internet connection to save or retrieve files from cloud storage – with Time Machine, no Internet connection is necessary. (If you’d like to store just the most important stuff in the cloud, I would suggest the contents of your Desktop and Documents folders.)
Backing up to DVD
You can burn backups of your most important files to a recordable DVD, if you have an external optical drive. Saving your data is more labor-intensive this way — especially compared to backing up to cloud-based storage — but the end result is a truly bulletproof backup that doesn’t rely on an Internet connection or external drive. Plus, the backup can be read in any DVD drive for decades to come.
Burning backups from the Finder
To use the Finder’s Burn feature to create a backup DVD, follow these steps:
Load a blank disc into your iMac’s optical drive.
If you’re using the default settings in the CDs & DVDs pane in System Preferences, a dialog appears, asking you to choose an action.
From the Action pop-up menu, choose Open Finder and then click OK.
An icon named Untitled DVD appears on your Desktop. Double-click the icon to open a Finder window.
Drag the files and folders that you want to back up into the disc’s Finder window.
They can be organized any way you like. Don’t forget that the total amount of data shouldn’t exceed 4GB or so (on a standard recordable DVD) or 8GB (on a dual-layer recordable DVD). You can see how much free space remains on the disc at the bottom of the disc’s Finder window.
When you’re ready to record, click File and then choose Burn Disc from the Finder menu.
You can also click the Action button that appears at the top of the disc’s Finder window and choose Burn Disc from the pop-up menu.
- Choose the fastest recording speed possible.
- Click Burn.
Burning backups from other recording applications
If you’ve invested in Toast 19 Titanium from Roxio (www.roxio.com) or another DVD recording application, you can create a new disc layout to burn your backup disc. (Think of a layout as a road map indicating which files and folders Toast should store on the backup.)
If you do decide to back up to DVD or to an external backup drive without using Time Machine, it’s a good idea to store that backup media somewhere safe, away from calamities. On the other hand, if you back up with Time Machine — as I’m about to demonstrate — you should instead leave your external drive plugged in to your iMac.
Putting Things Right with Time Machine
If you enable backups via the macOS Time Machine feature, you can literally move backward through the contents of your iMac’s internal drive, selecting and restoring all sorts of data (including the entire drive). Files and folders are ridiculously easy to restore — and I mean easier than any restore you’ve ever performed, no matter what the operating system or backup program. Time Machine can even handle some deleted items, like Contacts cards! To sum it up, Time Machine should be an important and integral part of every Mac owner’s existence.
If you don’t mind investing in legacy hardware on eBay, Apple’s Time Capsule device (which has been discontinued) is designed as a wireless storage drive for your Time Machine backup files. If you’re interested in a single Time Machine backup location for multiple Macs across your wireless network, a Time Capsule is a great addition to your home or office.
Before you can use Time Machine, you must have it enabled within the Time Machine pane in System Preferences. I cover the Time Machine configuration settings (and how to turn the feature on) in more detail in Chapter 5. You’ll also need an external drive that provides considerably more storage capacity than the drive you’re backing up. I recommend that your external Time Machine backup drive be at least twice the capacity of the drive you’re backing up. (To check on the size of a drive displayed on your desktop, right-click the drive and choose Get Info from the contextual menu.)
Here’s how you can turn back time, step by step, to restore a file that you deleted or replaced in a folder:
- Open a Finder window and navigate to the folder that contained the file you want to restore.
Click the Time Machine icon on the Finder menu bar (which bears a clock with a counterclockwise arrow) and then click Enter Time Machine.
The oh-so-ultra-cool Time Machine background appears behind your folder, complete with its own set of buttons at the bottom of the screen (as shown in Figure 22-4). On the right, you see a timeline (that series of stacked boxes) that corresponds to the different days and months included in the backups that macOS has made.
Click any segment within the timeline to jump directly to a date (displaying the folder’s contents on that date).
Alternatively, use the Forward and Back arrows at the right to move through the folder’s contents through time. (You should see the faces of Windows users when you riffle through your folders to locate something you deleted several weeks ago!)
The backup date of the items you’re viewing appears in the button bar at the bottom of the screen.- After you locate the file you want to restore, click it to select it.
Click the Restore button at the right side of the Time Machine button bar.
If you want to restore all the contents of the current folder, click the Restore All button instead.
Time Machine returns you to Finder, with the newly restored file now appearing in the folder. Outstanding!
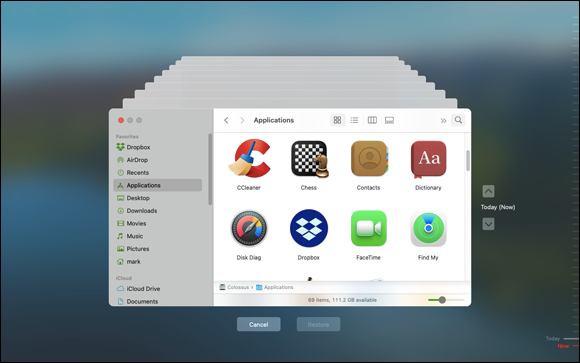
FIGURE 22-4: Yes, Time Machine really does look like this!
To restore specific data from your Contacts database, launch the Contacts application first and then launch Time Machine. Instead of riffling through a Finder window, you can move through time within the application window.
As I mention earlier, you can easily restore the entire contents of your iMac’s internal drive from your Time Machine backup, too. Reboot your iMac and hold down the ⌘ +R startup key sequence to boot using the macOS Recovery HD volume; then use the Restore function.
For robust backup and restore protection, Time Machine is all that a typical Mac owner at home is likely to ever need. Therefore, a very easy Mark’s Maxim to predict:
Get an external drive, connect it, and turn on Time Machine. Do it now. Don’t make a humongous mistake.
Maintaining Drive Health
Shifty-eyed, sneaky, irritating little problems can bother both your internal and external drives: permissions errors. Incorrect disk and file permissions can:
- Make your iMac lock up
- Make applications act screwy (or refuse to run at all)
- Cause weird behavior within a Finder window or System Preferences
And that’s not all: Problems with your drive’s catalog file can also result in corrupted data and files that won’t open.
To keep macOS Monterey running at its best, I recommend that you fix permissions and catalog errors at least once per week. Follow these steps:
- Click the Launchpad icon on the Dock and then click the Search box at the top of the window.
- Type the word disk.
- Double-click the Disk Utility icon.
- Click the volume or named partition at the left that you want to check.
Click the First Aid button and then click Run.
Disk Utility does the rest and then displays a message about whatever it has to fix, if anything. (When will someone invent a car with a Repair Me button?)
Automating Those Mundane Chores
The macOS Automator application is a big hit among iMac power users. You use Automator (shown in Figure 22-5) to create customized tools that automate repetitive tasks. Of course, writing an application might sound daunting — akin to singlehandedly building your own nuclear submarine over a long weekend — but Automator is actually easy to use. Heck, you might find it downright fun!
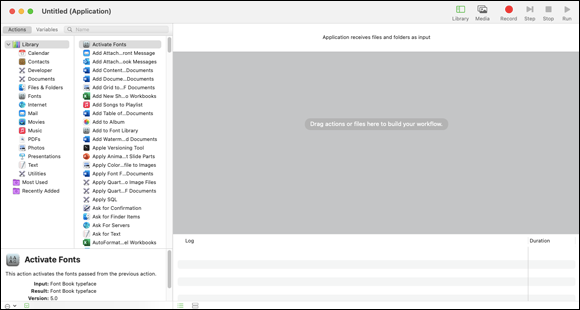
FIGURE 22-5: Automator is a dream come true for those who hate repetitive tasks.
You can also create workflows, which are sequential (and repeatable) operations that are performed on the same files or data, and then your Automator application can automatically launch whatever applications are necessary to get the job done.
Here’s a great example: You work with a service bureau that sends you a huge .zip file every week with new product shots for your company’s marketing department. Unfortunately, these images are flat-out huge — taken with a 24-megapixel camera — and they’re always in the wrong orientation. Before you move them to the Marketing folder on your server, you have to use Preview to laboriously resize each image and rotate it, and then save the smaller version.
With help from Automator, you can build a custom application that automatically reads each image in the folder, resizes it, rotates it, generates a thumbnail image, prints the image, and then moves the massaged images to the proper folder — and all with a single double-click! Of course, you can run Automator from Launchpad, or from your Applications folder in a Finder window. Currently, Automator can handle specific tasks within many applications (including Finder), as well as a number of applications from third-party developers.
Creating an application in Automator
To create a simple application with Automator, launch the application and follow these steps:
- Click the New Document icon.
- Select Application and click the Choose button.
Click the desired application in the Library list.
Automator displays the actions available for that application.
- Drag the desired action from the Library window to the workflow window on the right.
- Modify any specific settings provided for the action you chose.
- Repeat Steps 3–5 until you complete the workflow.
Click the Run button (at the upper right) to test your script.
Use sample files while you’re fine-tuning your application lest you accidentally do something deleterious to an original (and irreplaceable) file!- When the application is working as you like, press ⌘ +S to save it.
- In the Save dialog that appears, type a name for your new application.
- Click the Where pop-up menu and specify a location where the file should be saved.
- Click the File Format pop-up menu and choose Application.
Click Save.
Your new Automator application icon includes the Automator robot standing on a document. Most normal human beings would call you a programmer, so make sure you’re inscrutable from now on! If you plan to use your new Automator application often, don’t forget that you can make it more convenient to use by dragging the application icon to the Dock or to the desktop.
To find all the actions of a certain type in the Library list, click in the Search box at the top of the Library list and type a keyword, such as save or burn. You don’t even need to press Return!
Creating an Automator login item
If you want your Automator application to run every time you log in (to track your time on a project, for example), follow these steps to set up the Automator application as a login item:
- Open System Preferences.
- Display the Users & Groups pane.
- Click the Login Items button.
- Click the plus button at the bottom of the list.
- Navigate to the location of your new Automator application.
Click Add.
Now your Automator application is really automatic. Watch your significant other gape in amazement as your iMac begins to work without your touching the keyboard! (If you’ve added the application icon to your Dock, you can also simply right-click the icon and choose Options ⇒ Open at Login from the menu that appears. Either way, your iMac gets the message.)
Updating macOS Automatically
I prefer my iMac to take care of cleaning up after itself, so updating macOS should be automatic as well. In macOS Monterey, operating system updates are performed by the Software Update pane within System Preferences.
Software Update uses the Internet, so you need an Internet connection to shake hands with the Apple server and download any updates.
Updates are available in two convenient spots:
- The Apple menu: Click the Apple menu (
 ) and then choose About This Mac. Click the Software Update button, which alerts you to anything new that’s available.
 System Preferences: Click the Software Update icon in the System Preferences window.
To set Software Update to check for critical system updates and install them automatically, simply select the Automatically Keep My Mac Up To Date check box to enable it, click the Advanced button and make sure that all the check boxes are enabled, and then click OK.
If you’d rather handle updates manually — perhaps your iMac performs critical work in a video production house or lab and you’d prefer to verify that your software will be unaffected by the update — you can always disable this check box. When you’re satisfied that the update is safe, display the Software Update pane again and click the Update button to start the ball rolling.
If you’re using the same Apple ID on more than one Mac, the applications you’ve purchased through the App Store on your other Macs can be automatically downloaded to this computer as well. Click the Advanced button on the Software Update pane; then select the Install App Updates From the App Store check box to enable it; then sit back and watch convenience happen.