Chapter 13
Keeping Windows from Breaking
IN THIS CHAPTER
![]() Backing up your computer with File History
Backing up your computer with File History
![]() Getting technical information about your PC
Getting technical information about your PC
![]() Freeing up hard drive space
Freeing up hard drive space
![]() Tracking down and installing a new driver
Tracking down and installing a new driver
If Windows seems desperately broken, hop ahead to Chapter 18 for the fix; Windows 11 offers more quick fix tricks than ever. But if your computer seems to be running reasonably well, stay right here. This chapter explains how to keep it running that way for the longest time possible.
This chapter is a checklist of sorts, with each section explaining a fairly simple and necessary task to keep Windows running at its best. You discover how to set up and turn on the automatic backup program in Windows called File History, for example.
If somebody says your computer has a bad driver, it’s not a personal insult. A driver is a little program that helps Windows talk to your computer’s various parts. This chapter explains how to remove bad drivers by placing an updated driver behind the wheel.
Backing Up Your Computer with File History
Your computer’s hard drive will eventually die, unfortunately, and it will take everything down with it: years of digital photos, music, letters, financial records, scanned memorabilia, and anything else you’ve created or stored on your PC.
That’s why you must back up your files on a regular basis. When your hard drive finally walks off the stage, your backup copy lets you keep the show on the road.
 Windows 11 continues to push people to use OneDrive, Microsoft’s rental space on the internet, for storing their computer’s backups. To that end, Windows 11 now hides File History from its former spot in the Settings app.
But if you know where to find it, and I describe that secret here, Windows 11 still includes the free, automatic backup program called File History. After you turn it on, File History backs up every file in your main folders every hour. The program is easy to turn on, is simple to figure out, runs automatically, and backs up your most important files.
Before File History can go to work, you need two things:
An external hard drive: For dependable, automatic backups, you need a portable hard drive, which is a relatively inexpensive hard drive in a little box. A cord connects from the box to one of your computer’s USB ports, and when the drive is plugged in, Windows recognizes the drive immediately. Keep the drive plugged in to your computer, and File History gives you completely automatic backups.
 It’s difficult to keep a portable hard drive constantly plugged in to a laptop or tablet because they’re moved around so often. A safer but slightly more expensive option is to buy a Wi-Fi hard drive that stays at home. When you walk in the front door, Windows will find the wireless drive and automatically back up your files.
- Flip the On Switch: The File History program still comes free in Windows 11. But the program can’t do anything until you find it and tell it to begin running.
Follow these steps to tell your computer to start backing up your work automatically every hour:
Plug your portable drive’s cable into your USB port.
 The rectangular-shaped plug on the end of the drive or its cable plugs in to the rectangular-shaped USB port on your computer. (If the plug doesn’t fit in the first time, flip it over.) Some newer computers also include smaller USB-C ports, which are oval. Those push into the computer’s matching oval slot in either direction. Somebody finally made computers simpler!
Using a wireless drive? Then install it according to its instructions so that Windows will recognize it. (Unfortunately, I can’t give you exact instructions because different brands and models work slightly differently.) Some models plug into a USB port on your router, that box that turns your internet signal into a Wi-Fi hotspot in your home.
 Click the taskbar’s Search button, type File History, and press Enter.
The File History settings area jumps to the screen, shown in Figure 13-1, and begins searching for a plugged-in hard drive or memory card.

FIGURE 13-1: Click the Turn On button to start File History.
If necessary, select a drive for File History by clicking Add a Drive and choosing your drive from the drop-down window.
Usually, File History finds your plugged-in portable drive and selects it automatically. If yours did, jump to Step 4.
If your computer contains more than one portable drive, the Select a Drive window appears, listing the available storage spaces. Click the one you want, and click OK.
If your drive isn’t listed, then Windows isn’t recognizing it. Try unplugging it, restarting your computer, and then plugging it back in to a different USB port.
Once you’ve successfully added a drive, the Turn On button at the window’s bottom becomes clickable.
 To choose a networked location, click the Select a Network Drive link in File History’s opening window. Networked drives work well as backup locations for portable PCs, such as tablets and laptops. (I explain how to create a home network in Chapter 15.) If you try to save to a networked drive on another PC, Windows asks you to enter a username and password from an Administrator account on the other PC.
Click the Turn On button.
Click the Turn On button to start the backup process rolling.
When you turn on File History, Windows immediately starts its backup — even if one isn’t scheduled yet. That’s because the ever-vigilant Windows wants to make sure it grabs everything right now, before something goes wrong. The first backup can take a long time.
After backing up everything, though, Windows backs up only the changed files every hour, which takes much less time. It keeps the first batch of backed up files, thankfully, in case you ever want to retrieve those down the road.
Although File History does a remarkable job at keeping everything easy to use and automatic, it comes with a few bits of fine print, described here:
- File History backs up everything in your main folders:
Documents,Music,Pictures,Videos,Desktop,Favorites,Downloads, and a few others. To exclude some (perhaps exclude yourVideosfolder if you already store backup copies of your videos elsewhere), click the Exclude Folders link from the File History window's left pane. There, you can remove some folders and even add others. - Windows normally backs up changed files automatically every hour. To change that schedule, click the Advanced Settings link from File History’s left pane. Then choose the backup frequency. (You can choose between every 10 minutes to once a day.) You can also tell File History how long to keep backups. (I choose Until Space is Needed.)
- When you turn on File History, it only backs up your files and settings. Other people with accounts on your PC must turn on File History while logged in to their own accounts, too.
- File History also provides a handy way to move your files from an old Windows 10 PC to a new Windows 11 PC, a tiresome chore I describe in Chapter 20.
- I describe how to restore files from the File History backup in Chapter 18. That section is worth looking at now, though: Not only does File History work in emergencies, but it enables you to compare current files with versions you created hours or days before. It lets you revive better versions of files that you’ve changed for the worse.
 Windows saves your backup in a folder named
 FileHistoryon your chosen drive. Don’t move or delete that folder, or else Windows may not be able to find it again when you choose to restore it.
Finding Technical Information about Your Computer
![]() If you ever need to look under the Windows hood, heaven forbid, head for the Settings app by clicking the Start button and choosing the Settings icon shown in the margin.
If you ever need to look under the Windows hood, heaven forbid, head for the Settings app by clicking the Start button and choosing the Settings icon shown in the margin.
When the Settings app appears, select the System category and choose About from the bottom of the right column. Shown in Figure 13-2, the System window offers a technical briefing about your PC’s viscera:
- Device Specifications: This area lists your PC’s type of processor (its brains, so to speak) along with its amount of memory, known as RAM. You can upgrade memory fairly easily on a PC or laptop, but not on a tablet.
- Windows Specifications: Windows comes in several editions and versions. In this section, Windows lists the edition that’s running on your particular computer, as well as the version of that edition. Chances are, you’ll see Windows 11 Home or Pro listed here under Edition. The version number usually changes once a year, because that’s how often Microsoft updates Windows 11 with menu changes and new features. (Microsoft updated Windows 10 twice a year, much to the dismay of the techies in charge of business PCs.)
- Related Settings: Aimed at techies, this section offers a few links to little-used settings found inside the aging Windows Control Panel.
- Help from the Web: Clicking this section’s Get Help link takes you to Microsoft’s Virtual Agent, a robot that gives you a mechanical run-around when you’re looking for help. For better — and human-supplied — answers, visit Microsoft’s Answer’s Forum at
https://answers.microsoft.com.
Most of the stuff listed in the Settings app’s System window is fairly complicated, so don’t mess with it unless you’re sure of what you’re doing or a technical support person tells you to change a specific setting.
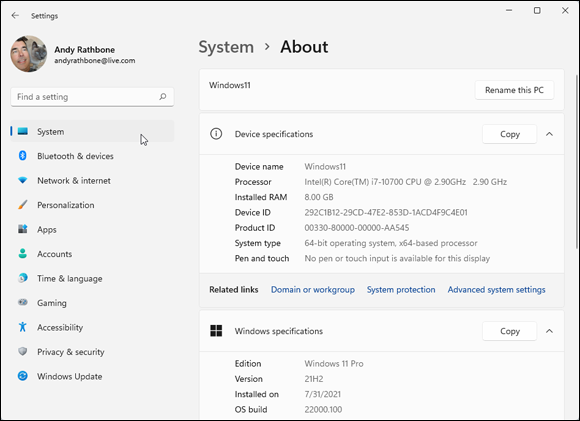
FIGURE 13-2: Clicking the System category provides technical information about your PC.
Freeing Up Space on Your Hard Drive
If Windows begins whining about running out of storage space, you can tell it to fix the problem itself. You just need to turn on Storage Sense, a Windows feature that tells Windows to take out its own trash.
To turn on Storage Sense, which makes Windows automatically empty its Recycle Bin and delete temporary files left behind by your apps and programs, follow these steps:
 Click the Start button and click the Settings icon shown in the margin.
The Settings app appears.
Click the System category, and click the word
Storagefrom the left column of the System page.The Storage section appears, as shown in Figure 13-3.
- Click the Storage Sense toggle switch to On.
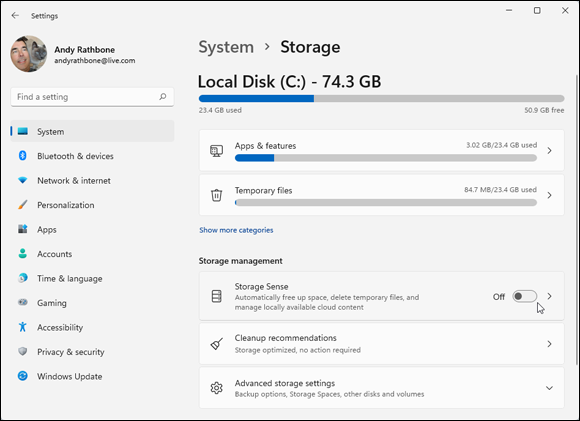
FIGURE 13-3: The Storage section offers many ways to increase storage space on your PC.
After you complete the preceding steps, Windows begins taking care of its own housekeeping automatically. To fine-tune how Windows manages its storage space, click the Storage Sense link itself. There, the Settings app's Storage section offers several other options:
- Cleanup of Temporary Files: This option lets you choose how often Windows deletes temporary files that it created in the background for its own housekeeping tasks. You never see these files, as they’re all created without your knowledge. Chances are good that you’ll never miss them.
- Automatic User Content Cleanup: Here, you can make Windows free up storage space every day, every week, every month, or only when your disk space runs low. You can also tell it how often to empty your Recycle Bin. Don’t tell it when to delete the content of your
Downloadsfolder unless you’re diligent about moving those downloaded files to another folder. - Locally Available Cloud Content: When you access files stored on OneDrive, Windows saves copies on your PC. Here, you can tell Windows to delete those downloaded copies if you haven’t opened them for a certain amount of time.
- OneDrive: When you access a file stored on OneDrive, Windows downloads a copy to your PC for you to open. If you haven’t touched that copy for a while, Storage Sense will delete it, leaving an identical copy safely stored on OneDrive. To free up space by deleting those extraneous extra files, open any folder, right-click OneDrive from the folder’s left pane, and choose Free Up Space from the pop-up menu.
- Run Storage Sense Now: Meant for people who need extra space immediately, this option works like much like Disk Cleanup did in older Windows versions.
The options above should help you free up enough space to continue working. But if Windows continually complains about not having enough room, you can try these more long-term options:
If you’ve upgraded to Windows 11, your old Windows version usually remains on your hard drive in a folder called Windows.Old. That folder consumes lots of space, and several options in the Settings app's Storage section offer to let you delete it. Deleting it, of course, means your computer won’t be able to return to that older Windows version, a last-ditch troubleshooting task I cover in Chapter 18.
Setting Up Devices That Don’t Work (Fiddling with Drivers)
Windows comes with an arsenal of drivers — software that lets Windows communicate with the gadgets you plug in to your PC. Normally, Windows automatically recognizes your new part, and it simply works. Other times, Windows heads to the internet and fetches some automated instructions before finishing the job.
In fact, the newest version of Windows now lets you download drivers automatically from Windows Update, a refreshing tact that saves you the time of tracking down drives.
But occasionally, you’ll plug in something that’s either too new for Windows to know about or too old for it to remember. Or perhaps something attached to your PC becomes cranky, and you see odd messages grumble about “needing a new driver.”
In these cases, it’s up to you to track down and install a Windows driver for that part. The best drivers come with an installation program that automatically places the software in the right place, fixing the problem. The worst drivers leave all the grunt work up to you.
If Windows doesn’t automatically recognize and install your newly attached piece of hardware — even after you restart your PC — follow these steps to locate and install a new driver:
Visit the part manufacturer’s website, and download the latest Windows driver.
You often find the manufacturer’s website stamped somewhere on the part’s box. If you can’t find it, search for the part manufacturer’s name on Google (
www.google.com) and locate its website.Look in the website’s Support, Downloads, or Customer Service area. There, you usually need to enter your part’s name, its model number, and your computer’s operating system (Windows 11) before the website coughs up the driver.
No Windows 11 driver listed? Try downloading a Windows 10, 8.1, 8, or 7 driver, instead — they sometimes work just as well.
Run the driver’s installation program.
Sometimes clicking your downloaded file makes its installation program jump into action, installing the driver for you. If so, you’re through. If not, head to Step 3.
 If the downloaded file has a little zipper on the icon, right-click it and choose Extract All to unzip its contents into a new folder that contains the files. (Windows names that new folder after the file you’ve unzipped, making it easy to locate.)
Right-click the Start button, and choose Device Manager from the pop-up menu.
 The Device Manager appears, listing an inventory of every part inside or attached to your computer. A yellow triangle with an embedded exclamation point icon appears next to the troublemaking part.
Click your problematic device listed in the Device Manager window. Then click Action from the Device Manager’s menu bar, and choose Add Legacy Hardware from the drop-down menu.
The Add Hardware Wizard guides you through the steps of installing your new hardware and, if necessary, installing your new driver. Beware, though: This last-ditch method of reviving problematic parts can frustrate even experienced techies.
Luckily, you need to install drivers only in either of these two cases:
- You’ve just bought and installed a new piece of hardware, and it’s not working correctly. The drivers packaged with newly bought computer gadgets are usually old. Visit the manufacturer’s website, download the latest driver, and install it. Chances are good that the new driver fixes problems with the first set of drivers.
- You’ve plugged in a new gadget that Windows doesn’t recognize. Tracking down and installing the latest driver can often fix the problems.
If you’re not having trouble with a piece of hardware, don’t bother updating its driver, even if you find a newer one online. Chances are good that newer driver adds support only for newer models of the gadget you own. And that new driver might throw a glitch into something that was already working fine.
Finally, don’t bother signing up for a service that claims to keep your computer up to date with the latest drivers. They can do more harm than good.
If your newly installed driver makes things even worse, there’s a solution: Head back to Device Manager, double-click the troublesome part’s name, and click the Driver tab in the Properties window. Keep your breathing steady. Then click the Roll Back Driver button. Windows ditches the newly installed driver and returns to the previous driver.