Chapter 15
Connecting Computers with a Network
IN THIS CHAPTER
![]() Understanding a network’s parts
Understanding a network’s parts
![]() Choosing between wired and wireless networks
Choosing between wired and wireless networks
![]() Setting up a small network
Setting up a small network
![]() Connecting wirelessly to public networks
Connecting wirelessly to public networks
![]() Sharing files between computers, phones, and other devices
Sharing files between computers, phones, and other devices
![]() Sharing an internet connection, files, and printers on a network
Sharing an internet connection, files, and printers on a network
Buying yet another PC can bring yet another computing problem: How can two or more PCs share the same internet connection and printer? And how do you share your files between your two PCs?
The solution involves a network. When you connect two or more computers, Windows introduces them to each other, automatically letting them swap information, share an internet connection, and print through the same printer.
Today, most computers can connect without anybody tripping over cables. Known as Wi-Fi or wireless, this option lets your computers chatter through the airwaves like radio stations that broadcast and take requests.
This chapter explains how to link a houseful of computers so that they can share things. After you’ve created a wireless network, you can share your internet connection with not only your Windows PCs but also smartphones, tablets, and other computerized gadgets. And, if you choose to give the password to your visitors, they can connect to the internet, as well.
Be forewarned, however: This chapter contains some pretty advanced stuff. Don’t tread here unless you’re running an Administrator account and you don’t mind doing a little head-scratching as you wade from conceptualization to actualization to “Hey, it works!”
Understanding a Network’s Parts
A network is simply two or more computers that have been connected so they can share things. Although computer networks range from pleasingly simple to agonizingly complex, they all have three things in common:
- A router: This little box works as an electronic traffic cop, controlling the flow of information between computers, as well as between your network and the internet. Today’s routers support both wired and wireless networks.
- A network adapter: Every computer needs its own network adapter — an electronic mouthpiece of sorts. A wired network adapter lets you plug in a cable; the cable’s other end plugs into your router. A wireless network adapter translates your computer’s information into radio signals and broadcasts them to the router. Most computers and laptops today include both adapters.
- Network cables: Computers connecting wirelessly don’t need cables, of course. But computers without wireless adapters need cables to connect them to the router.
When you plug a modem into the router, the router quickly distributes the internet signal to every computer on your network. (Some modems come with built-in routers, sparing you from having to connect the two.)
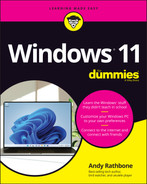
Most home networks resemble a spider, as shown in Figure 15-1, with some computers’ cables connecting to the router in the center. Other computers, laptops, tablets, and gadgets connect wirelessly to the same router.
The router divides its attention among networked computers efficiently, letting every computer simultaneously share a single internet connection.
Windows lets every computer share a single printer as well. If two people try to print something simultaneously, Windows stashes one person’s files until the printer is free and then sends them automatically when the printer is ready for more work.
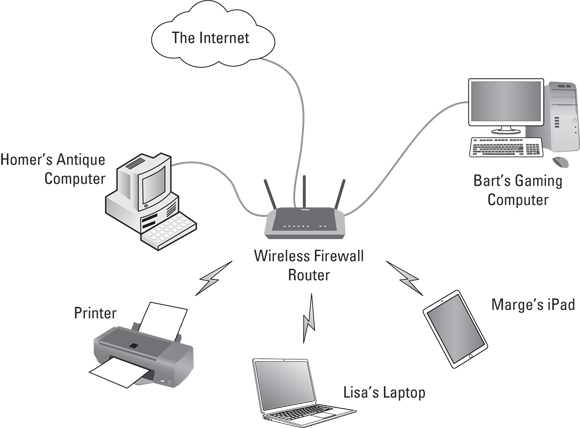
FIGURE 15-1: A network resembles a spider, with each computer communicating with a router near the center.
 Wireless routers deliver an internet signal to all connected wireless gadgets, not just Windows computers. After you set up your router, it also delivers your internet signal to iPads and other tablets, Apple computers, smartphones, and even some home theater devices (such as Blu-ray players, game consoles, “smart” televisions, Amazon Echo gadgets, and streaming video gadgets such as a Chromecast, Amazon Fire TV, and Roku boxes).
Setting Up a Small Network
If you’re trying to connect lots of computers — more than ten — you probably need a more advanced book, like Networking For Dummies All-in-One, 8th Edition, by Doug Lowe. Networks are fairly easy to set up, but sharing their resources can be scary stuff, especially if the computers contain sensitive material. But if you’re just trying to set up a few computers and wireless gadgets in your home or home office, this information may be all you need.
So without further blabbing, here’s a low-carb, step-by-step list of how to set up a small and inexpensive network. The following sections show how to buy the three parts of a network, install the parts, and make Windows create a network out of your handiwork.
Buying parts for a network
Visit the computer store across town or online, buy this stuff, and you’re well on your way to setting up your network:
- Network adapters (optional): Because most new computers and laptops include both wired and wireless adapters, you can probably cross this off your shopping list. But if you need to add an adapter, pick up an inexpensive wired or wireless adapter that plugs into the computer’s USB port. (Mobile devices like laptops, tablets, and smartphones all include built-in wireless adapters.)
- Network cable (optional): Not using wireless? Then buy Ethernet cables, which resemble phone cables but with slightly thicker jacks. Buy a cable for each computer you want to connect. The cables must be long enough to reach from the computer to the router, described next.
- Router: This little box does all the magic. Most routers today include built-in wireless; many also include a broadband modem for internet access. Wireless routers usually include four jacks to accommodate up to four nearby computers relying on cables.
 Some Internet Service Providers (ISPs) supply you with a wireless router or modem, and they even send a techie to your home to set up your network for you. It never hurts to ask.
Setting up a wireless router
Wireless connections bring a convenience felt by every smartphone owner. But with computers, a wireless connection also brings complication. You’re basically setting up a small radio transmitter that broadcasts to tiny radios inside your computers. You need to worry about signal strength, finding the right signal, and even entering passwords to keep outsiders from eavesdropping.
Unfortunately, different brands of wireless routers come with different setup software, so there’s no way I can provide step-by-step instructions for setting up your particular router.
However, every router requires you to set up these three things:
- Network name (SSID): Enter a short, easy-to-remember name here to identify your particular wireless network. Later, when connecting to the wireless network with your computer, smartphone, tablet, or other wireless gadget, you’ll select this same name to avoid accidentally connecting with your neighbor’s wireless network.
- Infrastructure: Of the two choices, choose Infrastructure instead of the rarely used alternative, Ad Hoc.
- Security: To keep out snoops, this option uses a password to encrypt your data as it flies through the air. Most routers offer at least three types of password options: WEP is barely better than no password, WPA is better, and WPA2 is better still. Choose the strongest security option available, and create a memorable password with mixed characters, such as Five&Three=8!.
Some routers include an installation program to help you change these settings; other routers contain built-in software that you access with your web browser in Windows.
As you set each of the preceding three settings, write them on a piece of paper: You must enter these same three settings when setting up the wireless connection on each of your computers and other wireless gadgets, a job tackled in the next section. You also need to pass out that information to any houseguests who want to piggyback on your internet connection while they visit.
Setting up Windows computers to connect to a network
First, a word to the wired crowd: If you’ve chosen to connect a computer to your router with a cable, plug one end of the cable into your computer’s network port. Plug the cable’s other end into one of your router’s network ports. (The ports are usually numbered; any number will do.) To connect other computers to the same router, connect cables between those computers’ network ports and the router’s other empty network ports.
If your internet company didn’t do it for you, plug a cable from your broadband modem’s LAN or Ethernet port into your router’s WAN port. (Those ports are almost always labeled, and if your router and modem live together in one box, you can skip this step.) Turn on your router, and you’ve finished: You’ve discovered how easy it is to create a wired network.
Wireless is a different story. After you set up your router to broadcast your network wirelessly, you must tell Windows how to receive it. Chapter 9 offers the full course in connecting to wireless networks, both your own and those you find in public, but here’s an abbreviated version for connecting to your own network:
 Click the Start button, and choose the Settings icon from the Start menu.
 When the Settings window appears, click the Network and Internet icon.
At the top of the Network and Internet page, Windows lists whether you’re connected to the internet and, if you’re connected, lists the name of the Wi-Fi network that your computer uses to slurp its data.
Click the page’s Wi-Fi section and make sure the Wi-Fi toggle at the page’s top is turned on. Then click the Show Available Networks button.
When you click the Show Available Networks button, Windows quickly sniffs the airwaves for nearby wireless networks and a list drops down, shown in Figure 15-2, listing of all the wireless networks within range of your computer. With any luck, your own network will be at the list’s top. Your network will have the name — the SSID — that you chose when setting up your router, described in the previous section.
Choose the desired wireless network by clicking its name, clicking the Connect Automatically button, if desired, and then clicking the Connect button.
The closest wireless network is usually the strongest, so you’ll probably spot your own wireless network at the top of the list.
If you select the adjacent Connect Automatically checkbox before clicking the Connect button, Windows automatically connects to that network the next time you’re within range, sparing you from repeating all these steps.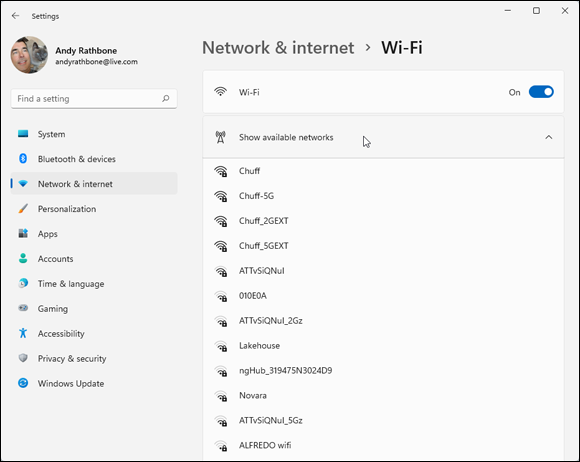
FIGURE 15-2: Windows places the strongest available network at the top of the list.
Enter a password, and click Next.
Here’s where you type in the same password you entered into your router when setting up your wireless network. (To confuse things, Windows 11 refers to your password as a “Network Security Key.”)
At this point, Windows treats your newly joined wireless network as a public network, the same as one you’d find in a coffee shop or airport. You won’t be able to find or access your other networked computers until you make some changes, covered in the next section.
If Windows asks to make your computer “discoverable,” choose Yes: You’re in your own home, and you want your other computers to be able to swap files. But if you’re connecting to somebody else’s network — a public network, for example, click No. You want your PC to be discoverable only when on your own network.
If you’re still having problems connecting, try the following tips:
- Head back to Step 2, and click the Troubleshoot button. Windows performs some basic diagnostics and resets your networking equipment. If the troubleshooter can’t fix the problem, it offers clues as to the connection-robbing culprit.
- Cordless phones and microwave ovens can interfere with wireless networks, oddly enough. If you’re having trouble with signal strength, try to keep your cordless phone out of the same room as your wireless computer, and don’t heat up that sandwich when web browsing.
 From the Windows desktop, the taskbar’s Wi-Fi icon (shown in the margin) provides a one-click way to see available wireless networks. If your desktop’s taskbar contains a Wi-Fi icon, click it, click the right-pointing arrow that appears next to the wireless icon in the pop-up menu, and jump to Step 3 in the preceding steps.
Sharing Files with Your Networked Computers
Creating a network between your computers makes it easier for them to share resources, such as an internet connection, printers, and even your files. But how can you share some files while keeping others private?
Microsoft’s solution used to be called a Homegroup. It was an automatic way of flipping networking switches so Windows PCs could see each other, as well as share their files, folders, and printers.
Windows 10 eventually removed the ability to create Homegroups, and Homegroups are still missing from Windows 11. That means you need to flip your computer’s networking switches manually.
The following sections explain which switches to flip so that Windows 11 can still share files with other computers and devices on your network.
Setting your home network to private
In Windows 7, 8, 8.1, and some earlier versions of Windows 10, Homegroup provided a fairly easy way to share your files. With a few clicks, it automatically let other people on your network share your Music, Pictures, and Videos folders. And it conveniently left out the folder most people don’t want to share: Documents.
Now, with Homegroup support dropped, Windows 11 doesn’t share any files or folders: It treats your home network as a public network. Public networks work fine in coffee shops and airports, where you don’t want strangers to know about your connected computer, much less access its private files.
However, you want a private network at home so you can share files, as well as a printer, among all your computers. To switch your network to private, follow these steps:
Click the Start button, click the Settings icon, and click Network and Internet from the left pane.
The Network and Internet section appears, shown in Figure 15-3, letting you double-check your Network settings on the top of the page.
Change the network to Private, if necessary.
Make sure that the network says the words Private Network beneath the word Properties, as shown in Figure 15-3. If it says Public Network, click the Properties button. When the Properties page appears, click the Private button from a drop-down menu near the top of the Properties page.
FIGURE 15-3: The Network and Internet page lets you toggle your network between Public and Private.
Making a network Private prevents your PC from appearing to wandering internet strangers, and limits access to those PCs on your own private network.
Click the Start button, and, in the Search box along the Start menu’s top, type Manage Advanced Sharing Settings and press Enter, and confirm that these settings are correct:
The age-old Control Panel’s Advanced Sharing Settings page appears, shown in Figure 15-4. The settings it displays may already be correct, but they’re the first place to look if your network isn’t behaving correctly. You can open each of the three sections listed below by clicking the downward-pointing arrow next to the section’s name.
Private: Make sure the network is set to Private (Current Profile). If it says Public, repeat Steps 1 and 2. When a network is set to Private, Windows should automatically toggle Network Discovery to On, which allows your PCs to see each other. If necessary, toggle on the Turn on File and Printer Sharing option.
Guest or Public: Everything in this section should be toggled off. That keeps your computer safer when connected to a public network.
All Networks: Make sure that a dot appears next to these settings:
- Turn off Public Folder Sharing
- Use 128-bit Encryption to Help Protect File Sharing Connections
- Turn On Password Protected Sharing
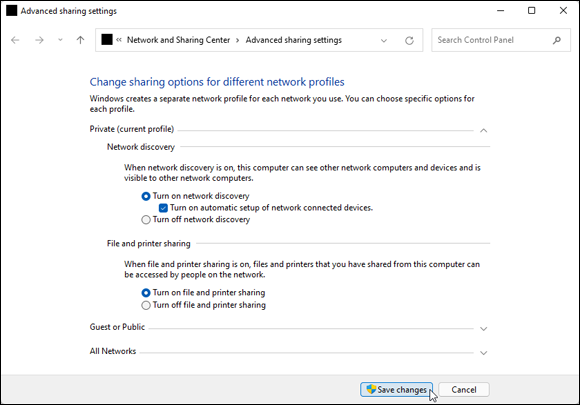
FIGURE 15-4: The Advanced Sharing settings page lets you fine-tune your network settings.
Click the Save Changes button.
Windows takes the necessary background steps that begin sharing your printer and allow you to start choosing which files and folders to share.
Most people need to follow these steps only once, when first setting up their home network. As you travel with laptops and tablets, Windows automatically treats every newly encountered network as public, adding the tighter security controls that go along with it.
After you set up your home network as private, several things happen:
- Your networked computers show up in File Explorer’s Network area, located on the bottom of File Explorer’s left pane. (Your other computers should now be able to see your computer as well.)
- You can see any files shared by other PCs on your network.
- Any printer installed on one of your Windows PCs will appear as an option in the other PC’s printing menus.
- You can begin sharing files and folders on your Windows computer, a task I describe in the next section.
Sharing files and folders on your private network
After you make your network private, as described in the previous section, other computers on your network can finally see your computer. But they can’t access its files or folders.
Before they can do that, you must manually share your files and folders by following these steps:
 Open File Explorer by clicking its icon on the taskbar, and find the folder or files that you want to share.
When File Explorer appears, click the This PC link in its left pane; your most popular folders appear along File Explorer’s right side. From there, you can navigate to the folder containing the items you want to share.
I explain how to navigate File Explorer and select items in Chapter 5.
Right-click the folder or files you want to share, and from the pop-up menu that appears, choose Show More Options. When the full menu appears, click Give Access To, and then click the option labeled Specific People from the pop-out menu.
The Choose People to Share With window appears, as shown in Figure 15-5. There, you can add people who should be allowed to access those files or folders on your home network.
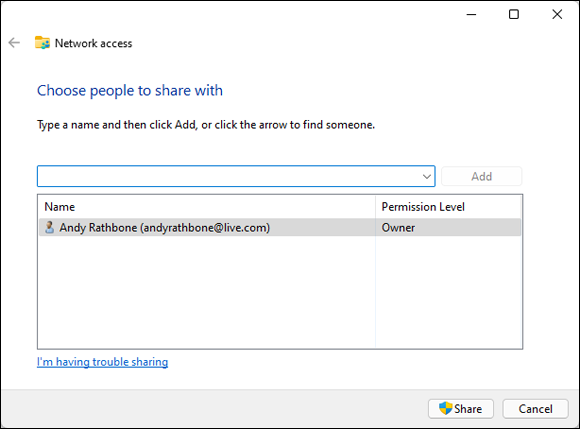
FIGURE 15-5: Choose the people you want to access those folders.
Add the names of people who should be able to access those files or folders, and click the Add button.
Add the people on your network who should be able to access those files and folders. You can do this in several ways, with these being the easiest:
- Microsoft accounts: If your network holders use Microsoft accounts, just type the email address linked to their Microsoft account.
- Everyone: To add everyone on your network, simply add the word Everyone.
Click an added person’s name and choose what type of access to grant that person.
You have three options here, as shown in Figure 15-6: Read, Read/Write, and Remove:
- Read: The most popular option, this allows the person to view the contents of the file or folder, but not make any changes. If they want to make changes, they can copy the file or folder to their own computer and make changes there. But they won’t be able to alter the copy on your own PC.
- Read/Write: This lets people not only view, read, and copy the items, but to change them as well. That means they can also delete them, so be careful when granting this power, especially if you’ve shared that item with Everyone, as described in Step 3.
- Remove: Choose this option to remove a listed person’s access to the items, handy when somebody can no longer be trusted with access to your files.
- Click the Share button to put your changes in motion.
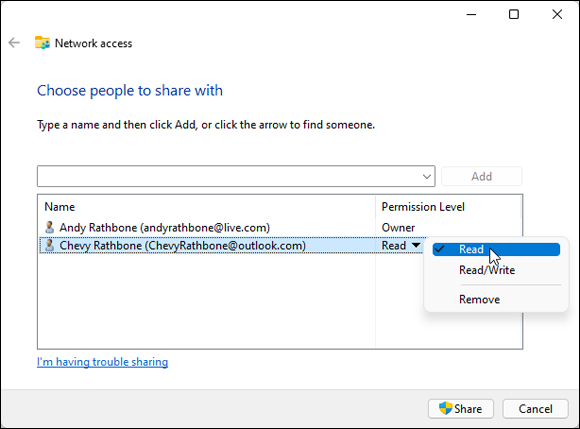
FIGURE 15-6: Choose the people who should have access to your shared items, as well as their type of access.
When you’re through sharing items, the next section explains how to access items shared on the network.
Accessing what others have shared
![]() To see the shared folders of other people on both your PC and home network, click the File Explorer icon (shown in the margin), found on the taskbar that runs along the bottom of every Windows screen.
To see the shared folders of other people on both your PC and home network, click the File Explorer icon (shown in the margin), found on the taskbar that runs along the bottom of every Windows screen.
When File Explorer appears, click Network, found in the Navigation pane along File Explorer’s left edge. The right side of the window, shown in Figure 15-7, promptly lists the names and icons of every computer on your network that offers shared files.
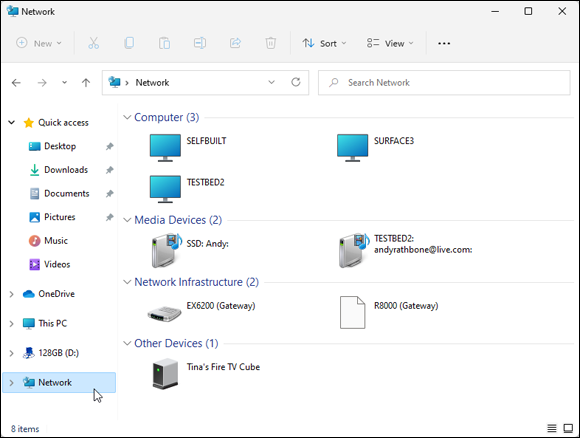
FIGURE 15-7: Click Network to see other accessible PCs on your network.
To browse the files shared on another networked computer, double-click that computer’s name from the Network window. The window promptly displays that computer’s shared folders, as shown in Figure 15-8, ready to be browsed as if they were your own.
If it asks for a password, type in a name and password of an account holder on that computer.
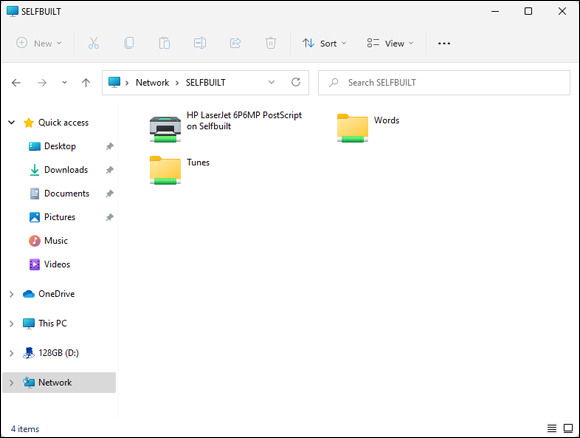
FIGURE 15-8: Click a computer’s name, and its available files appear to the right.
You can do more than browse those files, as described here:
- Opening: To open a file on a shared folder, double-click its icon, just as you would any other file. The appropriate program opens it. If you see an error message, the sharing person created the file using a program you don’t own. Your solution? Buy or download the program or app, or ask the person to save the file in a format that one of your programs can open.
- Copying: To copy a file from another networked PC, drag it into your own folder. Or right-click the file’s icon and choose Copy from the pop-up menu; then right-click inside the destination folder, and choose Paste from the pop-up menu.
Sharing a printer on the network
![]() If you’ve created a network, covered earlier in this chapter, Windows makes sharing a printer quite easy. After you plug a USB printer — the kind with the connector shown in the margin — into one of your networked Windows PCs, you’re set: Windows automatically recognizes the newly plugged-in printer as soon as it’s turned on.
If you’ve created a network, covered earlier in this chapter, Windows makes sharing a printer quite easy. After you plug a USB printer — the kind with the connector shown in the margin — into one of your networked Windows PCs, you’re set: Windows automatically recognizes the newly plugged-in printer as soon as it’s turned on.
Plus, your Windows PC quickly spreads the news to all the PCs in your network. Within minutes, that printer’s name and icon appear on all those PCs and in all their programs’ print menus.
If you don’t see your printer listed, make sure you’ve followed the steps in this chapter’s earlier section, “Setting your home network to private.”
To see that shared printer on your other networked Windows PCs, follow these steps:
- Click the Start button, and click Settings.
 When the Settings app appears, click the Bluetooth and Devices icon (shown in the margin).
- When the Bluetooth and Devices page appears, click Printers & Scanners along the right edge to see any printer or scanner that’s available to your computer.
Sharing with Nearby Sharing
 Creating a network makes it easier to share files with other PCs in your home. It’s the best way to share an internet connection, as well as printers.
But a network isn’t the only way to share files:
- You can attach files to email and send them to people with the Mail app or any other email program, as I cover in Chapter 10.
- You can share your OneDrive files and folders with anybody on the internet, as I explain in Chapter 5.
Plus, you can share files between nearby computers with the Nearby Sharing feature. Nearby Sharing works with Bluetooth or your computer’s Wi-Fi, which come built-in to nearly every portable computer and device. (If your PC doesn’t have Bluetooth, you can add it by buying a Bluetooth adapter and plugging it into one of your PC’s USB ports.)
Nearby Sharing isn’t the fastest way to send a file, so don’t use it for sending large videos. It’s mainly used for sending a small file or two to adjacent laptops. To be safe and save battery life on laptops and tablets, turn off Nearby Sharing after sharing your files.
If you’re an Apple fan, Nearby Sharing works much like the AirDrop feature found on Apple devices like iPads, iPhones, and Macs.
The next two sections explain how to turn on Nearby Sharing, as well as how to use it for sharing files with nearby devices.
Turning on Nearby Sharing
Before you can share files with Nearby Sharing, you must first turn on the feature by following these steps:
Click the Start button, choose the Settings icon, and choose the System category.
The Settings app opens to show its System settings.
Choose Nearby Sharing from the right pane.
The Nearby Sharing settings appear, shown in Figure 15-9.
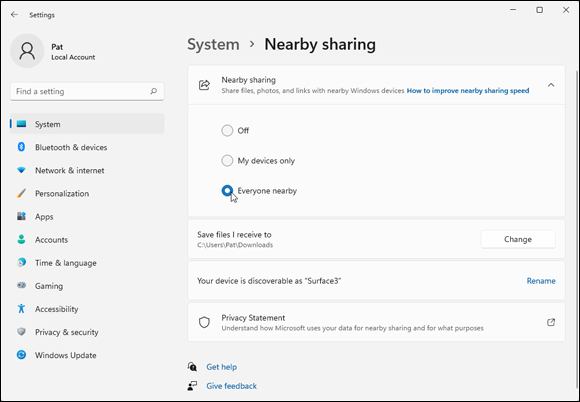
FIGURE 15-9: Click the Nearby Sharing toggle to My Devices Only or Everyone Nearby.
Choose who to can send you files.
Nearby Sharing offers three options:
- Off: Choose this setting if you’ve already set up a private home network, and you’re at home. You don’t need Nearby Sharing.
- My Devices Only: Choose this only if you want to restrict the Nearby Sharing to your own PCs.
- Everyone Nearby: The most popular option, this allows anybody with a Windows 10 or Windows 11 computer to both receive and send items through Nearby Sharing. It’s a handy way to send somebody a file during a meeting in a boardroom or coffee shop. (If a stranger tries to send you an unwanted file, simply ignore the message that pops up on your PC; the transfer won’t take place.)
Your changes take place immediately. If it’s not working, make sure you’ve turned on Bluetooth; Nearby Sharing needs that to work. (I explain how to turn on Bluetooth in Chapter 3.)
After you’ve turned on Nearby Sharing, you don’t need to revisit this setting unless you want to turn it off.
Sharing files with Nearby Sharing
After you and your friend have turned on Nearby Sharing, follow these steps to share a file or folder with a nearby friend:
Find the file you want to share.
File Explorer offers the easiest way to share things with Nearby Sharing, but a few other apps also support the new feature.
Select the item or items you want to share, and click the app’s Share icon on File Explorer’s top row of icons.
 Click the Share icon option atop File Explorer.
When the Share window appears, choose how you wish to share the file.
The Share window in File Explorer, shown in Figure 15-10, offers three ways to share your items:
- Nearby Sharing: This area lists any nearby computers with Nearby Sharing turned on. Click a computer’s name to start sending copies of the files to that computer. It also offers a quick way to turn Nearby Sharing on or off, saving you some time.
- Email a Contact: Frequently contacted people appear as a row atop the window. Click a person’s name, and choose their preferred email address to email them the files. This works best for fairly small files, not videos or a large number of photos.
- Share with App: Choose an app listed from this group to send the file to that app on your own PC.
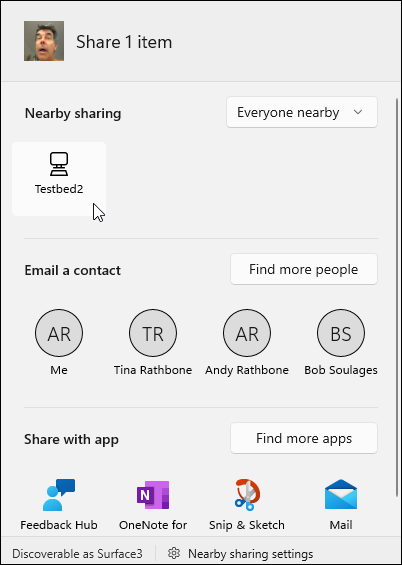
FIGURE 15-10: Click the name of the computer that should receive the file.
Have the other person approve the transfer.
When you choose a computer’s name in the previous step, a message pops up on the receiving computer. That lets the owner accept the transfer and, just as important, decline unwanted or unexpected file transfers.
After the recipient approves the transfer by clicking the Save button, the incoming files appear in their
Downloadsfolder.