Chapter 3
The Traditional Desktop
IN THIS CHAPTER
![]() Finding the desktop
Finding the desktop
![]() Finding the Start menu
Finding the Start menu
![]() Working on the desktop
Working on the desktop
![]() Retrieving deleted items from the Recycle Bin
Retrieving deleted items from the Recycle Bin
![]() Understanding the taskbar
Understanding the taskbar
![]() Customizing the desktop
Customizing the desktop
![]() Setting up multiple desktops
Setting up multiple desktops
![]() Making programs easier to find
Making programs easier to find
After you turn on your PC and type in your user name and password, the Windows desktop fills the screen, ready for work. For the most part, the Windows 11 desktop works the same way it’s worked for the past decade. It’s where you arrange your work in onscreen windows and make things happen.
The Windows 11 new Start menu and its gang of apps bring many changes, but the desktop works much like the familiar workhorse of yesteryear. This chapter shows you how to make the desktop do your bidding.
Finding the Desktop and the Start Menu
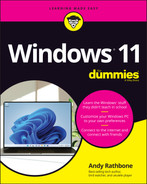
The Windows 11 Start menu may look drastically different from its predecessors, but the desktop, shown in Figure 3-1, is almost indistinguishable from the one in Windows 7.
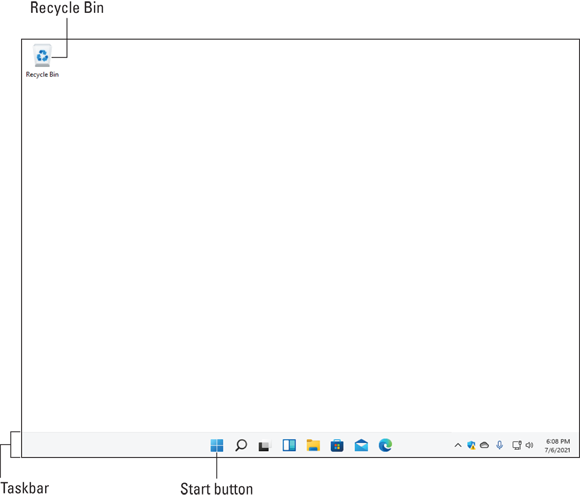
FIGURE 3-1: Except for the row of icons in the center of the taskbar, the Windows 11 desktop hasn’t changed much.
The Windows 11 desktop runs most of the Windows programs that ran on your old Windows 7, Windows 8, or Windows 8.1 computer. Exceptions are antivirus programs, security suites, high-performance video games, and some utility programs. Those don’t usually transfer well from one Windows version to another.
Unlike Windows 8 and Windows 8.1, Windows 11 runs apps within a window on the desktop.
Working with the Desktop
The desktop lets you run several apps and programs simultaneously, each living within its own little window. That separation lets you spread several programs across the screen, sharing bits of information among them.
When first installed, Windows starts with the freshly scrubbed, nearly empty desktop shown earlier in Figure 3-1. After you’ve been working for a while, your desktop will fill up with icons — little buttons that load your files with a quick double-click. Many people leave their desktops strewn with icons for easy access.
Other people organize their work: When they finish working on something, they store their files in folders, which are places for storing similar items, that I cover in Chapter 4.
No matter how you use the desktop, it comes with three main parts, labeled earlier in Figure 3-1:
 Start button: To launch a program, click the Start button. It’s the first icon on the right of the taskbar, that strip that runs along the bottom of your desktop. When the Start menu appears, click the name or icon for the app or program you want to run.
I cover the Start menu and all its quirks in Chapter 2. (Flip back to that chapter if you want to remove or rearrange the Start menu’s app icons.) For easy access to your favorite programs, place them on your desktop’s taskbar (described below).
- Taskbar: Resting lazily along the bottom edge of your screen, the taskbar shows icons for the apps and programs you currently have open, as well as icons for launching a few favored programs. (Hover your mouse pointer over a program’s icon on the taskbar to see the program’s name or perhaps a thumbnail photo of that program in action.) I describe how to add your favorite programs’ icons to the taskbar later in this chapter’s “Customizing the taskbar” section.
 Recycle Bin: The desktop’s Recycle Bin, that wastebasket-shaped icon, stores your recently deleted files and folders for easy retrieval. Whew!
I cover these items later in this chapter and throughout the book, but the following tips will help you until you page ahead:
- PC and laptop owners can start new projects directly from the Windows desktop: Right-click a blank part of the desktop, choose New Item, and choose the project of your dreams from the pop-up menu, be it loading a favorite program or creating a folder to store new files. (The New Item menu even lists some of your computer’s programs, sparing you a journey back to the Start menu.)
 Are you befuddled about a desktop object’s reason for being? Timidly rest the pointer over the mysterious doodad, and Windows often pops up a little box explaining what that thing is or does. Right-click the object, and the ever-helpful Windows usually tosses up a menu listing nearly everything you can do with that particular object. This trick works on most icons and buttons found on your desktop and its programs.
 All the icons on your desktop may suddenly disappear. To bring your work back to life, right-click your empty desktop and choose View from the pop-up menu. Then make sure the Show Desktop Icons menu option has a check mark so that everything stays visible.
Launching apps with the Start menu
The Start button lives on the left edge of your taskbar, that icon-filled strip centered along the desktop’s bottom edge. A click or tap of the Start button fetches the Start menu, which lists your installed apps and programs. When the Start menu appears, you click the app or program you’d like to run.
I cover the Start menu in Chapter 2, but here’s a quick step-by-step on how to open the Start menu and launch an app or program:
- Click the Start button, the left-most icon on your taskbar.
The Start menu appears, as shown in Figure 3-2.
The Start menu automatically lists names of your most recently accessed apps and programs in its bottom edge. Above them, the Start menu displays icons of popular apps installed on your computer.
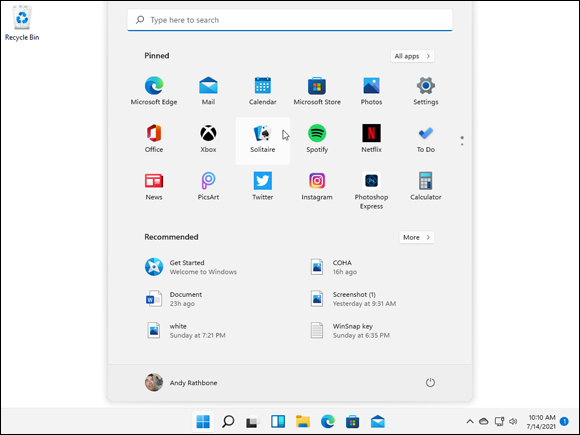
FIGURE 3-2: You can launch apps and programs from the Start menu.
If you see the app or program you want to launch listed on the Start menu, click it.
Click a name or an icon, and the app or program opens in a window on your desktop, ready for action.
Don’t see the name of the app or program you want to launch? Click the All Apps button in the Start menu’s upper-right corner to see an alphabetical list of all your apps and programs. From here, you have several choices:
- If you don’t see your desired app’s name, scroll down the list of names by clicking in the bar just to the right of the names. (I describe how to scroll with a scroll box in Chapter 4.)
- If the app you want to launch doesn’t appear on the list, chances are good that it’s not installed on your computer. To download it, open the Microsoft Store app, which I cover in Chapter 6.
You can also fetch the Start menu by pressing the ![]() key on your keyboard or tablet.
key on your keyboard or tablet.
![]() After you’ve opened an app or program, you’ll eventually want to close it, a task I cover in Chapter 4. (But here’s a spoiler: To close an app, move your mouse pointer to the app’s upper-right corner and click the little X, shown in the margin.)
After you’ve opened an app or program, you’ll eventually want to close it, a task I cover in Chapter 4. (But here’s a spoiler: To close an app, move your mouse pointer to the app’s upper-right corner and click the little X, shown in the margin.)
I explain more about the Start menu, including how to customize it to meet your needs, in Chapter 2.
Jazzing up the desktop’s background
To jazz up your desktop, Windows covers it with a pretty picture known as a background. (Many people refer to the background simply as wallpaper.)
 Already looking at a photo you want to appear as your background? Right-click it and choose Set As Desktop Background from the pop-up menu. Your photo quickly splashes itself across your desktop to create a new background.
When you tire of the built-in scenery, feel free to replace it with a picture stored on your computer:
 Click the Start button, and choose the Settings icon.
The Settings icon resembles a gear. Click it, and the new Windows 11 Settings app appears. (I cover the Settings app in Chapter 12.)
From the left column of the Settings app, click the Personalization icon, and from the right column, click the Background section.
The Personalization section of the Settings app opens to the Theme section. Scroll down and click the Background button; the Background section appears.
From the Personalize Your Background section, click Picture from the adjacent drop-down menu. Below that menu, click the Browse Photos button, shown in Figure 3-3, and double-click your desired photo.
Found a keeper? Double-click the photo, and you’re done; your change takes place immediately. Or, if you’re still searching, move to the next step.
FIGURE 3-3: Click the Browse Photos button to choose a photo from another folder for the background.
Navigate to your
Picturesfolder.Most people store their digital photos in their
Picturesfolder, either on their PC or on OneDrive. (I explain how to browse folders, as well as OneDrive, in Chapter 5.)Click different pictures to see how they look as your desktop's background.
When you find a background you like, you’re done. The change takes place automatically. Exit the Settings app with a click in its upper-right corner, and your chosen photo drapes across your desktop, like wallpaper beneath your desktop’s icons and open windows.
Here are some tips on changing your desktop’s background:
- Options listed on the Background page’s Choose a Fit For Your Desktop Image menu let you choose whether the image should be tiled repeatedly across the screen, centered directly in the middle, or stretched to fill the entire screen. The Tile, Fill, and Fit options work best with small photos by repeating or enlarging them to fit the screen’s borders. Feel free to experiment; you’ll want different options for different sized photos.
- The Microsoft Edge web browser can borrow most pictures found on the internet for a background. Right-click the website’s picture and choose Save Picture As from the pop-up menu. Microsoft sneakily offers to copy the image into your
Picturesfolder, where you can choose it as a background in Step 4 of the preceding list. - If a background photograph makes your desktop icons too difficult to see, splash your desktop with a single color instead: In Step 3 of the preceding list, click Solid Color instead of Picture. When the colored squares appear, click one to splash its color across your desktop.
- To change the entire look of Windows, choose Themes from the Personalization window’s left edge in Step 2. The right pane lets you customize your computer’s look by clicking the Background, Color, Sounds, and Mouse Cursor sections, and then changing them to your liking. I explain more about themes in Chapter 12.
Dumpster diving in the Recycle Bin
![]() The Recycle Bin, that wastebasket icon in the upper-left corner of your desktop, works much like a real recycle bin. Shown in the margin, it lets you retrieve the discarded desktop files you thought you’d never need.
The Recycle Bin, that wastebasket icon in the upper-left corner of your desktop, works much like a real recycle bin. Shown in the margin, it lets you retrieve the discarded desktop files you thought you’d never need.
You can dump something from the desktop or File Explorer — a file or folder, for example — into the Recycle Bin in either of these ways:
- Simply right-click the unwanted item and choose Delete from the pop-up menu. Windows asks cautiously if you’re sure that you want to delete the item. Click Yes, and Windows dumps it into the Recycle Bin, just as if you’d dragged it there. Whoosh!
- For a quick deletion rush, click the unwanted object and poke your Delete key.
Want something back? Double-click the Recycle Bin icon to see your recently deleted items. Right-click the item you want and choose Restore. The handy little Recycle Bin returns your precious item to the same spot where you deleted it. (You can also resuscitate deleted items by dragging them to your desktop or any other folder; drag ’em back into the Recycle Bin to delete them again.)
The Recycle Bin can get pretty crowded. If you’re searching frantically for a recently deleted file, tell the Recycle Bin to sort everything by the date and time you deleted it: Right-click an empty area inside the Recycle Bin and choose Sort By. Then choose Date Deleted from the pop-up menu.
To delete something permanently, just delete it from inside the Recycle Bin: Click it and press the Delete key. To delete everything in the Recycle Bin, right-click the Recycle Bin icon and choose Empty Recycle Bin.
To bypass the Recycle Bin completely when deleting files, hold down Shift while pressing Delete. Poof! The deleted object disappears, ne’er to be seen again — a handy trick when dealing with sensitive items, such as credit-card numbers or bleary-eyed selfies.
The Recycle Bin serves as an intelligent wastebasket, though. Here are a few other ways it shines:
 The Recycle Bin icon changes from an empty wastepaper basket to a full one (as shown in the margin) as soon as it’s holding any deleted file or files.
- The Recycle Bin holds only items deleted from the desktop, and your files and folders. It doesn’t retain information deleted from apps or programs.
- Your Recycle Bin keeps your deleted files until the garbage consumes about 5 percent of your computer’s available space. Then it automatically purges your oldest deleted files to make room for the new. If you’re low on hard drive space, shrink the bin’s size by right-clicking the Recycle Bin and choosing Properties. Decrease the Custom Size number to purge the bin more quickly; increase the number, and the Recycle Bin hangs onto files a little longer.
- The Recycle Bin saves only items deleted from your computer’s own drives. That means it won’t save anything deleted from a memory card, phone, MP3 player, flash drive, or digital camera.
- Already emptied the Recycle Bin? You might still be able to retrieve the then-trashed-now-treasured item from the Windows File History backup, covered in Chapter 13.
If you delete something from somebody else’s computer over a network, it can’t be retrieved. The Recycle Bin holds only items deleted from your own computer, not somebody else’s computer. (For some awful reason, the Recycle Bin on the other person’s computer doesn’t save the item either.) Be careful, and make sure every computer in your house has a backup system in place.
Bellying Up to the Taskbar
Whenever more than one window sits across your desktop, you face a logistics problem: Programs and windows tend to overlap, making them difficult to spot. To make matters worse, programs such as web browsers and Microsoft Word can contain several windows apiece. How do you keep track of all the windows?
The Windows solution is the taskbar — a special area that keeps track of your currently running programs and their windows. Shown in Figure 3-4, the taskbar lives along the bottom of your desktop, constantly updating itself to show an icon for every currently running app or desktop program.

FIGURE 3-4: Move the mouse pointer over a taskbar icon to see that app’s currently open files.
The taskbar remains accessible along the screen’s bottom edge, even when apps or the Start menu fill the screen.
The taskbar also serves as a place to launch your favorite programs. By keeping your favorite programs’ icons in sight and one quick click away, you’re spared a detour to the Start menu.
Not sure what a taskbar icon does? Rest your mouse pointer over any of the taskbar icons to see either the program’s name or a thumbnail image of the program’s contents, as shown in Figure 3-4. In that figure, for example, you can see that the Photos app displays three photos.
From the taskbar, you can perform powerful magic, as described in the following list:
- To play with a program listed on the taskbar, click its icon. The window rises to the surface and rests atop any other open windows, ready for action. Clicking the taskbar icon yet again minimizes that same window.
- Whenever you load an app or program, its icon automatically appears on the taskbar. If one of your open windows ever gets lost on your desktop, click its icon on the taskbar to bring it to the forefront.
- To close an app or program listed on the taskbar, right-click its icon and choose Close from the pop-up menu. The program quits, just as if you’d chosen its Exit command from within its own window. (The departing program thoughtfully gives you a chance to save your work before it quits and walks off the screen.)
- Taskbar icons with a thin underline along their bottom edge let you know that their app or program is currently running.
 Traditionally, the taskbar lives along your desktop’s bottom edge, but earlier Windows versions let you move it to any edge you want. That feature disappeared from Windows 11; the taskbar now stays firmly affixed to the screen’s bottom edge.
 Can’t find an open app or window? Click the taskbar’s Task View icon (shown in the margin) to see thumbnails of all your open apps and programs. Click the one you want to revisit, and it rises to the top of the screen.
- You can quickly jump to the taskbar page in the Settings app by right-clicking the taskbar and choosing Taskbar Settings.
- If the taskbar keeps hiding below the screen’s bottom edge, rest the mouse pointer to the screen’s bottom edge until the taskbar surfaces. Then right-click the newly revealed taskbar and choose Taskbar Settings. When the Settings app opens to the Personalization page, scroll down to the Taskbar section. Click it to fetch the Taskbar page, and then click the Taskbar Behaviors menu and click the Automatically Hide The Taskbar option to remove its check mark.
You can add your favorite apps and programs directly to the taskbar: From the Start menu, right-click the favored program’s name or icon, and choose Pin To Taskbar from the pop-up menu. The program’s icon then lives on the taskbar for easy access, just as if it were running. Tired of the program hogging space on your taskbar? Right-click it and choose Unpin From Taskbar from the pop-up menu.
Shrinking windows to the taskbar and retrieving them
Windows spawn windows. You start with one window to write a letter of praise to your local deli. You open another window to check an address, and then yet another to ogle an online menu. Before you know it, four windows are crowded across the desktop.
To combat the clutter, Windows provides a simple means of window control: You can transform a window from a screen-cluttering square into a tiny button on the taskbar along the bottom of the screen. The solution is the Minimize button.
![]() See the three buttons lurking in just about every window’s upper-right corner? Click the Minimize button — the button with the little line in it, shown in the margin. Whoosh! The window disappears, and is instead represented by its little icon on the taskbar, located as always at the bottom of the screen.
See the three buttons lurking in just about every window’s upper-right corner? Click the Minimize button — the button with the little line in it, shown in the margin. Whoosh! The window disappears, and is instead represented by its little icon on the taskbar, located as always at the bottom of the screen.
To make a minimized program on the taskbar revert to a regular, onscreen window, just click its icon on the taskbar. Pretty simple, huh?
It is simple, if you keep these things in mind:
- Can’t find the taskbar icon for the window you want to minimize or maximize? If you hover your mouse pointer over the taskbar icon, Windows displays a thumbnail photo of that program or the program’s name.
- If one program has several open files, say, Microsoft Word, then hover your mouse pointer over the Microsoft Word icon: A list appears, showing thumbnails of each open file. Click a thumbnail to return to that particular file.
- When you minimize a window, you neither destroy its contents nor close the program. And when you click the window’s name on the taskbar, it reopens to the same size you left it, showing its same contents.
Switching to different tasks from the taskbar’s Jump Lists
The Windows taskbar doesn’t limit you to opening programs and switching between windows. You can jump to other tasks, as well, by right-clicking the taskbar’s icons. Right-clicking the File Explorer icon, for example, brings up a quick list of your recently visited folders, as shown in Figure 3-5. Click any folder on the list to make a quick return visit. Similarly, right-click the Edge app to see the last few websites you’ve visited.
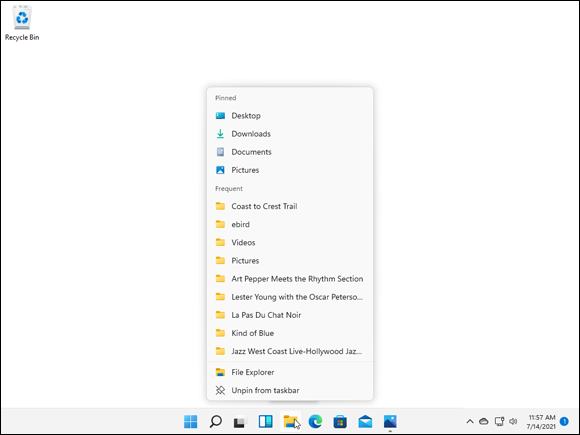
FIGURE 3-5: Right-click File Explorer to see a clickable list of recently visited locations.
Called Jump Lists, these pop-up menus add a special trick to the taskbar: They let you quickly jump to previously visited locations, letting you work more efficiently.
Jump List items work any time, even when a program is closed. As long as a program’s icon appears on the taskbar, you can access its Jump List. So even if you haven’t opened File Explorer, for example, you can still right-click its taskbar icon and jump to a recently visited folder.
Clicking the taskbar’s sensitive areas
Like a crafty card player, the taskbar comes with a few tips and tricks. For example, here’s the lowdown on the icons near the taskbar’s right edge, shown in Figure 3-6, known as the Action Center. Different items appear in the Action Center depending on your PC, your programs, and your PC’s settings, but you’ll probably encounter some of these:
 Show Desktop: This small strip nestled against the taskbar’s far-right edge instantly minimizes all open windows when you click it. Click it again to put the windows back in place. Windows 11 makes this strip nearly invisible, but it’s still there; just point at the far-right edge. When the words Show Desktop appear, you’re in the right place to click and minimize all your open windows.
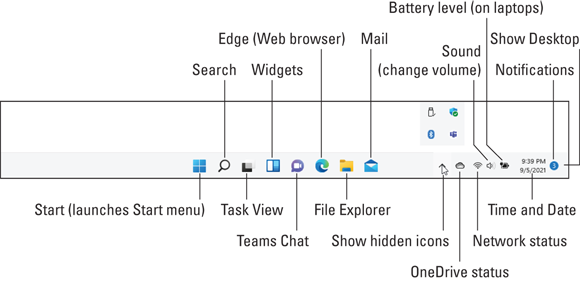
FIGURE 3-6: Click the arrow to see the taskbar’s hidden icons.
 Time/Date: Click the time and date area to fetch a handy monthly calendar. If you want to change the time or date or even add a second time zone, right-click the time and date area and choose Adjust Date and Time, a task I cover in Chapter 12. Above the calendar, Windows 11 lists any waiting notifications, described later in this list.
 Bluetooth: Click this to see your options for connecting wirelessly with Bluetooth, commonly used with mice, keyboards, and nearby speakers.
 Safely Remove Hardware: Before unplugging a storage device, be it a tiny flash drive, a portable music player, or a portable hard drive, click here. That tells Windows to prepare the gadget for unplugging.
 Notifications: When a small dot appears to the left of taskbar’s time and date area, that means a notification awaits to tell you about newly arrived emails, upcoming appointments, and other tidbits. (A number inside the dot lists the number of waiting notifications.)
 Wired Network: Found mostly on desktop PCs, this icon appears when you’re connected to the internet or other PCs through a wired network. Not connected? The icon turns into a circle with a line through it.
 Wireless Network: This appears when your PC is wirelessly connected to the internet or other network. The more waves you see on the icon, the more powerful your wireless signal. (I explain how to connect to wireless networks in Chapter 9.)
 Volume: Click or tap the tiny speaker icon to adjust your PC’s volume, as shown in Figure 3-7. Or right-click the volume icon and choose Open Volume Mixer to fetch a mixing panel. (Mixers let you adjust separate volume levels for each program, handy for keeping your music player’s volume louder than your other programs’ annoying beeps.) The volume slider also shows a list of “Quick Action” icons that once lived in the Windows 10 Action Center; I cover those in this chapter’s next section, “Seeing the Action Center and Notifications.”
 Task Manager: Coveted by computer technicians, this little program can end misbehaving programs, monitor background tasks, track your PC’s performance, and do other stuff of techie dreams.
 Windows Update: When you spot this icon, click it: Windows Update wants you to restart your computer so it can finish installing an update.
 OneDrive: When your computer is synchronizing its files with OneDrive (your internet storage space), little round arrows almost cover this icon.
 Power, Outlet: This shows that your laptop or tablet is plugged into an electrical outlet and is charging its battery.
 Power, Battery: Your laptop or tablet is running on batteries only. (Rest your mouse pointer over the icon to see how much power remains.)
- Arrow: Sometimes the taskbar hides things. If you see a tiny upward-pointing arrow at the start of the taskbar’s notification area, click it to see a few hidden icons slide up and out. (Check out the later “Customizing the taskbar” section for tips and tricks on whether icons should hide from you.)
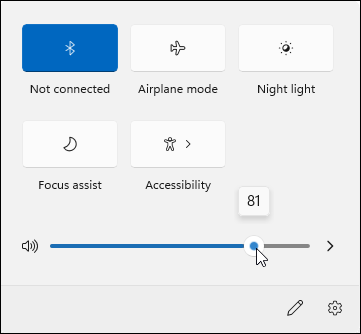
FIGURE 3-7: Slide the lever to adjust the volume.
You can pick and choose which notification icons should always be visible by right-clicking a blank portion of the taskbar and choosing Taskbar Settings. When the Taskbar Settings page appears, click Taskbar Corner Overflow, and choose which icons should appear by sliding their on/off toggles. (Turn on as many as will fit comfortably.)
Seeing the Action Center and Notifications
Windows 11 brings big changes to the taskbar’s icon-filled right edge. Back in Windows 10, the taskbar contained an Action Center icon. A click on the Action Center fetched the Notifications pane: a panel along the screen’s right edge that listed bits of information alerting you to new email, appointments, results of security scans, and other news.
Nestled along the Notifications pane’s bottom edge lived a list of icons that toggled handy settings. One quick click could quickly put your laptop into Airplane mode, for example; a click on the Night Light toggle dimmed your laptop’s screen for working in poorly lit areas, saving your eyes from screen glare.
Windows 11 dumped the Action Center icon, preferring to split its job into two separate sections, as described in the following sections.
Viewing notifications
In Windows 11, a click on the taskbar’s time and date area fetches not only a calendar, but a list of notifications above it, as shown in Figure 3-8. If no notifications await, you simply see the calendar, with nothing listed above it.
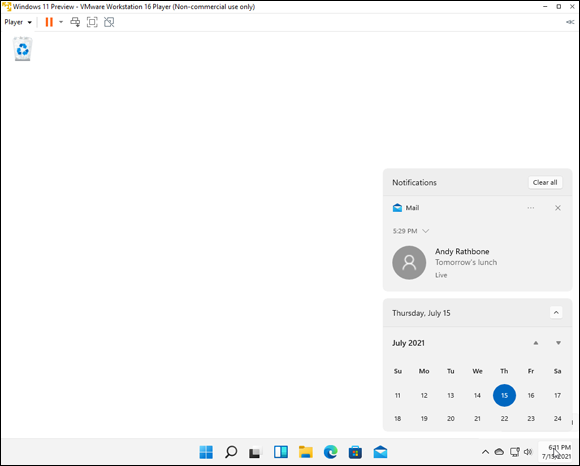
FIGURE 3-8: Click the time and date area to see the Notifications pane, which displays current information about both your life and your computer.
Notifications may list information about your latest emails, for example, as well as times of upcoming appointments, news headlines, virus scan results, and other informational tidbits.
They first appear as a flash in the lower-left corner of your screen, hoping your eyes will dart to it and absorb it. Then they disappear, piling up in the Notifications pane.
Notifications can be dealt with in a variety of ways:
- Ignore them. You needn’t even look at the Notifications pane. The notifications will simply pile up unread, with no damage done. Unless it’s a reminder for a forgotten-but-upcoming appointment, a notification usually is more informational than urgent.
- Clear them all. If you grow weary of seeing a pile of notifications, click the Clear All button in the Notifications pane’s upper-right corner. Whoosh, gone!
- Close any single notification by clicking the X in its upper-right corner.
- Stop seeing a particularly nagging notification by clicking the three dots next to the X in the notification’s upper-right corner. When the drop-down menu appears, select Turn Off All Notifications from that app or program.
- To choose which apps can bug you with notifications, click the three dots next to the X in any notification’s upper-right corner. When the drop-down menu appears, click Go To Notification Settings. There, toggle switches let you choose which apps can and can’t disturb you with their latest news.
Seeing Quick Settings icons
At the bottom of the Navigation pane, Windows 10 places its Quick Action icons: handy toggle switches for commonly used settings. Windows 11 shows those icons when you click the Sound or Network icons (located on the far right edge of the taskbar). And Windows 11 calls them Quick Settings icons.
Shown earlier in Figure 3-7, these icons appear most often, although Windows 11 lets you customize them to meet your own needs:
- Network or WiFi: This displays information about your current network connections, including the internet.
- Bluetooth: When turned on, this lets your PC communicate with other Bluetooth devices within range (about 30 feet). Common Bluetooth gadgetry includes speakers, smartphones, and smartwatches. I cover Bluetooth in Chapter 12.
- Location: This lets you toggle your computer’s knowledge of your geographic location, handy when looking at apps with maps or weather reports.
- All Settings: A click here fetches the Windows 11 Settings app, a huge panel of organized switches, which replaces Control Panel found in older Windows versions. (You can also reach the Settings app by clicking the Start button and clicking the Settings icon.)
The available icons vary according to your model of computer or tablet.
You can customize the Quick Settings’ bank of icons by clicking the little pencil icon in the section’s lower-right corner. When pushpins appear next to the other icons, click a pushpin to remove an icon. To add an unlisted icon, click the word Add; a pop-up list offers other icons you can add with a click on their name.
Watching Widgets
Windows 11 introduces Widgets: a panel filled with news about weather, sports, world events, stocks, and other tidbits of up-to-the-minute information that already appear on our phones, websites, TVs, radios, and wristwatches.
![]() To see the Widgets in Windows 11, click the Widgets icon (shown in the margin) from its home on the taskbar. A panel appears along the screen’s left edge, shown in Figure 3-9, showing information.
To see the Widgets in Windows 11, click the Widgets icon (shown in the margin) from its home on the taskbar. A panel appears along the screen’s left edge, shown in Figure 3-9, showing information.
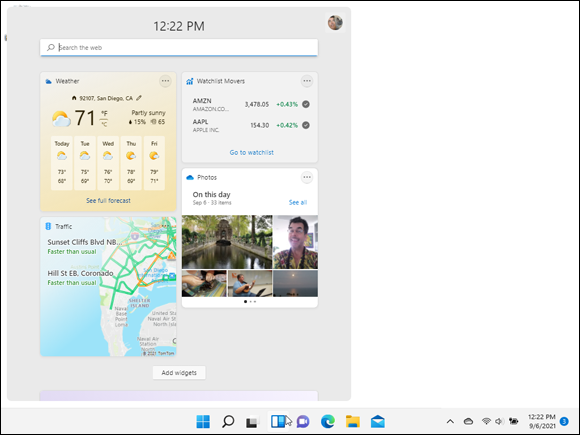
FIGURE 3-9: Click the taskbar’s Widgets icon, and the Widgets panel appears.
The Widgets fill themselves automatically with information gathered from the internet, and there’s not much you can do with them. Here are a few tricks, though, to make the Widgets match your interests:
- A click on the Add Widgets button lets you customize the panel with even more informational boxes: upcoming appointments, for example, current traffic information, or a to-do list.
- To customize a particular Widget, click the little three dots in that Widget’s upper-right corner. A menu appears, letting you customize the stocks that appear in the Watchlist Movers window, for example.
Behind the scenes, though, Widgets provides Microsoft with a way to know your interests, which make you more valuable to advertisers. And in today’s technology-based world, that’s increasingly important stuff.
Customizing the taskbar
Windows offers a whirlwind of options for the lowly taskbar, letting you play with it in more ways than a strand of spaghetti and a fork.
And that’s especially important if you don’t care for the new Start menu: By stocking the taskbar with icons for oft-used programs, you can avoid unnecessary trips to the Start menu.
First, the taskbar comes preloaded with icons for five apps: the new Widgets app (breaking news headlines), File Explorer (your file browser), Microsoft Edge (the Windows 11 web browser), the Microsoft Store app (for downloading apps and programs), and the Mail app. All but the first four taskbar icons are movable, so feel free to drag them to any order you want.
You can add your own favorites to the taskbar, as well. When you spot a favored program’s icon on the Start menu, right-click the icon, and choose Pin To Taskbar from the next pop-up menu.
For even more customization, right-click a blank part of the taskbar and choose Taskbar Settings. The Taskbar page appears in the Settings app, as shown in Figure 3-10.
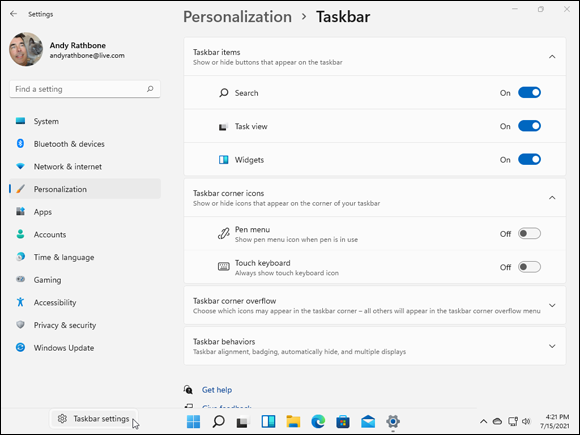
FIGURE 3-10: Right-click a blank portion of the taskbar and choose Taskbar Settings to customize the taskbar’s appearance and behavior.
Table 3-1 explains the most-used taskbar settings, as well as my recommendations for them.
TABLE 3-1 Most-Used Taskbar Settings
Setting | My Recommendations |
|---|---|
Taskbar items | These toggle switches let you add or remove the Search, Task View, and Widgets options. I read way too much news already, so I turn off the entire Widgets panel with a click of its toggle. |
Taskbar Corner Icons | On and off toggle switches live here, designed mostly for touchscreens, that let you add icons for a digital pen and touchscreen keyboard. I keep these turned off on my desktop PC, but turned on on my tablets. |
Taskbar Corner Overflow | Another bundle of toggle switches let you choose which tiny icons should appear on your taskbar’s far right edge, and which should be hidden, only to pop up when you click the little upward pointing arrow next to those icons. This is a personal choice, but I don’t like hidden icons, so I let them all show. |
Taskbar Behaviors | I ignore this overwhelming number of toggles except for one: In Taskbar Alignment, I choose left, which moves the currently centered icons and Start button back to the left corner, where they’ve lived for years. |
Feel free to experiment with this section’s many toggle switches until the taskbar looks right for you. Your changes take place immediately. Don’t like the change, or don’t notice a big difference? Click the toggle switch again to reverse your decision.
Again, most of these toggles boil down to personal preference; there’s no standard right or wrong for everybody. People who run Windows 11 on very wide monitors often prefer seeing their taskbar icons centered rather than along the traditional left side.
Setting Up Virtual Desktops
 Most people work with the same set of windows, over and over. Some people type into a word processor all day; others enter numbers into boxes. Because these people stick with one program, they can easily fire up their PC and begin working.
Others work on a wide variety of tasks and programs, and they meticulously arrange their programs and windows for the easiest access. To please the meticulous, Windows 11 continues with the Virtual Desktops introduced in Windows 10. They’re a simple way of organizing and switching between entire groups of windows.
You can create one desktop for writing, for example, complete with a word processor, notepad, and procrastinator’s toys. A second desktop can be arranged for video gaming, and a third can contain a browser stocked with favorite websites that constantly update in the background. At work, add a fourth for Facebook, so you can quickly switch back to your work desktop when the boss walks by.
Virtual desktops let you switch among these desktops quickly and easily, saving you the time it takes to rearrange the programs and windows to your liking.
To create virtual desktops and work between them, follow these steps:
- Click the taskbar’s Task View icon.
A click or tap on the Task View icon, shown in the margin, and the screen clears, showing thumbnails of all your currently open windows. Just above the Task View icon, shown in Figure 3-11, you see a miniature view of your desktop. To the right of it, a blank window shows the words New Desktop.
Click the words New Desktop, and your empty new desktop fills the screen.
The thumbnail expands into a new desktop. The new desktop is a replica of your original desktop but without any open programs or windows.
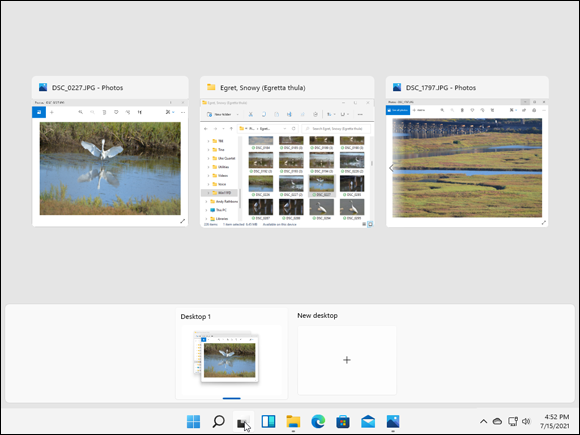
FIGURE 3-11: Click the taskbar’s Task View icon, and the words New Desktop appear above the taskbar.
![]() That’s it. You’ve created a second virtual desktop and switched to it. Windows keeps your other desktop tucked away until you want to switch back to it with a return click on the Task View icon.
That’s it. You’ve created a second virtual desktop and switched to it. Windows keeps your other desktop tucked away until you want to switch back to it with a return click on the Task View icon.
Some people love virtual desktops. Other people find the whole concept needless and confusing. But whether you love or hate virtual desktops, these tips will come in handy:
- To switch between desktops, click the Task View icon. When your miniature virtual desktop windows appear along the taskbar’s top edge, as shown in Figure 3-12, click the one you want.

FIGURE 3-12: When the thumbnail of the second desktop appears, switch to it with a click.
- To see a virtual desktop’s currently open windows, click the Task View icon. When the miniature desktops appear along the taskbar’s top edge, rest (or hover) your mouse pointer over a miniature desktop; the screen changes to show thumbnails of that desktop’s open windows. To revisit a window on any desktop, just click the window’s thumbnail.
 To close an unwanted desktop, click the Task View icon, and then click the X (shown in the margin) in that miniature desktop’s thumbnail. (Hover your mouse pointer over the miniature desktop, and the X appears.) Any open windows on that desktop will be dumped onto your original, “real” desktop. That’s important: You won’t lose any unsaved work by accidentally closing a virtual desktop.
 To create even more virtual desktops, click the Task View icon. From the screen that appears, click the plus sign (shown in the margin) in the center of the miniature desktop.
- Keyboard lovers can add a desktop by holding the Windows key and then pressing Ctrl+D. Your current desktop immediately disappears, replaced by a new, empty desktop. (Pressing
 + Tab opens the Task View mode, letting you see all your open windows, as well as any virtual desktops.)
 - To move an open window from one virtual desktop to another, click the Task View icon to see the thumbnails of your open virtual desktops. Then drag the desired window down to the desired desktop thumbnail along the screen’s bottom edge. (Right-clicking a desired window fetches a pop-up menu that lists all your virtual desktop options.)
- Keen-eyed upgraders from Windows 10 will notice the lack of a sliding bar along the screen’s right edge in Figures 3-11 and 3-12. Windows 10 let you slide that bar up or down to revisit apps and websites you opened in the last 30 days. Known as Timeline, the feature is no longer included in Windows 11.
Making Programs Easier to Find
Whenever you install a new program on your computer, the program usually asks way too many obtuse questions. But perk up your ears when you see this question: “Would you like a shortcut icon placed on your desktop or taskbar?”
Say yes, please, as that will save you from dashing out to the Start menu to find the program’s icon.
But if your favorite programs don’t yet have icons on the desktop or taskbar, put them there by following these steps:
Head to the Start menu, and click the All Apps button in the upper-right corner.
 As you scroll up or down, an alphabetical list of icons for all your apps and programs scrolls up or down as well.
Right-click the name of any program or app you want to appear on the taskbar, choose More from the pop-up menu, and choose Pin To Taskbar from the second pop-up menu.
If you’re using a touchscreen, hold down your finger on the desired app icon for a second or two. Then lift your finger, tap the word More, and tap the Pin To Taskbar option on the pop-up menu.
Now, instead of heading to the Start menu, you can launch your oft-used apps with a click on their taskbar icon.
After you’ve stocked your taskbar with icons, pretend they’re numbered, from left to right. (Skip the Start, Search, Widgets, and Task View icons, which don’t count.) Pressing ![]() +1 from the desktop opens the first program;
+1 from the desktop opens the first program; ![]() +2 opens the second program; and so on. You’ve created automatic shortcuts!
+2 opens the second program; and so on. You’ve created automatic shortcuts!
Don’t care for the Search, Widgets, or Task View icons? Windows 11 won’t let you move them, but you can hide them: Right-click the unwanted icon and choose Hide From Taskbar from the pop-up menu.