Chapter 12
Customizing Settings in Windows
IN THIS CHAPTER
![]() Finding the correct setting
Finding the correct setting
![]() Altering the appearance of Windows
Altering the appearance of Windows
![]() Changing video modes
Changing video modes
![]() Installing or removing apps and programs
Installing or removing apps and programs
![]() Installing a printer or scanner
Installing a printer or scanner
![]() Adding a Bluetooth gadget
Adding a Bluetooth gadget
![]() Automatically setting the computer’s time and date
Automatically setting the computer’s time and date
Most people hate changing settings in Windows, and for good reason: They’re too complicated. How do you know which setting works best? How can you even find the right setting? And, if you flip the wrong switch, how do you undo any peripheral damage?
Windows doesn’t make this easy, unfortunately, as several things work against you. First, each app includes its own, individual batch of settings. Windows, too, contains another set of master settings known as the Settings app. Finally, Windows occasionally kicks you to that old switch-filled circuit box known as the Control Panel, a remnant from earlier Windows versions.
No matter which bank of switches you face, you can use them to customize the look, feel, behavior, and vibe of Windows and its apps and programs. This chapter explains how to find the settings you need, what to do with them once discovered, and how to undo their handiwork if they make things worse.
One word of caution: Some settings can be changed only by the person holding the almighty Administrator account — usually the computer’s owner. If Windows refuses to flip a switch, call the PC’s owner for help.
Finding the Right Switch
 Windows 11 continues Microsoft’s migration to the Settings app, which now sports hundreds if not thousands of switches. The Control Panel bundled with earlier Windows versions still lurks in Windows 11, but you’ll encounter it far less than before.
To find the right switch to flip, let Windows help you. Follow these steps to find the setting you need:
 Click the taskbar’s Search icon (shown in the margin), click inside the Search box that appears atop the Search window, and type a word describing the setting you want to find.
When you type the first letter, every setting containing that letter appears in a list above the Search box. If you don’t know the exact name of your setting, begin typing a keyword: display, troubleshoot, mouse, user, privacy, or something that describes your need.
 Don’t see the right setting? Press the Backspace key to delete the letters you’ve typed and then try again with a different word.
The Search box, described in Chapter 7, lists other matches for your keyword: files on your computer, apps from Microsoft Store, and even items found on websites. If you see too much clutter, filter the results: Type the word settings: into the Search box, followed by a space and your search term. For example, to search for camera settings, type this into the Search box and press Enter:
settings: cameraClick your desired setting on the list.
Windows takes you directly to that setting.
When searching for a setting, always try clicking the taskbar’s Search icon first. That brings up a Search box that often saves a lot of time when searching for settings, among other things. Spending a few minutes with the Search box often yields better results than scouring the hundreds of settings haphazardly stuffed elsewhere in Windows.
![]()
![]() Looking for the settings inside a particular app, rather than inside Windows itself? Look in the app’s upper-right corner for an icon containing either three dots in a row or three stacked lines. Click that icon, and a drop-down menu appears, almost always listing an entry for Settings.
Looking for the settings inside a particular app, rather than inside Windows itself? Look in the app’s upper-right corner for an icon containing either three dots in a row or three stacked lines. Click that icon, and a drop-down menu appears, almost always listing an entry for Settings.
Flipping Switches with the Windows Settings App
Windows 11 tosses more settings than ever into the ever-expanding Settings app. Most Windows settings live there now, sparing you a trip to the old Control Panel found in previous Windows versions.
![]() To open the Settings app, click the Start button and click the Settings icon (a little gear) near the bottom of the Start menu’s left pane.
To open the Settings app, click the Start button and click the Settings icon (a little gear) near the bottom of the Start menu’s left pane.
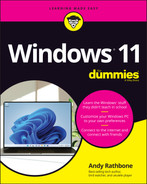
The Settings app appears, as shown in Figure 12-1. In keeping with the new, standardized look in Windows 11, the Settings app looks identical whether you’re viewing it on a desktop PC, tablet, or laptop.
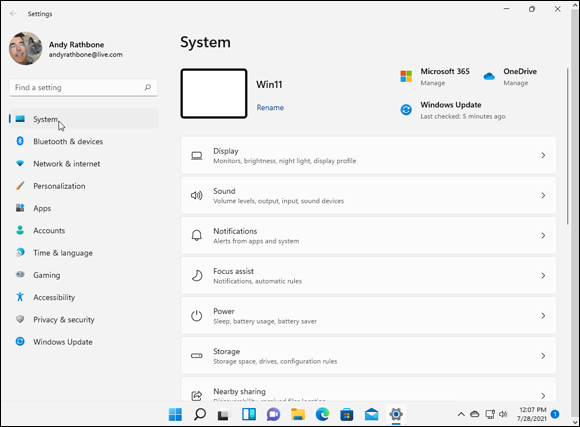
FIGURE 12-1: The Settings app lets you change your computer’s behavior.
The Settings app breaks its settings down into 11 categories, each covered in the rest of this chapter.
Adjusting the System settings
![]() This huge catch-all category collects settings that don’t fit neatly anywhere else. For instance, you can find ways to adjust your monitor’s resolution — the amount of information it can pack onto a screen without making everything too tiny to read. Head to the System category to control all the notifications that pop up in your screen’s lower-right corner, as well.
This huge catch-all category collects settings that don’t fit neatly anywhere else. For instance, you can find ways to adjust your monitor’s resolution — the amount of information it can pack onto a screen without making everything too tiny to read. Head to the System category to control all the notifications that pop up in your screen’s lower-right corner, as well.
The rest of this section covers the most important things you’ll eventually need to tweak in the System category.
Changing the screen resolution
One of the many change-it-once-and-forget-about-it options in Windows, screen resolution determines how much information Windows can cram onto your computer screen. Changing the resolution either shrinks everything to pack more stuff onscreen, or it enlarges everything at the expense of desktop real estate.
To find your most comfortable resolution — or if a program or game mutters something about you having to change your screen resolution or video mode — follow these steps:
 Click the Start button, click the Settings icon, and click the System icon.
The Settings app normally opens to the System page, so you may not need to click the System icon.
When the System page appears, click the word Display from the right pane.
The Display settings appear, as shown in Figure 12-2.
To change the screen resolution, click the Display Resolution drop-down list and select your desired resolution.
The drop-down menu lists a variety of resolutions, all sorted by number. The larger the numbers, the higher the resolution, and the more information Windows can pack onto your computer screen. Unfortunately, packing more information onto your screen shrinks the text and images.
Unless you have a good reason not to, choose the resolution with the word (Recommended)next to it. That's the highest resolution your computer supports.Choosing the Windows-recommended setting makes for the clearest text and images.
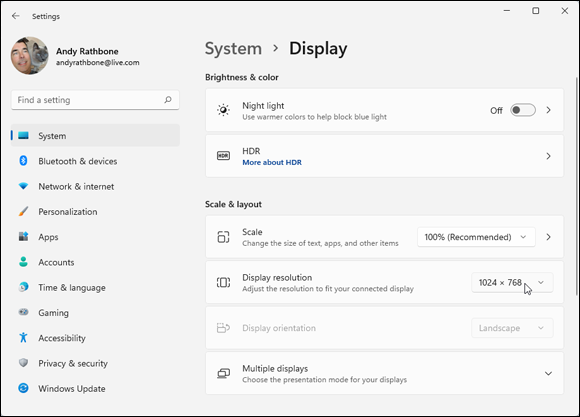
FIGURE 12-2: The Settings app’s System page opens to show the Display settings.
When Windows immediately changes to the new resolution, click the Keep Changes button to authorize the change. If you don’t like the new resolution, or it makes your display illegible, just wait for the screen to return to its previous setting.
When Windows makes changes your display’s resolution, it gives you 15 seconds to approve the change by clicking the Keep Changes button. If a technical glitch renders your screen unreadable, you won’t be able to see or click the onscreen button.Windows notices that you didn’t approve the changes, so it quickly reverts to your original, viewable display settings. Whew!
After you change your video resolution once, you’ll probably never return here unless you buy a new monitor or upgrade your computer’s video. You might also need to revisit this window if you plug a second computer screen into your PC, which I describe in the following section.
Adding a second monitor or projector
Have you been blessed with an extra computer screen, perhaps a leftover from a deceased PC? Connect it to your PC or tablet, and you’ve doubled your Windows desktop: Windows stretches your workspace across both computer screens. That lets you view the online encyclopedia in one computer screen while writing your term paper in the other.
Or you can mirror your laptop’s screen with what you see on the second monitor, handy when connecting to a projector at meetings, or holding video chats with business associates.
These same steps also let you connect your computer to most widescreen TVs for viewing photos and watching movies.
Most laptops and tablets come with a built-in video port for plugging in a nearby monitor.
To perform these video gymnastics on a desktop PC, however, the PC needs two video ports, and one port must match the connector on your second monitor or projector. This poses no problem if they’re only a few years old. Most modern Windows PCs, laptops, and tablets include an HDMI port for plugging in a second monitor or projector.
You may need to buy an inexpensive adapter or cable that matches the ports of both your desktop PC and the second display.
After you connect the second monitor or the projector to your computer and turn it on, follow these steps on your PC:
- Click the Start button, and click the Settings icon. When the Settings app appears, click the System icon.
When the Settings app opens to its System page, click Display from the right pane.
The Settings app then shows its Display settings, which depict one monitor with two numbers in it, as shown in Figure 12-3.
Choose how Windows should display itself on the two monitors.
At first, Windows assumes you want to duplicate your display on both monitors. However, you can choose how Windows should behave on the second monitor with the options provided in the drop-down menu shown in Figure 12-3. The drop-down menu offers these options, each handy for different scenarios:
- Duplicate These Displays: This option, shown in Figure 12-3, duplicates your desktop on both screens, which is helpful when you want to project an image of your desktop onto a wall or screen for presentations.
- Extend These Displays: This stretches Windows to fit across both screens, giving you an extra-wide desktop. This works best when you like to view lots of open windows simultaneously.
FIGURE 12-3: The Display settings page opens to show that your display is duplicated on each monitor.
- Show Only on 1: Choose this before you’re ready to show off your presentation; it blanks the screen on the second monitor. When you’re ready for action, switch to Duplicate These Displays so that your second screen duplicates your first.
- Show Only on 2: Choose this option to show only the second display, which is useful when hooking up a PC to a TV for watching movies in a dark room.
Each time you choose one of the preceding options, a small window appears onscreen. Click the Keep Changes button to change to your new display settings. Click the Revert button if you don’t like it. If changing the display makes the screen illegible, just wait a few seconds: If you don’t click Keep Changes, Windows assumes something is wrong, and it reverts to your earlier setting.
Click the Multiple Displays section to choose the presentation mode for your monitors.
This section, useful for both troubleshooters and people who frequently plug in a second monitor, holds some extra settings, each described in the following list:
- Remember Window Locations Based on Monitor Connection: Selecting this check box tells Windows to remember all the work you did setting up your extra monitors. Keep this checked unless you constantly connect to different monitors in different situations.
- Minimize Windows When a Monitor Is Disconnected: This check box normally remains checked, which automatically minimizes any open windows when you unplug the second monitor.
- Detect Other Display: Handy when troubleshooting, this option lets you know whether Windows even recognizes the second monitor, projector, or TV that you’ve plugged in.
- Identify: Windows identifies its monitors by numbers, but sometimes you can’t tell which monitor is assigned which number. Click this button, located beneath the picture representing your two monitors, and each monitor physically displays its assigned number on the center of its screen.
- Connect to a Wireless Display: Useful for connecting without a cable, this option fetches a little window that searches for any wireless TVs within range.
If necessary, change your monitor’s orientation in the Display Orientation area, and choose which monitor should have the Start button on its taskbar.
Windows assumes your monitor is in landscape mode, where the monitor’s display is wider than it is tall. (Most monitors and all TV sets are set up this way.) If you have a swiveling monitor or tablet that’s set up vertically, visit the Display Orientation section to tell Windows how you’ve rotated your monitors.
The Display Orientation section lets you choose the default Landscape mode or Portrait mode if you’ve turned a monitor or tablet sideways, perhaps to better display a full page of reading material.
Finally, decide which of the two monitors listed onscreen should reveal the Start menu when you press the Windows key. Click the desired onscreen monitor, and then select the Make This My Main Display check box.
If necessary, drag and drop the onscreen computer screens to the right or left until they match the physical placement of the real computer screens on your desk. Then choose your main display.
The Display section window of the Settings app shows your two monitors as little onscreen squares. Drag and drop the onscreen monitors until they match the placement of your real monitors.
Any Settings changes you make take place immediately; as soon as you click the Keep Changes button, you’re through.
Running Windows with two (or more) monitors may need a few other settings tweaks, as well:
- To adjust the screen resolution of your two monitors, follow the directions given in the previous section, “Changing the screen resolution.” This time, however, the Advanced Display Settings window shows both monitors. Click the monitor you want to change, and the Resolution drop-down list applies to that monitor alone.
- If you move the physical position of either of your two monitors, return to the first step and start over. You need to tell Windows of their new positions so that it places the correct display on the correct monitor.
- Windows normally extends the taskbar along the bottom of your second monitor, which looks odd when connecting to TVs or during presentations. To turn it off, open the Personalization category in the Settings app, and choose Taskbar Behaviors from the right column. There, click the toggle switch called Show My Taskbar on All Displays. This toggle lets you either limit your taskbar to your main display or extend it across the other connected displays as well.
Cutting back on notifications and ads
What Windows calls Notifications, other people call “Nags.” Notifications are the little informational blurbs that appear for a few seconds in your screen’s bottom corner and then hunker down in the Notifications pane for later reading.
Some people like to stay instantly up to date, glancing at the notifications to see the latest headline, for example, or the subject line of an incoming email. Others find the unexpected messages to be an intrusion. To control them, visit the Notifications settings in the Systems category by following these steps:
- Click the Start button, click the Settings icon, and click the System icon.
When the System page appears, click Notifications from the right pane.
The Settings app displays the Notifications settings, as shown in Figure 12-4. All the settings apply to the Notifications pane — the information-filled strip that appears when you click the Time and Date area, located on the taskbar’s right edge.
- Adjust the following settings as needed:
- Notifications: Click this single toggle switch to stop all your apps from bugging you with notifications. (Click the toggle switch back to On if you miss your apps’ notifications.)
- Focus Assist: Designed for the meticulous, this setting lets you designate the hours when notifications may appear. This way, you can give yourself uninterrupted time for work or video games. You can also choose to keep notifications from appearing on a second monitor, preventing the board room from seeing your reminder to pick up more kitty litter. You can also designate which specific apps may send notifications, and silence the rest.
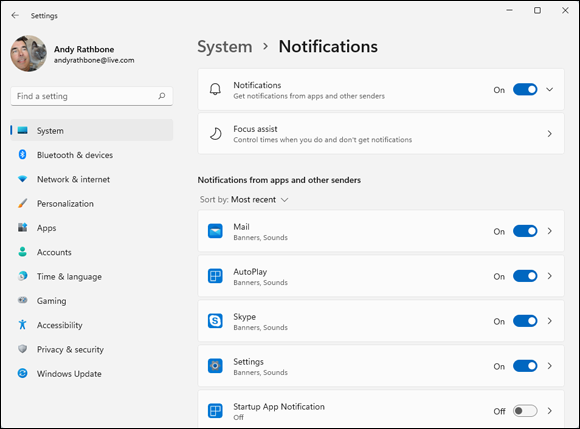
FIGURE 12-4: The Notifications settings let you turn off pop-up announcements.
- Notifications from Apps and Other Senders: The most often-used setting, Notifications from Apps and Other Senders lets you pick and choose which apps may send notifications. This setting offers a great way to stop the obnoxious ones, but preserve the important. The apps are sorted automatically, with the last one to bug you appearing at the top of the list.
- Offer Suggestions on How I Can Set Up My Device: Designed for people who rush through setting up their computer’s user accounts, this check box lets Windows remind you to finish customizing Windows 11. Turn it off after a month or so, or when you’re reasonably happy with how your computer works.
- Get Tips and Suggestions When I Use Windows: Although helpful at first, these notifications may turn into a nuisance after you’ve used Windows for a few months. At that point, toggle them off with a click inside this check box.
By carefully flipping the toggle switches listed above, you can remove most of the nags from the Notifications pane. Miss the notifications? Reverse your decision by clicking the missed setting’s toggle.
To turn off other pop-up ads, head to the Personalization category in the Settings app, and choose Device Usage from the right pane. There, turn off every toggle switch you spot.
Connecting and adjusting Bluetooth and other devices
![]() In Windows Land, devices are physical things such as your mouse, keyboard, printer, memory cards, and scanner. Accordingly, the Devices category of the Settings app contains settings to adjust your mouse’s scroll wheel, as well as how your computer reacts when you insert a memory card. In short, device settings are a hodgepodge that you can locate most easily by searching from the Start menu’s Search box, as described in this chapter’s first section, “Finding the Right Switch.”
In Windows Land, devices are physical things such as your mouse, keyboard, printer, memory cards, and scanner. Accordingly, the Devices category of the Settings app contains settings to adjust your mouse’s scroll wheel, as well as how your computer reacts when you insert a memory card. In short, device settings are a hodgepodge that you can locate most easily by searching from the Start menu’s Search box, as described in this chapter’s first section, “Finding the Right Switch.”
After you find this hidden spot in the Settings app, you can use it to make all the adjustments covered in the next few sections.
Adding a Bluetooth gadget
Bluetooth technology lets you connect nearby gadgets wirelessly to your computer, removing clutter from your desktop. On a tablet, Bluetooth lets you add a wireless mouse and keyboard, external speaker, and other gadget without hogging any of your computer’s coveted USB ports — those rectangular or oval holes where you plug in flash drives and other gadgetry.
Most tablets, laptops, and new desktop PCs come with built-in Bluetooth; you can add it to an older PC by plugging a tiny Bluetooth module into a vacant USB port.
Bluetooth can also connect your computer, laptop, or tablet with some smartphones for wireless internet access — if your wireless provider allows it – in a trick known as “tethering.”
To add a Bluetooth item to a computer, laptop, or tablet, follow these steps:
Make sure that your Bluetooth device is turned on and ready to pair.
Most Bluetooth devices include a simple On/Off switch. Telling the device to begin pairing is a little more difficult. Sometimes you can simply flip a switch. Other devices make you hold down a button until its little light begins flashing.
When you spot the flashing light, the device is ready to pair with another Bluetooth device including, you hope, your computer.
 Click the Start button, click the Settings icon, and in the Settings app, click the Bluetooth and Devices icon.
The Settings app opens to show the Devices category, which conveniently opens to Bluetooth and Devices, shown in Figure 12-5.
If your computer’s Bluetooth toggle is set to Off, click it to turn it On. Then click the Add Device button, just beneath it.
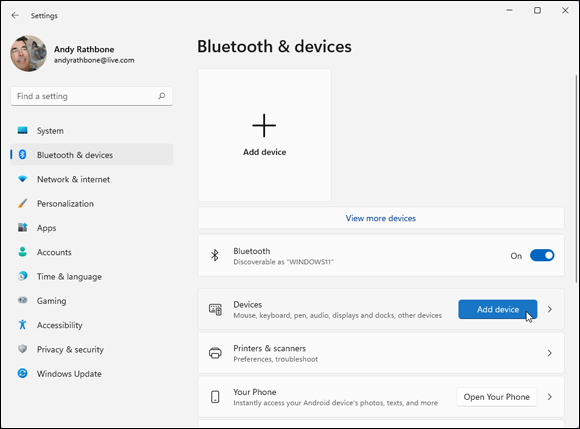
FIGURE 12-5: To add a Bluetooth wireless gadget, click Add Device.
 Click the Add Device button from the right side of the Bluetooth and Devices page, and then click the Bluetooth option from the Add a Device window.
Your computer quickly begins searching for any nearby Bluetooth devices that want to connect, known in Bluetooth parlance as pair.
If your device doesn’t appear, head back to Step 1 and make sure that your Bluetooth gadget is still turned on and ready to pair. (Many impatient gadgets give up and turn off after 30 seconds of waiting for a connection.)
- When your device’s name appears below the words Add a Device, click its name.
Type in your device’s code if necessary, and, if asked, click the Pair button.
Here’s where things get tricky. For security reasons, some devices make you prove that you’re sitting in front of your own computer and that you’re not a stranger trying to break in. Unfortunately, devices employ slightly different tactics when making you prove your innocence.
Sometimes you need to type a secret string of numbers called a passcode into both the device and your computer. (The secret code is usually hidden somewhere in your device’s manual.) But you need to type quickly before the other gadget stops waiting.
On some gadgets, particularly Bluetooth mice, you hold in a little push button on the mouse’s belly at this step.
Cellphones sometimes make you click a Pair button if you see matching passcodes on both your computer and phone.
When in doubt, type 0000 on your keyboard or press the Enter key. That’s often recognized as a universal passcode for frustrated Bluetooth device owners who are trying to connect their gadgets.Make sure your computer’s Bluetooth isn’t turned off: The toggle switch beneath the word Bluetooth, shown earlier in Figure 12-5, should be turned On. (Turning it off extends the battery life on tablets and laptops; on desktop PCs, always leave it turned on.) Don’t see the Bluetooth toggle? Then your computer doesn’t have built-in Bluetooth. You need to buy a Bluetooth adapter, an inexpensive little box that plugs into your computer’s USB port.
After a gadget successfully pairs with your computer, its name and icon appear when you click View More Devices, shown on the right side of Figure 12-5.
![]() To add a Bluetooth device from the Windows desktop, click the taskbar’s Bluetooth icon (shown in the margin), choose Add a Bluetooth Device, and then jump to Step 3 in the preceding list. Don’t see the taskbar’s Bluetooth icon? Then click the upward-pointing arrow that lives a few icons to the left of the taskbar’s clock. The Bluetooth icon appears in the pop-up menu, ready for your click.
To add a Bluetooth device from the Windows desktop, click the taskbar’s Bluetooth icon (shown in the margin), choose Add a Bluetooth Device, and then jump to Step 3 in the preceding list. Don’t see the taskbar’s Bluetooth icon? Then click the upward-pointing arrow that lives a few icons to the left of the taskbar’s clock. The Bluetooth icon appears in the pop-up menu, ready for your click.
![]() To disconnect a Bluetooth gadget, follow the first two steps in this section. Then, when you spot your gadget listed atop Figure 12-5, click the three vertical dots (shown in the margin) and choose Disconnect from the pop-up menu. Don’t click the other option, Remove Device, or you’ll need to go through the bother of pairing it again with your computer.
To disconnect a Bluetooth gadget, follow the first two steps in this section. Then, when you spot your gadget listed atop Figure 12-5, click the three vertical dots (shown in the margin) and choose Disconnect from the pop-up menu. Don’t click the other option, Remove Device, or you’ll need to go through the bother of pairing it again with your computer.
Adding a printer or scanner
Quarrelling printer manufacturers couldn’t agree on how printers and scanners should be installed. As a result, you install your printer in one of two ways:
- Some manufacturers say simply to plug in your printer or scanner by pushing its rectangular-shaped connector into a little rectangular-shaped USB port on your PC. Windows automatically notices, recognizes, and embraces your new device. Stock your printer with any needed ink cartridges, toner, or paper, and you’re done.
- Other manufacturers take an uglier approach, saying you must install their bundled software before plugging in your device. And if you don’t install the software first, the printer or scanner may not work correctly.
Unfortunately, the only way to know how your printer or scanner should be installed is to check the bundled manual. (Usually, this information appears on a colorful, one-page Quick Installation sheet packed in the printer’s box.)
No manual? Most manufacturers now offer them online at their website.
If your printer lacks installation software, install the cartridges, add paper to the tray, and follow these instructions to put it to work:
With Windows up and running, plug your printer into your PC and turn on the printer.
Windows may send a message saying that your printer is installed successfully, but follow the next step to test it.
- Click the Start button, click the Settings icon, and in the Settings app, click the Bluetooth and Devices icon.
The Settings app opens to show the Bluetooth and Devices category, shown previously in Figure 12-5.
From the right side of the Settings app, choose Printers and Scanners.
The Settings app displays any printers and scanners attached to your PC. If you spot your printer listed by its model or brand name, click its name, click the Manage button, and click the words “Print a Test Page” when the Managing Your Device window appears. If the test page prints correctly, you’re finished. Congratulations.
Test page didn’t work? Check that all the packaging is removed from inside your printer and that it has ink cartridges. If it still doesn’t print, your printer may be defective. Contact the store where you bought it, and ask who to contact for assistance.
The Managing Your Device window for your printer often contains a Printer Properties button as well. A click on that button lets you access the settings of your printer or scanner so that you can change their behavior.
That’s it. If you’re like most people, your printer works like a charm. If it doesn’t, see the tips and fix-it tricks in the printing section of Chapter 8.
- To remove a printer you no longer use, click its name in Step 3 and choose Remove Device from the pop-up menu. That printer’s name no longer appears as an option when you try to print from a program. If Windows asks to uninstall the printer’s drivers and software, click Yes — unless you think you may install that printer again sometime.
- You can change printer options from within many programs. Choose File in a program’s menu bar (you may need to press Alt to see the menu bar), and then choose Print Setup or choose Print. The window that appears lets you change things such as paper sizes, fonts, and types of graphics.
- When you create a network, which I describe how to do in Chapter 15, you can share your printer with other PCs on your network. Your printer will be listed as available for all the computers on your network.
- If your printer’s software confuses you, try clicking the Help buttons in its menus. Many buttons are customized for your particular printer model, and they offer advice not found in Windows.
- To print from your tablets and phones, buy and install a Wi-Fi printer. After it’s hooked up to your network and shared, it should appear as a print option in most popular Wi-Fi devices.
- I cover both printers and scanners in Chapter 8.
Connecting your phone
The Settings app in Windows 10 contained a separate entry called Phone for linking your phone with your PC. Windows 11 now melts that information into the Bluetooth and Devices category in a section called Your Phone.
However, Windows 11 should really call it “Your Android Phone.” Owners of iPhones miss out on the vast majority of the app’s features found in the newly improved Your Phone app. (I cover the app more in Chapter 17.) The app only works with Android phones running Android version 7.0 or later, and to take advantage of all the app features, you need one of the newest versions of Samsung’s Galaxy smartphones.
Why bother connecting your Android phone to your PC? Well, once connected, the Your Phone app in Windows 11 lets you do the following things:
- Read your phone’s notifications on your PC.
- Send and read your phone’s text messages from your PC.
- Easily view your phone’s photos on your PC’s monitor.
- Run your phone’s apps on your PC.
- Make calls with your phone.
But before you can do any of those things, you must connect your Android phone with Windows 11 by following these steps:
 Click the Start button, click the Settings icon, and from the left pane of the Settings app, click the Bluetooth and Devices icon.
The Settings app opens to the Bluetooth and Devices page.
Click the Open Your Phone button on the Settings app’s right pane and, when the Use Your Android Phone from Your PC window appears, click the Get Started button.
The Get Started window appears, inviting you to use your Android phone from your PC.
If asked, click the Sign In button to connect your Android phone with your Microsoft account.
When prompted, sign in with your Microsoft account.
If you’re already logged on to your PC with a Microsoft account, jump to the next step.
On your Android phone, visit the link listed on the Pair Devices window, and follow the instructions.
The instructions here differ according to your type of phone. You may need to use your phone to scan a QR code on your computer’s screen, for example, or input a number displayed on your phone into your computer.
If you’re having trouble, visit the Google Play app and download the Your Phone Companion – Link to Windows app. Sometimes the app itself makes the linking process easier.
Windows connects with your phone, allowing you to access it from your PC, as shown in Figure 12-6.
Even with Windows 11, the link between Windows and your phone is still a work in progress. Some features work only on certain phone models, for example, and the required Your Phone app may drain your phone’s battery more quickly than usual. (For an easier way to access your phone’s photos, install the OneDrive app: It automatically places all your phone’s photos wirelessly onto OneDrive, where they can be viewed on your PC as well.)
Still, if you hate typing text messages on your phone’s tiny keyboard, the app may be worth your time. I describe how to view, download, or delete your Android phone’s photos in Chapter 17.
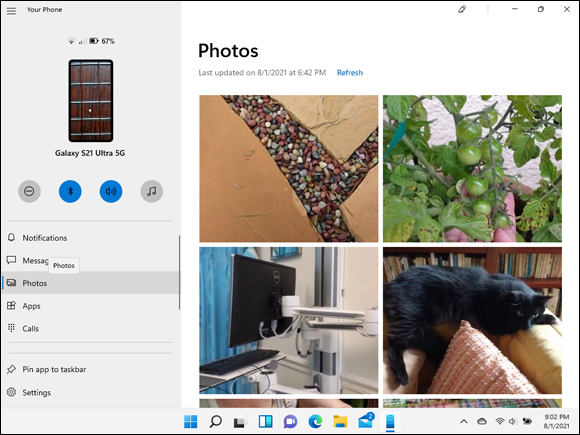
FIGURE 12-6: Connect Windows with your phone to view photos, send messages, and make phone calls from your PC.
Connecting to nearby Wi-Fi networks and internet
![]() For most people, the Wi-Fi settings listed in the Network and Internet category contains only one useful item: A way to find and connect with nearby Wi-Fi networks.
For most people, the Wi-Fi settings listed in the Network and Internet category contains only one useful item: A way to find and connect with nearby Wi-Fi networks.
![]() To bypass the Settings app and leapfrog directly to those settings, click the Wi-Fi icon in the taskbar, that strip along the bottom of your screen. When the Quick Action panel menu pops up, click the little right-pointing arrow next to the Wi-Fi icon in the menu’s upper-left corner. Finally, when the list of nearby Wi-Fi networks appears, click the name of your desired network. (The strongest network always appears atop the list.) Flip back to Chapter 9 for more details.
To bypass the Settings app and leapfrog directly to those settings, click the Wi-Fi icon in the taskbar, that strip along the bottom of your screen. When the Quick Action panel menu pops up, click the little right-pointing arrow next to the Wi-Fi icon in the menu’s upper-left corner. Finally, when the list of nearby Wi-Fi networks appears, click the name of your desired network. (The strongest network always appears atop the list.) Flip back to Chapter 9 for more details.
The other items in the Settings app’s Network and Internet category apply mostly to techies and can be safely ignored. Here, geeks can tweak their VPN (Virtual Private Network), and old-schoolers can create dial-up internet connections.
I devote Chapter 15 completely to networking, and the internet gets its due in Chapter 9.
Personalizing your PC’s look and feel
![]() One of the most popular categories in the Settings app is the Personalization category, which lets you change the look, feel, and behavior of Windows in a wide variety of ways. On the Personalization page await these nine icons:
One of the most popular categories in the Settings app is the Personalization category, which lets you change the look, feel, and behavior of Windows in a wide variety of ways. On the Personalization page await these nine icons:
- Background: Paydirt for budding interior designers, the Background settings let you choose a particular color or photo (sometimes called wallpaper) for your desktop. I cover changing wallpaper in the next section.
- Colors: When you’re satisfied with your background, choose Colors from the left pane to choose the color of the frames around your Start menu, windows, apps, and taskbar. Click a color from the presented grid, and you’re through. (To mix your own favorite color, click the View Colors button below the color grid.)
- Themes: After you’ve chosen your favorite background, colors, and lock screen, visit here to save them as a theme — a collection of your embellishment touches that can be easily slipped on or removed. The Get More Themes in Microsoft Store link takes you to the Microsoft Store, where you can download dozens of free themes that change the look of Windows.
- Lock Screen: Normally, Windows chooses from its own bundled photos to place on the lock screen — the image that appears when you first turn on your PC. Here, you can choose your own photo.
- Touch Keyboard: Handy only for touchscreen owners, this lets you splash different colors across the onscreen keyboard. More important, it lets you change the onscreen keyboard’s size, handy mostly for thumb-typers and owners of wide-screen tablets and laptops.
- Start: Visit here to control the look and feel of the Start menu itself. (I describe these settings in Chapter 2, which covers the Start menu in detail.)
- Taskbar: Head here to customize the behavior of your taskbar, the thin, icon-filled strip living along your desktop’s bottom edge. I cover this topic in Chapter 3. (To jump quickly to the taskbar’s Settings window, right-click the taskbar and choose Properties. The window that appears also lets you change your Start menu’s settings.)
- Fonts: A relatively new entry aimed at graphic designers and greeting card fans, this lets you install new fonts. To install a new font, just drag and drop it from File Explorer or your desktop onto the Fonts page’s Add Fonts box. (To add more fonts to your PC, click the
Get More Fonts in the Microsoft Storelink.) - Device Usage: Confused about Windows 11? Click here and toggle on all the ways you plan on using your computer: Gaming, Family, Creativity, School, Entertainment or Business. Windows then tosses up suggestions about how to manage those tasks more easily.
In the next few sections, I explain the Personalization tasks that you’ll reach for most often and how to handle the settings that appear.
Changing the desktop background
A background, also known as wallpaper, is simply the picture covering your desktop. To change it, follow these steps:
 Click the Start button, choose the Settings icon, and open the Personalization category.
Windows quickly kicks you over to the Settings app’s Personalization category, open to the Theme setting.
You can visit the Personalization category more quickly by right-clicking the desktop and choosing Personalize from the pop-up menu. The Personalization category opens directly to the Theme setting.Click the Background category from the right pane, and choose Picture from the Personalize Your Background drop-down menu shown in Figure 12-7.
The Background menu lets you create a background from a picture, a solid color, or a slideshow — a combination of photos that automatically changes at preset intervals.
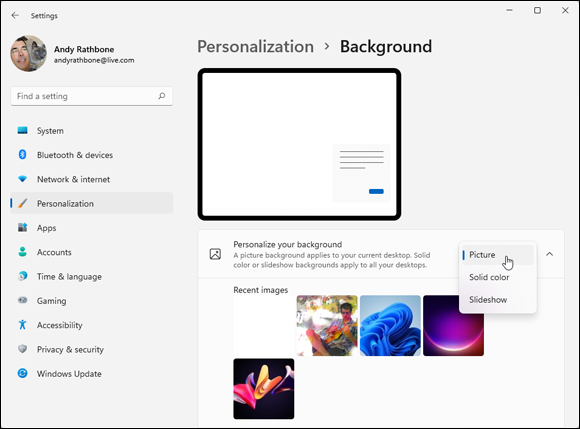
FIGURE 12-7: The Personalization category lets you control how Windows looks on your PC.
Click a new picture for the background.
Microsoft lists a few pictures to choose from. If you don’t like Microsoft’s offerings, click the Browse Photos button, listed in the Choose a Photo section, to search your computer’s Pictures folder for potential backgrounds.
When you click a new picture, Windows immediately places it across your desktop and shows you a preview at the top of the Personalization page. If you’re pleased, jump to Step 4; otherwise, keep browsing the available photos.
Decide whether to fill, fit, stretch, tile, center, or span the picture.
Although Windows tries to choose the best-looking setting, very few pictures fit perfectly across the desktop. Small pictures, for example, need to be either stretched to fit the space or spread across the screen in rows like tiles on a floor. When tiling and stretching make your background look odd or distorted, visit the Choose a Fit drop-down menu. There, you can try the Fill or Fit option to keep the perspective. Or try centering the image and leaving blank space around its edges. Choose the Span option only if you’ve connected your PC to two monitors and want the image to fill both screens.
As you choose different options, Windows immediately changes the background to show your new choice. Like what you see? Close the Settings window, and you’re done. Windows automatically saves your new background across your screen.
Changing the computer’s theme
Themes are simply collections of settings to spruce up your computer’s appearance: You can save your favorite screen saver and desktop background as a theme, for example. Then, by switching between themes, you can change your computer’s clothes more quickly.
To try one of the built-in themes in Windows, follow these steps:
- Click the Start button, choose the Settings icon, and open the Personalization category.
- Choose Themes from the Settings app’s right side.
The Settings app opens to display themes bundled with Windows, as shown in Figure 12-8. Click any theme, and Windows tries it on immediately.
Instead of choosing from the built-in themes, feel free to make your own by clicking the words Save Theme for saving your currently assigned desktop background, window color, sounds, screen saver, and mouse cursor. Type a name for your theme, and it appears as a choice in this section.
You can also download new themes from the Microsoft Store.
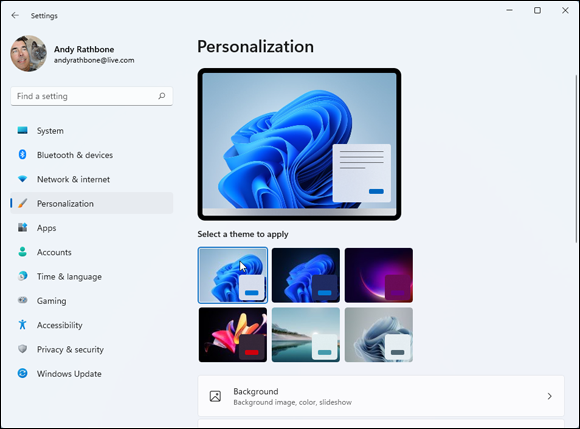
FIGURE 12-8: Choose a preconfigured theme to change how Windows looks and sounds.
Fixing and removing apps
![]() The Settings’ App category lets you uninstall unwanted apps and reset malfunctioning ones. You can also choose default apps — for example, the app you want to begin playing music when you open a music file. You can also choose which apps may open automatically as soon as you start Windows. That lets you open the apps more quickly, but makes Windows load a little more slowly. (I cover apps more completely in Chapter 6.)
The Settings’ App category lets you uninstall unwanted apps and reset malfunctioning ones. You can also choose default apps — for example, the app you want to begin playing music when you open a music file. You can also choose which apps may open automatically as soon as you start Windows. That lets you open the apps more quickly, but makes Windows load a little more slowly. (I cover apps more completely in Chapter 6.)
Removing an app from your Start menu doesn’t take much effort. Right-click the app’s icon from the Start menu, and choose Unpin from Start from the pop-up menu.
That doesn’t physically remove the app though. The app lives on in the Start menu’s alphabetical list and on your computer. To permanently remove an app or program from your PC, follow these steps:
 Click the Start button, click the Settings icon from the Start menu, and choose the Apps icon from the left pane.
When the Apps category appears, click Apps and Features from the window’s left pane.
The Apps and Features window appears, listing your currently installed apps and programs sorted alphabetically.
To sort the programs by their installation date, click the Sort By option and choose Sort By Install Date from the drop-down menu. This makes it easy to find the misbehaving app you installed yesterday.The same menu lets you view programs installed on different drives. This comes in handy on small tablets, where you may want to store programs on memory cards rather than their main memory.
The final menu option, Sort by Size, helps find and remove oversize apps when you’re running out of storage space.
Click the More menu to the left of the unloved program, and click its Move or Uninstall button.
 Click the More menu (shown in the margin) next to a listed program, and several options appear below it:
 - Advanced Options: Mostly technical stuff appears in this menu area, but if the app isn’t working correctly, try the Repair option. (If the app still misfires, choose Reset. The app deletes its data and reinstalls itself.)
- Move: When you’re running out of storage space, choose this option, if available. It lets you move an app or program onto another drive in your PC or onto your tablet’s memory card, freeing up space for your files.
- Uninstall: Click this button — as well as the confirmation button that follows — to completely remove the app or program from your PC.
Depending on which option you’ve clicked, shown in Figure 12-9, Windows either boots the program off your PC or moves it to another disk drive or memory card.
After you delete a program, it’s gone for good unless you kept its installation CD. Unlike other deleted items, deleted programs don’t linger inside your Recycle Bin. Mistakenly deleted apps, however, can almost always be relocated and reinstalled from the Microsoft Store. (The Microsoft Store remembers which apps you’ve downloaded or purchased, making them easy to reinstall for free.)
 Always use the Settings app to uninstall unwanted programs. Simply deleting their files or folders doesn’t do the trick. In fact, doing so often confuses your computer into sending bothersome error messages.
Microsoft doesn’t let you delete many of the apps bundled with Windows 11, unfortunately. You’re simply stuck with them. (But you can still remove them from the Start menu by right-clicking their icons and choosing Unpin from Start from the pop-up menu.)
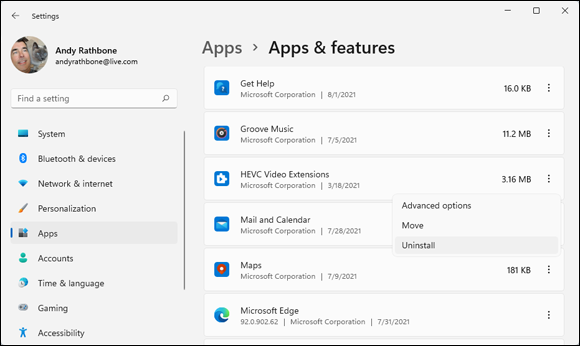
FIGURE 12-9: Click an unwanted app or program, and click the Uninstall button.
Creating and changing accounts for others
![]() Head to the Accounts category to create or change accounts for people who can use your computer, a chore I cover in Chapter 14, as well as to delete accounts for those no longer welcome. This category also lets you change your password or account picture. If you work on more than one PC, visit the category’s Sync Your Settings section to control what settings should link to your Microsoft account. Those settings then appear on any Windows device you log in to with your Microsoft account.
Head to the Accounts category to create or change accounts for people who can use your computer, a chore I cover in Chapter 14, as well as to delete accounts for those no longer welcome. This category also lets you change your password or account picture. If you work on more than one PC, visit the category’s Sync Your Settings section to control what settings should link to your Microsoft account. Those settings then appear on any Windows device you log in to with your Microsoft account.
Changing date, time, and language settings quickly
![]() Visited mostly by frequent fliers, this set-it-once-and-forget-it category lets you change your time zone, adjust the time and date formats to match your region, and tweak other settings relating to your language and geographic location.
Visited mostly by frequent fliers, this set-it-once-and-forget-it category lets you change your time zone, adjust the time and date formats to match your region, and tweak other settings relating to your language and geographic location.
Laptop and tablet owners will want to drop by here when visiting different time zones. Bilingual computer owners will also appreciate settings allowing characters from different languages.
To visit here, click the Start button, click the Settings icon from the menu, and click the Settings app’s Time and Language category. Four entries appear on the left pane:
- Date and Time: These settings are fairly self-explanatory. (Right-clicking your taskbar’s date and time area and choosing Adjust Date and Time lets you visit here as well.)
- Language and Region: Moved to a new country? Update your change here; your computer then passes on the new country to any apps that require that information. If you’re bilingual or multilingual, visit here when you’re working on documents that require entering characters from different languages.
- Typing: A plethora of options await to control how Windows interprets your typing. Toggles here let you decide whether Windows should automatically correct or highlight misspelled words. You can also visit your corrections history to change any mistakes Windows has made.
- Speech: If Windows doesn’t recognize your voice well, visit here to fine-tune its speech recognition settings. (You may also need to buy and install a better microphone to take advantage of speech-recognition programs.)
Setting up for video games
![]() The Gaming category lets you control how you record video games on Windows. It also lets you check your PC’s connection to Microsoft’s Xbox gaming consoles and activate the Xbox Game Bar.
The Gaming category lets you control how you record video games on Windows. It also lets you check your PC’s connection to Microsoft’s Xbox gaming consoles and activate the Xbox Game Bar.
Adapting Windows for your special physical needs
![]() Nearly everybody finds Windows to be challenging, but some people face special physical challenges as well. To assist them, the Settings app’s Accessibility category offers a variety of welcome changes.
Nearly everybody finds Windows to be challenging, but some people face special physical challenges as well. To assist them, the Settings app’s Accessibility category offers a variety of welcome changes.
If your eyesight isn’t what it used to be, for example, you may appreciate the ways to increase the text size on your computer screen.
Follow these steps to modify the settings in Windows:
Load the Windows Settings app.
You can fetch the Settings app either of two ways: - Mouse: Click the Start button, and then click the Settings icon from the Start menu.
- Keyboard: From the desktop, press
 +I.
+I.
When the Settings app appears, select the Accessibility icon.
The Accessibility area appears, as shown in Figure 12-10.
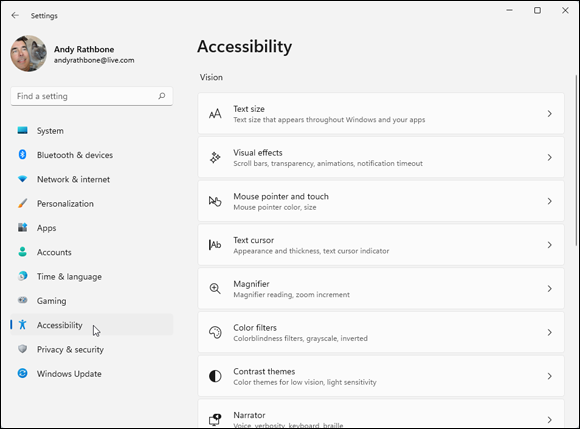
FIGURE 12-10: The Ease of Access Center provides help for users with physical limitations.
Change the settings according to your needs.
To make your computer easier to control, the Ease of Access window offers three groups of settings: Vision, Hearing, and Interaction. Each offers ways to help you see, hear, or control your PC. To turn a feature on or off, click its toggle button in these categories:
- Text Size: Perhaps the most frequently accessed section, this lets you enlarge text in Windows and its apps.
- Visual Effects: The first toggle switch in here makes the scroll bars more visible. It’s my first stop after installing Windows 11.
- Mouse Pointer and Touch: Visit here to change the size, color, and shape of the mouse pointer, making it easier to spot in a sea of text.
- Text Cursor: This area lets you change the cursor, the little bar that appears when you type words.
- Magnifier: When turned on, this enlarges the area around the mouse pointer when moved, making it easier to point and click in the right locations.
- Color Filters: This setting helps color-blind PC owners adjust the colors to make them easier to distinguish.
- Contrast Themes: This lets you adjust or eliminate most onscreen color, a change that helps vision-impaired people view the screen more clearly.
- Narrator: Designed for people with visual challenges, this setting activates a computerized voice that describes the words, buttons, and bars displayed onscreen, making them easier to find and click.
The Hearing section offers additional settings for those with hearing difficulties. The recently added Interaction section adds settings for those with limited mobility.
Choose any option’s toggle switch to turn on the feature immediately. If it makes matters worse, choose it again to toggle it off.
Some centers that assist physically challenged people may offer software or assistance for helping you make these changes.
If you’re not sure how to begin, feel free to experiment with the settings. Most of the switches are toggle switches that immediately turn a setting on or off. If you don’t care for what the setting does, click the toggle switch again to turn it off.
Managing your privacy and security
![]() There’s very little privacy left today when it comes to the internet. Nonetheless, this category lets you see the controls that Windows offers to limit the amount of information that apps and websites can gather about you. For example, you can control which apps can access your location and control your camera, as well as which apps can see your list of contacts in the People app.
There’s very little privacy left today when it comes to the internet. Nonetheless, this category lets you see the controls that Windows offers to limit the amount of information that apps and websites can gather about you. For example, you can control which apps can access your location and control your camera, as well as which apps can see your list of contacts in the People app.
Remember, though, that if you deny apps access to your information, they won’t be as helpful. The Maps app, for example, needs to know your physical location before it can give you directions.
When you’re done here, think about calling your bank, as well as your credit card and insurance companies. They, too, are often guilty of selling or sharing your information with other companies.
Staying current and safe with Windows Update
![]() Windows 10 contained a slew of security and backup tools. Windows 11 whittles it all down to one: Windows Update. Since Windows Update runs automatically, receiving security patches in the background every few weeks, you’ll probably never have to visit here anymore.
Windows 10 contained a slew of security and backup tools. Windows 11 whittles it all down to one: Windows Update. Since Windows Update runs automatically, receiving security patches in the background every few weeks, you’ll probably never have to visit here anymore.
But here’s one tip: If you hear that Microsoft has released an emergency security patch to counter some evilness traveling through the internet, drop by this section and click the Check for Updates button.
That tells your PC to check in with Microsoft immediately and grab any waiting security updates.
As for the old tools that used to be here, I cover them in Chapter 13. There, you discover how to speed up Windows, free up hard drive space, back up your data, and create a safety net called a restore point.
For information about the security settings that once lived here, flip back to Chapter 11.